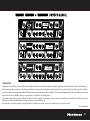
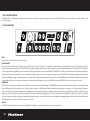
1
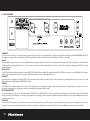
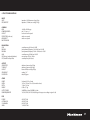
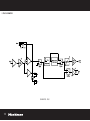
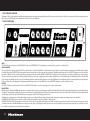
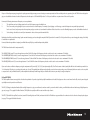
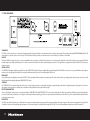
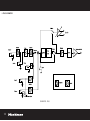
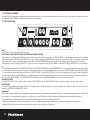
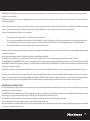
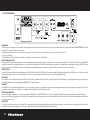
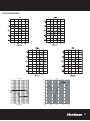
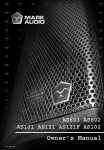
v. 23.june.2008
owner’s manual
TA501 ~ TA503 ~ TSA500
02
,
MASTER BOOM
TUBE FIRE
Hot
Pub Stadium
TOO
MUC
H!
Cold
SOLID STATE GAS
BASSLINE OUT
VINTAGYZER
FUNKYZER
INTIMITY LEVEL
PRIVATE
1. Introduction
Congratulations on purchasing one of the world’s best bass amplifiers! Markbass amps are built to the highest standards by a small team of skilled technicians in San Giovanni Teatino, Italy.
We have spent many years researching not only the highest-quality technologies for bass amp design and construction, but also the practical needs of the working bassist. The end result is a
product that combines outstanding sound quality with intuitive features, attractive design and extreme reliability—all in one impossibly lightweight unit. This amp will allow your instrument
to speak in its natural voice, faithfully conveying your musical ideas to your audience with stunning clarity.
Your amplifier has passed rigorous product testing and should survive even the toughest of environments on the road, in clubs, rehearsal halls and concert stages. Nonetheless, please treat it
with care and you will be rewarded with many, many years of glorious, rich, powerful bass tone!
If the clarity and power of this amp inspire you to play better music, we will have succeeded in our mission. Good luck and enjoy your new best friend!
Sincerely, Markbass
03
1.1 A Word from Marco De Virgiliis
When I began to develop the Markbass concept in Italy several years ago I had one objective in mind: to produce a top-quality bass amp that would meet the needs of professional bass players everywhere. I wanted my amps to be compact and lightweight, yet able to handle the low frequencies that today’s four, five and six string passive and active
basses are capable of producing. Thanks to modern technology and the availability of high-quality components like low-profile toroidal transformers, neodymium speakers and
so on, I was able to accomplish this.
The Markbass amplifier circuitry is designed specifically not to color the sound of the bass but to faithfully reproduce the unique tonal qualities of whatever instrument is played
through it. I have worked very closely with many high-profile professional bass players around the world to fine-tune the Markbass product line.
I am confident that the Markbass line of amps and cabinets is now ready to satisfy the needs of bass players all over the world.
Thanks for choosing Markbass; I hope you will find your new amp to be an inspiring upgrade to your sound!
We encourage you to use your Markbass gear in all kinds of musical situations-and please help us to continue developing our products by sending your comments
to [email protected].
And above all, enjoy the music.
Marco De Virgiliis
MARKBASS - ITALY
www.markbass.it
04
2. IMPORTANT SAFETY INSTRUCTIONS
1) Read these instructions;
2) Keep these instructions;
3) Heed all warnings;
4) Follow all instructions;
5) Do not use this apparatus near water;
6) Clean only with dry cloth;
7) Do not block any ventilation openings. Install in accordance with the manufacturer’s instructions;
8) Do not install near any heat sources such as radiators, heat registers, stoves, or other apparatus (including amplifiers) that produce heat;
9) Do not defeat the safety purpose of the polarized or ground-type plug. A polarized plug has two blades with one wider than the other. A grounding type plug has two blades and a third grounding prong.
The wide blade or the third prong are provided for your safety. If the provided plug does not fit into your outlet, consult an electrician for replacement of the obsolete outlet;
10) Protect the power cord from being walked on or pinched, particularly at plugs, convenience receptacles, and the point where they exit from the apparatus;
11) Only use attachments/accessories specified by the manufacturer;
12) Unplug this apparatus during lightning storms or when unused for long periods of time;
13) Refer all servicing to qualified service personnel. Servicing is required when the apparatus has been damaged in any way, such as when the power-supply cord or plug is damaged, liquid has been spilled or objects have fallen
into the apparatus, or when the apparatus has been exposed to rain or moisture, does not operate normally, or has been dropped;
14) “Warning: to reduce the risk of fire or electric shock, do not expose this apparatus to rain or moisture; and objects filled with liquids, such as vases, should not be placed on this apparatus”;
15) The socket outlet shall be installed near the equipment and shall be easily accessible;
16) The power cord must be unplugged prior to servicing.
2. PRÉCAUTIONS D’EMPLOI
1) Lire ces instructions;
2) Conserver ces instructions;
3) Suivre tous les conseils d’utilisations;
4) Suivre toutes les instructions;
5) Ne pas utiliser cet appareil au bord de l’eau;
6) Nettoyer uniquement avec un chiffon humide;
7) Ne pas bloquer le système de ventilation. Installer conformément aux instructions du fabricant;
8) Ne pas installer l’appareil près d’une source de chaleur tel qu’un radiateur, un fourneau, ou bien un autre appareil qui produit de la chaleur;
9) Ne pas modifier le système de sécurité de la fiche polarisée ou de de la fiche pour les prises de terre. Une fiche polarisée a deux broches, l’une étant plus distante de l’autre. Une fiche pour prise de terre a deux broches et
une pointe pour la masse. La broche plus distante et la pointe pour la masse ont été installées pour votre sécurité. Si la fiche fournie de rentre pas dans votre prise de courant consulter un électricien pour la substitution;
10) Protéger le cordon d’alimentation afin qu’il ne soit pas piétiné ou écrasé tout particulièrement au niveau des fiches, des prises de courant femelles, et des parties qui sortent de l’appareil;
11) Utiliser uniquement les accessoires recommendés par le fabricant;
12) Ne pas branché l’appareil en cas d’orage accompagné d’éclairs. Le débrancher en cas de non utilisation prolongée;
13) S’adresser à un service assistance agréé si l’appareil a subi des dommages, si le cordon d’alimentation ou la fiche a été endommagé, si un liquide a été renversé sur l’appareil ou bien si un object est tombé dans l’appareil,
si ce dernier a été exposé à la pluie ou à l’humidité, s’il ne fonctionne pas correctement ou s’il est tombé;
14) “Avertissant: pour réduire le risque du feu ou de décharge électrique, n’exposez pas cet appareil à la pluie ou l’humidité et les objets remplis de liquides; tels que des vases, ne devraient pas être placés sur cet appareil”;
15) La prise de courant doit être installée près de l’appareil et doit être facilement accessible;
16) La fiche principale doit être débranchée avant toute opération d’entretien.
MORE INFORMATION
For warrantee and service information, please contact your local Markbass distributor (contact information available at www.markbass.it). For more technical information, please visit us at www.markbass.it and fill out the form on the
Contact Us page. We hope you enjoy your amp and use it to make great music!
“The Lightning Flash with arrowhead symbol within an equilateral triangle, is intended to alert the
user to the presence of uninsulated “dangerous voltage” within the product enclosure that may be of
sufficient magnitude to constitute a risk of shock to persons.”
“The exclamation point within an equilateral triangle is intended to alert the user
to the presence of important operating and maintenance (servicing) instructions
in the literature accompanying the product.”
05
3. TA501 Product Overview
The Markbass TA501 is a high-quality bass amplifier with a tube compressor, a solid state preamp and an analog power amp, which delivers 500W of power into a 4 ohm cabinet (or two 8 ohm cabinets), or 300W
into an 8 ohm cabinet.
3.1 TA501 Front Panel
INPUT
The input jack can be used for both passive and active basses.
GAIN and MASTER
There are two knobs on the front panel of the TA501 that control the volume of your bass. The GAIN (2) control determines how much signal is passed through the preamp stage of the unit, which includes the
compressor, equalization and the effects loop. The MASTER (18) volume regulates how much output comes out of the power amp into your cabinet. If playing through the amp causes the blue “CLIP” (3) light to turn
on at all, you should turn down the GAIN (2) control to avoid distortion. When you first plug into the amp, start with the GAIN (2) and MASTER (18) controls set at their lowest levels, in other words turned all the way
counter-clockwise. Then, turn your instrument’s volume up to its full level and play as hard as you do in your most aggressive moments, and turn up the GAIN (2) control until the blue light starts illuminating. Next,
back off on the GAIN (2) just enough so that the light stays off as you play. This method will result in the optimal gain setting for the bass you’re playing. Different basses have different output levels, mostly depending
on their pickups-and in the case of active basses, the instrument’s onboard preamp and EQ settings. Once you’ve set the GAIN (2) level, use your MASTER (18) knob to control the volume of your bass.
COMPRESSOR
The TA501 features a tube compressor equipped with one ECC81 tube, made by JJ Electronics in the Slovak Republic. The COMP RATIO knob controls the ratio of gain reduction applied to the signal. When this knob
is turned all the way to the left, the compression ratio is 1:1-in other words, the compressor is off. When turned all the way up (clockwise), the compression ratio is infinity to one (1). At this setting the compressor is
acting as a limiter. The attack and release variables have been carefully preset to the optimal settings for bass guitar. Compression evens out the sound of your playing by reducing its dynamic range. The more you
compress, the more the loudest peaks of your playing are brought down in volume and prevented from “jumping out” too much. In combination with boosting volume, this allows you to “sound louder” overall. But
if overused, compression can make your playing sound unnatural, choked and less expressive. As with EQ, the best policy is to add it gradually and sparingly, listening carefully to the effect it’s having. Most players
will find that they rarely need to turn the compressor knob past 9 or 10 o’clock.
LINE OUT
This LINE OUT (5) knob controls the volume level of the rear LINE OUT XLR (28), which is connected to the mixing console in live or studio situations.
06
EQUALIZATION
Markbass amps are designed to faithfully reproduce the natural sound of your bass. If you have a good instrument, very little equalization (EQ)—if any—should be required. Bass guitars produce a surprisingly wide
range of frequencies—from extremely low frequencies that are more felt than heard, to extremely high frequencies that pass through your cabinet’s tweeter and are barely audible to the human ear.
As you experiment with your EQ settings, you will notice that all the different frequency ranges play essential roles in making up your bass tone:
LOW frequencies constitute music’s sonic foundation—they give power to your sound, physically resonating your listeners’ bodies (and yours!), sometimes even causing people to move and dance!
LOW MIDs (“MF LOW” or Mid Frequency Low) make your bass sound loud, projecting the sound over long distances, “filling the room.”
HIGH MIDs (“MF HIGH” or Mid Frequency High) convey the pitch of the notes that you play. Clarity of this range ensures that the melodies in your bass lines are heard. If detail is missing in this range, your melodic
contribution to the music will suffer.
HIGH frequencies carry the percussive content of your playing—the attack of your notes, the sound of your finger or pick passing over the string, fret noise, and in the case of slap bass, the “tick” noise produced when
the strings bounce off the frets.
If any one of these frequency ranges is neglected or poorly represented by your amp, you are not hearing an accurate representation of the sound that your bass is generating. Since the TA501 has been designed to
give you clear, detailed and musical sound at all frequencies, when the amp is set “flat”—with all EQ knobs at 12 o’clock—you should hear a very true mirror of the sound of your bass.
However, the following circumstances will require you to use equalization:
1.
The signal from your bass is lacking output level in one of the frequency ranges described above.
2.
The room or venue you’re playing in has poor acoustics and excites a certain frequency. For example, if you’re playing on a hollow stage, certain low frequencies may sound disproportionately
loud or out of control, and you may notice that every time you play a certain note, it sounds much louder than all the others. In these cases the offending frequency needs to be identified and reduced.
3.
You’re seeking to alter the basic sound of your instrument in order to achieve a particular musical effect.
Equalization should be treated as fine-tuning. Spend some time listening to your bass through the amp with all the EQ controls in the neutral (12 o’clock) position before you start changing the settings. You’re likely
to need little or no equalization!
However, if and when equalization is required, you will find this amp’s EQ to be powerful and impressively detailed.
The LOW EQ (7) control on the TA501 is set to a center frequency of 40 Hz. This means that it either boosts or cuts the volume of the frequencies around 40 Hz, to a maximum of 16 decibels.
The LOW-MID (MF LOW) (8) and HIGH-MID (MF HIGH) (10) controls are semi-parametric EQs. This means you have more specific control over what frequency you boost or cut. The knobs on the bottom row, MF LOW
(8) and MF HIGH (10), determine the center frequency of the range to be controlled. The knobs above, MF LOW LEVEL (9) and MF HIGH LEVEL (11), determine how much the frequency area selected will be turned
up or down, again to a maximum of 16 decibels. The HIGH EQ (12) control boosts or cuts the frequencies around 4.5 kHz, by as much as 16 decibels. The Q on this EQ (the range of frequency controlled) is quite wide,
spanning from about 2 kHz to about 30 kHz. If you need to reduce an offensive frequency using the semi-parametric EQ controls, start by turning the EQ’s LEVEL knob counter-clockwise (usually this will be in the
low-mids)—try around the 9 or 10 o’clock position. Play the note on your bass that sounds out of control. Then gradually turn the MF LOW (8) knob or MF HIGH (10) knob if the frequency is higher until you notice the
annoying sound go away. Unfortunately bad room acoustics can be very hard to compensate for... but you’ll find that the EQ on this amplifier is detailed and powerful enough that you should be able to fine tune
your amp to sound great anywhere!
VLE and VPF FILTERS
The TA501 amplifier features two magic knobs that alter the equalization of your bass signal with specially formulated musical results. Most players use these controls more than the EQ since they were designed
specifically to meet the practical needs of bassists.
The VLE (14) (Vintage Loudspeaker Emulator) filters out high frequencies to give you a mellower, less modern sound. As you turn the knob clockwise, you will find that a wider and wider range of high frequencies
gets cut (see page 11 for a graph of this filter’s function). This EQ effect is especially useful for acoustic and older styles of music.
The VPF (15) (Variable Pre-shape Filter) boosts lows (around 35 Hz) and highs (around 10 kHz), and cuts mids at 380 Hz. This filter has very powerful uses for rock music and is also a favorite of many slap bass players
(see page 11 for a graph of this filter’s function).
Again, we recommend you start off with these filters in the off position, and dial them in gradually to discover what effect they have. Explore them separately first—but you may find that using both in combination
can lead to some very appealing and musical results!
07
3.2 TA501 Rear Panel
SPEAKER OUT
The TA501 can be connected to one or two speaker cabinets using either 1⁄4” speaker cables (do not use instrument cables) or speakon speaker cables. The two high-quality Neutrik SPEAKON COMBO jacks (22) (23)
are designed to accept either of these connection types. The TA501 delivers 300W of power into an 8 ohm cabinet (or two 8 ohm cabinets), or 500W into a 4 ohm cabinet.
LINE OUT
The balanced XLR (28) output allows you to connect your amplifier directly to a mixing console (either in live situations or in a recording studio) without the need of a DI box. Simply connect a standard XLR cable
from this output to the soundboard/mixing console, or a snake connected to the board/console. If the soundman/engineer needs more or less signal from you, simply turn the front panel LINE OUT (16) control up
or down as necessary.
PRE EQ / POST EQ
This SWITCH (24) determines whether the signal that leaves the LINE OUT XLR (28) is affected by your amplifier’s EQ settings (including the VLE and VPF filters) or not. In most cases, you will find that sound engineers
prefer to receive a pre-EQ signal. Note that the line out signal includes whatever effects you’ve connected through the effects loop.
GROUND LIFT
Occasionally when you’re playing live and using the LINE OUT (28), the soundman will detect a hum from your amp’s signal. This is almost always due to a grounding problem related to your power source; you will
likely eliminate this hum simply by flipping the GROUND LIFT (29) switch.
TUNER OUT
The TUNER OUT (25) is an unbalanced signal that can be sent to a tuner, allowing you to tune as you play without passing your signal through pedals, which can degrade the quality of your signal. You can also use
this output to send your signal on to another amp, or any kind of recording unit that doesn’t require a balanced signal.
EFFECT SEND AND RETURN
If you use effect pedals or rack gear, you can route them through the SEND EFFECT (27) and RETURN EFFECT (26) on the rear panel of the amp. The effects loop is wired in parallel—this means that if something
happens to your effects chain (a battery dies or a cable gives out, for example) while you’re playing, you will not lose your main signal. If desired, however, the effects loop can be easily modified by authorized service
personnel to operate in series.
FOOTSWITCH
The TA501’s optional footswitch has two on/off switches. One is a mute control that interrupts the output signal from your amp, but allows it through to a tuner, should you have one plugged into the rear panel. This
is handy if you need to tune discreetly during live performances. The other switch bypasses your EQ and filter settings. Blue LEDs (6) (13) on the front panel illuminate when these switches are turned “on”.
08
4. TA501 Technical Details
INPUTS
INPUT
RETURN EFFECT CONTROLS
GAIN
COMPRESSOR RATIO
LINE OUT
PRE/POST EQ (for line out)
GROUND LIFT
MASTER VOLUME
impedance: 500 Kohm, max. voltage: 9 Vpp
impedance: 33 Kohm, max. voltage: 12 Vpp
–80 dB to +25 dB range
min. 1:1 / max. ∞:1
level control on front panel
switch on rear panel
switch on rear panel
EQUALIZATION
LOW
MID LOW
MID HIGH
HIGH
VLE (Vintage Loudspeaker Emulator) VPF (Variable Pre-shape Filter) center frequency: 40 Hz; level: ±16 dB
(semi-parametric) frequency 100–800 Hz; level: ±16 dB
(semi-parametric) frequency 700 Hz – 6 kHz; level: ±16 dB
center frequency: 4.5 kHz; level: ±16 dB
max cut range: 250 Hz – 20 kHz
center frequency 380 Hz (cut)
OUTPUTS
SEND EFFECTS
TUNER OUT
LINE OUT
SPEAKER OUT
FOOTSWITCH
unbalanced, max. voltage 12 Vpp
unbalanced, max. voltage 2 Vpp
balanced XLR, max. voltage 25 Vpp
speakon, 1/4”
mute, EQ bypass
OTHER
HEIGHT
WIDTH
DEPTH
WEIGHT
OUTPUT POWER
POWER REQUIREMENT
2 rack units (3.36 in. / 6 mm)
14.21 in. / 36.8 cm (19 in. / 48.3 cm with rack ears)
11.89 in. / 30.2 cm
8.16 lbs / 3.7 kg
300W RMS @ 8 ohm, 500W RMS @ 4 ohm
100/120V; 230V; 240V 50/60Hz (Voltage is factory preset according to region of sale)
FUSE
EUROPE AUSTRALIA/UK
USA/CANADA
JAPAN 4 A 250V T 5x20
4 A 250V T 5x20
8 A 250V T 5x20
10 A 250V T 5x20
09
5. TA501 Schematics
Schematics - TA501
10
6. TA501 Filter and EQ Graphs
11
7. TA503 Product Overview
The Markbass TA503 is a high-quality bass amplifier with a tube preamp and an analog power amp, which delivers 500W of power into a 4 ohm cabinet, or 300W into an 8 ohm cabinet. The tube preamp includes one
ECC81 tube and one ECC83 tube, both manufactured by JJ Electronics in the Slovak Republic.
7.1 TA503 Front Panel
INPUT
The TA503 offers two input jacks: one for PASSIVE BASSES (2) and one for ACTIVE BASSES (1). If your pickups are powered by a battery, your bass is considered “active”.
GAIN and MASTER
There are two knobs on the front panel of the TA503 that control the volume of your bass. The GAIN (3) control determines how much signal is passed through the preamp stage of the unit, which includes equalization and the effects loop. The MASTER (19) volume regulates how much output comes out of the power amp into your cabinet. If playing through the amp causes the blue “CLIP” (4) light to turn on at all, you should
turn down the GAIN (3) control to avoid distortion. When you first plug into the amp, start with the GAIN (3) and MASTER (19) controls set at their lowest levels, in other words turned all the way counter-clockwise.
Then, turn your instrument’s volume up to its full level and play as hard as you do in your most aggressive moments, and turn up the GAIN (3) control until the blue light starts illuminating. Next, back off on the GAIN
(3) just enough so that the light stays off as you play. This method will result in the optimal gain setting for the bass you’re playing. Different basses have different output levels, mostly depending on their pickups-and
in the case of active basses, the instrument’s onboard preamp and EQ settings. Once you’ve set the GAIN (3) level, use your MASTER (19) knob to control the volume of your bass.
LINE OUT
This LINE OUT (5) knob controls the volume level of the rear LINE OUT XLR (29), which is connected to the mixing console in live or studio situations.
EQUALIZATION
Markbass amps are designed to faithfully reproduce the natural sound of your bass. If you have a good instrument, very little equalisation (EQ-if any-should be required. Bass guitars produce a surprisingly wide range
of frequencies-from extremely low frequencies that are more felt than heard, to extremely high frequencies that pass through your cabinet’s tweeter and are barely audible to the human ear. As you experiment with
your EQ settings, you will notice that all the different frequency ranges play essential roles in making up your bass tone:
LOW frequencies constitute music’s sonic foundation-they give power to your sound, physically resonating your listeners’ bodies (and yours!), sometimes even causing people to move and dance!
LOW MIDs (“MF LOW” or Mid Frequency Low) make your bass sound loud, projecting the sound over long distances, “filling the room.”
HIGH MIDs (“MF HIGH” or Mid Frequency High) convey the pitch of the notes that you play. Clarity of this range ensures that the melodies in your bass lines are heard. If detail is missing in this range, your melodic
contribution to the music will suffer. HIGH frequencies carry the percussive content of your playing-the attack of your notes, the sound of your finger or pick passing over the string, fret noise, and in the case of slap
bass, the “tick” noise produced when the strings bounce off the frets.
12
If any one of these frequency ranges is neglected or poorly represented by your amp, you are not hearing an accurate representation of the sound that your bass is generating. Since the TA503 has been designed to
give you clear, detailed and musical sound at all frequencies, when the amp is set “flat”-with all EQ knobs at 12 o’clock-you should hear a very true mirror of the sound of your bass.
However, the following circumstances will require you to use equalization:
1.
The signal from your bass is lacking output level in one of the frequency ranges described above.
2.
The room or venue you’re playing in has poor acoustics and excites a certain frequency. For example, if you’re playing on a hollow stage, certain low frequencies may sound disproportionately
loud or out of control, and you may notice that every time you play a certain note, it sounds much louder than all the others. In these cases the offending frequency needs to be identified and reduced.
3.
You’re seeking to alter the basic sound of your instrument in order to achieve a particular musical effect.
Equalization should be treated as fine-tuning. Spend some time listening to your bass through the amp with all the EQ controls in the neutral (12 o’clock) position before you start changing the settings. You’re likely
to need little or no equalization!
However, if and when equalization is required, you will find this amp’s EQ to be powerful and impressively detailed.
The TA503 features four bands of semi-parametric EQ:
The LOW EQ (F LOW) control (7) covers the range between 40 and 300 Hz. The volume of the frequency selected can be boosted or cut to a maximum of 16 decibels.
The LOW MID EQ (MF LOW) control (9) covers the range between 100 and 800 Hz. The volume of the frequency selected can be boosted or cut to a maximum of 16 decibels.
The HIGH MID EQ (MF HIGH) control (11) covers the range between 700 Hz and 6 kHz. The volume of the frequency selected can be boosted or cut to a maximum of 16 decibels.
The HIGH EQ (F HIGH) control (13) covers the range between 1.5 and 16 kHz. The volume of the frequency selected can be boosted or cut to a maximum of 16 decibels.
If you need to reduce an offensive frequency using the semi-parametric EQ controls (8) (10) (12) (14), start by turning the EQ’s “level” knob counter-clockwise (usually this will be in the low-mids-try around the 9 or
10 o’clock position. Play the note on your bass that sounds out of control. Then gradually turn the frequency knob until you notice the annoying sound go away. Unfortunately bad room acoustics can be very hard
to compensate for... but you’ll find that the EQ on this amplifier is detailed and powerful enough that you should be able to fine tune your amp to sound great anywhere!
VLE and VPF FILTERS
The TA503 amplifier features two magic knobs that alter the equalization of your bass signal with specially formulated musical results. Most players use these controls more than the EQ since they were designed
specifically to meet the practical needs of bassists.
The VLE (16) (Vintage Loudspeaker Emulator) filters out high frequencies to give you a mellower, less modern sound. As you turn the knob clockwise, you will find that a wider and wider range of high frequencies
gets cut (see page 17 for a graph of this filter’s function). This EQ effect is especially useful for acoustic and older styles of music.
The VPF (17) (Variable Pre-shape Filter) boosts lows (around 35 Hz) and highs (around 10 kHz), and cuts mids at 380 Hz. This filter has very powerful uses for rock music and is also a favorite of many slap bass players
(see page 17 for a graph of this filter’s function).
13
7.2 TA503 Rear Panel
SPEAKER OUT
The TA503 can be connected to one or two speaker cabinets using either 1⁄4” speaker cables (do not use instrument cables) or speakon speaker cables. The two high-quality Neutrik SPEAKON COMBO jacks (23) (24)
are designed to accept either of these connection types. The TA503 delivers 300W of power into an 8 ohm cabinet (or two 8 ohm cabinets), or 500W into a 4 ohm cabinet.
LINE OUT
The balanced XLR (29) output allows you to connect your amplifier directly to a mixing console (either in live situations or in a recording studio) without the need of a DI box. Simply connect a standard XLR cable
from this output to the soundboard/mixing console, or a snake connected to the board/console. If the soundman/engineer needs more or less signal from you, simply turn the front panel LINE OUT (5) control up or
down as necessary.
PRE EQ / POST EQ
This SWITCH (25) determines whether the signal that leaves the LINE OUT XLR (29) is affected by your amplifier’s EQ settings (including the VLE and VPF filters) or not. In most cases, you will find that sound engineers
prefer to receive a pre-EQ signal. Note that the line out signal includes whatever effects you’ve connected through the effects loop.
GROUND LIFT
Occasionally when you’re playing live and using the LINE OUT (29), the soundman will detect a hum from your amp’s signal. This is almost always due to a grounding problem related to your power source; you will
likely eliminate this hum simply by flipping the GROUND LIFT (30) switch.
TUNER OUT
The TUNER OUT (26) is an unbalanced signal that can be sent to a tuner, allowing you to tune as you play without passing your signal through pedals, which can degrade the quality of your signal. You can also use
this output to send your signal on to another amp, or any kind of recording unit that doesn’t require a balanced signal.
EFFECT SEND AND RETURN
If you use effect pedals or rack gear, you can route them through the SEND EFFECT (28) and RETURN EFFECT (27) on the rear panel of the amp. The effects loop is wired in parallel-this means that if something happens to your effects chain (a battery dies or a cable gives out, for example) while you’re playing, you will not lose your main signal. If desired, however, the effects loop can be easily modified by authorized service
personnel to operate in series.
FOOTSWITCH
The TA503’s optional footswitch has two on/off switches. One is a mute control that interrupts the output signal from your amp, but allows it through to a tuner, should you have one plugged into the rear panel. This
is handy if you need to tune discreetly during live performances. The other switch bypasses your EQ and filter settings. Blue LEDs (6) (15) on the front panel illuminate when these switches are turned “on”.
14
8. TA503 Technical Details
INPUTS
INPUT (Passive)
INPUT (Active)
RETURN EFFECT
CONTROLS
GAIN
LINE OUT
PRE/POST EQ (for line out)
GROUND LIFT
MASTER VOLUME
impedance: 500 Kohm, max. voltage: 4 Vpp
impedance: 500 Kohm, max. voltage: 10 Vpp
impedance: 500 Kohm, max. voltage: 10 Vpp
FUSE
EUROPE AUSTRALIA/UK
USA/CANADA JAPAN 4 A 250V T 5x20
4 A 250V T 5x20
8 A 250V T 5x20
10 A 250V T 5x20
–80 dB to +25 dB range
level control on front panel
switch on rear panel
switch on rear panel
EQUALIZATION
LOW
MID LOW
MID HIGH
HIGH
VLE (Vintage Loudspeaker Emulator)
VPF (Variable Pre-shape Filter)
(semi-parametric) frequency: 40–300 Hz; level: ±16 dB
(semi-parametric) frequency: 100–800 Hz; level: ±16 dB
(semi-parametric) frequency: 700 Hz – 6 kHz; level: ±16 dB
(semi-parametric) frequency: 1.5–16 kHz; level: ±16 dB
max. range cut: 250 Hz – 20 kHz
center frequency 380 Hz (cut)
OUTPUTS
SEND EFFECT
TUNER OUT
LINE OUT
SPEAKER OUT
FOOTSWITCH
unbalanced, max. voltage 20 Vpp (pre-EQ)
unbalanced, max. voltage 2 Vpp
balanced XLR, max. voltage 15 Vpp
speakon, 1/4”
mute, EQ bypass
OTHER
HEIGHT
WIDTH
DEPTH
WEIGHT
OUTPUT POWER
POWER REQUIREMENT
2 rack units (3.36 in. / 86 mm)
14.21 in. / 36.8 cm (19 in. / 48.3 cm with rack ears)
11.89 in. / 30.2 cm
8.16 lbs / 3.7 kg
300W RMS @ 8 ohm, 500W RMS @ 4 ohm
100/120V; 230V; 240V 50/60Hz (Voltage is factory preset according
to region of sale)
15
9. TA503 Schematics
Schematics - TA503
16
10. TA503 Filter and EQ Graphs
17
11. TSA500 Product Overview
The Markbass TSA500 is a high-quality bass amplifier with a dual stage preamp (tube and solid state) and an analog power amp, which delivers 500W of power into a 4 ohm cabinet, or 300W into an 8 ohm cabinet.
The tube preamp includes one ECC83 tube manufactured by JJ Electronics in the Slovak Republic.
11.1 TSA500 Front Panel
INPUT
The INPUT JACK (1) can be used for both passive and active basses.
SOLID STATE GAS, TUBE FIRE AND MASTER BOOM (SOLID STATE GAIN, TUBE GAIN and MASTER)
There are three knobs on the front panel of the TSA500 that control the volume of your bass. This head has two preamp stages: the TUBE FIRE (TUBE GAIN - 3) control determines how much signal is passed through a
TUBE preamp stage and the SOLID STATE GAS (SOLID STATE GAIN - 2) controls the amount of signal through a SOLID STATE preamp stage; these two stages are wired in parallel so you can mix tube warm sound with
solid state clear sound. The preamp section includes equalization and the effects loop. The MASTER BOOM (MASTER - 16) volume regulates how much output comes out of the power amp into your cabinet.
If playing through the amp causes the blue ‘TOO MUCH!’ (CLIP - 4) light to turn on at all, you should turn down the TUBE FIRE (TUBE GAIN - 3) or the SOLID STATE GAS (SOLID STATE GAIN - 2) controls to avoid distortion.
When you first plug into the amp, start with the TUBE FIRE (TUBE GAIN - 3), the SOLID STATE GAS (SOLID STATE GAIN - 2) and MASTER BOOM (MASTER - 16) controls set at their lowest levels, in other words turned all the
way counter-clockwise. Then, turn your instrument’s volume up to its full level and play as hard as you do in your most aggressive moments, and turn up the TUBE FIRE (TUBE GAIN - 3) and/or the (SOLID STATE GAIN
- 2) controls until the blue light starts illuminating. Next, back off on the TUBE FIRE (TUBE GAIN - 3) and/or the (SOLID STATE GAIN - 2) just enough so that the light stays off as you play. This method will result in the
optimal gain setting for the bass you’re playing. Different basses have different output levels, mostly depending on their pickups and in the case of active basses, the instrument’s onboard preamp and EQ settings.
Once you’ve set the TUBE FIRE (TUBE GAIN - 3) and SOLID STATE GAS (SOLID STATE GAIN - 2) levels, use your MASTER BOOM (MASTER - 16) knob to control the volume of your bass.
BASSLINE OUT (LINE OUT)
This BASSLINE OUT (LINE OUT - 5) knob controls the volume level of the rear LINE OUT XLR (32) and the rear LINE OUT AUX XLR (25), which is connected to the mixing consoles in live or studio situations.
PRIVATE (PHONES)
For quiet practicing, plug headphones into this plug (1/4”) input (17). If you plug in headphones, the amp’s speaker will stay on because the headphones out is not linked to the main out. To control the level to your
headphones, use the INTIMITY LEVEL (PHONE LEVEL - 15) knob.
EQUALIZATION
Markbass amps are designed to faithfully reproduce the natural sound of your bass. If you have a good instrument, very little equalization (EQ)—if any—should be required. Bass guitars produce a surprisingly wide
range of frequencies—from extremely low frequencies that are more felt than heard, to extremely high frequencies that pass through your cabinet’s tweeter and are barely audible to the human ear.
As you experiment with your EQ settings, you will notice that all the different frequency ranges play essential roles in making up your bass tone:
LOW frequencies constitute music’s sonic foundation they give power to your sound, physically resonating your listeners’ bodies (and yours!), sometimes even causing people to move and dance!
LOW MIDs (’MF LOW’ or Mid Frequency Low) make your bass sound loud, projecting the sound over long distances, ‘filling the room’.
18
HIGH MIDs (’MF HIGH’ or Mid Frequency High) convey the pitch of the notes that you play. Clarity of this range ensures that the melodies in your bass lines are heard. If detail is missing in this range, your melodic
contribution to the music will suffer.
HIGH frequencies carry the percussive content of your playing the attack of your notes, the sound of your finger or pick passing over the string, fret noise, and in the case of slap bass, the ‘tick’ noise produced when
the strings bounce off the frets.
If any one of these frequency ranges is neglected or poorly represented by your amp, you are not hearing an accurate representation of the sound that your bass is generating. Since the TSA500 has been designed
to give you clear, detailed and musical sound at all frequencies, when the amp is set ‘flat’ with all EQ knobs at 12 o’clock you should hear a very true mirror of the sound of your bass.
However, the following circumstances will require you to use equalization:
1.
2.
3.
The signal from your bass is lacking output level in one of the frequency ranges described above.
The room or venue you’re playing in has poor acoustics and excites a certain frequency. For example, if you’re playing on a hollow stage, certain low frequencies may sound disproportionately loud or out of control, and you may notice that every time you play a certain note, it sounds much louder than all the others. In these cases the offending frequency needs to be identified and reduced.
You’re seeking to alter the basic sound of your instrument in order to achieve a particular musical effect.
Equalization should be treated as fine-tuning. Spend some time listening to your bass through the amp with all the EQ controls in the neutral (12 o’clock) position before you start changing the settings. You’re likely
to need little or no equalization!
However, if and when equalization is required, you will find this amp’s EQ to be powerful and impressively detailed.
The LOW EQ (7) control on the TSA500 is set to a center frequency of 40 Hz. This means that it either boosts or cuts the volume of the frequencies around 40 Hz, to a maximum of 16 decibels.
The LOW-MID (MF LOW) (9) and HIGH-MID (MF HIGH) (11) controls are semi-parametric EQs. This means you have more specific control over what frequency you boost or cut. The knobs on the bottom row, MF LOW
(8) and MF HIGH (10), determine the center frequency of the range to be controlled. The knobs above, MF LOW LEVEL (9) and MF HIGH LEVEL (11), determine how much the frequency area selected will be turned up
or down, again to a maximum of 16 decibels.
The HIGH EQ (12) control boosts or cuts the frequencies around 4.5 kHz, by as much as 16 decibels. The Q on this EQ (the range of frequency controlled) is quite wide, spanning from about 2 kHz to about 30 kHz.
If you need to reduce an offensive frequency using the semi-parametric EQ controls, start by turning the EQ’s ‘level’ knob counter-clockwise (usually this will be in the low-mids) try around the 9 or 10 o’clock position.
Play the note on your bass that sounds out of control. Then gradually turn the MF LOW (8) or MF HIGH (10) knob if the frequency is higher until you notice the annoying sound go away. Unfortunately bad room
acoustics can be very hard to compensate for but you’ll find that the EQ on this amplifier is detailed and powerful enough that you should be able to fine tune your amp to sound great anywhere!
VINTAGYZER (VLE) and FUNKYZER (VPF) FILTERS
The TSA500 amplifier features two magic knobs that alter the equalization of your bass signal with specially formulated musical results. Most players use these controls more than the EQ since they were designed
specifically to meet the practical needs of bassists.
The VINTAGYZER (VLE - Vintage Loudspeaker Emulator) (13) filters out high frequencies to give you a mellower, less modern sound. As you turn the knob clockwise, you will find that a wider and wider range of high
frequencies gets cut (see page 9 for a graph of this filter’s function). This EQ effect is especially useful for acoustic and older styles of music.
The FUNKYZER (VPF - Variable Pre-shape Filter) (14) boosts lows (around 35 Hz) and highs (around 10 kHz), and cuts mids at 380 Hz. This filter has very powerful
uses for rock music and is also a favorite of many slap bass players (see page 23 for a graph of this filter’s function).
Again, we recommend you start off with these filters in the off position, and dial them in gradually to discover what effect they have. Explore them separately first but you may find that using both in combination
can lead to some very appealing and musical results!
19
11.2 TSA500 Rear Panel
SPEAKER OUT
The TSA500 can be connected to one or two speaker cabinets using either ¼’’ speaker cables (do not use instrument cables) or speakon speaker cables. The two high-quality Neutrik SPEAKON COMBO jacks (23) (24)
are designed to accept either of these connection types.
The minimum load is 4 ohms. If you connect two cabinets, the impedance of each cab must be 8 ohms or higher. If you connect a 4 ohms cabinet, you cannot
connect a second cabinet.
The TSA500 delivers 300W of power into an 8 ohm cabinet, or 500W into a 4 ohm cabinet or two 8 ohm cabinets.
LINE OUT AND LINE OUT AUX
The balanced XLR (32) and (25) outputs allows you to connect your amplifier directly to a mixing console (either in live situations or in a recording studio) without the need of a DI box. Simply connect a standard XLR
cable from this outputs to the soundboard/mixing console, or a snake connected to the board/console. If the soundman/engineer needs more or less signal from you, simply turn the front panel LINE OUT (5) control
up or down as necessary. Two LINE OUTS permit you to send the signal to two different apparatuses, for example one signal to a mixing console and the other to a recording device.
PRE EQ / POST EQ
This switch (27) determines whether the signal that leaves the LINE OUT XLR (32) and the LINE OUT AUX (25) is affected by your amplifier’s EQ settings (including the VLE and VPF filters) or not. In most cases, you will
find that sound engineers prefer to receive a pre-EQ signal. Note that the line out signal includes whatever effects you’ve connected through the effects loop.
GROUND LIFT
Occasionally when you’re playing live and using the LINE OUT (32) and/or (25), the soundman will detect a hum from your amp’s signal. This is almost always due to a grounding problem related to your power source;
you will likely eliminate this hum simply by flipping the GROUND LIFT (33) and (26) switches.
TUNER OUT
The TUNER OUT (28) is an unbalanced signal that can be sent to a tuner, allowing you to tune as you play without passing your signal through pedals, which can degrade the quality of your signal. You can also use
this output to send your signal on to another amp, or any kind of recording unit that doesn’t require a balanced signal.
EFFECT SEND AND RETURN
If you use effect pedals or rack gear, you can route them through the SEND EFFECT (30) and RETURN EFFECT (29) on the rear panel of the amp. The effects loop is wired in parallel, this means that if something
happens to your effects chain (a battery dies or a cable gives out, for example) while you’re playing, you will not lose your main signal. If desired, however, the effects loop can be easily modified by authorized service
personnel to operate in series.
FOOTSWITCH
The TSA500’s optional footswitch has one on/off switch. This is a mute control that interrupts the output signal from your amp, but allows it through to a tuner, should you have one plugged into the rear panel. This
is handy if you need to tune discreetly during live performances. Blue LED (6) on the front panel illuminate when this switch is turned on.
20
12. TSA500 Technical Details
INPUTS
INPUT
RETURN EFFECT
CONTROLS
GAIN (TUBE SECTION)
GAIN (SOLID STATE SECTION)
LINE OUT
PRE/POST EQ (for both line out)
GROUND LIFT (for line out)
GROUND LIFT (for line out aux)
MASTER VOLUME
PHONES LEVEL
FOOTSWITCH
EQUALIZATION
LOW
MID LOW
MID HIGH
HIGH
VLE (Vintage Loudspeaker Emulator)
VPF (Variable Pre-shape Filter)
OUTPUTS
SEND EFFECT
TUNER OUT
LINE OUT
LINE OUT AUX
SPEAKER OUT
PHONES OUT
impedance: 500 Kohm, max. voltage: 10 Vpp
impedance: 22 Kohm, max. voltage: 15 Vpp
-80 dB to +35 dB range
-45 dB to +28 dB range
level control on front panel
switch on rear panel
switch on rear panel
switch on rear panel
center frequency: 60 Hz; level: ±16 dB
(semi-parametric) frequency 100 to 800 Hz; level: ±16 dB
(semi-parametric) frequency 700 Hz to 6 kHz; level: ±16 dB
center frequency: 4.5 kHz; level: ±16 dB
max cut range: 250 Hz to 20 kHz
center frequency 380 Hz (cut)
OTHER
HEIGHT
WIDTH
DEPTH
WEIGHT
OUTPUT POWER
POWER REQUIREMENT
FUSE
EUROPE AUSTRALIA/UK
USA/CANADA JAPAN 2 rack units (3.36 in. / 86 mm)
14.21 in. / 36.8 cm (19.01 in. / 48.3 cm with rack ears)
11.9 in. / 30.2 cm
7.5 lbs / 3.4 kg
300W RMS @ 8 ohm, 500W RMS @ 4 ohm
100; 120V; 230V; 240V 50/60Hz
(Voltage is factory reset according to region of sale)
4 A 250V T 5x20
4 A 250V T 5x20
8 A 250V T 5x20
10 A 250V T 5x20
unbalanced, max. voltage 12 Vpp
unbalanced, max. voltage 2 Vpp
balanced XLR, max. voltage 25 Vpp
balanced XLR, max. voltage 25 Vpp
speakon, 1/4”
30 to 600 ohm, max. voltage 10 Vpp
21
13. TSA500 Schematics
Footswitch
Line
Out2
Line
Out1
Return
Pre/Post
Jumper
Parallel
Series
Input
Buffer
Gain
+
Jumper
Parallel
Mute
LIMITER
EQUALIZER
Power
Amp
Power
Output
Mute
LIMITER
Send
-20 dB
Tuner
Schematics - TSA500
22
Amp
Phones
Phones
14. TSA500 Filter and EQ Graphs
VLE (min-max)
30
VPF (max)
15.00 dB
20
10.00 dB
10
5.00 dB
0
0.00 dB
dB
-10
-5.000 dB
-20
-10.00 dB
-30
-15.00 dB
-40
10
100
1000
Frequency - Hz
10000
100000
-20.00 dB
10.00 Hz
100.00 Hz
1.000 kHz
10.00 kHz
100.00 KHz
23
24
25
26
27
Product specifications are subject to change without notice
Italy - 66020 San Giovanni Teatino (Ch) - Via Aterno, 44 - Tel. +39 085 446 5705 - Fax +39 085 440 7399 www.markbass.it - [email protected]