1
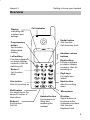
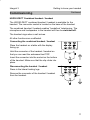
Operating Instructions
Operating instructions
MM588
connected to Integral 3
Getting to know your handset
Integral 3
Important information
Caution!
The handset must not be used in areas susceptible to explosions!
Keep away from dampness
Protect your handset against dampness. Do not, for example, leave it
outdoors when it is raining. This could damage the handset.
Protect against interference
Other electronic devices are generally protected against RF irradiation.
However, a device of this kind which is insufficiently protected may lead to
malfunctions.
Never unscrew the handset housing!
The housing could be damaged as a result. It does not contain any
components that can be repaired by yourself.
Operating the battery
At first, charge the battery to its full capacity, e.g. overnight. In the first week
of operation, always place the handset back in the charger after use.
New battery cells will generally only reach their full capacity after several
days of standard operation.
Batteries must be used in the appropriate manner.
Bosch is not liable for damage which occurs due to inappropriate handling
of the battery.
Charging the battery in standard operation
The charging time for an empty battery is approximately 8 hours.
When the batteries are exhausted
Exhausted batteries do not belong in the household rubbish, and are to be
disposed of in the appropriate manner! Refer to P. 68, Consumer
information.
2
Integral 3
Getting to know your handset
Contents
Getting to know your handset
Important information . . . . . . . . . . . . . . . . . . . . . . . . . . . . . . . . . . . . . . . . . . .
Overview . . . . . . . . . . . . . . . . . . . . . . . . . . . . . . . . . . . . . . . . . . . . . . . . . . . . . .
Display . . . . . . . . . . . . . . . . . . . . . . . . . . . . . . . . . . . . . . . . . . . . . . . . . . . . . . .
Commissioning . . . . . . . . . . . . . . . . . . . . . . . . . . . . . . . . . . . . . . . . . . . . . . . .
Basic rules of operation . . . . . . . . . . . . . . . . . . . . . . . . . . . . . . . . . . . . . . . . .
2
5
6
8
12
The functions
Telephoning in the usual manner . . . . . . . . . . . . . . . . . . . . . . . . . . . . . . . . .
Callback . . . . . . . . . . . . . . . . . . . . . . . . . . . . . . . . . . . . . . . . . . . . . . . . . . . . . .
Consultation call and call forwarding . . . . . . . . . . . . . . . . . . . . . . . . . . . . . .
Second call during a conversation . . . . . . . . . . . . . . . . . . . . . . . . . . . . . . . .
Abbreviated dialling . . . . . . . . . . . . . . . . . . . . . . . . . . . . . . . . . . . . . . . . . . . . .
Local telephone directory . . . . . . . . . . . . . . . . . . . . . . . . . . . . . . . . . . . . . . . .
Central telephone directory . . . . . . . . . . . . . . . . . . . . . . . . . . . . . . . . . . . . . .
Call list . . . . . . . . . . . . . . . . . . . . . . . . . . . . . . . . . . . . . . . . . . . . . . . . . . . . . . . .
Messages . . . . . . . . . . . . . . . . . . . . . . . . . . . . . . . . . . . . . . . . . . . . . . . . . . . . .
Suppression of call number display . . . . . . . . . . . . . . . . . . . . . . . . . . . . . . .
Follow me (to the handset) . . . . . . . . . . . . . . . . . . . . . . . . . . . . . . . . . . . . . .
Call diversion . . . . . . . . . . . . . . . . . . . . . . . . . . . . . . . . . . . . . . . . . . . . . . . . . .
Call forwarding . . . . . . . . . . . . . . . . . . . . . . . . . . . . . . . . . . . . . . . . . . . . . . . . .
Announcement . . . . . . . . . . . . . . . . . . . . . . . . . . . . . . . . . . . . . . . . . . . . . . . . .
Pick-up . . . . . . . . . . . . . . . . . . . . . . . . . . . . . . . . . . . . . . . . . . . . . . . . . . . . . . .
Accepting calls from ringing lines . . . . . . . . . . . . . . . . . . . . . . . . . . . . . . . . .
DTMF Post dialling . . . . . . . . . . . . . . . . . . . . . . . . . . . . . . . . . . . . . . . . . . . . .
Call charge display . . . . . . . . . . . . . . . . . . . . . . . . . . . . . . . . . . . . . . . . . . . . .
Muting the microphone . . . . . . . . . . . . . . . . . . . . . . . . . . . . . . . . . . . . . . . . . .
Setting the handset . . . . . . . . . . . . . . . . . . . . . . . . . . . . . . . . . . . . . . . . . . . . .
Emergency call . . . . . . . . . . . . . . . . . . . . . . . . . . . . . . . . . . . . . . . . . . . . . . . .
Personal Identification Number (PIN) . . . . . . . . . . . . . . . . . . . . . . . . . . . . .
Locking the handset . . . . . . . . . . . . . . . . . . . . . . . . . . . . . . . . . . . . . . . . . . . .
Language . . . . . . . . . . . . . . . . . . . . . . . . . . . . . . . . . . . . . . . . . . . . . . . . . . . . .
Self-assignment . . . . . . . . . . . . . . . . . . . . . . . . . . . . . . . . . . . . . . . . . . . . . . . .
15
18
19
21
22
23
28
30
32
33
34
36
38
39
40
41
42
43
44
45
49
50
51
53
54
3
Getting to know your handset
Contents
Integral 3
Continued
Self-assignment and call diversion off . . . . . . . . . . . . . . . . . . . . . . . . . . . . .
Opening the door from the handset . . . . . . . . . . . . . . . . . . . . . . . . . . . . . . .
Associated subscriber . . . . . . . . . . . . . . . . . . . . . . . . . . . . . . . . . . . . . . . . . .
Subscriber group . . . . . . . . . . . . . . . . . . . . . . . . . . . . . . . . . . . . . . . . . . . . . . .
Using the handset in another system . . . . . . . . . . . . . . . . . . . . . . . . . . . . .
55
56
57
60
63
Appendix
Codes for your handset . . . . . . . . . . . . . . . . . . . . . . . . . . . . . . . . . . . . . . . . .
Further information about your telephone . . . . . . . . . . . . . . . . . . . . . . . . . .
Specifications . . . . . . . . . . . . . . . . . . . . . . . . . . . . . . . . . . . . . . . . . . . . . . . . . .
Table of characters . . . . . . . . . . . . . . . . . . . . . . . . . . . . . . . . . . . . . . . . . . . . .
Index . . . . . . . . . . . . . . . . . . . . . . . . . . . . . . . . . . . . . . . . . . . . . . . . . . . . . . . . .
4
65
66
69
70
71
Getting to know your handset
Integral 3
Overview
Display
indicating call
numbers and
settings
Call indicator
Redial button
2nd function:
Call diversion from
Programming
button
2nd function:
Abbreviated
dialling
Handset volume
buttons
Left softkey
Functions depend
on status (display
contents). Also for
switching off.
Right softkey
Functions depend
on status (display
contents). Also for
switching on.
Button 1
2nd function:
Mute
Digit keys
For digits and
letters
Star button
Also for scrolling up
Shift button
For switching to the
second function of
the buttons
Button 0
2nd function:
Call list
Hash button
Also for scrolling
down
Microphone
Handset button
Corresponds to
lifting and
replacing the
handset
R button
Signal button for
functions within
a telephone system
2nd function:
Keyboard lock
5
Getting to know your handset
Integral 3
Display
Various texts and symbols in the display assist you in operating the
handset.
The texts and symbols are provided in the display to guide you through the
menus and inform you about the status of your handset.
The functions of the right and left softkeys change according to the current
status. The respective functions are shown in the display directly above the
softkeys.
The lines in the display
Symbol line indicating the status of the telephone.
Two text lines e.g. for the name and call number.
Smith
3050
off
Menu
Function of the right softkey e.g.
e g Menu
Menu.
Function of the left softkey
softkey, e.g.
e g off
off.
Symbol meanings
Battery full,
battery nearly full,
battery nearly empty,
battery
empty,
(battery symbol flashing) capacity for less than five minutes!
Mute: The microphone is off. Your call partner cannot hear you.
Lock: The handset is locked.
Handset: The handset has a telephone connection.
Shift: The shift button is pressed.
Dual-tone multifrequency dialling: Each push of the button is
transmitted to the connection subscriber (DTMF post dialling) as DTMF
tone coding (with audible output).
(Antenna without radio waves) Within range of the system: Your
handset is within range of a base station. You may make a call.
(Antenna with radio waves) Connection to system: Your handset has
a radio link.
6
Getting to know your handset
Integral 3
Display
Continued
The display of your handset can accommodate a maximum of 16
characters in each line.
The layout of the display contents depends on the status of your handset.
In basic status
3050
Smith
off
Menu
The
e display
d s ay shows
s o s the
t e first
st 16
6 letters
ette s of
o your
you name
a e or
o
the number.
Name display
2492
Conversation
Clrdown
Menu
If yyou are calling
g an internal subscriber,, the displayy
shows the subscriber
subscriber’ss internal call number or name.
When making a call
0004434758739124
Clrdown
Menu
y shows the number ((the last 16 digits)
g ) and
The display
possibly
ossibly the name.
When you are called
0004434758739124
Call
Clrdown
Menu
The displayy shows the name or number.
When a call is diverted to you
2492
Call diversion
Clrdown
Menu
The
ed
display
s ay sshows
o s tthe
e number
u be a
and
d ca
call d
diversion.
e so
7
Getting to know your handset
Integral 3
Commissioning
When you receive your handset, it is registered in the system and ready for
operation. All you need to do is connect the supplied charger.
Placement of the charger
Place the charger on a solid, even surface, e.g. a table. Choose a location
that is protected from direct sunlight and dampness. Please also observe
the information on P. 66.
Insert the mains plug into a socket. The charger is ready for operation.
Charging the handset
Simply place the handset into the
charger. You will hear an
acknowledgement tone. The display
and keypad lights will switch on
briefly. The battery symbol in the
symbol line will start to move. The
battery is being charged.
Charging
indicator light
for replacement
battery
When the batteries are being
charged, they will become slightly
warm. This is perfectly normal.
Removing the battery
Place the handset on a table with the
display facing down. Press in the
clip. Pull up the clip on the battery.
Press in the
clip.
i
Before using the handset for the first time, the batteries should be charged
for at least 8 hours.
New battery cells will generally only reach their full capacity after several
days of standard operation.
8
Integral 3
Commissioning
Getting to know your handset
Continued
Charging the replacement battery
Place a replacement battery in the
charging holder (rear side of the
charger). Slide the battery through
the guide notches parallel to the rear
panel. Make sure that the battery
clicks into place. The charging
indicator light switches on.
Fitting the replacement battery
Place the replacement battery onto
its rear edge. Tilt it onto the handset.
Make sure that the battery clicks into
place.
Vibra battery
A Vibra battery is available for the handset. The Vibra battery serves to
vibrate the handset when a call is received. How to activate the vibration is
explained on Page 45.
i
The charging process is ended when the replacement battery is full. The
charging indicator light will then switch off.
If a handset is placed in the charger, the handset will be charged. The
replacement battery will not be charged during this period. The charging
indicator light remains switched off.
The battery symbol in the display will only provide a reliable indication of
the charging status once the handset has been completely charged for the
first time!
9
Getting to know your handset
Commissioning
Integral 3
Continued
Carrying clip
The clip is designed for carrying your handset in an office environment. It
will not stay attached to wide leather belts. To carry the handset outdoors,
please use the carrying case which can be obtained as an accessory.
Releasing the clip
To release the clip, bend the lateral clamps slightly apart.
Attaching the clip
Place the handset on a table with the
display facing down. Attach the clip
to the handset from above. Make
sure that the clamping lugs click into
place.
i
When inserting a Vibra battery into the handset, it may occur that the
battery vibrates briefly. This is perfectly normal.
10
Integral 3
Getting to know your handset
Commissioning
Continued
HSG30-DECT Combined handset / headset
The HSG30-DECT combined handset / headset is available for the
handset. The connector socket is located on the base of the handset.
The combined handset / headset enables “handsfree” telephoning. The
microphone and loudspeaker in the handset will then be switched off.
The handset rings when a call arrives.
All other functions are unaffected.
Connecting the combined handset / headset
Place the handset on a table with the display
facing up.
Hold the connector of the handset / headset so
that you can read the embossed text TOP.
Insert the connector into the socket on the bottom
of the handset. Make sure that the clip clicks into
place.
Disconnecting the handset / headset
Press in the lateral locking lugs.
Remove the connector of the handset / headset
from the handset.
11
Getting to know your handset
Integral 3
Basic rules of operation
The operation of your telephone includes several operating steps which are
often repeated. Please familiarize yourself with these operating steps.
Left and right softkey
The function of the softkeys changes according to the situation. The
respective function always appears in the display above the softkey, e.g.
Menu or off .
The right softkey is used for switching on, calling up menus or
confirming.
The left softkey is used for ending a menu option or cancelling.
If you press the key for a long period when in any of the menus,
the handset will be returned to its basic status.
Star and hash buttons
The star and hash (#) buttons are used for scrolling in lists and
menus.
Switching on the telephone
The telephone is switched off. Press the right softkey for a long
period.
Switching off the telephone
The telephone is in basic status. Press the left softkey for a long
period.
i
If you place the switched off handset into the charger, the handset will be
switched on after a while and the charging process will be indicated.
12
Integral 3
Getting to know your handset
Basic rules of operation
Continued
Selecting a menu
Some functions and settings of your telephone can be obtained via the
display contents (menu). The menu is set out in such a way that most of the
menu options lead to submenus.
Call up the menu using the right softkey.
Use the star and hash (#) buttons to mark the desired menu
option, e.g. System .
Select the menu option using the right softkey.
Menu level back
The left softkey enables you to move to the next menu level up or
leave the menu.
Submenus
Submenus are operated in exactly the same way as the main menu.
Cancelling
Press the left softkey for a long period in order to reach basic status.
13
Getting to know your handset
Basic rules of operation
Integral 3
Continued
Entering characters for telephone directory entries
The digit keys may also be used to enter letters and characters, e.g. for
names in your personal telephone directory. The letters are printed on the
digit keys. Your telephone will automatically switch to the input of letters
and characters when this is required. The table of characters on Page 70
indicates which character404s you may enter.
Example: Entering the name “JOHN”:
Press the JKL button once. J appears in the display. Wait briefly.
Press the MNO button three times. JO appears in the
display. Wait briefly.
Press the GHI button twice. JOH appears in the display. Wait
briefly.
Press the MNO button twice. JOHN appears in the display.
Wait briefly.
Ending input
Press the right softkey twice. The characters are accepted.
Correcting characters
Press the left softkey.
Deleting the line
Press the left softkey for a long period.
i
To switch between upper and lower case letters: Press the key for a long
period.
The table of characters on P. 70 shows the lower case letters in the
second line.
14
The functions
Integral 3
Telephoning in the usual manner
Internal Calls: Dial the internal call number required. External Calls: Dial the
outside line code, (usually 9) followed by the external number required.
Making a call
Lift the handset.
Dial the call number, e.g. 1276.
Ending a call
Replace the handset.
Accepting a call
Your handset rings.
Lift the handset.
Redialling
Lift the handset.
Press the redial button.
i
If you have received a message, this will appear briefly in the display after
replacing the handset. Messages, refer to P. 32.
15
The functions
Integral 3
Telephoning in the usual manner
Continued
Specific redialling
With specific redialling, the dialled number is specifically stored in the
redialling memory even if you continue to make further calls.
The redial button will then retrieve the stored number.
You have made a connection. Do not hang up.
Press the redial button. The number is then sent to the redialling
memory.
Replace the handset.
Telephoning via a specific line bundle
Menu Dial assist
Menu Line group
Select the line group, e.g. Line group 1
Confirm.
Dial the call number, e.g. 012345.
The Specific redialling feature must have been enabled.
16
i
The functions
Integral 3
Telephoning in the usual manner
Continued
Private telephoning
Menu Dial assist
Menu Priv.line group
Confirm.
Dial the call number, e.g. 012345.
17
The functions
Integral 3
Callback
If the internal call partner who you wish to call does not answer or is busy,
you may activate an automatic callback. You will be informed when a busy
subscriber becomes free and/or when a subscriber who did not answer has
made a call.
Activating a callback
The subscriber is busy.
Menu Dialing options
Menu Callback
Confirm.
Callback appears briefly in the display.
Replace the handset.
Your telephone will ring when the desired subscriber becomes free.
Lift the handset. The connection is made.
Cancelling a callback
Press the # key, followed by 66.
Callback off appears briefly in the display.
i
If you lift the handset after a certain time, the callback will be cancelled.
This waiting period is set in the system.
18
The functions
Integral 3
Consultation call and call forwarding
When you are making an external call, you may mute the handset and
subsequently hold private consultation with someone in the room or an
internal subscriber. Your call partner, who is left waiting on the line, cannot
hear this consultation. It is also possible to forward the caller to an internal
or external subscriber.
Consulting with an internal subscriber
You are speaking on the telephone.
Switch to consultation by pressing the R button. Your call partner can
no longer hear you.
Enter the internal call number of the desired
subscriber, e.g. 7654.
You are connected. Your initial call partner is left waiting.
Ending consultation and returning to the first call
End consultation by pressing the R button.
You are now reconnected to the initial call partner.
19
The functions
Integral 3
Consultation call and call forwarding
Continued
Transferring a caller
You are speaking on the telephone.
Switch to consultation by pressing the R button.
Dial the number of the desired subscriber,
e.g. 7654.
Announce the call.
Replace the handset.
Your first call partner is now connected to your second call partner. Your
line is now free.
i
An external – external forward must be enabled by the Bosch Service.
You may forward the caller directly, or wait until he lifts the handset. In the
event that the internal subscriber does not answer the call, the call will be
returned to you in a short time.
You may also provide an external forward for an external subscriber.
However, this is only possible if the first external subscriber is also the
caller.
An external – external forward seizes two exchange lines!
20
Integral 3
The functions
Second call during a conversation
If a second external caller attempts to contact you while you are
telephoning, you will hear an acoustic signal. If you wish to do so, you may
end the current call and accept the second call. You may also choose to
ignore the second call.
This function must be enabled within your telephone system.
Accepting a second call
You are speaking on the telephone. You hear a quiet ringing tone.
Replace the handset. The second call is still waiting.
Lift the handset. You are connected to the second caller.
The second caller hears a ringback signal.
i
If the second call originates from a digital line and you do not answer the
call, it will be placed in the call list.
21
The functions
Integral 3
Abbreviated dialling
Within your telephone system, frequently used call numbers are stored
centrally under specific code numbers. You may dial one of these numbers
by entering the respective code number. (If you wish to specify additional
call numbers, please contact the Bosch Service.)
Lift the handset.
Press the shift key, followed by the abbreviated code dialling key.
Enter a three-digit code number, e.g. 900.
i
You may supplement the stored call number using the digit keys (post
dialling).
22
The functions
Integral 3
Local telephone directory
You may store up to 50 numbers. These numbers are not stored in the
telephone system, but locally in your handset.
Searching for an entry using the arrow keys
Menu Dial assist
Menu Local tel. dir.
Menu Search
Confirm.
Search for the entry, e.g. Claes
Lift the handset.
Searching for an entry by entering the first letter
Menu Dial assist
Menu Local tel. dir.
Menu Search
Confirm.
Enter the first letter, e.g. C. The first entry that starts with
C appears in the display, e.g. Carl .
Search for the entry, e.g. Claes
Lift the handset.
23
The functions
Integral 3
Local telephone directory
Continued
New entry
Menu Dial assist
Menu Local tel. dir.
Menu New entry
Confirm.
Enter the number (up to 24 digits), e.g. 7654.
Confirm.
... Enter the name (up to 16 characters). How to do this is explained
on P. 14.
Confirm. entry save? appears in the display.
Confirm.
24
The functions
Integral 3
Local telephone directory
Continued
Changing an entry
Menu Dial assist
Menu Local tel. dir.
Menu Edit
Confirm. Search for the entry, e.g. Claes
Confirm.
Change the number, e.g. 7654 (up to 24 digits).
Confirm.
... Change the name (up to 16 characters). How to do this is
explained on P. 14.
Confirm. entry change? appears in the display.
Confirm.
25
The functions
Integral 3
Local telephone directory
Continued
Deleting an individual entry
Menu Dial assist
Menu Local tel. dir.
Menu Clear entry
Confirm. Search for the entry, e.g. Claes
Confirm. delete? appears in the display.
Confirm.
Deleting all entries
Menu Dial assist
Menu Local tel. dir.
Menu Clear all
Confirm.
Enter the PIN, e.g. 7654 (refer to Page 50).
Confirm. Really delete all entries? appears in the display.
Confirm.
26
The functions
Integral 3
Local telephone directory
Continued
Querying the free capacity
Menu Dial assist
Menu Local tel. dir.
Menu Capacity
Confirm. The following appears in the display, e.g.: Positions: 50
incl. free: 45 .
27
The functions
Integral 3
Central telephone directory
The names and call numbers of important call partners are stored within
your telephone system. You may dial these numbers at any time.
Rapid search for an entry
Press the shift key.
Enter the first letter, e.g. C. The first entry that starts with
C appears in the display, e.g. Carl .
Search for the entry, e.g. Claes
Lift the handset.
Scrolling forward
Per name using the # key.
Per first letter using the shift and # keys.
Scrolling back
Per name using the star key.
Per first letter using the shift and star keys.
Dialling the displayed call number
Lift the handset.
Dialling the displayed call number in consultation
Press the shift key, followed by the abbreviated code dialling key.
Cancelling
Clear down button.
i
The central telephone directory must be set up within your system.
28
The functions
Integral 3
Central telephone directory
Continued
Searching for an entry via the menu
Menu Dial assist
Menu Centr. tel. dir.
Confirm.
Press the shift key.
Enter the first letter, e.g. C. The first entry that starts
with C appears in the display, e.g. Carl .
Press the shift key.
Enter the next letter, e.g. L. The first entry that starts
with CL appears in the display, e.g. Claes .
Enter further letters if required.
Scroll to the desired entry, e.g. Clee
Lift the handset.
29
The functions
Integral 3
Call list
If a caller cannot reach you, his ISDN call number will be entered in a call
list. When you switch on your handset or end a call, a corresponding
message will appear briefly in the display.
Viewing and dialling the call numbers
The following appears in the display: Call list .
Press the shift key, followed by the call list key.
The first caller in the list appears in the display, e.g. 069194193 .
Scrolling
Use the # key to scroll.
Dialling the displayed number
Lift the handset.
Dialling the displayed number in consultation
Press the shift key, followed by the abbreviated code dialling key.
This function must be set up within your telephone system.
i
Internal callers in the list are identified by a preceding I and are entered
with their direct inward dialling number or name.
Up to ten entries can be stored in the call list.
Subscribers with an analog connection or activated call suppression will not
be entered.
If you have returned a call to a subscriber from the call list, the respective
entry will be deleted automatically.
30
Integral 3
Call list
The functions
Continued
Cancelling
Use the left softkey to cancel.
Clearing individual call numbers from the call list
The following appears in the display: Call list .
Press the shift key, followed by the call list key. The first caller in
the list appears in the display, e.g. 069194193 .
Use the # key to scroll.
Use the 0 key to delete.
31
The functions
Integral 3
Messages
You may receive messages. The message will appear briefly in the display
subsequent to receipt and after each telephone conversation. The message
can be cleared once you have read it.
Receiving a message
A message appears briefly in the display, e.g. Meeting 14:30 .
Clearing a message
Press the # key, followed by 67. The display is in basic
status.
32
The functions
Integral 3
Suppression of call number display
If you do not wish to inform an external call partner of your call number, you
may prevent your call number from being indicated in the call partner’s
display.
Suppressing the display of your own call number
Menu Dialing options
Menu Rem. No. displ. on
Confirm.
The following appears briefly in the display: Rem. No. displ. off
When making your next telephone call, your call number will not be
indicated in the call partner’s display.
Reactivating the display of your own call number
Menu Dialing options
Menu Rem. No. displ.
Confirm.
The following appears briefly in the display: Rem. No. displ. on
The call number suppression must be enabled at the exchange.
i
After a call, the display of your call number will be reactivated
automatically.
33
The functions
Integral 3
Follow me (to the handset)
You may have calls diverted to you from a connection in your telephone
system. Your handset must be within range of the telephone system. You
may set up several call diversions one after the other to your handset.
Diverting calls
Press the shift key, followed by the follow me key. The following
appears in the display: Call div. from
Press the 1 key.
Enter the number from which you wish to divert calls, e.g. 27.
The following appears briefly in the display: Call div. from 27 - or
Call div. from Carl - . All calls for the specified call number will be
diverted to you.
Delayed call diversion
Press the shift key, followed by the follow me key. The following
appears in the display: Call div. from
Press the 2 key.
Enter the number from which you wish to divert calls, e.g. 27.
The following appears briefly in the display: Call div. from 27 - or
Call div. from Carl - . All calls for the specified call number will be
diverted to you.
i
The message “Call div. from 27” will only appear in the display if no entry is
available in the call list. If entries are stored in the call list, the message
“Call list” will appear in the display.
34
The functions
Integral 3
Follow me (to the handset)
Continued
Call diversion when busy
Press the shift key, followed by the follow me key.
Call div. from appears in the display.
Press the 3 key.
Enter the number from which you wish to divert calls, e.g. 27.
Call div. from 27 - or Call div. from Carl - appears briefly in
the display. All calls for the specified call number will be diverted to you.
Viewing a call diversion
When in basic status, you may check whether you have set up a call
diversion.
Press the star key and the left softkey.
The current call diversion appears briefly in the display. e.g.:
Call div. from 27 - .
Cancelling all call diversions
Press the shift key, follow me key and #.
Call div. from off appears briefly in the display.
35
The functions
Integral 3
Call diversion
You may divert all calls from your handset to another connection in your
telephone system. The handset must be within range of the system.
Call diversion
Menu Addit. services
Menu Call diversion
Menu Call div. to
Confirm.
Press the 1 key.
Enter the call diversion destination, e.g. 24.
Delayed call diversion
Menu Addit. services
Menu Call diversion
Menu Call div. to
Confirm.
Press the 2 key.
Enter the call diversion destination, e.g. 24.
36
The functions
Integral 3
Call diversion
Continued
Call diversion when busy
Menu Addit. services
Menu Call diversion
Menu Call div. to
Confirm.
Press the 3 key.
Enter the call diversion destination, e.g. 24.
Viewing a call diversion
Press the star key and the left softkey. The following appears
briefly in the display, e.g.: Call div. to 24 .
Cancelling a call diversion
Menu Addit. services
Menu Call diversion
Menu Clear
Confirm.
37
The functions
Integral 3
Call forwarding
You may forward an external call from your handset to another connection
that is programmed in the telephone system (call forward position). This
function must be set up by the Bosch Service.
Forwarding a call
Your handset rings.
Menu Addit. services
Menu Call diversion
Menu Call forwarding
Confirm. Call forwarding appears briefly in the display.
38
The functions
Integral 3
Announcement
You may make an announcement from your handset to a connection within
your telephone system. It is not possible to make an announcement to
another handset.
Making an announcement
Lift the handset.
Dial the call number, e.g. 1276.
Menu Dial assist
Menu Announcement
Confirm.
Announcement appears in the display. Speak now.
Ending the announcement
Replace the handset.
i
You will not be able to direct an announcement at a subscriber if he is busy.
This function must be enabled within your telephone system. Please
contact the Bosch Telecom Service if you require further information.
39
The functions
Integral 3
Pick-up
From your handset, you may retrieve (pick up) calls from other subscribers
of your telephone system.
Retrieving a call (pick-up)
Another telephone rings.
Lift the handset.
Menu Pick up calls
Menu Pick up
Confirm.
Enter the call number of the subscriber whose call you wish to
retrieve (pick up), e.g. 27.
You are connected.
If you have picked up an internal call, the number or name of the
subscriber will appear in the display.
i
If you have picked up an external call, the number or name of the line will
appear in the display.
40
The functions
Integral 3
Accepting calls from ringing lines
Accepting a ringing line
You hear an external call at another telephone.
Lift the handset.
Menu Pick up calls
Menu Seize ring. line
Confirm.
The name of the line or the number and/or name of the caller appears
in the display. You are connected.
41
The functions
Integral 3
DTMF Post dialling
You may switch over to DTMF post dialling whilst telephoning. Each press
of a button is transmitted as a tone, thus enabling the remote control of an
answering machine, for example.
DTMF on
You are speaking on the telephone.
Menu Conversation
Menu Tone PD (DTMF)
Confirm.
appears in the display. Make subsequent dialling. Each digit is
transmitted as a tone.
DTMF will be automatically reset when a conversation is ended.
42
i
The functions
Integral 3
Call charge display
You may view the charges incurred by the last external call.
Viewing the charges
Menu Addit. services
Menu Charges
Confirm.
The charges incurred by the last call appear in the display, e.g. Pnd 1.68
Call charge display off
Press the left softkey.
43
The functions
Integral 3
Muting the microphone
You may switch off the microphone on your handset whilst telephoning. The
handset remains switched on. Your call partner cannot hear you, but you
can hear him.
Muting the microphone
You are speaking on the telephone.
Switch off the microphone.
appears in the display.
Reactivating the microphone
The microphone is off.
appears in the display.
Switch on the microphone. You may continue telephoning.
i
If you end a call with the microphone muted, the microphone will be
automatically reactivated when commencing the next call.
44
The functions
Integral 3
Setting the handset
You may make the handset settings when in basic status.
Acoustics
Menu Set telephone
Menu Set acoustics
Confirm.
Make the desired ringing setting, e.g. Ringing tone . You may
choose between the ringing tone, vibrating, both, brief ringing tone or mute.
Confirm.
Press the left softkey for a long period to return to basic status.
Ringing volume
Press the programming button, followed by 1. The telephone
rings.
Use the star key to increase the ringing volume.
Use the # key to decrease the ringing volume.
Confirm.
i
A vibrating battery (special accessory) is required for the vibrating ringing
signal.
45
The functions
Setting the handset
Integral 3
Continued
Ringing sound pattern
Press the programming button, followed by 1. The telephone
rings.
Select a melody by entering a digit (0-9), e.g. 3.
Confirm.
Menu Set telephone
Menu Key beep
Select the key beep, e.g. Click . You may choose between click,
tone and off.
Confirm.
Handset volume
Menu Set telephone
Menu Handset volume
Confirm.
Enter the handset volume (from 1 to 4), e.g. 3.
Confirm.
46
The functions
Integral 3
Setting the handset
Continued
Temporarily adjusting the handset volume during conversation
You are speaking on the telephone.
Press the volume buttons on the side of the handset housing.
The set volume remains effective for the current conversation. The preset
handset volume will subsequently be reactivated.
Permanently setting the handset volume during conversation
You are speaking on the telephone.
Press the volume buttons on the side of the handset housing.
Press the right softkey.
Lighting
Menu Set telephone
Menu Lighting
Select the type of lighting, e.g. off . You may choose between
off and automatic (lighting is switched on automatically when the handset is
used).
Confirm.
47
The functions
Integral 3
Setting the handset
Continued
Reset
Performing a reset has the effect of returning some settings to their original
status when delivered: Handset PIN, key tone, handset volume, display
lighting. – The PIN must be entered for this purpose.
Menu Set telephone
Menu Reset
Confirm.
Enter the PIN, e.g. 2345.
Confirm. Really Reset? appears in the display.
Confirm.
i
When you receive your handset, the PIN is set to 0000. Refer to Page 50
for more information about the PIN.
48
The functions
Integral 3
Emergency call
When your handset is locked, the only function that can be used is that of
the emergency call number. The following appears in the display above the
right softkey: SOS.
Setting up and changing emergency call numbers
Menu Set telephone
Menu Emergency No.
Confirm.
Enter the PIN, e.g. 2345.
Confirm.
Enter the emergency call number, e.g. 6666.
Confirm.
Press the left softkey for a long period to return to basic status.
Making an emergency call
The handset is locked. SOS appears in the display above the right softkey.
Press the right softkey. The emergency call number appears in the
display, e.g. 6666?
Confirm. The emergency call number is dialled.
i
In order to delete an emergency call number, you must change the number.
Do not enter anything as the telephone number (press the left softkey for a
long period) and confirm using the right softkey.
49
The functions
Integral 3
Personal Identification Number (PIN)
Important settings and functions of your handset are safeguarded by
means of a four-digit Personal Identification Number (PIN). You may
change the PIN. The PIN also enables you to lock your handset.
PIN
Menu Lock
Menu Create PIN
Confirm.
Enter the old PIN. (When delivered, this is set to
0000). The digits do not appear in the display.
Confirm.
Enter the new PIN, e.g. 2345. The digits do not
appear in the display.
Confirm.
Repeat the new PIN. The digits do not appear in
the display.
Confirm.
Press the left softkey for a long period to return to basic status.
i
Take good note of your PIN! If you forget the PIN, an adjustment inside the
telephone will be necessary. Contact the Bosch Service in this case.
50
The functions
Integral 3
Locking the handset
Lock
Menu Lock
Menu Lock
Confirm.
appears in the display.
Unlocking
The handset is locked.
appears in the display.
Press any key, e.g. the right softkey.
Enter PIN appears in the display.
Enter the PIN, e.g. 2345. The PIN does not
appear in the display.
Confirm.
i
All functions are blocked when the handset is locked. Only the emergency
call feature will work (P. 49).
51
The functions
Locking the handset
Keyboard lock via the menu
Menu Set telephone
Menu Keyb. lock
Confirm.
Keyboard lock via the keys
Lock.
Unlocking the keyboard
The keyboard is locked.
Unlock.
52
Integral 3
Continued
The functions
Integral 3
Language
Determining the language of the local menu
Menu Set telephone
Menu Language
Language English selecting.
Confirm.
Press the left softkey for a long period to return to basic status.
i
You do not need to set the language of the system. This is already
configured.
53
The functions
Integral 3
Self-assignment
In the event that the Bosch Service has set up your handset as the night
station for a central office, calls will only arrive at your handset when the
night service of the central office has been activated. If you wish to be able
to receive these calls at all times, you must activate a self-assignment.
Activating a self-assignment
Menu Addit. services
Menu Own allocation
Confirm.
Own allocation appears briefly in the display.
Viewing a self-assignment
Press the star key and the left softkey.
Deactivating a self-assignment
Menu Addit. services
Menu Own allocation
Confirm. Own allocation off appears briefly in the display.
54
The functions
Integral 3
Self-assignment and call diversion off
If you have activated a self-assignment and a call diversion, you may
deactivate both by entering a digit code.
Deactivating self-assignment and call diversion
Press the star key, followed by 99.
The following appears briefly in the display: Own allocation off
and e.g. Call div. to 24 off
55
The functions
Integral 3
Opening the door from the handset
Menu Dialing options
Menu Door opener
Confirm.
This function must be set up by the Bosch Service.
56
i
The functions
Integral 3
Associated subscriber
The Bosch Service can set up a telephone in your system as an associated
subscriber, e.g. for an executive/secretary circuit. Some of the related
functions are particularly convenient.
Calling the associated subscriber
Menu Partner funct.
Menu Ringing
Confirm.
Call diversion to associated subscriber
Menu Partner funct.
Menu Call div. to
Confirm.
The following appears in the display, e.g.: Call div. to 24
Viewing a call diversion to the associated subscriber
Press the star key and the left softkey.
The following appears in the display, e.g.: Call div. to 24
i
If entries are present in the call list, these have priority. Call list will then
appear in the display instead of call diversion, for example.
57
The functions
Associated subscriber
Integral 3
Continued
Call diversion from associated subscriber
Menu Partner funct.
Menu Call div. from
Confirm.
The following appears briefly in the display, e.g.: Call div. from 24
Announcement to associated subscriber
Menu Partner funct.
Menu Announcement
Confirm.
Lift the handset.
Announcement appears in the display. Speak now.
Ending the announcement to the associated subscriber
Replace the handset.
i
The message “Call div. from 24” will only appear in the display if no entry is
available in the call list. If entries are stored in the call list, the message
“Call list” will appear in the display.
You will not be able to direct an announcement at a subscriber if his
internal line is busy.
58
The functions
Integral 3
Associated subscriber
Continued
Retrieve calls (pick up) from associated subscriber
The telephone of the associated subscriber rings.
Lift the handset.
Menu Partner funct.
Menu Pick up
Confirm.
Clearing a self-assignment from the associated subscriber
Menu Partner funct.
Menu Clear own all.
Confirm.
59
The functions
Integral 3
Subscriber group
The Bosch Service can combine several telephones in your system to form
a subscriber group. Some of the functions within the group are particularly
convenient.
Calling the subscriber group
If you call a subscriber group, all sets of this group will ring. You are
connected when one of the subscribers in this group lifts his handset.
Lift the handset.
Menu Dial assist
Menu Intern.grp.call
Confirm.
Select the subscriber group that you wish to call, e.g. Group 1 .
Confirm.
You may be part of up to eight partner groups.
60
i
The functions
Integral 3
Subscriber group
Continued
Announcement to subscriber group
Lift the handset.
Menu Dial assist
Menu Group announcem
Confirm.
Select the subscriber group to which you wish to make an
announcement, e.g. Group 1 .
Confirm.
Group 1 Announcement appears in the display. Speak now.
Ending the announcement
Replace the handset.
i
If a sucbscriber of the dialled subscriber group is busy, he will not receive
the announcement.
61
The functions
Subscriber group
Retrieving calls (pick up) from subscriber group
Lift the handset.
Menu Pick up calls
Menu Pick up group
Confirm.
Select the subscriber group, e.g. Group 1 .
Confirm.
You are connected.
62
Integral 3
Continued
The functions
Integral 3
Using the handset in another system
Your handset can be logged on to several systems. It features several
system entries for this purpose. You may change the name of these entries.
Selecting the system
Menu System
Menu Select system
Confirm. Select the system, e.g. System 4
Confirm.
Press the left softkey for a long period to return to basic status.
Changing the system name
Menu System
Menu Change name
Confirm. Select the system, e.g. System 4
Confirm.
... Change the name (up to 14 characters), e.g. West Site
Confirm.
Press the left softkey for a long period to return to basic status.
i
To be able to log on, the handset must be within range of the telephone
system.
63
The functions
Using the handset in another system
Integral 3
Continued
Checking the software version
Menu System
Menu Software version
Confirm. 9.71/26.03.00 , for example, appears in the display.
Press the left softkey for a long period to return to basic status.
64
Anhang
Integral 3
Codes for your handset
Code
Function
15 x Group announcement to group x
16 x Internal call to group x
17 x Retrieve (pick up) calls from group x
32 Retrieve (pick up) external calls
34 Retrieve (pick up) from an internal subscriber
40 Open door 1 during conversation
41 Open door 2 during conversation
42 Open door 1
43 Open door 2
46 Call charge display for last call
64 Self-assignment
66 Automatic callback
67 Clear messages
69 Call forwarding
701 Call diversion from
702 Delayed call diversion from
703 Call diversion when busy
711 Call diversion to internal subscriber
712 Delayed call diversion to internal subscriber
713 Call diversion to internal subscriber when busy
79 Suppressing the display of your own call number
80 Announcement to internal subscriber
82 Announcement to associated subscriber
83 Call diversion from associated subscriber
84 Call diversion to associated subscriber
85 Retrieve calls (pick up) from associated subscriber
89 Clear self-assignment for the associated subscriber
99 Clear self-assignment and call diversion
159 Transfer external caller to external subscriber
65
Appendix
Integral 3
Further information about your telephone
Service, installation and maintenance
Do not unscrew the telephone housing. Repairs and adjustments are the
exclusive domain of a qualified technician.
Your telephone is designed for use in standard operating conditions.
Contemporary items of furniture are coated with a great variety of varnishes
and plastics, and treated with various varnish preservation agents. For this
reason, it cannot be ruled out that some of these substances contain
components that can attack and soften the plastic feet of your charger. The
unit feet that have been altered by these foreign substances may, in certain
circumstances, leave unpleasant marks on the surface of the furniture.
Understandably, Bosch cannot be liable for such damage. You are
therefore advised to use an antiskid surface for your charger, in particular
with new furniture or furniture that has been refreshed using varnish
preservation agents.
When required, wipe your telephone with a slightly damp or antistatic cloth.
Do not use a dry cloth, as this could lead to malfunctions. Never use polish
or abrasive cleaning agents.
If you have any further questions or problems, please contact your
specialist dealer or the Bosch Service.
Weathering
Protect your handset against dampness, direct sunlight and extremely low
temperatures.
Avoid sudden transitions from cold to warm conditions. Otherwise
condensation will form on the handset.
Protect your handset against sprayed water and the intense accumulation
of dust or dirt.
When using the handset in extreme weathering conditions, please use the
carrying case (special accessory).
66
Appendix
Integral 3
Further information about your telephone
Continued
Authorization and CE certification
The telephone has been authorized by the regulating authorities for
telecommunication and post (Reg TP). This telephone is designed for
connection to Bosch telecommunications systems only. Only when
connected to Bosch telecommunications systems does this telephone
comply with the European regulations for electrical safety and
electromagnetic compatibility.
This telephone meets the requirements of the following EU
directives:
89/336/EEC
“Electromagnetic compatibility”
73/23/EEC
“Electrical equipment designed for use within
certain voltage limits”
This device operates in accordance with the DECT system with a frequency
range of 1880 to 1900 MHz. The allocation of this frequency range in the
frequency utilization plan is valid for an initial period of 10 years and will be
extended in accordance with European harmonization.
67
Appendix
Further information about your telephone
Integral 3
Continued
Consumer information about returning and disposing of used batteries
and accumulators pursuant to the BattV battery ordinance from 27.3.1998
Dear Customer,
This device / power supply unit is fitted with permanently installed batteries
or accumulators which contain harmful substances.
The type of harmful substance can be identified by the chemical symbol
that appears on the crossed-out garbage can in the device, accumulator or
battery label.
In accordance with the battery ordinance, you are required as the
consumer to return the device / power supply unit to us for the purpose of
removing or replacing the batteries or accumulators. This enables us to
dispose of the energy sources containing the harmful substances in the
appropriate manner. Our address:
Bosch Telecom GmbH
Produktbereich Private Netze
Funkruf-Reparaturzentrum
John-F.-Kennedy-Straße 43-53
D-38228 Salzgitter
In the exceptional event that you have the batteries or accumulators
replaced by your own qualified employees, you are obliged to ensure
proper disposal of the energy sources containing the harmful substances
by returning them either to us or an appropriate collection point.
Yours, Bosch Telecom GmbH
68
Appendix
Integral 3
Specifications
Standard: DECT (Digital Enhanced Cordless
Telecommunications).
Dimensions: 143 x 50 x 22.5 mm
Weight, handset: Approx. 115 g (with standard battery pack)
Battery type: Li-Ion; 600 mAh
Operating time for handset Conversation:
(with full battery): Stand-by:
Up to 10 hours
Up to 70 hours
Charging time: Max. 8 hours
Frequency range: 1.88 – 1.9 GHz
Transmitting power: Medium: 10 mW, Peak: 250 mW
Permissible operating Handset: –10 °C to +45 °C
temperature: Charger: +5 °C to +40 °C
Storage temperature: –5 °C to +45 °C
Transport temperature: –25 °C to +70 °C
Protection category: IP 40
Accessories: Charger
Standard battery pack
Vibrating battery pack
Clip
HSG30-DECT Combined handset / headset
Carrying case
Some of the listed accessories must be ordered separately!
i
69
Appendix
Integral 3
Table of characters
The digit keys may also be used to enter letters and numbers, e.g. for
names in the local telephone directory. Your telephone will automatically
switch to the input of letters when this is required.
The second line shows you the lower case letters. How to enter the
characters is explained on Page 14.
Key
Character
Space character . ? ! , & : ” ( ) ‘ % £ $ 1
ABCÄÅÀÆÇ2
abcäåàæç2
DEFÉÈ3
deféè3
GHIÌ4
ghiì4
JKL5
jkl5
MNOÑØÖ6
mnoñøö6
PQRSß7
pqrsß7
TUVÜÙ8
tuvüù8
WXYZ9
wxyz9
+–x*/=><#0
70
Integral 3
Appendix
Index
Abbreviated dialling, 22
Accepting calls, line, 41
Acoustics, 45
Announcement, 39
associated subscriber, 58
subscriber group, 61
Associated subscriber, 57
Basic rules, 12
entering characters, 14
selecting a menu option, 13
Battery
charging, 2
disposal, 68
operating, 2
removing, 8
Call
accepting, 15
second, 21
to an associated subscriber, 57
subscriber group, 60
Call charge display, 43
Call diversion, 36
off, 37, 55
associated subscriber, 57
Call diversion from, 34
associated subscriber, 58
Call forwarding, 20, 38
Call list, 30
Call number display, suppression,
33
Callback, 18
Characters
entering, 14
table, 70
Charger, placement, 8
Clip, 10
Codes, 65
Commissioning, 8
Consultation call, 19
Dialling, telephone directory, 23, 28
Display, 6
lighting, 47
Display contents, 6
DTMF Post dialling, 42
Emergency call, 49
Follow me, 34
See also Call diversion from
associated subscriber, 58
Handset
operating, 8
locking, 51
reset, 48
setting, 45
switching on and off, 12
volume, 46
Information, 2, 66
Keys
keyboard lock, 52
table of characters, 70
Language, local, 53
Lighting, 47
line, accepting calls, 41
71
Appendix
Index
Lock, 51
Locking, 51
Menu, selecting, 13
Messages, 32
Microphone, mute, 44
Mute, 44
Opening the door, 56
Operating time, 69
Overview, 5
Personal Identification Number, 50
Pick up
associated subscriber, 59
subscriber group, 62
Pick-up, 40
PIN, 50
See also Personal Identification
Number
Redialling, 15
Replacement battery, 9
Reset, 48
Ringing
sound pattern, 46
volume, 45
Second call, 21
72
Integral 3
Continued
Self-assignment, 54
associated subscriber, 59
off, 54, 55
Software version, 64
SOS, 49
See also Emergency call
Specifications, 69
technical, 69
Subscriber, associated, 57
Subscriber group, 60
Symbols, 6
System, 63
Telephone directory
central, 28
local, 23
Telephoning, 15
Version, software, 64
Vibra battery, 9
Vibrating, 45
See also Acoustics
Volume
headset, 46
ringing, 45
Robert Bosch
Industriale e Commerciale S.p.A.
Italy
Via M. A. Colonna 35
I-20149 Milano
Telephone +39-02-3 69 61
Fax +39-02-3 69 68 05
N.V. Robert Bosch S.A., Belgium
Rue Henri Genesse 1
B-1070 Bruxelles
Telephone +32-2-5 25 51 11
Fax +32-2-5 25 50 00
Robert Bosch AG
Kommunikationstechnik
Switzerland
Hohlstrasse 188
CH-8004 Zürich
Telephone +41-1-297-72 72
Fax +41-1-297-72 18
Robert Bosch España SA
Ventas Telecomunicación
Carretera N-VI, KM 18,150
E-28230 Las Rozas (Madrid)
Telephone +34-91-6312 400
Fax +34-91-6312 486
Bosch Télécom S.A., France
Bureaux du Parc
36–38 Rue de la Princesse
F-78430 Louveciennes, Paris
Telephone +33-1-30 82 30 82
Fax +33-1-30 82 30 30
Bosch Telecom Ltd., Great Britain
Broadwater Park
North Orbital Road
Denham, Uxbridge, Middx. UB9 5HJ
Telephone +44 18 95 878 000
Fax +44 18 95 838 835
Bosch Telecom GmbH
Produktbereich Private Netze
Kleyerstraße 94
D-60326 Frankfurt/Main
http://www.bosch-telecom.de
e-mail: [email protected]
4.998.067.328 · E5 · –/–/08.99. · Printed in Germany · Subject to modifications.
Robert Bosch AG
Geschäftsbereich
Kommunikationstechnik, Austria
Hietzinger Kai 139
A-1131 Wien
Telephone +43-1-8 78 70
Fax +43-1-8 78 70-73 70