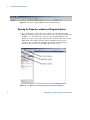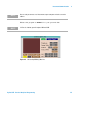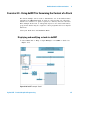
1
Agilent VEE
Practical Graphical
Programming
Agilent Technologies
Notices
© Agilent Technologies, Inc. 2008
Warranty
No part of this manual may be reproduced in
any form or by any means (including electronic storage and retrieval or translation
into a foreign language) without prior agreement and written consent from Agilent
Technologies, Inc. as governed by United
States and international copyright laws.
The material contained in this document is provided “as is,” and is subject to being changed, without notice,
in future editions. Further, to the maximum extent permitted by applicable
law, Agilent disclaims all warranties,
either express or implied, with regard
to this manual and any information
contained herein, including but not
limited to the implied warranties of
merchantability and fitness for a particular purpose. Agilent shall not be
liable for errors or for incidental or
consequential damages in connection with the furnishing, use, or performance of this document or of any
information contained herein. Should
Agilent and the user have a separate
written agreement with warranty
terms covering the material in this
document that conflict with these
terms, the warranty terms in the separate agreement shall control.
Part Number
W1141- 90038
Edition
First Edition, March 2008
Printed in Malaysia
Agilent Technologies, Inc.
3501 Stevens Creek Blvd.
Santa Clara, CA 95052 USA
Microsoft ® is a U.S. registered trademark
of Microsoft Corporation.
Software Revision
This guide is valid for A.01.xx revisions of
the Agilent VEE Product Name Variable
software, where xx refers to minor revisions
of the software that do not affect the technical accuracy of this guide.
Safety Notices
Technology Licenses
The hardware and/or software described in
this document are furnished under a license
and may be used or copied only in accordance with the terms of such license.
Restricted Rights Legend
U.S. Government Restricted Rights. Software and technical data rights granted to
the federal government include only those
rights customarily provided to end user customers. Agilent provides this customary
commercial license in Software and technical data pursuant to FAR 12.211 (Technical
Data) and 12.212 (Computer Software) and,
for the Department of Defense, DFARS
252.227-7015 (Technical Data - Commercial
Items) and DFARS 227.7202-3 (Rights in
Commercial Computer Software or Computer Software Documentation).
CAU TI O N
A CAUTION notice denotes a hazard. It calls attention to an operating procedure, practice, or the like
that, if not correctly performed or
adhered to, could result in damage
to the product or loss of important
data. Do not proceed beyond a
CAUTION notice until the indicated
conditions are fully understood and
met.
WA RN ING
A WARNING notice denotes a
hazard. It calls attention to an
operating procedure, practice, or
the like that, if not correctly performed or adhered to, could result
in personal injury or death. Do not
proceed beyond a WARNING
notice until the indicated conditions are fully understood and
met.
Agilent VEE - Practical Graphical Programming
In This Guide…
This guide introduces you to the fundamentals of Agilent
Visual Engineering Environment (VEE Pro), along with some
complex examples
1
The VEE Pro 8 Fundamentals
This chapter explores the fundamentals of VEE Pro 8. It
consists of an explanation of Mouse use and navigation of
tool bars and menus. The final two exercises show how to
develop a noisy waveform and the generation of random
numbers. It includes four exercises.
2
Instrument Communication
This chapter will examine the configuration of GPIB
instruments with a Panel Driver and Direct I/O. ActiveX was
called and the Internet was accessed to integrate equipment
via LAN, RS- 232, and USB communications. This unit
consists of four exercises.
3
Instrument Controls
This chapter will examine how to select and configure an
instrument driver and simulate how to set up and measure
temperature using a thermocouple. It will also demonstrate
how to interact with equipment using direct I/O and how to
set up National Instrument drivers in VEE Pro.
4
DotNet Control and Communications
This chapter uses four dotNET and dotNET control examples
to demonstrate the flexibility of a multitude of dotNET
applications and how to use them to enhance your VEE
applications.
5
Record Manipulation
This chapter will examine techniques for building and
unbuilding records in conjunction with the Get Field and Set
Field Objects. This unit contains four exercises.
Agilent VEE - Practical Graphical Programming
vii
6
The Virtual Vehicle Radiator
This chapter develops a virtual thermometer that displays
temperature and a Vehicle Radiator that displays
temperature and pressure changes. The final two exercises
demonstrate how data are monitored and logged for a
Vehicle Radiator. This unit consists of four exercises.
7
Program Preparation and Testing
This chapter will develop a pulse program and show you
how to add, restrict, vary, and change parameters. Use of
the To File is also included in an exercise. You will learn
how to develop an Operator Interface, build in more than
one statistic in a Formula Object, and calculate the statistics
of waveforms.
8
Test Data Analysis and Display
This chapter will examine how to write mathematical
expressions in VEE Pro, how to use a Formula Object with
instructions, how to combine waveforms and display both
their individual and combined waveforms; change X/Y scales,
modify the traces, add markers, and zoom in on parts of the
graphical display to interpolate between two data points,
how to use a Collector Object and math expressions to
create and display an array of data, how to use a
Concatenator Object to combine scalars and array elements
into a single array, and how to move test data to and from
files.
9
Vehicle Radiator Statistical Calculations and Presentations
This chapter will examine a variety of statistical calculations
and their presentations to indicate the flexibility of VEE Pro.
The Vehicle Radiator is used as the example upon which all
the statistical calculations are based.
10
Data Base and Operator Interface Manipulation
This chapter will examine searching and sorting data for
data base development and the use of Operator Interfaces to
access specifically desired information.
viii
Agilent VEE - Practical Graphical Programming
11
UserFunction Development
This chapter will examine the development of user functions.
UserFunctions will be called, edited, and used to monitor a
variety of statistical parameters.
12
Excel™ Spreadsheets
This chapter will examine the applications of Excel™
spreadsheets within VEE Pro. Vehicle Radiator data is then
transferred to an Excel™ spreadsheet directly, via Globals,
and then via a template. Finally, a series of sequential tests
are displayed on an Excel™ spreadsheet. The use of Excel™
enables the user to transfer data. It can also be used as a
reporting document for data analysis.
13
Microsoft Word™ Reports
This chapter will examine the ability of VEE Pro to transfer
data and diagrams to a Microsoft Word™ document.
14
VEE Pro Application Simulations
This chapter will examine three simulated devices, a
number- conversion technique, and an Agilent- supplied
telecommunications signal- measuring system.
15
Function Simulations
This chapter will examine how VEE can control and respond
to special waveforms that are both functions and relations.
It consists of five exercises.
16
Relation Simulations
This chapter will examine MATLAB®demonstrations available
within VEE Pro. It will also show how to display Vehicle
Radiator temperature and the results from a predesigned
digital filter program via MATLAB®.
Agilent VEE - Practical Graphical Programming
ix
17
VEE Pro Libraries
This chapter will examine the use of VEE Pro UserFunction
libraries. It will also show you how to import and delete
selected libraries. Finally, a program will be developed to
monitor Vehicle Radiator test limits.
18
Sequencer Usage
This chapter will examine the various options of the
Sequencer Object, how to pass data and explore global
variables via the Sequencer. The final exercise will use the
Sequencer to compare a waveform with a mask.
19
Data Logging, Storage, Selection, and Analysis
This chapter will examine the use of the Sequencer to store
and retrieve records, and monitor minimum and maximum
extremes. Finally you will learn how to use a menu to
choose which test to run next.
20
Graphical Operator Interfaces
This chapter will examine how to simulate test results
within a specified range, how to create a status panel to
provide status information regarding in- progress tests, and
how to nest UserFunctions when applying high- impact
warning signals.
x
Agilent VEE - Practical Graphical Programming
Contents
Preface ii
The VEE Pro 8 Fundamentals 1
The Mouse as Used in VEE Pro 2
Overview 3
Exercise 1.1 - The Development Screen and Its Bars 4
Opening the VEE Pro 8 program 4
Examining the title and status bars 4
Examining Menu Bar titles 5
Viewing the screen-control buttons 5
Opening the Properties Box and Program Explorer 6
Verifying the display of the Tool Bar and Status Bar 7
Viewing the Tool Bar icons 7
Examining three types of Note Pads 8
Connecting Objects in a VEE Pro 8 program 10
Running and saving a program 10
Using the Undo and Redo operations 11
Saving a program to a personal disk 12
Exercise 1.2 - Note Pads, Error Codes, and Object Views 13
Selecting and moving a Note Pad object 13
Preparing the Note Pad for entering text 13
Sizing the Note Pad and all other objects 14
Examining the use of the Note Pad via the Help menu 15
Examining error codes 15
Stopping and correcting a program 17
Changing between Open View and Iconic View 17
Agilent VEE - Practical Graphical Programming
xi
Contents
Changing internal object parameters 18
Changing the Waveform (Time) Mag scale 19
Exercise 1.3 - Generating and Displaying a Noisy Waveform 20
Devising a UserObject that will contain VEE Pro 8
interconnected objects 20
Naming terminals and pins to describe their function 21
Displaying a running program with a virtual oscilloscope 23
Noting object parameter changes in the description box and
with the red triangle 24
Selecting Properties with your mouse right button 26
Sizing an object 26
Selecting a Function and Object Browser box and creating a
formula from within it 27
Saving a program via the Menu Bar 29
Exercise 1.4 - Generating Random Numbers for Test
Development 30
Devising a random number generator 30
Applying the Collector object and accessing its Help
explanation 32
Using the Logging AlphaNumeric object to display and retain
data 32
Validating the number of data points collected 33
Determining the elapsed time to run a program 33
Demonstrating the usefulness of Show Data Flow and Show
Execution Flow buttons 34
Developing a faster random number generator 35
Summary 36
Agilent VEE Pro 8 and Hardware Connectivity
Instrument Communication 37
Overview 38
xii
Agilent VEE - Practical Graphical Programming
Contents
Exercise 2.1 - Configuring a GPIB Instrument with a Panel Driver
and Direct I/O 39
Reconfiguring an existing scope Panel Driver object 39
Exercise 2.2 - Calling Active X 44
Selecting ActiveX controls 44
Adding a control to VEE Pro 46
Exercise 2.3 - Working with the Web Browser 49
Using the Web Browser with ActiveX controls 49
Exercise 2.4 - Communicating with USB, LAN, and RS-232 51
Connecting to a USB/GPIB interface 51
Connecting to a USB networked hub 53
Summary 54
Instrument Controls 55
Overview 56
Exercise 3.1 - Selecting an Instrument 57
Configuring a virtual instrument to a real instrument 58
Exercise 3.2 - Monitoring Passive Devices 59
Installing the 34970A data acquisition switch unit 59
Configuring the interface 61
Recording temperature readings on a graph 62
Exercise 3.3 - Interacting with Equipment 65
Sending a single text command to an active instrument 65
Sending an expression list to an active instrument 66
Exercise 3.4 - Integrating National Instruments Hardware 68
Using National Instruments Data Acquisition in VEE Pro 68
Fetching/Reading Data to a scope 70
Summary 71
Agilent VEE - Practical Graphical Programming
xiii
Contents
DotNet Control and Communications 73
Overview 74
Exercise 4.1 - Applying a dotNET Date-time Example 76
Applying the dotNET DateTimeConversion program 76
Exercise 4.2 - Selecting Alternate Ways of Choosing dotNET
Files 78
Applying the OpenFileDialog class 78
Exercise 4.3 - Using dotNET Operations Builder for ListBox
Examples 81
Exercise 4.4 - Using dotNET for Examining the Content of a
Stack 85
Summary 89
Record Manipulation 91
Overview 92
Exercise 5.1 - Holding Records with Various Data Types 93
Building a record 93
Exercise 5.2 - Displaying and Extracting Field Records 98
Extracting and displaying test data with the Get Field object 98
Exercise 5.3 - Setting Record Fields 102
Altering data in a specific record field with the Set Field
object 102
Exercise 5.4 - Unbuilding a Record in a Single Step 105
Unbuilding a record in a single step 105
Summary 108
xiv
Agilent VEE - Practical Graphical Programming
Contents
Agilent VEE 8 Features and Handy Tools
The Virtual Vehicle Radiator 109
Overview 110
Exercise 6.1 - Simulating a Thermometer 111
Creating a virtual thermometer 111
Monitoring the thermometer UserObject 112
Modifying thermometer temperature-related parameters 113
Observing the effect of parameter changes to the thermometer
program 114
Exercise 6.2 - Simulating a Virtual Vehicle Radiator 115
Devising a virtual Vehicle Radiator UserObject 115
Cloning objects 117
Displaying the Vehicle Radiator outputs 118
Running Vehicle Radiator program with different
parameters 120
Exercise 6.3 - Data-Monitoring a Virtual Vehicle Radiator 121
Modifying a Note Pad description 121
Examining and interpreting a virtual scope waveform 121
Printing a VEE Pro screen 122
Monitoring the output of objects with AlphaNumeric
displays 123
Exercise 6.4 - Data-Logging a Virtual Vehicle Radiator 126
Revising Virtual Radiator monitoring program to allow data
logging of individual points 126
Including To File and From File objects to obtain one point from
an array 127
Setting To File and From File transactions 128
Examining the contents of From File 130
Summary 132
Agilent VEE - Practical Graphical Programming
xv
Contents
Program Preparation and Testing 133
Overview 134
Exercise 7.1 - Devising a Pulse Program 135
Describing your program within the Main menu description
box 135
Minimizing and maximizing the Main window workspace 136
Creating a dialog box 137
Adding and restricting the parameters of a virtual device 138
Varying the parameters of a program 138
Discovering the effect of entering an incorrect parameter
value 139
Changing program parameters via the Real Slider (or Real
Knob) 140
Adding two device waveforms together 140
Forcing input parameters so the waveform stays within the Y
axis scale 142
Storing the program results in a file using the To File object 143
Examining the contents of To File 143
Creating an operator interface 144
Switching between the Panel View and Detail View 145
Changing colors on the panel 145
Changing colors and fonts on an object 146
Documenting your program 146
Exercise 7.2 - Applying Multi-Formula objects 147
Using a single Formula object to provide more than one internal
formula 147
Exercise 7.3 - Devising a Vehicle Radiator Operator Interface 149
Developing a Operator Interface (panel display) 149
Exercise 7.4 - Logging Vehicle Radiator Statistical Data 152
Displaying the waveform that generated a set of statistics 152
Summary 154
xvi
Agilent VEE - Practical Graphical Programming
Contents
Test Data Analysis and Display 155
Overview 156
Exercise 8.1 - Modifying the Formula Object 158
Typing a statistical function into the Formula object 158
Calculating two parameters using one Formula object 159
Calculating a ramp function using the Formula object 160
Calculating standard deviations for a ramp function 161
Exercise 8.2 - Applying Multiline Formulas and Multiple Traces with
a Single Input Pin 164
Preparing a multiline Formula object 164
Creating an XY trace with three inputs 165
Combining multiple traces into a single trace 167
Displaying multiple traces with a single input display pin 168
Exercise 8.3 - Customizing Displays 169
Displaying a waveform 169
Changing the X and Y scales on a display scope 170
Zooming in on part of a waveform 171
Adding delta markers to a display for time interpolation 172
Interpolating between waveform data points 173
Exercise 8.4 - Manipulating Arrays and Array Data 174
Using the collector 174
Extracting values from an array 176
Using the Concatenator 178
Exercise 8.5 - Preparing To/From File Objects for Data Storage and
Access 180
Sending a text string to a file 180
Sending a time stamp to a file 183
Sending a real array to a file 184
Retrieving data using the From File object 186
Storing the time stamp 187
Storing real numbers 189
Agilent VEE - Practical Graphical Programming
xvii
Contents
Displaying data via From File 190
Summary 192
Vehicle Radiator Statistical Calculations and Presentations 193
Overview 194
Exercise 9.1 - Calculating Statistical Parameters with a Formula
Object 195
Displaying a waveform 195
Exercise 9.2 - Calculating and Displaying Multiple Statistical
Parameters 198
Modifying the Vehicle Radiator program to include statistical
calculations 198
Exercise 9.3 - Monitoring Parameters via an Operator
Interface 204
Changing the Vehicle Radiator Note Pad description 204
Creating a Vehicle Radiator operator interface 205
Securing an operator interface 207
Exercise 9.4 - Monitoring Vehicle Radiator Parameter
Extremes 208
Monitoring and recording Vehicle Radiator temperature
extremes 208
Building a UserFunction 210
Using Toggle Control for turning on and off a program 212
Devising an Operator Interface 213
Summary 214
Data Base and Operator Interface Manipulation 215
Overview 216
Exercise 10.1 - Manipulating DataSets 217
Storing a record from a DataSet object 217
Exercise 10.2 - Customizing Test Databases 223
xviii
Agilent VEE - Practical Graphical Programming
Contents
Exercise 10.2 - Customizing Test Databases 223
Performing a search and sort operation with DataSets 223
Exercise 10.3 - Using Operator Interfaces for Search
Operations 226
Preparing for a search operation 226
Creating an operator interface 230
Summary 233
UserFunction Development 235
Overview 236
Exercise 11.1 - Merging Bar Chart Display Programs 237
Displaying VEE Pro data on a bar chart 237
Exercise 11.2 - Operating with UserFunctions 240
Creating a UserFunction 240
Exercise 11.3 - Calling and Editing UserFunctions 244
Editing a UserFunction 244
Calling a UserFunction from an expression 247
Exercise 11.4 - Monitoring Vehicle Radiators with
UserFunctions 251
Editing a UserFunction 251
Summary 256
Reporting
Excel™ Spreadsheets 257
Overview 258
Exercise 12.1 - Exploring Excel™ Title Bar Options 259
Exercise 12.2 - Designing a Vehicle Radiator Three-Column
Spreadsheet 264
Agilent VEE - Practical Graphical Programming
xix
Contents
Preparing and transferring data to a multi-column Excel™
spreadsheet 264
Exercise 12.3 - Transferring VEE Pro Data to Excel™ via
Globals 272
Sending VEE Pro data to an Excel™ spreadsheet via
ActiveX 272
Exercise 12.4 - Developing a VEE Pro to Excel™ Template 280
Creating an VEE Pro to Excel™ template 280
Exercise 12.5 - Documenting Four Sequential Vehicle Radiator Tests
via Excel™ 283
Using Excel™ to document several test runs 283
Summary 287
Microsoft Word™ Reports 289
Overview 290
Exercise 13.1 - Using Microsoft Word™ for VEE Pro Reporting 291
Transferring VEE Pro data into a Microsoft Word™
document 291
Exercise 13.2 - Preparing and Directly Printing VEE Pro Graphs in
Microsoft Word™ 298
Printing reports in Microsoft Word™ 298
Exercise 13.3 - Transferring Vehicle Radiator Information from
Excel™ Spreadsheets to Word™ 301
Transferring spreadsheet(s) and graph(s) to Microsoft Word™
reports 301
Vehicle Radiator Test Report 303
Summary 305
xx
Agilent VEE - Practical Graphical Programming
Contents
Simulation and MATLAB®
VEE Pro Application Simulations 307
Overview 308
Exercise 14.1 - Simulating an Instrumentation Amplifier 310
Generating a differential signal with an ideal instrumentation
amplifier 310
Examining the ability of an IA to measure a small signal buried in
noise 313
Changing the differential gain of the instrumentation amplifier
by a factor of ten 314
Exercise 14.2 - Simulating a Strain Gauge 316
Constructing a four-element simulated strain gauge 316
Exercise 14.3 - Exploring Fluid Flow Devices 322
Constructing a four-element simulated strain gauge 322
Exercise 14.4 - Converting Among Four Number Systems 325
Converting among four number systems 325
Exercise 14.5 - Investigating Telecommunications Waveform
Testing 327
Testing the parameters of a telecommunications signal 327
Summary 330
Function Simulations 331
Overview 332
Exercise 15.1 - Simulating Time-Domain and Frequency-Domain
Integrated Waveforms 334
Devising time-domain and frequency-domain monitors for a
waveform 334
Devising a simulated square wave 336
Devising simulated triangular and ramp waveforms 337
Agilent VEE - Practical Graphical Programming
xxi
Contents
Examining pulse wave spectra 337
Examining noise spectra for different time samples 338
Adding fundamental and third-harmonic waveforms 340
Multiplying fundamental and third-harmonic waveforms 341
Showing two-sine-wave distortions of a fundamental 343
Exercise 15.2 - Simulating a Square Wave 345
Devising a virtual square wave 345
Changing the number of added sine waves for a wave shape
display 347
Exercise 15.3 - Simulating a Triangular Wave 348
Devising a virtual triangular wave 348
Changing the number of added cosine waves for a wave shape
display 350
Exercise 15.4 - Simulating a Trapezoidal Wave 351
Devising a virtual trapezoidal wave 351
Changing the number of combined cosine waves for a wave
shape display 353
Exercise 15.5 - Applying Lissajous Patterns 354
Preparing a Lissajous pattern-generation display 354
Displaying the frequency and phase ratios for a Lissajous
pattern 356
Summary 358
Relation Simulations 359
Overview 360
Exercise 16.1 - Accessing MATLAB® Demonstrations 361
Examining the MATLAB® demonstration for an RLC filter 361
Exercise 16.2 - Displaying Vehicle Radiator Plots via
MATLAB® 363
Applying MATLAB® example displays to an existing Vehicle
Radiator application 363
xxii
Agilent VEE - Practical Graphical Programming
Contents
Exercise 16.3 - Exploring a Pre-Designed Digital Filter Program 367
Exploring the Agilent digital filter program 367
Exercise 16.4 - Using MATLAB® to Display the Pre-Designed Digital
Filter 371
Displaying the Agilent digital filter output using
MATLAB® 371
Summary 376
VEE Pro Libraries 377
Overview 378
Exercise 17.1 - Exploring UserFunction Libraries 379
Creating and saving a library of UserFunctions 379
Applying I/O transaction guidelines 383
Exercise 17.2 - Exploring UserFunction Libraries with Fewer
Objects 388
Using file name selection 388
Exercise 17.3 - Importing and Deleting Libraries 391
Importing a library 391
Deleting a library 392
Finding functions in large programs 393
Exercise 17.4 - Monitoring Vehicle Radiator Test Limits 394
Recording several Vehicle Radiator tests 394
Building the Vehicle Radiator operator interface 400
Securing the Vehicle Radiator operator interface 402
Summary 403
Automation Segment
Sequencer Usage 405
Overview 406
Agilent VEE - Practical Graphical Programming
xxiii
Contents
Exercise 18.1 - Examining the Sequencer Options 407
Importing a bitmap for a panel background 407
Exercise 18.2 - Passing Data via the Sequencer 409
Passing data via a UserFunction 409
Setting up (three) tests in the Sequencer to call Rand via an
input terminal 410
Controlling test using the Slider 412
Exercise 18.3 - Exploring Global Variables with the Sequencer 414
Passing data using a global variable 414
Exercise 18.4 - Using the Sequencer to Compare a Waveform with a
Mask 419
Comparing a waveform output with a mask 419
Summary 416
Data Logging, Storage, Selection, and Analysis 425
Overview 426
Records Held in the Sequencer 427
Exercise 19.1 - Extracting Data from Records 429
Analyzing several runs of data from the Sequencer 429
Extracting a portion of the data to be analyzed 430
Exercise 19.2 - Storing and Retrieving Logged Data 432
Using the To/From File objects with logged data 432
Using the To/From DataSet objects with logged data 434
Exercise 19.3 - Displaying Vehicle Radiator Temperature
Extremes 436
Monitoring and recording Vehicle Radiator temperature
extremes 436
Modifying Vehicle Radiator test limits 437
Building a Vehicle Radiator test record 438
Logging and monitoring Vehicle Radiator test data 438
xxiv
Agilent VEE - Practical Graphical Programming
Contents
Exercise 19.4 - Selecting Data via Custom Menus 442
Using operator-interface menus to guide an operator 442
Summary 416
Graphical Operator Interfaces 449
Overview 450
Exercise 20.1- Executing the Order of Tests 451
Configuring and specifying a pass/fail test 451
Adding or inserting a configured test 453
Deleting a configured test 454
Accessing logged "record of records" test data 455
Exercise 20.2 - Creating a Status Panel 459
Creating a status panel for in-progress test 459
Exercise 20.3 - Applying High Impact Warning Signals 462
Creating a high impact warning 462
Creating a high impact repeated warning 464
Summary 469
Agilent VEE - Practical Graphical Programming
xxv
Contents
xxvi
Agilent VEE - Practical Graphical Programming
Agilent VEE
Practical Graphical Programming
1
The VEE Pro 8 Fundamentals
The Mouse as Used in VEE Pro 2
Overview 3
Exercise 1.1 - The Development Screen and Its Bars 4
Exercise 1.2 - Note Pads, Error Codes, and Object Views 13
Exercise 1.3 - Generating and Displaying a Noisy Waveform 20
Exercise 1.4 - Generating Random Numbers for Test Development 30
Summary 36
This chapter explores the fundamentals of VEE Pro 8. It
consists of an explanation of Mouse use and navigation of
toolbars and menus. The final two exercises show how to
develop a noisy waveform and the generation of random
numbers. It includes four exercises.
Agilent Technologies
1
1
The VEE Pro 8 Fundamentals
The Mouse as Used in VEE Pro
The mouse is a major device for preparing and navigating a VEE Pro 8
program. The functions of the mouse as used in VEE Pro 8 are described
below. The mouse controls a marker whose shape depends upon its
application. The marker can be either one of the following:
• a movable arrow that indicates where the marker is located on the
screen.
• a pair of two- headed arrows at right angles that allow you to move the
contents of an entire screen in any direction.
• one angled double- headed arrow in the corner of an object when you
want to "size" an object.
• a blinking "I" beam or a blinking vertical line that indicates your
location in the text and allows you to select portions of a text.
• a magnifying glass when you are on a connecting line between two
objects.
It takes other forms that will be explained as VEE Pro 8 details are
presented.
The conventions for mouse button usage are:
• "Move" means to move the cursor across the screen with neither mouse
button depressed.
• "Click" means to click and immediately release the mouse left button.
• "Click and drag" or "drag" means to depress and hold down the mouse
left button.
• "Double- Click" means to click rapidly the mouse left button twice.
Specific instructions will indicate when to click the mouse right button.
There are other ways to control and navigate computer programs,
including joy sticks, touch screens on key pads or monitors,
voice- activated devices, and rollers and touch- screens on laptops.
Compare the above mouse button functions with the instruction manuals
for these other devices.
2
Agilent VEE - Practical Graphical Programming
The VEE Pro 8 Fundamentals
1
Overview
Exercise 1.1 The Development Screen and Its Bars
This exercise will show you how to open the VEE Pro 8 program, view the
Title, Menu, Tool, and Status bars, and examine their titles, icons, menus,
control buttons and/or indicators; examine three types of Note Pads,
connect objects in a VEE Pro 8 program, use Undo and Redo, and run and
save a program.
Exercise 1.2 Note Pads, Error Codes, and Object Views
This exercise will show you how to select and enter data and/or text into
a Note Pad, size that object and all other objects, examine how to access
error codes via the Help menu, stop and correct a program, change
between the Open View and Icon View, change object internal parameters,
and change virtual oscilloscope scales.
Exercise 1.3 Generating and Displaying a Noisy Waveform
This exercise will show you how to create and include UserObjects, place
them within other UserObjects (nest them), change pin names, display and
running a program containing a virtual oscilloscope, changing object
parameters and noting their change with a Red Triangle, selecting
properties with the mouse right button, sizing an object, editing an object
and converting it to its Icon View, creating a formula from the Function
and object Browser, and saving a program via the menu bar.
Exercise 1.4 Generating Random Number Programs for Test
Development
This exercise will show you how to create a program that generates
random numbers, displays them, and indicates the total time required to
generate and to display the values.
Agilent VEE - Practical Graphical Programming
3
1
The VEE Pro 8 Fundamentals
Exercise 1.1 - The Development Screen and Its Bars
Learn how to open the VEE Pro 8 program, view the Title, Menu, Tool,
and Status bars, and examine their titles, icons, menus, control buttons
and/or indicators; examine three types of Note Pads, connect objects in a
VEE Pro 8 program, use Undo and Redo, and run and save a program.
Opening the VEE Pro 8 program
1 Click Start; go to Programs; select Agilent VEE Pro 8.
NO TE
Each time that VEE Pro 8 is opened, you should get the Welcome Window with the
Tip of the Day. After reading it, click on Close or, if you desire, examine Next Tip(s).
The white area is known as the VEE Work Area. The top (light blue) and bottom
(light grey) horizontal lines are the borders for VEE Pro 8 within the Microsoft
Windows operating system.
Examining the title and status bars
1 Go to the top multi- shade blue bar; it is the title bar. It contains the
VEE icon and the title of the program that is to be developed or has
been developed previously. The dark blue bar with "Main" as it title is
the development screen. (The white area under "Main" is the VEE Work
Area.)
2 Go to the bottom VEE grey bar; it is the Status Bar. See Figure 1- 1.
Prior to program preparation, it is "Ready" on the left and ExecMode:
VEE 8. (If you open an old program, it will indicate its VEE Execution
Mode.)
Figure 1-1 The Status Bar and the Microsoft Taskbar
4
Agilent VEE - Practical Graphical Programming
The VEE Pro 8 Fundamentals
NO TE
1
The bottom of your screen has Start as its left-hand label. It is the Microsoft Taskbar.
When more than one program or file is open, then it displays their titles for easy
access. The open program or file is depressed and is a lighter grey than are the other
open programs or files.
Examining Menu Bar titles
1 Examine the items listed beneath the light- blue bar. These are titles on
the Menu Bar, starting with File, Edit, and so forth. You are instructed
to access these items when you see, as examples: Menu Bar => File or
Menu Bar => Edit. If you are interested in examining the contents of
items on the Menu Bar at this time, then pull down that item or
sub- item where a list of its content is given.
NO TE
The icons on the next row (the Toolbar) will be described later.
Viewing the screen-control buttons
1 Examine the upper- right three buttons on the light blue and dark blue
bars. Their names are: minimize (the underline button), maximize (the
overlapping squares button), and close (the X button). They perform
similar operations (see Figure 1- 2).
The upper minimize button is used to drop the VEE Pro 8 screen to the
Windows Taskbar of programs. The bottom minimize button is used to
shrink the Main Work Area to the bottom of the VEE Pro8 screen.
The maximize button either reduces or expands the VEE Pro 8 screen
(top button) or the Work Area (bottom button).
The top close button closes the VEE Pro 8 screen and discontinues the
program. The bottom close button closes the Work Area. Its
reinstatement requires going to Menu Bar => File => New.
Agilent VEE - Practical Graphical Programming
5
1
The VEE Pro 8 Fundamentals
Figure 1-2 The Three Upper- Right Screen- Control Buttons
Opening the Properties window and Program Explorer
1 Go to Menu Bar => View and select (with a check mark) Program
Explorer and then Properties. The result of these selections is displayed
in Figure 1- 3. The first item selected is the Program Explorer. Its
display is on the top left side and shows the hierarchical location of the
Main Work Area. This hierarchy will be expanded upon in later
exercises. The second item displayed is the Properties window. It
describes the properties of the Main Work Area screen.
Figure 1-3 The Work Area with Program Explorer and Properties Displayed
6
Agilent VEE - Practical Graphical Programming
The VEE Pro 8 Fundamentals
1
Verifying the display of the Toolbar and Status Bar
1 Go to Menu Bar => View => Toolbar and Menu Bar => View => Status
Bar to verify that they have been selected via check marks. (These bars
can be removed by deleting their check marks.)
NO TE
Click on sub-heads under Properties to see the explanation in the bottom of the
Properties window.
Viewing the Toolbar buttons
1 Examine the Toolbar which is the third row from the top of the screen.
See Figure 1- 4. It contains several titles and icons that will be explored
gradually during the next several exercises.
Figure 1-4 The Toolbar
2 Go to Menu Bar => Device => Virtual Source => Function Generator. See
Figure 1- 5. Note the hierarchy of the titles within "Device"; it includes
the Function Generator.
Agilent VEE - Practical Graphical Programming
7
1
The VEE Pro 8 Fundamentals
Figure 1-5 The Hierarchy of "Device" from the Menu Bar
Examining three types of Note Pads
1 See Figure 1- 6. Here are three types of Note Pads: The standard Note
Pad from Menu Bar => Display => Note Pad (upper left), The Note Pad
where the standard information has been erased and another
expression has been typed by the user (upper right), and the Note Pad
from Menu Bar => System => What is the System menu? (bottom). Other
types of Note Pads will be introduced as they are applied. Also, the
various Note Pad capabilities will be explored where appropriate.
8
Agilent VEE - Practical Graphical Programming
The VEE Pro 8 Fundamentals
1
Figure 1-6 Three Types of Note Pads
Agilent VEE - Practical Graphical Programming
9
1
The VEE Pro 8 Fundamentals
Connecting objects in a VEE Pro 8 program
1 Go to Menu Bar => Device => Virtual Source => Function Generator.
Place this object on the left side of the screen.
NO TE
Objects are individual units (blocks) in the development of a VEE Pro program that
perform specific tasks. Each object (icon) contains software code.
2 Go to Menu Bar => Display => Waveform (Time). Place this object to the
right of the Function Generator. Click on Trace 1 and change the Title
to Voltage; click OK.
3 Connect the Function Generator output terminal "Func" to the "Voltage"
input terminal of Waveform (Time).
Running and saving a program
1 Click the Run toolbar button (it is the fifth button from the left on the
Toolbar) to run this program; note the waveform in the display. See
Figure 1- 7;
2 Save this program, Select File => Save as . . . and change its Name to
the file as EXER01.1, then save it in a new folder you named VEE
Exercises.
NO TE
10
Adding the extra zero in the Exercise title allows for later sorting your exercises in
numerical order by name.
Agilent VEE - Practical Graphical Programming
The VEE Pro 8 Fundamentals
1
Figure 1-7 Two Connected objects
Using the Undo and Redo operations
1 Remove the connection by holding down Ctrl and Z at the same time.
The connection will be removed. Note also the two curved arrows on
the top right side of the toolbar (Figure 1- 8). The left- hand arrow is
dark and will read "Redo Line Add" to indicate that it can be applied.
Figure 1-8 Two Other Methods of Applying Undo
2 Reinstate the connection by holding down Ctrl and Y at the same time.
The connection will be reinstated. Note also the right- hand curved
arrow. It can also be used to "Redo Line Add" which is no longer greyed
out. See Figure 1- 9.
Agilent VEE - Practical Graphical Programming
11
1
The VEE Pro 8 Fundamentals
NO TE
Redo will work only for the last Undo for both objects and connections.
Figure 1-9 Two Other Methods of Applying Redo
Saving a program to a personal disk
1 Save EXER01.1 to your personal disk as follows: insert your personal
disk, Select Menu Bar => File => Save As… .; select your personal disk;
go to the File Name field; type EXER01.1 if not named; click Save; close
this saved exercise to your personal disk.
NO TE
• Files saved in VEE Pro 8 cannot be opened in previous versions of VEE.
• Unless otherwise noted, always save your programs to your personal disk. Bring
that disk to all future exercises. If you so desire, make a second (backup) disk for
your own protection.
12
Agilent VEE - Practical Graphical Programming
The VEE Pro 8 Fundamentals
1
Exercise 1.2 - Note Pads, Error Codes, and Object Views
In this exercise, you will learn to select and enter data and/or text into a
Note Pad, size that object and all other objects, examine how to access
error codes via the Help menu, stop and correct a program, change
between the Open View and Icon View, change object internal parameters,
and change virtual oscilloscope scales.
Open the VEE Pro program "EXER01.1" that has been previously stored in
a folder labelled VEE Exercises.
Selecting and moving a Note Pad object
1 Select Menu Bar => Display => Note Pad. A blank rectangle (wire frame
outline) will appear on your Work Area containing instructions.
NO TE
The Note Pad allows you to document your program.
2 Move your Note Pad object as follows: Move the mouse (without clicking
it) and place this rectangle at the top- center of your Work Area; click
to establish its location.
3 Highlight the instructions within the Note Pad object; delete these
instructions by either clicking the "Backspace" or "Delete" key or
right- click any place on the Note Pad and; Clear All; click Yes to clear
the Note Pad.
4 Click in the Note Pad white area to obtain a cursor.
Preparing the Note Pad for entering text
1 Right- click anywhere on the Note Pad. Click on Font and Color...; select
the font, size, and color you desire. (The one in the next figure is Times
New Roman; 10; red).
Agilent VEE - Practical Graphical Programming
13
1
The VEE Pro 8 Fundamentals
2 Type the following program description into your Note Pad editing area:
The Function Generator generates a cosine waveform;
when connected to Waveform (Time), it displays
this waveform when the "Run" is keyed.
NO TE
If step 2 is done first, then highlight text with Ctrl+A and change font and color if
desired.
Sizing the Note Pad and all other objects
1 Size your Note Pad. Move the mouse to the lower right- hand corner of
the Note Pad object until a two- headed arrow appears. Depress the
mouse left button and change the size of the Note Pad so that all typed
words are displayed. See Figure 1- 10.
NO TE
The two-headed arrow is available on the four corners of any object after you click
in a corner.
Figure 1-10 Note Pad with Text
14
Agilent VEE - Practical Graphical Programming
The VEE Pro 8 Fundamentals
1
Examining the use of the Note Pad via the Help menu
1 Right- click any place on the Note Pad and a drop- down menu will
appear; click on Help; examine the description of this object and its
use.
NO TE
When the property EditEnabled is True, it allows you to edit the text in the panel.
When the property EditEnabled is False, no editing is allowed; the editing area is
greyed out. This is useful when you do not want other users to modify your note.
NO TE
You may also wish to examine Properties near the bottom of Note Pad/Help at this
time.
Examining error codes
1 Go to the Toolbar and click on the right- hand scissors icon. Cut the
connection between the Function Generator and Waveform (Time).
Attempt to run the program; a VEE Run Time Error box will appear.
See Figure 1- 11.
Agilent VEE - Practical Graphical Programming
15
1
The VEE Pro 8 Fundamentals
Figure 1-11 Run Time Error Displayed
2 Click on Help within the VEE Run Time Error box. The explanation for
the error code will appear.
3 or: select Menu bar => Help => Contents and Index to open VEE online
help, under Search tab, type "Error Codes" into the upper- left search
box, and click List Topics button. Then double- click on the words
"Error Codes" on the list that displays. A list of most error codes will
appear on the right side along with a brief explanation of each
displayed error code. Double- click on the error code for a more detailed
explanation. See Figure 1- 12.
16
Agilent VEE - Practical Graphical Programming
The VEE Pro 8 Fundamentals
1
Figure 1-12 An Error Code example
Stopping and correcting a program
1 Close the VEE Run Time Error box and stop the program. Restore the
connection between the Function Generator and Waveform (Time).
Changing between Open View and Icon View
1 Place your mouse on the title bar where the words "Function
Generator" are displayed.
NO TE
This view of the Function Generator is the Open View.
2 Click the dot on the right end of the title bar - its icon "minimize"
button. The Function Generator object converts to its Icon View. See
Figure 1- 13.
3 Double- click anywhere on the Function Generator icon. The Function
Generator object will return to its Open View.
Agilent VEE - Practical Graphical Programming
17
1
The VEE Pro 8 Fundamentals
Figure 1-13 The Function Generator Open View and Icon View
Changing internal object parameters
1 Drag the mouse pointer across the Frequency numbers in the white
area (data field); change the displayed numbers from 200 to 100 OR
double- click on the Frequency white area (data field) and enter: 100.
See Figure 1- 14.
NO TE
To save time and space, this instruction will be shortened to read as follows: "Edit
Frequency to 100".
Figure 1-14 Changing the Frequency data field
2 Click on the Run button and observe the change in the waveform
display.
18
Agilent VEE - Practical Graphical Programming
The VEE Pro 8 Fundamentals
1
Changing the Waveform (Time) Mag scale
1 Click on Waveform (Time) Mag box. Turn Automatic Scaling to off.
Change the Maximum to 2 and the Minimum to - 2. Run this program
with the new scale settings.
2 Run this program; compare its results with the previously settings. See
Figure 1- 15.
NO TE
If the waveform amplitude is greater than the Waveform (Time) display and "Auto
Scale" is on, the display will automatically adapt to the height and width of the
waveform. Auto Scale can be disabled and adjusted by clicking on Mag in the
upper-left corner of Waveform (Time).
Figure 1-15 A Comparison of the Two Mag Settings
3 Go to the File => Save as..., name the program EXER01.2 and save it to
your personal disk.
Agilent VEE - Practical Graphical Programming
19
1
The VEE Pro 8 Fundamentals
Exercise 1.3 - Generating and Displaying a Noisy Waveform
This exercise will show you how to create and include UserObjects, place
them within other UserObjects (nest them), change pin names, display and
running a program containing a virtual oscilloscope, changing object
parameters and noting their change with a Red Triangle, selecting
properties with the mouse right button, sizing an object, editing an object
and converting it to its Icon View, creating a formula from the Function
and object Browser, and saving a program via the menu bar.
The UserObject is accessed from the Device menu. It creates a special
window always within the Main Window. It can contain a group of
interconnected objects. It can be saved in a library as a single entity and
reused. It can contain programs of your own design and also other
UserObjects.
Always start with a clear Work Area: Select Menu Bar => File => New to
clear your Work Area.
Devising a UserObject that will contain VEE Pro 8
interconnected objects
1 Select Menu Bar => Device => UserObject. (This is one way to devise a
program.)
2 Move the wire- frame outline (UserObject) to the left side of your Work
Area (inside the Main window); click the mouse; double- click on the
UserObject title bar; its Open View will fill the screen.
3 In the UserObject’s Properties window, change its Title to Noisy Cosine.
4 Select Menu Bar => Device => Virtual Source => Function Generator;
place it in the upper left corner within the UserObject.
5 Select Menu Bar => Device => Virtual Source => Noise Generator; place
it below the Function Generator within the UserObject.
6 Select Menu Bar => Device => Formula.
7 Place this object to the right of and beside the Function Generator and
the Noisy Generator.
20
Agilent VEE - Practical Graphical Programming
The VEE Pro 8 Fundamentals
1
8 Click on the Formula object Menu button; select Add terminal => Data
Input. A second input pin will appear labelled "B".
Naming terminals and pins to describe their function
1 Double- click on the Formula "A" input pin; change the pin name to
Cosine.
2 Connect the Function Generator Func output pin to the Formula data
input pin "Cosine".
3 Connect the Noise Generator noiseWF output pin to the Formula data
input pin "B"; change the pin name to "Noise".
4 Double- click in the Formula object white space; change its formula to
read: Cosine + Noise.
5 Change the object title bar to also read: Cosine + Noise.
6 Go to the dark blue horizontal top bar and click on the mouse right
button; select Add Terminal, Data Output. (An X will appear on the
right edge of the UserObject.) Change the X to Temp. See Figure 1- 16.
Figure 1-16 The Completed Noisy Cosine UserObject
Agilent VEE - Practical Graphical Programming
21
1
The VEE Pro 8 Fundamentals
7 Connect the Cosine + Noise Result output pin to the Temp output pin.
See Figure 1- 16.
8 Go to the upper- right corner of the UserObject and click on the
horizontal bar; it will send the UserObject, in the form of an icon, to
the bottom left of the Main work area. Its Icon View will also appear in
the Main work area. See Figure 1- 17.
Figure 1-17 The iconview of the Noisy Cos function
22
Agilent VEE - Practical Graphical Programming
The VEE Pro 8 Fundamentals
1
Displaying a running program with a virtual oscilloscope
1 Select Menu Bar => Display => Waveform (Time); place it to the right of
the Noisy Cosine object. Change its Title to Oscilloscope.
2 Change its Y Scale name from Mag to Temp.
3 Change its Trace Info name from Trace 1 to Degree C.
4 Connect the Noisy Cosine output pin (Temp) to the oscilloscope input
pin Degree C.
5 Move the oscilloscope so its display shows fully in the Main window.
6 Select Menu Bar => Display => Alphanumeric and place it to the right
of the Waveform (Time) display. Lengthen its icon vertically; connect
the Alphanumeric input to the output (Temp) of the Noisy Cosine icon.
7 Depress the Run button; the displays will appear as shown in Figure
1- 18.
NO TE
As you scroll down the Alphanumeric object, all 256 points (0 through 255) are
displayed.
8 Save this program as EXER01.3.
Figure 1-18 The Noisy Cosine Program after running
Agilent VEE - Practical Graphical Programming
23
1
The VEE Pro 8 Fundamentals
◊
Noting
object parameter changes in the description box and
with the red triangle
To expand your knowledge, explore the following variations to this
Exercise 01.3:
9 Open your saved program EXER01.3.
10 Click on the Temp label in the oscilloscope object; vary the scope
screen amplitude; observe its effect on the waveform.
NO TE
The symbol ◊ informs you that the indicated step enables you to expand your
understanding of the flexibility and functionality of VEE Pro 8.
11 Vary the Function Generator frequency, amplitude, and time span; run
the program for each variation; record the effects that these changes
have on the oscilloscope waveform, both Temp and Time. Right- click on
the oscilloscope object. Select the Description box. Replace the standard
words with: The label of the oscilloscope has been changed from Trace
1 to Degree C. Close this box; a red triangle will appear in the
upper- right corner, indicating that you have changed that object's
standard description.
NO TE
24
Should you accidentally move a program off screen and cannot easily find it, then place
the pointer over any portion of the Main white space and depress the keyboard key:
Home. The entire program will be moved to the upper left of your Work Area.
Agilent VEE - Practical Graphical Programming
The VEE Pro 8 Fundamentals
1
12 Double- click on the AlphaNumeric. Change its Title to Temperature in
Degree C. Select Menu Bar => View => Program Explorer. Three views of
the UserObject will appear as shown in Figure 1- 19.
Figure 1-19 Three views of UserObject and the Red Triangle
Agilent VEE - Practical Graphical Programming
25
1
The VEE Pro 8 Fundamentals
Selecting Properties with your mouse right button
1 Click on Menu Bar => View => Properties; the UserObject Properties
window will appear.
2 Open the oscilloscope description box again. See Figure 1- 20.
Figure 1-20 UserObject Properties window Displayed with Description Showing
Sizing an object
1 Go to the upper- right corner of the Noisy Cosine UserObject. Click the
mouse left button on the middle Noisy Cosine button in the upper- right
corner (this will cause the UserObject to reduce in size so the Main
window is observable. Clicking it again will cause it to once more fill
the screen; this middle button is a toggle). Maximize the Noisy Cosine
so it fills the screen.
NO TE
26
If you lose the VEE Pro 8 screen, then you may click on the Program Explorer Main
or Noisy Cosine to re-acquire it.
Agilent VEE - Practical Graphical Programming
The VEE Pro 8 Fundamentals
1
Selecting and editing an object and converting it to an Icon View
2 Edit Frequency of the Function Generator to 100.
3 Click on the Function Generator upper- right button; it will reduce the
Function Generator object to an icon. Move the Function Generator
object to the left of the Work Area slightly above the center.
4 Click on the Noise Generator upper- right button; it will reduce the
Noise Generator object to an Icon View. Drag and place it under the
Function Generator object.
NO TE
From now on, you should recall that "drag" includes "drag and release"; "move"
means moving the mouse without pressing the mouse button.
Selecting a Function and Object Browser box and creating a
formula from within it
1 Select Menu Bar => Device => Function & Object Browser.
a The following steps show an alternate method for choosing a specific,
internally defined formula.
b The box that appears is a "pop- up dialog box". See Figure 1- 21 (the
dialog box can be sized by clicking and moving its outside borders).
2 Select Type: Operators; Category: <All>; Functions: + .
Agilent VEE - Practical Graphical Programming
27
1
The VEE Pro 8 Fundamentals
Figure 1-21 Function & Object Browser pop-up dialog box and its Formula object
3 Click on Create Formula in the lower- left corner of the pop- up dialog
box; a new formula "A+B" will appear.
4 Place "A+B" to the right of the Function Generator and the Noise
Generator.
NO TE
This is another way to create the A+B (Formula) object. The Function & Object
Browser object provides access to the VEE-determined library of math expressions.
5 Go to the Noisy Cosine title bar; click on the upper right- hand "_"
button (this will reduce the Noisy Cosine UserObject to an icon; the
icon of the edit window will appear across the bottom of the screen
under the Main window as a rectangle).
NO TE
Raise the bottom of the Main window to see the Noisy Cosine rectangle.
6 Delete formula object before saving.
28
Agilent VEE - Practical Graphical Programming
The VEE Pro 8 Fundamentals
1
Saving a program via the Menu Bar
1 Select Menu Bar => File => Save As
2 Save this program to your personal disk; name it as EXER01.3; click
OK.
Agilent VEE - Practical Graphical Programming
29
1
The VEE Pro 8 Fundamentals
Exercise 1.4 - Generating Random Numbers for Test
Development
This exercise will show you how to create a program that generates
random numbers, displays them, and indicates the total time required to
both generate and display the values.
Open VEE Pro; clear your Work Area, maximize Main; toggle Program
Explorer off.
Devising a random number generator
NO TE
Many programmers avoid using the Start button; they prefer to use the
Run button only; you may prefer to begin with step 2.
1 Select Menu Bar => Flow => Start; place it in the upper- left of your
screen.
NO TE
Once the Start button is placed, it is moved by using the mouse right button.
2 Select Menu Bar => Flow => Do; place it under Start (or in the
upper- left of your screen).
NO TE
The Do object is used to allow monitoring of the time for the program to run.
3 Connect the output of Start to the input (top pin) of Do.
4 Select Menu Bar => Flow => Repeat => For Count; place it under Do.
NO TE
30
The value in the object "For Count" can be changed, depending upon the number of
random numbers desired.
Agilent VEE - Practical Graphical Programming
The VEE Pro 8 Fundamentals
1
5 Connect the bottom pin of Do to the top pin of For Count; set the
count value to 12.
6 Select Menu Bar => Device => Function & Object Browser => Type:
Built- in Functions; Category: Probability and Statistics; Functions:
Random.
7 Click on Create Formula; place the object to the right of For Count.
See Figure 1- 22.
Figure 1-22 Partial layout of Exercise 1.4
8 Go to the random Object menu and delete both input pins first low,
then high.
9 Change the Title of random(low,high) to random(0,10) which will
become the range of the random number generator.
NO TE
The value of the chosen random numbers can be changed to any range desired.
10 Change the random- number range in the edit (white) space from its
generic low, high to the values 0,10.
11 Connect For Count output (right- hand) pin to the random(0,10)
sequence input (top) pin.
Agilent VEE - Practical Graphical Programming
31
1
The VEE Pro 8 Fundamentals
12 Select Menu Bar => Flow => Do; place it below For Count. Connect For
Count sequence output (bottom) pin to the Do sequence input (top) pin.
Applying the Collector object and accessing its Help
explanation
1 Select Menu Bar => Data => Collector; place it below random(0,10);
connect its Data (input) pin to the random(0,10) output (Result) pin.
NO TE
The Collector object is used because it allows each chosen random number to be
displayed in the AlphaNumeric object as an n+1 dimensional array. The Collector
continues to collect the input data until the XEQ pin is triggered.
NO TE
Use the mouse right click to access, among other things, the Help menu. Click on the
Help word to see more information regarding the Collector object. A specific Help can
be accessed via any object.
Using the Logging AlphaNumeric object to display and retain
data
1 Select Menu Bar => Display => Logging AlphaNumeric; change its Title
to Random Numbers via its Properties window; connect its input to the
Collector Output (Array).
2 Select Menu Bar => Device => Formula; change its input terminal A to
Count; place it below the second Do object and to the left of Collector;
change the formula to Count +1.
3 Connect the output pin of For Count to the Formula input.
32
Agilent VEE - Practical Graphical Programming
The VEE Pro 8 Fundamentals
1
Validating the number of data points collected
1 Select Menu Bar => Display => AlphaNumeric; place it to the right of
the Formula; change its Title to Final Count.
2 Connect the output of Formula to the input of Final Count adding "1"
to For Count.
Determining the elapsed time to run a program
1 Select Menu Bar => Device => Timer; place it to the right of Random
Numbers; change its Title to Elapsed Time.
2 Connect the upper Do object output pin to the Elapsed Time top input
pin.
3 Connect the lower Do object output pin to the Elapsed Time bottom
input pin.
4 Connect the lower Do object bottom pin to the bottom- left (XEQ)
Collector pin.
5 Run this program; it should look like Figure 1- 23.
NO TE
The Formula object and its Final Count (Alphanumeric) object confirm the number of
loops performed by the For Count object. Elapsed Time (the timer) indicates
approximately how long it takes for the loops to run, whatever the number of loops.
Agilent VEE - Practical Graphical Programming
33
1
The VEE Pro 8 Fundamentals
Figure 1-23 Generating and monitoring random data
6 Save this program as EXER01.4.
Demonstrating the usefulness of Show Data Flow and Show
Execution Flow buttons
1 Experiment with this program and assess the changes:
• Change the value of For Count.
• Change the range of the low, high values in random(0,10), both low
and high.
• Remove the Formula object; connect For Count directly to Final
Count.
• Turn on the Show Data Flow button in the Toolbar; monitor the data
flow.
• Turn on the Show Execution Flow button in the Toolbar; run the
program again.
2 Close this program without saving it.
34
Agilent VEE - Practical Graphical Programming
The VEE Pro 8 Fundamentals
1
Developing a faster random number generator
1 Open your VEE Pro 8 program and select Menu Bar => Flow => Start;
place this object in the upper left corner.
2 Select Menu Bar => Flow => Do; place this object below Start.
3 Select Menu Bar => Device => Timer; place it to the right of Start;
change its title bar to Elapsed Time.
4 Select Menu Bar => Device => Formula; place it below the three objects;
change its title bar to Random(0,10); change its edit area to
Randomize(ramp(12,0,9),0,10); right click on the object and select Delete
Terminal to delete its input terminal.
5 Select Menu Bar => Display => Logging AlphaNumeric; place it to the
right of the Formula object; change its title bar to Random Numbers.
6 Connect the terminals as follows: bottom of Start to the top of Do;
bottom of Do to the top of Random(0,10); the right- hand terminal of Do
to the top input of Elapsed Time; the bottom input of Elapsed Time to
the bottom of Random Numbers; and the Result of Random(0,10) to the
input of Random Numbers. Run this program. It should look like Figure
1- 24.
Figure 1-24 A faster random number generator implementation
7 Save this program as EXER01.4a. Note the differences in Elapsed Time
between this exercise and EXER01.4.
Agilent VEE - Practical Graphical Programming
35
1
The VEE Pro 8 Fundamentals
Summary
This chapter provides an introduction to the VEE Pro development screen
and its bars; note pads, error codes, and different views of an object; how
to generate a noisy waveform, and the generation of random numbers.
The next four chapters examine hardware connectivity; Chapter 2 focuses
on instrument control and communications.
This completes Chapter 1.
36
Agilent VEE - Practical Graphical Programming
Agilent VEE
Practical Graphical Programming
2
Instrument Communication
Overview 38
Exercise 2.1 - Configuring a GPIB Instrument with a Panel Driver and
Direct I/O 39
Exercise 2.2 - Calling Active X 44
Exercise 2.3 - Working with the Web Browser 49
Exercise 2.4 - Communicating with USB, LAN, and RS-232 51
Summary 54
This chapter will examine the configuration of GPIB
instruments with a Panel Driver and Direct I/O. ActiveX was
called and the Internet was accessed to integrate equipment
via LAN, RS- 232, and USB communications. This unit
consists of four exercises.
Agilent Technologies
37
2
Instrument Communication
Overview
Exercise 2.1 Configuring a GPIB Instrument with a Panel
Driver and Direct I/O
This exercise will show you how to configure an instrument from the
Menu bar, to use a Panel Driver, modify that instrument's name and
controlling parameters, and save the configuration for later applications.
Exercise 2.2 Calling Active X
This exercise will show you how to call ActiveX and investigate some of
its flexibilities and its many properties.
Exercise 2.3 Working with the Web Browser
This exercise will show you how to use ActiveX controls to access the
internet.
Exercise 2.4 Communicating with USB, LAN, and RS-232
This exercise will show you how to integrate your equipment with USB
and LAN connections, including RS- 232.
38
Agilent VEE - Practical Graphical Programming
Instrument Communication
2
Exercise 2.1 - Configuring a GPIB Instrument with a Panel Driver
and Direct I/O
This exercise will show you how to configure an instrument from the
Menu bar, to use a Panel Driver, modify that instrument's name and
controlling parameters, and save the configuration for later applications.
Advantages of GPIB include a speed of 1 Mb/sec, shielded cable, will allow
up to 14 instruments per system with addresses from 1 to 30, can be a
daisy- chain configuration, and a stable system. Disadvantages are: a
higher cost than LAN or USB, the need for a GPIB card, GPIB cables, and
installation time.
Open VEE and clear your Work Area, maximize Main; and toggle Program
Explorer off.
Reconfiguring an existing scope Panel Driver object
NO TE
1 Select Menu Bar => I/O => Instrument Manager… ; see Figure 2- 1.
When VEE is loaded and used for the first time, there will be no instruments
displayed in the Instrument Manager window.
Agilent VEE - Practical Graphical Programming
39
2
Instrument Communication
Figure 2-1 The Instrument Manager window
2 Move the dialog box, by dragging its title bar, if you so desire; "My
Configuration" should be highlighted.
3 Click Add under Instrument. This displays the Instrument Properties
window, which presents the following fields:
Add Interface/Device: Select GPIB from the following list - GPIB, ASRL,
TCPIP, USB, NIDAQ, VXI, GPIO.
Instrument Properties:
Name: Enter scope name. (Use a naming convention that will be
easily understood and reused by the other team members. Later, you
will save time by choosing already existing virtual instruments. Here
we have used "hp54504a")
Interface: Select GPIB if not already preselected. (Could later change
this to USB or LAN)
40
Agilent VEE - Practical Graphical Programming
Instrument Communication
2
Board Number: The select code of the interface (GPIB) plus the local
bus address of the instrument (which is a number from 0 to 31).
Type 0 in the Board Number field because you are developing a
program without an instrument present (NOT LIVE).
VISA Alias: The alias for VISA address string. It must be the same as
it is configured in Agilent IO library. Leave it empty here.
VISA Address: Enter "GPIB0::14::INSTR" where GPIB0 is card #0.
NO TE
Pressing the Tab key after typing in a field will move you to the next field; pressing
Shift-Tab will move you to the previous field.
4 Leave all the other defaults as they are given.
5 Click on Advanced.
6 Leave Timeout (sec): at 5.
7 Toggle Live Mode to OFF if it is not dimmed (grayed out).
NO TE
Live Mode should be OFF and dimmed because the address is set to 0 and no real
instrument is connected.
8 Leave Byte Ordering at MSB (as required by all IEEE488.2- compliant
devices).
9 Type in Description (optional): hp54504a; this description will appear
on the title bar.
10 Click on the Panel Driver tab.
11 Click on the blank space to the right of ID Filename: A list of
instruments will appear entitled: Read from what Instrument Driver?
12 Scroll horizontally until you reach hp54504a.cid; click on it. See Figure
2- 2 which contains all the boxes open.
Agilent VEE - Practical Graphical Programming
41
2
Instrument Communication
Figure 2-2 Instrument Manager programmed for a virtual scope
13 Click Open; then click OK when Advanced Instrument Properties
appears.
14 Return to the Instrument Manager box; click the Save button.
NO TE
• An instrument object named Scope using the driver file hp54504a@(NOT LIVE) is
now in your list of available instruments. It does not have a bus address specified
because it is NOT LIVE at this time.
• You can develop your program in this mode and add an address later when there is
a live instrument.
• If you already have an Agilent instrument available, then refer to the Owner's
Manual for the instrument and the Agilent I/O Libraries Suite Manual.
15 Select Menu Bar => I/O => Instrument Manager; highlight scope(@(NOT
LIVE)); under Create I/O object, click Panel Driver - the hp54504a @
(NOT LIVE) object will appear on the screen. See Figure 2- 3.
42
Agilent VEE - Practical Graphical Programming
Instrument Communication
NO TE
2
You are ready to connect a real instrument to your computer and select an active
address.
16 Save this program as EXER02.1 to your personal disk.
NO TE
In Exercise 4 below, you will explore LAN and USB.
Figure 2-3 Selected hp54504a @ Not Live
Agilent VEE - Practical Graphical Programming
43
2
Instrument Communication
Exercise 2.2 - Calling Active X
This exercise will show you how to call ActiveX and investigate some of
its flexibilities and many properties.
Open VEE and clear your Work Area and maximize Main.
Selecting ActiveX controls
1 Select Menu Bar => Device => ActiveX Control References.
2 Place checkmarks in those Registered Controls that you want to use
with VEE Pro.
NO TE
Select only those Controls that will be used in your program as much memory space
is consumed.
3 Click OK; see Figure 2- 4.
NO TE
44
If you know a control type library exists for a control, but it does not appear in the list,
then it is possible that the library did not get registered during its installation. Press
the Browse button to find the type library missing from the list. VEE Pro will attempt
to register the type library and add it to the list.
Agilent VEE - Practical Graphical Programming
Instrument Communication
2
Figure 2-4 ActiveX Control References Box
Agilent VEE - Practical Graphical Programming
45
2
Instrument Communication
Adding a control to VEE Pro
1 Select Menu Bar => Device => ActiveX Controls => Calendar; see Figure
2- 5.
Figure 2-5 Selected ActiveX Device (Calendar)
2 Release the selected Calendar; a calendar will appear; enlarge it so it
becomes readable. See Figure 2- 6.
46
Agilent VEE - Practical Graphical Programming
Instrument Communication
2
Figure 2-6 The Calendar
NO TE
• Controls (objects) can be placed on a VEE Pro Main, UserObject, or UserFunction
screen.
• Controls can be deleted by either selecting Cut (the scissors) from the Toolbar,
highlighting the object and pressing the Delete key on your keyboard, or by
right-clicking on the object and selecting "Delete Object" on the menu.
3 Right- click on Calendar and select the Properties window; then open its
Control Properties window. Note those properties that you can access
with the Properties window compared with those you can access via
the Control (Calendar) Properties window. See Figure 2- 7.
Agilent VEE - Practical Graphical Programming
47
2
Instrument Communication
Figure 2-7 The Two Properties windows for Calendar
4 Save this exercise as EXER02.2.
5 Select Menu Bar => Flow => Confirm (OK); place the OK button next to
the Calendar control. This OK button will force the program to run as
long as it is not pressed.
6 Select Menu Bar => Run; you can now select the new dates in the
Calendar ActiveX control; then press the OK button to stop the
execution of the program.
7 Close this program without saving it.
48
Agilent VEE - Practical Graphical Programming
Instrument Communication
2
Exercise 2.3 - Working with the Web Browser
This exercise will show you how to use ActiveX controls to access the
internet.
Open VEE and clear your Work Area and maximize Main.
Using the Web Browser with ActiveX controls
1 Go to Help, select Open Examples, then open ActiveX controls.
2 Open the WebBrowser icon. See Figure 2- 8.
3 Click the Run button; the Agilent WebBrowser. WebBrowser1 will appear
with information choices at the top and bottom. (You are now at the
Agilent Web Site)
4 Click Done; you will return to Figure 2- 8.
Figure 2-8 WebBrowser Example
Agilent VEE - Practical Graphical Programming
49
2
Instrument Communication
5 Go to the icon object "WebBrowser Setup. You can change the address
(that is in Red) where it says "WebBrowser1.Navigate". You may insert
any desired web site address and reach that web site. As noted in
Figure 2- 8 on the Note Pad, you may also reach an HTML help file on
your local hard drive.
6 An example of using a different web site is given in Figure 2- 9 after
changing the first line of the WebBrowser Setup object to
http://www.agilent.com/find/adn.
Figure 2-9 WebBrowser with a Web Address change
50
Agilent VEE - Practical Graphical Programming
Instrument Communication
2
Exercise 2.4 - Communicating with USB, LAN, and RS-232
This exercise will show you how to integrate your equipment with USB
and LAN connections. Advantages of USB are: it is easy to connect and
disconnect, requires no extra card, and cables are available at a modest
price, and allows high- speed data transfer. However, LAN is not always
easy to configure or control but it allows access to the World Wide Web.
Open VEE and clear your Work Area and maximize Main.
Connecting to a USB/GPIB interface
1 Go to Help; Agilent VEE on the Web; Agilent VEE Home Page.
2 Click on Explore now, and then More Information.
3 Select USB products via the Search box.
4 Click on GPIB, LAN, USB Products for PC- Instrument Connections.
Scroll down to Product Comparison. See Figure 2- 10 below.
Figure 2-10 The USB Product Comparison table
Agilent VEE - Practical Graphical Programming
51
2
Instrument Communication
5 Click on 82357B USB/GPIB Interface High- Speed USB 2.0 in the
upper- left corner of the Product Comparison chart.
6 View the Demo video to catch a glimpse of how easy it is to connect
your instrument using the 82357B Multimedia Demonstration.
7 Learn about the features of the USB/GPIB interface via the Agilent I/O
Hardware Family Datasheet.
8 Click on IO Libraries Suite 14.2; The IO Libraries Suite’s Connection
Expert is able to simultaneously manage instrument connections from
multiple vendors by following the applicable instructions. Read the
material on this sheet that relates to your application.
9 Obtain the connector shown in Figure 2- 11. It is 82357B USB/GPIB
Interface High- Speed USB 2.0 connector.
Figure 2-11 82357B USB/GPIB Interface High-Speed USB 2.0 connector
52
Agilent VEE - Practical Graphical Programming
Instrument Communication
2
Connecting to a USB networked hub
1 Go to the USB Product Comparison table; Figure 2- 10 again, and select
the E5813A Networked 5- Port USB Hub.
2 Interface a variety of GPIB, RS- 232, and USB devices as necessary to
complete your test system. (GPIB and RS- 232 devices require
attachment of a converter to the E5813A). See Figure 2- 12.
Figure 2-12 Networked Five-Port USB hub
3 Apply power where appropriate.
4 Use your newly connected equipment as desired; further information, if
desired, is available on the Agilent web site and within VEE Pro 8 Help.
NO TE
The Agilent E5813A Networked 5-port USB hub uses LAN technology to end the
five-meter USB cabling distance limitation, allowing USB devices to be anywhere on a
Local Area Network (LAN). The hub provides remote control and monitoring of native
USB-compatible devices, GPIB instrumentation (using the 82357A) and RS-232
devices (using the E5805A) via a standard LAN connection.
5 Use the E5813A USB ports for remote connection of instruments and
devices to complete your test system. There are no switches to set and
no PC cards to install.
Agilent VEE - Practical Graphical Programming
53
2
Instrument Communication
Summary
This chapter showed you how to configure GPIB instruments, how to call
ActiveX controls, how to use controls to access the Internet, and explained
how to integrate your equipment via USB and LAN communications.
The next chapter will describe how to connect hardware with other
controls.
This completes Chapter 2.
54
Agilent VEE - Practical Graphical Programming
Agilent VEE
Practical Graphical Programming
3
Instrument Controls
Overview 56
Exercise 3.1 - Selecting an Instrument 57
Exercise 3.2 - Monitoring Passive Devices 59
Exercise 3.3 - Interacting with Equipment 65
Exercise 3.4 - Integrating National Instruments Hardware 68
Summary 71
This chapter will examine how to select and configure an
instrument driver and simulate how to set up and measure
temperature using a thermocouple. It will also demonstrate
how to interact with equipment using direct I/O and how to
set up National Instrument drivers in VEE Pro.
Agilent Technologies
55
3
Instrument Controls
Overview
Exercise 3.1 Selecting an Instrument
This exercise will show you how to set the parameters within VEE Pro to
configure an actual instrument driver, such as an oscilloscope.
Exercise 3.2 Monitoring Passive Devices
This exercise will show you how to set up and measure temperature using
a thermocouple and a digital multimeter for VEE Pro access.
Exercise 3.3 Interacting with Equipment
This exercise will show you how to send a single text command, or an
expression list, to an active instrument using Direct I/O.
Exercise 3.4 Integrating National Instruments Hardware
This exercise will demonstrate how to set up National Instrument drivers
in VEE Pro.
56
Agilent VEE - Practical Graphical Programming
Instrument Controls
3
Exercise 3.1 - Selecting an Instrument
This exercise will show you how to set the parameters within VEE Pro to
configure an actual instrument driver, such as an oscilloscope.
Open your VEE program and clear your Work Area and maximize it.
1 Open EXER02.1. It should look like Figure 3- 1. Save it as EXER03.1
immediately.
NO TE
EXER02.1 showed you how to add new instruments to the Instrument Manager.
Figure 3-1 Selected Agilent54504a @ Not Live
Agilent VEE - Practical Graphical Programming
57
3
Instrument Controls
Configuring a virtual instrument to a real instrument
1 Select Menu Bar => I/O => Instrument Manager.
2 Choose scope(Agilent54504a(@(NOT LIVE)).
3 Open Properties; double- click on the VISA Address field; change the
address to GPIB0::9::INSTR.
NO TE
• The "9" in the address signifies the default address for oscilloscopes and "0" is
the GPIB board card number.
• Click on Advanced under Properties; toggle the Live Mode to ON; click OK twice.
• The Instrument List will now include a GPIB7 heading with
oscope(@)GPIB0::9::INSTR appearing under it.
4 Save this exercise again as EXER03.1
NO TE
58
As this now represents a live (real) instrument, an interface to an actual oscilloscope
must be connected to the PC system via a card. See EXER03.2 below.
Agilent VEE - Practical Graphical Programming
Instrument Controls
3
Exercise 3.2 - Monitoring Passive Devices
This exercise will show you how to set up and measure temperature using
a thermocouple and a digital multimeter for VEE Pro access.
Reference: Practical Temperature Measurements, Agilent Technologies
Application Note 270, Publication Number 5965- 7822E.
Installing the 34970A data acquisition switch unit
1 Turn off your computer.
2 Install the 34970A unit in the appropriate slot as noted in your card
list. For a photograph of this switch unit, see Figure 3- 2.
Agilent VEE - Practical Graphical Programming
59
3
Instrument Controls
Figure 3-2 The 34970A Data Acquisition/Switch Unit
3 Turn on your computer.
60
Agilent VEE - Practical Graphical Programming
Instrument Controls
3
Configuring the interface
Open your VEE program and clear your Work Area and maximize Main.
1 Select Menu Bar => I/O => Instrument Manager… .
2 Select "My configuration" if it is not the default folder.
3 Select AGILENT34970A from the "My configuration" list.
NO TE
We have assumed that the unit for this instrument has been installed on your
computer; see step 2 above.
4 Obtain a J- type thermocouple and install it into one of the channels on
the 20- channel multiplexer (34901A). See Figure 3- 3.
Figure 3-3 The 34901A 20-Channel Multiplexer
5 Insert the Multiplexer into the top slot in the rear of the 34970A Data
Acquisition/Switch Unit. See the bottom photograph of Figure 3- 2
above.
6 Prepare the thermocouple setup with its ice bath as shown in
Figure 3- 4 below.
Agilent VEE - Practical Graphical Programming
61
3
Instrument Controls
Figure 3-4 Thermocouple setup with its ice bath and equivalent circuit
7 Place a beaker of water on a hot plate; insert the( J- type) thermocouple
(J1).
8 Set the controls on the Data Acquisition/Switch Unit to cause its panel
to display temperature readings. (See the 34970A manual for guidance.)
9 Turn on the hot plate; note the temperature changes via the panel
readout, set as advised in Application Note 290.
10 Turn off the hot plate.
Recording temperature readings on a graph
1 Select Menu Bar => I/O => Instrument Manager… ; select Agilent 34970a.
2 Select Menu Bar => Help => Open Example => InstrumentIO =>
InstrManagerIntegrated => Ag34970a.
3 Open and read the Programming sample goal and Requirements note
pads.
NO TE
This program requires real instruments. The following diagrams are simulated
figures.
4 See Figure 3- 5 for a simplified version of Agilent 34970a graphing
program.
62
Agilent VEE - Practical Graphical Programming
Instrument Controls
3
Figure 3-5 Partial program for temperature graphing
5 See Figure 3- 6 for a simulated output of temperature data.
NO TE
The lines on the graph were inserted to illustrate the output; the input pins are not
connected so the program, as shown, will not run.
6 Close your partial program, saving it only if you plan to connect
equipment.
Agilent VEE - Practical Graphical Programming
63
3
Instrument Controls
Figure 3-6 Simulation of the graphing program after running
NO TE
64
For further information, see Agilent 34970A Data Acquisition/Switching Product
Overview publication 5966-4443EN obtained via the Agilent Web site:
www.agilent.com/find/assist.
Agilent VEE - Practical Graphical Programming
Instrument Controls
3
Exercise 3.3 - Interacting with Equipment
This exercise will show you how to send a single text command, or an
expression list, to an active instrument using Direct I/O.
Open your VEE program and clear your Work Area and maximize Main.
Sending a single text command to an active instrument
1 Select Menu Bar => I/O => Instrument Manager…
2 Select funcgen(@(NOT LIVE)); click on Direct I/O to create a Direct I/O
object; place the object in Main.
3 Double- click on its transaction bar to obtain its Dialog Box.
4 Select WRITE, TEXT, and type "AM 5 VO" with EOL ON; click OK. See
Figure 3- 6.
NO TE
The information within the quotes is the command that will be sent to the
Function Generator when the program runs. The quote marks are necessary.
NO TE
Some instruments specify characters that must be sent at the end of a command.
These characters are given in the instrument documentation. They must be
included in the Advanced Properties section of the I/O Dialog Box.
Figure 3-7 A Single-Text-Command I/O Transaction
Agilent VEE - Practical Graphical Programming
65
3
Instrument Controls
Sending an expression list to an active instrument
1 Select Menu Bar => I/O => Instrument Manager…
2 Select funcgen(@(NOT LIVE)); click on "Direct I/O"; place it to the right
of the Work Area.
3 Double- click on its transaction bar to obtain its Dialog Box.
4 Select WRITE TEXT, and type "FR",A,"HZ" with EOL ON; click OK.
NO TE
• FR represents frequency; A represents the frequency value at input terminal A,
and HZ represents the frequency unit: "Hertz".
• The terminal A was added automatically. This transaction command will write
the string "FR", followed by whatever value is sent into input terminal A,
followed by the string "HZ".
5 Select Menu Bar => Flow => Repeat => For Range; place it to the left of
the Function Generator. (This will simulate the frequency value.)
6 Connect the For Range data output pin to the funcgen(@ (NOT LIVE))
data input pin.
7 Edit the fields in the For Range object as follows. See Figure 3- 7.
From: 10
Thru: 2.1M
Step: 50k
Figure 3-8 An Expression List I/O Command Transaction
66
Agilent VEE - Practical Graphical Programming
Instrument Controls
NO TE
3
• The Function Generator will start at 10 Hz, increase in steps of 50 kHz, and stop
at 2.1MHz.
• This subprogram is designed to work with the Agilent3325B Function Generator.
Set the Instrument Manager to call the live instrument. When the Agilent3325B
is connected, change the transaction box Title to "LIVE".
8 Save this program as EXER03.3a.
9 Run this program only if the Agilent3325B is attached.
Agilent VEE - Practical Graphical Programming
67
3
Instrument Controls
Exercise 3.4 - Integrating National Instruments Hardware
This exercise will demonstrate how to set up National Instrument drivers
in VEE Pro.
Open your VEE program and clear your Work Area and maximize Main.
Using National Instruments Data Acquisition in VEE Pro
1 Go to Menu Bar => Help; search for "Using NI"; select "Using NI Data
Acquisition in VEE".
NO TE
There are six different National Instruments driver libraries supported in VEE:
niDMM, niSCOPE, niDAQ, niDAQmx, niSWITCH, and niFGEN.
2 Load the National Instruments library if it is not there already.
3 Select Menu Bar => I/O => Instrument Manager.
4 Highlight My Configuration; Click on Add.
5 Select NIDAQ interface; Click on OK.
6 Select NI- DMM Driver Type; Click on OK.
7 Click NI- DMM Driver under Create I/O Object; Place the object in Main;
then double- click on its transaction bar to Select the Function Panel;
see Figure 3- 9.
NO TE
68
Help is available by clicking on Function Help.
Agilent VEE - Practical Graphical Programming
Instrument Controls
3
Figure 3-9 Selection of the Function Panel for NIDMM
8 Open Function Help; read all material that applies to your planned NI
instrument program.
9 Return to "Using NI Data Acquisition in VEE"; read the sections titled
"SCXI Support" and "NI- DAQ Asynchronousity Issues".
10 Go to "NI- SCOPE Fetch/Read Functions" and read all material that
applies to your planned NI instrument program.
Agilent VEE - Practical Graphical Programming
69
3
Instrument Controls
Fetching/Reading Data to a scope
1 Prepare the AGniScope sub- program as shown in Figure 3- 10.
Figure 3-10 A multi-fetch two-channel data acquition sub-program
2 Prepare the remainder of your program as guided by the NI Help topics
within VEE and NI materials.
3 Save your final program as EXER03.4.
70
Agilent VEE - Practical Graphical Programming
Instrument Controls
3
Summary
This chapter showed you how to select and configure an instrument driver
and simulated how to set up and measure temperature using a
thermocouple. It also demonstrated how to interact with equipment using
direct I/O and how to set up National Instrument drivers in VEE Pro.
The next chapter will show how to communicate with .NET.
This completes Chapter 3.
Agilent VEE - Practical Graphical Programming
71
3
72
Instrument Controls
Agilent VEE - Practical Graphical Programming
Agilent VEE
Practical Graphical Programming
4
DotNet Control and Communications
Overview 74
Exercise 4.1 - Applying a dotNET Date-time Example 76
Exercise 4.2 - Selecting Alternate Ways of Choosing dotNET Files 78
Exercise 4.3 - Using dotNET Operations Builder for ListBox Examples 81
Exercise 4.4 - Using dotNET for Examining the Content of a Stack 85
Summary 89
This chapter uses four dotNET and dotNET control examples
to demonstrate the flexibility of a multitude of dotNET
applications and how to use them to enhance your VEE
applications.
Agilent Technologies
73
4
DotNet Control and Communications
Overview
Exercise 4.1 Applying a dotNET Date-time Example
This exercise applies DateTimeConversion to demonstrate how dotNET can
be used to insert date/time into a VEE Pro 8 program.
Exercise 4.2 Selecting Alternate Ways of Choosing dotNET
Files
This example demonstrates how to use the OpenFileDialog class to display
and apply a Windows standard open file dialog box.
Exercise 4.3 Using dotNET Operations Builder for ListBox
Examples
The ListBox and CheckedListBox examples can be used to select specific
items from lists either by highlighting the item or by checking it.
74
Agilent VEE - Practical Graphical Programming
DotNet Control and Communications
4
Exercise 4.4 Using dotNET for Examining the Content of a
Stack
The Stack example is used to demonstrate one of the built- in data
structures in .NET Framework. A stack is a last in, first out collection.
This example shows how to add (push) objects to the stack and remove
(pop) them.
The .NET (pronounced dot net) capabilities were developed by Microsoft.
Some of its capabilities are applicable to VEE Pro 8. They are
demonstrated by many more examples and are also available from both
Help => Open Example => dotNET and Help => Open Example =>
dotNETControls.
More learning information is given in
http://msdn.microsoft.com/vstudio/express/beginner/ then choose
Beginning Web Site Development 1 => Tier 1 and Tier 2 or whichever
apply to your personal capabilities and requirements.
Agilent VEE - Practical Graphical Programming
75
4
DotNet Control and Communications
Exercise 4.1 - Applying a dotNET Date-time Example
This exercise applies DateTimeConversion to demonstrate how dotNET can
be used to insert date/time into a VEE Pro 8 program.
Open VEE Pro 8, clear your Work Area, and maximize Main.
Applying the dotNET DateTimeConversion program
1 Go to Help => Open Example => DotNET => DateTimeConversion.
Rearrange the objects as shown in Figure 4- 1.
Figure 4-1 DateTimeConversion program
2 Remove the objects: README, Warranty Disclaimer, From VEE to .NET,
and its AlphaNumeric.
76
Agilent VEE - Practical Graphical Programming
DotNet Control and Communications
NO TE
4
It is easy to convert UTC time to local time. The System namespace is imported to
save typing.
3 Run this program. It should look like Figure 4- 2 but with your current
date and time inserted.
Figure 4-2 .NET to VEE portion of conversion program
4 Insert these three objects into whatever program you desire to include
VEE Pro date and time.
5 Save Figure 4- 2 as EXER04.1; close your modified program.
Agilent VEE - Practical Graphical Programming
77
4
DotNet Control and Communications
Exercise 4.2 - Selecting Alternate Ways of Choosing dotNET Files
This example demonstrates how to use the OpenFileDialog class to display
and apply a Windows standard open file dialog box.
Clear your Work Area and maximize Main.
Applying the OpenFileDialog class
1 Go to Help => Open Example => DotNET => SelectFiles. See Figure 4- 3.
This figure offers the Select Files program included in one object.
Figure 4-3 DotNET => SelectFiles in one object
2 Go to Menu Bar => Device => Function & Object Browser and select the
Type, Assembly, Namespace, Type and Members shown in Figure 4- 4.
Click on Create Instance. The "openfiledialog" shown below is the result.
78
Agilent VEE - Practical Graphical Programming
DotNet Control and Communications
NO TE
4
This program could be developed as a single object (above) or by using the Function &
Object Browser and selecting the appropriate categories.
Figure 4-4 Generating the "openfielddialog" object with the Function & Object Browser
3 Devise the program shown in Figure 4- 5 in the same Main area of
Figure 4- 4; it will perform the same as Figure 4- 3; run this program.
Agilent VEE - Practical Graphical Programming
79
4
DotNet Control and Communications
Figure 4-5 SelectFiles program with separate objects after running
4 Save this program as EXER04.2.
80
Agilent VEE - Practical Graphical Programming
DotNet Control and Communications
4
Exercise 4.3 - Using dotNET Operations Builder for ListBox
Examples
The ListBox and CheckedListBox examples can be used to select specific
items from lists either by highlighting the item or by checking it.
1 Clear your Work Area and maximize Main.
2 Select Menu Bar => Help => Open Example => DotNETControls =>
ListBox. See Figure 4- 6 and arrange objects as shown.
Figure 4-6 ListBox before running
3 Save it as EXER04.3; run this program; select two or three colors by
holding down Shift; see Figure 4- 7.
Agilent VEE - Practical Graphical Programming
81
4
DotNet Control and Communications
Figure 4-7 ListBox while running
4 Increase the Text Array via its Property box to six and add two more
colors to the Text Array box. See Figure 4- 8.
NO TE
82
The two added colors were automatically alphabetized as noted in the ListBox.
Agilent VEE - Practical Graphical Programming
DotNet Control and Communications
4
Figure 4-8 Expanded ListBox with two of six colors selected
5 Save this figure as EXER04.3a and close this program.
6 Select Menu Bar => Help => Open Example => DotNETControls =>
CheckedListBox. See Figure 4- 9; add two colors and arrange objects as
shown.
NO TE
• The two colors are not alphabetized in the CheckedListBox below.
• Only one color at a time is displayed.
NO TE
The "Set CheckOnClick…" and "Add Item to CheckedListBox" objects were
constructed using the dotNET Op Builder in the Function & Object Browser. For
additional information on the dotNET Operation Builder, click on the Help button. It
will take you to the Select a Type menu where you then can select whichever VEE
on-line Help is of interest to you.
Agilent VEE - Practical Graphical Programming
83
4
DotNet Control and Communications
Figure 4-9 CheckedListBox after being expanded and while running
7 Save this program as EXER04.3b.
NO TE
84
To build your own Add an Item object, select Menu Bar => Device => Windows
Forms Controls => ListBox => right-click on ListBox, generate .NET Operation
Builder; double-click to Add an Operation; select Accessibility object; go to Items;
select Add; click OK twice - the item Add is then added as
"System.Windows.Forms.ListBox". For additional Help, right-click on the object
and select Help.
Agilent VEE - Practical Graphical Programming
DotNet Control and Communications
4
Exercise 4.4 - Using dotNET for Examining the Content of a Stack
The Stack example can be used to demonstrate one of the built- in data
structures in .NET Framework. A stack is a last in, first out collection
which is in contrast to a queue. A queue is a first in, first out collection.
This example shows how to add (push) objects to the stack and remove
(pop) them. Stacks may be coupled to other programs such as a Payroll
data base.
Clear your Work Area and maximize Main.
Displaying and modifying a stack via dotNET
1 Select Menu Bar => Help => Open Example => DotNET => Stack. See
Figure 4- 10.
Figure 4-10 DotNET example :"Stack"
Agilent VEE - Practical Graphical Programming
85
4
DotNet Control and Communications
2 Open all icons, arrange the objects, and change the Text object
information as shown in Figure 4- 11.
Figure 4-11 Modified Stack Example before running
3 Save this program as EXER04.4.
4 Run this program; it should look like Figure 4- 12; note that the stack
output is the reverse of the Text icon.
86
Agilent VEE - Practical Graphical Programming
DotNet Control and Communications
4
Figure 4-12 Modified Stack Example after running
5 Modify the For Count from 8 to 7; change the array size from 8 to 7 via
its Properties window.
6 Change the Title of the Logging AlphaNumeric to Names of Employees.
7 Change the content of the Text object; our choices are shown in Figure
4- 13; save this as EXER04.4a.
8 Run this program.
Agilent VEE - Practical Graphical Programming
87
4
DotNet Control and Communications
Figure 4-13 Names and size of Text object modified
9 Close this program.
88
Agilent VEE - Practical Graphical Programming
DotNet Control and Communications
4
Summary
This chapter uses four dotNET and dotNET control examples to
demonstrate the flexibility of a multitude of dotNET applications.
Additional examples can be found in three locations:
1 Open VEE Pro Help, click on Guide to Agilent VEE Example Programs
under Contents tab; select .NET examples. These examples demonstrate
.NET's power and flexibility and are rated by difficulty.
2 Select Menu Bar => Help => Open Example => DotNET.
3 Select Menu Bar => Help => Open Example => DotNET Controls.
The next chapter will examine techniques for building and unbuilding
records with the Get Field and Set Field objects.
This completes Chapter 4.
Agilent VEE - Practical Graphical Programming
89
4
90
DotNet Control and Communications
Agilent VEE - Practical Graphical Programming
www.agilent.com
Contact us
To obtain service, warranty or technical
support assistance, contact us at the
following phone numbers:
United States:
(tel) 800 829 4444
(fax) 800 829 4433
Canada:
(tel) 877 894 4414
(fax) 800 746 4866
China:
(tel) 800 810 0189
(fax) 800 820 2816
Europe:
(tel) 31 20 547 2111
Japan:
(tel) (81) 426 56 7832 (fax) (81) 426 56
7840
Korea:
(tel) (080) 769 0800
(fax) (080) 769 0900
Latin America:
(tel) (305) 269 7500
Taiwan:
(tel) 0800 047 866
(fax) 0800 286 331
Other Asia Pacific Countries:
(tel) (65) 6375 8100
(fax) (65) 6755 0042
Or visit Agilent World Wide Web at:
www.agilent.com/find/assist
Product specifications and descriptions in
this document are subject to change without notice.
© Agilent Technologies, Inc. 2008
Printed in Malaysia
First Edition, March 2008
W1141-90038
Agilent Technologies