1
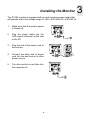
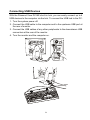
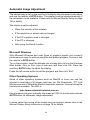
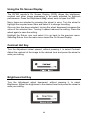
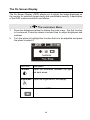
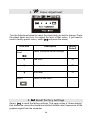
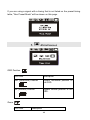
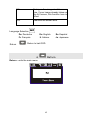
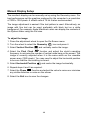
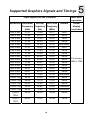
Diamond View DV180 Colour LCD Monitor 18.1” (45.9 cm) LCD Panel Size User’s Manual TABLE OF CONTENTS 1. SAFETY INSTRUCTIONS AND MAINTENANCE .................................... 3 2. INTRODUCTION............................................................................................. 4 UNPACKING THE MONITOR ............................................................................. 4 FEATURES ....................................................................................................... 4 3. INSTALLING THE MONITOR ..................................................................... 6 CONNECTING THE MICROPHONE ..................................................................... 7 CONNECTING THE SPEAKER ............................................................................ 7 CONNECTING HEADPHONES ............................................................................ 8 CONNECTING USB DEVICES ........................................................................... 9 4. SETTING UP AND USING THE DV180 ..................................................... 10 THE CONTROL PANEL ................................................................................... 10 USING YOUR MONITOR FOR THE FIRST TIME ................................................ 10 AUTOMATIC IMAGE ADJUSTMENT ................................................................ 11 Microsoft Windows................................................................................. 11 Other Operating Systems ....................................................................... 11 USING THE ON SCREEN DISPLAY .................................................................. 12 CONTRAST HOT KEY..................................................................................... 12 BRIGHTNESS HOT KEY .................................................................................. 12 THE ON SCREEN DISPLAY ............................................................................. 13 MANUAL DISPLAY SETUP ............................................................................. 18 5. SUPPORTED GRAPHICS SIGNALS AND TIMINGS ............................. 19 6. TROUBLESHOOTING AND USEFUL HINTS.......................................... 21 TROUBLESHOOTING ...................................................................................... 21 NEED MORE HELP?....................................................................................... 23 7. SPECIFICATIONS......................................................................................... 24 8. CONTACTING MITSUBISHI ELECTRIC ................................................ 25 AUSTRALIA ................................................................................................... 25 NEW ZEALAND.............................................................................................. 25 1 Copyright Copyright ©1999 Mitsubishi Electric Australia Pty. Ltd. All rights reserved. No part of this publication may be reproduced, transmitted, transcribed, stored in a retrieval system or translated into any language or computer language, in any form or by any means, electronic, mechanical, magnetic, optical, chemical, manual or otherwise, without the prior written permission of Mitsubishi Electric Australia Pty. Ltd. Disclaimer Mitsubishi Electric Australia Pty. Ltd. makes no representations or warranties, either expressed or implied, with respect to the contents hereof and specifically disclaims any warranties, merchantability or fitness for any particular purpose. Further, Mitsubishi Electric Australia reserves the right to revise this publication and to make changes from time to time in the contents hereof without obligation to notify any person of such revision or changes. Diamond View is a registered trademark of Mitsubishi Electric Australia Pty. Ltd. Microsoft, Windows and Internet Explorer are registered trademarks of Microsoft Corporation. Other trademarks or registered trademarks are the property of their respective owners. Fill in here!! For convenience, write your monitor’s information in the space below. The serial number is on the base of the product. Monitor Information Product Name: DV180 Serial Number: Date of Purchase: Dealer Information Dealer: Telephone Number: Address: 2 Safety Instructions and Maintenance Safety Instructions z z z z z z z z 1 The power supply cord connects the monitor to the electrical mains power supply. The socket outlet shall be near the monitor and shall be easily accessible. This monitor should be operated from the type of power indicated on the rating label on the base of the monitor. If you are not sure of the type of power available, consult your dealer or local Power Company. Unplug the monitor from the wall outlet before cleaning. Do not use liquid or aerosol cleaners. Use a soft cloth to clean the monitor housing. Slots and openings on the back or top of the cabinet are provided for ventilation. They must not be blocked or covered. This product should never be placed near or over a radiator or other heat source. The monitor should never be enclosed in a built-in installation unless proper ventilation is provided. Never push objects of any kind, or spill liquid of any kind into the monitor. Do not attempt to service the monitor yourself, as opening or removing covers may expose you to dangerous voltages or other risks. In the event of any problem, misuse or an accident such as dropping, contact your nearest Mitsubishi Electric Authorised Service Centre. Do not expose the monitor to direct sunlight or heat. Do not place anything on your monitor. Bad ventilation may elevate the temperature within the monitor and cause it to fail. 3 Introduction Unpacking the Monitor 2 Check following items. If they are missing or damaged, consult your place of purchase immediately. z Diamond View DV180 TFT LCD monitor with signal cable and built-in USB hub z Floppy diskette containing Windows 95, 98 and 2000 drivers, and the test pattern display program for Automatic setup of the display (Auto.exe). z Mitsubishi Australia DV180 User’s Manual z Warranty Card z Power cord z Audio input cable z Microphone cable z USB cable Locate the model name and the serial number on the label underneath the base of your monitor. Write down the details of your monitor and dealer in the space on page 2 for future reference. Features Your Diamond View DV180 monitor has the following features: z High Resolution DV180 provides you SXGA resolution (1280 x 1024 pixels) with perfect image quality. z On Screen Display The On-Screen Display (OSD) allows you to adjust all settings simply with on-screen menus. z Auto Adjustment With auto adjustment function, the monitor can automatically adjust Colour Temperature, Horizontal and Vertical position, Pixel Clock and Clock Phase for you. 4 z High Quality Ratiometric Expansion With any kind of resolution, your DV180 monitor can always display a full-screen image. z 16 Million Colour (True Colour) Display With dithering support, the DV180 monitor enhances the visual effect and offers you a better resolution of image quality. z High Brightness and Contrast Brightness of up to 235 cd/m2.(typical) is available. Compared with the 200:1 contrast ratio of most other LCD monitors, the DV180 offers a contrast ratio of 300:1 for improved clarity and dynamic colour range. z Lower Power Consumption Compared to the maximum 150 W power consumption of 21" CRT monitors, the DV180 consumes a maximum of only 75 W while operating. z Power Saving The monitor’s power management complies with VESA DPMS standard. When the system is idle (off mode), the monitor automatically reduces its power consumption to 5 W or less. z Plug and Play Compatibility With its DDC-1 and DDC-2B, it is compatible with the Plug and Play features of Microsoft® Windows® 95, Windows 98 and Windows 2000. z Space Saving Compared with CRT monitors, the depth of your LCD monitor footprint is only 217mm, saving up to 70% of your desktop real estate. z Light Weight Your monitor weights only 9.8Kg, almost 70% lighter than traditional 21" CRT monitors. z Built-in USB Hub 4 downstream ports and 1 upstream port. z Multimedia Support The built-in speakers and microphone are convenient, easy to use and save desktop space. 5 Installing the Monitor 3 The DV180 monitor is equipped with an auto-sensing power supply that will operate within the voltage range of 100 to 240 Volts AC, at 50~60 Hz. 1. Make sure that the system power is turned off. 2. Plug the signal cable into the VGA signal connector at the rear of the PC. 3. Plug the end of the power cord to the monitor. 4. Connect the other end of power cord into the wall socket or other power source. 5. Turn the monitor on and then turn the computer on. 6 Connecting the Microphone After connecting the microphone to the computer’s sound card, you can use it for video conferencing, to record or edit audio files and for many other applications. 1. Turn the computer system off. 2. Plug one end of audio cable into the LINE IN port at the rear of the computer and the other end to the microphone connector at the rear of the monitor. 3. Turn the monitor and the computer on. ) To record using the microphone, you don't need to be close to the microphone. Staying in the position that you usually use to operate your computer allows you to achieve optimal recording performance. Connecting the Speaker The DV180 is equipped with built-in stereo speakers. After connecting the speaker, you can enjoy music easily. 1. Turn the computer system off. 2. Plug one end of the audio cable into the LINE OUT port at the rear of the computer. Plug the other end into the speaker port at the back of the monitor. 3. Turn on the computer and the monitor. 7 ) To adjust the audio volume, use the volume control at the right side of your monitor. Connecting Headphones Plug your headphones into the headphone connector at the rear of monitor to avoid disturbing others while still being able to hear audio through the monitor. 8 Connecting USB Devices With the Diamond View DV180’s built-in hub, you can easily connect up to 4 USB devices to the computer via the hub. To connect the USB hub to the PC: 1. Turn the system power off. 2. Connect the USB cable to the computer and to the upstream USB port at the rear of monitor. 3. Connect the USB cables of any other peripherals to the downstream USB connectors at the rear of the monitor. 4. Turn the monitor and the computer on. 9 Setting up and Using the DV180 The Control Panel 4 Adjust. Wheel Auto Power Switch: Turns the monitor on or off. AutoKey: Automatically adjusts the display’s colour temperature, Horizontal Position, Vertical Position, Clock Phase and Pixel Clock. Adj. (Adjust) Wheel: Rotate and press this to access the On Screen Display (OSD). Audio Volume Control: (at the rear of the monitor) rotates to adjust the audio volume Using Your Monitor for the First Time When the DV180 monitor is first installed the display must be adjusted to give optimal performance. For best performance set the PC’s graphics card to a resolution of 1280 x 1024 pixels before adjusting the monitor. A refresh rate of 75 Hz is recommended. If you are using Windows 95, 98 or 2000 you will be prompted for the Windows driver files the first time that you use the monitor. These files are also included on the diskette. Place the diskette in the PC’s floppy disk drive and click OK to install them. 10 Automatic Image Adjustment The easiest way to set up the monitor is to display the adjustment test pattern and use the monitor’s AUTO button. The display must be adjusted manually if the test pattern is not available. Please refer to Manual Display Setup on page 18 for details. The display must be adjusted: • When the monitor is first installed • If the resolution or refresh rate is changed • If the PC’s graphics card is changed • If the PC is changed • After using the Recall function Microsoft Windows With Microsoft Windows and most types of graphics signals your screen’s performance is easy to optimise using the test pattern program, Auto.exe, and the monitor’s AUTO button. To run the program, insert the diskette into a floppy disk, click on the Windows Start button, click on Run, type A:\auto.exe and then click OK. Press the monitor’s AUTO button to adjust the display. Press the left mouse button to exit the program and then click “Exit”. Other Operating Systems Users of other operating systems such as MacOS or Linux can use the internet to download a full-screen test from the File Downloads, TFT LCD Monitors section of Mitsubishi Electric Australia’s web site. Various bitmap file formats are available. The URL is http://www.mitsubishi-electric.com.au Use a graphics program to display the image at 100% of its size and press the AUTO button for automatic image adjustment. In some cases fine tuning of the image may be required, please refer to the Manual Display Setup instructions on page 18 for details. 11 Using the On Screen Display The DV180 monitor’s On Screen Display (OSD) allows the brightness, contrast and other image parameters to be easily adjusted for optimum performance. Press the Adjustment (Adj.) wheel once to open the OSD. Menu items are selected by pressing the wheel in once. Turn the wheel to highlight the required menu item and select it to change its setting. Once an item has been selected, turning the wheel downward increases the value of the selected item. Turning it upward reduces the setting. Press the wheel again to save the setting. Highlight the Return icon and select it to go back to the previous menu. Selecting Return from the main menu closes the On Screen Display. Contrast Hot Key Turn the Adjustment wheel upward, without pressing it, to select Contrast. Adjust the contrast of the image to the desired level and press the wheel to save your setting. Brightness Hot Key Turn the Adjustment wheel downward, without pressing it, to select Brightness. Adjust the brightness to the desired level and press the wheel to save your setting. 12 The On Screen Display The On Screen Display (OSD) allows you to adjust the image displayed on the monitor for optimum image clarity and comfortable viewing. A description of the OSD’s menus and their use follows: 1. The Luminance Menu 1. Press the Adjustment wheel to display the main menu. The first function is Luminance. Press the wheel a second time to adjust brightness and contrast. 2. Turn the wheel to highlight the function that is to be adjusted and press the wheel to select it. OSD Icon Description Contrast Adjust the difference between the light and dark areas. Brightness Adjust the brightness of the display. Return Return to last OSD menu. 13 2. OSD Icon The Geometry Menu Description Hor. (horizontal) Position Adjusts the horizontal position of the display. Ver. (vertical) Position Adjusts the vertical position of the display. Phase Adjusts the phase of pixel clock. It can improve the focus and stability of your screen as well. Pixel Clock Adjusts the frequency of the pixel. With this function, you can enlarge or reduce the width of your screen. Return Return to last OSD. Note: There is a limit when you adjust the vertical position of the image downward. The colour of the numeric position indicator will change to red once the screen reaches the limit. 14 3. Colour Adjustment Turn the Adjustment wheel to select the colour that you wish to change. Press the wheel again and turn it to adjust the level of that colour. If you want to and press the wheel. recall a factory preset colour, select OSD Icon Description Factory Default Recall the preset colour settings. Recall R Red level 75 G Green level 75 B Blue level 75 Return Return to last OSD. 4. Recall Factory Settings Select to recall the factory settings. This page is also a "status display" that shows the current horizontal and vertical (refresh rate) frequencies of the graphics signal from the computer. 15 If you are using a signal with a timing that is not listed on the preset timing table, "Non Preset Mode" will be shown on this page. 5. Miscellaneous OSD Position OSD Icon Description Hor. (horizontal) Position adjusts horizontal position of the OSD. Ver. (vertical) Position adjusts vertical position of the OSD. Zoom OSD Icon Description 16 ON Enlarges the image to full screen size. If your image already takes up the full screen, this function has no affect. OFF Reduces the screen size. Language Selection Return De: Deutsche En: English Es: Español Fr: Français It: Italiano Ja: Japanese Return to last OSD. 6. Return Return : exits the main menu. 17 Manual Display Setup The monitor’s display can be manually set up using the Geometry menu. For best performance set the graphics produced by the computer to a resolution of 1280 x 1024 pixels. A refresh rate of 75 Hz is also recommended. The image adjustment is easiest if the test pattern is used. Alternatively, an image with fine text can be used, preferably with black text on a white background. For example, Apple Macintosh users can display the contents of the System folder using the List view. To adjust the image: 1. Press the adjustment wheel to open the On-Screen menu. 2. Turn the wheel to select the Geometry 3. Select Vertical Position icon and press it. and vertically centre the image. 4. Select the Pixel Clock function and adjust the clock’s sampling frequency to minimise the number of vertical noise bars on the screen. The image is correctly adjusted when it is the same width as the viewable screen area (1280 pixels). You may need to adjust the horizontal position to be sure that the clock setting is correct. 5. Select Horizontal Position and centre the image horizontally. 6. Repeat steps 4 and 5 as required. 7. Select the Phase function and adjust the value to remove or minimise any visible distortion or noise on the screen. 8. Select the Exit icon to save the changes. 18 Supported Graphics Signals and Timings Input Signal from the Computer Dot Clock Resolution Horizontal Vertical Frequency Frequency Frequency (MHz) (Hz) (kHz) 640 x 350 31.47 70.08 25.17 640 x 350 37.86 85.10 31.50 720 x 400 31.47 70.08 28.32 720 x 400 37.93 85.00 35.50 640 x 480 35.00 67.00 30.24 640 x 480 31.47 60.00 25.18 640 x 480 37.86 72.80 31.50 640 x 480 37.50 75.00 31.50 640 x 480 43.27 85.00 36.00 800 x 600 35.16 56.25 36.00 800 x 600 37.88 60.32 40.00 800 x 600 48.08 72.19 50.00 800 x 600 46.87 75.00 49.50 800 x 600 53.67 85.10 56.25 832 x 624 49.72 74.55 57.29 1024 x 768 48.36 60.00 65.00 1024 x 768 56.48 70.10 75.00 1024 x 768 60.02 75.00 78.75 1024 x 768 35.52 86.95 44.96 1024 x 768 60.24 74.93 80.00 1280 x 64.00 60.00 108.00 1024 1280 x 80.00 75.00 135.00 1024 19 Remark 5 Multi-scan operation Actual display resolution DOS VESA DOS VESA Macintosh DOS VESA VESA VESA Full screen VESA 1280 x 1024 VESA VESA VESA VESA Macintosh VESA VESA VESA Interlaced Macintosh VESA VESA ) Signal timings not shown in the table may not be supported. We recommend that you set your graphics card to use one of the factory preset timings to achieve the optimum screen image. ) There are 22 modes that are compatible with VESA standards, Windows 95, 98 and NT, and the Apple Macintosh. ) In some rare cases, the screen may show a small amount of noise. This may be caused by non-standard signal frequencies from the VGA card. It is not a defect. You can improve it by automatic adjustment or by manually adjusting the Clock Phase and Pixel Frequency in the image menu. ) Some interference lines may appear on your screen when shutting down the computer system or turning off the monitor. This is normal and will not harm the monitor. ) To extend the product life, we suggest you use the power saving features of your computer system. 20 Troubleshooting and Useful Hints Troubleshooting 6 If you encounter any problems using this product, make sure that your monitor is properly installed. Please refer to chapter 4 of this manual for the installation guide. The answers to some common questions follow: 9 There is some noise or flickering on the screen or the picture is unstable. Check: Signal cable connector pins. If there are bent or missing pins, consult your place of purchase. Graphics card. Check that the drivers and settings are correct. The set up of the monitor. If you are using Windows re-run the test pattern program (Auto.exe) that is on the floppy disk supplied with the monitor and press the monitor’s AUTO button. This may be caused by non-standard signal frequencies from the VGA card. It is not a defect and can be improved by manually adjusting the Clock Phase and Pixel Frequency in the image menu. Scanning frequency. Change the settings of your graphics card to one of the Supported Graphics Signals and Timings specified on page 19 and re-align the monitor. 9 The image appears grainy or edges of objects appear jagged. Check: The resolution of the graphics card. Graphics resolutions below 1280 x 1024 will appear as full screen images, but they are not optimal. Increase the resolution to 1280 x 1024 pixels. 9 I can't find the DV180 on the Windows 95, 98 or 2000 monitor lists. You need to update the Windows setup information file for your DV180. This is on the diskette that was supplied with your monitor. You can also download the files from the File Downloads section of Mitsubishi Electric Australia’s web site at: http://www.mitsubishi-electric.com.au 21 9 There is no picture on the screen. Check: Power saving mode. Press any key or move the mouse to deactivate power saving and turn the monitor on. Power cord. Check that it is securely plugged into the wall socket and into the monitor and that the wall socket is switched on. Signal cable connector pins. If there are bent or missing pins, consult your place of purchase. 9 Characters look too dark or too light. Adjust the brightness and contrast settings. 9 The speakers don’t work. Check: Audio cable. Make sure that the audio cable is connected to the PC’s “LINE-OUT” port and the monitor’s speaker port. Volume control. Make sure that the volume control at the rear of the monitor’s base is not set to the minimum volume level. 9 The microphone doesn’t work. Check: Audio cable. Make sure that the audio cable is connected to the PC’s “LINE-IN” port and the monitor’s microphone port. 9 There is noise or feedback from speakers when using the microphone. Move the speakers further away from the monitor or point them away from the microphone. If the microphone is not being used, some sound cards will allow you to mute the microphone setting of the Windows volume control. To do this: 1. Double click the speaker icon on the Windows task bar or open the Multimedia icon of the Control Panel. 2. Open the volume control window and select “Mute” under the microphone volume adjustment. 22 9 The Auto key does not function properly and an "unsupported" message shows. In some non-full-screen patterns, the Auto-key function cannot work properly and an "unsupported" OSD will pop up. In this situation, you need to use the Adjust wheel to set your screen up manually. 9 The sound of speakers distorts and the screen flashes when using speakers. Check whether the audio cable is connected to “ Line Out” port of PC rather than the “Speaker Out” port of the PC’s sound card. Need More Help? If your problems persist after checking this manual, please contact your place of purchase or e-mail us at [email protected] Driver files and product information are available from Mitsubishi Electric Australia’s web site at http://www.mitsubishi-electric.com.au 23 Specifications 7 LCD Panel 18.1” (46 cm) diagonal Active Matrix TFT Maximum Resolution 1280 x 1024 pixels at 75 Hz refresh rate Display Area 359 mm (H) x 287 mm (V) Brightness 235 cd/m² (typical) Contrast Ratio 300:1 Video Input Analogue RGB Horizontal Scanning 31.5 ~ 80 kHz Vertical Scanning 56 ~ 85 Hz Refer to page 18 Supported Graphics Signals and Timings of this manual User’s Controls Power switch, On Screen Display, Auto Adjust, Speaker Volume USB Hub 1 upstream and 4 downstream ports Speaker Output Power 0.5 Watts per channel (stereo) Audio Input Impedance 50k ohms Microphone Sensitivity -68 dB Frequency Response 100 Hz ~ 16 kHz Power Supply (Universal) 90 ~ 264 V AC, 47 ~ 63 Hz Power consumption 75 W maximum (including USB hub) less than 5 W in power saving modes Regulatory Compliance C-Tick (AS3548), AS3260, CE, TCO’99 Dimensions (W x H x D) 457 mm (W) x 469 mm (H) x 217 mm (D) Weight (net) 12.6 kg Ambient Temperature Operating: +5°C ~ +40°C / +41°F ~ +104°F Storage: Relative Humidity -20°C ~ +60°C / -4°F ~ +140°F Operating: 20% ~ 85% non-condensing Storage: 10% ~ 85% non-condensing *Specifications are subject to change without notice 24 Contacting Mitsubishi Electric Australia Address: Mitsubishi Electric Australia Pty. Ltd. 348 Victoria Road, Rydalmere, NSW, 2116 Telephone: (02) 9684-7777 Fax: (02) 9898-0484 Web site: http://www.mitsubishi-electric.com.au Tech. Support: [email protected] New Zealand Address: MELCO New Zealand Ltd. 1 Parliament Street, Lower Hutt Telephone: (04) 560-9100 Fax: (04) 560-9140 Web site: http://www.melco.co.nz 25 8