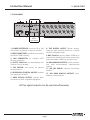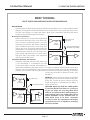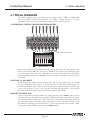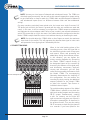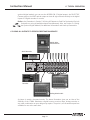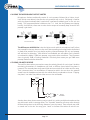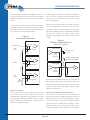
1
Instruction
Manual
IMPORTANT NOTICE
This manual contains valuable information you will
need to install and use the 1788A.
A separate remote control manual has been
created to deal with remotely controlling the 1788A,
use of the PC and Mac software, and use of the
1788A-R dedicated hardware remote control unit.
Please be sure to maintain a copy of that manual
together with this one.
P/N 999-4320 Revision 1 Released 05/12/2005
Manufactured by
Aphex Systems Ltd.
11068 Randall St.
Sun Valley, CA 91352 USA
S Y S T E M S
Copyright 2005 Aphex Systems Ltd. All rights reserved.
Produced by: Donn Werrbach. Creation tool: Adobe InDesign 2.0. Printed by: Stuart F. Cooper Co., Los Angeles.
MICROPHONE PREAMPLIFIER
A MESSAGE FROM THE PRESIDENT
Dear Aphex Customer,
Congratulations on your purchase of the Model 1788A remote controlled microphone preamplifier. Years of
research and development were required to overcome the hurdles that similarly purposed products do not even
address. Additional years of use of the original Model 1788A in some of the most critical audio applications
resulted in the significant improvements that are embodied in the 1788A.
The primary improvement is the use of TCP/IP protocol over Ethernet for remote control. Execution of control
commands as well as metering feedback is almost instantaneous for 128 channels.. The control can be achieved
via an extremely powerful yet easy to use software package (PC or Mac), a dedicated hardware remote controller
Model 1788A-R, or anything that talks MIDI.
Of course, the same unique features that made the 1788A so functional and great sounding are still included
in the 1788A. Included is the Digitally Controlled Low Noise Amplifier (LeNA™) that provides glitchless and
noiseless gain changes. The MicLim™ is a limiter that is in front of the preamp that virtually prevents overload.
The Drift Stabilized A/D™ eliminates the need for the high pass filter in the digital domain and also assures
maximum resolution. All these patented features make the 1788A an indispensable tool for live or studio
applications.
We are extremely pleased that you have joined the elite of the audio world that appreciate the benefits that
only the 1788AA system provides.
Very truly yours,
Marvin Caesar
President
Safety Declarations
CAUTION: For protection against electric shock, do not remove the cover. No user serviceable parts inside.
WARNING: This equipment has been tested and found to comply with the limits for a Class A digital device pursuant to
Part 15 of the FCC Rules. These limits are designed to provide reasonable protection against harmful interference when
the equipment is operated in a commercial environment. This equipment generates, uses, and can radiate radio frequency
energy and, if not installed and used in accordance with the operating guide, may cause interference to radio communications. Operation of this equipment in a residential area is likely to cause interference in which case the user will be required
to correct the interference at his own expense.
The user is cautioned that changes and modifications made to the equipment without approval of the manufacturer could
void the user’s authority to operate this equipment.
It is suggested that the user use only shielded and grounded cables to ensure compliance with FCC Rules.
|
®
C
US
59887
Conforms to standards
UL60950 and EN60950.
Page 2
Instruction Manual
CONTENTS
CONTENTS
1. INTRODUCTION – 4
1.1 LOGICAL CONTROL BLOCKS — 4
1.2 PATENTED TECHNOLOGY — 4
1.3 SIGNAL & CONTROL — 4
1.4 SIMPLIFIED BLOCK DIAGRAM — 5
2. QUICK START – 6
2.1 FRONT PANEL — 6
2.2 REAR PANEL — 7
2.3 GETTING UP & RUNNING — 8
3.3 REAR PANEL VIEW — 10
3. INSTALLATION – 10
3.1 UNPACKING AND INSPECTING — 10
3.2 MOUNTING — 10
3.3 REAR PANEL VIEW — 10
3.4 POWER CONNECTION — 10
3.5 MICROPHONE INPUT — 11
3.6 OUTPUT CONNECTORS — 11
3.7 INPUT TRANSFORMER MODE — 12
3.8 MIDI CONNECTIONS — 12
3.9 COM PORT — 13
3.10 INSTALLING NEW FIRMWARE INTO THE 1788A — 13
3.11 AUX OUTPUT POST/PRE MODE SETTING — 13
4. FUNCTIONS IN DETAIL – 15
4.1 LOCAL BLOCK — 15
4.2 CONTROL BLOCK — 18
4.3 DIGITAL BLOCK — 20
4.4 MONITOR BLOCK — 21
4.5 TEST BLOCK — 21
4.6 SECONDARY FUNCTIONS — 22
4.6.1. Display Brightness — 22
4.6.2. Flash Version — 22
4.6.3. Synchronize — 22
4.6.4. Sysex Dump — 22
5. USING THE DIGITAL MODULE – 23
5.1 SYNCHRONIZATION — 23
5.2 SENDING DIGITAL AUDIO — 28
6. TYPICAL OPERATION – 29
6.1 BYPASSING A CONSOLE’S MICROPHONE PREAMPLIFIERS — 29
6.2 DIRECT TRACKING — 30
6.3 USING ALL OUTPUTS TO FEED FIVE DESTINATION DEVICES — 31
6.4 USING THE MICROPHONE OUTPUT LIMITER — 32
6.5 USING POLARITY REVERSE — 32
6.6 GROUPING CHANNELS — 33
7. Warranty & Service – 34
7.12 WARRANTY — 34
6.2 SERVICE INFORMATION — 34
8. Specifications – 35
8.1 GENERAL SPECIFICATIONS — 35
8.2 ARCHITECT’S SPECIFICATIONS — 36
APPENDICES - 47
Appendix A: Balanced and Unbalanced Lines and Operating Levels — 37
Appendix B: Dealing With Grounds and Hum — 38
Appendix C: Proper Wiring Techniques — 39
Appendix D: Standard Cable Wiring — 41
Appendix E: Helpful Wiring Table — 45
Appendix F: Word Clock Cabling — 47
Page 3
MICROPHONE PREAMPLIFIER
1. INTRODUCTION
The Aphex Model 1788A is a premium 8-channel remote controlled microphone
preamplifier with sophisticated features. Remote control means the preamps can be
located anywhere they are needed for optimum performance. By locating 1788A’s just
off-stage, near the microphones for example, many difficulties can easily be overcome
such as long mic lines picking up noise and RF interference; capacitance of long mic
lines degrading the high end response; mic splitters dumping multiple loads onto the mic
knocking down output level and making mics sound dull and lifeless.
1.1 LOGICAL CONTROL BLOCKS
Controls on the front are graphically divided into five separate blocks: Local, Control,
Digital, Monitor and Test.
The Local Block includes the individual meters and function lights for all eight channels,
and a single set of assignable function control buttons plus a multipurpose ADJUST knob.
The Control Block manages port and NET parameters. The Digital Block manages the
digital audio parameters when the Digital Option is installed. The Monitor Block puts the
selected channel’s sound up on headphones. The Test Block is used to calibrate system
levels.
1.2 PATENTED TECHNOLOGY
MicLim™, our patented “microphone output limiter”, limits in front of the preamplifier
to prevent overloading the front end. Now you don’t have to worry about clipping and
you can run higher gain and higher average output level. This translates not only to
distortion prevention, but to digital audio with maximum resolution and no “overs”. Low
level signals that used to be lost in the noise will be audible, making your tracks more detailed and
dimensional.
LeNA™, our patented digitally controlled low noise amplifier, allows glitchless and
noiseless local and remote control over gain.
Our patented Drift Stabilized A/D Converter further advances the quality of digital
audio by perfectly balancing the ADC and eliminating its digital highpass filter.
1.3 SIGNAL & CONTROL
Analog I/O
The Model 1788A has three analog signal groups:
1. Eight Balanced MIC Inputs on XLR
2. Eight Servo-Balanced MAIN Line Outputs on XLR
3. Eight Active Balanced AUX Line Outputs on one 25 Pin D-Sub following Tascam
pinout.
Remote Control
1788A’s are controlled through MIDI protocol. Both standard MIDI and special Ethernet
LAN ports are provided. Anything producing MIDI such as a light controller board, a show
control system, a sequencer, a DAW, a MIDI controller, or a keyboard can act as the 1788A’s
controller. The Ethernet connection facilitates high speed remote control networking of a
constellation of 1788A’s. Up to 300 units (2400 mics) can be controlled by software and
64 banks of 16 units can be controlled by the hardware remote simultaneously.
Page 4
Instruction Manual
1. INTRODUCTION
Optional Digital I/O
When the optional digital audio output module is installed, three 8-channel simultaneous
digital outputs are available:
1. Alesis ADAT® Output, Optical Fiber Interface
2. Tascam® TDIF™ Output, 25 Pin D-SUB
3. Aphex specific AES/EBU Output, 15 Pin D-Sub
Digital sync is derived from a selectable internal clock, or externally from either the BNC
clock I/O or the TDIF connector. A Dip Switch is provided to set certain critical parameters
relating to sync. Please refer to section 3 for the dip switch chart.
How LeNA™ Changes Everything
Other manufacturers’ remotely controlled preamps provide whopping and popping gain
steps of 4 to 10dB. Events often call for trimming the mic gain, and jumping through
such large steps can be painfully obvious to the audience and the talent. We worked
on this problem until we invented and patented a new technology that we call LeNA™
(Digitally Controlled Low Noise Amplifier). With LeNA we give you gain “stops” (stable
gain set-points) in 1dB increments that are ramped through inaudibly minute 1/4dB steps
- smooth as a baby’s bottom!
Presets - Another Advantage
The ability to create and save presets is a side benefit of having a comprehensive digital
remote control system. The whole eight channel array of preamp functions can be stored
to presets and recalled. You can reconfigure a single 1788A or a very large array of them
just by recalling a preset. This works out great when you need to re-set mics by the scene
or act, or to get fast setups at new venues.
1.4 SIMPLIFIED BLOCK DIAGRAM
Phantom Power
Tone Bus
Clip Light
Clip Det.
Level Det.
+20dB
Front End
MIC
INPUT
Lo Cut
-26dB
0-39dB
0 -27dB
Gain
Attn.
HPF
Test Tone
Pad
Pre
Limiter
Polarity
Post
Limiter
Limit Light
Other Channel
WORD CLOCK
Input (BNC)
PLL
Clock Int/Ext.
Underlined Italics
indicate digital controls
Sample Rate
+6dB
Servo
Bal.
MAIN
OUTPUT
(XLR)
Main Output Ref
.
Main Mute
Input Gain Control
AES3 Outputs Paired
As 1&2, 3&4, 5&6, 7&8
Peak Meter
+48V
0-27dB
+6dB
Attn.
Bal.
AUX
OUTPUT
(DB25)
Aux Output Ref
.
Aux Mute
A/D
Conv.
X4
AES3
OUTPUT
(DB15)
ADAT
OPTICAL
Internal
Clock
TDIF
WORD CLOCK
Output (BNC)
Page 5
MICROPHONE PREAMPLIFIER
2. QUICK START
2.1 FRONT PANEL
2
5,6,7,8
9,10,11
4
3
1
1. CHANNEL SELECT buttons select one of
eight channels for local control.
2. CHANNEL STATUS READOUT displays input
gain and maximum output settings; function
status and headroom.
12,13,14,15
16 18,19
17
20
21
23
22
24
so that MIDI Channel and Device numbers and
Net numbers can be adjusted. After adjustment
the STORE saves the selected numbers.
13. MODE selects whether the remote control
will be MIDI or LAN.
3.
MULTIPLE
SELECT button allows
simultaneous control of a group of channels.
14. SET I.D. selects which number (Channel,
Device or Net) is being adjusted.
4. ADJUST CONTROL adjusts gain setting for
the input, maximum output for the MAIN OUT
and AUX OUT, and the Channel, Device, and
Net numbers in the Status Readout Display. For
secondary control it sets the display brightness.
15. LOCAL CONTROL button
adjustments from the front panel.
5. GAIN SELECT button determines the
function of the GAIN control: Input, Main
Output or Aux Output.
6. MUTE shuts down the analog output of the
selected channel. Gain and other functions can
be adjusted while a channel is muted.
7. PHANTOM +48V engages the 48V phantom
power for condensor microphones.
8. 26dB PAD inserts a 26dB PAD (attenuation)
on the input stage.
9. POLARITY REVERSE reverses polarity on the
input stage.
10. ENABLE LIMITER engages the MicLim™
limiter on the output of the microphone.
11. LOW CUT 75Hz engages a 12dB/octave
low cut filter with a corner frequency of 75hz.
12. ADJUST/STORE arms the ADJUST control
allows
16. REMOTE ACTIVITY LED indicates the
1788A is receiving control data from a remote
device.
17. GLOBAL STATUS READOUT displays values
for the elected function.
18. CLOCK button selects either an internal or
external digital clock synchronization reference.
19. RATE button selects the sampling rate when
using the internal digital clock.
20. MONITOR CHANNEL selects the channel
sent to the head phone monitor. Selected
channel is indicated on the Channel Status
Readout.
21. VOLUME control adjusts headphone
monitor level.
22. PHONE JACK is used for headphones.
23. 700Hz TEST TONE is used to adjust system
levels. It is bussed to selected channel at one of
two levels (0dBFS or - 0dBFS).
24. POWER On switch.
Page 6
Instruction Manual
2. QUICK START
2.2 REAR PANEL
2
IN
MIDI
OUT
THRU
4
5
6
RS-232
UTIL
AES/EBU OUTPUT
1 2 3 4
10
AUX
OUTPUT
11
CH 8
MIC IN
CH 7
MIC IN
CH 6
MIC IN
CH 5
MIC IN
CH 4
MIC IN
CH 3
MIC IN
CH 2
MIC IN
CH 1
MIC IN
LINE OUT
LINE OUT
LINE OUT
LINE OUT
LINE OUT
LINE OUT
LINE OUT
LINE OUT
ON
ADAT
WORD
IN CLOCK OUT
90-260 V~50/60Hz 60 WATTS
LAN
OPTICAL
TDIF
MODEL 1788A - 8 Channel Mic Pre
Aphex Systems Sun Valley, CA
1
3
7
8
9
Optional
Digital Module
12
1. POWER RECEPTACLE: works on 80 to 280
VAC without any jumper changes or switches.
2. MIDI CONNECTORS: provided for controlling
the Model 1788A remotely.
3. LAN CONNECTOR: for standard CAT5
Ethernet connection.
4. RS-232 COM Port: for downloading new
firmware into the preamp.
5. DIP SWITCH: sets priority for external
synchronization.
6. AES/EBU DB-15 DIGITAL OUTPUT: provides
four stereo pairs of AES3.
7. ADAT OPTICAL OUTPUT: provides direct
connection to ADAT compatible equipment.
8. TDIF DIGITAL OUTPUT (Tascam format):
routes all eight channels directly to a Tascam
DA-88 or compatible input.
9. BNC Clock I/O: syncs the Model 1788A to an
external clock source (word clock or super-clock)
and links multiple 1788A’s to the same clock.
10. AUX ANALOG OUTPUTS: DB-25 connector
with eight active-balanced transformerless
outputs.
11. XLR MIC INPUTS: balanced, transformer
isolated.
12. XLR MAIN ANALOG OUTPUTS: servobalanced, transformerless.
All five signal outputs can be used simultaneously.
Page 7
MICROPHONE PREAMPLIFIER
2.3 GETTING UP & RUNNING
Here’s a step by step instruction on using the 1788A. Please plug a
microphone into Channel 1 and connect the CH1 Main Output to a
mixer or recorder input. Turn all units on.
1. Press the LOCAL CONTROL button in the Control Block to enable
the front panel controls. It’s a good idea to get into the habit of
tapping the LOCAL CONTROL button every time you need to make new
adjustments at the front panel just to make sure you have access.
2. Press the CHANNEL SELECT button on the front panel labeled “1”.
This attaches the preamp controls to channel 1.
3.. If the microphone you are using requires phantom power, press the
Phantom +48V button. You should see the +48V light come on in
the first channel’s Channel Status Readout. If you are using a dynamic
or ribbon microphone, leave the +48V off or turn it off if it is on.
CAUTION 1: Beware of the potential shock hazard with
phantom power. Don’t touch the contacts.
CAUTION 2: It has been reported that some ribbon mics may be
damaged by phantom power. This is unusual, but it’s a good idea to
keep it turned off when not required.
4. At this point you can try all the other parameters like PAD, POL, etc.
by pressing their buttons to get the feel. You should be able to adjust
the preamp gain, and hear the mic through your system. Next, we
need to set the maximum output level to match your mixer or recorder.
Turn all the preamp functions off. Turn down your speaker volume.
5. Turn on the 0dB test tone by holding down the 0dB 700Hz TEST
button and tapping the channel 1 select button. The Ch 1 bargraph
meter should go to full scale indicating tone presence. You should hear
the tone and see it’s presence on your equipment.
6. Select Main Out with the GAIN SELECT button and adjust the
output level with the ADJUST control. If you know the rated maximum
input level (MIL) to your recorder or mixer, set the 1788A’s output to
that value. For example, if your recorder can take +24dBu max input,
set the 1788A’s output to 24 as indicated on the 1788A’s digital gain
readout. That makes sure the dynamic range of the 1788A is matched
Page 8
Instruction Manual
2. QUICK START
to your equipment and that our MIcLim protection will indeed protect
you from clipping your gear. If you don’t know the MIL of your input,
then use your mixer or recorder’s meters to indicate full scale input.
Simply adjust the 1788A’s Main Output Gain to get just under a full
scale reading. When done, tap the TONE button to kill it.
NOTE: If completely in doubt, simply set the output level to a number
that is 20dB above your 0dB reference level. If +4dBu, set it to
+24. If -10dBV (equal to approx. -12dBu), set it to 8.
7. Give the microphone some sound and monitor the Headroom
meter in the Channel Status Readout. Select Input Gain with the
GAIN SELECT button and adjust the input gain so that the peaks fall
approximately between 12dB and 6dB of headroom.
8. If the input gain is set at its lowest setting (26dB) and the level is still
too hot, use the 26dB PAD.
9. To test the MicLim protection, select ENABLE LIMITER. You will
easily verify that it’s working on loud shouts. Try shouting into the mic
with the Limiter on and off to see the difference. With MicLim on, you
will be able to safely run higher gain and level without fear of clipping
on loud sounds.
10. When mic’ing a vocal, the LOW CUT 75Hz function will provide
pop protection. For deepest musical bass when mic’ing an instrument,
you’ll probably want to leave it off.
11. You can monitor your mic channel with headphones on the front
panel. Turn down the phones volume, plug in the phones. Press the
Monitor Channel Select until 1 appears and adjust the volume to
suit. Now you can hear channel 1 in high fidelity.
12. Running remote control will require additional instructions that are
covered in the separate Remote Control Manual.
Page 9
MICROPHONE PREAMPLIFIER
3. INSTALLATION
3.1 UNPACKING AND INSPECTING
Your Aphex product was carefully inspected and packaged at the factory prior to shipment.
The carton and packing materials are designed to protect the unit during shipment, but
you should inspect the carton and its contents for signs of physical damage before use.
It is your responsibility to file a damage claim with the shipper. We encourage you to
save the original packing materials in case you should ever need to ship this unit out for
servicing.
3.2 MOUNTING
The Model 1788A occupies 2RU (90mm or 3.5 inches) of a standard EIA equipment rack.
Allow at least an additional 3” to 4” of depth for connectors. Place the Model 1788A in
the desired rack space and secure with the cushioned rack screws supplied or equivalent
hardware. Don’t position the Model 1788A directly above power amplifiers or power
supplies that produce strong hum fields or heat.
A word on rack mounting and ventilation
All electronic equipment will experience premature failure if operated at excessive
temperatures. The 1788A requires adequate vented air space for proper cooling. What
is adequate depends on the ambient temperature, proximity of other heat producing
equipment, and whether the air is moving or still. It is always best to err on the safe side.
We recommend at least one free rack space be allowed between each 1788A. The space
between units may be filled with perforated filler panels, but we recommend against
solid panels as they will restrict air flow. In severe cases, such as very hot climates or tight,
unventilated closets, a rack-top exhaust fan may be required to keep the air moving. One
of the best ways to know if you have adequate ventilation for a stack of 1788A’s is to feel if
the top unit’s chassis is substantially hotter then the bottom unit. If so, you should provide
better ventilation.
3.3 REAR PANEL VIEW
IN
MIDI
OUT
THRU
RS-232
UTIL
AES/EBU OUTPUT
1 2 3 4
AUX
OUTPUT
CH 8
MIC IN
CH 7
MIC IN
CH 6
MIC IN
CH 5
MIC IN
CH 4
MIC IN
CH 3
MIC IN
CH 2
MIC IN
CH 1
MIC IN
LINE OUT
LINE OUT
LINE OUT
LINE OUT
LINE OUT
LINE OUT
LINE OUT
LINE OUT
ON
ADAT
WORD
IN CLOCK OUT
90-260 V~50/60Hz 60 WATTS
LAN
OPTICAL
TDIF
MODEL 1788A - 8 Channel Mic Pre
Aphex Systems Sun Valley, CA
3.4 POWER CONNECTION
The Model 1788A uses a standard IEC power cord with a voltage range of 80 -280 VAC.
The appropriate mains plug for each country is normally shipped with each unit. However,
if you must install or replace the plug use the correct wiring code as follows:
USA
Black = Live
White = Neutral
Green = Ground
IEC/Continental
Brown = Live
Blue = Neutral
Yellow/Green = Earth
Page 10
Instruction Manual
3. INSTALLATION
Ground Loops
Ground loops hardly ever cause problems within the 1788A since it was designed with
high immunity. However, other equipment connected to the 1788A may experience hum
and noise from a ground loop. Ground loops can occur when various interconnected
equipment is powered from separate AC circuits that are fed from opposite phases of the
power feeder. Most service panels assign odd numbered breakers to one phase and even
to the other. Rooms that are powered from more than one circuit can have outlets that are
out of phase. Adjacent rooms may be powered with opposite phase.
NOTE: If your system is plagued with ground loop troubles, you should try to get all
the equipment onto the same phase or use a local power isolation transformer.
3.5 MICROPHONE INPUT
The eight transformer coupled microphone INPUT CONNECTORS are locking female 3-pin
XLR’s wired with pin 2 positive.
3.6 OUTPUT CONNECTORS
Two separate analog outputs per channel are provided:
1. Transformerless servo-balanced Main Outputs on eight separate XLR’s
2. Eight transformerless active balanced Aux Outputs on a single DB-25 connector.
Main and Aux outputs have separate individual output level control. Using these two
outputs, the 1788A can serve as an active mic splitter.
Pin connections for the XLR type connectors follow the international standard of pin-1
ground, pin-2 positive and pin-3 negative as shown below.
MALE AND FEMALE 3-PIN XLR CONNECTORS
NOTE: Read more information about audio wiring practices in the appendices.
2
2
3
2 Positive (+)
3
1
3 Negative (-)
1
1 Shield (Ground)
1
1
3
2
3
2
DB-25 PIN CONFIGURATION (AUX OUTPUT)
The following chart is a pin configuration for the analog DB-25 connector.
1
2
3
4
5
6
7
8
9 10 11 12 13
Male
14 15 16 17 18 19 20 21 22 23 24 25
13 12 11 10 9
8
7
6
5
4
3
2
25 24 23 22 21 20 19 18 17 16 15 14
1
Female
CH1
(+)
24
(-)
12
GND 25
CH2
10
23
11
Page 11
CH3
21
9
22
CH4
7
20
8
CH5
18
6
19
CH6
4
17
5
CH7
15
3
16
CH8
1
14
2
MICROPHONE PREAMPLIFIER
This connector pinout matches the Tascam Analog DB-25 connector that has also been
adopted by many other manufacturers such as Mackie and Yamaha. Ready made cables
can be purchased to connect with other products, or to obtain a break-out to XLR plugs.
Refer to Sections 5 for more information about using the Main and Aux Outputs.
CHANGING THE MODE
Remove the 1788A’s top cover and locate the set of
jumper pins JP1 and JP2 near each transformer. Move the
shorting device to the appropriate position as shown in the
illustration below (one jumper must always be left open).
3.8 MIDI CONNECTIONS
(LOADED) JP1
(UNLOADED) JP2
3.7 INPUT TRANSFORMER MODE
The 1788A’s Jensen® microphone input transformers can be operated in one of two
modes: LOADED and UNLOADED. The loaded mode places a load resistor on the
transformer secondary according to the transformer manufacturer’s specifications. This
maximally flattens the frequency and phase response between 20Hz and 20KHz. The
sound, of course, is outstanding. We have received many kudos. However, in our design
lab we discovered that leaving the transformer unloaded opens up the definition and
adds “sparkle” to many microphone sources. For analog and digital recording we feel the
user may deeply appreciate this added dimension, so we gave you a jumper option. The
LOADED mode is shipped by default, and the user will have to change the jumper to try
the UNLOADED mode.
INPUT
XFRMR
The external remote control is based
on MIDI protocol. The Model 1788A
is fitted with MIDI and Ethernet
ports for this purpose. MIDI data is transmitted via a special fiveconductor cable. Not just any 5 pin cable will suffice for proper
operation. MIDI cables are specially grounded and shielded to ensure efficient data
transmission.
IN
MIDI
OUT
THRU
MIDI CONNECTOR
Only the MIDI Out and MIDI Thru Ports connect Pin #2 to Ground.
3 5
2
1 4
Not Connected
Data Ground
Data +
Not Connected
NOTE: Remote control software for the 1788A is continually under development and
will go through new releases from time to time. To avoid obsoleting this manual,
we have moved the instructions covering remote operation to a separate dedicated
manual. Please locate and review that manual when planning your remote control
system.
Page 12
Instruction Manual
3. INSTALLATION
3.9 COM PORT
This is a standard RS-232 Com Port that runs at a fixed 9600 Baud. It is provided to allow
downloading of new firmware into the 1788A. It has no other purpose. Read ahead
for instructions on this procedure.
3.10 INSTALLING NEW FIRMWARE INTO THE 1788A
Aphex is always striving to improve the performance of its equipment. The firmware that
was programmed into your unit was the latest available at the time it was shipped. There
may be updates to the firmware that were made from time to time. Please check the
Aphex website at www.aphex.com to see if there are any updates made to the firmware
from the time you had purchased or last updated the unit.
Determine your current firmware version by going into Local Control, depressing both Test
Tone buttons and Channel 8 at the same time. The firmware version will appear in the
Global Readout Display. If a new version is available, you may install it on your 1788A as
follows.
NOTE: Do not attempt to download any firmware designed for the 1788A onto older
Model 1788 units.
DOWNLOAD PROCEDURE:
1. Download to your computer the update program from the Aphex web site or other
media that you may have received.
2. Connect a NULL MODEM cable from your computer’s Com Port to the 1788A’s Com
Port.
3. Power up the 1788A while holding down both Test Tone buttons. “Load-A” will appear
in the Global Readout Display.
4. Run the update program on your computer and follow the on-screen instructions.
5. At the end of a successful 1788A download, the computer screen will show the
message: “End of Load”.
6. Cycle the 1788A’s power normally off and on. Verify the new firmware version as
described above. The new version should now appear in the Global Readout Display.
3.11 AUX OUTPUT POST/PRE MODE SETTING
Two Aux Output modes are provided: PRE and POST mic gain control. This mode feature
was created after many requests from users. As the default, the 1788A is normally shipped
in the POST mode. This would normally be considered the “normal” mode except that
many users will find advantages to the PRE mode as will be explained below.
HERE’S THE DIFFERENCE
The POST mode sources the Aux Output signal from the preamplifier’s variable gain stage
just as the Main Output does. Thus, the Aux Output will vary as a function of the preamp
gain setting. This makes the Aux Output pretty much equivalent to the Main Output
except for its own output gain variability. The PRE mode sources the Aux Output from the
preamp’s 20dB first stage, before gain control is applied. This way, the Aux Output does
not respond to variations of the preamp gain adjustment. This is well illustrated in the
figure below.
Page 13
MICROPHONE PREAMPLIFIER
Mic
Input
Aux Output
Attenuation
Output
Stage
PRE POST
0 to -27dB
1 dB stops
+6dB
Selectable
26dB Pad
Input
Stage
Digitally
Controlled
Amplifier
Main Output
Attenuation
Output
Stage
0 or -26dB
+20dB
0 to +39dB
1 dB stops
0 to -27dB
1 dB stops
+6dB
AUX
Output
Main
Output
EXAMPLE OF USING PRE MODE
The FOH position has control over the 1788A’s but the monitor position doesn’t
want to be affected by the FOH’s gain changes.
In this case, the monitor position gets a fixed gain of 20dB from the microphone that
will not change. This represents a moderately amplified mic signal that is normally easy
to accommodate by the monitor mixing console. The Aux Output level can be adjusted
downward to reduce the Aux output level back approximately to mic level if necessary, but
you’re better off taking the hotter level and reducing your console’s preamp gain.
Note: Pad, Polarity and Lo Cut controls are in front of the variable gain amplifier
and will therefore affect the Aux Output in both PRE and POST modes. In the above
example, if the pad is suddenly engaged by the FOH operator, then a drop in level will
be seen at the Monitor position. These are usually fixed settings that should be
decided upon during set up and left alone thereafter.
PRE
POST
CHANGING THE PRE/POST SETTING
Remove the top cover and locate the jumper on each preamp module as illustrated below.
Move the jumper to the appropriate position.
VR3
VR2
VR1
VR6
JP1
JP2
PRE
POST
VR4
Default
Page 14
INPUT
XFRMR
Instruction Manual
4. FUNCTIONS IN DETAIL
4. FUNCTIONS in DETAIL
4.1 LOCAL BLOCK
Channel Select and Channel Status Readout
Select LOCAL CONTROL and use the CHANNEL SELECT buttons to choose one of eight
channels. Only one channel can be selected at a time, unless the MULTIPLE SELECT
button is engaged, making it possible to create a group of channels.
Each channel has its own Channel Status Readout. At the top is a two-digit gain
readout LED displaying the input or output gain setting depending on the status of the
GAIN SELECT button. The vertical 12 segment LED meter on the right side indicates
the available peak headroom measured in dB (4dB increments). To indicate that Local
Block functions (Polarity Reverse, Low Cut 75Hz, 26dB PAD, Phantom +48V and Enable
Limiter) have been engaged, the associated LED in the individual channel status readouts
is illuminated. When MUTE is engaged, the two-digit GAIN display at the top of the
individual channel status readout will flash double dash marks to indicate their muted
status. The flashing dash marks will alternate with the current gain setting. Even though
both analog outputs are muted, the digital outputs will not be muted. All indicators and
metering can be monitored at the remote location.
Gain Select
The GAIN SELECT button determines the function of the ADJUST control and the status
of the gain display in the individual channel status readout. The gain LED readout reflects
either the input or output setting depending on the position of the GAIN SELECT button.
Continually depressing the button will cycle through the three modes: Input, Main
Output and Aux Output. When Input is selected, ADJUST controls the input gain. When
Output (Main or Aux) is selected, the ADJUST controls the maximum output level.
8
Input Gain Control
The input gain is the actual gain of the front-end preamp section, before the variable Main
or Aux output settings take effect. Use Input Gain to bring the microphone’s signal level up
to the appropriate range as indicated on the channel’s Headroom Meter. The available
range of control is from +26dB to +65dB in 1dB stops (not “steps”) with individual
precision within +/- 0.08dB.
Page 15
MICROPHONE PREAMPLIFIER
NOTE: The gain does not move in 1dB steps. It ramps in small increments (1/4dB steps)
between 1dB “stops” to eliminate all gain adjustment glitches.
This brings us to making a comment about gain steps. While there are several remote
controlled preamps on the market, the problem is that they have stepped gain control
and the step size can be as large as 10dB. Even a 3dB step, up or down, in a microphone
preamp will cause an audible click or pop when it is changed. Only the Aphex Model
1788A overcomes this problem by the use of our patented LeNA™ digitally controlled
low noise amplifier technology. This method makes the step size very small, eliminating
the artifacts of sudden gain changes. This is especially appreciable when you have to roll
through a gain change of 6dB or more very quickly. The 1788A just sounds like a fader was
moved with no jumps, pops or zips. The 1788A rolls through the full span of 26 to 65dB
in 250 milliseconds. A single 1dB stop is completed in less than 15 milliseconds. In other
words, the 1788A’s smooth gain control is also fast and responsive.
Output Gain Control
The Main and Aux outputs have their own separate settings but work in the same way.
The gain is set for Main and Aux outputs depending on the position of the GAIN SELECT
button. The output gain programs an output stage attenuator to bring the 1788A’s
internal reference peak level down as necessary to match the maximum input levels of
external devices.
CAUTION: If you’re driving an unbalanced input from the Main Output, the actual output
reading on the channel status readout will be accurate up to +21dB as that is the
maximum output level when running Main Output unbalanced. Higher gain settings
than +21dBu will be inaccurate but will not cause any distortion. If you are using Aux
output and running a unbalanced input, the actual output will be 6dB lower than
what is indicated on the channel status readout.
There are many input stages that have odd maximum input levels (e.g. +18dBu). In order
to retain the function of the microphone limiter and maximize noise performance of the
entire audio system, the Model 1788A has output level trim of up to 27dBu balanced.
Once the maximum input level of the device following the Model 1788A is defined, the
output level of the Model 1788A can be trimmed to that level. The input gain of the
1788A is then adjusted to optimum performance. In addition to the 27dB of output
adjustment, each output may be muted.
In the event the input gain level is used to adjust the maximum output level, the benefit
of the MicLim™ function will be lost. The output level should be considered as a
“set-up and forget” function. Once it is adjusted properly, there should be no need
to make further adjustments. The displayed output level on the individual channel status
readout indicates the absolute full-scale output peak level of the output signal. This means
that no further considerations have to be taken regarding headroom when setting up the
system’s overall gain structure. For this reason, it is not recommended that the Main and
Aux output levels are adjusted remotely, even though it is possible. The test tones are quite
useful for set up purposes (described later in this section).
Mute
When the MUTE function is selected on an individual channel, both analog outputs are
muted. If MUTE is engaged when MULTIPLE SELECT is engaged then the entire group of
Page 16
Instruction Manual
4. FUNCTIONS IN DETAIL
channels is muted. The channel or channels that have been muted will flash double dash
marks in the Gain display of the individual channel status readout to indicate their muted
status. The flashing dash marks will alternate with the current gain setting. All parameters
may be adjusted while a channel is muted. When receiving gain settings (input or output)
remotely, the MUTE readout indication in the channel status readout will be overwritten
on any muted channel. To re-display the MUTE function, the GAIN SELECT button or the
CHANNEL SELECT button must be pressed again. The MUTE function does not affect the
headphone monitor output or the digital outputs.
Polarity Reverse
The POLARITY REVERSE button reverses the microphone preamp’s output polarity.
This can be a very useful feature in tracking down polarity differences in microphones
and/or cables. It is much easier and quicker than the alternative of swapping cables
and equipment. When the POLARITY REVERSE is inserted into a selected channel, the
corresponding POL REV LED indicator will illuminate on that channel’s status readout.
Additionally, the POLARITY REVERSE button itself will be illuminated.
Refer to Section 5.6 for instructions on how to properly use the POLARITY REVERSE
function.
Low Cut 75Hz
To help reduce low frequency rumble that can be caused by wind, handling of the
microphone or bad vocal articulation (popping “P’s”), a 75 Hz, 12dB per octave low cut
filter is provided. In general, this filter could be engaged when mic’ing vocals as it will
not usually affect the tonality of the human voice. When mic’ing instruments with very
wide bandwidth in the low frequency range, you may want to defeat the filter unless
there is substantial extraneous low frequency noise. When the LOW CUT 75Hz filter is
inserted into a selected channel, the corresponding LOW CUT LED indicator will illuminate
on that channel’s status readout. Additionally, the LOW CUT 75Hz button itself will be
illuminated.
26dB PAD
Using the 26dB PAD attenuates the preamp’s input signal by 26dB. It allows the channel
to receive line level inputs from a wireless microphone receiver or other high level device.
When the 26dB PAD is inserted into a selected channel, the corresponding PAD LED
indicator will illuminate on that channel’s status readout. Additionally, the 26dB PAD
button will be illuminated.
PHANTOM +48V
Pressing the PHANTOM +48V button engages the internal phantom power source. The
48 volt microphone power ramps up and down very slowly to avoid glitches. The ramping
also protects powered microphones from current surges, which have been known to
cause microphone damage. When the PHANTOM +48V power source is used on a
selected channel, its corresponding +48V LED lights up on the channel’s status readout.
Additionally, the PHANTOM +48V button itself will be illuminated.
CAUTION: Hot-plugging a microphone into a phantom powered input causes a very loud
impulse which can cause speaker damage. To be safe, allow at least 20 seconds for the
phantom power to discharge before plugging or unplugging a microphone.
Page 17
MICROPHONE PREAMPLIFIER
Enable Limiter
Enabling the LIMITER engages the proprietary Microphone Output Limiter (MicLim™)
which virtually eliminates the possibility of input overload. The MicLim provides up to
20dB of additional headroom. When the MicLim is inserted into a selected channel, the
corresponding LIM ON LED indicator will illuminate on that channel’s status readout as
well as the ENABLE LIMITER button. In the event the input exceeds the limiter threshold,
the CLIP/LIM indicator will illuminate.
Multiple Select
Normally, the preamp functions are controlled on a channel by channel basis. The
MULTIPLE SELECT button allows group control.
Activating MULTIPLE SELECT lets you chose any combination of the 8 channels for
simultaneous function control. Press any channel button to add it, and press again to
remove it.
When channels are added to the group, the function buttons of the Local Block will light
up to display the status of the lowest numbered channel. Other added channels do not
change status, and remain as they were until one of the function buttons in the Local
Block is pressed. Then, all grouped channels will take up that particular function state.
All uncommanded functions of the grouped channels will remain in their prior individual
state.
4.2 CONTROL BLOCK
Note: The first time any function button is depressed, it
will not change status of the selected function, it will only
indicate its current status in the global status readout.
Global Status Readout
The six-digit display of the global status readout indicates whatever data value is relevant
to functions that are presently selected for control or view in the Control, Digital or
Monitor Blocks.
Adjust/Store
This button enables the adjustment and storing of the Channel, Device, and Net numbers
that this specific 1788A will respond to for remote control. To provide a level of protection
from inadvertent modification of the settings, the procedure for using this button has
been made quite specific and you should become thoroughly familiar with it to avoid
confusion.
The Adjust/Store button is inactive if it is not lit. You cannot light it just by pressing it alone.
You must first select a parameter to adjust. That is a measure of protection from
inadvertent misconfiguration of the Channel, Device, and Net numbers which are critical
to successful remote control.
Page 18
Instruction Manual
4. FUNCTIONS IN DETAIL
Once the Adjust/Store button is lighted, you are committed to a new store. You can use
the ADJUST dial to change the displayed number to what is wanted. Pressing the Adjust/
Store button again commits the displayed number into effect. The button will then go
dark telling you the adjust and store sequence is completed and no further changes can
be made without re-starting the sequence.
How To Escape From A Commitment
There are two ways to escape if you are into a commitment but you really don’t want to
change anything.
1. Don’t change the displayed number, or if you did, put it back to it’s old value and
press Adjust/Store again. The old value will be re-committed, which is like doing
nothing.
2. Press the Mode button. This will act like an “Escape” button and dump out of the
adjust and store sequence without committing any changes you may have made to
the number displayed.
CAUTION: Pressing any button other than Mode in the Control Block will act as a
STORE command, just as if you pressed the Adjust/Store button a second time.
Mode
This selects which port handles remote control communications for the 1788A: MIDI or
LAN. No matter whether you are using the MIDI or the LAN port for remote control, you
must first put the Mode into MIDI in order to be able to change the Set I.D. parameters.
Once the Set I.D. parameters have been stored, you can change the Mode back to LAN if
appropriate.
Set I.D.
This button steps through the three key unit identification parameters of Channel, Device
and Net numbers. The presently in effect values will appear in the Global Status Readout.
How To Change The Channel, Device, and Net Numbers
When you need to set or change these values, you must go through the Adjust/Store
procedure as follows.
1. Press Local Control. The button will light up indicating you now have local control
of the 1788A’s front panel.
2. Set the Mode to MIDI.
3. Toggle the Set I.D. button to Channel, Device or Net - whichever is due to be
updated.
4. Press Adjust/Store. It will light up.
5. Spin the ADJUST dial to set the correct number in the General Status Readout.
Select other I.D.’s as desired and adjust their values.
6. When the desired numbers are updated, press Adjust/Store again to store the
update. The Adjust/Store button will go off indicating the values were stored and
you’re back in safe mode.
7. Put the 1788A into the correct remote interface port by using the Mode button.
8. Press Local to return the unit to remote control state.
Page 19
MICROPHONE PREAMPLIFIER
Local Control
The LOCAL button allows front panel control. Press it once, you’re in local. Press it again,
you’re back in remote. The LOCAL button is lighted when the 1788A is in the local state
and dark in the remote state.
NOTE: None of the front panel buttons will be lighted while the 1788A is in the remote
control state.
While in local control state, all remote control is rejected. Because the 1788A was created
to be used primarily in remote controlled applications, the local control state is deemed to
be temporary, for emergency or infrequent control. To prevent permanent remote control
lockout, the local control state will time out automatically five minutes after the
last front panel operation was detected.
When in the remote control state, every front panel control is locked out except
for the LOCAL and MONITOR SELECT buttons. Depress the LOCAL button once to
regain control of the front panel.
Store Upon Release of Local Control
Whether the control state is set back to remote manually with the Local button or through
the automatic time-out feature, all the settings on the Model 1788A will be stored upon
entering the remote control state. This insures that the locally made changes will not revert
to the prior state and will become the new default condition upon power-up.
Remote Activity LED
Flashes when the Model 1788 is receiving remote control data.
4.3 DIGITAL BLOCK
NOTE: This block is only active with the optional digital module
inserted into the rear panel of the Model 1788A.
Clock
The CLOCK button selects either the internal (Int.) or an external (Ext.) digital clock as a
synchronization reference and the corresponding LED will illuminate depending on which
one is selected.
When the Int. mode is selected, the 1788A locks to an internal clock generator that can
be set at one of three sample rates (32k, 44.1k and 48k) using the SAMPLE RATE button.
The chosen sample rate is displayed in the Global Status Readout.
In the Ext. mode, external clock is taken from one of two sources (BNC Word Clock In or
the DB-25 TDIF) on a priority basis. The highest priority input is the Word Clock. If no
Word Clock is detected, the 1788A then tries to lock to the TDIF.
NOTE: In Ext. mode, the incoming sample rate is displayed in the Global Status
Readout. The indication will be of the nearest standard rate of 32, 44.1, 48, or 96KHz,
and not a precise frequency measurement.
Page 20
Instruction Manual
4. FUNCTIONS IN DETAIL
Sample Rate
The RATE button toggles through the three available sample rates of 32, 44.1, 48, or
96KHz when running the 1788A on internal clock only.
4.4 MONITOR BLOCK
Channel Select
Repeatedly pressing the CHANNEL SELECT button toggles through all eight
channels which will be displayed in the General Status Readout. The audio
of the displayed channel is sent to the headphone jack. It is only possible
to monitor one channel at a time. When the unit is in remote control, the
Channel Select button is still functional.
Volume Control and Phone Jack
The VOLUME control sets only the headphone volume and does not affect the mic pre or
line output gains. Any headphone with a 1/4” stereo or mono phone plug is suitable. With
stereo headphones, both ears hear the same signal.
TIP: Turn down the volume control before plugging in phones to avoid ear damage.
4.5 TEST BLOCK
700Hz Test Tone
A 700Hz test tone is provided for adjusting the system levels and checking the
full function of each 1788A mic channel. Why 700Hz? Because it sounds nice
and you won’t mistake it for other test tones. When the test tone is activated
for any given channel or group of channels, several things happen. First, a low
level tone is substituted for the mic input jack. Second, the preamp gain is reprogrammed
to the precise level necessary to achieve the calibrated output level. This checks the
function of the whole amplifier chain from the mic input back to the line outputs. Also,
two precisely calibrated output levels are available for system setup. When the tone is
stopped, all the original gain programming is clicklessly restored.
This puts two extremely useful tools into your hands. First, you have a complete confidence
check of all preamp channels of your 1788A, as well as the optional A/D converters.
Second, you have a definitive system level reference for matching the 1788A’s output level
to any following equipment. By using the tones for level calibration, you can guarantee
the highest signal to noise ratio and that MicLim will absolutely protect your system
downstream from overload.
Two tone levels are available: -20dB and 0dB.
The dB reference is the maximum level before clipping of the preamp and the A/D
converters. So, the 0dB tone represents the maximum undistorted output level available
and maximum digital level. The -20dB tone represents the 20dB headroom point and
Page 21
MICROPHONE PREAMPLIFIER
typically is where you want to set your 0VU reference, or average operating level of all
following equipment.
The Gain indicators in the individual channel status readout are used to show when the
channel is in a test tone mode with a blinking bar. When the test tone is activated, it is
not possible to adjust the input gain on the channel being tested. Also, the MicLim™ and
26dB PAD functions are defeated.
Starting and Stopping the Test Tone
1. Put the 1788A in Local Control.
2. Hold down either the -20dBfs or 0dBfs button at the same time as you press the
CHANNEL SELECT button(s) of the channel or channels you wish to test.
When the test tone is activated the two test tone buttons will start flashing.
To deactivate the test tone, press either one of the two test tone buttons
again.
4.6 SECONDARY FUNCTIONS
4.6.1. Display Brightness
You can dim or brighten the front panel display by holding down BOTH TONE BUTTONS
and pressing the Channel 7 button. This puts the 1788A into “display mode”. Turning the
ADJUST dial will vary the display through 5 levels that are indicated in the Global Status
Readout window as D-0 (dimmest) through D-4.
To exit the display mode, press any other Channel Select button.
4.6.2. Flash Version
To determine the version of firmware that is installed in the 1788A, hold down BOTH
TONE BUTTONS and press the Channel 8 button. The version number will be displayed
in the Global Status Readout window.
4.6.3. Synchronize
BOTH TONE BUTTONS plus Channel 6. This is used in transferring all the parameters of
one 1788A to another 1788A through the MIDI ports.
4.6.4. Sysex Dump
BOTH TONE BUTTONS plus Channel 5. This is used to send a complete SysEx snapshot
of the 1788A’s controls to a MIDI controller.
NOTE: The procedures used for 3 and 4 above are described in the Remote Control
manual’s Using MIDI section.
Page 22
Instruction Manual
5. USING THE DIGITAL MODULE
5. USING THE DIGITAL MODULE
When you have the 1788A’s digital audio option installed, you have a very versatile digital
front end for any digital recorder, mixer, or DAW. The mic preamp and A/D Converters are
perfectly matched for headroom and low noise. There are only two areas you need to deal
with in using the digital module:
1. Synchronization (internal or external)
2. Sending digital audio data to other equipment
5.1 SYNCHRONIZATION
The 1788A can run on selectable internal crystal oscillators at 32Khz. 44.1KHz, 48Khz,
and 96KHz. When running from externally supplied sync, it can lock up on any frequency
between 32KHz and 96KHz.
NOTE: Beware that you will run into problems trying to use TDIF and ADAT Optical
outputs with any external clock sampling above 48KHz.
External Sync
The 1788A can take three types of external sync. All are received at the BNC Word Clock
IN jack.
1. Word Clock
2. Superclock (256 times sampling frequency)
3. AES/EBU Signal
Dip Switch Settings
Sync is detected according to the setting of three dip switches as illustrated below.
Phase 0
Word Clock
1 2 3 4
Super Clock
ON
Word Clock In
1 2 3 4
Phase 90
ON
Out 10Ω
1 2 3 4
AES3 In
ON
1 2 3 4
Out 75Ω
ON
1 2 3 4
ON
Default Settings
Switch 1: Determines if Word Clock at the sampling frequency or Superclock at 256X the
sampling frequency is accepted.
Switch 2: Determines if incoming Word Clock is expected to be shifted by 90 degrees. It’s
part of the Tascam TDIF specifications, but not all TDIF interfaces conform. Most seem to
produce standard in-phase Word Clocks. Try this switch if you have a DA-88 that won’t
recognize digital audio from the 1788A.
Switch 3: Determines if the source of switch 1 or AES/EBU input is accepted.
Switch 4: Word Clock output impedance; 10 ohms or 75 ohms. Allows either brute force
or impedance matched transmisison.
Refer to inset or Appendix F.
Page 23
MICROPHONE PREAMPLIFIER
BNC Clock I/O
The sync capability is made even more flexible by providing a feed-through port. When in
external sync mode, the BNC output jack is tied directly to the BNC input jack. This allows
the sync signal to pass through and be sent on to another unit. Depending on the quality
of the driver, up to eight 1788A’s may be looped together from a single clock source.
When the 1788A is set for internal sync, the BNC input jack is ignored and the BNC output
jack is connected to an output driver that supplies a low jitter Word Clock suitable for
sync’ing seven other 1788A’s and additional equipment.
NOTE: The BNC jack input range for good lock is 1V to 5V p-p. This means it can be
used with both terminated and unterminated word clock sources.
Clock In
This BNC jack is provided to receive your master clock source. It also accepts AES/EBU (or
S/PDIF) and Superclock depending on the dip switch settings.
The Model 1788A can operate equally well from a typical “brute force” 5V word clock
output or from a matched impedance master clocking distribution. Please refer to
Appendix F for a thorough discussion of clock wiring and distribution systems.
When the Model 1788A is operating in external clock mode, the Clock In jack is tied
directly to the Clock Out jack through a metal relay contact. The input load is light enough
to daisy-chain up to eight units by looping straight through. The final unit should have
a 50 or 75 ohm (as dictated by your distribution cable impedance) BNC terminator plug
inserted in its Clock Out jack to properly terminate the transmission line. If only one unit is
connected, then simply place the terminator plug on the single unit’s Clock Out jack.
When the Model 1788A is operating in the internal clock mode, the Clock In jack is
isolated and unterminated.
Clock Out
As previously described, this jack is directly tied to the Clock In jack to facilitate daisychaining multiple units to a master clock source when the unit is operating in external clock
mode. You’ll need to decide whether to use the brute force or matched impedance output
mode. We generally recommend impedance matched, as shown in the examples of this
chapter. However, if the unit to be driven is a short distance away, it is more cusromary in
the industry to use brute forced clock. Appendix F tells more about these choices.
When the Model 1788A is operating in internal clock mode, the Clock Out jack is
disconnected from Clock In and reconnected to the unit’s internal clock source. Thus,
any Model 1788A operating in internal clock mode can serve as a master clock source
when required. The internal clock is derived from a low jitter crystal oscillator and is fully
competent as a master clock.
Local Clock Mastering
You can use one Model 1788A as a clock master and slave everything else to it. For
example, to synchronize a group of Model 1788A’s, simply set the first unit to internal
clock mode and all the others to external. Daisy-chain the Clock Out of the first unit
through the clock ins and outs of the remaining units. This way all digital audio outputs
will be locked together to the first unit’s clock reference. You can also loop the clock
output of the last unit in line to your digital recorder or workstation, but remember to
terminate the last unit in line.
Page 24
Instruction Manual
5. USING THE DIGITAL MODULE
LOCAL CLOCK MASTERING
Termination or Sync to
Other Equipment
MIDI
OUT
P
<
IN
THRU
UTIL
RS-232
AES/EBU OUTPUT
1 2 3 4
AUX
OUTPUT
CH 8
MIC IN
CH 7
MIC IN
CH 6
MIC IN
CH 5
MIC IN
CH 4
MIC IN
CH 3
MIC IN
CH 2
MIC IN
CH 1
MIC IN
LINE OUT
LINE OUT
LINE OUT
LINE OUT
LINE OUT
LINE OUT
LINE OUT
LINE OUT
CH 8
MIC IN
CH 7
MIC IN
CH 6
MIC IN
CH 5
MIC IN
CH 4
MIC IN
CH 3
MIC IN
CH 2
MIC IN
CH 1
MIC IN
LINE OUT
LINE OUT
LINE OUT
LINE OUT
LINE OUT
LINE OUT
LINE OUT
LINE OUT
CH 8
MIC IN
CH 7
MIC IN
CH 6
MIC IN
CH 5
MIC IN
CH 4
MIC IN
CH 3
MIC IN
CH 2
MIC IN
CH 1
MIC IN
LINE OUT
LINE OUT
LINE OUT
LINE OUT
LINE OUT
LINE OUT
LINE OUT
LINE OUT
ON
ADAT
WORD
IN CLOCK OUT
90-260 V~50/60Hz 60 WATTS
OPTICAL
LAN
TDIF
N=8
Max
MODEL 1788A - 8 Channel Mic Pre
Aphex Systems Sun Valley, CA
MIDI
OUT
P
<
IN
THRU
UTIL
RS-232
AES/EBU OUTPUT
1 2 3 4
AUX
OUTPUT
ON
ADAT
WORD
IN CLOCK OUT
90-260 V~50/60Hz 60 WATTS
OPTICAL
LAN
TDIF
2
MODEL 1788A - 8 Channel Mic Pre
Aphex Systems Sun Valley, CA
MIDI
OUT
P
<
IN
THRU
UTIL
RS-232
AES/EBU OUTPUT
1 2 3 4
AUX
OUTPUT
ON
ADAT
WORD
IN CLOCK OUT
90-260 V~50/60Hz 60 WATTS
OPTICAL
LAN
1
TDIF
MODEL 1788A - 8 Channel Mic Pre
Aphex Systems Sun Valley, CA
Remote Clock Mastering
Depending on your system design, you may need to sync one or more 1788A’s to an
existing clock source. That is made simple by series-looping from the clock sourcebut you
you can also use a clock distribution amplifier and configure a parallel clocking scheme.
Series Remote Clocking
Terminator Plug
P
<
IN
MIDI
OUT
THRU
RS-232
UTIL
AES/EBU OUTPUT
1 2 3 4
AUX
OUTPUT
CH 8
MIC IN
CH 7
MIC IN
CH 6
MIC IN
CH 5
MIC IN
CH 4
MIC IN
CH 3
MIC IN
CH 2
MIC IN
CH 1
MIC IN
LINE OUT
LINE OUT
LINE OUT
LINE OUT
LINE OUT
LINE OUT
LINE OUT
LINE OUT
CH 8
MIC IN
CH 7
MIC IN
CH 6
MIC IN
CH 5
MIC IN
CH 4
MIC IN
CH 3
MIC IN
CH 2
MIC IN
CH 1
MIC IN
LINE OUT
LINE OUT
LINE OUT
LINE OUT
LINE OUT
LINE OUT
LINE OUT
LINE OUT
CH 8
MIC IN
CH 7
MIC IN
CH 6
MIC IN
CH 5
MIC IN
CH 4
MIC IN
CH 3
MIC IN
CH 2
MIC IN
CH 1
MIC IN
LINE OUT
LINE OUT
LINE OUT
LINE OUT
LINE OUT
LINE OUT
LINE OUT
LINE OUT
ON
ADAT
WORD
IN CLOCK OUT
90-260 V~50/60Hz 60 WATTS
LAN
OPTICAL
TDIF
N=8
Max
MODEL 1788A - 8 Channel Mic Pre
Aphex Systems Sun Valley, CA
MIDI
OUT
P
<
IN
THRU
RS-232
UTIL
AES/EBU OUTPUT
1 2 3 4
AUX
OUTPUT
ON
ADAT
WORD
IN CLOCK OUT
90-260 V~50/60Hz 60 WATTS
LAN
OPTICAL
TDIF
2
MODEL 1788A - 8 Channel Mic Pre
Aphex Systems Sun Valley, CA
MIDI
OUT
P
<
IN
THRU
RS-232
UTIL
AES/EBU OUTPUT
1 2 3 4
AUX
OUTPUT
ON
ADAT
WORD
IN CLOCK OUT
90-260 V~50/60Hz 60 WATTS
LAN
OPTICAL
1
TDIF
MODEL 1788A - 8 Channel Mic Pre
Aphex Systems Sun Valley, CA
From Clock Source
Page 25
MICROPHONE PREAMPLIFIER
Parallel Remote Clocking
To Additional 1788A’s
or Other Gear
Clock D.A.
MIDI
OUT
P
<
IN
THRU
RS-232
UTIL
AES/EBU OUTPUT
1 2 3 4
AUX
OUTPUT
CH 8
MIC IN
CH 7
MIC IN
CH 6
MIC IN
CH 5
MIC IN
CH 4
MIC IN
CH 3
MIC IN
CH 2
MIC IN
CH 1
MIC IN
LINE OUT
LINE OUT
LINE OUT
LINE OUT
LINE OUT
LINE OUT
LINE OUT
LINE OUT
CH 8
MIC IN
CH 7
MIC IN
CH 6
MIC IN
CH 5
MIC IN
CH 4
MIC IN
CH 3
MIC IN
CH 2
MIC IN
CH 1
MIC IN
LINE OUT
LINE OUT
LINE OUT
LINE OUT
LINE OUT
LINE OUT
LINE OUT
LINE OUT
CH 8
MIC IN
CH 7
MIC IN
CH 6
MIC IN
CH 5
MIC IN
CH 4
MIC IN
CH 3
MIC IN
CH 2
MIC IN
CH 1
MIC IN
LINE OUT
LINE OUT
LINE OUT
LINE OUT
LINE OUT
LINE OUT
LINE OUT
LINE OUT
CH 8
MIC IN
CH 7
MIC IN
CH 6
MIC IN
CH 5
MIC IN
CH 4
MIC IN
CH 3
MIC IN
CH 2
MIC IN
CH 1
MIC IN
LINE OUT
LINE OUT
LINE OUT
LINE OUT
LINE OUT
LINE OUT
LINE OUT
LINE OUT
CH 8
MIC IN
CH 7
MIC IN
CH 6
MIC IN
CH 5
MIC IN
CH 4
MIC IN
CH 3
MIC IN
CH 2
MIC IN
CH 1
MIC IN
LINE OUT
LINE OUT
LINE OUT
LINE OUT
LINE OUT
LINE OUT
LINE OUT
LINE OUT
ON
From Clock Source
ADAT
WORD
IN CLOCK OUT
90-260 V~50/60Hz 60 WATTS
LAN
OPTICAL
TDIF
MODEL 1788A - 8 Channel Mic Pre
Aphex Systems Sun Valley, CA
MIDI
OUT
P
<
IN
THRU
RS-232
UTIL
AES/EBU OUTPUT
1 2 3 4
AUX
OUTPUT
ON
ADAT
WORD
IN CLOCK OUT
90-260 V~50/60Hz 60 WATTS
LAN
OPTICAL
TDIF
MODEL 1788A - 8 Channel Mic Pre
Aphex Systems Sun Valley, CA
MIDI
OUT
P
<
IN
THRU
RS-232
UTIL
AES/EBU OUTPUT
1 2 3 4
AUX
OUTPUT
ON
ADAT
WORD
IN CLOCK OUT
90-260 V~50/60Hz 60 WATTS
LAN
OPTICAL
TDIF
MODEL 1788A - 8 Channel Mic Pre
Aphex Systems Sun Valley, CA
MIDI
OUT
P
<
IN
THRU
RS-232
UTIL
AES/EBU OUTPUT
1 2 3 4
AUX
OUTPUT
ON
ADAT
WORD
IN CLOCK OUT
90-260 V~50/60Hz 60 WATTS
LAN
OPTICAL
TDIF
MODEL 1788A - 8 Channel Mic Pre
Aphex Systems Sun Valley, CA
MIDI
OUT
P
<
IN
THRU
RS-232
UTIL
AES/EBU OUTPUT
1 2 3 4
AUX
OUTPUT
ON
ADAT
WORD
IN CLOCK OUT
90-260 V~50/60Hz 60 WATTS
LAN
OPTICAL
TDIF
MODEL 1788A - 8 Channel Mic Pre
Aphex Systems Sun Valley, CA
If Impedance Matched, Use Terminations
Variations
As you can see, clocking is usually pretty simple. Sometimes, especially with the use of
many channels and multiple 1788A’s, you may need to work out an optimal clocking
scheme depending upon what equipment is involved outside the 1788A’s. You might, for
example, need to fan out from a parallel clock D.A. to several racks of 1788A’s which are
locally series-looped. With long distance clock runs, you should use impedance matched
transmission to minimize jitter problems.
Refer to Appendix F for information about word clock distribution methods and
cabling.
Page 26
Instruction Manual
5. USING THE DIGITAL MODULE
BRIEF TUTORIAL
BRUTE FORCE AND IMPEDANCE MATCHED TRANSMISSION
BACKGROUND
Synchronization of digital audio equipment shouldn’t be a problem but it is. All the problems would
disappear if impedance matched transmission were used by every piece of gear. But, this just isn’t
the case, even though it is simple and cheap. “Brute Force” transmission (the kind that causes
trouble) is still found throughout the industry.
Brute Force Transmission
What’s “brute force”? It refers to driving the Word
Clock output jack directly from a line driver logic
chip. The driver’s output impedance is too low,
usually around 10 ohms. This assures a good and
clean unloaded output pulse at full logic level
(5Vp-p) but does not consider transmission line
characteristics. Over distances less than 6 feet this
method seems to work ok, but with longer lines,
heavy ringing and overshoot occur which causes
high jitter and in the extreme cases equipment
may not even be able to lock.
Brute Force
Clock Transmitter
5Vp-p Output Level
Open Circuit
<10Ω
Source
Impedance
Still 5Vp-p But With Ringing
(Worse With Longer Cable)
Brute Force
Clock Transmitter
<10Ω
Source
Impedance
Clock Receiver
Coax
Line
Impedance Matched Transmission
Impedance matching changes a few things, but
is not complicated. If a transmission line (like
75 ohm coax cable) is sourced and loaded by its
characteristic impedance, then there will be no overshoot or ringing of the word clock, even at great
distances. The only complication is that the pulse amplitude received will be half the amplitude of
the logic driver’s output. That means the clock receiver must have a greater sensitivity, or effectively
a lower logic threshold to detect the clock’s level
transitions.
Clock
Transmitter
5Vp-p Open Circuit
75Ω
Source
Termination
2.5Vp-p With Termination
Clock
Transmitter
75Ω
Source
Termination
Clock
Receiver
75Ω
Coax
Line
75Ω
Load
Termination
PROBLEM: A lot of word clock inputs use standard
logic chips that won’t work on a halved input level.
If they did, it would be easy to convert any brute
forced clock system to matched lines by adding a
resistor at each end.
SOLUTION: Aphex has made the 1788A capable
of receiving Word Clock down to 1/2 volt p-p
so you can safely run very long Word Clock
cables to its remote location while getting no
cable induced jutter. The 1788A’s Word Clock
output impedance can be switched from 10
ohms (brute force) to 75 ohms (matched)
in order to meet any requirement. We highly
recommend the use of impedance matching
whenever possible.
Page 27
MICROPHONE PREAMPLIFIER
5.2 SENDING DIGITAL AUDIO
The digital module provides three simultaneous 8-channel outputs:
1. Four AES/EBU 110 ohm pairs on a 15-pin D-Sub
2. ADAT® Optical on a TOSLINK Jack
3. Tascam TDIF® on a 25-pin D-Sub
Connect your digital audio receivers to any or all of these outputs. You need to take into
account the clocking requirements of all outboard equipment. In some special cases this
may prevent you from usinng all the outputs at once.
AES/EBU Output
Four 2-channel standard professional AES/EBU outputs are provided. The pinout of the
15-pin D-Sub is according to our own standard. The chart below shoes the wiring pinout
so you can make suitable breakout adapters.
1
2
3
4
5
6
7
8
Male
9 10 11 12 13 14 15
8
7
6
5
4
3
2
15 14 13 12 11 10 9
1
Female
CH1&2
CH3&4
CH5&6
CH7&8
1
2
3
4
5
6
7
8
(+)
(-)
GND
9 - 15
DIN 1&2 *
DGND
DIN 3&4 *
DGND
DIN 5&6 *
DGND
DIN 7&8 *
DGND
LRCK IN *
EMPH IN *
FS1 IN *
FS0 IN *
DGND
FS1 OUT
FS0 OUT
EMPH OUT
LRCK OUT
DGND
DOUT 7&8
DIN1&2
DOUT 5&6
DGND
DOUT 3&4
DGND
DOUT 1&2
TDIF® Jack
The pinout is standardized by Tascam. We have reproduced their wiring diagram for you
for reference only. We highly recommend that you obtain commercially available cables.
13 12 11 10 9
8
7
6
5
4
3
2
1
25 24 23 22 21 20 19 18 17 16 15 14
* PINS NOT CONNECTED IN THE 1788A
ADAT® Optical
This runs on a plastic optical fiber that can transmit over a limited distance of typically 10
meters maximum. It is most suitable when the ADAT device is located in or next to the
same rack as the 1788A.
Page 28
Instruction Manual
6. TYPICAL OPERATION
6. TYPICAL OPERATION
This section suggest ways to get the most out of your Model 1788A. Let these ideas
serve as inspiration more than instruction. The 1788A is flexible enough to fill many
requirements we have not illustrated and probably haven’t even thought of.
6.1 BYPASSING A CONSOLE’S MICROPHONE PREAMPLIFIERS
P
<
AUX
OUTPUT
CH 8
MIC IN
CH 7
MIC IN
CH 6
MIC IN
CH 5
MIC IN
CH 4
MIC IN
CH 3
MIC IN
CH 2
MIC IN
CH 1
MIC IN
LINE OUT
LINE OUT
LINE OUT
LINE OUT
LINE OUT
LINE OUT
LINE OUT
LINE OUT
3
3
3
3
3
3
3
3
2
2
2
2
2
2
2
2
1
1
1
1
1
1
1
1
P
<
Use Line Level Inputs
Mixing Console
Console mic preamps are not always top rate. They tend to be of minimal quality for the
sake of economical production. Using the 1788A as a front end to your console can give
you great benefits. Of course, this is especially true when you avail yourself of the remote
control capability and place the preamps at front-of-house or off-stage, close to the mics
themselves.
USING LINE -vs- MIC INPUTS
Some consoles are equipped with separate mic and line level inputs, but you should
check the manual for your console to assure that the line input does indeed bypass the
microphone preamp stage. Many consoles route the line input through a loss pad right
into the mic preamp. In such a case, you will still hear the deficiencies of the console
preamps, and not be able to realize the full sonic value of the 1788A.
SAVED BY THE INSERT JACK
If your console does not have separate line inputs, but does have “Insert” jacks, you can
use these to bring in the audio from the Model 1788A and reap the sonic benefits. Console
channel inserts with a “send” and “return” allow you to interrupt the signal path following
the input gain stage to introduce signal processing or effects. On some consoles, there
are separate connectors for send and return. If this is the case with your console, simply
connect the Model 1788A’s output(s) to the Return jack(s).
Page 29
MICROPHONE PREAMPLIFIER
NOTE: You may run into issues of balanced and unbalanced inserts. The 1788A can
drive both types just as easily. You can refer to this manual’s appendix on proper wiring
to get information on how to match the 1788A’s Main and Aux Outputs to balanced
and unbalanced inputs (there is a difference between Main and Aux unbalanced
wiring).
On many consoles, particularly lower priced units, the inserts are a single 3-contact 1/4”
TRS phone jack on which the sleeve is ground and the other two contacts are send and
return. In this case, it will be necessary to configure the 1788A’s output as unbalanced
and fabricate the correct adapter cable. Refer to your console’s user manual to determine
which TRS contact (tip or ring) is the return. Your cables should be configured so that the
Model 1788A’s output feeds the return circuit without shorting or disturbing the send.
NOTE: You should adjust the 1788A’s Main or Aux Output to match the maximum
input level of the console. This will guarantee the absolute best signal to noise ratio
and protection from clipping that is afforded by MicLim.
6.2 DIRECT TRACKING
When in the initial tracking phase of the
recording process, often the signal fed to
the individual recorder tracks is kept pure
and natural. Effects and processing are
added later, during the mix-down process.
In this situation, you can bypass the
mixing console altogether by connecting
the Model 1788A’s outputs directly to
the designated inputs on the recorder. By
shortening the distance of the signal path,
and eliminating unnecessary electronic
circuitry and connectors, you will likely
realize the best possible performance from
the Model 1788A. The accompanying
illustration demonstrates the simplicity of
this configuration. You can monitor the
recording by simply routing the additional
outputs provided on the Model 1788A
to either the console’s Tape Return or
individual channel inputs.
P
<
ú
CH 6
MIC IN
CH 5
MIC IN
CH 4
MIC IN
CH 3
MIC IN
CH 2
MIC IN
CH 1
MIC IN
LINE OUT
LINE OUT
LINE OUT
LINE OUT
LINE OUT
LINE OUT
LINE OUT
LINE OUT
3
3
3
3
3
3
1
1
1
2
2
3
2
3
CH 7
MIC IN
1
CH 8
MIC IN
AUX
OUTPUT
2
2
2
1
2
1
1
2
1
P
<
ú
Use Line Level Inputs
The multiple analog outputs of the Model
1788A makes it possible to use both the
eight main analog outputs and the analog
DB-25 output simultaneously, creating
a split. For instance, use the eight XLR
type connections to bypass your console’s
microphone preamplifiers as described in
the previous section. Then use the analog
DB-25 connector to feed all eight channels
to a recorder. If you have opted for the
Page 30
Instruction Manual
6. TYPICAL OPERATION
optional digital module, you can use the AES/EBU DB-15 digital output, the DB-25 TDIF
(Tascam type) or the ADAT optical output to route all eight channels directly to the digital
inputs of a digital recorder or console.
Refer to the illustration in Section 5.4 (Using All Outputs to Feed Five Destination Devices)
for details on using all available outputs simultaneously. Also, see Section 5.4 (Using
the Optional Digital Module) for additional information and hook-up illustrations.
6.3 USING ALL OUTPUTS TO FEED FIVE DESTINATION DEVICES
Digital Mixer
Live Broadcast
ADAT Recorder
P
<
IN
MIDI
OUT
THRU
RS-232
UTIL
AES/EBU OUTPUT
1 2 3 4
AUX
OUTPUT
CH 8
MIC IN
CH 7
MIC IN
CH 6
MIC IN
CH 5
MIC IN
CH 4
MIC IN
CH 3
MIC IN
CH 2
MIC IN
CH 1
MIC IN
LINE OUT
LINE OUT
LINE OUT
LINE OUT
LINE OUT
LINE OUT
LINE OUT
ON
ADAT
WORD
IN CLOCK OUT
ú
LINE OUT
90-260 V~50/60Hz 60 WATTS
LAN
OPTICAL
TDIF
3
3
3
3
3
3
3
3
2
2
2
2
2
2
2
2
1
1
1
1
1
1
1
1
MODEL 1788A - 8 Channel Mic Pre
Aphex Systems Sun Valley, CA
P
<
DA-88 / DA-98
Recorder
Analog House Mix
Analog Monitor Mix
A picture is worth a thousand words. The above illustration gives you an idea of the
flexibility of the 1788A. Substitute a digital house or monitor mixer, analog recorder, or
any other combination as your design may require. The point is, all the audio outputs are
available for use at the same time.
Page 31
MICROPHONE PREAMPLIFIER
6.4 USING THE MICROPHONE OUTPUT LIMITER
Microphone limiters traditionally consist of a mic preamp followed by a limiter circuit.
Until MicLim was devised, that was the only practical way to do it. Everybody is familiar
with the clipped overload that’s heard when a performer suddenly gets on the mic too
loudly. The compressor/limiter held down the P. A. level, but the preamp was clipping
horribly. Until MicLim, there was no other choice except to constantly keep a hand on the
preamp’s gain knob.
Pre
Amp
Optically
Coupled
Attenuator
Peak
Limiter
Still
Heavily
Clipped
Pre
Amp
Peak
Detector
Conventional Mic Limiter
No
Clipping
Aphex MicLim Mic Limiter
The difference with MicLim is that the limiter works with the microphone itself, before
the preamplifier has any chance to clip at all. Patent pending technology had to be devised
to make that possible since just about anything inserted between the mic and preamp
will add noise or distortion. With MicLim now available you will seldom find it possible
to overload the Model 1788A mic preamp, even under severe conditions. That’s because
there is typically 20dB of limiting headroom. Effectively that means you get 20dB more
preamp headroom before distortion.
6.5 USING POLARITY REVERSE
There will be times when you need to reverse the polarity (phase) of a mic signal. Vocalists
monitoring themselves on headphones will hear a different sound when the phase is
reversed. The reversed phase may sound fuller and more truthful or hollow and far away.
That is because there is a cancellation of frequencies within the ear when the external
sound from the headphone mixes with the sound directly conducted to the ear. “Flipping
the phase” can make the problem either more or less noticeable.
Distance
to Mic2
Distance
to Mic1
=
Sound
Cancelled
Another time when phase reversing can be helpful is in mixing multiple microphones that
are within each other’s coverage areas. The “crosstalk” between mics may come through
different delays due to the differing distances from the sound. These sounds may tend
to cancel out in the mix. You may get a “nasal” or hollow effect when all mics are on.
Page 32
Instruction Manual
6. TYPICAL OPERATION
Changing the polarity of one or more mics will often clear up the problem. It is always
worth the time to experiment with mic polarity.
6.6 GROUPING CHANNELS
It is possible to create a group of channels, and treat them all together with any or all of
the preamp control functions.
Grouping Caveats
Several properties of group operation are important to know as they may affect the way
you use grouping.
1. The Model 1788A computes the modified individual channel gains in an invisible
workspace that can retain over- and under-range values. This allows the unit to be
able to restore the channels’ gain relationships if you reverse the direction of group
gain shift after one or more channels have limited out. However, the workspace
memory is erased when exiting the MULTIPLE SELECT mode, and all channel gains
become normalized with their new ratios or differences.
Ramp Up
Group 20dB
Internal Over
Range Memory
85
Upper Limit 65
65
55
45
Ramp Group
Back Down 20dB
55
55
50
45
35
35
30
30
Lower Limit
Internal Under
Range Memory
HOW GROUP GAIN CONTROL WORKS
2. The individual channel functions will remain unchanged within the group until a
function is operated. At that time, whatever function is operated passes to all in the
group and the function will not revert to the original values upon leaving MULTIPLE
SELECT mode.
Creating a Group
To create a group, first go into LOCAL control. Then press the MULTIPLE SELECT button.
Now individually press the buttons for the channels you want to group. The grouped
channel buttons will all be lit. To remove a channel, press its button again.
Disengaging the Group
Press the MULTIPLE SELECT button again and the group will disappear.
NOTE: Once a group has been created, it’s definition stays in memory. Next time you press
the MULTIPLE SELECT button, the previous group will appear. You can change the
group simply by pressing the channel buttons to remove or add channels.
Page 33
MICROPHONE PREAMPLIFIER
7. Warranty & Service
7.1 Limited Warranty
PERIOD
One year from date of purchase
SCOPE
All defects in workmanship and materials. The following are not covered:
a. Voltage conversions
b. Units on which the serial number has been defaced, modified, or removed
c. Damage or deterioration:
1. Resulting from installation and/or removal of the unit.
2. Resulting from accident, misuse, abuse, neglect, unauthorized product modification or failure to
follow instructions contained in the User’s Manual.
3. Resulting from repair or attempted repair by anyone not authorized by Aphex Systems.
4. Occurring from shipping (claims must be presented to shipper).
WHO IS PROTECTED
This warranty will be enforceable by the original purchaser and by any subsequent owner(s) during the warranty
period, so long as a copy of the original Bill of Sale is submitted whenever warranty service is required.
WHAT WE WILL PAY FOR
We will pay for all labor and material expenses for covered items. We will pay return shipping charges if the repairs
are covered by the warranty.
LIMITATION OF WARRANTY
No warranty is made, either expressed or implied, as to the merchantability and fitness for any particular purpose.
Any and all warranties are limited to the duration of the warranty stated above.
EXCLUSION OF CERTAIN DAMAGES
Aphex Systems’ liability for any defective unit is limited to the repair or replacement of said unit, at our option, and
shall not include damages of any other kind, whether incidental, consequential, or otherwise.
Some States do not allow limitations on how long an implied warranty lasts and/or do not allow the exclusion or
limitation of incidental or consequential damages, so the above limitations and exclusions may not apply to you.
This warranty gives you specific legal rights, and you may also have other rights which vary from State to State.
7.2 SERVICE INFORMATION
If it becomes necessary to return this unit for repair, you must first contact Aphex Systems, Ltd. for a
Return Authorization (RMA number), which will need to be included with your shipment for proper
identification. If available, repack this unit in its original carton and packing material. Otherwise,
pack the equipment in a strong carton containing at least 2 inches of padding on all sides. Be sure
the unit cannot shift around inside the carton. Include a letter explaining the symptoms and/or
defect(s). Be sure to reference the RMA number in your letter and mark the RMA number on the
outside of the carton. If you believe the problem should be covered under the terms of the warranty,
you must also include proof of purchase. Insure your shipment and send it to:
Aphex Systems, Ltd.
11068 Randall Street
Sun Valley, CA. 91352
PH: (818) 767-2929 FAX: (818) 767 -2641
Page 34
Instruction Manual
8. SPECIFICATIONS
8. Specifications
8.1 GENERAL SPECIFICATIONS
MIC INPUT
Connector:
Type:
Input Z:
Maximum Input Level (MIL):
CMRR:
Nominal Preamp Gain:
Phantom Power:
Pad:
EIN:
Tube Type:
XLR-3F
Jensen Transformer Coupled
1.6KΩ nominal
+27dBu (with input pad)
99dB @60Hz, -72dB @ 10KHz
26 to 65dB
+48VDC
26dB
-124dBu (Input Shorted)
ANALOG OUTPUTS
Connector:
Type:
Output Z Balanced:
Output Z Unbalanced:
Nominal Level
Maximum Output Level (MOL):
Main Out: 8 ea. XLR-3M; Aux Out: DB-25
Main is Servo Balanced, Aux is is Impedance Balanced
66Ω
33Ω
+4dBu
XLR: +27dBu
DIGITAL OUTPUTS
Connectors:
Type:
Impedance:
AES/EBU DB-15 Male, ADAT® Optical, DB-26 TDIF®
Data, Digital Audio
Stanfdard
Connector:
Impedance:
TRS 1/4” Phone Jack
8-600Ω
HEADPHONE
AUDIO
Freq. Response:
Noise:
THD+N:
SMPTE IMD:
DIM:
Crosstalk
+/- 0.2dB 10Hz-20KHz
-124dBu EIN
0.003% @ +4dBu Out
<0.02%
.005%
Better than -96dB
DIGITAL AUDIO
Internal Sample Rates:
External Sample Rates:
Resolution:
Word Clock Input:
Word Clock Output:
Dynamic Range:
Noise Dither:
Level Equivalency:
FUNCTIONS
LOCAL
BLOCK
Channel Select
Input Gain
Main Output Gain
Aux Output Gain
Polarity
Mute
75Hz Low Cut Filter
26dB PAD
Enable Limiter
Phantom Power
Multiple Select
OTHER SPECS
Power requirements:
Power Consumption (maximum):
Dimensions:
Depth Behind Front Panel:
Net Weight:
Shipping Weight:
32KHz, 44.1KHz, 48KHz
Automatically syncs to any word clock between 32KHz and 96KHz
24 Bits
BNC Jack, High Z, Captures <2.5Vp-p to 5Vp-p
BNC Jack, 75 Ohms, 5Vp-p
Digital dynamic range greater than analog front end.
Dithered by analog preamp noise floor. Equivalent to 16-bit digital audio dither.
-20dBFS Digital = +4dBu Analog
CONTROL
BLOCK
ADJUST/STORE
Mode MIDI/LAN
Set I.D. DEV/CHAN/NET
Local/Remote
Remote Activity LED
DIGITAL
BLOCK
MONITOR
BLOCK
Clock
Rate
Monitor Select
Volume
85 to 260V~, 50-60Hz
60 Watts
19” W x 3.5” H x 13.25” overall depth (483mm W x 89mm H x 337mm overall depth)
12” (305mm)
Rack-mounted: 14lbs. (6.37kg)
19lbs. (8.6kg)
All specifications are subject to change without notice.
Page 35
TEST
BLOCK
700Hz Tone -20dB
700Hz Tone 0dB
MICROPHONE PREAMPLIFIER
8.2 ARCHITECT’S SPECIFICATIONS
Basic Description
A multichannel microphone preamplifier comprising eight identical channels that are
both locally controllable and remotely controllable by MIDI protocols through MIDI and
Ethernet ports. The multichannel preamp shall further comprise an optional digital audio
output module.
The microphone preamps shall comprise the following selectable functions: 1.)
+48VDC Phantom Power; 2.) Polarity Reversal; 3.) 26dB Pad; 4.) 75Hz 12dB/Octave Low
Cut Filter; 5.) Continuous Gain Control from 26 to 65dB; 6.) MicLim™ Microphone Limiter;
7.) Channel Mute. The gain adjustment of the preamp channels shall take place in 1dB
stops with gain changes stepping through small fractions of a dB.
The analog outputs shall comprise a Main and an Aux balanced line output for each
channel. The Main and Aux outputs shall have their own separate gain adjustment in
addition to the preamp’s gain adjustment. The Main outputs shall occupy individual
XLR 3-pin male connectors. All eight Aux outputs shall occur on a single 25-pin D-Sub
connector conforming to the Tascam analog standard pinout.
The digital outputs shall comprise a 15-pin D-Sub connector carrying four AES/EBU
signal pairs, an ADAT® Optical jack, and a 25-pin D-Sub TDIF ® connector all operating
simultaneously. There shall be provisions to synchronize the digital module from Word
Clock (LR Clock), Superclock, and TDIF clock as well as an internal crystal oscillator reference.
The internal sample rates shall be selectable among 32KHz, 44.1KHz, and 48KHz.
Physical Properties
The device shall be packaged in an all metal chassis measuring 19” (482.23mm) wide,
3.5” (89mm) high, with an overall depth of 14.5” (355mm). Depth behind the front panel
shall be approximately 13” (330mm). The device shall have a net weight of approximately
14lbs. (6.37kg) and is capable of mounting in a standard electronic equipment rack.
Power
The unit shall have a self contained power supply operating on ac line voltages from 85 to
260V~ 50/60Hz. Connectorization and agency listings shall be appropriate to meet local
requirements.
Page 36
Instruction Manual
APPENDIX A
Appendix A: Balanced and Unbalanced
Lines and Operating Levels
Interfacing all types of equipment with balanced and
unbalanced lines and can sometimes be troublesome. First you have to somehow connect balanced
to unbalanced and then you have to deal with different levels. This tutorial will teach you about the
principles of balanced and unbalanced lines, wiring
standards, and how to effectively interface them.
Standards
Professional audio equipment usually comes
equipped with inputs and outputs that are balanced
using 3-pin XLR connectors and sometimes 1/4 inch
phone jacks as well. This equipment most often is
designed to operate at +4dBu, a professional industry standard. That translates to a magnitude of 1.23
volts RMS (Root-Mean-Squared).
lines are the same. They both need two conductors.
What makes a system unbalanced is when one of
the wires is formed into a tube that wraps around
the other conductor, without touching it, such that
the outer conductor can be said to “shield” the inner
conductor. This describes all of the coaxial cable used
for video, cable-TV and radio as well as most of the
high fidelity audio cables.
Balancing
If both conductors are identical insulated wires that
Figure 1 Balanced Line Model
Consumer gear has unbalanced I/O as standard, usually on RCA jacks. The normal operating signal level
follows the IHF (Institute of High Fidelity) standard
of -10dBV, or 0.316 volts (316mV) RMS. Converting
to dBu dimensions, this works out to be the same as
-7.79dBu. There is therefore a difference of 11.79dB
between pro and consumer operating levels.
Grounding
There is the notion that some king of earthly “ground”
exists out there that sinks all the noise and acts as
some kind of a shield. You see wires connected to
ground rods and water pipes that are supposed to
get a good ground. This is not a correct interpretation of grounding from an audio standpoint. Proper
grounding of equipment and wiring is important and
you will gain a better understanding of that as you
read along.
Balanced -vs- Unbalanced
Every audio signal is connected through a circuit. The
circuit must contain two conductors to create a complete return path. In other words, a signal voltage is
conducted to a piece of equipment by injecting a current into a wire. That current has flow though to the
destination through the wire and return back to the
source through another wire. Since audio is an alternating voltage, swinging through negative and positive polarity, the current through the two conductors
changes direction each alternate half cycle. Which
wire is the source and which is the return alternates
accordingly. In this regard, balanced and unbalanced
Figure 2 Unbalanced Line Model
are twisted together, then they form a balanced line.
This describes telephone lines, microphone cables,
and most professional audio cables. Typical balanced
cables include an additional shield wrap around the
twisted pair, but this is not strictly required for balanced lines to work properly.
Many people, because they have more experience
with unbalanced wiring, think that balanced is
confusing. Believe it or not, balanced lines are really
easier to understand than unbalanced. There is no
grounding issue with balanced, and the way it works
is perfectly natural and simple. Balancing naturally
rejects hum and noise and eliminates all sorts of
complications in interfacing.
Balanced transmission works something like this.
Your balanced input stage looks at the two wires
and detects only the potential (voltage) difference
between them. Anything that is the same on the two
wires (for all practical purposes as seen measuring
from ground) is called a common mode signal and
is cancelled out by the differential amplifier. Figure
Page 37
MICROPHONE PREAMPLIFIER
1 illustrates how the hum is induced into both wires
equally and therefore is cancelled out.
Since the balanced line has wires that are twisted
together, each wire tends to pick up the same
amount of induction from external sources. Induction
will create no significant voltage difference between
the wires, hence the noise (or hum) will not be picked
up by the differential input stage.
It can be seen that the signal generator driving the
twisted pair will cause a difference between the
wires, and that signal will be readily picked up by
the differential input stage. One of the beauties of
the balanced line is that it is completely independent
from ground. Nothing is connected to ground at all,
nor does it care about ground. Nevertheless, most
professional cable has an overall shield wrap that is
intended to be connected somehow to ground. You
may well ask why, and the answer is less than glorious. Simply, nothing is perfect, not even balanced
cable. Under some circumstances the shield can overcome extreme interference problems that can’t be
adequately rejected by the twisted pair alone. Things
like 2-way radios, television transmitters, and light
dimmers can induce very heavy interference that may
be reduced by shielding. You are going to find virtually all balanced cables include a shield so you need
to deal with it, even if it is not actually needed. That
subject will be addressed a little later.
Unbalancing
Unbalanced wiring works a little differently. Figure 2
shows the basic plan. In this case, the wires are not
twisted, they are coaxial. The unbalanced input stage
is somewhat like the balanced input stage because
amplifies a difference signal, but this time it is the
difference between two non-symmetrical conductors. To make things even less symmetrical, the outer
conductor is connected to ground at both ends. The
principle is that the outer shield conductor shields
the inner conductor from induced noises. This can
only work well if the cable is relatively short and the
ground at each end of the cable is somewhat equal,
i.e., there is no “grounding difference” that can
cause current to flow through the shield conductor.
Grounding difference is a serious problem in studios,
because often the equipment grounds are connected
to power outlet grounds, and there can be a significant difference of ac voltage between alternating
wall outlet grounds. For this reason, unbalanced systems can sometimes never be made hum free, and
just changing one piece of equipment in a studio can
cause hum to appear somewhere else. When you are
using unbalanced gear, it is a very good procedure
to power all your equipment from one large power
isolation transformer. At the very least, make sure all
equipment is powered together off the same distribution panel circuit (same circuit breaker).
Appendix B: Dealing With Grounds and Hum
Ground Loops
Many people equate this term with hum, and that’s
just about the bottom line of it. If you have a ground
sensitive system, like unbalanced audio equipment
for example, then hum will result from ground
currents that flow from the ac power system. It is
sometimes very difficult to isolate and stop ground
currents between unbalanced equipment, but it is
quite easy to clean up balanced gear. That’s why pro
gear is always balanced! The cost of balancing is that
of more expensive connectors, cable, and electronics
but the cost is worth it when you depend on your
audio quality. That’s why the Model 230 is equipped
with a fully balanced I/O. Now that we’ve sold you
on only using really expensive pro gear, lets show you
how to get away with the really cheap stuff! At least
from the standpoint of killing ground hum.
A ground loop is an ac current that has become
routed through your audio ground system. The current comes mainly from ground potential differences
that exist between different wall outlets that return to
opposite phases at the power distribution panel. Secondarily, however, many pieces of equipment contain
line filters and transformers that leak a small amount
of ac power into the chassis and ground return.
You may once have had the experience of getting
zapped by touching two pieces of gear at the same
time. That illustrated the ground loop effect going
straight through you! No matter what you do, you
may not be able to prevent some of your equipment
from generating ground currents. The most likely culprits are digital products because they use switching
power supplies that require heavy line filters to prevent conducted EMI from going out of the box. These
line filters often take the ground leakage current right
up to the UL safety limits. Although it probably won’t
kill you, that is a lot of ground loop current for audio
cables to handle.
There are basically three ways to attack the prob-
Page 38
Instruction Manual
APPENDIX B & C
lem of a ground loop. First is to eliminate it from
its source, and the second is to re-route it through
another path. The third is to balance out your unbalanced audio interfaces.
Identify the Sources
A good way to identify grounding problems is to use
a multimeter to check the ac voltage between the
chassis of your various gear when no audio cables are
hooked up and all gear is plugged in and switched
on. Just start touching the two probes to the metal
chassis of different pieces of gear. Ideally, you should
always see zero volts. Warning! You may see as much
as the whole line voltage between two different
chassis! It does happen. This voltage between chassis
will be responsible for your ground loop problems.
If you find there is more than about 1 volt between
equipment grounds, you should start looking for a
remedy.
Commonize the Power
Try plugging all of your equipment into the same
outlet strip. Get one that has enough outlets in one
strip or string more than one together. Of course, you
need to make sure you don’t overload the one ac circuit your strip is plugged into. If the load is too great
for one circuit, use a second or third circuit that is
tapped off the same 120 volt phase in your distribution panel. That means all outlets should be on odd
or even numbered circuit breakers. That’s because,
as you go down the column, the circuit breakers
tap into alternating legs of your incoming electric
power. Be sure you’re always on the same leg. You
can tell you’re on the same leg by measuring the ac
voltage between the hot slots of the different outlets
you’ve chosen. It should be very low or zero. That will
remedy 50 percent of the cases.
Check the Cord Polarity
For products that have 2-wire power cords, try reversing one of the power cords in the socket. That may
reduce the ground current generated by the internal
electronics of the offending gear.
Redirect Ground Loops
Sometimes it just comes down to brute force grounding. That means providing such heavy, low resistance,
ground current paths that little current is left to flow
through your audio grounds. You can try adding
heavy gauge, for example 12 gauge, copper wire
from chassis to chassis. You will need to locate a
metal screw that solidly binds to the metal chassis of
the gear. You may even need to drill a hole through
the chassis and install a screw yourself. Equipment in
rack shelves can have their chassis grounded to the
metal rack frame by a heavy wire and the frame itself
can act as a brute force ground. You just have to try
everything you can think of. Usually a combination of
all these methods will be needed to completely clean
up a badly humming audio system.
Balance Out the Audio
Remember, balanced lines are inherently hum free.
If you can balance out your unbalanced equipment,
you will be able to stop the hum.
Pseudo Balancing
You will find in Appendix D an interconnecting
method called Pseudo Balanced. This works when
connecting an unbalanced output to a balanced
input. This breaks up the ground loop by requiring
the shield to be grounded only at one end. For best
results always ground the shield only at the receiving
end.
Level Interface Units
Aphex manufactures the Model 124 Level Interface
box which is designed to electronically convert two
unbalanced inputs and outputs into two balanced
inputs and outputs, and at the same time translate
the -10dBV IHF unbalanced levels to the pro +4dBu
balanced levels. This cost effectively gives your nonprofessional unbalanced equipment a fully professional I/O equal to the world’s best pro audio gear.
Seriously consider putting one of these on each
unbalanced piece of gear you use.
Avoid Transformers
The use of balancing transformers is an option, but
you will invariably lose audio quality due to transformer limitations. Try everything else first.
Appendix C: Proper Wiring Techniques
A true balanced line should be used wherever your
equipment allows. Use “twisted pair” shielded cable.
For unbalanced wiring you should use high grade,
low capacitance shielded wire for best results. If you
have an unbalanced output but have a balanced
input, the “pseudo-balanced” configuration may
help deal with ground loop hum. This method and
others are illustrated in Table 2.
Page 39
MICROPHONE PREAMPLIFIER
CONNECTOR WIRING STANDARDS
The 3 pin XLR, 1/4” (63.5 mm) TS mono phone and
the 1/4” (63.5 mm) TRS stereo phone are the most
commonly used line level connectors in pro audio.
Less common is the use of the “RCA” phono jack,
which is essentially a consumer type connector. The
XLR and the TRS are three conductor and are used
for balanced connections. The TS and the RCA are
two conductor and are used for unbalanced connections.
In addition to the three main contacts on an XLR
there is also a grounding lug contact. This lug is connected to the connector’s case (shell). In all Aphex
products audio ground and chassis ground are one
and the same. Aphex products that use XLR connectors tie Pin I to the XLR case automatically. Therefore
it is not necessary to use the XLR case-ground lug.
This also makes possible the use of XLR ground drop
adapters (see Note 3).
TABLE 1: The wiring convention shown is now
standardized in 17 countries including the USA.
Please note that any equipment that still uses Pin 3
as positive on XLR connectors is not adhering to the
standard.
THE PIN 1 DILEMMA AND HOW IT AFFECTS
CABLE SHIELD CONNECTIONS
The three main contacts on an XLR (or TRS) and
the accepted wiring assignments shown above are
only part of the picture. The standard for terminating ground is Pin 1 (Sleeve). But which ground? It
could be connected to audio signal ground or chassis
ground depending on the method of grounding used
by the equipment manufacturer. In all Aphex products audio ground and chassis ground are one and
the same at all I/O jacks. This is just good, common
sense engineering practice (which is what you would
expect from us, course). Unfortunately, many products are designed so that the noisy currents from
the shield drain into signal ground instead of chassis ground. This practice creates a real hum and
noise problem for end-users. The appropriate overall
grounding scheme of an audio system would be a lot
easier to predict without this problem1.
The standard balanced line wiring recommenda-
tion from Aphex Engineering is this: In the majority
of cases maximum noise rejection occurs when the
shield is connected to the input ground only (especially in locations with high levels of RFI). That means
the sending end shield should be left disconnected.
However, if you already have cables with the
shield connected at both ends, go ahead and
try them out. If you are connecting a fairly
simple audio system it may be fine as is.
A word on optional shield connections: Connecting the cable shield of a balanced line at both
ends creates unnecessary ground loops which may
carry noise and hum currents that can be amplified. Connecting the shield only at the sending
end (instead of the receiving end) may exaggerate
common mode noises at the receiving input stage. It
can actually increase RFI and noise more than having
no shield at all. Because of the “Pin I Dilemma” (mentioned above) you may be forced, in some situations,
to experiment with how the cable shield is connected
to ground to eliminate a pesky hum or radio interference problem. It might be good to try XLR ground
drop adapters (see Note 3) as a method of trying
these conflicting methods out and being able to
change easily if necessary.
IMPEDANCE
Regardless of inaccuracies, it has become more or
less standard over the years to refer to balanced
lines as low impedance and unbalanced lines as high
impedance. The fact is, however, that both balanced
and unbalanced lines are operated at low impedance in modern practice owing to the fact that all
output stages have become low impedance. A few
exceptions might be outputs from passive mixers,
instrument pickups, electric guitars and some keyboard synthesizers. It is generally ideal to drive any
audio line from a low impedance and receive into a
high impedance. Generally, a minimum 1: 10 ratio is
possible. This is called “bridging”. This has become
modern practice and all balanced inputs are normally
running 10K ohms or higher impedance. Because of
these developments, it is now no longer as critical to
consider impedance when dealing with interfacing
pro line level equipment (impedance “matching” is
mostly a requirement of the past).
Page 40
Instruction Manual
APPENDIX D
TABLE 1 - BALANCED & UNBALANCED CONNECTOR WIRING STAN3-Pin XLR
1/4” TRS Phone
Standard Wiring Convention (Balanced)
Pin-1
Sleeve
Ground/Shield (Earth, Screen)
Pin-2
Tip
Positive (Signal, High, Hot)
Pin-3
Ring
Negative (Signal Reference, Return, Low, Common)
1/4” TS Phone
RCA
Standard Wiring Convention (Unbalanced)
Tip
Center Pin
Positive (Signal)
Sleeve
Shell
Ground/Shield (Signal Reference/Return)
A word on impedance and interfacing adapters: If you are connecting between two line level
devices and they have different connectors (example:
1/4” phone to XLR or vice-versa), you do not need to
use an impedance matching transformer. With very
few exceptions you are strictly dealing with a difference in connector types and should only use hardwired adapters (or cables) for this situation.
APPENDIX D: Standard Cable Wiring
In relation to 1/4” phone jacks, you may see the terms
“TS” and “TRS” as abbreviations. Here is a what that
means: TS refers to the Tip-Sleeve or “mono” 2conductor type and TRS refers to Tip-Ring-Sleeve or
“stereo” 3 conductor type 1/4” phone connectors.
This applies to jacks (female connectors) and plugs
(male connectors).
Note: We recommend using only conventional
1/4” phone plugs with the Model 230 and with
all other audio equipment. Professional patch bay
cords using brass PJ055 telephone type plugs are
designed only for patch bays and will not make
proper contact with standard 1/4” phone jacks.
The following instructions show all the different ways
you will probably ever need to hook up your 230 as
well as any other equipment you may own. You will
see that connecting balanced outputs to balanced
inputs is ultimately simple and the same cable will
work for all flavors of output stages.
Connecting a balanced output to an unbalanced
input requires a little more knowledge and care.
You should refer to your equipment manuals and
determine the type of balanced output stage that is
provided, then use the correct “transition cable” as
depicted in this section. Improper transition cables
can cause crosstalk, hum, and distortion problems
within your system.
TYPES OF BALANCED OUTPUTS
Believe it or not, there are at least 5 types of balanced
output stages in use today. They may be placed
into two main classes: transformer balanced, and
transformerless balanced, usually called “active balanced”. Transformer balanced outputs are becoming
outdated because of their high cost and their sonic
limitations. However, they can still be found on a lot
of older equipment.
Within the transformerless class, there are several
types of circuits that are used by different manufacturers. These different types of output circuits all look
just about alike to any balanced line, but they act differently when driving an unbalanced line. You need
to observe the proper cable wiring for each type of
output circuit. We strongly recommend that you refer
to your various equipment manuals to find out what
is used in each case before hooking up to unbalanced
lines.
When connecting a balanced output to a balanced
input, however, you don’t need to know what kind
of balanced output you are dealing with. Simply
treat it generically.
Page 41
MICROPHONE PREAMPLIFIER
XLR to XLR
OK for Microphones
Standard store-bought cable. Shield grounded at both ends.
Positives: Good for microphones.
Negatives: May cause ground loops through the shield grounds if used to
connect equipment together.
Preferred for Line Levels
Shield grounded at receiving end only.
Positives: Stops ground loops and reduces noise.
Negatives: None
PART 1: BALANCED OUT to BALANCED IN
1/4” TRS Phone to 1/4” TRS Phone Balanced Cables
OK
Standard store-bought cable. Shield is grounded at both ends.
Positives: Both ends are interchangeable.
Negatives: May cause ground loops through shield contacts.
No Connect
BETTER
Custom cable. Shield is grounded at receiving end only.
Positives: Stops ground loops and reduces noise.
Negatives: Should be oriented so lifted shield is at sending end.
XLR to 1/4” TRS Phone Balanced Cables
From an Output
To an Input
Female XLR
Male XLR
To an Input
From an Output
Stereo Phone Plug
Stereo Phone Plug
No Connect
Stops Ground Loops
Page 42
No Connect
Stops Ground Loops
Instruction Manual
APPENDIX D
PART 2: BALANCED OUT to UNBALANCED IN
Voltage Balanced Outputs
It was mentioned that there are several types of
balanced output stages in use today. The following diagrams show you how to properly unbalance each type of output. If you follow these
instructions, you should have no problems.
SIMPLIFIED SCHEMATIC
Unbalancing loses half the output level.
You lose 6dB of gain.
Female XLR
Don’t Ground or Connect Pin 3
Transformer Balanced Outputs
Mono Phone Plug
SIMPLIFIED SCHEMATIC
Unbalancing loses no output level.
You retain full gain.
Female XLR
Ground Pin 3 Directly to Pin 1.
Alternatively, Carry Pin 3 Through Twisted Pair Cable
and Ground at Other End
Impedance Balanced Outputs
Mono Phone Plug
SIMPLIFIED SCHEMATIC
Unbalancing loses no output level.
You retain full gain.
Female XLR
Servo Balanced Outputs
Mono Phone Plug
SIMPLIFIED SCHEMATIC
Unbalancing loses no output level.
You retain full gain.
Female XLR
Pin 3 Doesn’t Matter
OK Grounded or Not Grounded
Ground Pin 3 Directly to Pin 1
Do Not Carry Pin 3 Through Cable and Ground
at Other End
Mono Phone Plug
Page 43
MICROPHONE PREAMPLIFIER
PART 3: UNBALANCED to UNBALANCED
Standard Cable (Guitar Cord)
Mono (TS) Phone Plug
Mono (TS) Phone Plug
PART 4: UNBALANCED OUT to BALANCED IN
Standard Method
Mono (TS) Phone Plug
Enhanced Method (Pseudo Balanced)
Advantage: Reduced Hum and Noise Pickup
Stereo (TRS) Phone Plug
(Guitar cord of Part 3 above usualy works just as well)
Mono (TS) Phone Plug
Stereo (TRS) Phone Plug
Not Used
Male XLR
Male XLR
Mono (TS) Phone Plug
Mono (TS) Phone Plug
Not Used
PART 5: “Y” INSERT CABLES
Male XLR
To Equipment Input
Ground Shield This End Only
Sleeve
Female XLR
From Equipment Output
Tip
Ring
Stereo Plug
To TRS
Insert Jack
Ground Shield This End Only
Don’t Connect Pin 3
Mono (TS) Phone Plug
To Equipment Input
To TRS
Insert Jack
Ground Shield This End Only
From Equipment Output
Mono (TS) Phone Plug
Ground Shield This End Only
Page 44
Instruction Manual
APPENDIX E
APPENDIX E: HELPFUL WIRING TABLE
Also see next page...
TABLE 2 - - TYPES OF ACTIVE BALANCED INPUT/OUTPUT CIRCUITS & INTERFACE WIRING
OUTPUT
TYPE
WIRING DIAGRAM
(Interface from OUTPUT to INPUT)
INPUT
TYPE
Wire: single conductor with a shield (coax style)
1
POSITIVE (HIGH)
Unbalanced
Unbalanced
SHIELD (GND)
Wire: two conductor with a shield (twisted pair)
2
Unbalanced
POSITIVE (HIGH)
NEGATIVE (LOW)
SHIELD (GND)
Unbalanced
Pseudo
Balanced
Unity
Gain2
Unity
Gain2
Balanced
(see Note 4 for
Unbalanced
wiring)
Unbalanced
Unbalanced
6dB
Loss2
Balanced
Balanced
Unity
Gain2
Unbalanced
Unbalanced
Unity
Gain2
Balanced
Balanced
Unity
Gain2
Unbalanced
Unbalanced
Unity
Gain2
Balanced
Balanced
Unity
Gain2
No Connection (see Note 4)
3
Resulting Interface
METHOD / LEVEL
Wire: two conductor with a shield (twisted pair)
Voltage
Balanced
POSITIVE (HIGH)
NEGATIVE (LOW)
SHIELD (GND)
No Connection (see Note 5)
4
Wire: two conductor with a shield (twisted pair)
Voltage
Balanced
POSITIVE (HIGH)
NEGATIVE (LOW)
SHIELD (GND)
NC Optional (see Note 6)
5
Wire: two conductor with a shield (twisted pair)
Impedance
Balanced
POSITIVE (HIGH)
NEGATIVE (LOW)
SHIELD (GND)
NC Optional (see Note 6)
6
Wire: two conductor with a shield (twisted pair)
Impedance
Balanced
POSITIVE (HIGH)
NEGATIVE (LOW)
SHIELD (GND)
NC Optional (see Note 6)
7
8
CrossCoupled
Balanced
(Aphex Servo
Balanced)
Wire: two conductor with a shield (twisted pair)
CrossCoupled
Balanced
(Aphex Servo
Balanced)
Wire: two conductor with a shield (twisted pair)
POSITIVE (HIGH)
NEGATIVE (LOW)
SHIELD (GND)
NC Optional (see Note 6)
POSITIVE (HIGH)
NEGATIVE (LOW)
SHIELD (GND)
NC Optional (see Note 6)
Page 45
MICROPHONE PREAMPLIFIER
NOTES
The following notes are referenced in the text and in Table 2 on the preceding pages.
Note 1: ADDITIONAL READING SUGGESTIONS: Sound System Engineering by Don Davis and Carolynn Davis (Howard W.
Sams and Co.), Handbook for Sound Engineers (The New Audio Cyclopedia) Edited by Glen Ballou (Howard W. Sams and
Co.) and Sound Reinforcement Handbook by Gary Davis and Ralph Jones (Hal Leonard Publishing Corp.).
For more information on the “Pin 1 Dilemma” see the June 1995 issue of the Journal of the AES (Vol.43/No.6, Audio Engineering Society, New York). This issue is dedicated to “Shields & Grounds.”
Note 2: TABLE 2: LEVEL CHARACTERISTICS (unity gain verses 6dB loss)
Diagrams 1, 2 and 4 through 8: The effective interface gain will remain at OdB for all of the interfaces shown.
Diagram 3 Balanced to Unbalanced: This configuration should be used with equipment incorporating a conventional active
balanced output stage. Most non-Aphex equipment uses this kind of output stage because of its simplicity and low cost.
Therefore, you will find yourself using diagram 3 fairly often when interfacing typical equipment together. In this case, the
interface gain will be 50% down, giving a 6dB loss of level. This is because each output driver has fixed gain and supplies
only half the balanced output amplitude. You can usually compensate for the loss by adjusting the output level or input
level settings on the associated equipment.
Note 3: XLR GROUND DROP ADAPTERS A word on using XLR ground drop adapters (and mic cables): A secondary advantage to not using the XLR case lug as a ground is the ability to use barrel style XLR “ground drop” adapters (hard-wired
female to male XLR adapters with Pin 1 disconnected). These can be used on one side of the cable to disconnect the ground
as discussed earlier. If the case lug is tied to the cable’s shield (with or without Pin 1) the cable will still be grounded to the
equipment’s ground though the XLR ground drop’s case. XLR ground drops are useful especially for live sound situations
where the same stock of XLR cable may be used for line level patching and/or for patching microphones. The reason is
that XLR cables used for microphones should never have the shield disconnected at one end. This is a safety issue for the
performing artist - microphones should always be grounded!
Note 4: If you have an unbalanced output but have a balanced input, the “pseudo-balanced” configuration may help deal
with ground loop hum. However, it is possible to wire this as an unbalanced interface. To wire unbalanced - use a coax cable
with a single conductor and a shield, wire as follows: Output (From) - connect the ground contact to the cable shield, connect the positive contact to the positive conductor; Input (To) - connect the ground and the negative contacts to the cable
shield, connect the positive contact to the positive conductor. Please note that this in fact occurs by default when plugging
an unbalanced cable with a 1/4” TS (Tip-Sleeve) phone plug into a TRS (Tip-Ring-Sleeve) phone jack.
Note 5: Some electronically balanced output circuits from other manufacturers exhibit problems when the negative output
amplifier is shorted to ground to in order to drive an unbalanced load. The grounded output amplifier pumps current onto
the ground which may cause distortion or cause the amplifier to fail. When wiring this type of output be careful to leave
the negative contact unterminated.
Note 6: Shield Option: Connect receiving end only. See text preceding Table 2 titled - THE PIN 1 DILEMMA AND HOW IT
AFFECTS CABLE SHIELD CONNECTIONS
Note 7: Single-Ended, Impedance-Balanced
Note 8: It is possible to wire this as an unbalanced interface. To wire unbalanced - use a coax cable with a single conductor and a shield, wire as follows: Output (From) - connect the ground and the negative contacts to the cable shield, connect the positive contact to the positive conductor; Input (To) - connect the ground contact to the cable shield, connect
the positive contact to the positive conductor.
Page 46
Instruction Manual
APPENDIX F
APPENDIX F: WORD CLOCK CABLING
useful bandwidth of the line is maximized under these con-
Transmission Systems
ditions, and the pulse waveform is best preserved.
There are basically two systems in use for distributing word
clock by coaxial lines: 75Ω matched, and unmatched with
unspecified impedance. We sometimes call the unmatched
method “brute force”. You’ll see why as you go through
That is not to say the pulse waveform won’t undergo some
degradation. All matched transmission lines have losses,
especially at high frequencies. When the cable exceeds
this tutorial.
a certain length, depending on the cable’s quality, cable
Matched Coaxial Transmission
with. Nevertheless, a general rule is that matched transmis-
equalization may be required to recover additional band-
This is by far the better way to send pulse shaped waveforms over a long distance. Coaxial cable is manufactured
to several standard impedance characteristics. The most
common are 50 and 75 ohms (Ω). 50Ω cable has traditionally been popular around radio transmission apparatus,
but television has long adopted 75Ω cable to carry video
signals. Industry has also adopted 75Ω for the lead-in and
internal house wiring for cable TV. More recently, the AES
adopted, by standard AES3-ID 2001, 75Ω cable for distribution of digital audio.
sion lines will always have better bandwidth and less jitter
than unmatched lines of equal length.
It should be noted from figure 1 that when a matching line
driver is not loaded by the line, its output voltage rises by
double. This is something to take into account when measuring or specifying word clock output levels.
A slight revision of figure 1 is shown in figure 2. The internal termination resistor is replaced by a “loop-through”
jack and an external load adapter. The principle is the
Figure 1
Principle of 75Ω Matched Transmission
same, but the loop-through jack allows daisy-chaining
of many clock recipients from a single clock source over a
single clock cable. As you could imagine, this can greatly
Clock
Transmitter
simplify clock distribution among compatible equipment.
5Vp-p Open Circuit
75Ω
Source
Termination
Figure 2
75Ω Transmission Loop-Through Jacks
2.5Vp-p With Termination
Clock
Transmitter
75Ω
Source
Termination
Clock
Receiver
75Ω
Coax
Line
75Ω Coax Line
75Ω
Load
Adapter
75Ω
Load
Termination
75Ω Clock
Receiver
Input Jack
Loop-Through Jack
For practical purposes, transmission line theory need not
Daisy-Chain Example
be studied at great length. The basic idea is very simple.
Figure 3 expands upon figure 2 to show the principle of
To create a matched transmission line, you terminate both
daisy-chaining a matched transmission. Note that only the
ends of the line by a resistance equal to the line’s own
last unit in a daisy-chain needs a load adapter to properly
characteristic impedance.
terminate the 75Ω line.
This configuration causes all the power launched from
Unmatched Lines
the sending end to be absorbed at the receiving end. The
In the simplest context, an unmatched line
Page 47
is one that is
MICROPHONE PREAMPLIFIER
not terminated in its characteristic impedance. In most cas-
Though ugly from an engineering viewpoint, the only solu-
es, unmatched word clock lines are driven by a low output
tion is such cases is to apply unmatched transmission lines
impedance voltage driver and loaded by a high impedance
as best as one can and then rely on “brute force” clocking
receiver.
to hold it all together.
A length of coax driven by a brute forced output driver will
With brute force clocking, 5Vp-p clock pulses are fed out
cause edge ringing and wave distortion of the clock pulses.
from a low impedance line driver with no intention of
If the length is too long, the distortion can cause clock jitter.
impedance matching the coaxial cable. Daisy chaining is
It is important to minimize the cable length.
not usually possible because the magnitude of jitter rapidly
rises. Very short cable runs are necessary. Every piece of
gear gets a separately driven feed, and no terminating load
Figure 3
Transmission Daisy-Chain
is used.
Figure 4
Principle of Unmatched Lines
Hi-Z Clock Receiver
Input Jack
75Ω Coax Feed
First
Device
And Brute Force Clocking
Brute Force
Clock Transmitter
75Ω Coax
Loop-Through Jack
5Vp-p Output Level
Open Circuit
<10Ω
Source
Impedance
Hi-Z Clock Receiver
Still 5Vp-p But With Ringing
(Worse With Longer Cable)
Input Jack
N
Devices
Brute Force
Clock Transmitter
75Ω Coax
Loop-Through Jack
<10Ω
Source
Impedance
Hi-Z Clock Receiver
Clock Receiver
Coax
Line
Input Jack
Last
Device
75Ω
Load
Adapter
Loop-Through Jack
Figure 4 above illustrates the Brute Force clock principle. We
have found that many of the commercially available clock
detangler and regenerator/driver boxes actually source out
brute force clock as their hedge against unknown studio
equipment characteristics.
Brute Force Clocking
It is an unfortunate fact that transmission line techniques
Clocking The 1788A With 75Ω Matched Lines
for word clock have not been implemented in much of
First, you need to be aware that when switched to the
the digital audio equipment presently available. This leads
external clock mode, the 1788A automatically connects the
to real clocking compatibility problems in today’s studios.
word clock input jack to the word clock output jack through
Obvious problems are usually seen as “no lock” but less
a metal relay contact. This permits direct feed-through of
obvious is sound degrading jitter.
clock with almost no loading from the 1788A. If using a
75Ω clock system, then you can daisy-chain the W.C. input
to additional 1788A’s or other equipment. If the 1788A is
Page 48
Instruction Manual
APPENDIX F
Figure 5
End-of-Line Termination
the last unit in line, the best option for terminating the line
as shown in figure 5.
Last Unit In Line
Clocking The 1788A With Brute Force
Not knowing what the 1788A’s word clock input may be
UTIL
driven by, we made it automatically accept the brute force
AES/EBU OUTPUT
1 2 3 4
voltage levels.
ON
When accepting brute force clock, do not install
ADAT
WORD
IN CLOCK OUT
a termination adapter - it would be of no benefit.
When the driving source is not matched to the line
OPTICAL
TDIF
impedance, then adding a load impedance will not
improve the transmission characteristics.
Maximum Brute Force cable length depends on several factors, but you probably shouldn’t attempt distances greater
than 4 feet.
NOTE ON CONVERTING TO A
MATCHED LINE: because of the
1788A’s automatic input level adaptation, you can convert a brute forced
clock source into a workable matched
line by inserting an in-line 75Ω, 10dB
pad at the sending end of the
cable, and then installing a 75Ω termination adapter at the receiving end.
This may reduce or eliminate jitter
problems when the word clock distribution cable is of appreciable length.
Typical 75Ω Attenuator
Page 49
75Ω Terminator
Terminator Can
Go Here Instead
Tee
MICROPHONE PREAMPLIFIER
This product is protected under one or more of the following Aphex patents.
4,578,648
4,633,501
4,843,626
4,939,471
5,115,471
5,155,769
5,334,947
5,359,665
5,422,602
5,424,488
5,450,034
5,463,695
5,483,600
5,485,077
5,612,612
5,737,432
5,848,167
5,896,458
5,898,395
5,930,374
6,266,423
Page 50