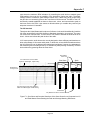
1
320D
Compellor
Compellor
®
®
Owner’s Manual
Dual Mono/Stereo Automatic Level Controller
with Analog & Digital I/O
Manual P/N 999-4260 • Revision 1 • 09/30/03
Copyright 2003 Aphex Systems Ltd. All rights reserved. Printed in U.S.A. Written and produced by Donn Werrbach.
S Y S T E M S
11068 Randall St., Sun Valley, CA 91352 U.S.A.
Fast Finder
Safety Declarations
Contents
1
Quick Start
2
Introduction
3
Installation
4
Specifications
5
Using Digital Audio
6
Operating Instructions
7
System Description
8
Performance Test
9
Warranty & Service
10
Appendices
11
CAUTION: For protection against electric shock, do not remove the cover. No user serviceable parts inside.
WARNING: This equipment has been tested and found to comply with the limits for a Class A digital device pursuant to
Part 15 of the FCC Rules. These limits are designed to provide reasonable protection against harmful interference when
the equipment is operated in a commercial environment. This equipment generates, uses, and can radiate radio frequency
energy and, if not installed and used in accordance with the operating guide, may cause interference to radio communications. Operation of this equipment in a residential area is likely to cause interference in which case the user will be required
to correct the interference at his own expense.
The user is cautioned that changes and modifications made to the equipment without approval of the manufacturer could
void the user’s authority to operate this equipment.
It is suggested that the user use only shielded and grounded cables to ensure compliance with FCC Rules.
|
Conforms to standards
UL60950 and EN60950.
®
C
US
59887
Page 2
320D
Compellor
1. Contents
2. Quick Start - Page 6
3. Introduction - Page 7
3.1 About This Manual
3.2 What Is A Compellor?
3.3 What Does It Do?
3.4 How Does It Work?
3.5 A BIt Of Compellor History
4. Installation - Page 10
4.1 Unpacking
4.2 Damage & Claims
4.3 Main Voltage Selection
4.4 Power Cord
4.5 Mounting In A Rack
4.6 Proper Ventilation
4.7 Panel Security
4.8 Tools & Equipment Needed
4.9 Safety Considerations
4.10 Remote Connector
4.11 Reference Level Setting
4.12 Input Connections
4.12.1 Analog
4.2.2 Digital
4.13 Output Connections
4.13.1 Analog
4.13.2 Digital
4.14 Summary
5. Specifications - Page 14
5.1A Analog Inputs
5.1B Digital Inputs
5.2A Analog Outputs
5.2B Digital Outputs
5.3 Audio
5.4 System Functions
5.5 Threshold
5.6 Ratio
5.7 Attack Times
5.8 Release Times
5.9 Digital Audio
5.10 Other Specifications
6. Using Digital Audio - Page 16
6.1 How The Compellor Interfaces
6.2 I/O and Synchronizing
6.3 Input Selector
6.4 Sample Rates
6.5 Changing The Default Internal Clock
6.6 Processing Thresholds
6.7 Bypass Mode
Page 3
320D
1. Contents
Compellor
7. Operation - Page18
7.1 Introduction
7.2 Recording
7.3 Mixing
7.4 Mastering
7.5 VIdeo Post Production
7.6 Sound Reinforcement
7.7 Live Concerts
7.8 Broadcast Radio Pre-processing
7.9 Broadcast STL/Phone Line Driver
7.10 Television Broadcasting and Cable Systems
7.11 Video and Audio Tape Duplication
7.12 Voice Processing
8. System Description - Page 22
8.1 Model Differences
8.2 Signal Flow
8.3 Processing Functions
8.4 Leveling Function
8.5 Compressor Function
8.6 DRC
8.7 DVG
8.8 Silence Gate
8.9 Stereo Enhance
8.10 Stereo Linking
8.11 Meter Selection
8.12 Limiter
8.13 Process Balance
8.14 Drive Control
8.15 Output Control
8.16 Process Switch
8.17 Input/Output
8.18 Operating Levels
8.19 Input/Output Metering
8.20 Gain Reduction Metering
9. Warranty & Service Information - Page 27
10. Appendices
Apndx A. Balanced & Unbalanced Lines and Operating Levels - Page28
Apndx B. Dealing With Grounds and Hum - Page 29
Apndx C. Proper Wiring Techniques - Page 31
Apndx D. Standard Cable Wiring - Page 32
Apndx E. About Reference Levels - Page 36
Apndx F. Digital-vs-Analog; Peak-vs-RMS: How To Deal With The Confusion - Page 38
Page 4
Page 5
320D
Compellor
2. Quick Start
You can use this quick setup to get a signal through your Compellor right away. Then.
you’ll want to go on and read through the manual to discover the wealth of information
that is available to you.
Quick Start
1. Make sure there is signal going through the Compellor with Process both “In” and “Out”. If
not, check the input and output wiring. They may be reversed. Be sure to check for the correct input selection (analog or digital) on the rear panel. Leave Compellor in bypass (Process
“OUT”) until finished with set up.
2. For Analog In: Set rear panel Input Select to Analog. Send a zero VU tone into the
Compellor (at +4dBu or -10dBV depending on your operating level settings). Check to see
the rear panel REF LEVEL switches are set for your operating level. If you do not have a tone
generator, use program material that averages around zero VU in your system.
For Digital In: Set rear panel Input Select to AES3. Send a digital tone at -20dBFS.
3. Switch Compellor “Meter Select” to Input. The last red LED should indicate approximately ‘0’ on the meter. If not, adjust the rear panel REF LEVEL switch to the position which
gives you the closest reading to ‘0’. NOTE: This switch only affects the analog I/O. The
digital input is internally calibrated and is guaranteed to match -20dBFS to 0VU on the
Compellor’s meter.
4. Set the Process Balance to 12 o’clock.
5. Switch the Meter Select to G.R. (gain reduction). Adjust the Drive control to achieve 12dB
of gain reduction with ‘0’VU input. The last lighted LED shows the total amount of gain reduction occurring.
6. Set Leveling Speed to Slow if you are controlling full program, Fast if you are controlling
live voice.
7. Set Limiter “On”.
8. Set the Silence Gate to 12 o’clock.
9. Stereo Enhance: If using the Compellor for mono or dual mono operation, switch the
Stereo Enhance to “Off”. If using the Compellor for stereo program, switch the Stereo
Enhance to “In”.
10. Link: If using the Compellor for mono or dual mono operation, press the “Unlink” button.
If using the Compellor for a normal stereo program, switch the Link to “Leveling”. If using
the Compellor for any matrixed stereo program (e.g.- surround encoded), switch the Link to
“Leveling & Compression”.
11. Switch the Meter Select to Output. Adjust the Output control so that the red part of the
level meter indicates 0dB. Switch the Compellor into circuit (Process “In”). The Compellor will
now act as a unity gain device whenever the input level is at zero VU, and make gain corrections for higher and lower incoming levels.
Page 6
3. Introduction
3.1 About This Manual
This manual reflects the new digital audio features of the Model 320D. It contains much of
the material found in the older 320A/323A manual but has been updated and streamlined to
make it easier to use. There is also new content specific to digital audio.
3.2 What Is A Compellor?
A Compellor is the first and only product designed specifically for the transparent control of
audio levels. While other audio processors are designed simply to compress and limit audio
signals, a Compellor is designed to intelligently manage the dynamic range of audio without
causing noticeable changes to the character and feeling of the sound. Contained within the
Compellor are three gain controllers: a frequency discriminate leveler, a compressor, and a
limiter, all working interactively. In addition, a dynamic verification gate, silence gate, and
dynamic release computer intelligently guide the operation of the gain controllers to assure
the least noticeable processing effects will be generated.
The name “Compellor” is a combination of “Compressor-Leveler-Limiter”.
3.3 What Does It Do?
Simply stated, a Compellor automatically evens out the varying levels in an audio system
without making itself noticed. It may seem odd to have a processor you wouldn’t notice working, but imagine being able to keep a wandering vocal track just right in the mix as if the talent
were using perfect voice techniques. Imagine a TV show that always sounded just the right
level even though scene changes were wide ranging. Now imagine these things without any
background swells, pinched voices, or holes punched by a transient hitting the limiter. If you
can, then you realize just a few things the Compellor can accomplish.
Without a Compellor, it is usual to insert a compressor or limiter in the line to control varying
levels. That always results in degraded sound due to the processing by-products. Lost punch,
overly fat backgrounds, inversion (when a loud sound gets lower than average), suck-down
by transients, and noise swell ups are typical problems encountered with usual processing.
The Compellor was designed specifically to avoid all of these problems and more.
3.4 How Does It Work?
Standard compressors and limiters process the sound on arbitrary principles of level detection, something like an audio VU or peak meter. Our hearing is a much more complex process and we can readily hear the “attenuate and recover” effects caused by these simpler
devices.
In contrast, a Compellor automatically detects and corrects the sound level according to how
we hear, and therefore seems natural and relatively undetectable. The unique and patented
circuitry in a Compellor resulted from years of experiments in audio processing and creates
the only level controller on the market designed specifically to be as “transparent” to the ear
as possible. Additional information about the processing circuits in a Compellor will be found
in the various sections of this manual.
3.5 A Bit Of Compellor History
At first, there was a controversy about whether a Compellor actually did anything. Engineers
would call up and complain they couldn’t hear the difference between “in” and “out” of the
Page 7
320D
Compellor
3. Introduction
circuit. They thought that all audio processors should be noticeable. We had to explain that
the unit was in fact working, and we asked them to listen to their mixes with and without
the Compellor. After they did that, they were amazed at the results. Meanwhile, broadcasters were discovering the Compellor. They found it greatly enhanced their air chains. The
Compellor soon won the favor of broadcasters internationally.
Some owners may be interested in how the Compellor was first developed. The story begins
in Hawaii in 1982 when Donn Werrbach, a consulting broadcast engineer, undertook to design
an advanced AGC unit for on-air processing to improve the sound of radio stations. Werrbach
The Compellor has become the world standard audio level controller.
Understandably, we are very proud of that fact!
had been experimenting with broadcast audio processing for many years but needed to find a
good enough VCA (voltage controlled amplifier chip) to fully implement all the new processing
techniques he had discovered. A chance contact with Boyd Collings, who was then the Aphex
agent in Honolulu, introduced Werrbach to the type 1537A VCA chip which was produced and
sold by Aphex. Given a free sample, a couple of weeks time, and the inspiration brought by
the VCA’s fabulous performance, Werrbach produced the first Compellor prototype.
Werrbach’s prototype found its way not only into on-air trials but into a tape duplicating lab,
an album recording studio, and several live showrooms where it quickly proved its usefulness
as a gain controller without processing artifacts. At Boyd’s urging, Aphex’s product manager
Jon Sanserino visited Honolulu and auditioned Werrbach’s prototype at the Audissey recording studio where he was intrigued by its possibilities. Finally, in 1983, an agreement was
reached between Werrbach and Marvin Caesar, the president of Aphex Systems, to produce
the Compellor as a product line.
The first unit rolled off the line in 1984 as the Aphex Model 300 Stereo Compellor. Patents
were secured for key inventions of the Compellor circuitry and are assigned exclusively to
Aphex Systems.
As a premier product line, Aphex decided to build the Model 300 to the highest commercial
standards including only the best available parts and construction techniques. As a result,
not only is the audio processing performance outstanding, but the reliability and long lifetime
of the product was assured. Thousands of Model 300’s are still in constant use today, some
with as much as 19 years of duty under 24-hour service!
The next models introduced were the Models 301 and 303 based on the Model 300 design.
The Model 301 was a single channel version, while the Model 303 was a Model 301 with an
Aural Exciter (tm) added. These models are also still in widespread use.
In 1991, Aphex released the Model 320 Dual/Stereo Compellor as an updated replacement
for the Model 300 Stereo Compellor. The principle functions were retained but many improvements were implemented as well as new convenience features to make the Compellor even
easier to install and use. One such improvement was the conversion to a new and improved
proprietary VCA chip, the Aphex VCA1001, to replace the now obsolete 1537A. The great
success of the model 320 soon led to the Model 323 single channel Compellor with Aural
Exciter to replace the older Models 301 and 303.
Page 8
In 1994, Aphex introduced the current Compellor Models 320A and 323A. The model “A”
revision signifies the inclusion of an improved patented Leveler circuit called the “Frequency
Discriminate Leveler” (FDL) while all other aspects of the Model 320 remain the same. With
the FDL, Compellors became even more transparent and useful than ever before.
Now, in 2003 (as this manual is being written), the Compellor is still the most advanced and
effective audio level controller available. No all-digital products have been able to approach
it. In this digital age, that builds a strong argument to add digital I/O capability to Compellors.
This has been accomplished with the Model 320D which contains both analog and digital
audio I/O capabilities.
Page 9
320D
4. Installation
Compellor
4.1 Unpacking
Your Compellor was packed carefully at the factory in a container designed to protect the unit
during shipment. Nevertheless, Aphex recommends making a careful inspection of the shipping carton and the contents for any signs of physical damage.
4.2 Damage & Claims
If damage is evident, do not discard the container or packing material. Contact your carrier
immediately to file a claim for damages. Customarily, the carrier requires you, the consignee,
to make all damage claims. It will be helpful to retain the shipping documents and the waybill
number.
4.3 Mains Voltage Selection And Fuse
Before applying power to the Compellor, it is a good idea to verify the correct mains voltage
setting. This is easily determined by looking through the transparent fuse cover on the rear
of the chassis.
AC Line power is supplied to the unit via an integral receptacle/fuse holder on the rear panel.
This receptacle meets the various international safety certification requirements, provides the
international mains power selection, and serves as a radio frequency line filter. The programmed voltage can be read near the left end of the fuse clip on the surface of the programming card. If the incorrect voltage is seen, proceed to reprogram the voltage.
Reprogramming the mains voltage is easy if the following steps are followed. Remember to
check the fuse value and install the correct fuse as indicated.
FUSE
PULL
1. Slide window open
FUSE DATA
100-120VAC
0.375 Amp
Slow Blow
2. Pry out “Fuse Pull”
3. Extract programming card
Programming Card
100
120
220
240
Side 1
220-240VAC
0.25 Amp
Slow Blow
Side 2
4. Arrange correct voltage to read in this position.
Fully re-insert the card by pressing firmly.
Page 10
4.4 Power Cord
The Compellor uses a standard IEC power cord set. The appropriate mains plug for each
country is normally shipped with each unit. However, if you must install or replace the plug,
Power Cord Color Codes
USA Color Code
Black = Hot (live)
White = Neutral
Green = Ground
IEC/Continental Color Code
Brown = Hot (live)
Blue = Neutral
Yellow/Green = Ground
use the correct wiring code as follows:
4.5 Mounting In A Rack
The Compellor occupies one standard 19 in. x 1 3/4 in. rack space (1RU). Chassis depth is
9 1/2 inches not including connectors. Allow at least 3 inches additional space in back for
wiring and connectors. The chassis is designed to be fully supported by front panel mounting
alone. To avoid cosmetic damage to the panel, use the cushioned rack screws provided in
the shipping kit or other cushioned rack screws.
4.6 Proper Ventilation
A Compellor runs warm because the product was designed to efficiently conduct most of
the circuitry’s heat directly to the exterior surfaces. This keeps the hot internal components
such as voltage regulators running far cooler than if they relied on direct convection cooling.
Therefore, if the chassis seems unusually warm to the touch, you need not be alarmed since
the inside of the chassis is never much warmer than that. However, we do not recommend
installing a Compellor in a space which severely restricts air ventilation around the unit such
as a totally sealed rack enclosure unless you can provide an empty rack space above and
below the unit to facilitate cooling. Typical rack enclosures with louvers or fan cooling are
recommended in which case you can install the Compellor in any available rack space.
4.7 Panel Security
A transparent security cover is available through any Aphex dealer to fit your Compellor. This
is absolutely the most convenient way to protect your installation from tampering. When
ordering, ask for Aphex part number SC-1.
4.8 Tools And Equipment Needed
Only standard technician’s tools are required to install the Compellor. Additional test equipment is required for servicing as will be indicated in the related sections of this manual.
4.9 Safety Considerations
Aphex has taken care to insure the safety of its products. The Compellor is constructed to
comply with international electrical safety standards.
To minimize the risk of shock or fire, do not expose the unit to moisture. Allow adequate
ventilation around the unit for cooling. Make sure the mains voltage is properly selected. Do
not open the chassis cover: there are no user serviceable parts inside.
Page 11
320D
4. Installation
Compellor
Installation should be performed only by qualified individuals. It is the installer’s responsibility
to insure his personal safety and the safety of others in the work area. It is never a good idea
to work alone in the vicinity of high power electrical and radio frequency equipment.
4.10 Remote Connector
Remote control, a feature of the Models 320A and 323A, is not available with the Model
320D.
4.11 Reference Level Setting
The Compellor should be normalized to match the operating level of your system. When the
Compellor is properly matched to the system reference level, then the Compellor’s meters
will match the system meters and the internal dynamic range of the Compellor will be optimized.
Normalizing the Compellor is accomplished by a rear panel REF LEVEL switch provided for
each channel. Two standard reference levels of -10dBV and +4dBu are available. Simply
set the switches as required. If you are using a Model 320D as a stereo processor, then be
sure you normalize both channels equally. Otherwise, you can operate the two channels
independently at different operating levels.
If you have a nonstandard operating level, select the closest setting to your operating level.
For DAT machines and other digital media that define operating levels according to a maximum level rather than an average level, we have found the -10dBV position most often provides the correct match.
4.12 Input Connections
4.12.1 Analog
The input impedance is 20 kilohms and the Compellor will not significantly load the source
when the unit is in-line. Inputs are made by means of 3-pin female XLR jacks. Pin connections follow conventional standards. Pin 1 is connected directly to chassis ground. Signal
pins 2 and 3 may be used either as pin-2 positive or pin-3 positive as you wish. Current U. S.
and international industry standards call for using pin-2 as the positive polarity lead.
For unbalanced use, tie pin 3 to pin 1 for the ground and use pin 2 as “hot”.
Whether using balanced or unbalanced wiring, be sure to follow the same connection scheme
for both channels of the input and output wiring to avoid audio phasing problems.
Interfacing with unbalanced sources can sometimes be improved with a pseudo-balanced
connection. For a complete tutorial on balanced and unbalanced interfacing to other equipment, please refer to Appendix 1 of this manual.
4.12.2 Digital
The AES/EBU input conforms to the 110 ohm impedance standard using a 3-pin XLR female
jack. Pins 2 and 3 are signal, and pin 1 is ground. Use only rated digital audio cables. Ordinary
audio cable can cause jitter, resulting in noise or distortion in the audio.
4.13 Output Connections
4.13.1 Analog
Page 12
The output impedance of 65 ohms is optimized for driving long cables and consequently
a Compellor can drive just about any kind of line, balanced or unbalanced, of any length.
Unique servo balanced output circuitry automatically maintains the proper gain and level into
a balanced or unbalanced output line.
Output connections are made by means of 3-pin male XLR jacks. The pinout follows the
same conventions as the input jacks described above, and you should exercise the same
care about wiring as described for input wiring. Refer to Appendix 1 for complete details
about wiring and interfacing to other equipment.
4.13.2 Digital
The AES/EBU output conforms to the 110 ohm standard using a 3-pin XLR male jack. It is
capable of driving any standard digital audio cable run. Be sure to use only digital audio rated
cabling for best results.
4.14 Summary
If you pay attention to the line voltage setting, reference level, and i/o wiring you should have
no trouble operating the Compellor. If any difficulties are experienced while installing the
Compellor, other information contained in this manual will probably supply adequate assistance. Please study this manual before contacting the factory for assistance.
Page 13
320D
Compellor
5. Specifications
5.1A ANALOG INPUTS
Connector:
Type:
Impedance:
Operating Level:
Max input level:
CMRR:
3 pin XLR female
transformerless, servo balanced, RFI fIltered
22K-ohms balanced, 11K-ohms unbalanced
user selectable +4dBu or -10dBV
+27dBu(ref = +8), +25dBu(ref = +4), +10.8dBV(ref = -10)
>90dB/100Hz, >70dB, 1KHz, >50dB, 20KHz
5.1B DIGITAL INPUT
Connector:
Type:
Impedance:
3 pin XLR female
transformer balamced
110 ohms
5.2A ANALOG OUTPUTS
Connector:
Type:
Impedance:
Max level out (bal):
Max level out (unbal):
3 pin XLR male
electronic servo balanced (unbalanced without 6dB loss)
65 ohms bal or unbal (nominal load 600 ohms or greater)
+25dBu(ref = +4), +10.8dBV(ref = -10)
+20dBu(ref = +4), +10.8dBV(ref = -10)
5.2B DIGITAL OUTPUTS
Connector:
Type:
Impedance:
3 pin XLR male
transformer balanced
110 ohms
5.3 AUDIO
Frequency response:
Hum & noise:
No gain reduction:
10dB gain reduction:
Crosstalk @ 20KHz:
Dynamic THD
Static THD:
IMD, max output:
+/- 1dB 10Hz to 65KHz
measured for a 1KHz tone at unity gain
-67dBu(ref = +4), -86dBV(ref = -10)
-74dBu(ref = +4), -89dBV(ref = -10)
-65dBu(ref = +4), -78dBV(ref = -10)
typically .05% for 1KHz at 20dB gain reduction
.025% at maximum output level
.13%(ref = +4), .4%(ref = -10)
5.4 SYSTEM FUNCTIONS
Compression
Frequency Discriminate Leveling
Peak Limiter
Dynamic Verification Gate (DVG)
Dynamic Recovery Computer (DRC)
Silence Gate
Stereo Enhance
5.5 THRESHOLD
Compressor:
Leveler:
Limiter:
30dB below nominal level
30dB below nominal level
14dB above nominal level
Page 14
5.6 RATIO
Compressor:
Leveler:
Limiter:
1.1:1 to 3:1 program dependent
20:1
>30:1
5.7 ATTACK TIMES
Compressor:
Leveler, fast:
Leveler, slow:
Limiter:
5 to 50mSec program dependent
20Hz = 1.5 Sec > 1KHz Frequency Discriminate Leveler
20Hz = 5 Sec > 1KHz Frequency Discriminate Leveler
1 uSec
5.8 RELEASE TIMES
Compressor:
Leveler, fast:
Leveler, slow:
Limiter:
200 mSec to 1 Sec program dependent
3 Sec
10 Sec
200 mSec
5.9 DIGITAL AUDIO
Input SR:
I/O Type:
Default Output SR:
Word Clock:
Locks to 44.1, 48, 88.2, 96kHz +/- 3%
AES/EBU 110 ohms XLR
User definable by replacing crystal; 48kHz standard
Not Supported
5.10 OTHER SPECIFICATIONS
AC input:
Power requirements:
Power input (max):
Dimensions:
Net weight:
Shipping weight:
IEC standard receptacle with voltage selector, fuse, & filter
100-120-220-240VAC, 50-60Hz
20 watts
19”W x 1.75” H x 10.125” overall depth
depth behind front panel = 9.25”
8 lbs.
9 lbs.
Page 15
320D
Compellor
6. Using Digital Audio
6.1 How the Compellor Interfaces
Being an analog processor at the core, the Model 320D contains a high quality 24-bit low
noise codec to receive digital audio and to transmit digital audio. Once the incoming digital
audio is converted by the DAC section, it passes through the Compellor as normal audio. The
audio output is then converted back into digital by the ADC section of the codec.
6.2 I/O and Synchronizing
On the rear panel you can find two AES/EBU digital audio jacks and a push-button switch for
selecting digital or analog audio input. The AES/EBU jacks are standard professional XLR
110 ohm interfaces. There is no word clock input or output. All synchronizing is accomplished
from either the AES/EBU input signal, or the default internal crystal oscillator if no digital audio
input is present.
The output is synchronized to the input sample rate unless there is no digital input, in which
case the internal default sample rate is automatically selected.
IN
AES3
DIGITAL
32-96kHz
OUT
INPUT
AUDIO
SOURCE
SELECT
IN
ANALOG
CH2
OP
LEVEL
-10
+4
ANALOG
DIGITAL
6.3 Input Selector
When using a digital audio input, you must select it on the rear panel or the analog input will
be received and the digital input ignored. There is no indication on the front panel of which
input is being used. You should be sure to determine that at the time of installation. This is
probably the first place to look if no audio is being received.
6.4 Processing Thresholds
The Model 320D translates the -20dBFS level of the digital audio source to the 0dB reference
within the Compellor circuits. The digital audio now looks as if its -20dBFS level is the same
as the nominal operating level of an analog input. Properly recorded digital audio is therefore
perfectly fitted into the Compellor’s dynamic range and all processing will be just as an analog signal would receive. The average levels will target around -20dBFS with peaks that will
naturally rise as far (as but seldom as high as) 0dBFS. The selectable peak limiter’s threshold translates to -6dBFS. Thus, no digital audio output peaks will rise above -6dBFS when
the limiter is on. The combination of averaging the level around -20dBFS and holding peaks
below -6dBFS packages the audio perfectly for natural sound quality and for most transfer or
transmission purposes. For example, the digital audio would be ready for direct input to an
MP3 coder, HD recorder, .wav file, etc.
6.4 Bypass Mode
When the front panel Bypass button is pressed, the analog and digital signals are metal contact connected from input to output resulting in a true bypass. The analog line in is tied directly
to the analog line out; the AES3 in is directly tied to the AES3 out. If power fails, the bypass
condition is automatically set, providing a fail-safe feature for mission critical audio chains.
A condition that can cause trouble if not understood is when you are operating the 320D in a
system that feeds analog audio to the Compellor but takes the AES3 digital output. Obviously,
Page 16
when in Bypass, the Compellor cannot feed the analog input to the digital output. The digital
output will simply go dead with no carrier. There is no practical way to avoid this.
NOTE: Because the digital I/O is inherently a stereo interface (two channels on one
AES/EBU connection), the Model 320D must have both bypass switches set to Bypass
in order to get the digital I/O to go into bypass. The analog I/O will bypass on a per
channel basis, however.
6.6 Sample Rates
The 320D accepts any sample rate from 32kHz to 96kHz. If there is no digital input present,
the 320D will automatically sync to it’s own internal clock frequency, giving the possibility of
having an analog input and a non house-synchronized digital output.
With no AES3 input present, the 320D defaults to an internal crystal clock to determine the
self-generated AES3 sample rate. The rate is fixed and not selectable. However, the crystal
can be changed by the user to obtain the desired sample rate. The 320D comes with the
48kHz crystal already installed and a kit of extra crystals for the sample rates of 32, 44.1, and
96kHz is packed inside each 320D. If you need to change the 320D’s default sample rate,
use the following procedure to change the crystal.
6.7 Changing The Crystal
a. Make sure the power cord is unplugged and the unit has been off for several minutes.
b. Remove the top cover from the chassis and locate the crystal kit packed packed inside.
c. Locate the digital audio interface board as shown in figure 6.1.
d. Locate the crystal Y2. It’s wire pins are inserted into socket receptacles on the board and
the case is held in place with a dab of silicone glue.
e. Carefully pull the crystal out of the socket. If necessary, cut or peel off the glue to release
the crystal. Clean any residual glue from the pc board.
f. Insert the new crystal until it is fully seated in the pin receptacles. Add a dab of silicone glue
to hold it in place. Refer to Table 6-1 to select crystal frequencies.
NOTE: DO NOT USE SUPER GLUE. IT MAY RUN DOWN THE PINS AND RENDER THE
OSCILLATOR INOPERABLE.
Fig 6.1
Location of Y2 Crystal
Table 6-1 Crystal Frequencies
Page 17
Sample Rate
kHz
Frequency
mHz
32.0
44.1
48.0
96.0
8.1920
11.2896
12.2880
24.5760
320D
Compellor
7. Operation
7.1 Introduction
The “Quick Start” guide in the front of this manual is the best way to begin using your
Compellor. You will get a good feel for what is going on, and you will have a signal going
through the processor, ready for fine tuning. We strongly recommend reading section 8
describing the Compellor’s features and controls in order to understand what all the settings
mean. For the present purposes, we will discuss specific applications of a Compellor and give
you suggestions on how to tune it for best results.
7.2 Recording
Regardless of how consistent a musician or a vocalist may be, when there is a ‘take’ the levels
can vary dramatically from the rehearsals. Trying to ride faders in real time is impractical, if
not impossible. You want to have real time control over the levels, but not change the musical
character of what you are recording. The Compellor is the perfect solution.
Set up the Compellor for no more than 4 to 6dB of gain reduction with nominal ‘0’ VU in, use
fast leveling speed with Process Balance at 12 to 1 o’clock. This setting will give you 4 to 6dB
of increase in the lowest level signals and keep overly enthusiastic performers from overloading the recorder. When using the Compellor as a dual mono unit make sure that the Stereo
Enhance is off and the Unlinked is in.
Using the Compellor while recording will give you more consistent levels to work with when
you mix, thus making the mix process faster and easier. It will also allow you to maintain better
signal to noise performance in the recording medium.
7.3 Mixing
Layering elements within a mix so that each ‘sits’ in its own pocket, not interfering with other
elements is a critical part of assembling a high quality mix. Typical multitrack mix downs
become very complex. Gain adjustments on the different elements can be manually made
through the mix, programmed through automation, or the Compellor can be used. By using
the Compellor on an individual track or subgroup, that element can be ‘fit’ into the mix more
easily and require less attention from the mix engineer.
A background vocal subgroup, for example, may disappear into the noise or become lead
vocals. By using the Compellor, the background vocals stay in the background, but at the
right level.
Use one channel of the Compellor as a pre-fader insert, or on the output of a buss and return
the buss into a fader. This will give you the ability to automatically control the levels of the
element and also adjust the level of the return if necessary. Note: If you insert the Compellor
post-fader, the Compellor will ‘unwind’ any fader moves.
Using the Drive control, adjust the amount of total gain reduction for the amount you want to
bring up the lowest level signal (usually no more than 6 to 8dB). Process Balance should be
set more towards Leveling (CCW) for a more dynamic sound and more towards Compress
for tighter instantaneous dynamics.
7.4 Mastering
A recording studio is not the typical listening environment. Most listening is done in a higher
noise environment with less than optimal acoustics (e.g.- a car). Monitoring in a studio is
usually done at higher levels than in a typical playback situation. Furthermore, if the master
Page 18
has too wide a dynamic range, it can cause broadcast processors (if the processing does not
include the Compellor) to work too hard and generate audible artifacts. These are all reasons
to master a final mix which has a controlled dynamic range.
The goal, of course, is to maintain the sound quality of the studio while you are trying to
‘tighten’ the mix. Adjust the Compellor for 2 to 4dB of gain reduction with the Process Balance
at 11 o’clock. Stereo Enhance should be in and Leveling Link in. If the mix was encoded for
surround or has some other matrix processing, use the Compression and Leveling Link. Note:
If there is one dominant element in your mix, the Compellor will work on that element causing
the lower level elements to be ‘ducked’. It is therefore important to control the elements in the
recording and the mix down before the mastering process.
7.5 Video Post-Production
Speed is of the utmost importance in video production. There is no time to do endless takes
and overdubs, ride faders or program automation level changes. But the demand to have a
quality end product still remains. The Compellor will automatically control and blend levels
from multiple sources and takes.
7.6 Sound Reinforcement:
Each music or speech source can have its own variation of level. Multiple sources
can have extreme variation in levels. Some examples- a ‘fire and brimstone preacher’
followed by a little girl on the same P.A. system, a foreground music system playing
from a juke box and the selections all have different levels, one speaker in a conference room trying to shout down a more soft-spoken
Houses of Worship
individual. The Compellor controls the level variations
Restaurants
within a source and the segue between sources is
Discos
much smoother in terms of level.
Paging Systems
Conference Rooms
Adjust the Compellor so that the amount of gain reduction
with ‘0’ VU in is the desired amount of gain you want to
add to the lowest level signal. Caution: Since the Compellor is so transparent, even at great
amounts of gain reduction, it is hard to tell when there is too much gain reduction. If there is
an open microphone, there may be feedback if the Compellor brings up too much gain. Make
sure that there is no feedback when the Compellor is fully released (i.e.-no gain reduction).
7.7 Live Concerts
As in a recording environment, artists will often play at much different levels at different times.
Controlling dynamics becomes even more important because there is no way to ‘fix it in the
mix’.
Use the Compellor on individual elements or subgroups and you will not have to work the faders as often or as hard. The Compellor can be used as a final gain rider so that the average
level of the concert stays within defined dynamic range.
Be careful not to use too much gain reduction on vocals and instruments which are miked so
that you avoid feedback when the Compellor is fully released.
7.8 Broadcast Radio Pre-processing
Levels coming off the studio board are unpredictable, even with an operator watching levels.
Level differences from cart to CD to voice to satellite and back can be dramatic. There are
Page 19
320D
Compellor
7. Operation
numerous other devices which effectively control the level differences, but none have the
transparency of the Compellor. These other devices, particularly multiband compressors and
limiters, have a ‘sweet spot’ which renders the best results. Adjust the Compellor so that its
output is driving the downstream processors at their sweet spot.
7.9 Broadcast STL/ Phone Line Driver
The aural STL’s and phone lines have limited dynamic range. It is advisable to do processing
in front of those links so that they are not overloaded or driven so lightly that there is too much
noise. Set the Compellor for 12dB of gain reduction, Process Balance at 11 o’clock, Leveling
Speed ‘slow’, Limiting ‘in’, Stereo Enhance ‘in’ and Leveling Link ‘in’.
7.10 Television Broadcasting and Cable Systems
The single biggest complaint generator from viewers is the apparent level difference between
commercials and program. The differences may be even more exaggerated when there are
local inserts into national feeds. Commercials are processed to have low peak to average
ratios. So even if the peaks of the commercials are the same as the program peaks (as would
be measured on a modulation monitor) the average levels are higher, causing the apparent
loudness difference.
The Compellor recognizes the differences in density and adjusts it release times based on
the peak to average ratio of the input. If an input is already heavily processed (e.g.- a commercial), the Compellor slows its release time. When the Compellor sees a very high peak
to average ratio (e.g.- a live news broadcast) it speeds its release time. Segues between
program and commercials are much smoother.
Another complaint made to cable systems is the difference of levels channel to channel. If
each channel of a cable system has a Compellor and all the Compellors in a cable system
are set similarly, channel to channel differences will be eliminated.
7.11 Video and Audio Tape Duplication
The dynamic range of most tape formats is usually much less than the original source material. In addition, the usable dynamic range of the playback medium of duplicated tape is usually less than that of the original (e.g.- video tape copy of a theatrical release). The Compellor
will automatically control the dynamics of the original without losing the impact and artistic
intent of the original.
The Compellor is also useful when assembling a single tape from multiple sources. The level
differences between the sources are automatically smoothed out, obviating the need for studio time to level adjust each source before mastering.
7.12 Voice Processing
The human voice is the most difficult signal to process. We may not know what that drum
sounded like originally, but we all know what a human voice sounds like. Processing artifacts
are therefor much more noticeable on human voices.
Consonant recognition is a critical part of intelligibility. If the processing is not done correctly,
the consonants will be ‘crushed’ causing the loss of intelligibility. The Compellor effectively
controls the levels without loss of intelligibility, indeed because the levels are more controlled,
the intelligibility will be enhanced.
It is recommended that Leveling Speed be set for ‘fast’ when processing voices.
Page 20
7.13 Hard Disk Recording
Transferring music to hard disk can be improved using a Model 320D. It is a known fact that
CD’s are mastered at varying average levels with some strikingly lower or higher in volume
level than others. When building a broadcast or webcast music library on a hard disk audio
server, it would be nice to have a way to even out those levels so the on-air segues will always
be smooth and fat. The Compellor can do that without adding artifacts across the whole inventory of titles. Simply transfer each title through the Compellor’s digital I/O port. Alternatively,
if you cannot re-record an existing library, you can place a Model 320D at the output of the
audio server. It will automatically ride gain for you and serve up neatly packaged audio perfect
for the on-air mix and subsequent broadcast audio processing.
Page 21
320D
Compellor
8. System Description
8.1 Model Evolution
The model 320D Compellor is a dual channel audio processor capable of being stereo linked.
It is essentially a Model 320A with a digital audio interface added. In order to make room for
the necessary additional connectors on the back panel, we eliminated the analog input impedance selectors and the remote control jack of the Model 320A. We also limited the operating
level selectors to +4dBu/-10dBV selections.
8.2 Signal Flow
The Compellor contains an input stage, an intermediate VCA stage, and an output stage. The
input audio signal undergoes all processing in the VCA stage and is subsequently sent out
through the output stage. A side chain system produces the control signals which change the
VCA gain according to the signal processing requirements. When using a digital audio input,
the digital input is first converted to analog by a high grade codec and the recovered analog
is sent through the analog input path. The analog input jack is disabled. The digital output is
generated by the codec from the analog VCA output signal. The digital and analog outputs are
available simultaneously. You can have an analog input and digital output or vice-versa.
8.3 Processing Functions
A Compellor provides automatic gain control and excess peak control through the three principal functions of leveling, compression, and peak limiting. In addition, a dynamic verification
gate (DVG), silence gate, and dynamic release computer (DRC) are incorporated as proprietary support functions. A very subtle stereo enhancement technique is also included as a
user selectable feature.
8.4 Leveling Function
The leveler is a slow acting automatic gain controller. This means that it responds to the average power level of the audio signal much as the ear hears the loudness, or relative volume
level. It constantly but slowly adjusts the VCA gain, attempting to keep the average volume
level of the output signal constant. The compression ratio of the leveler is about 20:1 which
means that if the input signal changes by 20dB, the leveler could keep the change of output
level down to only 1dB. The actual range of leveling depends on how much gain reduction
the user chooses.
The leveler has two operating speeds which can be selected by a front panel switch: “fast”
and “slow”. The slow speed will not affect musical dynamics but will act fast enough to follow
the general density trends of a program mix. The fast speed is better for plain voice work
as it can follow the faster and more unpredictable voice changes of announcers and singers
as they weave around the mic or use expression. The frequency discriminate leveling in the
series “A” Compellors has so improved the leveling function that fast leveling is now feasible
for use with musical programs to materially increase the loudness density of a mix without
causing objectionable bass pullback and bass pumping.
The leveler is influenced by both the silence gate and dynamic verification gate whereby the
gain control generated by the leveler can be frozen by either of the two gates. This means
that either gate can make the leveler stop changing the VCA gain and hold the most recent
leveling value.
The frequency discriminate leveler, as opposed to the previous leveler, responds more slowly
to low frequencies than to higher frequencies. This represents a significant improvement
whereby the ear can perceive much less effect of the bass signals controlling the Compellor
gain. The prior leveler responds to all frequencies at the same rate.
Page 22
8.5 Compressor Function
The compressor cooperates with the leveler to supply more consistent program level control
than possible with the leveler alone. While the leveler is relatively slow responding, the compressor works much faster to control both the transients and other quick changes in the sound
level. The compressor has a variable compression ratio depending upon depth of compression. In other words, the ratio gets higher as more compression is used. Even at the highest
ratio it is not excessively stiff, achieving a maximum of only about 3:1.
The attack and release times of the compressor are program dependent as a function of the
audio waveform’s complexity. Thus, most of the sonic artifacts of compression are minimized
or eliminated. It can be generalized that transient sounds will cause faster attack and release
as well as greater compression than continuous and slow changing sounds. Like the leveler,
the compressor is also influenced by the DVG and silence gate. Either gate can force the
compressor to freeze and hold its gain control at a steady value.
8.6 DRC
The dynamic release computer, or “DRC” is directly imbedded in the compressor to control
the release time. This circuit detects the audio waveform and directly affects the compression detector. The result is a compressor which responds differently to “fat” and “dense”
sounds than for “thin” and “peaky” sounds. This is how the Compellor can better match the
changing elements in a program. For example, the DRC helps the Compellor match up a live
announcer’s voice level and density with the relatively heavier density of a recorded cut-in or
segue without resorting to excessive compression effects.
8.7 DVG
The “dynamic verification gate” continuously detects the Compellor’s processed VCA output
signal and computes the historical average of peak values. It also “verifies” when the present
peaks exceed or equal the historical average and outputs a “stop and go” control for both the
leveler and compressor functions. Whenever the present peak amplitude is below the historical average, the leveler and compressor gain controls are frozen by “gating” their respective
level detectors into a “stop and hold” mode. Otherwise the level detectors are gated into the
“ track and go” mode. Thus, the word “gate” does not indicate the audio signal itself is being
gated in any way, although our use of the term “Silence Gate” has confused some uninformed
users.
8.8 Silence Gate
This is not an audio gate. It does not affect the main audio path. The Silence Gate acts to
gate the gain control functions, thereby causing the gain to either “freeze” or continue being
controlled. The net effect is to prevent the background noise from swelling up when the program stops for a period of time. You could interpret the Silence Gate as an augmentation to
the DVG function.
The DVG, described above, needs a continuing source of audio to maintain its operation.
If the audio should stop for any reason, the DVG first freezes the VCA gain then simply
relinquishes all control after about 1.5 seconds of silence. This would allow the Compellor
to begin recovering gain and thus bring up the background noise level. To prevent this, the
Silence Gate is used. Whenever the input audio signal drops below the user selected silence
threshold for one second or longer, the silence gate circuit freezes the VCA gain in lieu of
the DVG circuit. You should set the Silence Gate threshold to a level above the typical back-
Page 23
320D
Compellor
8. System Description
ground noise, but below the lowest program signal expected. Typically, a setting of -30dB (at
about 9 o’clock) is satisfactory for all purposes.
If, for some reason, you want to prevent the Compellor from bringing up program fades below
a certain point, simply set the Silence Gate threshold to the level where you want the fade to
become “uncorrected”. The Compellor will then freeze its automatic gain control and let the
program continue fading out naturally.
8.9 Stereo Enhance
When the Stereo Enhance button is selected, the sidechain signals are coupled in a manner which helps to push the stereo image slightly wider depending on the amount of compression. This is purely a function of the interactive gain reduction of the two channels, and
does not matrix or modify the main audio paths. The effect is valid even when the leveling
is stereo linked. If the compression is stereo linked then the effects of “Stereo Enhance”
are eliminated.
8.10 Stereo Linking
Two link modes are possible with the model 320D. The first mode links only the leveling
systems of the two channels. The second mode links both leveling and compression. You
cannot link compression only.
8.11 Meter Selections
The Compellor’s dual color LED meters have a three position meter selector which is operated as a scanning push switch. Three LED’s indicate the meter mode as the selector is
repeatedly depressed to cycle through the selections. Selection 1 displays the Compellor’s
incoming signal level. Selection 2 shows the Compellor’s output level. Selection 3 shows the
Compellor’s VCA gain reduction level.
The audio level selections set up the meter in two colors to simultaneously indicate the average, or “VU meter” level, and the peak level. VU is shown in red and peak in green. In the
gain reduction setting, the meter uses two colors to simultaneously indicate the leveling and
compression gain control.
8.12 Limiter
The peak limiter has a very fast attack of less than 1 microsecond. This positively stops audio
peaks from escaping the VCA if the limiter is turned on. The threshold of limiting is about
14dB above the output zero VU reference level. With such a high threshold, the limiter only
activates occasionally when excessively high transients are present in the output audio.
8.13 Process Balance
This control allows you to balance the relative amount of leveling and compression being
used. Normally, this control is used with the Drive control to obtain the exact proportions and
depth of gain reduction desired. Process Balance should be set more towards Level (CCW)
for a more dynamic sound and more towards Compress (CW) for tighter instantaneous
dynamics.
8.14 Drive Control
This control sets the VCA gain ahead of the processing threshold and thus sets the depth of
processing for a given input signal. The higher the drive, the more gain reduction.
Page 24
8.15 Output Control
This control allows you to normalize the output level to 0VU after the processing is set up. It
will usually get set around 12 o’clock, but there is a plus or minus 10dB range available which
is useful if you need to match a slightly odd level.
8.16 Process Switch
This operates a bypass relay which completely bypasses the Compellor in the process out
mode. The relay will also go to bypass if the power is shut off or the power supply fails. This
is a life saver in cases where the program must never be lost such as broadcast chains or
live performances.
8.17 Input/Output
The Compellors use the Aphex active servo balanced input and output stages. We like to
specify pin 2 as positive but this is purely arbitrary since the balanced input and output pins
are directly in phase and there is no dedicated unbalanced output which would be specified in
relation to the input phase. You could just as well call pin 3 positive if that is what you want.
8.18 Operating Levels
A rear panel rotary switch for each channel selects the normal operating level for the
Compellor. You can chose -10dBV, +4dBu, and +8dBu as the reference level. This switch
sets the dynamic range of the Compellor’s circuitry to best match your standard operating
level, and also sets the 0dB calibration of the front panel audio level meter to equal the reference level selected.
8.19 Input/Output Metering
When the Meter Select button is toggled into either Input or Output, the bi-color LED meter is
programmed to indicate a bar graph from left to right. Within the bar graph is a red portion
and a green portion. The red portion indicates the VU or “average” level and the green portion indicated the peak level of the signals. Figure 9-1 shows an example of an audio level
indication showing a zero VU signal with a peak level of +9dB.
This would translate to an average signal level of +4dBu with a peak value of +13dBu if the
Compellor were normalized to +4dBu. Note that, since the peak value is always greater than
the average value of an audio signal, the green bar always appears to the right of the red
bar.
-15
2
-12
4
-9
6
-6
8
-3
10
0
12
3
14
6 Reds
6
16
9
18
12 PGM (dB)
20 G.R. (dB)
3 Greens
Figure 8-1 Bargraph Level Meter Example
Page 25
320D
Compellor
8. System Description
8.20 Gain Reduction Metering
When the Meter Select is toggled into “G.R.” the bi-color LED meter is programmed to indicate a bar graph from left to right but differing from the program level indications. In this case,
the bar is entirely green except for a possible red dot which floats within the green bar. The
entire length of the green bar indicates total gain reduction of the Compellor. The position of
the red dot indicates the amount of Leveling gain reduction, if any. The amount of gain reduction contributed by compression is inferred from the remainder of gain reduction indicated
above the red dot.
-15
2
-12
4
-9
6
-6
8
-3
10
0
12
3
14
6 Reds
1 Red
6
16
9
18
12 PGM (dB)
20 G.R. (dB)
3 Greens
7 Greens
2 Dark
Figure 8-2 Bargraph G. R. Meter Example
If all gain reduction is due to compression, then the indication will be a totally green bar, and
the whole bar indicates compression. If all the gain reduction is from leveling, then the green
bar will have a red dot at the right most point. Figure 9-2 shows an example of indicating
16dB total gain reduction with 4dB of leveling. 12dB of compression is therefore inferred.
Page 26
320D
9. Warranty & Service
Compellor
9.1 Limited Warranty
PERIOD
One year from date of purchase
SCOPE
All defects in workmanship and materials. The following are not covered:
a. Voltage conversions
b. Units on which the serial number has been defaced, modified, or removed
c. Damage or deterioration:
1. Resulting from installation and/or removal of the unit.
2. Resulting from accident, misuse, abuse, neglect, unauthorized product modification or failure to follow
instructions contained in the User’s Manual.
3. Resulting from repair or attempted repair by anyone not authorized by Aphex Systems.
4. Occurring from shipping (claims must be presented to shipper).
WHO IS PROTECTED
This warranty will be enforceable by the original purchaser and by any subsequent owner(s) during the warranty
period, so long as a copy of the original Bill of Sale is submitted whenever warranty service is required.
WHAT WE WILL PAY FOR
We will pay for all labor and material expenses for covered items. We will pay return shipping charges if the repairs
are covered by the warranty.
LIMITATION OF WARRANTY
No warranty is made, either expressed or implied, as to the merchantability and fitness for any particular purpose.
Any and all warranties are limited to the duration of the warranty stated above.
EXCLUSION OF CERTAIN DAMAGES
Aphex Systems’ liability for any defective unit is limited to the repair or replacement of said unit, at our option, and shall
not include damages of any other kind, whether incidental, consequential, or otherwise.
Some States do not allow limitations on how long an implied warranty lasts and/or do not allow the exclusion or limitation of incidental or consequential damages, so the above limitations and exclusions may not apply to you.
This warranty gives you specific legal rights, and you may also have other rights which vary from State to State.
9.2 To Obtain Service
If it becomes necessary to return this unit for repair, you must first contact Aphex Systems,
Ltd. for a Return Authorization (RMA number), which will need to be included with your shipment for proper identification. If available, repack this unit in its original carton and packing
material. Otherwise, pack the equipment in a strong carton containing at least 2 inches of
padding on all sides. Be sure the unit cannot shift around inside the carton. Include a letter
explaining the symptoms and/or defect(s). Be sure to reference the RMA number in your letter and mark the RMA number on the outside of the carton. If you believe the problem should
be covered under the terms of the warranty, you must also include proof of purchase. Insure
your shipment and send it to:
Aphex Systems, Ltd.
11068 Randall Street
Sun Valley, CA. 91352
PH: (818) 767-2929 FAX: (818) 767-2641
Page 27
320D
Compellor
Appendix A: Balanced and Unbalanced
Lines and Operating Levels
Interfacing all types of equipment with balanced and
unbalanced lines and can sometimes be troublesome. First you have to somehow connect balanced
to unbalanced and then you have to deal with different levels. This tutorial will teach you about the
principles of balanced and unbalanced lines, wiring
standards, and how to effectively interface them.
Standards
Professional audio equipment usually comes
equipped with inputs and outputs that are balanced
using 3-pin XLR connectors and sometimes 1/4 inch
phone jacks as well. This equipment most often is
designed to operate at +4dBu, a professional industry standard. That translates to a magnitude of 1.23
volts RMS (Root-Mean-Squared).
10. Appendices
lines are the same. They both need two conductors.
What makes a system unbalanced is when one of
the wires is formed into a tube that wraps around
the other conductor, without touching it, such that
the outer conductor can be said to “shield” the inner
conductor. This describes all of the coaxial cable used
for video, cable-TV and radio as well as most of the
high fidelity audio cables.
Balancing
If both conductors are identical insulated wires that
are twisted together, then they form a balanced line.
This describes telephone lines, microphone cables,
and most professional audio cables. Typical balanced
cables include an additional shield wrap around the
twisted pair, but this is not strictly required for balanced lines to work properly.
Consumer gear has unbalanced I/O as standard, usually on RCA jacks. The normal operating signal level
follows the IHF (Institute of High Fidelity) standard
of -10dBV, or 0.316 volts (316mV) RMS. Converting
to dBu dimensions, this works out to be the same as
-7.79dBu. There is therefore a difference of 11.79dB
between pro and consumer operating levels.
Grounding
There is the notion that some king of earthly “ground”
exists out there that sinks all the noise and acts as
some kind of a shield. You see wires connected to
ground rods and water pipes that are supposed to
get a good ground. This is not a correct interpretation of grounding from an audio standpoint. Proper
grounding of equipment and wiring is important and
you will gain a better understanding of that as you
read along.
Balanced -vs- Unbalanced
Every audio signal is connected through a circuit. The
circuit must contain two conductors to create a complete return path. In other words, a signal voltage is
conducted to a piece of equipment by injecting a current into a wire. That current has flow though to the
destination through the wire and return back to the
source through another wire. Since audio is an alternating voltage, swinging through negative and positive polarity, the current through the two conductors
changes direction each alternate half cycle. Which
wire is the source and which is the return alternates
accordingly. In this regard, balanced and unbalanced
Figure 1 Balanced Line Model
Figure 2 Unbalanced Line Model
Many people, because they have more experience
with unbalanced wiring, think that balanced is
confusing. Believe it or not, balanced lines are really
easier to understand than unbalanced. There is no
grounding issue with balanced, and the way it works
is perfectly natural and simple. Balancing naturally
rejects hum and noise and eliminates all sorts of
complications in interfacing.
Balanced transmission works something like this.
Your balanced input stage looks at the two wires
and detects only the potential (voltage) difference
between them. Anything that is the same on the two
wires (for all practical purposes as seen measuring
from ground) is called a common mode signal and
Page 28
320D
Compellor
is cancelled out by the differential amplifier. Figure
1 illustrates how the hum is induced into both wires
equally and therefore is cancelled out.
Since the balanced line has wires that are twisted
together, each wire tends to pick up the same
amount of induction from external sources. Induction
will create no significant voltage difference between
the wires, hence the noise (or hum) will not be picked
up by the differential input stage.
It can be seen that the signal generator driving the
twisted pair will cause a difference between the
wires, and that signal will be readily picked up by
the differential input stage. One of the beauties of
the balanced line is that it is completely independent
from ground. Nothing is connected to ground at all,
nor does it care about ground. Nevertheless, most
professional cable has an overall shield wrap that is
intended to be connected somehow to ground. You
may well ask why, and the answer is less than glorious. Simply, nothing is perfect, not even balanced
cable. Under some circumstances the shield can overcome extreme interference problems that can’t be
adequately rejected by the twisted pair alone. Things
like 2-way radios, television transmitters, and light
dimmers can induce very heavy interference that may
be reduced by shielding. You are going to find virtually all balanced cables include a shield so you need
to deal with it, even if it is not actually needed. That
subject will be addressed a little later.
Unbalancing
Unbalanced wiring works a little differently. Figure 2
shows the basic plan. In this case, the wires are not
twisted, they are coaxial. The unbalanced input stage
is somewhat like the balanced input stage because
amplifies a difference signal, but this time it is the
difference between two non-symmetrical conductors. To make things even less symmetrical, the outer
conductor is connected to ground at both ends. The
principle is that the outer shield conductor shields
the inner conductor from induced noises. This can
only work well if the cable is relatively short and the
ground at each end of the cable is somewhat equal,
i.e., there is no “grounding difference” that can
cause current to flow through the shield conductor.
Grounding difference is a serious problem in studios,
because often the equipment grounds are connected
to power outlet grounds, and there can be a significant difference of ac voltage between alternating
wall outlet grounds. For this reason, unbalanced sys-
Appendix B
tems can sometimes never be made hum free, and
just changing one piece of equipment in a studio can
cause hum to appear somewhere else. When you are
using unbalanced gear, it is a very good procedure
to power all your equipment from one large power
isolation transformer. At the very least, make sure all
equipment is powered together off the same distribution panel circuit (same circuit breaker).
Appendix B: Dealing With Grounds and
Hum
Ground Loops
Many people equate this term with hum, and that’s
just about the bottom line of it. If you have a ground
sensitive system, like unbalanced audio equipment
for example, then hum will result from ground
currents that flow from the ac power system. It is
sometimes very difficult to isolate and stop ground
currents between unbalanced equipment, but it is
quite easy to clean up balanced gear. That’s why pro
gear is always balanced! The cost of balancing is that
of more expensive connectors, cable, and electronics
but the cost is worth it when you depend on your
audio quality. That’s why the Model 320D is equipped
with a fully balanced I/O. Now that we’ve sold you on
only using really expensive pro gear, lets show you
how to get away with the really cheap stuff! At least
from the standpoint of killing ground hum.
A ground loop is an ac current that has become
routed through your audio ground system. The current comes mainly from ground potential differences
that exist between different wall outlets that return to
opposite phases at the power distribution panel. Secondarily, however, many pieces of equipment contain
line filters and transformers that leak a small amount
of ac power into the chassis and ground return.
You may once have had the experience of getting
zapped by touching two pieces of gear at the same
time. That illustrated the ground loop effect - straight through you! No matter what you do, you
may not be able to prevent some of your equipment
from generating ground currents. The most likely
culprits are digital products because they use switching power supplies that require heavy line filters to
prevent conducted EMI from going out of the box.
Filters so employed very often take the ground leakage current right up to the UL safety limits. Although
it won’t kill you, that is a lot of ground loop current
for audio cables to handle.
Page 29
320D
Compellor
There are basically three ways to attack the problem of a ground loop. First is to eliminate it from
its source, and the second is to re-route it through
another path. The third is to balance out your unbalanced audio interfaces.
Identify the Sources
A good way to identify grounding problems is to use
a multimeter to check the ac voltage between the
chassis of your various gear when no audio cables are
hooked up and all gear is plugged in and switched
on. Just start touching the two probes to the metal
chassis of different pieces of gear. Ideally, you should
always see zero volts. Warning! You may see as much
as the whole line voltage between two different
chassis! It does happen. This voltage between chassis
will be responsible for your ground loop problems.
If you find there is more than about 1 volt between
equipment grounds, you should start looking for a
remedy.
Commonize the Power
Try plugging all of your equipment into the same
outlet strip. Get one that has enough outlets in one
strip or string more than one together. Of course, you
need to make sure you don’t overload the one ac circuit your strip is plugged into. If the load is too great
for one circuit, use a second or third circuit that is
tapped off the same 120 volt phase in your distribution panel. That means all outlets should be on odd
or even numbered circuit breakers. That’s because,
as you go down the column, the circuit breakers
tap into alternating legs of your incoming electric
power. Be sure you’re always on the same leg. You
can tell you’re on the same leg by measuring the ac
voltage between the hot slots of the different outlets
you’ve chosen. It should be very low or zero. That will
remedy 50 percent of the cases.
Check the Cord Polarity
For products that have 2-wire power cords, try reversing one of the power cords in the socket. That may
reduce the ground current generated by the internal
electronics of the offending gear.
from chassis to chassis. You will need to locate a
metal screw that solidly binds to the metal chassis of
the gear. You may even need to drill a hole through
the chassis and install a screw yourself. Equipment in
rack shelves can have their chassis grounded to the
metal rack frame by a heavy wire and the frame itself
can act as a brute force ground. You just have to try
everything you can think of. Usually a combination of
all these methods will be needed to completely clean
up a badly humming audio system.
Balance Out the Audio
Remember, balanced lines are inherently hum free.
If you can balance out your unbalanced equipment,
you will be able to stop the hum.
Pseudo Balancing
You will find in Appendix D an interconnecting
method called Pseudo Balanced. This works when
connecting an unbalanced output to a balanced
input. This breaks up the ground loop by requiring
the shield to be grounded only at one end. For best
results always ground the shield only at the receiving
end.
Level Interface Units
Aphex manufactures the Model 124A Level Interface
box which is designed to electronically convert two
unbalanced inputs and outputs into two balanced
inputs and outputs, and at the same time translate
the -10dBV IHF unbalanced levels to the pro +4dBu
balanced levels. This cost effectively gives your nonprofessional unbalanced equipment a fully professional I/O equal to the world’s best pro audio gear.
Seriously consider putting one of these on each
unbalanced piece of gear you use.
Avoid Transformers
The use of balancing transformers is an option, but
you will invariably lose audio quality due to transformer limitations. Try everything else first.
Redirect Ground Loops
Sometimes it just comes down to brute force grounding. That means providing such heavy, low resistance,
ground current paths that little current is left to flow
through your audio grounds. You can try adding
heavy gauge, for example 12 gauge, copper wire
Page 30
Appendix C
Appendix C: Proper Wiring Techniques
A true balanced line should be used wherever your
equipment allows. Use “twisted pair” shielded cable.
For unbalanced wiring you should use high grade,
low capacitance shielded wire for best results. If you
have an unbalanced output but have a balanced
input, the “pseudo-balanced” configuration may
help deal with ground loop hum. This method and
others are illustrated in Table 2.
CONNECTOR WIRING STANDARDS
The 3 pin XLR, 1/4” (63.5 mm) TS mono phone and
the 1/4” (63.5 mm) TRS stereo phone are the most
commonly used line level connectors in pro audio.
Less common is the use of the “RCA” phono jack,
which is essentially a consumer type connector. The
XLR and the TRS are three conductor and are used
for balanced connections. The TS and the RCA are
two conductor and are used for unbalanced connections.
In addition to the three main contacts on an XLR
there is also a grounding lug contact. This lug is connected to the connector’s case (shell). In all Aphex
products audio ground and chassis ground are one
and the same. Aphex products that use XLR connectors tie Pin I to the XLR case automatically. Therefore
it is not necessary to use the XLR case-ground lug. This
also makes possible the use of XLR ground drop
adapters (see Note 3).
TABLE 1: The wiring convention shown is now
standardized in 17 countries including the USA.
Please note that any equipment that still uses Pin 3
as positive on XLR connectors is not adhering to the
standard.
THE PIN 1 DILEMMA AND HOW IT AFFECTS CABLE
SHIELD CONNECTIONS
The three main contacts on an XLR (or TRS) and
the accepted wiring assignments shown above are
only part of the picture. The standard for terminating ground is Pin 1 (Sleeve). But which ground? It
could be connected to audio signal ground or chassis
ground depending on the method of grounding used
by the equipment manufacturer. In all Aphex products audio ground and chassis ground are one and
the same at all I/O jacks. This is just good, common
sense engineering practice (which is what you would
expect from us, course). Unfortunately, many products are designed so that the noisy currents from
the shield drain into signal ground instead of chassis ground. This practice creates a real hum and
noise problem for end-users. The appropriate overall
grounding scheme of an audio system would be a lot
easier to predict without this problem1.
The standard balanced line wiring recommendation from Aphex Engineering is this: In the majority
of cases maximum noise rejection occurs when the
shield is connected to the input ground only (especially in locations with high levels of RFI). That means
the sending end shield should be left disconnected.
However, if you already have cables with the shield
connected at both ends, go ahead and try them
out. If you are connecting a fairly simple audio
system it may be fine as is.
A word on optional shield connections: Connecting
the cable shield of a balanced line at both ends creates unnecessary ground loops which may carry noise
and hum currents that can be amplified. Connecting
the shield only at the sending end (instead of the
receiving end) may exaggerate common mode noises
at the receiving input stage. It can actually increase
RFI and noise more than having no shield at all.
Because of the “Pin I Dilemma” (mentioned above)
you may be forced, in some situations, to experiment
with how the cable shield is connected to ground to
eliminate a pesky hum or radio interference problem.
It might be good to try XLR ground drop adapters
(see Note 3) as a method of trying these conflicting
methods out and being able to change easily if necessary.
IMPEDANCE
Regardless of inaccuracies, it has become more or
less standard over the years to refer to balanced
lines as low impedance and unbalanced lines as high
impedance. The fact is, however, that both balanced
and unbalanced lines are operated at low impedance in modern practice owing to the fact that all
output stages have become low impedance. A few
exceptions might be outputs from passive mixers,
instrument pickups, electric guitars and some keyboard synthesizers. It is generally ideal to drive any
Page 31
320D
Appendix D
Compellor
TABLE 1 - BALANCED & UNBALANCED CONNECTOR WIRING STANDARDS
3-Pin XLR
1/4” TRS Phone
Standard Wiring Convention (Balanced)
Pin-1
Sleeve
Ground/Shield (Earth, Screen)
Pin-2
Tip
Positive (Signal, High, Hot)
Pin-3
Ring
Negative (Signal Reference, Return, Low, Common)
1/4” TS Phone
RCA
Standard Wiring Convention (Unbalanced)
Tip
Center Pin
Positive (Signal)
Sleeve
Shell
Ground/Shield (Signal Reference/Return)
audio line from a low impedance and receive into a
high impedance. Generally, a minimum 1: 10 ratio is
possible. This is called “bridging”. This has become
modern practice and all balanced inputs are normally
running 10K ohms or higher impedance. Because
of these developments, it is no longer as critical to
consider impedance when dealing with interfacing
pro line level equipment (impedance “matching” is
mostly a requirement of the past).
A word on impedance and interfacing adapters:
If you are connecting between two line level devices
and they have different connectors (example: 1/4”
phone to XLR or vice-versa), you do not need to use
an impedance matching transformer. With very few
exceptions you are strictly dealing with a difference
in connector types and should only use hard-wired
adapters (or cables) for this situation.
APPENDIX D: Standard Cable Wiring
In relation to 1/4” phone jacks, you may see the terms
“TS” and “TRS” as abbreviations. Here is a what that
means: TS refers to the Tip-Sleeve or “mono” 2conductor type and TRS refers to Tip-Ring-Sleeve or
“stereo” 3 conductor type 1/4” phone connectors.
This applies to jacks (female connectors) and plugs
(male connectors).
The following instructions show all the different ways
you will probably ever need to hook up your 320D as
well as any other equipment you may own. You will
see that connecting balanced outputs to balanced
inputs is ultimately simple and the same cable will
work for all flavors of output stages.
Connecting a balanced output to an unbalanced
input requires a little more knowledge and care.
You should refer to your equipment manuals and
determine the type of balanced output stage that is
provided, then use the correct “transition cable” as
depicted in this section. Improper transition cables
can cause crosstalk, hum, and distortion problems
within your system.
TYPES OF BALANCED OUTPUTS
Believe it or not, there are at least 5 types of balanced
output stages in use today. They may be placed
into two main classes: transformer balanced, and
transformerless balanced, usually called “active balanced”. Transformer balanced outputs are becoming
outdated because of their high cost and their sonic
limitations. However, they can still be found on a lot
of older equipment.
Within the transformerless class, there are several
types of circuits that are used by different manufacturers. These different types of output circuits all look
just about alike to any balanced line, but they act differently when driving an unbalanced line. You need
to observe the proper cable wiring for each type of
Page 32
Appendix D
output circuit. We strongly recommend that you refer
to your various equipment manuals to find out what
is used in each case before hooking up to unbalanced
lines.
XLR to XLR
When connecting a balanced output to a balanced
input, however, you don’t need to know what kind
of balanced output you are dealing with. Simply
treat it generically.
OK for Microphones
Standard store-bought cable. Shield grounded at both ends.
Positives: Good for microphones.
Negatives: May cause ground loops through the shield grounds if used to
connect equipment together.
Preferred for Line Levels
Shield grounded at receiving end only.
Positives: Stops ground loops and reduces noise.
Negatives: None
PART 1: BALANCED OUT to BALANCED IN
1/4” TRS Phone to 1/4” TRS Phone Balanced Cables
OK
Standard store-bought cable. Shield is grounded at both ends.
Positives: Both ends are interchangeable.
Negatives: May cause ground loops through shield contacts.
No Connect
BETTER
Custom cable. Shield is grounded at receiving end only.
Positives: Stops ground loops and reduces noise.
Negatives: Should be oriented so lifted shield is at sending end.
XLR to 1/4” TRS Phone Balanced Cables
From an Output
To an Input
Female XLR
Male XLR
To an Input
From an Output
Stereo Phone Plug
Stereo Phone Plug
No Connect
Stops Ground Loops
Page 33
No Connect
Stops Ground Loops
320D
Compellor
PART 2: BALANCED OUT to UNBALANCED IN
Voltage Balanced Outputs (Used on the 207)
It was mentioned that there are several types of
balanced output stages in use today. The following
diagrams show you how to properly unbalance each
type of output. If you follow these instructions, you
should have no problems.
SIMPLIFIED SCHEMATIC
Unbalancing loses half the output level.
You lose 6dB of gain.
Female XLR
Don’t Ground or Connect Pin 3
Transformer Balanced Outputs
Mono Phone Plug
SIMPLIFIED SCHEMATIC
Unbalancing loses no output level.
You retain full gain.
Female XLR
Ground Pin 3 Directly to Pin 1.
Alternatively, Carry Pin 3 Through Twisted Pair Cable
and Ground at Other End
Impedance Balanced Outputs
Mono Phone Plug
SIMPLIFIED SCHEMATIC
Unbalancing loses no output level.
You retain full gain.
Female XLR
Servo Balanced Outputs
Mono Phone Plug
SIMPLIFIED SCHEMATIC
Unbalancing loses no output level.
You retain full gain.
Female XLR
Pin 3 Doesn’t Matter
OK Grounded or Not Grounded
Ground Pin 3 Directly to Pin 1
Do Not Carry Pin 3 Through Cable and Ground
at Other End
Mono Phone Plug
Page 34
Appendix D
PART 3: UNBALANCED to UNBALANCED
Standard Cable (Guitar Cord)
Mono (TS) Phone Plug
Mono (TS) Phone Plug
PART 4: UNBALANCED OUT to BALANCED IN
Standard Method
Mono (TS) Phone Plug
Enhanced Method (Pseudo Balanced)
Advantage: Reduced Hum and Noise Pickup
Stereo (TRS) Phone Plug
(Guitar cord of Part 3 above usualy works just as well)
Mono (TS) Phone Plug
Stereo (TRS) Phone Plug
Not Used
Male XLR
Male XLR
Mono (TS) Phone Plug
Mono (TS) Phone Plug
Not Used
PART 5: “Y” INSERT CABLES
Male XLR
To Equipment Input
Ground Shield This End Only
Sleeve
Female XLR
From Equipment Output
Tip
Ring
Stereo Plug
To 207
Insert Jack
Ground Shield This End Only
Don’t Connect Pin 3
Mono (TS) Phone Plug
To Equipment Input
To 207
Insert Jack
Ground Shield This End Only
From Equipment Output
Mono (TS) Phone Plug
Ground Shield This End Only
Page 35
320D
Compellor
Appendix E
Appendix E: About Reference Levels
ANALOG SYSTEMS
Systems declaring the average reference level are very different than systems declaring the
peak reference level. In the United States, most analog systems still use the VU meter and
we declare the +4dBu (for example) reference level to be the average program level. Peak
program levels may greatly exceed this level but sufficient headroom is allowed in the electronics to safely carry any unseen peaks. In a peak declared system such as practiced in
Europe, a maximum signal level is declared as the reference and a Peak Program Meter is
used to observe the program levels.
In an average reference system, peak levels may exceed the reference level by as much
as 20dB.
Thus, a +4dBu referenced system may see peaks as high as +24dBu. If we carefully controlled a mixed program to keep its sound level constant, we would see fairly consistent VU
indications, but extremely variable PPM indications. Likewise, if we mixed the same program
to keep the PPM indications consistent, the sound level would vary.
Since the Compellor is expressly concerned with controlling the sound level as the ear
perceives it, only the average level bears relevance. This is an important concept to
grasp if you are used to dealing with peak responding level meters, because you cannot see the Compellor’s benefits on peak meters.
When you set the Compellor’s REF LEVEL switch to match your system reference, an
assumption is made of an average reference level.
For peak referenced systems, such as the +6dBu German system, the average program level
will reside far below the reference level (typically 10 to 15dB below, or around -8dBu) but will
be uncertain and variable depending on the peak factor of the particular sound.
DIGITAL SYSTEMS
Digital recording has almost universally adopted peak level metering. Digital level meters
have 0dB at the top of the scale. That is defined as 0dBFS, or 0dB referred to full scale. It is
impossible to have a digital signal that exceeds 0dBFS in peak value. If recording a signal that
frequently peaks to 0dB, it is likely the signal is clipping since it is probable that some of the
peak waveform is “going over the top”. Therefore, it is necessary to keep all signals peaking
below 0dB in a digital system.
There are further constraints on peak levels in digital audio. Any type of digital audio processing can add peak overshoot. Digital effects like reverb or phasing add a lot of overshoot, as do
bit reduction schemes such as MP3. For example. transmission codecs used for ISDN audio
can easily add 6dB of overshoot. Therefore, it is wise to record and maintain digital audio
streams at lower than -6dBFS maximum peak at all times.
In an attempt at dealing with this problem, the Society of Motion Picture and Television
Engineers (SMPTE) has declared a standard of practice where 0VU is equal to -20dBFS.
Most of the world’s audio industry has accepted this standard in principle, but it is widely misunderstood. The problem is the difference between peak and average level measurements,
and how reconcile them.
Page 36
Appendix E
In a world where all audio levels would be monitored by VU meters, this SMPTE standard
would make things simple. Since VU meters measure something close to the average level,
we could simply equate 0VU to -20dBFS with a calibration tone. We could mix and track on
the VU meters, knowing there is 20dB of headroom in the digital domain for peaks. Since
most audio has peaks that go 10 to 14dB over the average level, then we would still have 6 to
8 dB of digital headroom left over to allow for subsequent digital overshoots. However, most
of the digital gear is shipped only with peak responding dBFS meters, not VU meters.
When working only with dBFS meters, it is not possible to apply the SMPTE standard, and
therein lies the confusion.
Early in digital audio history, the manufacturers of DAT recorders taught everybody to record
at an average level of -18dBFS, but they forgot to tell you something important. They forgot
to tell you that the -18dB should be the actual average level, not the running average of the
peak levels. Unfortunately, the DAT machines only come with dBFS metering, and people
went around recording peak levels way down in the mud - at least 10dB too low for good
digital quality. That’s why so many DAT recordings sound like crap.
That’s not the worst of it. With no other sources of edification, recordists and engineers have
applied the same principle in other digital audio work. This has led to a serious problem in the
recording industry where tracks and mixes are ridiculously variable in level and quality. You
will find CD’s that were mastered with peaks slamming against 0dBFS and clipping all to hell.
You can also find CD’s mastered so peaks hardly ever exceed -8dBFS. These discrepancies
reveal the widespread problem of misunderstanding the technology.
COMPELLOR TO THE RESCUE
A Compellor can make necessary corrections to the average levels in a peak referenced
system, either analog or digital. Remember, though, that a PPM or dBFS indication of the
Compellor’s output will not appear as consistent as the input. The average output level as
seen on a VU meter certainly will be more consistent. As explained previously, this is the
natural result of level averaging - the desired processing effect - and should not be
misinterpreted as a problem.
If, after the average levels have been corrected by a Compellor, it is felt the PPM or dBFS
indications should be made more consistent, you can use an Aphex Dominator “Precision
Multiband Peak Limiter” after the Compellor. The Dominator will not act on the average
levels but will transparently control the peaks and bring the program closer to having consistent peak levels without disturbing the average levels. The Compellor and Dominator are
designed to work together and no other peak limiter will perform with equal transparency to the sound quality.
Since the Compellor’s reference system is average, you will not be able to find a direct matching REF LEVEL setting for a peak referenced system. However, remembering that averages
are usually 10 to 12 decibels below the peak level of typical sound, you can use the -10dBV
setting on the Compellor to get a reasonable match for peak references of about 0 to +6dBu
(-10dBV equals -7.8dBu).
An excellent way to set the Compellor’s REF LEVEL switch is to pass a signal through
the Compellor at standard levels and observe the input level meter on the Compellor.
The red bar part of the indication is similar to a VU indicator. Select a REF LEVEL
switch setting that brings the red bar closest to hitting 0VU.
Page 37
320D
Compellor
Appendix F
Appendix F
Digital–vs–Analog; Peak–vs–RMS
How To Deal With The Confusion
By Donn Werrbach • 10/03/03
The Confusion
The matter of audio level measurements and specifications can be very confusing at times.
That is because some specs relate to peak measurements and some to average or RMS
measurements. There is no one standard in use throughout the industry.
Where The Problem Comes From
Any sound’s tonality and intelligence is conveyed by the details of specific frequency components, and those components’ phase and amplitude relationship. Sounds contain not only
harmonics in varying amounts, but also may contain unrelated frequency components. These
all add up to create complex and varying audio waveforms.
If all sound were nothing but pure simple sine waves (the most fundamental wave of nature),
the measurement of sound would be very simple. Measurements, whether peak weighted or
average weighted, would almost come out the same. A sine wave’s peak level is only 3dB
higher than it’s average level, and what’s more important, the ratio of peak to average, also
called the “crest factor”, is always the same no matter what the level is. Both peak and average level meters could be calibrated in the same relative units (like VU) and would read the
same.
However, since sound waves are complex, their peak to average ratio varies depending on
the sound characteristics, and that ratio can vary from 3dB to as much as 15dB. So, in the real
world, peak and average meters will disagree by as much as 15dB. The ear hears loudness
based on the power level contained in a sound wave. The power level is proportional to the
average signal level, so averaging meters will respond to level more like our hearing. Peak
measurement of audio cannot infer the volume level except with pure test tones because the
crest factor of program audio is large and variable, kicking the peak meter well above the
average measurement.
The problem is that we find both kinds of meters in use and they cannot be easily reconciled.
Dueling Standards
The PPM Standard
Throughout Europe, and its sphere of influence in the world, professional analog standards
have been based upon some form of peak audio measurement. One of the most popular
standards is the German DIN Peak Program Meter (PPM). These are found on recording
consoles, program line meters, tape recorders, and everywhere else. These meters have a
10 millisecond peak integration time and several seconds of fallback time. As a result, not all
transient peaks are captured by the meter, but the readings tend to ride atop the typical peak
level, totally disregarding the average level.
An advantage of this method is that audio electronics need not be built with very much headPage 38
Appendix F
room above the maximum PPM indication. By controlling the audio levels to maintain good
PPM readings, there can be no possibility of the electronics clipping the audio. The disadvantage is that to maintain a good average volume level, it takes very clever people riding
the gain who can accurately guess at the crest factor of all the sounds. The BBC of the U.K.
has actually created standards on where to allow music, voices, and commercials to peak on
their own version of a PPM. It just seems so ridiculous when you consider they could all just
adopt the American VU standard.
The VU Standard
Throughout the United States and its sphere of influence in the world is traditionally found the
VU meter as specified by the ASA (American Standards Association, now extinct). The name
VU comes from “Volume Units”. It is the intent of VU meters to indicate the audio level as we
hear it. It does not indicate the peak levels of the audio.
In VU meter practice, audio electronics must be designed to have sufficient peak headroom to
allow safe passage of all unseen audio peaks. To allow this, at least 20dB of headroom above
the 0VU reference level is designed into professional equipment. However, the advantage is
that monitoring and controlling levels by VU indications yields pleasing consistency of sound
levels without any guessing about the crest factor.
Both Meters
Show 0VU
Sine Wave
Low Crest Factor 0VU Sine Wave
Peaks At -20dB Digital, +4dBu Analog
dB Full Scale
20
10
5
7
1
0
Synth
+
1
2
3
20
10
5
7
VU
-20
Shaded Area =
Average Level
3
3
1
0
+
1
2
VU
8
-27
-27
-20
dBFS
0
DIN PPM
+5
0
-5
-10
-24
-27
-20
-36
-39
0
-12
-5
-18
-10
-24
-27
-20
-30
-30
-33
High Crest Factor 0VU Synth Waveform
Peaks At -4dBFS Digital, +20dBu Analog
+5
-21
-21
-4
-6
-15
-15
-18
DIN PPM
-9
-9
-12
0
-3
-3
-6
dBFS
-30
-40
-50
-33
-36
-39
-30
-40
-50
Peak Meters
Very Different for Same Loudness
Figure F-1, Sine Wave and Complex Waveform of the Same Sound Level Compared on VU
and Peak Meters Demonstrating the Peak and Average Metering Differences
Page 39
3
320D
Compellor
Digital Audio’s Contributions to the Problem
Death of a Perfectly Good VU Meter
As superior as the VU monitor is for general audio work, it seems the fate of the VU paradigm
is going to be a sad but quiet death from abandonment. Digital audio technocrats are dictating
technology from their laboratories far away from where people create and produce art. They
don’t really know much about VU, which means they don’t really understand the demands of
the art or the end user’s needs.
Birth of dBFS
In the analog world, there can always be found a little more headroom. Magnetic tape has
a very soft and spongy nonlinear area above the maximum operating level. It compresses
peaks without hacking off the tops. Most other electronics have some headroom to spare. It
is seldom catastrophic, from a sonic perspective, when a few peaks hit analog clipping. In the
digital world, the same is not true.
Digital audio has a very hard peak ceiling that literally shaves off any and all excessive peaks.
That causes severe audible distortion and needs to be avoided. True also is that, when the
best digital audio had only 16 bits, it was readily discovered that the best sound came from
recording at the maximum level to capture all the digital quantization possible and stay out of
the low level grunge.
To assist with that cause, digital audio equipment makers disavowed the VU meter in favor of
a new kind of peak responding meter. After a few early experiments, the digital audio meters
have emerged with instant peak response (no peak integration like the PPM) with 0dB at the
very top of the scale. The new scale is called dBFS (dB referred to full scale). This allows you
to accurately see how your audio waves fit below the digital ceiling so you can avoid digital
clipping.
DAT Tragedy
That may seem all well and good considering the fact that 16-bit audio has such limitations.
But, now with 24-bit digital audio prevalent with its much greater useful dynamic range, the VU
meter has not been reintroduced and probably won’t be unless a stroke of luck knocks some
sense into somebody along the line. That is because of DAT machines.
Digital audio users get precious little technical training. What little there is comes from the
equipment’s user manuals. DAT machines were the first popular digital recording media.
Through the DAT manuals, users were taught to record the average levels at -18dB. OK, fine,
if that means you are to record the average levels at –18dBFS. That leaves 18dB for swells
of volume level and the host of variable peaks that may rise above by up to 14dB. The DAT
manuals forgot to tell you that, however, and it was wrongly interpreted to mean the recording
of average peaks should be at –18dBFS. That has unfortunately stuck as a general digital
audio practice that needs to be corrected. The Compellor Model 320D can truly help.
Where The Compellor Fits In
The Compellor is an automatic level controlling device. In a VU world, its results are readily
visible. Varying input levels become better matched and consistent output levels. The meters
show it. In a PPM or dBFS world, it takes some understanding to see how the Compellor can
be used effectively.
Page 40
Appendix F
Most simply stated, the Compellor will accept an audio input, digital or analog, level it out
and add some compression making it more consistent in average level. The resulting average output level will target around 0VU. That means –20dBFS in the digital audio world and
+4dBu (or –10dBV depending in the level reference settings) in the analog world. The digital
output will have peaks that may rise up to 0dBFS but will probably not consistently rise above
–8dBFS. That is because audio’s typical crest factor is 10 to 14 dB.
If the Compellor’s limiter is switched in, it will stop peaks at the –6dBFS level for digital audio,
or 14dB above the 0VU reference for analog signals.
If the digital audio input was previously held consistent on a dBFS meter, as if a peak limiter
had been used, it may not look as peak-consistent at the Compellor output. That is because
the Compellor acts to correct the average levels at the expense of letting the peaks fly where
they may. This should not deter you because you’re actually getting what you wanted. If you
want to also see solidly consistent peaks after the Compellor’s processing, then you can add
an Aphex Dominator multiband peak limiter. It will flawlessly bring the peaks to consistent
levels without affecting the average level first established by the Compellor. The CompellorDominator pair is the best audio packaging system there is for effectiveness and sonic transparency.
Handling Codecs & Digital STL’s (Studio-Transmitter Links)
The Ideal Audio Package
Digital audio that is processed by a Compellor is packaged ideally. It has a consistent level
residing around –20dBFS and safe peaks for any digital medium, including bit reduction
codecs.
AES/EBU INPUT
ANALOG INPUT
RX
TX
ADC
Decoder
Microwave STL
Coder
AES/EBU OUTPUT
DSP
DSP
DAC
ANALOG OUTPUT
ISDN LINK
Figure F-2, Typical Codec Applications
Analog/Digital Level Discrepancy
Many digital STL’s and codecs have both analog and digital audio inputs. You should be
aware that there can be a level error when switching between them. That is because, while
the Compellor operates at the SMPTE standard level of –20dBFS average, the STL or codec’s
analog input reference may be different. For example, an STL’s analog input reference may
be stated as +4dBu. If the STL coder operates with SMPTE standards, it will convert that level
to –20dBFS digital like the Compellor. In that case, switching between the Compellor’s analog
output and digital output will result in the same digital audio level through the coder. However,
some coders have been calibrated higher than the SMPTE standard. A +4dBu analog input
may translate to higher than –20dBFS, perhaps as high as –12dBFS digital. This is presumably for the purpose of maintaining a better SNR through the codec but at the expense of
all important digital headroom. When switching between the Compellor’s analog and digital
Page 41
320D
Compellor
outputs into the codec, the level will then shift and be louder with the analog input. That may
give the effect of a fuller on-air sound when the coder is driven by analog because the on-air
audio processor at the decoder side is driven with higher input level.
What, Me Worry?
This level mismatch need not be a problem, especially if you intend to use only the digital output. Simply readjust the final audio processor to be optimal with the –20dBFS average digital
audio input level. If you want to also use the Compellor’s analog output for comparison or for
a backup plan, then you can readjust the coder’s analog input gain, if available, or add an
external attenuator to the coder’s analog input to get the –20dBFS digital reference conversion. Reducing the Compellor’s analog output gain will not solve the problem because
it will also drop the digital level proportionately.
Summary
Increasingly, audio monitoring is a mixed bag. Some equipment with VU, some with PPM and
some with dBFS. Only if you understand what the meters show, will you be able to use them
properly. Being aware that VU meters indicate relative volume level without regard to peaks
and that PPM or dBFS peak meters indicate the available headroom below clipping without
regard to perceived loudness is most important. Secondly, it is important to know how to set
up an operating level. With these two bits of knowledge, you will be able to find a satisfactory
solution to all of your audio interfacing problems. Confusion: Gone!
Page 42
Page 43