1
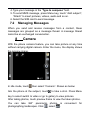
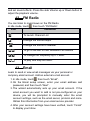
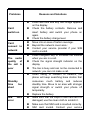
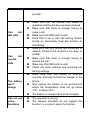
RS75 User Manual Thank you for purchasing the RS75 mobile phone Thank you for purchasing this mobile phone Please read all safety precautions and this manual carefully before using your device to ensure safe and proper use. Content, images and screenshots used in this manual may differ in appearance from the actual product. No part of this manual may be reproduced, distributed, translated, or transmitted in any form or by any means, electronic or mechanical, including photocopying, recording, or storing in any information storage and retrieval system, without the prior written permission. Copyright © 2013 All rights are reserved CONTENT 1ASSEMBLING ..................................................... 5 1.1I NSTALLING/ R EMOVING THE BATTERY .......................... 5 1.2C HARGING THE BATTERY ........................................... 5 1.3T-‐F LASH CARD USE ................................................. 6 1.4I NSERTING/R EMOVING THE SIM CARD ....................... 6 1.5P OWER O N OR O FF ............................................... 6 2PHONE APPEARANCE AND KEYS ...................... 6 2.1P HYSICAL I MPRESSION ............................................. 6 2.2K EYS SPECIFICATION ................................................ 7 2.3U SE THE TOUCH SCREEN ........................................... 7 2.4LOCK OR UNLOCK THE SCREEN .................................... 8 2.1.1.Lock the screen ....................................... 8 2.1.2.Rotate the screen ................................... 8 2.1.3.Unlock the screen ................................... 8 2.5H OME S CREEN ...................................................... 9 2.1.4.Add items to the idle screen ................... 9 2.1.5.Move items on the Home screen ........... 9 2.1.6.Remove items from the Home screen .... 9 2.1.7.Adding Shortcuts from Applica?ons .... 10 2.1.8.No?fica?on Panel ................................ 10 2.6A CCESS APPLICATIONS ........................................... 10 2.7C USTOMIZE YOUR DEVICE ....................................... 10 2.1.9.Change the language ........................... 10 2.1.10.Set the current ?me and date ............ 10 2.1.11.Set S IM card informa?on ................... 11 2.1.12.Set your ringtone ............................... 11 3TEXT ENTRY ..................................................... 11 3.1K EY FUNCTIONS FOR I NPUT M ODE ............................ 11 3.2C OPY AND PASTE TEXT ........................................... 12 4CALLING ........................................................... 12 4.1M AKING A C ALL .................................................. 12 4.2E MERGENCY C ALL ................................................ 12 4.3A NSWERING A C ALL ............................................. 13 5CALL LOGS ....................................................... 13 6CONTACTS ....................................................... 13 7MESSAGING ..................................................... 14 7.1S END MESSAGE ................................................... 14 7.2M ANAGING M ESSAGES ........................................ 15 8CAMERA .......................................................... 15 9VIDEO R ECORD ................................................ 15 10SOUND R ECORDER ........................................ 15 11MUSIC ............................................................ 15 12FM R ADIO ..................................................... 16 13EMAIL ............................................................ 16 14CALENDAR .................................................... 17 15CLOCK ............................................................ 17 16ALARM .......................................................... 17 17FILE M ANAGER .............................................. 17 18PC CONNECTIONS ......................................... 18 19APPLICATIONS ............................................... 18 20SETTINGS ....................................................... 18 20.1WALLPAPER ..................................................... 19 20.2SIM MANAGEMENT ........................................... 19 20.3W IRELESS & NETWORKS ...................................... 19 20.3.1.AIRPLANE M ODE.................................... 19 20.3.2.WI-‐FI S ETTINGS...................................... 19 20.3.3.BLUETOOTH S ETTINGS...........................20 20.3.4.TETHERING & P ORTABLE HOTSPOT.......20 20.3.5.VPN S ETTINGS........................................ 20 20.3.6.MOBILE NETWORKS............................... 20 20.4C ALL SETTINGS .................................................. 20 20.5AUDIO PROFILES ................................................ 20 20.6D ISPLAY .......................................................... 20 20.7LOCATION ........................................................ 21 20.8S ECURITY ........................................................ 21 20.9A PPLICATIONS .................................................. 21 20.10A CCOUNTS & SYNC .......................................... 22 20.11P RIVACY ........................................................ 22 20.12S TORAGE ....................................................... 22 20.13L ANGUAGE & KEYBOARD .................................... 22 20.14V OICE INPUT & OUTPUT .................................... 22 20.15A CCESSIBILITY ................................................. 22 20.16D ATE & TIME ................................................. 23 20.17S CHEDULE POWER ON/OFF ................................. 23 20.18A BOUT PHONE ................................................ 23 21TROUBLESHOOTING ..................................... 23 22SAFETY AND GENERAL INFORMATION ......... 23 1 1.1 Assembling Installing/ Removing the battery Installing the battery 1. With the top of battery (the terminal with pole) facing up toward the contacting points in the battery compartment, press the bottom of battery slightly until it enters into place; 2. Slide battery cover forward along the side slot until it clicks into place. Removing the battery 1. Long press Power key to switch the phone off; 2. Slide downward the battery cover; 3. Use your nail to lightly lift the battery away. 1.2 Charging the battery Your phone is powered by a rechargeable battery. When the battery is weak, the battery sensor informs you. At this time, you need charge the battery. When the battery becomes too weak for the phone to operate, it switches off automatically. 1. Open the cover of the multifunction jack on the bottom of the device. 2. Plug the small end of the travel adapter into the multifunction jack. 3. Plug the large end of the travel adapter into a power outlet. 4. When the battery is fully charged, unplug the travel adapter from the power outlet. 5. Unplug the travel adapter from the device. 6. Close the cover to the multifunction jack. Note: Ø During charging, the phone can operate as usual. But the Ø Ø charging time increases. Use only approved chargers and cables. Unauthorized chargers or cables can cause batteries to explode or damage your device. While the device is charging, the touch screen may not function due to an unstable power supply. If this happens, disconnect the charger from the device. 1.3 T-Flash card use This mobile supports the T-Flash card feature. Make sure that the T-Flash card has already inserted into mobile. Make contacting points downwards. Ensure the angled corner is positioned correctly and slide the card into the carrier; 1.4 Inserting/Removing the SIM card When you subscribe to a cellular service, you will receive a Subscriber Identity Module (SIM) card with subscription details, such as your personal identification number (PIN) and optional services. Contacting points downwards. Ensure the angled corner is positioned correctly and slide the card into the carrier; Note: Ø Be careful when handling, inserting or removing the SIM card, friction or bending may damage SIM card. Ø If left unused, keep SIM card out of the reach of small children. Ø Keep SIM card away from static, dusty and water. Ø When inserting or removing SIM card, always make sure that the phone is switched off before you remove the battery. Or the SIM card memory might be damaged. 1.5 Power On or Off Make sure the battery is already inserted: Power On: Press and hold the Power key to turn on the phone. After power on, the phone searches for your network automatically. Some SIM card is protected by the PIN number, if you are asker for inputting the PIN number, please enter it. Power Off: Press and hold the Power key until the power-off image display. Note: Ø PIN is provided by your service provider. If the PIN is entered incorrectly three times, the SIM card is barred. Ø If the phone asks for an unlock code when switched on, enter the unlock code. 2 Phone Appearance and Keys 2.1 Physical Impression 1. 2. Menu key Functions Description 7. Hand strap insert Home key 8. 3.5mm Headset jack 3. Back key 4. Receiver 9. Power key 5. Front Camera 11. Camera 6. USB jack 12. Speaker 10. Volume key 2.2 Keys specification Keys Specification Home Menu Back Volume Power While on any application or screen, press to return to the Home screen. Press and hold to open the recent applications window. Press to open a list of actions that you can do on the current screen or dialog box. Press to go back to the previous screen, or to close a dialog box, menu, or the notifications panel. Press upwards or downwards to increase or decrease the volume. Slide down the key fully to enter vibrate mode. Long press to power on the mobile. While not on a call, press and hold to open the phone options menu that allows you to turn off or switch your device to silent or airplane mode. Press to lock the screen. 2.3 Use the touch screen Your device’s touch screen lets you easily select items or perform functions. Learn basic actions to use the touch screen. 1. To avoid scratching the touch screen, do not use sharp tools. 2. Do not allow the touch screen to come into contact with other electrical devices. Electrostatic discharges can cause the touch screen to malfunction. 3. Do not allow the touch screen to come into contact with water. The touch screen may malfunction in humid conditions or when exposed to water. A quick and easy way to interact with the Home screen and the whole interface of your device is by touch. Basically, the following are the types of actions, called finger gestures, which you would do when interacting with your device: Touch: When you want to select items such as icons and options or press on-screen buttons, simply touch them with your finger. Apply some pressure with your finger pad when touching them on the screen. Slide: To slide means to drag your finger vertically or horizontally across the screen. Touch and hold: Touch an item and hold it for more than 2 seconds to open a pop-up option list. Drag: Touch and hold your finger with some pressure before you start to drag. When the item magnifies and the device vibrates, drag your finger to any part of the screen to move the item, or drag to the Trash button to delete the item. While dragging, do not release your finger until you have reached the target position. Double touch: Touch twice quickly with your finger to zoom in or out while viewing photos or web pages. 2.4 Lock or unlock the screen 2.1.1. Lock the screen 1. To lock, press Power key. 2. To save battery power, the device automatically turns off the screen and locked when you leave it idle after a certain period of time. 2.1.2. Rotate the screen The phone can detect direction by a built-in motion sensor. If you rotate the phone, the screen interface will be rotated with mobile phones automatically. 2.1.3. Unlock the screen 1. Press the Power key to awake the screen. 2. Touch and drag the screen from bottom to top. 3. You can choose the type of Screen Unlock you want to use, from Pattern, PIN or Password. For more information, refer to “Settings-Security-Set up screen lock”. 2.5 Home Screen The idle screen has 5 panels, slide left or right to view the panels. There are 5 shortcut functions in the bottom of idle screen: Call , Messaging , Application , Browser and Email . 2.1.4. Add items to the idle screen You can customize the Home screen by adding shortcuts to applications, widgets, folders, wallpapers, video wallpaper or theme. To add items to the Home screen: 1. In idle screen, press Menu key and select “Add”. Or touch and hold the screen. 2. Select the item: Shortcuts: Add shortcuts to items, such as applications, bookmarks, and contacts. Widgets: Add widgets, such as the analogue clock, calendar, and music player. Folders: Create a new folder or add folders for your contacts. Wallpapers: Set a background image. Video Wallpapers: Set a video by default, in SD card or recording as wallpaper. l l l l l 2.1.5. Move items on the Home screen 1. Touch and hold an item to activate move mode. 2. Drag the item to the location you want when the item is magnified. 2.1.6. Remove items from the Home screen 1. Touch and hold an item to remove. The item is magnified. 2. Drag the item to the trash tab. 3. When the item and the trash tab turns red, release the item. 2.1.7. Adding Shortcuts from Applications 1. Touch Applications . 2. Touch and hold on an application icon. 3. Navigate to a Home screen panel. Release the Shortcut icon. 2.1.8. Notification Panel The Notification Panel shows information about connections, messages, and other items. To display the Notification Panel, touch the indicator icons area on the top of the screen and drag your finger downward to open the notification panel. To hide the panel, touch the bottom frame and drag your finger upward. In the list, you can access notifications, such as messages, calls, events or processing status. You can also check current status of Wi-Fi, Bluetooth, GPS, Data connection and Airplane mode, and switch the status. Slide left or right to set the screen and current profile mode. 2.6 Access applications 1. In idle screen, touch Applications . 2. Slide up or down to show other applications. 3. Touch , back to idle screen. 2.7 Customize your device Get more from your device by customizing it to match your preferences. 2.1.9. Change the language 1. In idle screen, touch , select “Settings-Language & keyboardSelect language”. 2. Select the language. 2.1.10. Set the current time and date 1. In idle mode, touch , select “Settings-Date & time”. 2. Select the time zone, set the time and date and change other options. 2.1.11. Set SIM card information 1. In idle mode, touch , select “Settings-SIM management-SIM Information”. 2. Touch the SIM card, edit SIM name, phone number, set SIM background color and display numbers. 2.1.12. Set your ringtone User can set the incoming call ringtone by default, or take the music in phone or SD card as ringtone. 1. In idle mode, touch , select “Settings-Audio profiles”. 2. Touch the profile you need, such as “General”. 3. Touch “Voice call ringtone”, touch the ringtone to listen, touch “OK”. If user wants to take the music in phone or SD card as ringtone, in idle mode, touch , select “Music”, touch and hold one music file, shows the option list, touch “Use as phone ringtone”. 3 3.1 Text Entry Key functions for Input Mode User can enter text by selecting characters on the virtual keyboard. Touch and hold the blank text input field and select “Input method”, select the input method. User also can touch , select “SettingsLanguage & keyboard” to set the corresponding parameters. The keys of Android input method are shown as below: Icon Specification Touch to activate the numerical keyboard. Touch to activate the symbols keyboard. Touch to delete a character, hold to delete all characters. Insert a space Touch to switch between lowercase and uppercase. 3.2 Copy and paste text While you are entering text, you can use the copy and paste feature to use text in other applications. 1. Touch and hold the text you want to copy until appears. 2. Drag the two icons to adjust the selected text. 3. Select Copy to copy the text into the clipboard. 4. In another application, touch the text input field. 5. Select Paste to insert the text into the field. 4 Calling In any dialing interface, user can touch the tab at the bottom to switch function of Phone, Call log, Contacts and Favorites. 4.1 Making a Call 1. In idle mode, touch , show the dialing interface. 2. Enter an area code and a phone number. Touch to erase a wrong number. Touch and hold to erase the entire number. Touch and hold 0 key until character “+” appears, and then you can dial an international number. Touch and hold 1 key to enter voice mail. 3. Touch , dialing the number. 4. If you are using a SIM card that supports the 3G function, touch , dialing the video call. 5. Touch , save the number to Contacts. 6. During the call, touch “End” to end the call. Note: You can also touch Call log, Contacts and Favorites to quickly dialing. 4.2 Emergency Call Only in GSM system coverage, you can make an emergency call, even though the phone is locked, without SIM card, or cannot enroll to the system. This phone, like any wireless phone, operates using radio signals, wireless, and landline networks as well as user programmed functions, which cannot guarantee connection in all conditions. Therefore, you should never rely solely on any wireless phone for essential communications like medical emergencies. Check with local service providers to make an emergency call. 4.3 Answering a Call When somebody calls you, the phone rings, and displays the incoming call area. If the caller can be identified, the caller’s phone number (or name if stored in your phonebook) is displayed. 1. If the screen is locked, when a call is coming, drag right to answer the call, drag left to reject. 2. If the screen is unlocked, when a call is coming, answer the call by touch “Answer”. Touch “Reject” to end. 3. When the phone is ringing, press the Volume key to mute the ringtone. 4. To end the call, select “End”. Note:The speaker sound volume maybe loud, so please not use the speaker beside ear. 5 Call Logs You can view all calls, dialing calls, received calls and missed calls. 1. In idle mode, touch , select “Call logs”. 2. Touch , select SIM card. 3. Touch “All” view all logs, touch view dialing calls, touch view received calls and touch view missed calls. 4. Touch a log to dial the number. 5. Select a log, touch at right side, and view the details. From the detail view, you can dial the number, send message to the number or add the number to the phonebook. 6. In any log list interface, press Menu key to delete log or set speed dial. 6 Contacts This feature allows you to store phone numbers and their corresponding names in the memory of your SIM card and phone’s memories. In idle mode, touch , select “Contacts”, touch “All contacts”, select group or SIM card, touch to search contact, touch to add new contact. Search Enter the contact information you want to search. As you enter information, matching contacts will appear on the screen. Adding a Contact 1. Select “New contact”, and select save contact to phone or SIM card, then the new contact window appears. 2. Touch each field to enter the contact information with the onscreen keyboard. 3. Select “Save” to save the contact. Select “Revert”, back to contact list. Note : If add new entry to SIM card, there only need input name and number. Delete contact Tick at the numbers you want to delete. Groups By creating groups of contacts, you can manage multiple contacts and send messages or email to an entire group. There are 5 default groups, you can touch to add members. Start by creating a group. 1. Touch “Add group”, input group name. 2. Touch “Add members”, tick off the contacts, touch “Save” and back to member list. 3. Select “Save”. Note : Contacts which saved in SIM card cannot use group function. 7 Messaging Learn to create and send text (SMS) or multimedia (MMS) messages, and view or manage messages you have sent or received. 7.1 Send message 1. In idle mode, touch , select “Messaging”. 2. Touch “Compose new message”. 3. In the “To” field, enter the recipient’s phone number. Touch to select from Contacts. 4. Type your message in the “Type to compose” field. 5. To send MMS message, press Menu key, touch “Add subject”, “Attach” to insert pictures, videos, audio and so on. 6. Select the SIM card to send message. 7.2 Managing Messages When you send and receive messages from a contact, these messages are grouped as a message thread. A message thread looks like an exchanged conversation. 8 Camera With the phone camera feature, you can take picture at any time without carrying digital camera. Enter the menu, the display shows the preview image. In idle mode, touch then select “Camera”. Shown as below: Aim the phone at the subject, touch to take a shot. Press Menu key to select switch to video or go to gallery to view pictures. After taking photos, touch preview frame to view the taken photos. You can take 360° panoramic photos, is convenient for photographing landscapes. Click , select . 9 Video Record In idle mode, touch then touch “Camera”, click , select “Camcorder” to recording video screen. Aim the phone at the subject. To start recording, touch . To stop recording, touch . The video is saved automatically. Press Menu key to select switch to camera or go to gallery to view videos. After recording videos, touch preview frame to view the recorded videos. 10 Sound Recorder You can record sound through the menu. The recording files are saved in the memory card. You can use the sound as phone ringtone or message tone, you can see and play the recording files in “Music - Playlists - My recording”. In idle mode, touch , then touch Sound recorder. Touch to start recording, during the recording, touch to stop recording and save. 11 Music Music plays digital audio files from the device’s storage card. Music supports the following music file formats: MP3, AMR, WMA, MIDI, WAV, AAC, and OGG. In idle mode, touch , then touch Music. Your music is organized into four categories: Artists, Albums, Songs and Playlists. Touch a category to view the list. At any level inside a Music library category, touch and hold an item (a song, artist, album, or playlist) to open the options menu, and then touch Play. During playing, press Menu key, and user can view music library, on/off party shuffle, add to playlist, use as ringtone, delete the song and set sound effects. Press the side Volume up or Down button to adjust the playback volume. 12 FM Radio You can listen to music/news on the FM Radio. In idle mode, touch , then touch “FM Radio”. Icon Indication To launch Channel List Change the sound output Change the sound to headset To go to the last or next available FM stations To change the frequency by 0.1 MHZ. To play and stop the radio. 13 Email Learn to send or view email messages via your personal or company email account. Add an external e-mail account. 1. In idle mode, touch , then touch “Email”. 2. On the Email setup screen, enter your email address and password, and then touch “Next”. 3. The wizard automatically sets up your email account. If the email account you want to add is not pre-configured on your device, you will be prompted to manually enter the email account settings, such as the email server, protocol and more. Obtain this information from your email service provider. 4. After your account settings have been verified, touch “Finish” to display your Inbox. 5. While on the account Inbox, press Menu key, and then touch Refresh to update your Inbox. 6. To add more email accounts, return to the Email setup screen, press Menu key and touch Add account. Repeat steps above. 7. Press Menu key, and then touch “Compose” to create an email. 14 Calendar Calendar helps you schedule and sound alarms for appointments, meetings, and events. In idle mode, touch , then touch “Calendar”. Press Menu key, and then touch “Agenda” to show all the agenda. 15 Clock In idle mode, touch , then touch “Clock”. You can see a time screen. There are four shortcuts at the bottom of the screen: Alarm, Picture show, Music player and Home. You can also touch to save power and view the charging percentage completion. 16 Alarm In idle mode, touch , then touch “Clock”, select . 1. Select from the existing settings of alarm clock, or touch “Add alarm” to set up a new alarm. 2. Touch “Time”, slide up and down to adjust the hour, minute and AM/PM. Touch “Set” to save the settings. 3. Touch “Repeat” to select a day to sound the alarm. Touch “OK” to save the settings. 4. Touch “Ringtone” to set up the preferred ringtone when your alarm sounds. Touch “OK” to save the settings. 5. Touch “Vibrate” to on /off the vibrate. 6. Touch “Label” to input alarm info. 7. Touch “Done” to save the settings of the alarm. In alarm list, press menu key, select “Settings”, set volume, snooze duration and so on. 17 File Manager Find, view and manage files stored on an installed memory card. If the file is associated with an application on your device, you can launch the file in the application. In idle mode, touch , select “Files Manager”. In a folder, press Menu key to create folder, edit, sort files; touch “Edit”, select multiple folders to delete, share, copy, cut or rename. 18 PC Connections You can connect your device to a PC as a removable disk and access the file directory. If you insert a memory card in the device, you can also access the file directory of the memory card by using the device as a memory card reader. 1. Insert the memory card in the device. 2. Attach your device to the computer with a USB cable. Your device recognizes the connection and displays USB connected in the Status Bar and Notifications Panel. 3. Touch “USB connected”, at the USB Mass Storage prompt, touch Turn on USB storage”. 4. Select “OK”, start to use. 5. Open memory card folder, and copy files between your computer and the memory card. To disconnect the device to the PC, click the USB device icon on the Windows task bar and click the option to safely remove the mass storage device. Then remove the PC data cable from the PC. Otherwise, you may lose data stored on the memory card or damage the memory card. 19 Applications Learn to install apk applications. 1. Copy the required apk application to the SD card; 2. Insert the SD card into the phone, and power on the phone. In idle mode, touch , select “File Manager”, find the apk application, click “Install” to install the application to the phone. 20 Settings This section explains Settings for customizing your device. In idle mode, touch , select “Settings”. 20.1 Wallpaper Select the Theme and Wallpaper. 20.2 SIM management Select SIM card. Select which SIM you will use by default when voice/video call and data connection. Set roaming and associate contacts with a specific SIM card. 20.3 Wireless & networks Enable/disable Airplane mode, WLAN, Bluetooth. Set WLAN, BT, VPN, Mobile networks. 20.3.1. Airplane mode Flight mode allows you to use many of your tablet’s features, such as Camera, Games, and more, when you are in an airplane or in any other area where accessing data is prohibited. Note: When your tablet is in Flight Mode, it cannot access online information or applications. 20.3.2. Wi-Fi Settings Learn to use your device’ s wireless networking capabilities to activate and connect to any wireless local area network (WLAN) compatible with the IEEE802.11 a/b/g/n standards. You can connect to the internet or other network devices anywhere an access point or wireless hotspot is available. Wi-Fi: Turn the WLAN feature on or off. Network notification: Set the device to notify you when an open network is available. WPS Connect: connect to a WLAN using a Wi-Fi Protected Setup (WPS) button. Select a network from Wi-Fi network list, input password (if necessary). Select “Connect”. l l l l 20.3.3. Bluetooth Settings Bluetooth is a short-range wireless communications technology for exchanging information over a distance of about 30 feet. You do not need to line up the devices to send information with Bluetooth. If the devices are in range, you can exchange information between them, even if they are in different rooms. Bluetooth: Turn the Bluetooth wireless feature on or off. Device name: Set a Bluetooth name for your device. Discoverable: Set your device to be visible to other Bluetooth devices. Scan for devices: Search for available Bluetooth devices. From the list of scanned devices, touch the target device, enter a PIN for the Bluetooth wireless feature or the other device’ s Bluetooth PIN, if it has one, select “OK”. When the owner of the other device enters the same PIN or accepts the connection, pairing is complete. If the pairing is successful, the device will automatically search for available services, send or receive files. l l l l l Note: Some devices, especially headsets or heads-free car kits, may have a fixed Bluetooth PIN, such as 0000. 20.3.4. l Tethering & portable hotspot USB tethering: Select to active. You can tether your phone to your computer with a USB cable, to share your phone’s internet connection with your computer. Portable Wi-Fi hotspot: You can turn your phone into a portable Wi-Fi hotspot, to share your phone’s internet connection with one or more computers or other devices. Help: Learn more about USB and WLAN tethering. l l 20.3.5. VPN Settings Set up and manage Virtual Private Networks (VPNs). 20.3.6. Mobile networks Show data used in current period, and reset data amount. Set up Access Point Names (APNs), search for available networks and select a network for roaming. 20.4 Call settings Set Voicemail, Call forwarding, Call barring, Call waiting, Internet calling, FDN, Minute REMINDER, Phone settings and Cell broadcast. 20.5 Audio profiles Select different prompt mode for call, message, notification and feedback in different environment, and edit the profile. Predefined profiles are: General, Silent, Meeting or Outdoor. 20.6 Display l Brightness: Adjust the brightness of the display or automatic brightness. Auto-rotate screen: Set whether or not to rotate l ² the content automatically when the device is rotated. Animation: set no window, or other animation to select. Screen timeout: Set the length of time the device waits before turning off the display’s backlight. l l 20.7 Location Set the use wireless or GPS satellite for finding your location. You can view locations at street level. 20.8 Security ² Screen unlock: Set unlock mode, such as pattern, PIN or password. SIM card lock: Lock SIM card: Activate or deactivate the PIN lock feature to require the PIN before using the device. Change SIM PIN: Change the PIN used to access SIM card. Visible passwords: By default, the device displays your password as ”·” for security. Set the device to display your password as you enter. Select device administrators: View device administrators installed on your device. You can active device administrators to apply new policies to your device. Credential storage: Use secure credentials: Use certificates and credentials to ensure secure use of various applications. Install from SD card: Install encrypted certificates that are stored on a memory card. Set password: Create and confirm a password for accessing credentials. Clear storage: Erase the credential contents from l l ² ² l l l l the device and reset the password. 20.9 Applications Change the settings for managing installed applications. Unknown sources: Select to download applications from any source. If you do not select this option, you can download applications only from Android Market. Manage applications: Access the list of the applications installed on the device and check the application information. Running services: View the services you are using and access them to manage. Storage use: View storage used by applications. Battery use: View what has been using the battery. Development: USB debugging: Select to connect your device to a PC by using a PC data cable. This is for application development. Stay awake: Set the device’s screen to stay on while charging the battery. Allow mock locations: Allow mock locations and service information to be sent to a location manager service for testing. This is for application development. ² ² ² ² ² l l l 20.10Accounts & sync Change the settings for the auto sync feature or manage accounts for synchronization. Background data: Select this setting to use the auto sync feature. The auto sync will run in the background without opening applications and synchronize data. Auto-sync: Set the device to synchronize contact, calendar, and email data automatically. l l 20.11Privacy Delete all DRM licenses, factory data reset and system OTA package update. 20.12Storage View the SD card & phone storage information. 20.13Language & keyboard Select language, set input method. 20.14Voice input & output Set text-to-speech, install voice data and engine, and then use this function. 20.15Accessibility Enable/disable Power button ends call and Quick boot. 20.16Date & time Enable/disable Use network-provided time, or set the time, time zone and date manually. Select hour and date format. 20.17Schedule power on/off Set Schedule power on/off time. You can set two items. 20.18About phone View the system information of phone. 21 Troubleshooting If problems occur when using the phone, try to find a solution here first. Problems Reasons and Solutions n Can’t switch on Can’t connect to network n n n n n n The audio quality of the call is poor n n n Standby time too short SIM error card n n n n Press and hold end key until image appears on the display. Check the battery contacts. Remove and insert battery and switch your phone on again. Check the battery charge level. Move into an area of better coverage. Beyond the network cover area; Contact your service provider if your SIM card is invalid. Press navigator key to increase the volume when you are in a call. Check the signal strength indicator on the display. The line is busy and can not be connected to network; you can not make a call. When failing to connect to network, the phone will keep searching base station that consumes much battery and reduces standby time. Move to an area with stronger signal strength or switch your phone off temporarily. Replace the battery. Make sure that the chips in SIM card are not damaged; use the clean cloth to scratch it. Make sure that SIM card is inserted correctly. SIM card invalid. Contact your service provider. n n Can not dial calls n n n Can not receive calls n n n n The battery won’t charge n n Can not set some functions n n Make sure that the number you dialed is available and the dial key has been pressed. Make sure that there is enough money to make a call. Make sure that SIM card is valid. Fixed Dial is set or has call barring feature turned on. Deactivate fixed dial function or call barring. Make sure that your phone has connected to network (Check if the network is too busy or invalid). Make sure that there is enough money to receive the call. Make sure that SIM card is valid. Check call divert settings and incoming call barring settings. Make sure that the battery is inserted correctly. Securely connect the charger to the phone. Only charge the battery in an environment where the temperature does not go below -10℃ or above 45℃. The battery or charge need to be changed. The operation is wrong. The network providers do not support the function, or you don’t apply the function. 22 Safety and General Information Read these guidelines before using your wireless phone. Failure to comply with them may be dangerous or illegal. General Precautions Mobile Phone Please use the phone at a temperature of -10℃~45℃ and a relative humidity of 35%~85%. Avoid using the phone near regular telephone, television, radio and automatic office equipment, as they may interfere with one another. Please keep the removable SIM card out of the reach of children as there is a risk they could swallow it. Battery Please put the battery in a cool and well-ventilated place out of direct sunlight. Batteries have life cycles. If the time that the battery powers equipment becomes much shorter than usual, the battery life is at an end. Replace the battery with a new battery of the same. Do not discard battery with household trash. Please dispose of used battery according to your local environmental laws and guidelines. Charger Do not charge the phone in the below environment: Under direct sunlight; Temperature out of range: -10℃ to 45℃; Humid, dusty or severely shaking environment (could cause a malfunction); Near appliances such as television, radio (could affect the image, audio effect). ² ² ² ² ² ² ² ² ² ² Phone Precautions 1. Switch off your phone in aircraft, hospital and any facility where posted notices instruct you to do so. Wireless phone can cause interference to electronic instruments and medical equipment, when using your phone in such kind of area, meet any special regulations in force. Your phone features automatically power on function, check your power settings and make sure your mobile phone will not automatically switch on when on board an aircraft. Turn off your phone whenever on board an air craft, so as not to interfere with electronic system and result in aircraft accidents. 2. To avoid electromagnetic interference and/or compatibility conflicts, turn off your mobile phone in any facility where posted notices instruct you to do so. Hospitals or health care facilities may be using equipment that is sensitive to external RF energy. Especially when near the below devices: hearing aid, pacemaker and other medical devices, fire detector, automatic door and other automatic control devices. In the event of mobile phone interfering with pacemaker and other medical electronic devices, consult the manufacturer of the device or local salesman. Mobile phone may interfere with appliances like television, radio, or PC. 3. Do not hit the LCD display with extreme force or use it to hit other things. Doing so may break the glass and cause the LCD liquid to leak. If the liquid enters into eyes, it may blind you. In such case, rinse with a large quantity of water immediately (do not rub your eyes) and consult a doctor. 4. Do not disassemble or remodel your phone. Doing this may damage your phone or result in the leakage of electricity and circuit fault. 5. In a very few cases, the use of mobile phone may interfere with the electronic equipments in some cars. In such case, for safety, do not use mobile phone. 6. Do not press keys with sharp things like needle or pen head. Doing so may cause damage to your phone or operation mistakes. 7. Do not use the mobile phone if it has a damaged antenna, as it may cause injury to persons. 8. Turn your phone off and do not remove its battery or charge the battery when in an area with a potentially explosive atmosphere. Sparks in such areas could cause an explosion or fire resulting in property damage, bodily injury or even death. For example: switch off the phone before entering refueling point. Do not use the phone near at a refueling point (service station) or near fuels or chemicals. 9. Keep your phone away from moisture. If water or other liquids get into phone, it will cause phone overheating, leakage of electricity and malfunction. Battery Safety Precautions Battery Precautions Do not throw a battery into a fire. A battery may rupture or bum violently when thrown into a fire. Please dispose of the used battery according to your local environmental laws. When installing battery, do not forcibly put pressure on the battery, or it may result in overheating, leaking, rupturing or fire. Do not short-circuit the positive (+) and negative (-) terminals. If the positive and negative terminals come into contact with each other or are shorted with wire or other metallic objects, an instantaneous high current will flow, possibly damaging the battery structure due to the generated heat, with ² ² ² the possible result of overheating, leaking, rupturing or fire. Do not exceed the battery manufacturer's charging current or voltage limitations. And only use the approved peripherals. Do not directly solder anything onto the battery terminals. Direct soldering onto the battery terminals can cause heat generation, leaking, rupturing or fire. If the electrolyte inside the battery gets into your eyes, it may blind you. In such case, do not rub your eyes but rinse with a large quantity of water immediately and consult a doctor. For safety, do not put the battery into your mouth or use the damaged battery. Do not attempt to disassemble or modify a battery. Doing so may result in leaking, overheating, rupture or fire. Do not use or put battery near high temperature places like fire or heat-generating parts, or it may cause leaking, overheating, rupture or fire. Stop using the battery if abnormal heat, odor, discoloration, deformation, or abnormal conditions are detected during use, charge, or storage. Do not allow leaked electrolyte to come into contact with your skin or clothes. If this happens, rinse with a large quantity of water immediately and consult a doctor. If the battery leaks electrolyte or emits a strange odor, immediately remove it from open flame to avoid fire and rupture. Keep battery from moisture, as it may cause the battery to overheat, smoke and corrode. Do not place or store the battery in an automobile in hot weather, under direct sunlight. Use or storage of the battery in these places may cause battery leakage and overheating, and possibly lower the performance and shorten the battery's life. Only use the approved batteries and fittings. Do not ² ² ² ² ² ² ² ² ² ² ² ² connect to unspecified devices. Do not continuously charge the battery for more than 24 hours, as battery may be damaged by extensive overcharging. Battery Capability Calling, backlight on and playing game drain your battery much quicker. Long talk-time decreases the duration of the standby time. Idle time becomes shorter if the phone is out of coverage. Battery capability varies along with charging level, temperature, signal strength, and backlight. ² ² ² ² Disposing of Used Battery The rechargeable batteries contain toxic heavy metals like mercury, cadmium, and lead. Improperly disposed batteries will cause heavy metal contamination. These batteries when discarded in ordinary household or workplace, after a long time, the heavy metal will leach slowly into the soil, ground water and surface water. Therefore, please dispose of used battery in a proper way. 1. Do not land filled, because the heavy metal will leach slowly into the soil, ground water and surface water. 2. Do not incinerate, because the heavy metals can enter the air through smokestack emissions and can concentrate in the ash produced by combustion. 3. Do not compost, because the heavy metals in the compost may exceed standards. 4. Do not throw away used batteries random, avoiding environmental pollution. 5. Separate wasted batteries from household trash, reducing its harm to the environment. Charger Precautions 1. Use charger to charge battery quickly. Before charging, make sure the battery has been inserted in the phone correctly. Do not remove the battery while charging. 2. Please use the specified alternating current. Using other voltage will cause electricity leakage, fire or damage to the phone and charger. 3. Charge your battery for at least 12 hours at the first time for its best performance and long cycle life. 4. If the charger still plugs in the charge slot and the phone has been fully charged, the phone will check the battery state automatically, and recharge the battery once it is not at full level. 5. While the mobile phone is being charged, keep it out of the reach of children. 6. Do not short-circuit the charger. A short-circuit may result in electric shock, smoke and damage to the charger. 7. If the power cord is damaged, please do not use the charger, or it may cause fire or electric shock. 8. Please clean the dust on the power outlet in time. 9. Do not put container filled with water beside charger, as water may be splashed on charger, causing the charger overheating, leakage of electricity and malfunction. 10. If the charger comes into contact with water or any other liquids, immediately unplug the charger from outlet to reduce the risk of overheating, fire, electric shock or charger malfunction. 11. Do not disassemble or modify the charger. Doing so could result in risk of injury to persons, electric shock, fire and damage to the charger. 12. Do not use charger in a high moisture environment like bathroom, or it may cause electric shock, fire and damage to the charger. 13. Do not touch the charger, power cord and power outlet with wet hands as it may cause electric shock. 14. Never put a heavy object on the power cord or modify the power cord. Doing so may cause electric shock or fire. 15. To reduce risk of electric shock or injury, unplug the charger from the power outlet before cleaning or maintenance. 16. When you disconnect the power cord of the charger, grasp and pull the plug, not the cord. Pulling the cord may cause electric shock and fire. Care and maintenance Your phone is a product of superior design and craftsmanship and should be treated with care. By following the warranty obligations and by caring for your mobile, you can enjoy it for many years: 1. Keep the phone dry. Precipitation, humidity and liquids containing minerals will corrode the electronic circuits; 2. Do not use or store the phone in dusty areas as the dust could obstruct or damage the moveable parts; 3. Do not store the phone in hot areas. High temperatures can shorten the life of electronic devices, damage batteries and warp or melt certain plastics; 4. Do not store the phone in cold areas, because moisture can form inside the phone when temperature rises, which may damage the electronic circuits; 5. Do not drop, knock, bump or shake the phone. Rough handling may damage the internal circuits. Put the phone in a safe place when you do not use it; 6. Use a slightly cloth damping with clean water or neutral soap to clean your phone housing. Never use any chemical or abrasive cleaners, as they could damage the phone; 7. Do not paint your phone as the paint could obstruct any moving parts and prevent normal use; 8. Use only approved batteries and accessories. Use of any unauthenticated batteries and accessories could damage your phone and may be dangerous; 9. If there’s something wrong with your phone or its accessories, do not attempt to dismantle the phone. Contact qualified service personnel to repair your phone. Terminology explanation GSM Global system of mobile SMS Short message service SIM Subscriber identify module card PC Personal computer PIN PIN code is a 4-8 digit personal identification number, and is used to prevent your SIM card from misuse. It is provided by your service provider. If you enter 3 times error PIN code continuously, the SIM card will be locked, and then you must enter PUK code to unlock. PIN2 PUK PUK2 PIN code is a 4-8 digit personal identification number. It is provided by your service provider. To protect the access of some advanced functions like fixed dial. If you enter 3 times error PIN2 code continuously, the SIM card will be locked, and then you must enter PUK2 code to unlock. An 8 digit key code. Used to unlock SIM cards after the wrong PIN has been entered. PUK is provided by your service provider. An 8 digit key code. Used to unlock SIM cards after the wrong PIN2 has been entered. PUK2 is provided by your service provider. FCC RF Exposure Information and Statement The SAR limit of USA (FCC) is 1.6 W/kg averaged over one gram of tissue. Device types RS75 (FCC ID: WA6RS75) has also been tested against this SAR limit. The highest SAR value reported under this standard during product certification for use at the ear is 0.82W/kg and when properly worn on the body is 1.10W/kg. This device was tested for typical body-worn operations with the back of the handset kept 1.5cm from the body. To maintain compliance with FCC RF exposure requirements, use accessories that maintain a 1.5cm separation distance between the user's body and the back of the handset. The use of belt clips, holsters and similar accessories should not contain metallic components in its assembly. The use of accessories that do not satisfy these requirements may not comply with FCC RF exposure requirements, and should be avoided. FCC WARNING This device complies with Part 15 of the FCC Rules. Operation is subject to the following two conditions: 1. This device may not cause harmful interference. 2. This device must accept any interference received, including interference that may cause undesired operation. Note 1: This equipment has been tested and found to comply with the limits for a Class B digital device, pursuant to part 15 of the FCC Rules. These limits are designed to provide reasonable protection against harmful interference in a residential installation. This equipment generates, uses and can radiate radio frequency energy and, if not installed and used in accordance with the instructions, may cause harmful interference to radio communications. However, there is no guarantee that interference will not occur in a particular installation. If this equipment does cause harmful interference to radio or television reception, which can be determined by turning the equipment off and on, the user is encouraged to try to correct the interference by one or more of the following measures: - Reorient or relocate the receiving antenna. - Increase the separation between the equipment and receiver. -Connect the equipment into an outlet on a circuit different from that to which the receiver is connected. -Consult the dealer or an experienced radio/TV technician for help. Note 2: Any changes or modifications to this unit not expressly approved by the party responsible for compliance could void the user's authority to operate the equipment. FCC Hearing-Aid Compatibility (HAC) Regulations for Wireless Devices On July 10, 2003, the U.S. Federal Communications Commission (FCC) Report and Order in WT Docket 01- 309 modified the exception of wireless phones under the Hearing Aid Compatibility Act of 1988 (HAC Act) to require digital wireless phones be compatible with hearing-aids. The intent of the HAC Act is to ensure reasonable access to telecommunications services for persons with hearing disabilities. While some wireless phones are used near some hearing devices (hearing aids and cochlear implants), users may detect a buzzing, humming, or whining noise. Some hearing devices are more immune than others to this interference noise, and phones also vary in the amount of interference they generate. The wireless telephone industry has developed a rating system for wireless phones, to assist hearing device users find phones that may be compatible with their hearing devices. Not all phones have been rated. Phones that are rated have the rating on their box or a label located on the box. The ratings are not guarantees. Results will vary depending on the user’s hearing device and hearing loss. If your hearing device happens to be vulnerable to interference, you may not be able to use a rated phone successfully. Trying out the phone with your hearing device is the best way to evaluate it for your personal needs. M-Ratings: Phones rated M3 or M4 meet FCC requirements and are likely to generate less interference to hearing devices than phones that are not rated. M4 is the better/higher of the two ratings. RS75 is rated M3. T-Ratings: Phones rated T3 or T4 meet FCC requirements and are likely to be more usable with a hearing aid’s telecoil than phones that are not rated. T4 is the better/higher of the two ratings. RS75 is rated T3. Please power off the Bluetooth function while using hearing aid devices with your RS75. Hearing devices may also be rated. Your hearing device manufacturer or hearing health professional may help you find this rating. Higher ratings mean that the hearing device is relatively immune to Interference noise. Safety and regulatory guide The hearing aid and wireless phone rating values are then added together. A sum of 5 is considered acceptable for normal use. A sum of 6 is considered for better use. A sum of 8 is considered for best use. In the above example, if a hearing aid meets the M2 level rating and the wireless phone meets the M3 level rating, the sum of the two values equal M5. This should provide the hearing aid user with “normal usage” while using their hearing aid with the particular wireless phone. “Normal usage” in this context is defined as a signal quality that is acceptable for normal operation. This methodology applies equally for T ratings. The M mark is intended to be synonymous with the U mark. The T mark is intended to be synonymous with the UT mark. The M and T marks are recommended by the Alliance for Telecommunications Industries Solutions (ATIS). The U and UT marks are referenced in Section 20.19 of the FCC Rules. The HAC rating and measurement procedure are described in the American National Standards Institute (ANSI) C63.19 standard. For information about hearing aids and digital wireless phones FCC Hearing Aid Compatibility and Volume Control: http://www.fcc.gov/cgb/dro/hearing.html Gallaudet University, RERC: https://fjallfoss.fcc.gov/oetcf/eas/reports/GenericSearch.cfm