1
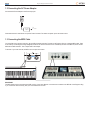
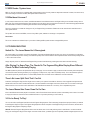
Retro-Fit Upgrade
for Pegasus Wing
Pegasus Wing Duo Plus Retro-Fit Kit
PEGASUS WING RETRO-FIT KIT
SPECIAL MESSAGE
Congratulations on the purchase of the exclusive WERSI Direct Ltd
Upgrade kit for your Pegasus Wing keyboard.
This product utilizes batteries or an external power supply (adapter).
DO NOT connect this product to any power supply or adapter other
than one described in the manual or specifically recommended by
WERSI.
This upgrade allows you to transform your Pegasus Wing keyboard
into a portable organ that is both great in terms of sound, function and
style.
Please read this instruction manual for guidance on using the Pegasus Wing retro-fit upgrade.
Although it is easy to assemble and easy to use, there are certain
procedures and specific information that we recommend complete
familiarization with.
Enjoy your new upgrade and your new expanded Pegasus Wing Duo
Plus Organ!
WERSI Direct Ltd
WARNING: Do not place this product in a position where anyone could
walk on, trip over, or roll anything over power or connecting cords of any
kind. The use of an extension cord is not recommended! If you must use
an extension cord, the minimum wire size for a 25’ cord (or less) is 18
AWG.
NOTE: The smaller the AWG number, the larger the current handling
capacity. For longer extension cords, consult a local electrician.
This product should be used only with the components supplied or; a
cart, rack, or stand that is recommended by WERSI. If a cart, etc., is
used, please observe all safety markings and instructions that accompany the accessory product.
SPECIFICATIONS SUBJECT TO CHANGE:
The information contained in this manual is believed to be correct at
the time of printing. However, WERSI Direct LTd reserves the right to
change or modify any of the specifications without notice or obligation
to update existing units.
This product, either alone or in combination with an amplifier and
headphones or speaker/s, may be capable of producing sound levels
that could cause permanent hearing loss. DO NOT operate for long
periods of time at a high volume level or at a level that is uncomfortable. If you experience any hearing loss or ringing in the ears, you
should consult an audiologist.
IMPORTANT: The louder the sound, the shorter the time period before
damage occurs.
Some WERSI products may have benches and / or accessory
mounting fixtures that are either supplied with the product or as
optional accessories. Some of these items are designed to be dealer
assembled or installed. Please make sure that benches are stable and
any optional fixtures (where applicable) are well secured BEFORE
using.
Benches supplied by WERSI are designed for seating only. No other
uses are recommended.
NOTICE:
Service charges incurred due to a lack of knowledge relating to how a
function or effect works (when the unit is operating as designed) are
not covered by the manufacturer’s warranty, and are therefore the
owners responsibility. Please study this manual carefully and consult
your dealer before requesting service
.
ENVIRONMENTAL ISSUES:
WERSI strives to produce products that are both user safe and environmentally friendly. We sincerely believe that our products and the
production methods used to produce them, meet these goals.
Pegasus Wing Duo Plus Retro-Fit Kit
1.1 INSTALLATION / UPGRADE
At this time, the installation will be carried out by WERSI Direct Ltd qualified staff only. This position may change and if you have purchased this
unit on the second hand market, please refer directly to this manual or to WERSI Direct Ltd. Please call the customer support hot line on 0800
084 2013.
What’s in the retrofit kit?
1 x 76 note lower manual (in Black and off-white colour design)
1 x MIDI cable
1 x Power Unit
4 x attachment brackets
12 x Screw and Wing nut assortment
1 x User Manual (This manual)
USB Memory Stick (with included WERSI Direct Ltd Total Presets)
Pegasus Wing Duo Plus Retro-Fit Kit
PRECAUTIONS
PLEASE READ CAREFULLY BEFORE PROCEEDING
* Please keep this manual in a safe place for future reference.
WARNING
Always follow the basic precautions listed below to avoid the possibility of serious injury or even death from electrical shock, shortcircuiting, damages, fire or other hazards. These precautions include, but are not limited to, the following:
Power supply/AC power adaptor
Battery
• Do not place the power cord near heat sources such as heaters or radiators, and
do not excessively bend or otherwise damage the cord, place heavy objects on it,
or place it in a position where anyone could walk on, trip over, or roll anything
over it.
• Only use the voltage specified as correct for the instrument. The required voltage
is printed on the name plate of the instrument.
• Use the specified adaptor (page 22) only. Using the wrong adaptor can result in
damage to the instrument or overheating.
• Check the electric plug periodically and remove any dirt or dust which may have
accumulated on it.
Do not open
• This instrument contains no user-serviceable parts. Do not open the instrument
or attempt to disassemble or modify the internal components in any way. If it
should appear to be malfunctioning, discontinue use immediately and have it
inspected by qualified Yamaha service personnel.
Water warning
• Do not expose the instrument to rain, use it near water or in damp or wet
conditions, place on it any containers (such as vases, bottles or glasses)
containing liquids which might spill into any openings. If any liquid such as water
seeps into the instrument, turn off the power immediately and unplug the power
cord from the AC outlet. Then have the instrument inspected by qualified Yamaha
service personnel.
• Never insert or remove an electric plug with wet hands.
Fire warning
• Do not put burning items, such as candles, on the unit.
A burning item may fall over and cause a fire.
• Always replace all batteries at the same time. Do not use new batteries together
with old ones.
• Do not mix battery types, such as alkaline batteries with manganese batteries, or
batteries from different makers, or different types of batteries from the same
maker, since this can cause overheating, fire, or battery fluid leakage.
• Do not tamper with or disassemble batteries.
• Do not dispose of batteries in fire.
• Do not attempt to recharge batteries that are not intended to be charged.
• Keep batteries away from children.
• If the batteries do leak, avoid contact with the leaked fluid. If the battery fluid
should come in contact with your eyes, mouth, or skin, wash immediately with
water and consult a doctor. Battery fluid is corrosive and may possibly cause loss
of sight or chemical burns.
• Always make sure all batteries are inserted in conformity with the +/- polarity
markings. Failure to do so might result in overheating, fire, or battery fluid
leakage.
• When the batteries run out, or if the instrument is not to be used for a long time,
remove the batteries from the instrument to prevent possible leakage of the battery
fluid.
If you notice any abnormality
• When one of the following problems occur, immediately turn off the power switch
and disconnect the electric plug from the outlet. (If you are using batteries,
remove all batteries from the instrument.) Then have the device inspected by
Yamaha service personnel.
• The power cord or plug becomes frayed or damaged.
• It emits unusual smells or smoke.
• Some object has been dropped into the instrument.
• There is a sudden loss of sound during use of the instrument.
CAUTION
Always follow the basic precautions listed below to avoid the possibility of physical injury to you or others, or damage to the
instrument or other property. These precautions include, but are not limited to, the following:
Power supply/AC power adaptor
Connections
• Do not connect the instrument to an electrical outlet using a multiple-connector.
Doing so can result in lower sound quality, or possibly cause overheating in the
outlet.
• When removing the electric plug from the instrument or an outlet, always hold the
plug itself and not the cord. Pulling by the cord can damage it.
• Remove the electric plug from the outlet when the instrument is not to be used for
extended periods of time, or during electrical storms.
• Before connecting the instrument to other electronic components, turn off the
power for all components. Before turning the power on or off for all components,
set all volume levels to minimum.
• Be sure to set the volumes of all components at their minimum levels and
gradually raise the volume controls while playing the instrument to set the desired
listening level.
Handling caution
Location
• Do not place the instrument in an unstable position where it might accidentally
fall over.
• Before moving the instrument, remove all connected cables.
• When setting up the product, make sure that the AC outlet you are using is easily
accessible. If some trouble or malfunction occurs, immediately turn off the power
switch and disconnect the plug from the outlet. Even when the power switch is
turned off, electricity is still flowing to the product at the minimum level. When
you are not using the product for a long time, make sure to unplug the power cord
from the wall AC outlet.
• Use only the stand specified for the instrument. When attaching the stand or rack,
use the provided screws only. Failure to do so could cause damage to the internal
components or result in the instrument falling over.
DMI-3
• Do not insert a finger or hand in any gaps on the instrument.
• Never insert or drop paper, metallic, or other objects into the gaps on the panel or
keyboard. This could cause physical injury to you or others, damage to the
instrument or other property, or operational failure.
• Do not rest your weight on, or place heavy objects on the instrument, and do not
use excessive force on the buttons, switches or connectors.
• Do not use the instrument/device or headphones for a long period of time at a
high or uncomfortable volume level, since this can cause permanent hearing loss.
If you experience any hearing loss or ringing in the ears, consult a physician.
1/2
NP-31/NP-11 Owner’s Manual
5
adaptors may result in irreparable damage to both the
adaptor and the instrument.
Pegasus Wing Duo Plus Retro-Fit Kit
2 Connect the AC adaptor to the power supply jack.
3 Plug the AC adaptor into an AC outlet.
1.2 Connecting the AC Power Adaptor
CAUTION
• Unplug the AC Power Adaptor when not using the
Power
Adaptor
to the Power
input
jack:
instrument,
or during
electrical
storms.
Connect the AC
2
For battery operation, the instrument requires six 1.5V
“AA” size, LR6 or equivalent batteries. (Alkaline batteries are recommended.) When battery power
3
AC power
becomes too low for proper operation, the volume
AC outlet
adaptor
may be reduced, the sound may be distorted, and other
problems may occur. When this happens, make sure to
replace
all batteries,
following
the precautions listed
Underneath the new Lower Manual is a special Power On button. This button
will power
up the new
lower manual.
Using Batteries
below.
1 Open the battery compartment cover located on the
instrument’s bottom panel.
WARNING
rols and
Terminals
1.3 Connecting
the MIDI Cable
2 Insert six new alkaline batteries, being careful to
ols
nd
Terminals
Terminals
and
Terminals
the polarity
markings
on
theMIDI
sideController
of the keyboard. This talks to the Pegasus Wing via a standard MIDI cable. There
Your retrofit
kit follow
lower manual
is basically
a 76Terminals
note
Panel
Controls
and
compartment.
is zero latency and the Pegasus Wing intelligently transitions all Left hand functions to be controlled by the new Lower Manual, which submits
nd
Terminals
MIDI data on3 MIDI
channel
This is explain
latermaking
in the chapter.
Replace
the 2.
compartment
cover,
sureo
that it
nel Controls
and
Terminals
i
locks firmly in place.
To the rear of your lower manual, the MIDI In and Out ports are located:
i
i
o
i
o
Panel
Controls
and oTerminals
!0
!1
i
o
i
o
!0
!1Panel Controls and Terminals
i
o
• Make sure to install the batteries with the proper orientation, maintaining the correct polarity (as shown). Incorrect
battery installation may result in heat, fire and/or leaking of
corrosive chemicals.
• When the batteries run down, replace them with a complete set of six new batteries. NEVER mix old and new batteries. Do not use different kinds of batteries (e.g. alkaline
and manganese) at the same time.
• Never connect or disconnect the AC power adaptor when the power is on
and the batteries are installed. Doing so will turn the power off.
s and terminals as
wed from the rear
nt.
sand terminals as
ed from the rear
t.
e
• If the instrument is not to be used for a long time, remove
the batteries in order to prevent possible fluid leakage and
damage to the instrument.
NOTE
Shows the jacks and terminals as
seen when viewed from the rear
of the instrument.
Shows the Shows
jacks and
theterminals
jacks Shows
andas
terminals
the jacks
asand terminals as
Shows the jacks and terminals
as seen
Shows the jacks and terminals as
seen when
viewed
when
from
viewed
theseen
rear
from
when
the viewed
rear from the rear
seen when viewed from
seen when viewed from the rear
ofthe
therear
instrument.
of the instrument.
of the instrument.
of the instrument.
of the instrument.
NP-31/NP-11
Shows the jacks and terminals as
Shows the jacks and terminals as
Shows the jacks and terminals as
seen when viewed from the rear
seen when viewed from the rear
seen when viewed from the rear
of the instrument.
of the instrument.
of the instrument.
C2
C3
C2
!0
!1
i
o
!0
!1
i
o
Shows the jacks and terminals as
seen when viewed from the rear
C4 of the instrument. C5
C3
C3
C4
C3
NP-11
C4
C5
C4
C1
NP-11
NP-11
C3
Shows the jacks and terminals as
C5
C6viewed
C5 from
C6 the rear
seen
when
C2 instrument.
C3
of the
NP-11
C4
(The illustration shows
the NP-31)
C4
C5
Shows the jacks and terminals as
seen when viewed from the rear
of the instrument.
C6
(The illustration
(The shows
illustration shows
(The illustration shows
NP-11
the NP-31) the NP-31)
the NP-31)
C5
7
Shows the jacks and terminals as
seen when viewed from the rear
of the instrument.
C6
C6
Owner’s Manual
(The illustration shows
C6
the NP-31)
wIMPORTANT:
r C2
t
u C5
C1 e
C3
C4
C6
(The illustration shows
The NP-11
MIDI Cable must be connected to theNP-11
MIDI
Out Only of the Lower Manual. It must
then beshows
connected to the ‘MIDI IN’ of the Pegasus Wing.
(The illustration
the NP-31)
r
e
w If yourconnect
e the
rcable
t incorrectly,
t
t
u
u Manual u
the NP-31)
will
not
work.
q
w C1 then your
e Lower
r
t
C2
C3
C4
C5 u
C6
e
r
q
w
y
al ........................ page 8
level of the entire sound.
t
y
eC1y r
qy
u
C2
NP-11
tC3
C4
u
C5
NP-11
w
e
ry
y
q
r
u [VARIATION]
buttonw
..............................page
10
ye
t
t
C6
(The illustration shows
the NP-31)
(The illustration shows
the NP-31)
u
u
For selecting a different Voice for the Voice button.
.........
age
l ........................
8 pageu
8 [VARIATION]
page
u [VARIATION]
88 button
u
button
..............................page
..............................page
button
..............................page
10
10
108
ch
.......................
page
i[VARIATION]
[SUSTAIN]
jack
........................................page
[MASTER
VOLUME]
........................
page
8 Voice
ufor[VARIATION]
button
..............................page
10
y
ound.
entire
evelqofsound.
the entire
Forsound.
selecting
For selecting
a dial
different
For
a different
selecting
Voice for
Voice
a different
the
Voice
for the
button.
Voice
button.
the Voice button.
or off. For adjusting the volume level
Forof
connecting
pedal, optionalFor
FC3selecting
Foot Pedal
or
the entireasound.
a different
Voice for the Voice button.
.........
h
age
.......................
8 page
i8 [SUSTAIN]
page
i
[SUSTAIN]
8 jacki........................................page
[SUSTAIN]
jack
........................................page
jack ........................................page
8 10 8
8
FC4/FC5
Footswitch.
.....
page
u
[VARIATION]
button
..............................page
..................pages
12,
13
w
[ VOLUME]
]8(Standby/On)
switch
.......................
page
8Pedal
i
[SUSTAIN]
jackor........................................page
8
ASTER
dial
........................
page
8
u
[VARIATION]
button
..............................page
10
or
off.
For
connecting
For
connecting
a
pedal,
For
connecting
a
optional
pedal,
optional
FC3
a
pedal,
Foot
FC3
optional
Foot
or
Pedal
FC3
or
Foot
Pedal
y
tire sound.
Forpower
selecting
different
the Voice.....................page
button.
Demo
Songs
and Piano
o
MIDI
[IN] Voice
[OUT]for
terminals
For
turning
the
on
oraentire
off.
Foraconnecting
a 19
pedal,
optional
FC3
Foot Pedal or
adjusting
the
volume
level
of
the
sound.
For
selecting
different
Voice
for
the
Voice
button.
FC4/FC5
Footswitch.
FC4/FC5
Footswitch.
12,
pages
.................pages
13
12,813 FC4/FC5
13Footswitch.
For........................................page
connecting
external MIDI devices,
.....e
page
i12,
[SUSTAIN]
jack
8 allowing
FC4/FC5
Footswitch.
[DEMO]
button...............................pages
12,
(Standby/On)
switch
.......................
page
8 ........................
i 13
[SUSTAIN]
jack
8
Demo
s
ano
and
Piano
Songs
and
Piano
o
MIDI
o
[IN]
MIDI
[OUT]
[IN]
o
terminals
[OUT]
MIDI
[IN]
terminals
.....................page
[OUT]
.....................page
terminals
.....................page
19
198........................................page
the
use
of
various
MIDI
functions.
q
[MASTER
VOLUME]
dial
page
u 19
[VARIATION] button ..............................page
10
For
connecting
a
pedal,
optional
FC3
Foot
Pedal
or
F] button
...........page
14Voice Demo Songs and Piano
For
playing
all
the
o
MIDI
[IN]
[OUT]
terminals
.....................page
19
turning the power
on
or
off.
For
connecting
a
pedal,
optional
FC3
Foot
Pedal
or
For connecting
For
external
For
connecting
external
MIDI
devices,
MIDI
external
devices,
allowing
MIDI
allowing
devices,
allowing
Forconnecting
adjusting
the
volume
level
of
the
entire
sound.
For
selecting
a
different
Voice
for
the
Voice
button.
FC4/FC5
Footswitch.
!0 [PHONES/OUTPUT] jack ........................page
8
ges 12,
13 Songs.
For connecting external
MIDI devices, allowing
Demo
FC4/FC5
Footswitch.
the use the
of
various
use of various
MIDI
the
use
functions.
MIDI
of
various
MIDI
functions.
MO]
12,
13functions.
........page
]ge
button
14button...............................pages
...........page
14
14
For
connecting
a
set
of
standard
stereo
headw
[
]
(Standby/On)
switch
.......................
page
8
i
[SUSTAIN]
jack
........................................page
8
nd
Piano
o
MIDI
[IN]
[OUT]
terminals
.....................page
19
the
use
of
various
MIDI
functions.
..................
pages
10,
11
qDemo
[MASTER
VOLUME]
dial ........................
page 8
u [VARIATION]
button
..............................page 10
r [METRONOME
ON/OFF]
button
...........page
playing
all !0
the[PHONES/OUTPUT]
Voice
Songs
and
Piano
o 14
MIDI
[IN]8 [OUT]8terminals
.....................page
19optional FC3 Foot Pedal or
!0
[PHONES/OUTPUT]
!0
[PHONES/OUTPUT]
jack
........................page
jack
........................page
jack
........................page
8
phones,
allowing
private
practice.
For
turning
the
power
on
or
off.
For
connecting
a
pedal,
For
connecting
external
MIDI
devices,
allowing
instrument
sounds),
such
For adjusting the volume level of the entire
sound.
For selecting
a different Voice for8the Voice button.
For using the metronome.
!0 [PHONES/OUTPUT]
jack ........................page
For connecting
external MIDI devices,
allowing
mo Songs.
Pegasus Wing Duo Plus Retro-Fit Kit
1.4 Activating the Lower Manual and how it talks to the Pegasus Wing
Now that you have your Lower Manual connected to the Pegasus Wing, you are ready to switch up your new instrument. Turn on your Pegasus
Wing keyboard.
Now power up your Lower Manual. (Press the Power Button located underneath the keyboard (right hand side).
Now wait for the Pegasus Wing to fully load.
Now, we must tell the lower manual to transmit on MIDI Channel 2 so that the Pegasus Wing can take commands from the Lower Manual.
1.5 Choosing MIDI Channel 2
Choosing the MIDI Channel is very easy. Follow these steps:
1. Hold down the two small rubber buttons next to the Power Button at the same time.
2. While holding the two small rubber buttons, you must now press the C#1 key on the Lower Manual.
The display of the Pegasus Wing will now register your Chord Changes on the main display (upper left of the display) and you will of course
hear a sound when you play the Lower Manual!
PLEASE NOTE: Please make sure that a either Lower Selector 1 and 2 are activated (turned on) and that they have their volumes
audible (drawbars pulled out, or preset). We know some customers do not use any sounds on the Lower Manual / Left Hand, but of
course this new retrofit design greatly encourages you to use the fantastic sounds available for a richer and more exciting playing
experience!
OK! You’re ready to go!
Pegasus Wing Duo Plus Retro-Fit Kit
2.1 MIDI Resets / System Jams
MIDI is a very old concept and is a standard data communication protocol for every electronic keyboard instrument. However, from time to time,
due to the analogue connection of MIDI, MIDI System Data crashes occur.
2.2 What does this mean?
In short, what it means is that on occasion, the MIDI data that the Lower Manual sends to the Pegasus Wing isn’t converted correctly due to a
MIDI crash. This means that the Pegasus Wing knows that you are playing, but can’t quite work out the chord of the note being played because
the crashed MIDI connection isn’t allowing accurate data to reach the Pegasus Wing intact.
There is a simple way to combat this. Simply turn off your Pegasus Wing and restart it. Please also do the same for the Lower Manual for a
100% system reboot.
This problem isn’t exclusive to WERSI, it is true of any MIDI system, whether it is analouge or computerised.
Please Note:
This is not a hardware or software fault, it is just a fact of Analouge MIDI systems and the now aged MIDI protocol.
2.3 TROUBLESHOOTING
Switch On - The Lower Manual Isn’t Recongised.
The correct switch on procedure must always be followed. You’ll become familiar with this process very quickly. Occasionally you might think
that you’ve followed the process correctly, but sometimes perhaps one of the two buttons wasn’t depressed at the same time as pressing the C#
1 note on the Lower manual.
Simply retry the process or restart both the Pegasus Wing and the Lower Manual by powering both units down and then rebooting.
After Playing For Some Time, The Chords On The Pegasus Wing Main Display Show Different
Chords To What I’m Actually Playing.
The MIDI System has jammed. As explained at the top of this page. You can continue to play, but the sound will most likely sound transposed,
or the incorrect notes are being sounded (i.e you might play a C Major chord, only to hear an F# Major chord). You must restart the system in
this event. As previously advised, this is a common MIDI problem and is universal across all Electronic musical instruments.
There’s No Lower Split Point That I Can Set
At this time, the Pegasus Wing Duo Plus Organ does not allow you to split the Lower Manual. However, a future upgrade and expansion will
address this function as well as increase the amount of sounds available for both Upper and Lower manuals from 2 to 4 sounds for the Upper
Manual and from 2 to 3 sounds for the Lower Manual. The Pedal Board will remain at 1 sound only. This is expected early 2013.
The Lower Manual Has Power Down On It’s Own
If the Lower Manual hasn’t been played for 30 minutes, it has a Power Save function built into it, which automatically shuts it down. You’ll need
to simply turn it back on and set it to send on MIDI Channel 2 as if you were performing a normal start up.
3.0 You’re Ready To Play!
You can now refer to the English User Manual for the Pegasus Wing keyboard. The functionality (except for the split point function) is identical
for the Pegasus Wing Duo Organ. The Pegasus Wing Keyboard controls all aspects of the Pegasus Wing Duo and due to this, the manual for
the Pegasus Wing explains everything in depth.
ADVICE: When the Pegasus Wing Manual refers to the ‘Left Hand’, think of it as really referring to the ‘Lower Manual’. It couldn’t be easier.
Enjoy your new Pegasus Wing Duo Plus Organ - the best of both worlds, a portable organ and a separate portable arranger keyboard in one!
WERSI Direct Ltd - 0800 084 2013 - www.wersidirect.com - [email protected]