1
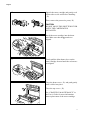
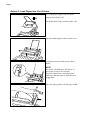
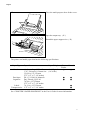
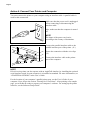
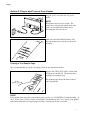
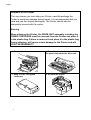
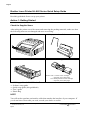
English
Brother Laser Printer HL-660 Series Quick Setup Guide
Read this guidebook first to set up your printer.
Action 1: Getting Started
Check the Supplied Items
After taking the printer out of the carton and removing the packing materials, make sure that
the following items are not damaged and none are missing:
• Printer
• Multi-purpose sheet feeder
• Drum unit
• Starter Toner cartridge
NOTE: This is a starter toner cartridge
– expected yield 1,000 pages
TN-100 Replacement toner cartridge
– expected yield 3,000 pages
•
•
•
•
•
®
3.5” floppy disks for DOS/Windows
Software setup guide
Quick setup guide (this guidebook)
User’s guide
Plastic Bag
NOTE
You will need to purchase an interface cable that matches the interface of your computer. If
you do not know what cable you need, consult your dealer or reseller.
The product names in this guidebook are trademarks or registered trademarks of each manufacturer. The specifications are subject to change without notice.
© 1994 Brother Industries, Ltd.
UL7075001 A Printed in
Japan
1
English
Action 2: Install the Toner Cartridge / Drum Unit
1
Unpack the drum unit and gently shake it
from side to side five or six times.
2
Remove the protective parts, in order, as
shown in the illustration.
NOTE
Do not expose the drum unit to light for
longer than a few minutes, as this will
damage the drum.
3
Open the top cover. Open the drum cover
by pushing the two blue tabs in toward the
center of the unit and lifting the cover
toward you.
4
Install the drum unit into the printer.
Make sure that you gasp the ▲ marks.
2
English
5
Unpack the toner cartridge and gently rock
it from side to side well before installing.
(①)
Then, remove the protective parts.( ② )
CAUTION
DO NOT MOVE THE SHUTTER LEVER
UNTIL THE CARTRIDGE IS
INSTALLED.
6
Install the toner cartridge into the drum
unit. Make sure that the ▲ marks are
aligned.
7
Gently pull the blue shutter lever on the
toner cartridge forward until the red arrows
are aligned.
8
Close the drum cover ( ① ) and push gently
until it clicks into place.
Close the top cover. ( ② )
See “CHAPTER 5 MAINTENANCE” in
the User’s Guide for more information
about replacement of the toner cartridge.
3
English
Action 3: Load Paper into Your Printer
1
Install the paper support into the multipurpose sheet feeder. (①)
Install the sheet feeder into the printer. (②)
2
Open the multi-purpose sheet feeder cover.
3
Load paper into the multi-purpose sheet
feeder.
NOTE
The feeder can hold up to 200 sheets of
plain paper or up to 10 envelopes.
Excessive sheets may cause paper jams.
Make sure that the paper is stacked below
the ▲ mark.
4
Move the paper guide to fit the paper width.
4
English
5
Close the multi-purpose sheet feeder cover.
6
Open the output tray. ( ① )
Extend the paper support wire. ( ② )
The printer can handle paper that has the following specifications.
Paper Type
Cut sheet
Paper Size
A4, Letter, Legal, B5, A5,
3”x5”, Executive, Custom size
(70-216 x 127-356 mm
2.75”-8.5” x 5”-14” inches)
Envelopes
DL, C5, COM-10, Monarch
Organizer
Day-Timer®, J,K,L M
70-216 x 127-356mm
2.75”-8.5” x 5”-14” inches
Labels
70 - 216 x 127-356 mm
Transparencies 2.75”-8.5” x 5”-14” inches
Paper Weight
60-135 g/m2
(16-36 lbs)
Sheet
Feeder
●
Manual
●
●
●
●
●
●
●
See “CHAPTER 2 PAPER HANDLING” in the User’s Guide for more information.
5
English
Action 4: Connect Your Printer and Computer
You must connect the printer to your computer using an interface cable. A parallel cable is
used for this connection.
1
Make sure that the power cord is unplugged
before connecting or disconnecting the
interface cable.
Also, make sure that the computer is turned
off.
NOTE
The shape of the power cord varies
according to the country of destination.
2
Connect the parallel interface cable to the
parallel interface port of the printer. ( ① )
Secure the connection with the wire clips.
(②)
Connect the interface cable to the printer
port of the computer.
NOTE
HL-660 series printer can also operate with an AppleTalk interface by installing the optional
serial interface board. In some countries it is installed as standard. For more information, see
“CHAPTER 4 OPTIONS” in the User’s Guide.
For the location of your computer’s parallel printer port, see the User’s Guide of your
computer. Next, skip to the section “Turning On Your Printer”. After printing a test sample
page, you will then be ready to prepare your computer’s software. For setting up the printer
software, see the Software Setup Guide.
6
English
Action 5: Plug in and Turn on Your Printer
1
Plug the power cord into the AC power
outlet.
NOTE
This printer has no power switch. The
printer has a sleep mode which allows the
printer to automatically reduce power
consumption when not in use.
2
Make sure that the READY lamp is ON
after the printer has warmed up (about 60
seconds).
Printing a Test Sample Page
We recommend that you print a test page. Refer to the instructions below.
1
Depress the TEST (FF/CONT) switch until
all lamps are turned ON. The printer starts
printing a test sample page.
The printed page shows the basic control
panel operations.
NOTE
If the printer does not print a test sample page exactly, see “CHAPTER 6 Troubleshooting - Q
& A” of the User’s Guide. If after reviewing the information in the User’s Guide, your printer
still cannot print the test sample page correctly, consult your dealer or reseller.
7
English
Shipment of the Printer
If for any reason you must ship your Printer, carefully package the
Printer to avoid any damage during transit. It is recommended that you
save and use the original packaging. The Printer should also be
adequately insured with the carrier.
Warning
When shipping the Printer, the DRUM UNIT assembly including the
TONER CARTRIDGE must be removed from the Printer and place it
in the plastic bag. Failure to remove it and place it in the plastic bag
during shipping, will cause severe damage to the Printer and will
VOID THE WARRANTY.
1 Remove the drum unit.
2 Place it in the plastic bag and fold
the plastic bag under the drum unit.
3 Wrap it in the corrugated
cardboard.
4 Re-pack the printer.
8