1
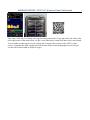
PROCEDURES FOR GETTING TRACK FILES
FROM HAND HELD GPS RECEIVERS
This is a compendium of contributed procedures for
getting track files from various models of GPS-equipped
devices. Comments, corrections, and – most importantly
– contributions are solicited.
Printed: 3 July 2011
AMOD AGL 3080 DATALOGGER .......................................................................................................... 2 ANDROID DEVICES: “GPS Test” (Camera Time Calibration) ............................................................... 4 ANDROID DEVICES: “My Tracks” ......................................................................................................... 5 GARMIN AUTOMOTIVE NUVI 255W GPS........................................................................................... 6 GARMIN OREGON HIKING GPS (TOUCH INTERFACE) ................................................................... 7 GARMIN 396 AVIATION GPS ................................................................................................................ 8 IPAD, IPHONE: “GPSTrack” .................................................................................................................... 9 DEVICES/SOFTWARE KNOWN TO NOT PRODUCE TRACK FILES ............................................ 10 For contributions, please try to cover the following:
• Initial Setup
• How to clear old tracks out of the GPS
• Setup before each flight
• What to do on the flight: Starting the unit up, verifying
that the track file is being recorded (if possible), etc.
• After flight processing steps/special software, if any.
If possible, also check the on-line manuals for similar models and
indicate the ones to which your procedures pertain.
AMOD AGL 3080 DATALOGGER Initial Setup (You may also access the user’s manual) Load batteries Press power button and hold for 1 second. i. All three lights will flash once, then the green GPS satellite icon will remain on
1. Steady green means AMOD is searching for satellite lock on
2. Flashing green means good lock
ii. Once you have a green light, power off the unit by pressing the power button until all three lights
come on together. Then release and the unit is off.
Setting logging mode This is essentially how often the datalogger records a location.
1. From the “Off” state, press the power and mark buttons (the buttons on each side) at the
same time for about 5 seconds. All three lights will flash together 5 times, and then a single
light will remain on.
2. Set to Mode 1 (location every second, good for 72 hours) until the “memory full” icon
remains steadily on. It looks like a stack of papers.
3. If any other light sequence remains, continue to repress the mark button until the steady red
“stack of papers” light remains.
4. When set in mode 1, power down the unit (see above)
Clearing the memory 1. Place the unit in the “setup” mode (See above)
2. Hold the “mark” button down until the three lights begin to flash sequentially, then release
3. The stored memory is cleared
Use with CAP Imagery programs This datalogger does not require any special software for use with ARGUS or Phyllis imagery processes. For our purposes, the unit acts like an external drive such as a memory stick, thumb drive, etc. Procedure 1. With the unit off, simply connect it to the laptop with a mini-usb cable. If this is the first
time it is connected, the laptop will initiate the “new device” process, and activate the
connection automatically.
2. The laptop now recognizes the datalogger as an external drive (d,e,f, or whatever one is
available).
3. From this point, the gps files (labeled “.log”) will be available.
4. The laptop may automatically open a window allowing you to “open folder to view files”.
If so, click on this, and you can view whatever .log files there are.
5. If it does not automatically open, then go to the Windows Explorer program in the
accessories folder on the computer, and use that to navigate to the appropriate external drive
that is the datalogger. (Note: this is not “Internet Explorer” that is used to access the
internet.)
6. “Drag and Drop” or otherwise process the file as directed by the imaging software
(Phyllis/ARGUS)
Note on software that accompanies the AMOD AGL 3080: This software is used by the datalogger to
process your own photos for your own personal tagging and publishing. The software is NOT needed
nor used by the processes for CAP Imaging (Phyllis, ARGUS, etc.) It is possible that if the
accompanying software is loaded on your computer, it may automatically activate when you plug in the
datalogger. If so, just close the AMOD software and ignore it. If you are in the field using a laptop that
has not had the AMOD software loaded, it won’t be an issue.
(Procedure courtesy of Tom Weston)
ANDROID DEVICES: “GPS Test” (Camera Time Calibration) This is not a GPS, but it is a handy (free) app for setting camera time. If you tap on the time value at the
lower right corner of the main screen, you get a screen that shows current Zulu time to the exact second.
You can either use this time to set your camera time or simply take a picture of the GPS Test time
screen. Comparing the EXIF camera time with the time shown on the photographed screen will give
you the offset value needed by Phyllis or Argus.
ANDROID DEVICES: “My Tracks” Initial Setup Download and install the free Google App called “My Tracks”
Factory default settings appear to be satisfactory. Track file sampling is adaptive, running as fast at 1
sample/second when the GPS is changing speed or direction but sampling less frequently when there is
little change.
Clearing Old Tracks (Optional) Open the My Tracks application, open the menu, select “Tracks” then “Delete All.”
In the Airplane Prior to takeoff, open the My Tracks application, open the menu and select “Record Track.”
After the last photo is taken, open the menu again and select “Stop Recording.” Accept the default track
name and add “Activity Information” and “Track Description” information as you like. Select “Save.”
Close the application.
Use with CAP Imagery programs (Option 1) Open the My Tracks application, open the menu, select “Tracks.” Press and hold on the
desired track until a menu pops up. From this menu select “Write to SD Card” then “Save a GPX File.”
Attach your Android device to your computer so you can access its SD card as if it were a disc drive.
Locate the “MyTracks” directory and, under it, the “gpx” directory which contains your file. You can
access the GPX file directly from Phyllis or Argus or you can use Windows Explorer to find the GPX
file and move it to your hard drive.
(Option 2) Open the My Tracks application, open the menu, select “Tracks.” Press and hold on the
desired track until a menu pops up. From this menu select “Share With Friends” then “A GPX File.” A
dialog will pop up that allows you to email the GPX track file to a mailbox where you will have access
to it.
GARMIN AUTOMOTIVE NUVI 255W GPS To Record a Track Clearing Old Tracks (optional) Turn on, touch Tools, touch My Data, touch Clear Trip Log, touch Yes to confirm deletion, touch Back
twice.
In The Airplane Turn GPS on and keep on during time of track recording.
Getting The Track File Downloading (You need to have drivers installed on your computer so Windows recognizes the Garmin device as a
drive when you connect the GPS to the computer’s USB port. If Windows does not recognize the
Garmin as a device, Google Earth will not find it to import tracking logs. This driver installation should
happen automatically when you plug in the GPS.)
Connect mini USB port on back of GPS to a USB port on a computer with Google Earth installed.
Using Windows Explorer or Phyllis, navigate to the Nuvi (seen as an attached disk drive) and find the
GPX file. (Note that Argus cannot take this file directly; you must process your photos using Phyllis so
that Phyllis can do the NMEA format translation for Argus prior to uploading your zip file.)
(If you want to use Google Earth, click “Tools”, click “GPS”, radio button “Garmin”, check other
options as desired, uncheck “Adjust altitudes to ground height”, click “Import.” Google Earth will
search for the device and will import the track log as a temporary file. When you close Google Earth it
will ask if you want to save it.)
(Procedure courtesy of Kevin Dunlevy)
GARMIN OREGON HIKING GPS (TOUCH INTERFACE) To Record a Track Clearing Old Track Files (Optional) Touch “Setup,” touch “Reset,” Touch “Clear Current Track”
Setup Touch “Setup,” touch “Tracks,” verify “Track Log” is “Record, Show On Map,” “Record Method” is
“Auto” and “Interval” is “Most Often”. Touch the appropriate button to change the selection if this not
what you see.
In The Airplane Turn on the GPS.
You can verify that a track is being recorded by touching “Map” and seeing it on the screen.
Getting The Track File Touch “Track Manager,” touch “Current Track,” touch “Save Track.” Either accept the default file
name offered or type in your own, then touch the green check mark. After the track is saved, you can
clear the current track or just leave it -- your choice.
Plug the GPS into your computer using a standard mini-USB cable.
Open Windows Explorer, navigate to the “Garmin Oregon” drive (like “F;\”), then to the “Garmin”
folder and the “GPX” subfolder. Your saved track will be there. The file can be accessed and used by
Phyllis directly from the GPS or you can copy it onto your computer before pointing Phyllis to it. (Note
that Argus cannot take this file directly; you must process your photos using Phyllis so that Phyllis can
do the NMEA format translation for Argus prior to uploading your zip file.)
GARMIN 396 AVIATION GPS To Record a Track Clearing Old Tracks (optional) In the Main Menu, scroll down to “Track,” use right arrow/down arrow to “Clear” old track files.
Setup In the Main Menu, scroll down to “Track,” verify “Record Mode” is “Wrap” and “Interval” is
“Resolution” or use right arrow and down arrow to change them as necessary.. (Optional: right
arrow/down arrow to “Clear” old track files.
In The Airplane Turn on the GPS before takeoff, turn off after the last photos are taken (or when you are done using it
for navigation.)
Getting The Track File Downloading Connect the GPS to your computer with a USB cable & turn it on.
Open the Garmin MapSource program. (This program should have come on a disk with your GPS.)
From the menu, select “Transfer/Receive From Device” then “Tracks.” The tracks will download.
Click the “Tracks” tab for the left panel to see them listed. Zoom the map panel as you like to review
the tracks that were downloaded. All of them are displayed simultaneously. (This is why it is easiest to
clear the GPS track files before your flight.)
Click on a track file name to highlight it on the map display. Use Edit/Track Properties to look at the
track in detail and, if you like, rename the track file.
Highlight the track you want to download, then from the menu, select “File/Save As,” give the file a
name and save as the default Garmin Database (gdb) format.
Post Processing For Phyllis, no post-processing is necessary. Phyllis can read the native Garmin gdb format and, if you
upload from Phyllis she will translate it to NMEA format for Argus.
For Argus, you have two options. You can download and install the GPSBabel program on your
computer or you can use the internet service called “GPS Visualizer.” Here are the links:
http://www.gpsbabel.org/
http://www.gpsvisualizer.com/gpsbabel/gpsbabel_convert
Either way, set the input format to be Garmin MapSource gdb, set the output format to be “NMEA 0183
sentences” and run the program
The result will be an NMEA file that both Phyllis and Argus can read. (Note: There will be minor
syntax errors in the file,. If you try to use the NMEA file with other software you may have problems.)
(Procedure courtesy of Dick Johnson)
IPAD, IPHONE: “GPSTrack” Initial Setup From the App Store search for GPS Track. Locate the app GPSTrack by John Bafford. The cost for this
app is $1.99. Install the app to your Ipad or IPhone.
Open the app and go to settings to configure for tracking and exporting track files.
Settings: •
•
•
Distance Units – Set to ‘Nautical Miles’
Accuracy – Set to ‘Record all Points’
Default Email – You may enter an email address to which the export files can be delivered.
In the Airplane Prior to takeoff, open GPSTrack and start on the ‘Track’ tab. Select ‘Start Tracking’ when you would
like to begin recording your track file. Keep in mind that the output file will be quite large as the track
in being recorded every second.
The program will record the track file in the background if you switch to another app without stopping.
You may use other apps while continuing to record your track file.
When finished tracking, select ‘Stop Tracking’.
Use with CAP Imagery programs
From the ‘Track’ tab, select your track file and either use the default track ‘Name’ or change it to the
mission number including sortie number.
Select ‘Export Track’ and an email with the track file attached will appear. Send the track file to desired
email address.
When you receive the email, save the track file to desired location for retrieval using Phyllis and
ARGUS.
(Procedure courtesy of Dan Nunn)
DEVICES/SOFTWARE KNOWN TO NOT PRODUCE TRACK FILES ALK Technologies’ Copilot Live (Android Application) (no time stamps in the track file)
Brunton Atlas GPS (no time stamps in the track file) (Courtesy of Keith Struck)
Casio EX-H20G GPS-enabled Camera (no time stamps in the track file) (Courtesy of Kevin Dunlevy)