1
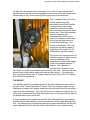
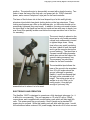
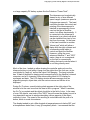
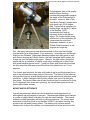
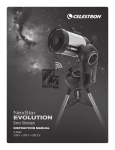
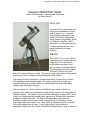
Copyright (c) 2005 Cloudy Nights Telescope Reviews
Celestron NEXSTAR 130GT
130mm f/5 Newtonian "Computerized" Telescope
by David Knisely
MSRP: $380
The era of Go-To telescopes has
been firmly established over the
past 10 years or so. However,
most of these instruments have
tended to be fairly complex and
costly pieces of equipment. Enter
the Celestron NexStar 130GT
telescope: a modest and light GoTo telescope with some of the
same features as its larger
brethren.
THE OTA
The 130GT is a 5.1 inch (130mm
clear aperture) f/5 Newtonian on a
single arm Go-To altazimuth
mount which can slew to and
track a variety of celestial objects.
The telescope tube itself is about
24 inches (610mm) long and
about 6.5 inches (165mm) in width. The tube is made of thin steel that is painted
a light silver on the outside and a light flat-black on the inside.
The primary mirror is mounted on a rather close-fitting 3-point mirror cell with
both adjustment and locking screws. The primary does have a small ring
reinforcer placed at its center, which is a considerable aid when collimating
(aligning) the telescope's mirrors.
The secondary is a 1.5 inch minor-axis elliptical mirror which is glued to a
cylinder that is fixed to an adjustable 3-screw cell mounted on a 4-vane spider of
adequate quality. This results in a linear central obstruction of about 29%, which
is high for a Newtonian but probably fairly typical for a "Richest-field" telescope
designed for wide-field work. The back of the secondary mirror was not
precisely centered on the short cylinder it was glued to for fastening it to the
secondary holder (the "spider"), as it was nearly 3 millimeters closer to the side
of the tube opposite the focuser. A very slight offset in that direction is
sometimes required for short f/ratio "richest-field" Newtonians in order to catch all
Copyright (c) 2005 Cloudy Nights Telescope Reviews
the light from the primary, but in the case of a 5.1 inch f/5, the required offset
amount should actually be fairly negligible and the center of the secondary mirror
should really be very close to being on the optical axis of the telescope.
Thus, it appears that much of the
off-axis positioning of the
secondary mirror in this NexStar
is a slight error in the gluing
placement of the mirror rather
than something designed to really
be this way. From the secondary
size, the maximum fully
illuminated field will be on the
order of 0.6 degrees, which may
be a bit on the small side for a
"richest-field" telescope. The
focuser is a standard 1.25" rackand-pinion unit which ranges in
height from 3.25 inches to 5.25
inches above the tube surface.
The focuser has two set screws to
hold the eyepiece in place, as well
as being threaded on the
eyepiece end with threads similar
to that of a standard camera "T"
adapter. The telescope is
provided with a Celestron "red
dot" finder in a metal dove-tail base near the front of the tube. This base will also
accept many of the smaller single stalk optical finder mounts. The instrument
also comes with 25mm (26x, 2.1 degree true field) and 10mm (65x, 0.97 degree
true field) Plossl eyepieces.
THE MOUNT
The NexStar mount is a modified version of the driven altazimuth ones used for
the rest of the "low-end" NexStar GT series. The fork is a black single arm unit
tilted back at roughly a 45 degree angle from the vertical with the fork arm offset
slight from the azimuth axis. The core of the fork is an aluminum casting, but it is
covered by a black plastic housing that shields some of the electronics as well as
the altitude drive motor and clutch.
A large clamshell style cradle known as the "tube Clamping Ring" is provided to
hold the optical tube assembly, and is mounted firmly to the upper bearing of the
fork. The clamping ring is opened by removing a large thumbscrew, and the unit
can be adjusted so as to allow the tube to be rotated to a convenient viewing
Copyright (c) 2005 Cloudy Nights Telescope Reviews
position. The azimuth motor is also partially covered with a plastic housing. Two
jacks sit near the base of the fork arm: one power jack for 12VDC electrical
power, and a second "telephone" style jack for the hand controller.
The base of the fork arm sits in the bowl shaped top of a thin wall light duty
aluminum tripod which has plastic locking knobs on the leg extensions. These
locking mechanisms are a little on the delicate side, so the knobs should not be
excessively tightened (they may break). In addition, the wing nuts used to fasten
the tripod legs to the tripod top are thin pot metal and are also easy to break (one
was found to be partially broken even before the scope was taken out of the box
for assembly).
The mount simply is placed on the
tripod and a very broad somewhat
conical knob underneath is turned
to tighten things down. Setup
time is thus very quick (excluding
the time it takes to level the tripod
and to get the scope's electronics
up and tracking). The tripod has a
3-armed central folding spreader
which also acts as the support for
a small rotating accessory tray.
The accessory tray also has a
holder for the hand controller.
The extendable tripod allows the
base of the mount to be anywhere
from 25 to 46 inches above the
ground, although for greatest
stability, I would recommend that
the legs not be extended to full
height. The entire scope set up
weighs in at only 18lbs, so for
many people, it may be light
enough to just carry fully
assembled out to where it is to be used.
ELECTRONICS AND OPERATION
The NexStar 130GT is designed to operate as a fully electronic telescope (i.e.: it
is difficult to use manually). The unit operates on 12 volts DC with a 750mA
current draw, and is supplied with a small battery pack which will hold eight AA
cells. This power pack has a cord nearly 4 feet in length and a standard DC
power plug on one end. While this battery pack will work with the scope, I would
still recommend either a decent 12V power supply that works off of house current
Copyright (c) 2005 Cloudy Nights Telescope Reviews
or a large capacity DC battery system like the Celestron "Power Tank".
The telescope can be electrically
slewed in any of nine different
speed ranges (maximum speed is
4 degrees per second). The hand
controller provides the control and
pointing of the telescope and is
identical in appearance to those
used on the rest of NexStar
series, but differs electronically. It
is connected to the telescope's
electronics by a coiled cord which
can be stretched from two to four
feet from the scope. At the base
of the hand controller is another
"phone jack" which will allow a
laptop with the right software and
a connecting serial cable to
control and point the NexStar.
However, unlike the more
advanced NexStar "i" and "GPS"
series, there is not a receptacle
on the fork for conveniently
holding the hand controller when it
is not being directly used.
Much of the time, I ended up either draping the controller and cord over the
telescope's tube or just letting it hang over the right side of the fork arm, as the
cord tended to "wrap up" around the tripod if left hanging. The hand controller
has 19 back-lit buttons for slewing and command inputs to the NexStar's internal
computer, and a 16 character/2-line side-scrolling back-lit LCD display for
messages and data. The LCD display window allows messages such as
alignment prompts, object data, and the various menus and utilities to be
displayed.
During Go-To slews, a small rotating slash appears at the right edge of the
window to let the user know that the slew is still in progress. When it vanishes,
the Go-To is complete and the object should be in the field of view. In the case
of over 100 objects, one touch of the "INFO" key will cause the display to scroll a
long description across its window describing various aspects of the object
currently in view. The speed of the scrolling is controllable with the push of a
button, which is a real convenience.
The display tended to get a little sluggish at temperatures much below 28F, and
at temperatures below zero, it may go completely blank. I recommend that the
Copyright (c) 2005 Cloudy Nights Telescope Reviews
hand controller be kept in a warm place prior to powering the scope up, as the
electrical current flowing through the unit seems to help prolong its operating time
at low temperatures.
The alignment setup is generally in one of three modes:
1. AUTO
2. 2-STAR
3. QUICK ALIGN
The first step in all of these is to make certain that the telescope's tripod is level.
Unfortunately, no bubble level is supplied with the scope, so one must be
purchased. Once the tripod is leveled, the mount is attached to the tripod and
the electronic alignment can begin.
The AUTO method takes the user through a series of alignment steps where the
scope is leveled in altitude (i.e.: horizontal to the ground) and pointed as close to
true north as possible. Then, inputs of location, date, and time are entered.
When these are entered, the telescope slews to the first of two selected stars to
begin its alignment. The red-dot finder should be aligned with the main telescope
prior to setup, and the scope will first ask the user to set the star on the red dot
and then tweak the alignment further by looking into the eyepiece to truly center
the first star. Once that is done, the scope slews to its second alignment star,
and the process is repeated. The scope announces the alignment a success,
prompts you to turn off the red-dot finder, and the user should be ready to begin
Go-To operation.
The 2-STAR alignment is similar, except that the user merely selects two stars
and aligns the scope on each one without the input of date, time, and precise
location.
The QUICK ALIGN just requires input of location, date, and time, asking you to
point the scope level and to the north for alignment. The QUICK ALIGN mode is
probably the fastest, but is also the least accurate. One nice item is that once
you enter your location data, the telescope can remember it, although you will
still need to update the date and time.
For finding things, the NexStar has a database of 4033 objects including the
planets, moon, named stars, prominent double stars, some variable stars,
asterisms, and a selection of deep-sky objects from the Messier and NGC
catalogs, as well as the Caldwell list. Some, like the Messier and NGC objects,
are directly accessible with the push of just a few buttons, while others require a
few more button pushes to access. More objects would be available for the
telescope to point towards if a laptop control and external software were used,
but there is no guarantee that some of these objects would be bright enough to
be visible in the telescope's 5.1 inch aperture.
Copyright (c) 2005 Cloudy Nights Telescope Reviews
THE SKY Level-1 and the NexStar Observer's List software came with the
telescope, but the serial cable for an external computer was not provided. The
hand controller also provides a series of utilities for telescope control as well as
settings for an equatorial mount. However, the NexStar 130GT cannot be
mounted equatorially, as no wedge is available for it, and the mounting system is
not designed for equatorial use.
OPTICAL PERFORMANCE
The NexStar 130GT's optics were judged to be fairly good. The scope came
slightly out of optical alignment, but it was at least possible to collimate this
instrument. The alignment or collimation instructions provided in the manual are
woefully inadequate, so it is best to refer to one of the better Newtonian
collimation instruction sites on the internet.
Basically, what one does is first make certain the center of the primary mirror at
the back of the telescope is visible centered in the secondary mirror when looking
into the focuser. The secondary mirror can be rotated in its mount by loosening
the central screw of the spider, and the other three screws on the spider allow
minor tilting of the secondary to get it properly aligned. Collimation of the
secondary was a bit of a pain (mostly in the need to fool with a screw locking the
rotation of the secondary), but eventually it was achieved.
Then, with the three adjusting screws on the back end of the telescope, the
primary mirror is adjusted so that the reflection of the spider and secondary
mirror is centered in the primary mirror. The large knurled locking screws next to
the adjustment screws were a little on the long side, and were sometimes a bit of
a pain to use. However, the primary needed very little adjustment to get it
aligned properly. That having been said, the telescope holds collimation fairly
well on the whole, so bouncing it around as I carried it inside and outside the
house didn't change things very much. The red-dot finder has two alignment
screws and I had to adjust them over nearly their full range of motion to get the
red dot aligned with the main telescope.
Once out under the sky, I put in the Ronchi grating and put the scope on Polaris.
The Ronchi bands were pretty straight overall, but showed very slight curvature
on the very ends of a type indicating a very mild turned-down edge in the
telescope's primary mirror. However, the Star test at high power showed very
little in the way of spherical aberration and no on-axis astigmatism, with clear
diffraction disk and ring structure easily visible in the in-focus star images.
Copyright (c) 2005 Cloudy Nights Telescope Reviews
The eyepieces were of fair quality,
with the 25mm showing
considerable astigmatism towards
the edges of the 2 degree field it
provided. However, with a Tele
Vue 24mm Panoptic, images were
quite good over a 2.38 degree
field. A wide field is necessary for
finding things, as the Go-To slews
of the NexStar 130GT
occasionally don't end up
extremely close to the desired
object. The focuser height along
with the size of the secondary will
compromise the outer field
illumination however, so as a
Richest Field instrument, its not
as good as it might be.
Still, I did enjoy being able to see the entire sword of Orion and the nebulae
involved with it at a single glance. From a dark sky, I could also see the Merope
Nebula in the Pleiades. High power planetary images were fairly good as well,
with Saturn showing the Cassini division, the main equatorial belt complex, the
Crepe ring, and the darker polar region. However, the light scatter around the
planet may be an indication of slightly rough mirror surfaces as is often found
with some machine-ground optics. I could see Rhea, and Dione with the scope,
but they were faint and were more difficult than they should be in a 5.1 inch
aperture.
The focuser was functional, but was a bit harder to get a good high-power focus
due to the stiffness and coarse nature of its motion. The interior of the tube was
fairly dark but was not as well blackened as a good astronomical telescope really
should be. A bright flashlight made the tube interior look more of a dark grey
than black. The red-dot finder was at least functional (and is used more for initial
Go-To alignment than as an aid in pointing), but I would have preferred a low
power optical finder instead.
MOUNT AND ELECTRONICS
Overall, the telescope's electronics did do what they were supposed to do,
although with varying degrees of success. The telescope slewed to and tracked
a number of objects when ordered to through the hand controller. The internal
software worked reasonably well with no obvious problems. The motors were
somewhat noisier than those in my NexStar 9.25SCT, and when tracking, they
produced an odd weak buzzing sound. The slewing at the slower speeds
showed a lot of play in the clutches, as it sometimes took a few seconds for the
Copyright (c) 2005 Cloudy Nights Telescope Reviews
scope to actually move when one of the slew buttons was pressed and held
down.
The Go-To accuracy was somewhat variable, being usually under a degree from
the intended location and in a number of cases, less than half a degree from the
target. However, there were a few times when the scope missed its target by
quite a margin (the so-called "NexStar Gremlin"). That usually meant that
something in the scope's alignment or the orientation of the tripod had gone
wrong. A tripod settling into the ground or the scope getting bumped were
usually the main causes of this problem, although a low battery or a bad power
connection at the jack can also lead to this.
Tracking was good at low power, but at high powers (in excess of 100x), it
tended to wander somewhat, sometimes letting the object very slowly drift to the
edge of the field or beyond. The misses in the Go-To slews, plus the slightly
sloppy slewing and tracking will very likely be major sources of frustration for the
novice telescope owner who gets one of these NexStar Go-To scopes. In
addition, the little external battery pack with the eight "AA" cells did not last all
that long, with perhaps three or four 2-hour observing sessions being the most it
would support. Colder temperatures really reduced the capacity of the little pack,
so it is best to use an external power supply with the NexStar 130GT.
Getting the tripod very close to level and the scope pointed accurately North
during alignment are the keys to good pointing accuracy with the NexStar
130GT. As such, the tripod should be leveled using a small bubble level *before*
the mount is put on the tripod. In addition, the tube needs to be slewed to level
when pointed due north early in the alignment procedure, so again, a small
carpenter's level that can be placed temporarily on the top side of the telescope
tube is a real help here. The more carefully this leveling is done, the better the
Go-To slews and tracking will tend to be. Alignment was fairly easy, and in some
cases, took less time than it did when doing a full GPS alignment with my
NexStar 9.25GPS.
I generally slewed the scope to Polaris and then down in altitude to level the tube
when starting the alignment. The mount uses friction clutches for its drive
system, so the scope can be moved by hand with a little pressure. However, I do
not recommend that this be done on a routine basis, as eventually, the clutches
may become a little too loose to allow the motors to drive the scope properly.
The telescope tube should be placed very near its "balance point" when in its
cradle (the center of the tube clamp ring) should be about 8 inches from the back
end of the telescope tube). If this is not done, the tracking may not be as
accurate due to unequal loading of the altitude drive motor. A loss of alignment
can also occur if a person tries to move the scope by pushing it with a little hand
pressure, so once alignment is achieved, it is best not to touch the telescope
other than to change eyepieces or shut off the red-dot finder. Many of these tips
Copyright (c) 2005 Cloudy Nights Telescope Reviews
are vital in the proper operation of the scope, but as usual, Celestron's manual
does not mention them. Indeed, the manual was only barely adequate to
understand a little of how the scope works. It falls well short of a decent guide to
the use of the 130GT.
While the telescope OTA isn't all that bad, the mount and Go-To system are
definitely the areas of the greatest problems. As mentioned earlier, portions of
this mount used hardware and construction which seems a bit on the flimsy side.
This was especially noticeable at high power, where the vibration and movement
of the scope when touched or vibrated by the wind at times made it hard to view.
Clearly, the mount may be a bit on the small side. There is little excuse for not
using standard steel hardware in places like the wing nuts or the tripod leg locks.
Plastic in the leg locks is also somewhat questionable, although I have seen
similar features on other small telescope mounts.
The power and hand controller connectors are located on the moving fork, which
can allow both cords to get wrapped up or pinched in parts of the tripod. I had
this happen during a long slew when the cord of the hand controller got wedged
between one of the tripod's wing nuts and the mount. I heard the motors
suddenly slowing and then noticed the cord being rather heavily stretched, so I
managed to stop the slew and untangle things before something really bad
happened. This could easily been avoided if, as on the NexStar 9.25 and 11 inch
models, some kind of mounting hook had been fixed to the fork to hold both the
hand controller and the battery pack.
The overall design of the mount shows a number of flaws as well, each of which
could have easily been avoided with a little careful thought. The biggest problem
is with the altitude range of the scope. While the mount is able to slew through
the zenith, the length of the scope when placed in the clamshell of the mount in
the balanced position will cause the rear of the telescope tube to strike either the
top of the tripod legs or the base of the mount at altitude angles higher than 72
degrees and at certain azimuth positions. This effectively reduces sky coverage
to some extent and can cause some additional headaches. Often, this nearzenith area has some of the best seeing in the sky, so there should be no reason
why a Go-To altazimuth mount can't provide better access to this rather enlarged
version of "Dobson's Hole".
I had this problem come up when slewing to the Pleiades. The scope tried to go
there, but then stopped, with the bottom of its tube jammed firmly against the
base of the mount. There is a utility in the menus of the hand controller which
will allow the user to keep the scope from slewing to an altitude higher than a
certain limit. This might help somewhat with this problem. Unfortunately, it is not
implemented as the default altitude slew limit for the NexStar 130GT. The user
has to first know about the limit feature, find it, and set it properly.
Also, when the telescope is tracking an object, the slew limits do *not* apply, so
Copyright (c) 2005 Cloudy Nights Telescope Reviews
the telescope might still hit the top of the tripod legs as a tracked object's altitude
exceeded the slew limit value. This would result in not only a tracking failure, but
a complete screwup in the alignment. The user would then have to shut the
NexStar 130GT off and realign it once again. The scope can be moved forward
in the cradle to avoid the tripod legs, but the scope's bottom end still hits the base
of the mount at about 82 degrees of altitude. In addition, if the tube is shifted
forward, the added weight may cause the clutch in the altitude axis to slip. I
noted that if the scope was very far forward from its nominal balanced position
and the scope was nearly level, the nose of the scope would slowly sink as the
clutch slipped. Tracking was also less than accurate even at moderate powers if
the scope is not properly balanced in the clamping ring of the mount. If the arm
of the fork had been made just a tad longer, or the tripod legs set a bit farther
down in the base, this tube strike problem could have easily been avoided.
I did come up with a way to get around this problem by making a thin metal bar
with a counterweight on one end (an old power transformer from my junk box). I
then put a hole in one end of the bar and used the large thumbscrew style bolt in
the clamping ring to hold it in place while the bar held the transformer out beyond
the rear end of the telescope tube. With my crude counterweight system, I was
able to move the scope forward in the clamping ring to a point where it would
balance properly and clear both the tripod legs and the base of the mount. The
scope worked pretty well in this modified mode, giving me access to the entire
Copyright (c) 2005 Cloudy Nights Telescope Reviews
sky, although it looked a little funny. Such a counterweight device could easily
have been retrofitted to the scope by Celestron, and could have also been
fashioned to provide a nice place to hang the hand controller (a much better
place than the little accessory tray). Unfortunately, this has not been done, and I
have some doubts as to whether Celestron is really concerned enough about the
tube-strike problem to even consider this possible solution.
CONCLUDING THOUGHTS
The NexStar 130GT poses some interesting problems with the way it operates,
so much so that I might have some reservations in recommending it to a
beginner. With my experience using the NexStar 9.25GPS, I had little trouble
making the 130GT work, but it didn't seem to work well enough to really impress
me. The mount is not as well designed as it really should be. It is a bit on the
light side, and the occasional annoying problems with the Go-To and tracking are
enough to generate some frustration among novice users.
That, coupled with an inadequate manual would probably lead to the NexStar
130GT sitting in a closet somewhere gathering dust, rather than being a helpful
tool for the new observer. Can the 130GT be a useful instrument to the
amateur? Yes, it might make a good "grab and go" scope for someone who
knows how the unit works and is willing to put up with the occasional problems
that the instrument demonstrates. It has reasonably good optical performance,
especially for the cost, and with some care, the electric slewing and Go-To
features can be made to function at least well enough for richest-field
observations.
WHAT I LIKED ABOUT THE NEXSTAR 130GT
1. Light weight.
2. Low cost (for a Go-To telescope).
3. Fairly decent optics.
4. Wide field views.
5. Go-To and computer control capability.
6. Easy assembly.
7. Reasonably quick alignment.
WHAT I DID *NOT* LIKE ABOUT THE NEXSTAR 130GT
1. Not very robust construction.
2. Inconsistent Go-To and tracking accuracy.
3. Tube bottom strikes the tripod or base of Fork at high altitude angles.
4. Inadequate tube interior blackening.
5. Excessive play in the motor clutches.
6. Inadequate manual.
7. Not very "novice friendly" in operation.
8. Red-dot finder.
9. Inadequate battery pack.
Copyright (c) 2005 Cloudy Nights Telescope Reviews
10. Coarse focuser.
11. No place provided on the fork to mount the hand controller or battery pack to
prevent cord "wrap-up" problems
SUMMARY
The NexStar 130GT 5.1 inch f/5 Newtonian is a low-cost and very portable
telescope which provides fairly good optical performance as well as Go-To
operation similar to the larger telescopes of the NexStar line. However, the
problems which this instrument presented may make it a less than outstanding
choice for the beginner or for those who have not already had experience
operating Go-To telescopes.
Click to discuss this article in the forums