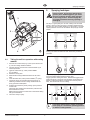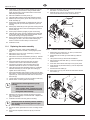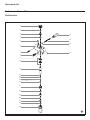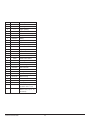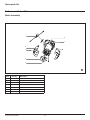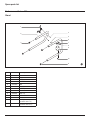
1
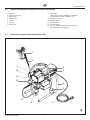
GB Operating manual Performance Series 450e Airless high-pressure spraying unit Models: 0558067 0558073 Performance Series 450e Edition 9 / 2010 0558 940D GB Warning! Attention: Danger of injury by injection! Airless units develop extremely high spraying pressures. 1 Never put your fingers, hands or any other parts of the body into the spray jet! Never point the spray gun at yourself, other persons or animals. Never use the spray gun without safety guard. Do not treat a spraying injury as a harmless cut. In case of injury to the skin through coating materials or solvents, consult a doctor immediately for quick and expert treatment. Inform the doctor about the coating material or solvent used. 2 The operating instructions state that the following points must always be observed before starting up. 1. Faulty units must not be used. 2. Secure Titan spray gun using the safety catch on the trigger. 3. Ensure that the unit is properly earthed. The connection must take place through a correctly earthed two-pole and earth socket outlet. PE 4. Check allowable operating pressure of high-pressure hose and spray gun. 5. Check all connections for leaks. 3 The instructions regarding regular cleaning and maintenance of the unit must be strictly observed. Before any work is done on the unit or for every break in work the following rules must be observed: 1. Release the pressure from spray gun and hose. 0 bar 2. Secure the Titan spray gun using the safety catch on the trigger 3. Switch off unit. Be safety-conscious! 2 Performance Series 450e GB Contents Contents Page 9. Page Remedy in case of faults..............................................12 1. 1.1 Safety regulations for Airless spraying........................ 4 Earthing instructions.........................................................5 2. 2.1 2.2 General view of application...........................................6 Application........................................................................6 Coating materials..............................................................6 3. 3.1 3.2 3.3 3.4 3.5 3.6 Description of unit..........................................................6 Airless process..................................................................6 Functioning of the unit.......................................................6 Legend for explanatory diagram Performance Series 450e.................................................7 Explanatory diagram Performance Series 450e............... 7 Technical data...................................................................8 Transportation in vehicle...................................................8 4. 4.1 4.2 4.3 4.4 Starting operation...........................................................8 High-pressure hose, spray gun and separating oil.....................................................................8 Connection to the mains network......................................8 Cleaning preserving agent when starting-up of operation initially.........................................8 Taking the unit into operation with coating material.........................................................9 5. Spraying technique.........................................................9 6. 6.1 Handling the high-pressure hose................................10 High-pressure hose.........................................................10 Spare parts list for main assembly........................................20 Spare parts list for fluid section............................................22 Spare parts list for drive assembly........................................24 Spare parts list for motor assembly......................................25 Spare parts list of frame.........................................................26 Spare parts list for suction system.......................................27 7. Interruption of work......................................................10 Warranty...................................................................................28 8. 8.1 8.2 8.3 8.4 Cleaning the unit (shutting down)...............................10 Cleaning unit from outside..............................................10 Suction filter....................................................................11 Cleaning the high-pressure filter.....................................11 Cleaning Airless spray gun.............................................11 Performance Series 450e 10. Servicing........................................................................14 10.1 General servicing............................................................14 10.2 High-pressure hose.........................................................14 3 11. 11.1 11.2 11.3 11.4 11.5 11.6 11.7 11.8 Repairs at the unit.........................................................14 Relief valve.....................................................................14 Inlet and outlet valve.......................................................14 Packings.........................................................................15 Replacing the motor assembly........................................16 Carbon brushes in motor................................................16 Replacing the gears........................................................17 Replacing the transducer................................................17 Performance Series 450e connection diagram............... 18 12. Accessories for Performance Series 450e................. 19 13. 13.1 13.2 Appendix........................................................................19 Selection of tip................................................................19 Servicing and cleaning of Airless hard-metal tips................................................................19 Safety Regulations 1. GB Safety regulations for Airless spraying This manual contains information that must be read and understood before using the equipment. When you come to an area that has one of the following symbols, pay particular attention and make certain to heed the safeguard. NOTE TO PHYSICIAN: Injection into the skin is a traumatic injury. It is important to treat the injury as soon as possible. DO NOT delay treatment to research toxicity. Toxicity is a concern with some coatings injected directly into the blood stream. Consultation with a plastic surgeon or reconstructive hand surgeon may be advisable. This symbol indicates a potential hazard that may cause serious injury or loss of life. Important safety information will follow. Attention i This symbol indicates a potential hazard to you or to the equipment. Important information that tells how to prevent damage to the equipment or how to avoid causes of minor injuries will follow. A hazard symbol such as this one refers to a specific, task-related risk. Be sure to heed the safeguard. HAZARD: EXPLOSION OR FIRE Solvent and paint fumes can explode or ignite. Severe injury and/or property damage can occur. Notes give important information which should be given special attention. PREVENTION: • Provide extensive exhaust and fresh air introduction to keep the air within the spray area free from accumulation of flammable vapors. • Avoid all ignition sources such as static electricity sparks, electrical appliances, flames, pilot lights, hot objects, and sparks from connecting and disconnecting power cords or working light switches. • Plastic can cause static sparks. Never hang plastic to enclose spray area. Do not use plastic drop cloths when spraying flammable materials. • Always flush unit into separate metal container, at low pump pressure, with spray tip removed. Hold gun firmly against side of container to ground container and prevent static sparks. HAZARD: Injection injury A high pressure stream produced by this equipment can pierce the skin and underlying tissues, leading to serious injury and possible amputation. DO NOT TREAT AN INJECTION INJURY AS A SIMPLE CUT! Injection can lead to amputation. See a physician immediately. The maximum operating range of the unit is 214 bar (21.4 MPa, 3100 PSI) fluid pressure. PREVENTION: • NEVER aim the gun at any part of the body. • NEVER allow any part of the body to touch the fluid stream. DO NOT allow body to touch a leak in the fluid hose. • NEVER put your hand in front of the gun. Gloves will not provide protection against an injection injury. 0 bar • Do not smoke in spray area. • Fire extinguisher must be present and in good working order. • Place sprayer at least 6.1 m (20 feet) from the spray object in a well ventilated area (add more hose if necessary). Flammable vapors are often heavier than air. Floor area must be extremely well ventilated. The pump contains arcing parts that emit sparks and can ignite vapors. • ALWAYS lock the gun trigger, shut the fluid pump off and release all pressure before servicing, cleaning the tip guard, changing tips, or leaving unattended. Pressure will not be released by turning off the engine. The PRIME/SPRAY valve or pressure bleed valve must be turned to their appropriate positions to relieve system pressure. PE • ALWAYS keep tip guard in place while spraying. The tip guard provides some protection but is mainly a warning device. • NEVER use a spray gun without a working trigger lock and trigger guard in place. • ALWAYS remove the spray tip before flushing or cleaning the system. • Follow material and solvent manufacturer’s warnings and instructions. Be familiar with the coating material’s MSDS sheet and technical information to ensure safe use. • The paint hose can develop leaks from wear, kinking and abuse. A leak can inject material into the skin. Inspect the hose before each use. • Do not use materials with a flashpoint below 21° C (70° F). Flashpoint is the temperature at which a fluid can produce enough vapors to ignite. • Use lowest possible pressure to flush equipment. • All accessories must be rated at or above the maximum operating pressure range of the sprayer. This includes spray tips, guns, extensions, and hose. • The equipment and objects in and around the spray area must be properly grounded to prevent static sparks. • Use only conductive or earthed high pressure fluid hose. Gun must be earthed through hose connections. • Power cord must be connected to a grounded circuit (electric units only). • The unit must be connected to an earthed object. Use the green earthing wire to connect the unit to a water pipe, steel beam, or other electrically earthed surface. 4 Performance Series 450e Safety regulations GB General view of application HAZARD: HAZARDOUS VAPORS Paints, solvents, insecticides, and other materials can be harmful if inhaled or come in contact with body. Vapors can cause severe nausea, fainting, or poisoning. HAZARD: EXPLOSION HAZARD DUE TO INCOMPATIBLE MATERIALS Will cause severe injury or property damage. PREVENTION: • Do not use materials containing bleach or chlorine. • Do not use halogenated hydrocarbon solvents such as methylene chloride and 1,1,1 - trichloroethane. They are not compatible with aluminum and may cause an explosion. If you are unsure of a material’s compatibility with aluminum, contact your coating’s supplier. PREVENTION: • Use a respirator or mask if vapors can be inhaled. Read all instructions supplied with the mask to be sure it will provide the necessary protection. • Wear protective eyewear. HAZARD: GENERAL This product can cause severe injury or property damage. • Wear protective clothing as required by coating manufacturer. PREVENTION: • Read all instructions and safety precautions before operating equipment. • Follow all appropriate local, state, and national codes governing ventilation, fire prevention, and operation. • Pulling the trigger causes a recoil force to the hand that is holding the spray gun. The recoil force of the spray gun is particularly powerful when the tip has been removed and a high pressure has been set on the airless pump. When cleaning without a spray tip, set the pressure control knob to the lowest pressure. • Use only manufacturer authorized parts. User assumes all risks and liabilities when using parts that do not meet the minimum specifications and safety devices of the pump manufacturer. 1.1Earthing Instructions PE DANGER — Improper installation of the earthing plug can result in a risk of electric shock. If repair or replacement of the cord or plug is necessary, do not connect the green earthing wire to either blade terminal. The wire with insulation having a green outer surface with or without yellow stripes is the earthing wire and must be connected to the earthing pin. • Before each use, check all hoses for cuts, leaks, abrasion or bulging of cover. Check for damage or movement of couplings. Immediately replace the hose if any of these conditions exist. Never repair a paint hose. Replace it with another earthed high-pressure hose. Check with a qualified electrician or serviceman if the earthing instructions are not completely understood, or if you are in doubt as to whether the product is properly earthed. Do not modify the plug provided. If the plug will not fit the outlet, have the proper outlet installed by a qualified electrician. • Make sure power cord, air hose and spray hoses are routed in such a manner to minimize slip, trip and fall hazard. • Clean up all material and solvent spills immediately to prevent slip hazard. Caution – The power cord for this equipment acts as an emergency stop/emergency switching off device. The power cord must be placed near an easily accessible, unobstructed socket-outlet. • ALWAYS follow the material manufacturer’s instructions for safe handling of paint and solvents. Work or repairs at the electrical equipment: These may only be carried out by a skilled electrician. No liability is assumed for incorrect installation. A list of the materials used in the construction of the equipment will be made available on request to validate compatibility with the coating materials to be used. • Do not use this unit in workshops that are covered under the explosion prevention regulations. Operating Temperature This equipment will operate correctly in its intended ambient, at a minimum between +10°C and +40°C. • Always unplug cord from outlet before working on equipment (electric units only). • Always keep the power cord plug in sight during usage to prevent any accidental shutdown or startup. Relative Humidity The equipment will operate correctly within an environment at 50% RH, +40°C. Higher RH may be allowed at lower temperatures. Measures shall be taken by the Purchaser to avoid the harmful effects of occasional condensation. • Wear ear protection. This unit can produce noise levels above 85 dB(A). Altitude This equipment will operate correctly up to 2100m above mean sea level. • Never leave this equipment unattended. Keep away from children or anyone not familiar with the operation of airless equipment. • Do not move unit while unit is running. • Do not spray on windy days. Performance Series 450e Electric models must be earthed. In the event of an electrical short circuit, earthing reduces the risk of electric shock by providing an escape wire for the electric current. This product is equipped with a cord having an earthing wire with an appropriate earthing plug. The plug must be plugged into an outlet that is properly installed and earthed in accordance with all local codes and ordinances. Transportation and Storage This equipment will withstand, or has been protected against, transportation and storage temperatures of -25°C to +55°C and for short periods up to +70°C. It has been packaged to prevent damage from the effects of normal humidity, vibration and shock. 5 General view of application 2. 2.1 GB General view of application 3. Application 3.1 All painting jobs in the workshop and on the building site, small dispersion work with the spray gun or internally fed Airless roller. Coating materials Processible coating materials i Pay attention to the Airless quality of the coating materials to be processed. 3.2 Dilutable lacquers and paints or those containing solvents, twocomponent coating materials, dispersions, latex paints. No other materials should be used for spraying without Titan’s approval. Airless process Functioning of the unit In the following there is a short description of the technical construction for better understanding of the function. TITAN Performance Series units are electrically driven highpressure spraying units. A gear unit transfers the driving force to a crankshaft. The crankshaft moves the pistons of the material feed pump up and down. The inlet valve is opened automatically by the upwards movement of the piston. The outlet valve is opened when the piston moves downward. The coating material flows under high pressure through the highpressure hose to the spray gun. When the coating material exits from the tip it atomizes. The pressure regulator controls the volume and the operating pressure of the coating material. Filtering Despite suction filter and insertion filter in the spray gun, filtering of the coating material is generally advisable. Stir coating material before commencement of work. i Description of unit The main areas of application are thick layers of highly viscous coating material for large areas and a high consumption of material. A piston pump takes in the coating material by suction and conveys it to the tip. Pressed through the tip at a pressure of up to a maximum of 214 bar (21.4 MPa), the coating material is atomised. This high pressure has the effect of micro fine atomisation of the coating material. As no air is used in this process, it is described as an AIRLESS process. This method of spraying has the advantages of finest atomisation, cloudless operation and a smooth, bubble-free surface. As well as these, the advantages of the speed of work and convenience must be mentioned. Examples of objects of spraying Doors, door frames, balustrades, furniture, wooden cladding, fences radiators (heating) and steel parts, internal ceilings and walls. 2.2 Description of unit Attention: Make sure, when stirring up with motor-driven agitators that no air bubbles are stirred in. Air bubbles disturb when spraying and can, in fact, lead to interruption of operation. Viscosity With this unit it is possible to process highly viscous coating materials of up to around 20.000 MPa·s. If highly viscous coating materials cannot be taken in by suction, they must be diluted in accordance with the manufacturer’s instructions. Two-component coating material The appropriate processing time must be adhered to exactly. Within this time rinse through and clean the unit meticulously with the appropriate cleaning materials. Coating materials with sharp-edged additional materials These have a strong wear and tear effect on valves, highpressure hose, spray gun and tip. The durability of these parts cane be reduced appreciably through this. 6 Performance Series 450e GB 3.3 1 2 3 4 5 6 7 Description of unit Legend for explanatory diagram Performance Series 450e Spray gun High-pressure hose Return hose Suction hose Frame Drip cup Power cord 8 9 10 11 12 13 Relief valve Lever position vertical – PRIME ( k circulation) Lever position horizontal – SPRAY ( p) Pressure control knob ON/OFF switch Circuit breaker Pressure gauge Oil cup for Piston Lube (Piston Lube prevents increased wear of the packings) 3.4Explanatory diagram Performance Series 450e 1 2 9 3 10 4 11 12 5 6 13 Performance Series 450e 8 7 7 GB Description of unit 3.5 Technical data 5. Fill the oil cup with Piston Lube (Fig. 3). Do not use too much Piston Lube, i.e. ensure that no Piston Lube drips into the coating material container. Voltage: 110 Volt AC, 50/60 Hz Max. current consumption: 9.5 A @ 110VAC Power cord: 3 x 1.5 mm2 – 6 m Acceptance capacity: 900 Watt Max. operating pressure: 214 bar (21.4 MPa) Volume flow at 12 MPa (120 bar) with water: 1.62 l/min Max tip size: 0.021 inch – 0.53 mm Max. temperature of the coating material: 43°C Max viscosity: 20.000 MPa·s Weight: 15.2 kg Special high-pressure hose: 6,35 mm, 15 m-18 NPSM Dimensions (L X W X H): 480 x 360 x 405 mm Vibration: Spray gun does not exceed 2.5m/s2 Max sound pressure level: 80 dB (A) * * Place of measuring: 1 m in distance from the unit and 1.6 m above the floor, 12 MPa (120 bar) operating pressure, reverberant floor. 3.6 Starting operation Attention Piston Lube prevents increased wear and tear to the packings. Transportation in vehicle Secure the unit with a suitable fastening. 4. 4.1 Starting operation 4.2 High-pressure hose, spray gun and separating oil 1. Screw the pressure gauge (1) to the coating material outlet (Fig. 2, Item 2). 2. Screw the high-pressure hose (3) to the coating material outlet on the pressure gauge (Fig. 2, Item 4). 3. Screw the spray gun (5) with the selected tip onto the high-pressure hose. 4. Tighten the union nuts at the high-pressure hoses firmly so that coating material does not leak. Connection to the mains network Attention The unit must be connected to an appropriatelygrounded safety outlet. Before connecting the unit to the mains supply, ensure that the line voltage matches that specified on the unit’s rating plate. 4.3 Cleaning preserving agent when startingup of operation initially 1. Depending on the model, swivel or immerse the suction tube (Fig. 4 Item 2) or the suction hose and return hose (1) into a container with a suitable cleaning agent. 2. Turn the pressure control knob counterclockwise (3) to minimum pressure. 3. Open the relief valve (4), valve position PRIME (k circulation). 4. Switch the unit (5) ON. 5. Wait until the cleaning agent exudes from the return hose. 6. Close the relief valve, valve position SPRAY (p spray). 7. Pull the trigger of the spray gun. 8. Spray the cleaning agent from the unit into an open collecting container. 5 1 4 3 2 8 Performance Series 450e GB Spraying Technique 5. Spraying technique Injection hazard. Do not spray without the tip guard in place. NEVER trigger the gun unless the tip is completely turned to either the spray or the unclog position. ALWAYS engage the gun trigger lock before removing, replacing or cleaning tip. 3 The key to a good paint job is an even coating over the entire surface. Keep your arm moving at a constant speed and keep the spray gun at a constant distance from the surface. The best spraying distance is 25 to 30 cm between the spray tip and the surface. 5 1 25 - 30 cm 2 Keep the spray gun at right angles to the surface. This means moving your entire arm back and forth rather than just flexing your wrist. 4 4.4 Taking the unit into operation with coating material 1. Immerse the suction tube (Fig. 4, Item 2) and return hose (1) into the coating material container. 2. Turn the pressure control knob counterclockwise (3) to minimum pressure. 3. Open the relief valve (4), valve position PRIME (k circulation). 4. Switch the unit (5) ON. 5. Wait until the coating material exudes from the return hose. 6. Close the relief valve, valve position SPRAY (p spray). 7. Trigger the spray gun several times and spray into a collecting container until the coating material exits the spray gun without interruption. 8. Increase the pressure by slowly turning up the pressure control knob. Check the spray pattern and increase the pressure until the atomization is correct. Always turn the pressure control knob to the lowest setting with good atomization. 9. The unit is ready to spray. Keep the spray gun perpendicular to the surface, otherwise one end of the pattern will be thicker than the other. Trigger gun after starting the stroke. Release the trigger before ending the stroke. The spray gun should be moving when the trigger is pulled and released. Overlap each stroke by about 30%. This will ensure an even coating. 25 - 30 cm i Performance Series 450e 9 25 - 30 cm If very sharp edges result or if there are streaks in the spray jet – increase the operating pressure or dilute the coating material. Handling the high-pressure hose 6. GB Handling the high-pressure hose 8. Avoid sharp bending or kinking of the high-pressure hose. The smallest bending radius amounts to about 20 cm. Do not drive over the high-pressure hose. Protect against sharp objects and edges. High-pressure hose The unit is equipped with a high-pressure hose specially suited for piston pumps. i 7. Cleaning the unit (shutting down) A clean state is the best method of ensuring operation without problems. After you have finished spraying, clean the unit. Under no circumstances may any remaining coating material dry and harden in the unit. The cleaning agent used for cleaning (only with an ignition point above 21 °C) must be suitable for the coating material used. • Secure the spray gun, refer to the operating manual of the spray gun. Clean and remove tip. For a standard tip, refer to Page 19, Section 13.2. If a non-standard tip is installed, proceed according to the relevant operating manual. 1. Remove suction hose from the coating material. 2. Close the relief valve, valve position SPRAY (p spray). 3. Switch the unit ON. 4. Pull the trigger of the spray gun in order to pump the remaining coating material from the suction hose, highpressure hose and the spray gun into an open container. Danger of injury through leaking high-pressure hose. Replace any damaged high-pressure hose immediately. Never repair defective high-pressure hoses yourself! 6.1 Cleaning the unit (shutting down) Only use titan original-high-pressure hoses in order to ensure functionality, safety and durability. Attention Interruption of work 1. Open the relief valve, valve position PRIME (k circulation). 2. Switch the unit OFF. 3. Turn the pressure control knob counterclockwise to minimum pressure. 4. Pull the trigger of the spray gun in order to release the pressure from the high-pressure hose and spray gun. 5. Secure the spray gun, refer to the operating manual of the spray gun. 6. If a standard tip is to be cleaned, see Page 19, Section 13.2. If a non-standard tip is installed, proceed according to the relevant operating manual. 7. Depending on the model, leave the suction tube or the suction hose and return hose immersed in the coating material or swivel or immerse it into a corresponding cleaning agent. The container must be earthed in case of coating materials which contain solvents. Caution! Do not pump or spray into a container with a small opening (bunghole)! Refer to the safety regulations. 5. Immerse suction hose with return hose into a container with a suitable cleaning agent. 6. Turn the pressure control knob counterclockwise to minimum pressure. 7. Open the relief valve, valve position PRIME (k circulation). 8. Pump a suitable cleaning agent in the circuit for a few minutes. 9. Close the relief valve, valve position SPRAY (p spray). 10. Pull the trigger of the spray gun. 11. Pump the remaining cleaning agent into an open container until the unit is empty. 12. Switch the unit OFF. If fast-drying or two-component coating material is used, ensure that the unit is rinsed with a suitable cleaning agent within the processing Attention time. 8.1 Cleaning unit from outside First of all pull out mains plug from socket. Danger of short circult through penetrating water! Never spray down the unit with high-pressure or Attention high-pressure steam cleaners. Wipe down unit externally with a cloth which has been immersed in a suitable cleaning agent. 10 Performance Series 450e GB 8.2 i Suction filter Cleaning the unit (shutting down) 8.4 1. Rinse Airless spray gun with an appropriate cleaning agent. 2. Clean tip thoroughly with appropriate cleaning agent so that no coating material residue remains. 3. Thoroughly clean the outside of the Airless spray gun. A clean suction filter always guarantees maximum feed quantity, constant spraying pressure and problem-free functioning of the unit. 1. Screw off the filter (Fig. 5) from suction pipe. 2. Clean or replace the filter. Carry out cleaning with a hard brush and an appropriate cleaning agent. Intake filter in Airless spray gun 1. Pull the bottom of the trigger guard forward (1) so that it comes loose from the handle assembly (5). 2. Loosen and remove the handle assembly (5) from the gun head (2). 3. Turning clockwise, unscrew the filter (4) from the gun body (2). i 8.3 Clean the filter cartridge regularly. A soiled or clogged high-pressure filter can cause a poor spray pattern or a clogged tip. 1. Turn the pressure control knob counterclockwise to minimum pressure. 2. Open the relief valve, valve position PRIME (k circulation). 3. Switch the unit OFF. 2 1 Unplug the power plug from the outlet. 4 3 4. Unscrew the filter housing (Fig. 6, Item 1). with a strap wrench. 5. Pull the filter cartridge (2) from the manifold (3). 6. Clean all the parts with the corresponding cleaning agent. If necessary, replace the filter cartridge. 7. Check the O-ring (4), replace it if necessary. 8. Push the new or cleaned filter into the pump manifold. 9. Screw in filter housing (1) and tighten it as far as possible with the strap wrench. 5 1 2 3 Performance Series 450e Left-handed threads require turning the filter clockwise to remove. 4. Turning counterclockwise, screw the new or cleaned filter into the gun body. 5. Make sure all the parts are clean and the handle seal (3) is in position inside the gun head. 6. Thread the handle assembly (5) into the gun head (2) until secure. 7. Snap the trigger guard (1) back onto the handle assembly (5). Cleaning the high-pressure filter 4 Cleaning the Airless spray gun 11 GB Remedy in case of faults 9. Remedy in case of faults Type of malfunction A. Unit does not start B. Unit does not draw in material C. Unit draws in material, but the pressure does not build up Possible cause Measures for eliminating the malfunction 1. No voltage applied. 1. Check voltage supply. 2. Pressure setting too low. 2. Turn up pressure control knob. 3. ON/OFF switch defective. 3. Replace. 1. Relief valve is set to SPRAY (p spray). 1. Set relief valve to PRIME (k circulation). 2. Filter projects over the fluid level and sucks air. 2. Refill the coating material. 3. Filter clogged. 3. Clean or replace the filter. 4. Suction hose/suction tube is loose, i.e. the unit is sucking in outside air. 4. Clean connecting points. Replace O-rings if necessary. Secure suction hose with retaining clip. 1. Tip heavily worn. 1. Replace 2. Tip too large. 2. Replace tip. 3. Pressure setting too low. 3. Turn pressure control knob clockwise to increase. 4. Filter clogged. 4. Clean or replace the filter. 5. Coating material flows through the return hose when the relief valve is in the SPRAY (p spray) position. 5. Remove and clean or replace relief valve. 6. Packings sticky or worn. 6. Remove and clean or replace packings. 7. Valve balls worn. 7. Remove and replace valve balls. 8. Valve seats worn. 8. Remove and replace valve seats. 12 Performance Series 450e GB Type of malfunction D. Coating material exits at the top of the fluid section E. Increased pulsation at the spray gun F. Poor spray pattern G. Unit loses power Performance Series 450e Possible cause Remedy in case of faults Measures for eliminating the malfunction 1. Upper packing is worn. 1. Remove and replace packing. 2. Piston is worn. 2. Remove and replace piston. 1. Incorrect high-pressure hose type. 1. Only use titan original-high-pressure hoses in order to ensure functionality, safety and durability. 2. Tip worn or too large. 2. Replace tip. 3. Pressure too high. 3. Turn pressure control knob to a lower number. 1. Tip is too large for the coating material which is to be sprayed. 1. Replace tip. 2. Pressure setting incorrect. 2. Turn pressure control knob until a satisfactory spraying pattern is achieved. 3. Volume too low. 3. Clean or replace all filters. 4. Coating material viscosity too high. 4. Thin out according to the manufacturer’s instructions. 1. Pressure setting too low. 1. Turn pressure control knob clockwise to increase. 13 GB Servicing 10. 10.1 Servicing 11.2 Danger of crushing - do not reach with the fingers or tool between the moving parts. High-pressure hose 3. Unplug the power plug from the outlet. 4. Remove the retaining clip from the connecting bend at the suction hose and pull off the suction hose. 5. Screw off the return hose. 6. Swivel the unit 90° to the rear in order to work more easily on the material feed pump. 7. Unscrew the inlet valve housing (Fig. 9, Item 1) from the pump manifold. 8. Remove the lower seal (2), lower ball guide (3), inlet valve ball (4), inlet valve seat (5) and O-ring (6). 9. Clean all the parts with the corresponding cleaning agent. Check the inlet valve housing (1), inlet valve seat (5) and inlet valve ball (4) for wear and replace the parts if necessary. If the worn inlet valve seat (5) is unused on one side, install it the other way round. Inspect the high-pressure hose visually for any notches or bulges, in particular at the transition in the fittings. It must be possible to turn the union nuts freely. 11. Repairs at the unit Switch the unit OFF. Before all repair work: Unplug the power plug from the outlet. 11.1 Inlet and outlet valve 1. Remove the four screws in the front cover and then remove the front cover. 2. Switch the unit ON and then OFF so that the piston rod is positioned in the lower stroke position. General servicing Servicing of the unit should be carried out once annually by the titan service. 1. Check high-pressure hoses, device connecting line and plug for damage. 2. Check the inlet valve, outlet valve and filter for wear. 10.2 Repairs at the unit Relief valve 1. Use a drift punch of 2 mm to remove the grooved pin (Fig. 8, Item 1) from the relief valve handle (2). 2. Remove the relief valve handle (2) and cam base (3). 3. Using a wrench, remove the valve housing (4) from the pump manifold (6). 4. Ensure that the seal (5) is seated correctly, then screw the new valve housing (4) completely into the pump manifold (6). Tighten securely with a wrench. 5. Align the cam base (3) with the hole in the pump manifold (6). Lubricate the cam base with grease and slide on the cam base. 6. Bring the hole in the valve shaft (7) and in the relief valve handle (2) into alignment. 7. Insert the grooved pin (1) to secure the relief valve handle in position. 2 3 4 5 6 6 1 4 1 2 7 3 5 10. Unscrew outlet valve housing (Fig. 10, Item 7) from the piston (8) with adjusting wrench. 11. Remove the upper ball guide (10), crush washer (9), outlet valve ball (11), and outlet valve seat (12). 12. Clean all the parts with the corresponding cleaning agent. Check outlet valve housing (7), outlet valve seat (12), outlet valve ball (11) and upper ball guide (10) for wear and replace parts if necessary. If the worn outlet valve seat (12) is unused on one side, install it the other way round. 13. Carry out installation in the reverse order. Lubricate O-ring (Fig. 9, Item 6) with machine grease and ensure proper seating in the inlet valve housing (Fig. 9, Item 1). 14 Performance Series 450e GB Repairs at the unit 5 8 10 6 10 7 8 4 9 11 12 2 7 11.3 Packings 1 1. Remove inlet valve housing in accordance with the steps in Chapter 11.2, Page 14. 2. It is not necessary to remove the outlet valve. 3. Unscrew both cylinder head screws (Fig. 11, Item 1) from the pump manifold (2) with a 3/8 inch hexagon socket head wrench. 4. Slide the pump manifold (2) and piston (3) forward until the piston is out of the T-slot (10) on the slider assembly (5). 5. Push piston (3) downward out of the pump manifold (2). 6. Unscrew retainer nut (6) from the pump manifold (2) and remove piston guide (7). 7. Remove upper packing (8) and lower packing (9) from the pump manifold (2). 9 3 8. Clean pump manifold (2). 9. Lubricate upper packing (8) and lower packing (9) with machine grease. 10. Insert upper packing (Fig. 12) with O-ring (1) and protruding lip (2) downward. 1 2 11. Insert lower packings (Fig. 13) with O-ring (1) and protruding lip (2) upward. 2 1 12. Insert piston guide (Fig. 11, Item 7) into the retainer nut (6). Screw retainer nut (6) into the pump manifold (2) and tighten by hand. 13. Push installation tool (included with the replacement packings) for the piston (3) from above onto the piston. 14. Lubricate installation tool and piston (3) with machine grease. Performance Series 450e 15 Repairs at the unit GB 15. Guide piston (3) through the lower packings (9) into the pump manifold (2) from below. Using a rubber mallet, lightly tap the piston (3) from below until it can be seen above the pump manifold. 16. Remove installation tool from piston (3). 17. Carefully tighten retainer nut (6) with adjusting wrench. 18. Slide the top of the piston (3) into the T-slot (10) on the slider assembly (4). 19. Position the pump manifold (2) underneath the gear unit housing and push up until it rests against the gear unit housing. 20. Attach pump manifold (2) to the gear unit housing. Ensure that the pressure sensor does not damage the pressure sensor seal (10). 21. Screw pump manifold (2) tightly to gear unit housing. 22. Lubricate O-ring (Fig. 9, Item 6) between pump manifold (2) and inlet valve housing with machine grease. Screw inlet valve housing to the pump manifold. 23. Push connection bend of suction hose into the inlet valve housing (Fig. 9, Item 1) and secure with retaining clip. Screw on return hose and clamp to suction hose. 24. Install front cover. 11.4 14. Reconnect the wires (refer to the electrical schematic in the section 11.8 of this manual). 15. Slide the motor cover (2) over the motor. Secure the motor cover with the four motor cover screws (1). 3 5 6 1 2 9 8 11.5 Carbon brushes in motor 1. Remove the four screws (Fig. 15, Item 1) at the motor cover (2). Remove motor cover. 2. Remove the two screws (3) at the shells (4). Remove shells. 3. Lift up both covers (5) with a small screwdriver. 4. Pull red wire (6) and black wire (7) out of the respective carbon brush. 5. Insert new carbon brush and snap cover (5) into place. 6. Insert red wire (6) and black wire (7) onto the respective carbon brush. 7. Screw down both shells (4). 8. Push motor cover (2) over the motor and fasten with the four screws (1). 7 If the motor will not dislodge from the pump housing: • Remove the front cover plate. • Using a rubber mallet, carefully tap on the front of the motor crankshaft that extends through the slider assembly. 3 4 1 2 5 10. With the motor removed, inspect the gears in the gear box housing for damage or excessive wear. Replace the gears, if necessary. 11. Install the new motor into the gear box housing. i 10 Replacing the motor assembly 1. Open the relief valve, valve position PRIME (k circulation), switch the unit OFF, and unplug the power cord. 2. Remove the four motor cover screws (Fig. 14, Item 1). Remove the motor cover (2). 3. Remove the four heat sink assembly screws (3). Pull the heat sink assembly (4) away from the gear box housing (5). 4. Disconnect the five wires from the relay (6) that is mounted on the inside of the heat sink assembly. 5. Connect the five wires to the new relay (refer to the electrical schematic in section 11.8 of this manual). 6. Using the four heat sink assembly screws (3), install the heat sink assembly (4) onto the gear box housing (5). Tighten the screws securely. 7. Disconnect the black and red wires coming from the gear box housing. Disconnect the black and red wires from the capacitors (8). Disconnect the black and red wires from the motor (9). 8. Loosen and remove the four motor mounting screws (10). 9. Pull the motor out of the gear box housing. i 4 6 Rotate the motor fan manually until the armature gear engages with the mating gear in the gear box housing. 12. Secure the motor (9)with the four motor mounting screws (10). 13. Push the new capacitors into their clip (8) on the new motor. 16 Performance Series 450e GB 11.6 Replacing the Gears 11.7 1. Open the relief valve, valve position PRIME (k circulation), switch the unit OFF, and unplug the power cord. 2. Loosen and remove the four motor cover screws (Fig. 16. 1). Remove the motor cover (2). 3. Disconnect the black and red wires coming from the gear box housing. 4. Loosen and remove the four motor mounting screws (3). 5. Pull the motor (4) out of the gear box housing (5). i If the motor will not dislodge from the pump housing: • Remove the front cover plate. • Using a rubber mallet, carefully tap on the front of the motor crankshaft that extends through the slider assembly. Make sure the transducer is aligned properly with the hole in the pump manifold during reassembly. Improper alignment may cause damage to the transducer o-ring. Refill the gear box in the pump housing with five ounces of Lubriplate GR132 (P/N 0293396). 2 1 2 1 3 4 7 3 5 4 8 6 6 7 8 9 Performance Series 450e Replacing the Transducer 1. Open the relief valve, valve position PRIME (k circulation), switch the unit OFF, and unplug the power cord. 2. Loosen and remove the four front cover screws (Fig. 17, Item 1). Remove the front cover (2). 3. Stop the sprayer at the bottom of its stroke so that the piston is in its lowest position. 4. Tilt the sprayer back for easy access to the fluid section. 5. Using 3/8” a hex wrench, loosen and remove the two pump manifold mounting screws (5). 6. Pull the pump manifold (6) down approximately 1.3 cm from the pump housing to clear the transducer. 7. Slide the pump block and piston rod forward until the piston rod is out of the T-slot (4) on the slider assembly (3). 8. Using a wrench, remove the transducer assembly (8) from the pump manifold. 9. Thread the new transducer assembly into the pump manifold (6). Tighten securely with a wrench. 10. Reassemble the pump by reversing steps 2–7. 6. Inspect the armature gear (6) on the end of the motor for damage or excessive wear. If this gear is completely worn out, replace the entire motor. 7. Remove and inspect the 2nd stage gear (7) for damage or excessive wear. Replace if necessary. 8. Remove and inspect the crankshaft/gear assembly (8) for damage or excessive wear. Replace if necessary. 9. Reassemble the pump by reversing the above steps. During reassembly, make sure the thrust washer (9) is in place. i Repairs at the unit 5 17 18 Switch F 1 2 F Brown / black F F 3 4 Blue / white Blue / white Black White F Black White F Circuit breaker Brown / Blue for model 0558067. Black / White for model 0558073. + WH2 M MB FB F M Capacitors Black + M WH4 F Red FB MB WH7 F Black Motor F M Red WH5 Red Blue Microswitch Blue Black 11.8 EMI filter Brown / black Power cord i Repairs at the unit GB Performance Series 450e connection diagram Performance Series 450e WH1 WH6 GB Accessories 12. Accessories for Performance Series 450e Liquid Shield Plus Airless Tip Selection Cleans and protects spray systems against rust, corrosion and premature wear. Now with -25º anti-freeze protection. Part # Description 314-483 4 ounce (112 ml) bottle 314-482 1 liter bottle Tips are selected by the orifice size and fan width. The proper selection is determined by the fan width required for a specific job and by the orifice size that will supply the desired amount of fluid and accomplish proper atomization. For light viscosity fluids, smaller orifice tips generally are desired. For heavier viscosity materials, larger orifice tips are preferred. Please refer to the chart below. i Piston Lube Do not exceed the sprayer’s recommended tip size. Specially formulated to prevent materials from adhering to the piston rod, which becomes abrasive to the upper seals. Piston Lube will break down any material that may accumulate in the oil cup and keep it from drying. Part # Description 314-481 4 ounce (112 ml) bottle 314-480 8 ounce (240 ml) bottle The following chart indicates the most common sizes and the appropriate materials to be sprayed. Tip Size Spray Material Filter Type .011 – .013 Lacquers and stains 100 mesh filter .015 – .019 Oil and latex 60 mesh filter .021 – .026 Heavy bodied latex and blockfillers 30 mesh filter Miscellaneous Fan widths measuring 8” to 12” (20 to 30 cm) are preferred because they offer more control while spraying and are less likely to plug. 13. 13.1 Appendix Part # 490-012 730-397 314-171 314-172 Description Hose Coupling, 1/4” x 1/4” High Pressure Fl. Gauge Lubriplate, 14 ounce individual Lubriplate, 6 lb. can Appendix Selection of tip To achieve faultless and rational working, the selection of the tip is of the greatest importance. In many cases the correct tip can only be determined by means of a spraying test. Some rules for this: The spray jet must be even. If streaks appear in the spray jet the spraying pressure is either too low or the viscosity of the coating material to high. Remedy: Increase pressure or dilute coating material. Each pump conveys a certain quantity in proportion to the size of the tip: The following principle is valid: large tip = low pressure small tip= high pressure There is a large range of tips with various spraying angles. 13.2 Servicing and cleaning of Airless hard-metal tips Standard tips If a different tip type has been fitted, then clean it according to manufacturer’s instructions. The tip has a bore processed with the greatest precision. Careful handling is necessary to achieve long durability. Do not forget the fact that the hard-metal insert is brittle! Never throw the tip or handle with sharp metal objects. The following points must be observed to keep the tip clean and ready for use: 1. Turn the relief valve handle fully counterclockwise (k Circulation). 2. Switch off the gasoline engine. 3. Dismount the tip from the spray gun. 4. Place tip in an appropriate cleaning agent until all coating material residue is dissolved. 5. If there is pressure air, blow out tip. 6. Remove any residue by means of a sharp wooden rod (toothpick). 7. Check the tip with the help of a magnifying glass and, if necessary, repeat points 4 to 6. Performance Series 450e 19 Spare parts list Performance Series 450e Main Assembly 13 14 30 15 1 16 17 18 BS4343 NEMA 5-15P 2 3 0558 466 ~110V 20 Ft. 4343 19 800-741 4 ~120V 8.25 Ft. 5 NEMA 5-15P 20 21 10 11 12 6 7 58 466 110V 0 Ft. 800-741 ~120V 8.25 Ft. 22 8 23 9 24 25 26 31 27 4 36 3 28 37 38 32 33 34 29 35 20 Performance Series 450e Item Part No. Description Item Part No. Description 1 0558 302 Motor shroud 20 0509 218 Screw (4) 2 9805 287 Screw (4) 21 0558 301 Face plate 3 0558 555 Power cord jumper* 22 0558 263A 4 0551 714 Cord grip 23 0507 931 Cam base 5 9805 259 Ground screw 24 5006 543 Groove pin 6 0509 218 Screw (4) 25 0507 662 Relief valve knob 7 0523 527A Motor control assembly 26 730-197 Cap 8 0507 751 Grommit 27 9885 612 Return tube fitting 9 0509 550 Screw (4) 28 0508 553 Screw (2) 10 03662 Microswitch insulator 29 0508 239 Manometer 11 0522 362 Microswitch 30 0551 705 Siphon assembly 12 9800 604 Screw (2) 31 ------- 13 0509 219 Screw 32 0551 714 Cord grip* 14 0551 513 Knob 33 0509 218 Screw (6)* 15 0551 522 Knob housing 34 9800 340 Ground screw (2)* 16 9822 522 Retaining ring 35 0558 452 Bracket cover* Fluid section assembly Power cord (see inset, left) 17 02712 Spring 36 0558 449 Bracket* 18 0551 521 Plunger 37 0551 980 Lock nut (2)* 19 -------- Drive assembly 38 0522 424 EMI filter, 20A* Performance Series 450e 21 * UK only Spare parts list Performance Series 450e Fluid section 1 2 3 24 4 25 5 26 6 7 27 8 9 10 11 12 13 14 15 16 17 18 19 20 21 22 23 22 Performance Series 450e Item Part No. Description 1 0509 594 Retainer 2 0509 584 Piston guide 3 ------- 4 0551 535 Spacer 5 0551 112 Transducer assembly 6 806-106 Pump manifold 7 0509 873 Fitting 8 0507 690 Bypass valve assembly 9 0507 745 Gasket 10 ------- Upper packing Lower packing (2) 11 0290 277A 12 806-309 Piston rod Upper cage 13 0551 263 Crush washer 14 0516 303 Outlet valve ball 15 0551 620 Outlet valve seat 16 13481 Outlet valve retainer 17 704-535 Bushing 18 0509 581 Inlet valve seal 19 0509 591 Lower ball guide 20 0509 583 Inlet valve ball 21 0551 534 Inlet valve seat 22 0509 582 O-ring, Teflon 23 0508 680 Inlet valve housing 24 0516 775 Filter housing 25 0515 252 Filter 26 0296 289 O-ring 27 0507 517 Pipe plug 0509 151 Piston assembly (includes items 11-16) 0551 533 Repacking kit (includes items 2-4, 10, 12, 14, 18, 20 and 22). Performance Series 450e 23 Spare parts list Performance Series 450e Drive Assembly 1 2 9 10 3 4 5 8 6 7 Item Part No. Description 1 0558 316 Housing assembly 2 0508 573 Thrust washer 3 0508 572A 4 0509 121 5 0558 353A 6 9820 213 Washer (4) 7 9800 341 Screw (4) 8 0508 208 Slider assembly 9 9850 936 Power switch 10 704-211A Circuit breaker Gear/crankshaft assembly 2nd stage gear Motor assembly, 120V 24 Performance Series 450e Spare parts list Performance Series 450e Motor Assembly 1 6 7 2 3 4 5 Item Part No. Description 1 0522 100 Capacitor assembly 2 806-304 Fan shroud (2) 3 704-322 Screw (2) 4 806-308 Fan 5 9804 916 Screw 6 0551 543 Tie wrap 7 0551 540 Motor, Labyrinth Kit assembly, 120V Performance Series 450e 25 Spare parts list Performance Series 450e Stand 1 4 2 5 6 3 7 8 9 10 11 Item Part No. Description 1 0508 377 Cord holder 2 806-071 Leg, left 3 9885 546 Plug (2) 4 0551 527 Screw 5 0509 856 Nut 6 0290 234 Leg, right 7 806-216 Tube clip 8 0551 434 Screw 9 0508 381 Drip cup 10 9805 230 Screw 11 9885 546 Plug (2) 0551 526 Left leg assembly (includes items 1-4) 0551 524 Right leg assembly (includes items 5-11) 26 Performance Series 450e Spare parts list Performance Series 450e Suction system 1 4 2 3 Item Part No. Description 1 0551 706 Siphon hose 2 9850 638 Tie wrap (2) 3 0551 707 Retun tube 4 0279 459 Clip 0551 705 Siphon tube assembly (includes items 1-4) Performance Series 450e 27 Warranty Titan Tool, Inc., (“Titan”) warrants that at the time of delivery to the original purchaser for use (“End User”), the equipment covered by this warranty is free from defects in material and workmanship. With the exception of any special, limited, or extended warranty published by Titan, Titan’s obligation under this warranty is limited to replacing or repairing without charge those parts which, to Titan’s reasonable satisfaction, are shown to be defective within twelve (12) months after sale to the End User. This warranty applies only when the unit is installed and operated in accordance with the recommendations and instructions of Titan. This warranty does not apply in the case of damage or wear caused by abrasion, corrosion or misuse, negligence, accident, faulty installation, substitution of non-Titan component parts, or tampering with the unit in a manner to impair normal operation. Defective parts are to be returned to an authorized Titan sales/service outlet. All transportation charges, including return to the factory, if necessary, are to be borne and prepaid by the End User. Repaired or replaced equipment will be returned to the End User transportation prepaid. THERE IS NO OTHER EXPRESS WARRANTY. TITAN HEREBY DISCLAIMS ANY AND ALL IMPLIED WARRANTIES INCLUDING, BUT NOT LIMITED TO, THOSE OF MERCHANTABILITY AND FITNESS FOR A PARTICULAR PURPOSE, TO THE EXTENT PERMITTED BY LAW. THE DURATION OF ANY IMPLIED WARRANTIES WHICH CANNOT BE DISCLAIMED IS LIMITED TO THE TIME PERIOD SPECIFIED IN THE EXPRESS WARRANTY. IN NO CASE SHALL TITAN LIABILITY EXCEED THE AMOUNT OF THE PURCHASE PRICE. LIABILITY FOR CONSEQUENTIAL, INCIDENTAL OR SPECIAL DAMAGES UNDER ANY AND ALL WARRANTIES IS EXCLUDED TO THE EXTENT PERMITTED BY LAW. TITAN MAKES NO WARRANTY AND DISCLAIMS ALL IMPLIED WARRANTIES OF MERCHANTABILITY AND FITNESS FOR A PARTICULAR PURPOSE WITH RESPECT TO ACCESSORIES, EQUIPMENT, MATERIALS OR COMPONENTS SOLD BUT NOT MANUFACTURED BY TITAN. THOSE ITEMS SOLD, BUT NOT MANUFACTURED BY TITAN (SUCH AS GAS ENGINES, SWITCHES, HOSES, ETC.) ARE SUBJECT TO THE WARRANTY, IF ANY, OF THEIR MANUFACTURER. TITAN WILL PROVIDE THE PURCHASER WITH REASONABLE ASSISTANCE IN MAKING ANY CLAIM FOR BREACH OF THESE WARRANTIES. Note on disposal: In observance of the European Directive 2002/96/ EC on waste electrical and electronic equipment and implementation in accordance with national law, this product is not to be disposed of together with household waste material but must be recycled in an environmentally friendly way! Titan or one of our dealers will take back your used Titan waste electrical or electronic equipment and will dispose of it for you in an environmentally friendly way. Please ask your local Titan service centre or dealer for details or contact us direct. International www.titantool.com/international 1770 Fernbrook Lane Minneapolis, MN 55447 28 Performance Series 450e