1
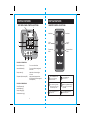
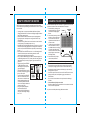
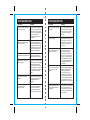
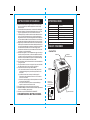
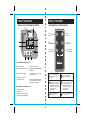
USER MANUAL
CONCEPT R1
INDOOR INFRARED HEATER
CONCEPT R1 CALEFACTOR INFRARROJO PARA
Model Numbers 15301-15314
INTRODUCTION
SAFETY INSTRUCTIONS
Thank you for choosing the RedCore™ Concept R1 Indoor Infrared Heater. At
Best Green Technologies, our mission is to improve your comfort with safe,
therapeutic heating products. The RedCore™ Concept R1 is a state-of-the art room
heater that produces soft infrared heating that will keep you comfortable and
help you reduce energy bills.
Please refer to our website for further information on all RedCore™ products.
WARNING: When using electrical appliances, basic precautions should
always be followed to reduce risk of fire, electric shock, and injury to persons.
WARNING: Risk of electric shock no user-serviceable parts inside
except to clean the air filter.
WARNING: This product must run on its own electrical circuit.
Do not share a circuit on which this product is running.
Best Green Technologies, LLC
E-Mail: [email protected]
www.redcoreheaters.com
888-4 BGT HEAT (888-424-8432)
CUSTOMER SUPPORT
DO NOT RETURN THIS PRODUCT TO THE STORE
WHERE YOU BOUGHT IT!
FOR IMMEDIATE CUSTOMER SERVICE, PLEASE CALL:
888-4BGT HEAT
(888-424-8432)
A CUSTOMER SERVICE REPRESENTATIVE WILL ASSIST YOU
WITH ANY QUESTIONS REGARDING YOUR
CONCEPT R1 INFRARED HEATER.
When using electrical appliances, basic safety precautions should always
be followed, including the following:
1. Read all instructions before using this appliance.
2. The heater is hot when in use. To avoid burns, do not place any objects such as
furniture, papers, clothes, and curtains closer than 3 feet (0.9 m) to the front of the heater
and keep them away from the sides and rear when the heater is plugged in.
3. Extreme caution should be taken when using any appliance around children, elderly,
or disabled persons, or whenever the heater is operating unattended. Children
under 14 years of age should not be allowed to operate this heater. This product
is for adult use only and all children must be supervised when using this product.
4. Always unplug heater when not in use.
5. Do not operate heater with a damaged cord or plug, after the heater malfunctions,
or if the heater has been dropped or damaged in any manner. Discard heater or
return to an authorized service facility for examination and/or repair.
6. Do not use outdoors.
7. This heater is not intended for use in bathrooms, laundry areas, and similar
indoor locations. Never locate appliance where it may fall into a bathtub or
other water container.
8. Do not run cord under carpeting. Do not cover cord with throw rugs, runners,
or similar coverings. Do not route cord under furniture or appliances.Arrange
cord away from traffic areas and where it will not be tripped over.
9. To disconnect the appliance, turn controls to off, wait for heater to cool down
and shut off, and then remove plug from outlet.
10. Connect to properly polarized outlets only.
11. Do not insert or allow foreign objects to enter into ventilation opening as this
may cause an electric shock, fire or damage the appliance.
12. To prevent a possible fire, do not block air intakes or exhaust in any manner.
Do not use on soft surfaces, like a bed, where openings may become blocked.
13. The heater has hot parts and sparking parts inside. Do not use in areas where
gasoline, paint, or flammable liquids are used or stored.
2
3
SAFETY INSTRUCTIONS
14. Use this appliance only as described in this manual.Any use not recommended
by the manufacturer may cause fire, electric shock, or injury to persons.
15. Always plug heaters directly into a wall outlet receptacle. Do not use an
extension cord.
16. To prevent overload and blown fuses, be sure that no other appliance is
plugged into the same outlet on the same circuit.
17. It is normal for the heater’s plug and cord to feel warm to the touch.A plug
or cord which becomes hot to the touch or becomes distorted in shape may
be a result of a worn electrical outlet (receptacle).Worn outlets or receptacles
should be replaced prior to further use of the heater. Plugging this heater into
a worn outlet (receptacle) may result in overheating of the power cord or fire.
18. Be sure that the plug is fully inserted into an appropriate receptacle. Please
remember that receptacles also deteriorate due to aging and continuous use:
check outlet and cord periodically for signs of overheating or deformations
of the plug. If any overheating or deformation is present, immediately
discontinue using the receptacle and contact a qualified electrician.
19. This appliance is equipped with a polarized plug: one blade is wider than the
other.This plug will fit in a polarized outlet only one way. If the plug does not
fit in the outlet, reverse the plug. If it still does not fit, contact a qualified
electrician to install a polarized outlet. Do not change the plug in any way.
20. Do not cover the appliance while it is functioning in order to avoid overheating
and/or risk of fire.
21. Do not place the heater near a bed because objects such as pillows or
blankets can fall off the bed and be ignited by the heater.
22. Check your heater cord and plug connections.
a) Faulty wall outlet connections or loose plugs can cause the outlet or plug to
overheat. Be sure the plug fits tight in outlet.
b) Heaters draw more current than small appliances. Overheating of the outlet
may occur even if it has not occurred with the use of other appliances.
c) During use, check frequently to determine if your plug outlet or faceplate
is HOT!
d) If so, discontinue use of the heater and have a qualified electrician check
and/or replace faulty outlet(s).
23. Do not locate against walls or behind drapes or furniture.
24. KEEP THE PACKAGING. It is required in case you need to return
the unit, and for off-season storage and any transporting needs.
25.This appliance is for HOUSEHOLD USE ONLY.
SPECIFICATIONS
Voltage
120V AC 60HZ
Heating power
1500 Watts
Temperature control range
60〜90℉
Heating element
Infrared PTC heater
Coverage
Up to 1,000 square feet
Dimensions
10.75” Wide X 11.0” Deep X 10.5” High
Weight
8.75 pounds
LCD display and touch button operation
Tip-over safety switch automatically shuts heater down if it tips over
PARTS & FEATURES
HEATER
LCD Display
Overheat
Indicator Light
Carry handles
On/Off (I/O) switch
located in back of unit
Hot air
outlet
SAVE THESE INSTRUCTIONS!
4
5
PARTS & FEATURES
PARTS & FEATURES
LCD DISPLAY AND CONTROL BUTTONS
REMOTE CONTROL FUNCTIONS
D
E
Power Button
Heater Button
POWER
HEATER
H
F
Low Fan
Button
G
K
CONCEPT R-1
OVERHEAT
I
Temperature Up
Button
LOW
FAN
HIGH
FAN
UP
DOWN
Hign Fan
Button
Temperature Down
Button
TEMP
A
B
C
LCD DISPLAY FUNCTIONS
Power On/Off button (A):
Turn on or turn off the Power
Heater On/Off button (B):
Turn on or turn off the heating function
of the heater
Fan Adjust button (C):
Adjust the fan to function at High or
Low mode
Temperature Up/Down button (D/E):
Adjust the desired temperature from
60~90ºF. (Note: LCD will show target and
actual temperature).
LCD DISPLAY INDICATORS
Desired Temperature (H)
Actual Temperature (F);
Fan Adjust Setting (G)(K);
Overheat Indicator Light (I)
6
Press the HEATER power button
to turn on or off the heating
function of the heater.
Press the POWER button
to turn on the unit.
Press the LOW FAN button to turn
fan on LOW. Pressing LOW FAN
button again will generate a “beep”
but the fan will stay on LOW.
Press HIGH FAN button to turn fan on
HIGH. Pressing HIGH FAN button again
will generate a “beep” but the fan will
stay on HIGH.
Press the TEMP UP button to raise
the temperature.
Press the TEMP DOWN button to
lower the temperature
7
HOW TO OPERATE THE HEATER
NOTE:The heater may emit a slight harmless smoke when first used. This smoke is a
normal condition caused by initial heating of the infrared element. It will occur only briefly
and is not harmful.
• Un-package heater: cut open tape area and fold back flaps. Remove Styrofoam
packaging and lift heater from box. We recommend keeping the package for off-season
storage and any transporting needs.
• Position: Find a level and unobstructed location to place the unpackaged heater.
• Plug in: Plug the power cord directly into an unused grounded 120 volt 15 amp
circuit receptacle.
• Set ON/OFF switch to ON: Press down the switch located on the rear of the heater
to the ON position (I).This provides electricity to the unit.
• Set POWER to ON: Press the POWER button on the LCD panel to turn on the unit.
The Actual Temperature will be displayed. NOTE:The heating function will still not be
active.You must press the HEATER on/off button (see below) to activate the heating
function.
• Heater ON/OFF: Press the HEATER button to turn on or off the heating function of
the heater.The fan will not operate until the heating element has reached a
temperature high enough to begin the warming process.
• When you press the HEATER button, if the actual room temperature is higher than
the default setting temperature of ”70F”, the heater will not start heating .Adjust the
desired temperature up to a number (> 2 degrees F) higher than the actual room
temperature.
• Temperature setting: Press the TEMP UP
or TEMP DOWN button to set the
desired temperature. The temperature
range is 60-90 degrees F.
• Fan adjust: Pressing FAN button turns fan
from HIGH to LOW. Pressing again turns
fan from LOW to HIGH.
• Turn off the heater: Press the POWER
button to turn off all functions.The fan
will continue to run until all of the heat
has been expelled and will then turn off.
The COOLING DOWN indicator will
show on the LCD display to indicate that
the heater is cooling down.
• Change the temperature display from
Fahrenheit to Celsius: Press the
temperature UP and DOWN buttons at
the same time and the display will change
from ºF to ºC.
8
CLEANING THE AIR FILTER
The lifetime washable air filter needs to be cleaned on a regular basis to ensure maximum
performance of the heater.To clean the air filter, follow these simple steps:
1. Remove the filter by unscrewing screw
AIR FILTER
SCREW
and opening the filter cover on the back
COVER
of the heater and carefully pulling the
filter out.
2. Clean the filter by vacuuming it with an
attachment, or run warm water over it
to remove dust. Run the water in the
opposite direction of the air flow until
the water runs clear.
3. The filter might excrete some filtered
residue, so be cautious not to drip on
any stainable surfaces such as carpeting.
You can also soak the filter in water
mixed with a small amount of mild dish
soap (don't forget to rinse with water
after soaking the filter).
4. Clean the air filter every 30 days in
order to maintain performance.
CAUTION: Disconnect power cord before servicing.
• Ensure that the heater is turned off (the switch on the back of the unit should be
in the off position). Unplug the power cord from the wall outlet before cleaning.
• Carefully wipe the exterior of the heater with a soft, damp (not wet) cloth and dry
thoroughly with a soft, dry cloth.
• Over time dust may accumulate on the front vent of the heater.This can be removed
by wiping with a damp cloth, or carefully cleaning using a vacuum cleaner with
brush attachment.
• Do not use harsh or abrasive cleaners to clean your heater, as these will damage
the surface.
• Clean the filter every 30 days or as needed.
• When filter is visibly dirty, simply remove the filter from the unit, and with a hand-held
vacuum, remove the heavy particulate.
Any other service should be performed by a qualified service technician.
9
WARNING TO USER
PERFORMANCE SUGGESTIONS
To assure maximum performance of the heater, please note the following
recommendations:
1. For best results, do not locate the heater in an area with a high rate of air filtration
and movement as the warm air will be exhausted.
2. Try placing the heater near a warmer inside wall and direct the output towards a
cooler outside wall.The cooler outside wall will tend to draw the generated heat
towards itself, which will allow for more efficient heating.
3. Placing the heater next to a cold air return will draw the heat away from area to be
heated.Try closing or covering the cold air return.This will allow for more efficient
heating. Experiment with the placement of the heater to see what works best for you.
4. To ensure maximum efficiency, a 40% (minimum) relative humidity should be
maintained in the heated environment.
5. When the heater is placed in an isolated area, i.e. basement or recreation area, the
delivery registers and air return grills of the existing system should be closed in that
area if possible.
6. Try placing the heater a few feet above the floor in rooms with large areas of bare
concrete. Make sure the heater is secure and won't fall.This will allow for more
efficient heating since concrete acts as a heat sink and will tend to draw the heat in
its direction.
7. Try lowering your central heating system to a lower temperature and placing the
heater in the area you spend the majority of your time. Now set the heater to your
comfort level.This will help reduce your overall energy consumption.
8. When heating larger areas, place the heater in a central location. If a ceiling fan is
nearby, try using it at the same time to help distribute the heat evenly.
9. If used in an extremely dirty or dusty area, the filter must be cleaned more frequently
as the filter can clog and cause the heater to stop working. Please refer to “How to
Clean the Air Filter” in this manual for cleaning instructions.
10. The heater grill is hot when in use.To avoid burns, do not let bare skin touch the hot
surface. Keep combustible materials, such as furniture, pillows, bedding, papers, clothes,
and curtains at least three feet from the front of the heater and keep them away from
the sides and rear.
11. CAUTION: Extreme caution is necessary when any heater is used by or near
children or invalids and whenever the heater is left operating and unattended.
12. To disconnect heater, turn controls to off, then remove plug from outlet.
Always unplug heater when not in use.
10
TROUBLESHOOTING
QUESTION
ANSWER
Why does the blower fan not work
after I have turned on the heater
power button?
The blower fan will not work until
the heating element is hot enough to
heat the air passing by. It will normally
turn on after about 10 seconds.
Why does the blower fan keep
running after I have turned off the
power button?
The blower fan will continue to run
until the proprietary heat chambers
have cooled down.After a few minutes
the fan will shut off automatically.
Why has the heater airflow seem to
have diminished?
Make sure the rear intake is not
blocked and that the filter is clean.
Follow the filter maintenance
procedure to clean the filter.
The heater has shut itself off and a red
LED light is illuminated on the front of
the heater.What does this mean?
The heater has gone into Auto
Recovery mode.This occurs when the
internal temperature of the heater
exceeds a pre-defined limit. Simply wait
a few minutes for the internal
components to cool down, and restart
the heater. Check to make sure no
other appliances are operating on the
circuit used to run the heater, as this
could also cause overheating. Be sure
to clean the air filter on the back of the
heater, as this could cause the unit to
overheat.
Once I initially plug the unit in and turn
it on, how long will it take to heat
my room?
Generally, it takes less than an hour.
Please remember that with any type
of heating process there are many
variables: size of the room, how well
the room is insulated, how many
doors/windows, how much bare
concrete (which acts as a heat sink
with any type of heating), the opening
and closing of an exterior door, and
the outside temperature etc.
11
TROUBLESHOOTING
QUESTION
ANSWER
Can I use the heater to heat multiple
rooms at the same time?
Yes. Keep in mind the heating will vary
based on how open your floor plan is
and the sizes of the rooms involved.
In some cases, running a ceiling fan will
help in heating multiple rooms
simultaneously by placing the unit in
a central room.
My home is not insulated very well,
will this heater help me?
Yes, but it will take a little longer to
heat the room initially and the outside
temperature will also have an impact
on heating time. Once the room has
reached the desired temperature it
will cycle on and off accordingly.
Can the heater be used in a bathroom?
It is not recommended due to the
high level of moisture in a bathroom.
Will I be able to use the heater in a
basement or garage?
Yes, but keep in mind that rooms with
little insulation will not retain the heat
as efficiently. Bare concrete floors
which act as a heat sink with any type
of heating will absorb some of the heat.
Placing the heater a few feet above the
floor will allow for more efficient
heating.
Can I use more than one heater
at a time?
Yes, but you should make sure they are
not on the same circuit. Each heater
and appliance should be on its
own circuit.
Can I use the heater on a
job/construction site?
The heater was not designed to be
used in a high dust construction
environment. Using the heater for
this purpose will void your warranty.
12
TROUBLESHOOTING
QUESTION
ANSWER
Can I move the heater around while
it is operating?
It is not recommended to move any
portable heater while it is operating.
We recommend moving the heater
only once the fan has completely
turned off.
What is zone heating?
Zone heating is about focusing heat
where people spend the most time.
After all, there is no point to heating
multiple rooms to 68+ degrees
when not in use.
Can I use the heater and another
appliance at the same time?
Yes, as long as they are not on the
same circuit. Zone heaters are
considered to be an appliance.You
should not run more than one large
appliance on a single circuit breaker.
Your freezer, refrigerator, microwave
oven, washing machine, dryer, and other
such appliances should not share a
circuit breaker.
Can I use an extension cord, surge
protector, or power strip with
my heater?
It is not recommended. It is designed
to plug directly into a grounded 120
volt 15 amp circuit receptacle.
However, if you have to use an
extension cord, the cord should be
No. 14 AWG minimum size and rated
not less than 1875 watts.The extension
cord should be a 3 wire cord with a
grounding type cord and plug connector.
I don't have a grounded outlet; can I
use a cord adaptor or remove the
grounding plug?
NO. If you don't have a grounded outlet,
contact a licensed electrician in your
area for advice. Removing or altering any
part of the heater is unsafe and also will
void the warranty.
13
WARRANTY CONTINUED
WARRANTY
Limited Warranty &Limited Lifetime Warranty on PTC Heating Element Only
Best Green Technologies LLC (“BGT”) warrants this RedCore™ portable room heater
to the original retail purchaser (“Purchaser”), for one year from the date of purchase,
against defects in material and workmanship under normal use and service. BGT further
warrants the following components:
PTC ceramic heating element for lifetime of product.
Should your RedCore™ room heater prove defective within one year from the date of
purchase, please follow our return procedure to return the defective unit. Within the first
30 days, BGT is responsible for the freight cost to and from our authorized service center
for all units with a BGT authorized RMA. After 30 days and up to life of warranty, the
customer is responsible for freight costs to and from our authorized service center.
Under no circumstances are products damaged in shipping covered under this warranty.
BGT’s sole obligation under this warranty is to replace, or at BGT’s discretion, to repair,
free of charge, all defective parts according to the timeline described above.
All replacement parts and units will be new, remanufactured, or refurbished.
ANY IMPLIED WARRANTY OF MERCHANTABILITY IS SIMILARLY LIMITED TO
ONE (1) YEAR FROM DATE OF ORIGINAL PURCHASE AND NO ACTION BASED
UPON ANY IMPLIED WARRANTY OF MERCHANTABILITY OR OTHERWISE MAY
BE COMMENCED AFTER EXPIRATION OF ONE (1) YEAR FROM DATE OF
ORIGINAL RETAIL PURCHASE. Some states do not allow limitations on how long an
implied warranty lasts, so the above limitation may not apply to you.
The provisions of this warranty shall not apply to any product which in BGT’s judgment
has been (1) subject to misuse or neglect. (2) damaged in an accident or in shipping,
(3) used for a purpose for which it was not designed, or (4) repaired or altered in any
way that adversely affected its performance or reliability. Do not attempt to “open unit”,
except for filter servicing and/or humidifier tank refilling. Opening unit will void
manufacturer’s warranty.
THIS WARRANTY DOES NOT COVER:
• Damage, accidental or otherwise, to the unit while in the possession of the consumer
not caused by a defect in material or workmanship.
• Damage caused by consumer misuse, tampering, or failure to follow the care
and special handling provisions in the instructions.
• Damage to the finish of the case, or other appearance parts caused by the wear.
• Damage caused by repairs or alterations of the unit by anyone other than those
authorized by Best Green Technologies.
• Subjective claims regarding decibel level of heater fan when product is operating at
normal fan decibel levels.
• Freight and Insurance cost for the warranty service beyond 30 days from date of
purchase up to life of warranty.
14
This warranty covers only new products purchased from our authorized dealers or
retailers. It does not cover used, salvaged, or refurbished products.
To obtain warranty service, the defective product or part must be shipped or delivered
to: Best Green Technologies, the Manufacturer. If warranty applies under BGT’s
approved terms, all shipping charges and insurance are covered by purchaser.
BEST GREEN TECHNOLOGIES LLC NEITHER ASSUMES NOR AUTHORIZES ANY
PERSON TO ASSUME FOR IT ANY OTHER LIABILITY IN CONNECTION WITH ITS
PRODUCTS.THERE ARE NO WARRANTIES WHICH EXTEND BEYOND THE
DESCRIPTION ON THE FACE HEREOF. NO RESPONSIBILITY IS ASSUMED FOR
INCIDENTAL OR CONSEQUENTIAL DAMAGES THAT MAY RESULT FROM THE
USE OF A BGT PRODUCT, NOR FOR THE DAMAGES DUE TO ACCIDENT, ABUSE,
LACK OF RESPONSIBLE CARE,THE AFFIXING OF ANY UNAUTHORIZED
ATTACHMENT, LOSS OF PARTS, OR USE AT A VOLTAGE OTHER THAN SPECIFIED.
Some states do not allow the exclusion of limitation of incidental or consequential
damages, so these limitations may not apply to you. BGT disclaims all liabilities for defects
or damages caused by use of replacement parts obtained from or by service at any
service center other than Best Green Technologies.
This warranty gives you specific legal rights, and you may also have other rights which
vary from state to state.
QUESTIONS? Call 1- 888- 424-8432 or visit www.redcoreheaters.com
Dear Customer: Please keep this warranty for your record. DO NOT return it.
15
INTRODUCCIÓN
INSTRUCCIONES DE SEGURIDAD
Gracias por escoger el calefactor infrarrojo para interior RedCore™ Concept R1.
En Best Green Technologies, nuestra misión consiste en mejorar su comodidad con
productos de calefaccionamiento seguros y terapéuticos. El RedCore™ Concept R1
es un calefactor de ambientes de última tecnología que produce calor infrarrojo
que lo mantendrá cómodo y lo ayudará a reducir los gastos de energía.
Consulte nuestro sitio para obtener más información acerca de todos los
productos RedCore™.
Best Green Technologies, LLC
Correo electrónico: [email protected]
www.redcoreheaters.com
888-4 BGT HEAT (888-424-8432)
ATENCIÓN AL CLIENTE
NO DEVUELVA ESTE PRODUCTO A LA TIENDA
EN LA CUAL LO ADQUIRIÓ.
PARA RECIBIR ATENCIÓN INMEDIATA AL CLIENTE,
COMUNÍQUESE AL:
888-4BGT HEAT
(888-424-8432)
UN REPRESENTANTE DE ATENCIÓN AL CLIENTE LO
AYUDARÁ CON TODAS LAS PREGUNTAS QUE TENGA
ACERCA DE SU CALEFACTOR INFRARROJO CONCEPT R1.
2
ADVERTENCIA: Siempre que se utilicen equipos eléctricos, deben
tomarse precauciones básicas para reducir el riesgo de incendio, choque
eléctrico y lesiones físicas.
ADVERTENCIA: Riesgo de choque eléctrico. Salvo por el filtro de aire,
este equipo no tiene en su interior piezas que el usuario pueda reparar.
ADVERTENCIA: Este producto debe ser conectado en un circuito
eléctrico independiente. No comparta el circuito con otros artefactos eléctricos.
When using electrical appliances, basic safety precautions should always
be followed, including the following:
1. Lea todas las instrucciones antes de utilizar este aparato.
2. Durante el uso, el calefactor se calienta. Para evitar quemaduras, no coloque
objetos, como muebles, papeles, vestimenta y cortinas a una distancia inferior a
3 pies (0,9 m) del frente del calefactor y manténgalos alejados de los costados y
la parte posterior cuando el calefactor esté enchufado.
3. Debe tener mucho cuidado al utilizar cualquier artefacto cerca de niños, personas
mayores o discapacitadas, o cuando el calefactor esté en funcionamiento sin
supervisión. No debe permitir que los niños menores de 14 años utilicen este
calefactor. Este producto es únicamente para ser utilizado por adultos y los niños
deben ser supervisados cuando lo utilicen.
4. Desenchufe siempre el calefactor cuando no lo utilice.
5. No ponga en funcionamiento el calefactor si el cable o el enchufe están dañados,
si el calefactor ha estado funcionando mal o si se ha caído o roto de cualquier
otra manera. Deseche el calefactor o llévelo a un centro autorizado de servicio
técnico para que lo revisen o lo reparen.
6. No lo utilice al aire libre.
7. Este calefactor no fue diseñado para su uso en baños, lavaderos ni ambientes con
características similares. Nunca coloque el calefactor en un lugar desde el que
pueda caer dentro de una bañera o cualquier otro recipiente con agua.
8. No realice el tendido del cable por debajo de alfombras. No cubra el cable con
alfombrillas, tapetes o materiales similares. No realice el tendido del cable por
debajo de muebles ni electrodomésticos. Coloque el cable alejado de áreas de
alto tránsito, donde nadie se tropiece con él.
9. Para desconectar este artefacto, coloque los controles en la posición de apagado,
espere a que el calefactor se enfríe y se apague, y retire el enchufe del tomacorriente.
10. Conéctelo solamente a tomacorrientes con la conexión polarizada adecuada.
11. No introduzca ni permita la entrada de objetos extraños en las aberturas de
ventilación, ya que podría ocasionar un choque eléctrico, un incendio o la rotura
del equipo.
12. Para evitar un posible incendio, no obstruya la entrada ni la salida de aire de ninguna
manera. No lo coloque sobre superficies blandas, como camas, ya que las aberturas
podrían quedar obstruidas.
13. El calefactor tiene piezas calientes y piezas que provocan chispas en el interior. No
lo utilice en zonas en las que se emplee o guarde gasolina, pintura o líquidos inflamables.
3
INSTRUCCIONES DE SEGURIDAD
14. Utilice este artefacto exclusivamente según se describe en este manual. Cualquier
otro uso no recomendado por el fabricante puede provocar incendios, choques
eléctricos o lesiones.
15. Conecte los calefactores siempre directamente a un tomacorriente. No utilice alargadores.
16. Para evitar la sobrecarga o la quemadura de fusibles, asegúrese de que no se conecte
ningún otro equipo eléctrico en el mismo tomacorriente del mismo circuito.
17. Es habitual que el cable y el enchufe de un calefactor se sientan calientes al tacto. Si un
cable o un enchufe se vuelven calientes al tacto o se deforman, puede deberse al
desgaste del tomacorriente. Los tomacorrientes desgastados se deben reemplazar antes
de continuar utilizando el calefactor. Si enchufa este calefactor en un tomacorriente
desgastado puede sobrecalentarse el cable de alimentación o provocarse un incendio.
18. Asegúrese de que el enchufe esté totalmente insertado en un tomacorriente adecuado.
Recuerde que los tomacorrientes también se deterioran debido al paso del tiempo y el
uso continuo: revise periódicamente el tomacorriente y el cable para ver si hay señales
de recalentamiento o deformidades en el tomacorriente. Si hay algún tipo de
sobrecalentamiento o deformación, deje de usar inmediatamente este tomacorriente
y comuníquese con un electricista calificado.
19. Este artefacto está equipado con un enchufe polarizado: una espiga es más ancha que
la otra. Este enchufe se puede conectar a un tomacorriente polarizado únicamente en
un sentido. Si no puede conectar este calefactor en un tomacorriente, dé vuelta el
enchufe. Si aun así no puede enchufarlo, comuníquese con un electricista calificado para
que instale un tomacorriente polarizado. No cambie el enchufe.
20. No cubra el artefacto mientras esté funcionando a fin de evitar el sobrecalentamiento
y el riesgo de incendios.
21. No coloque el calefactor cerca de una cama porque los objetos como las almohadas
o las sábanas pueden caerse de la cama y encenderse con el calefactor.
22. Compruebe las conexiones del enchufe y el cable del calefactor.
a) Las conexiones del tomacorriente o los enchufes con fallas pueden provocar
sobrecalentamiento.Asegúrese de que el enchufe encaje perfectamente en el
tomacorriente.
b) Los calefactores necesitan más corriente que los artefactos pequeños.
El tomacorriente puede sobrecalentarse, incluso si esto no ha ocurrido antes
con el uso de otros artefactos.
c) Durante el uso, compruebe el estado con frecuencia para determinar si el enchufe
o el tomacorriente está CALIENTE.
d) Si es así, deje de usar el calefactor y solicite a un electricista calificado que
compruebe o reemplace los tomacorrientes con fallas.
23. No coloque este equipo contra paredes o detrás de muebles o cortinas.
24. CONSERVE EL EMPAQUE. Lo necesitará si debe devolver el calefactor, para almacenarlo
cuando no lo esté utilizando y para transportarlo.
25. Este artefacto es para USO DOMICILIARIO EXCLUSIVAMENTE.
ESPECIFICACIONES
Voltaje
120V CA 60Hz
Potencia de calefacción
1500 Watts
Rango de control de temperatura
60〜 90℉
Elemento calefactor
Calefactor infrarrojo PTC
Cobertura
Hasta 1000 pies cuadrados
Dimensiones
10,75 x 11 x 10,5 pulg (An. X Prof. x Al.)
Peso
8,75 libras
Operación con los botones táctiles y pantalla LCD
Interruptor de seguridad en caso de vuelco; apaga el calefactor si se cae.
PIEZAS Y FUNCIONES
CALEFACTOR
Pantalla LCD
Luz indicadora
de sobrecalentamiento
Manijas para
transportar
Interruptor de
encendido ubicado
en la parte posterior
de la unidad
Salida de aire caliente
CONSERVE ESTAS INSTRUCCIONES.
4
5
PIEZAS Y FUNCIONES
PIEZAS Y FUNCIONES
PANTALLA LCD Y BOTONES DE CONTROL
FUNCIONES DEL CONTROL REMOTO
D
E
Botón del
calefactor
POWER
HEATER
Botón de
encendido
H
F
Botón de
velocidad alta
G
K
CONCEPT R-1
OVERHEAT
I
Botón de ascenso
de la temperatura
LOW
FAN
HIGH
FAN
UP
DOWN
Botón de
velocidad baja
Botón de descenso
de la temperatura
TEMP
A
B
C
FUNCIONES DE LA PANTALLA LCD
Botón de encendido (A):
Encienda o apague el equipo
Botón de encendido del calefactor (B):
Encienda o apague la función de calentamiento
del calefactor
Botón de ajuste del ventilador (C):
Ajuste el ventilador para que funcione en
el modo Alto o Bajo
Botón de Ascenso o descenso
de la temperatura (D/E):
Ajuste la temperatura deseada entre 60 y
90 ºF. (Nota: la pantalla LCD mostrará la
temperatura real y la deseada).
INDICADORES DE LA PANTALLA LCD
Temperatura deseada (H)
Temperatura real (F)
Nivel de ajuste del ventilador (G)(K);
Luz indicadora de sobrecalentamiento (I)
6
Presione el botón HEATER para
encender o apagar la función de
calefacción.
Presione el botón POWER del
calefactor para encender la unidad.
Oprima el botón de VELOCIDAD
BAJA para que el ventilador funcione
a BAJA velocidad. Si oprime el botón
de VELOCIDAD BAJA nuevamente,
el ventilador emitirá un sonido, pero
continuará funcionando a
BAJA VELOCIDAD.
Oprima el botón de VELOCIDAD ALTA
para que el ventilador funcione a ALTA
velocidad. Si oprime el botón de
VELOCIDAD ALTA nuevamente, el
ventilador emitirá un sonido, pero
continuará funcionando a
ALTA VELOCIDAD.
Presione el botón TEMP UP para
elevar la temperatura.
Presione el botón TEMP DOWN para
bajar la temperatura.
7
LIMPIEZA DEL FILTRO DE AIRE
CÓMO HACER FUNCIONAR EL CALEFACTOR
NOTA: es posible que el calefactor emita un humo tenue e inocuo la primera vez que lo
utilice. Este humo es normal y se produce al calentar por primera vez el elemento infrarrojo.
Ocurrirá brevemente y no es nocivo.
• Desempaque el calefactor: corte la zona de la cinta y abra las solapas. Retire el empaque
de espuma de poliestireno y retire el calefactor de la caja. Le recomendamos que conserve
el empaque para almacenar el calefactor cuando no lo utilice y para transportarlo.
• Posición: encuentre una ubicación nivelada y sin obstrucciones para colocar el calefactor.
• Conéctelo: conecte el cable de alimentación directamente en un tomacorriente de
120 voltios y 15 amperios, con conexión a tierra y que no sea utilizado por otro artefacto.
• Coloque el interruptor de encendido en la posición de encendido: presione el interruptor
ubicado en la parte posterior del calefactor para colocarlo en la posición de encendido
(I). De esta manera, la unidad recibirá electricidad.
• Encienda el equipo: presione el botón POWER del panel LCD para encender la unidad.
Se mostrará la temperatura real. NOTA: la función de calefacción aún no estará activa.
Debe presionar el botón de encendido del calefactor (ver abajo) para activar la función
de calefaccionamiento.
• Encendido del calefactor: presione el botón HEATER para encender o apagar la función
de calefacción. El ventilador no funcionará hasta que el elemento calefactor haya
alcanzado una temperatura lo suficientemente elevada como para comenzar el proceso
de calentamiento.
• Al presionar el botón HEATER, si la temperatura real del ambiente es superior al ajuste
de temperatura predeterminado de 70 ºF, el calefactor no comenzará a calentar.Ajuste
la temperatura deseada hasta un número (> 2 ºF) superior a la de la temperatura real
del ambiente.
• Ajuste de la temperatura: presione el
botón TEMP UP o TEMP DOWN para
ajustar la temperatura deseada. El rango
de temperatura es de 60 a 90 ºF.
• Ajuste del ventilador: al presionar el
botón FAN, el ventilador pasa de nivel
Alto al Bajo. Si presiona el botón
nuevamente, el ventilador pasará del
nivel Bajo al Alto.
• Apague el calefactor: presione el botón
POWER para apagar todas las funciones. El ventilador continuará funcionando hasta
que se expulse todo el calor.A continuación, se apagará. En la pantalla LCD aparecerá
el indicador de enfriamiento para indicar que el calefactor se está enfriando.
• Cambie la temperatura de Fahrenheit a Celsius: presione los botones de temperatura
UP y DOWN al mismo tiempo para cambiar la unidad de temperatura de ºF a ºC.
El filtro de aire lavable se debe limpiar de manera regular para garantizar el máximo
rendimiento del calefactor. Para limpiar el filtro de aire, siga estos pasos sencillos:
1. Quite el filtro destornillando el tornillo
CUBIERTA DEL
TORNILLO
y abriendo la tapa del filtro ubicada en
FILTRO DE AIRE
la parte posterior del calefactor. Con
cuidado, retire el filtro.
2. Limpie el filtro aspirándolo o con agua
tibia para retirar el polvo. Haga pasar
el agua en la dirección opuesta al flujo
de aire hasta que el agua salga limpia.
3. El filtro puede despedir algunos residuos
filtrados; por lo tanto, tenga cuidado de
que no caigan gotas sobre superficies
que se puedan manchar, como alfombras.
También puede empapar el filtro en agua
con una pequeña cantidad de detergente
suave para platos (no olvide enjuagar el
filtro con agua después de lavarlo).
4. Limpie el filtro de aire cada 30 días a fin
de mantener el rendimiento.
PRECAUCIÓN: Desconecte el cable de alimentación antes de brindar
servicio al equipo.
•
•
•
•
•
•
Asegúrese de que el calefactor esté apagado (el interruptor ubicado en la parte
posterior de la unidad debe estar en la posición de apagado). Desconecte el cable de
alimentación del tomacorriente antes de proceder a la limpieza.
Repase cuidadosamente el exterior del calefactor con un paño suave y apenas
humedecido. Luego, seque cuidadosamente con un paño suave y seco.
Con el paso del tiempo, es posible que se acumule polvo en la abertura de ventilación
del frente del calefactor. Puede quitar el polvo repasando la ventilación con un paño
apenas húmedo o limpiarlo con una aspiradora con un accesorio en forma de cepillo.
No utilice limpiadores abrasivos ni fuertes para limpiar el calefactor, ya que podría
dañar la superficie.
Limpie el filtro cada 30 días o con la frecuencia necesaria.
Cuando el filtro esté visiblemente sucio, simplemente quite el filtro de la unidad y,
con una aspiradora de mano, quite las partículas pesadas.
Cualquier otro servicio debe ser realizado por un técnico calificado.
8
9
ADVERTENCIAS PARA EL USUARIO
SUGERENCIAS PARA EL DESEMPEÑO
Para garantizar el máximo desempeño del calefactor, tenga en cuenta las
siguientes recomendaciones:
1. Para obtener mejores resultados, no coloque el calefactor en un área con una tasa
elevada de movimiento y filtración de aire porque el aire caliente será expulsado.
2. Intente colocar el calefactor cerca de una pared interna más cálida y dirija la salida
hacia una pared externa más fría. La pared externa más fría tenderá a atraer el calor
generado hacia ella y esto permitirá un calentamiento más eficiente.
3. Si coloca el calefactor cerca de un retorno de aire frío, el calor se extraerá del área
que se desea calefaccionar. Intente cerrar o cubrir el retorno de aire frío. Esto permitirá
un calefaccionamiento más eficiente. Coloque el calefactor en distintos lugares para
ver cuál es el más conveniente.
4. Para garantizar la máxima eficiencia, se debe mantener una humedad relativa del 40%
(como mínimo) en el ambiente que desea calefaccionar.
5. Cuando coloque el calefactor en un área aislada, como un sótano o una zona de
recreación, los medidores y las rejillas de retorno del aire del sistema existente deben
estar cerrados en ese lugar, siempre que sea posible.
6. Pruebe colocar el calefactor unos cuantos pies por encima del piso en los ambientes
con grandes áreas de concreto sin alfombrar.Asegúrese de que el calefactor esté firme
y no se caiga. De esta manera logrará un calefaccionamiento más eficiente porque el
concreto actúa como un disipador de calor y tenderá a atraer al calor hacia sí.
7. Intente bajar el sistema de calefaccionamiento central a una temperatura más baja y
colocar el calefactor en la zona en la cual pasa la mayor parte del tiempo. Ahora, ajuste
el calefactor en el nivel deseado. De esta manera, ayudará a reducir su consumo total
de energía.
8. Al calefaccionar grandes áreas, coloque el calefactor en una ubicación central. Si hay
un ventilador de techo cerca, intente utilizarlo al mismo tiempo para ayudar a distribuir
el calor de manera uniforme.
9. Si se lo utiliza en una zona con mucho polvo o suciedad, se debe limpiar el filtro con
mayor frecuencia porque el filtro se puede tapar y puede hacer que el calefactor deje
de funcionar. Consulte la sección “Cómo limpiar el filtro de aire” en este manual para
conocer las instrucciones de limpieza.
10. La rejilla del calefactor se calienta durante su uso. Para evitar quemaduras, no permita
que la piel descubierta entre en contacto con superficies calientes. Mantenga los
materiales combustibles, como muebles, almohadas, ropa de cama, papeles, prendas
de vestir y cortinas al menos a 3 pies de distancia de las partes delantera, posterior
y laterales de la unidad.
11. PRECAUCIÓN Se debe actuar con máxima prudencia si el calefactor es utilizado por
niños o personas inválidas, o cerca de ellos, y cada vez que se deje el equipo en
funcionamiento y sin supervisión.
12. Para desconectar el calefactor, apague los controles y quite el enchufe del tomacorriente.
Desenchufe siempre el calefactor cuando no lo utilice.
10
RESOLUCIÓN DE PROBLEMAS
PREGUNTA
RESPUESTA
¿Por qué no funciona el
ventilador después de haber
colocado el botón de encendido
del calefactor en la
posición de encendido?
El ventilador no funcionará hasta que el
elemento calefactor no esté lo suficientemente
caliente como para calentar el aire que pasa.
En general, se encenderá después de
aproximadamente 10 segundos.
¿Por qué continúa funcionando
el ventilador después de haber
colocado el botón de encendido
del calefactor en la posición de
apagado?
El ventilador continuará en funcionamiento
hasta que las cámaras de calentamiento se
hayan enfriado. Después de unos cuantos
minutos, el ventilador se apagará
automáticamente.
¿Por qué el flujo de aire parece
ser menor?
Asegúrese de que la entrada posterior no
esté bloqueada y que el filtro esté limpio.
Realice el procedimiento de mantenimiento
del filtro para limpiar el filtro.
El calefactor se ha apagado y
el LED rojo se enciende en la
parte delantera del calefactor.
¿Qué significa esto?
El calentador ha pasado al modo de
Autorrecuperación. Esto ocurre cuando la
temperatura interna del calefactor supera un
límite predefinido. Simplemente espere unos
cuantos minutos a que los componentes internos
se enfríen y vuelva a encender el calefactor.
Asegúrese de que no haya otros artefactos en
funcionamiento en el circuito que se utiliza para
el calefactor porque esto podría provocar un
sobrecalentamiento.Asegúrese de limpiar el
filtro de aire ubicado en la parte posterior del
calefactor, ya que esto podría provocar el
sobrecalentamiento de la unidad.
Una vez que enchufe por
primera vez la unidad, ¿cuánto
tiempo tardará en calefaccionarse
el ambiente?
En general, lleva menos de una hora. Recuerde
que con cualquier tipo de proceso de
calefaccionamiento, existen muchas variables:
dimensiones del ambiente, calidad de aislamiento
del ambiente, cuántas puertas o ventanas hay,
cuánto concreto sin alfombrar hay (que actúa
como disipador de calor con cualquier tipo de
calefaccionamiento), la abertura y el cierre de
puertas externas, la temperatura exterior, etc.
11
RESOLUCIÓN DE PROBLEMAS
PREGUNTA
¿Puedo usar el calefactor
para calefaccionar varios
ambientes al mismo tiempo?
Mi vivienda no está muy bien
aislada, ¿este calefactor
me ayudará?
RESPUESTA
Sí. Recuerde que el calefaccionamiento
dependerá de las aberturas de la planta
y de las dimensiones de los ambientes
que desee calefaccionar. En algunos casos,
el funcionamiento de un ventilador de
techo ayuda a calefaccionar varias
habitaciones de manera simultánea, si se
coloca el equipo en un ambiente central.
Sí, pero le llevará más tiempo calefaccionar
el ambiente por primera vez y la temperatura
exterior también tendrá un efecto sobre
el tiempo de calefaccionamiento. Una vez
que el ambiente haya alcanzado la
temperatura deseada, se encenderá y
apagará según sea necesario.
¿Puedo usar el calefactor
en un baño?
No se recomienda debido al alto nivel de
humedad que hay en los baños.
¿Podré usar el calefactor en
un sótano o un garaje?
Sí, pero recuerde que los ambientes con poco
aislamiento no conservan el calor con tanta
eficiencia. Los pisos de concreto sin alfombrar
actúan como disipadores de calor de cualquier
tipo de calefaccionamiento y absorben parte
del calor. Si coloca el calefactor unos cuantos
pies por encima del nivel del piso, el
calefaccionamiento será más eficiente.
¿Puedo usar más de un
calefactor al mismo tiempo?
¿Puedo usar el calefactor
en un lugar en construcción?
RESOLUCIÓN DE PROBLEMAS
PREGUNTA
¿Puedo mover el calefactor
mientras está en funcionamiento?
No se recomienda trasladar los calefactores
portátiles mientras están en funcionamiento.
Le recomendamos mover el calefactor
únicamente una vez que se haya apagado
totalmente el ventilador.
¿Qué es el calefaccionamiento
por zonas?
El calentamiento por zonas consiste en
concentrar el calor en los lugares en los
que la gente pasa la mayor parte del tiempo.
Después de todo, no tiene sentido
calefaccionar varias habitaciones a más de
68 ºF si no se las está utilizando.
¿Puedo usar el calefactor y
otro artefacto al mismo tiempo?
Sí, siempre y cuando no estén conectados
en el mismo circuito. Los calefactores por
zonas se consideran un artefacto. No debe
hacer funcionar más de un artefacto grande
en un mismo interruptor de circuito. El
freezer, el refrigerador, el horno microondas,
la lavadora, la secadora y otros artefactos
similares no deben compartir un mismo
interruptor de circuito.
¿Puedo usar un cable alargador,
un protector contra sobretensión
o un múltiple eléctrico con mi
calefactor?
No es conveniente. Esta unidad ha sido diseñada
para ser conectada directamente en un
tomacorriente de 120 voltios y 15 amperios,
con conexión a tierra. Sin embargo, si debe
utilizar un alargue, el cable debe ser, como
mínimo, de calibre 14 AWG y con una
clasificación de potencia superior a 1875 watts.
El alargador debe ser un cable de 3 alambres,
con conexión a tierra y un enchufe
No cuento con un tomacorriente
con conexión a tierra; ¿puedo usar
un adaptador o quitar el enchufe
con descarga a tierra?
NO. Si no tiene un tomacorriente con
conexión a tierra, comuníquese con un
electricista licenciado de la zona para que le
brinde asistencia. Quitar o alterar las piezas
del calefactor puede resultar inseguro y,
además, anula la garantía.
Sí, pero debe asegurarse de que no estén
conectados en el mismo circuito. Cada
calefactor y artefacto debe estar en su
propio circuito.
El calefactor no fue diseñado para que lo
utilice en un ambiente en construcción con
mucho polvo. El uso del calefactor con este
fin anulará su garantía.
12
RESPUESTA
13
GARANTÍA (CONTINUACIÓN)
GARANTÍA
Garantía limitada y Garantía limitada de por vida únicamente para el elemento
calefactor PTC
Best Green Technologies LLC ("BGT") garantiza el calefactor portátil de ambientes
RedCore™ al comprador minorista original ("Comprador"), por el plazo de un año a
partir de la fecha de compra, contra defectos en los materiales y la mano de obra, siempre
y cuando se respeten las condiciones de uso y servicio normales.Además, BGT garantiza
los siguientes componentes:
- Elemento calefactor cerámico PTC durante la vida útil del producto.
Si el calefactor de ambientes RedCore™ presenta un desperfecto dentro del plazo de un
año a partir de la fecha de compra, siga nuestro procedimiento de devolución para devolver
la unidad defectuosa. Dentro de los primeros 30 días, BGT será responsable de los costos
de flete hacia y desde los centros de servicio autorizados, para todas las unidades que
cuenten con una autorización de devolución (RMA). Después de 30 días y durante el plazo
de la garantía, el cliente es responsable de los costos del flete hacia y desde nuestros centros
de servicio autorizados.
En ninguna circunstancia, los productos que resulten dañados durante el envío serán
cubiertos por esta garantía.
La única obligación de BGT, en conformidad con esta garantía, consiste en reemplazar o,
a discreción de BGT, reparar sin cargo todas las piezas defectuosas, en conformidad con
el plazo anterior.Todas las piezas y las unidades de repuesto serán nuevas, reparadas o
reacondicionadas. CUALQUIER GARANTÍA IMPLÍCITA DE COMERCIABILIDAD SE
LIMITA, DEL MISMO MODO,A UN (1) AÑO A PARTIR DE LA FECHA DE COMPRA
ORIGINAL Y NO SE PODRÁN INICIAR ACCIONES LEGALES SOBRE LA BASE DE
UNA GARANTÍA IMPLÍCITA DE COMERCIABILIDAD NI SOBRE OTRAS BASES, UNA
VEZ FINALIZADO EL PLAZO DE UN (1) AÑO DE LA FECHA DE COMPRA
ORIGINAL. En algunos estados, no se permiten limitaciones sobre la cantidad de tiempo
que dura una garantía implícita; por lo tanto, es posible que la limitación anterior no se
aplique en su caso.
Las disposiciones de esta garantía no se aplicarán a productos que, a juicio de BGT: (1)
hayan estado sometidos a uso indebido o negligencia, (2) se hayan dañados por un
accidente o durante el envío, (3) hayan sido utilizados para un fin para el cual no han sido
diseñados, o (4) hayan sido reparados o alterados de alguna manera que afecte de forma
adversa su confiabilidad o rendimiento. No intente “abrir la unidad”, excepto para limpiar
el filtro o recargar el tanque humidificador. Si abre la unidad, la garantía del fabricante
quedará anulada.
ESTA GARANTÍA NO CUBRE LO SIGUIENTE:
• Daños, accidentales o de otro tipo, mientras la unidad se encuentra en manos del
consumidor, y que no sean a causa de defectos de los materiales o la mano de obra.
• Daños provocados por el uso indebido, la modificación o el incumplimiento de las
disposiciones de cuidado y manipulación especiales que se incluyen en estas
instrucciones.
• Daños al acabado de la carcasa u otras piezas estéticas debido al desgaste.
• Daños provocados por reparaciones o alteraciones de la unidad realizadas por
personas no autorizadas por Best Green Technologies.
• Reclamos subjetivos respecto del nivel de ruido del ventilador del calefactor cuando
el producto funciona con niveles de ruido normales.
• Los costos de flete y seguro para el servicio de garantía, una vez transcurridos 30 días
de la fecha de compra y hasta la finalización del período de garantía.
Esta garantía cubre únicamente los productos nuevos que adquirió a minoristas o
distribuidores autorizados. No cubre productos usados, rescatados o reacondicionados.
Para obtener servicio bajo la garantía, debe enviar o entregar el producto o la pieza
defectuosos a: Best Green Technologies, el Fabricante. Si se aplica la garantía en
conformidad con los términos aprobados por BGT, todos los costos de seguro y envío
quedarán a cargo del comprador.
BEST GREEN TECHNOLOGIES LLC NO ASUME, NI AUTORIZA A NINGUNA
PERSONA A ASUMIR EN SU NOMBRE, OTRA RESPONSABILIDAD EN RELACIÓN
CON SUS PRODUCTOS. NO EXISTEN GARANTÍAS QUE SE EXTIENDAN
MÁS ALLÁ DE LA DESCRIPCIÓN QUE SE INCLUYE EN EL PRESENTE DOCUMENTO.
NO SE ASUME NINGÚN TIPO DE RESPONSABILIDAD POR DAÑOS FORTUITOS O
DIRECTOS QUE PUEDAN SURGIR POR EL USO DE UN PRODUCTO DE BGT, NI
POR DAÑOS DEBIDOS A ACCIDENTES, MAL USO, FALTA DE CUIDADO
RESPONSABLE, LA CONEXIÓN DE ACCESORIOS NO AUTORIZADOS, LA PÉRDIDA
DE PIEZAS O EL USO CON UN VOLTAJE DIFERENTE DEL QUE SE ESPECIFICA.
En algunos estados, no se permite la limitación de daños fortuitos o directos; por lo tanto,
es posible que estas limitaciones no se apliquen en su caso. BGT deslinda toda su
responsabilidad por defectos o daños causados por el reemplazo de piezas o las
reparaciones que se realicen en un centro de servicio ajeno a Best Green Technologies.
Esta garantía le otorga derechos legales específicos y es posible que usted también
tenga otros derechos, que varían de un estado a otro.
¿TIENE ALGUNA PREGUNTA? Comuníquese al 1-888-424-8432
o visite www.recoreheaters.com
Estimado cliente: Conserve esta garantía para sus registros. {} NO la devuelva.
14
15