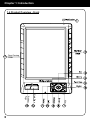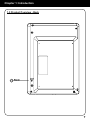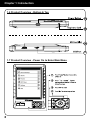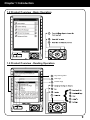
1
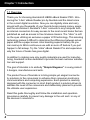
eBook Reader PRO
Instructional Manual
mnl M10138 / M10119
AEBK01F /
AEBK01WF
Copyright © 2009 Aluratek, Inc. All Rights Reserved.
aluratek.com
Table of Contents
Chapter 1: Introduction
1.1 Overview
1.2 Features
1.3 Package Contents
1.4 Product Overview - Front
1.5 Product Overview - Back
1.6 Product Overview - Bottom & Top
1.7 Product Overview - Power On to Enter Main Menu
1.8 Product Overview - Basic Operation
1.9 Product Overview - Reading Operation
04
05
05
05
06
07
08
08
09
09
Chapter 2: Operating Instructions
2.1 Charging the Battery
2.2 Inserting a Memory Card
2.3 Power On
2.4 To read an eBook on the included memory card
2.5 Finding and downloading free eBooks online
2.6 To copy an eBook to the “Libre”
10
10
10
10
11
11
12
Chapter 3: Recent Readings
3.1 Recent Readings
14
14
Chapter 4: eBooks
4.1 To Read an eBook
4.2 To Go to a Particular Bookmark
4.3 To Bookmark a Page
4.4 To Remove Bookmark
4.5 To Search a Particular Keyword Within a Document
4.6 To Jump to a Certain Page
4.7 To Change a Font Size
4.8 To Setup Auto Turn Page
4.9 To Rotate
4.10 To Set the Codepage
4.11 To Set the Alignment
4.12 To Start / Stop Background Music
15
15
15
15
15
15
16
16
16
16
16
17
17
Chapter 5: Pictures
5.1 To Display Picture
5.2 To Rotate a Picture
5.3 To Zoom In / Out
5.4 To View the Picture in Full Screen
5.5 To Reset the Picture to the Original Size
18
18
18
18
18
18
5.6 To Setup Auto Turn Page (slide show)
5.7 To Start / Stop Background Music
18
18
Chapter 6: MP3 Player
6.1 To Play Music
6.2 To Show Playlist
6.3 To Turn Off LCD
6.4 To Select Play Mode (repeat one, repeat all, random)
6.5 To Start / Stop Background Music
6.6 To Show the Instruction of the Keys for the MP3 Control
19
19
19
19
19
19
19
Chapter 7: Settings
7.1 To Set the Language for the Unit
7.2 To Set Auto Power Off
7.3 To Set Auto Turn Page
7.4 To Set the Volume
7.5 To Set the Font
7.6 To Show the Serial Number of the Device
7.7 To Show the Battery Level
7.8 To Show the Internal Battery Memory Capacity / Usage
7.9 To Show the External SD Card Memory Capacity / Usage
7.10 To Show the Firmware Number of the Device
7.11 To Restore the System to Factory Default
7.12 To Upgrade the Firmware
7.13 Internal File Manager
7.14 SD Card File Manager
7.15 To Setup Background Music for the System
20
20
20
20
20
20
20
20
21
21
21
21
21
21
21
21
Chapter 8: Help
22
Technical Support
Radio and TV Interference Statement
Warranty
23
24
25
Chapter 1: Introduction
1.1 Overview
Thank you for choosing Aluratek’s® LIBRE eBook Reader PRO. Introducing the “Libre” eBook Reader pro by Aluratek and the latest craze
in the current digital revolution. Now you can digitally store and carry
around with you thousands of your favorite books saving money, space
and the environment. Aluratek’s “Libre” connects to any computer with
an internet connection for easy access to the most recent books that are
published as well as access to free timeless classics. The “Libre” is soft
on the eyes utilizing an exclusive e-paper LCD technology. This amazing
technology makes it difficult to determine the difference between actual
paper and the e-paper screen. Also boasting superior battery life you
can read up to 24hrs continuous use with an auto off feature if you just
happen to fall asleep. Try the “Libre” eBook Reader Pro and experience
why the future of books has gone digital.
In addition to making sure only quality materials are used for manufacturing, Aluratek® is also dedicated to provide the best customer satisfaction and support.
The goal of Aluratek is to embody “Simple Elegance” in every product
it designs, manufactures and sells.
The product focus of Aluratek is to bring simple yet elegant connectivity solutions to the consumers to enhance their consumer electronics,
communications and computing experience. Each product is carefully
designed with the consumer in mind. Each product is solution-driven to
address the need of the consumers and deliberately planned to provide
the ultimate user experience.
Read this guide thoroughly and follow the installation and operation
procedures carefully to prevent any damage to the unit and / or any of
the devices it connects to.
4
Chapter 1: Introduction
1.2 Features
• Supports PDF, TXT, FB2, EPUB, MOBI, PRC and RTF electronic book
format
• Supports BMP, JPG, GIF, animated GIF picture format
• Content search for easy navigation between books and pages
• Bookmark and auto page turn function
• Adjustable font type and size
• Screen rotation support (portrait and landscape mode)
• Built-in MP3 player with background playback support
• SD card slot - up to 32GB
• Internal lithium-ion polymer battery (24 hrs continuous use / 2 weeks
standby time)
• Battery level indicator and low level warning
• 1 Year Warranty
1.3 Package Contents
Your order has been carefully packaged and inspected. The following
should be included in your package. Please inspect the contents of the
package to ensure that you have received all items and that nothing has
been damaged. If you discover a problem, please contact us immediately for assistance.
• Libre eBook Reader PRO
• 2GB SD Card
• USB Cable
• Earphones
• Hand Strap
• Carrying Case
• Power Adapter
• Quick Start Guide
• Warranty / Registration Card
5
Chapter 1: Introduction
1.4 Product Overview - Front
1
14
Page Turning
Slider
Next Page
Previous
Page
6
Chapter 1: Introduction
1.5 Product Overview - Back
7
Chapter 1: Introduction
1.6 Product Overview - Bottom & Top
19
1.7 Product Overview - Power On to Enter Main Menu
8
Chapter 1: Introduction
1.8 Product Overview - Basic Operation
1.9 Product Overview - Reading Operation
Page Turning Slider
Next Page
Previous Page
7
9
Chapter 2: Operating Instructions
2.1 Charging the Battery:
The battery is not fully charged and it is highly recommended to be fully
charged before first use. It is recommended to charge the battery for a
minimum of 4 hours using the AC/DC power adapter or 7 hours using
the USB port on your computer via the included USB cable.
2.2 Inserting a Memory Card:
To better user experience, we have included a 2GB SD card that is
preloaded with 100 eBooks. Follow the instructions below to insert the
optional SD/SDHC memory card into the unit.
1. Turn off “Libre” eBook Reader if it is currently powered on
2. Open the memory card cover on the top edge of the “Libre” eBook
Reader
3. Insert the SD card into “Libre” eBook Reader
Note: There is only one correct direction to insert the SD memory card
into the slot. Do not force the card into the slot, or else it may damage
both the “Libre” eBook Reader and the SD memory card.
2.3 Power on
To power ON the unit for the first time, please press and hold the
“Power” button for 5 (five) seconds (located on the bottom of the unit).
The “Libre” will take less than one minute to boot up and you will then
see the menu list.
Standby Mode:
If you are not planning to use the “Libre” for an extended period of
time you can have the “Libre” enter “Stand-by” mode for up to 14 days
preserving the battery life. To do this, press the “power” button for 1
(one) second then release it and the screen will go blank. To wake the
“Libre” up from “Stand-By” mode simply press the “Power” button for
1(one) second.
Note: The “Libre” will automatically go into “Stand-by” mode if there
is no activity. You can adjust the auto “Stand-By” mode to “Never, 3
10
Chapter 2: Operating Instructions
Minutes, 5 Minutes, 10 Minutes, 15 Minutes, 30 Minutes) by selecting
“User Settings” from the main menu and pressing “OK” then select “Auto
Power Off” and moving the cursor up or down then press “OK”.
2.4 To read an eBook on the included memory card
There are 100 titles preinstalled on the included SD card. To read them,
please:
1. Select “EBooks” and press “OK”
2. Select the desired book from the list and press “OK”
To turn pages press the “page turn” buttons located on the bottom left of the
“Libre”
To return to the previous screen/menu press the “
the bottom right of the “Libre”
“ button located on
2.5 Finding and downloading free eBooks online
You may download thousands of free eBooks from below websites.
Note: There are more sites available and it is recommended that you
check the Aluratek.com website for the most up to date suggested eBook
source sites.
http://www.free-ebooks.net/
http://www.gutenberg.org/wiki/Main_Page
http://www.scribd.com/
http://freecomputerbooks.com/
http://books.google.com/
11
Chapter 2: Operating Instructions
For example:
1. Go to http://books.google.com
2. Search for Alice’s Adventures in Wonderland
3. In the top right corner, click on “Download” and select EPUB
4. Select “Save File” and click OK.
Note: There are many file types that are supported including:
(TXT, EPUB, RTF, PDF, FB2, MOBI, PRC)
2.6 To copy an eBook to the “Libre”:
1. Make sure the unit is powered on
2. Connect “Libre” to your computer with the included USB cable
3. The internal memory and the SD card (if applicable) will show up in
your computer as Removable Disks.
4. Double click on the Removable Disk and a window will open which
shows the content of the drive.
12
Chapter 2: Operating Instructions
For internal memory, this is what you will see:
Double click on folder “Books”
Copy and paste the eBook that you just downloaded to this folder or
transfer directly from your computer to the folder “Books” by dragging
and dropping the eBook.
For SD card, copy and paste the eBook that you just download into the
root directory of the SD card. There will not be any folders available if
you are transferring directly to the SD Card.
5. Disconnect the cable after the transfer complete
6. You will able to find the newly transferred book when you select
eBooks from the main menu at this time.
To purchase newly release books, you may go to websites such as:
Note: The below resources will be most updated on Aluratek.com website:
http://www.ebooks.com
http://www.fictionwise.com/home.html
Because there are various formats available for download, please visit:
http://www.aluratek.com/ebook for more detail on downloading and
purchasing the newest released books.
13
Chapter 3: Recent Readings
Main menu screen
3.1 Recent Readings
To read a book that you read recently:
1. Select “Recent Readings” from the main menu and press “OK”
2. Select the desired book from the list and press “OK”
14
Chapter 4: eBooks
4.1 To Read an eBook
1. Select “eBooks” from the main menu and press “OK”
2. Select the desired book from the list and press “OK”
While reading a book, you can also select these options.
4.2 To Go to a Particular Bookmark
1. Press “
” and select “Bookmark List” using the arrow buttons
(or the “1” button) and press “OK”
2. Select the desired book using the arrow buttons and press “OK”
4.3 To Bookmark a Page
1. Press “
” and select “Bookmark This Page” using the arrow
button (or the “2” button) and press “OK”
4.4 To Remove Bookmark
1. Press “
” and select “Remove Bookmark” using the arrow
buttons (or the “2” button) and press “OK”
4.5 To Search a Particular Keyword Within a Document
1. Press “
” and select “Find” using the arrow buttons (or the
“3” button) and press “OK”
2. Enter the keyword using the buttons on the right side of the unit.
For example, to search for “car”:
Press the “2” button and select “c” from the list
Press the “2” button and select “l” from the list
Press the “7” button and select “u” from the list
Once the desired keyword is entered, press “OK”.
If the keyword is found, it will be highlighted, To go to the next match,
press “>” or “down” and press “<” or “^” for previous match.
15
Chapter 4: eBooks
4.6 To Jump to a Certain Page
1. Press “
” and select “Jump To” using the arrow buttons (or
the “4” button) and press “OK”
2. Enter the page number and press “OK”.
4.7 To Change a Font Size
1. Press “
” and select “Setting” using the arrow button (or the
“5” button”) and press “OK”
2. Select “Font Size” and press “OK”
3. Select the desired font size and press “OK”
4.8 To Setup Auto Turn Page
1. Press “
” and select “Setting” using the arrow button (or the
“5” button”) and press “OK”
2. Select “Auto Turn Page” and press “OK”
3. Select the desired interval and press “OK”
4.9 To Rotate
1. Press the “
” or press “
” and select “Setting”
using the arrow button (or the “5” button) and press OK”
2. Select “Rotate” using the arrow button (or the “3” button)
4.10 To Set the Codepage
(only when different codepage is available)
1. Press “
” and select “Setting” using the arrow button (or the
“5” button) and press “OK”
2. Select “Select Codepage” and press “OK”
3. Select the desired Codepage and press “OK”
16
Chapter 4: eBooks
4.11 To Set the Alignment
1. Press “
” and select “Setting” using the arrow button (or the
“5” button) and press “OK”
2. Select “Alignment” using the arrow button and press “OK”
3. Select the desired alignment and press “OK”
4.12 To Start / Stop Background Music
1. Press “
” and select “Setting” using the arrow button (or the
“5” button) and press “OK”.
2. Select “Background Music” using the arrow button and press “OK”
3. Select “Start” or “Stop” to start or stop background music
17
Chapter 5: Pictures
5.1 To Display Picture
1. Select “Pictures” from the main menu and press “OK”
2. Select the desired picture file and press “OK”
While viewing a picture, you can select these options
5.2 To Rotate a Picture
1. Press “
” and select “Rotate” using the arrow button (or the
“1” button) and press “OK”.
5.3 To Zoom In / Out
1. Press “
” and select “Zoom in” or “Zoom out” using the arrow button
(or the “2”, “3” button respectively) and press “OK”.
5.4 To View the Picture in Full Screen
1. Press “
” and select “Full Screen” using the arrow button (or the “4”
button) and press “OK”.
5.5 To Reset the Picture to the Original Size
1. Press “
” and select “Original Size” using the arrow button (or the
“5” button) and press “OK”.
5.6 To Setup Auto Turn Page (slide show)
1. Press “
” and select “Auto Turn Page” using the arrow button (or the
“6” button) and press “OK”.
2. Select the desired interval and press “OK”
5.7 To Start / Stop Background Music
1. Press “
” and select “Background Music” using the arrow
button (or the “7” button) and press “OK”.
2. Select “Start” or “Stop” to start or stop background music
18
Chapter 6: MP3 Player
6.1 To Play Music
1. Select “MP3 Player” from the main menu and press “OK”
2. Select the desired music file and press “OK”
3. While music is playing, you can press the “page up” or “page down”
for previous or next song, you can also adjust the volume by pressing
“<” or “>” buttons
While listening to music, you can select these options:
6.2 To Show Playlist
1. Press “
” and select “Playlist” using the arrow button (or the “1”
button) and press “OK”.
6.3 To Turn Off LCD
1. Press “
” and select “Turn off LCD” using the arrow button (or the
“2” button) and press “OK”.
2. To turn on the LCD again, please press either the “OK” or “
”.
6.4 To Select Play Mode (repeat one, repeat all, random)
1. Press “
” and select “Play Modes” using the arrow button (or the
“3” button) and press “OK”.
2. Select the desired mode and press “OK”
6.5 To Start / Stop Background Music
1. Press “
” and select “Background Music” using the arrow button
(or the “4” button) and press “OK”.
6.6 To Show the Instruction of the Keys for the MP3 Control
1. Press “
” and select “Hot keys” using the arrow button (or the “5”
button) and press “OK”.
19
Chapter 7: Settings
Select Settings from the main menu.
User Settings:
7.1 To Set the Language for the Unit
1. Select “Languages” using the arrow button (or the “1” button) and
press “OK”.
2. Select the desired language and press “OK”.
7.2 To Set Auto Power Off
1. Select “Auto Power Off” using the arrow button (or the “2” button)
and press “OK”.
2. Select the desired time and press “OK”.
7.3 To Set Auto Turn Page
1. Select “Auto Turn Page” using the arrow button (or the “3” button)
and press “OK”.
2. Select the desired time and press “OK”.
7.4 To Set the Volume
1. Select “Volume” using the arrow button (or the “4” button) and press
“OK”.
2. Select the desired volume and press “OK”.
7.5 To Set the Font
1. Select “Fonts” using the arrow button (or the “5” button) and press
“OK”.
2. Select the desired font and press “OK”.
System Settings:
7.6 To Show the Serial Number of the Device
1. Select “Serial Number” using the arrow button (or the “1” button”)
and press “OK”.
7.7 To Show the Battery Level
1. Select “Battery” using the arrow button (or the “2” button) and press “OK”.
20
Chapter 7: Settings
7.8 To Show the Internal Battery Memory Capacity / Usage
1. Select “Memory Capacity” using the arrow button (or the “3” button)
and press “OK”.
7.9 To Show the External SD Card Memory Capacity / Usage
1. Select “Card Capacity” using the arrow button (or the “4” button) and
press “OK”.
7.10 To Show the Firmware Number of the Device
1. Select “Firmware Version” using the arrow button (or the “5” button)
and press “OK”.
7.11 To Restore the System to Factory Default
1. Select “Restore Defaults” using the arrow button (or the “6” button)
and press “OK”.
2. Press OK to confirm or “return” to cancel.
7.12 To Upgrade the Firmware
1. Select “Upgrade Patch” using the arrow button (or the “7” button) and
press “OK”.
2. Press OK to confirm or “return” to cancel.
7.13 Internal File Manager
You can navigate the files in the internal memory by selecting “Internal
File Manager”.
7.14 SD Card File Manager
You can navigate the files of the SD card by selecting “SD Card File
Manager”.
7.15 To Setup Background Music for the System
1. Select “Background Music” using the arrow button (or the “5” button)
and press “OK”.
2. Select “Start” or “Stop” to start or stop background music
21
Chapter 8: Help
A copy of this Instructional Manual in PDF format is available under the
Help menu of the main menu.
22
Technical Support
If you need further assistance, please contact Aluratek support department
prior to returning this device.
E-mail: [email protected]
Web: www.aluratek.com/support
Local (Irvine, CA): 949-419-6504
Toll free: 1-866-580-1978
23
Radio and TV Interference Statement
WARNING!!! This equipment has been tested and found to comply
with the limits of a Class B digital device, pursuant to part 15 of the
FCC rules. These limits are designed to provide reasonable protection
against harmful interference in a residential installation
This equipment generates, uses and can radiate radio frequency energy
and, if not installed and used in accordance with the instruction, may
cause harmful interference to radio communications. However, there is
no guarantee that interference will not occur in a particular installation.
If this equipment does cause harmful interference to radio or television
reception, which can be determined by turning the equipment off and
on, the user is encouraged to try to correct the interference by whatever
measures may be required to correct the interference.
24
Warranty
Aluratek warrants this product against defect in material or workmanship
for 1 Year from the date of purchase.
This warranty becomes invalid if the factory-supplied serial number or
“warranty void” sticker has been removed or altered on the product.
This warranty does not cover:
A) Cosmetic damage or damage due to acts of God
B) Accident, misuse, abuse, negligence or modification of any part of the product.
C) Damage due to improper operation or maintenance, connection to improper
equipment, or attempted repair by anyone other than Aluratek.
D) Products sold AS IS or WITH FAULTS.
IN NO EVENT SHALL ALURATEK’S LIABILITY EXCEED THE PRICE
PAID FOR THE PRODUCT FROM DIRECT, INDIRECT, SPECIAL, INCIDENTAL, OR CONSEQUENTIAL DAMAGES RESULTING FROM THE
USE OF THE PRODUCT, IT’S ACCOMPANYING SOFTWARE, OR IT’S
DOCUMENTATION.
Aluratek makes no warranty or representation, expressed, implied, or
statutory, with respect to it’s products, contents or use of this documentation and all accompanying software, and specifically disclaims it’s quality, performance, merchantability, or fitness for any particular purpose.
Aluratek reserves the right to revise or update it’s product, software or
documentation without obligation to notify any individual or entity.
25
Aluratek, Inc.
12A Mauchly Irvine, CA 92618
[email protected]
949.419.6504 • office
949.419.6477 • fax