1
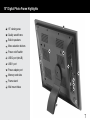
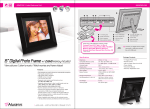
15” Digital Photo Frame
Instructional Manual
aluratek.com
ADMPF315F
mnl M10054
Copyright © 2010 Aluratek, Inc. All Rights Reserved.
Table of Contents
Introduction ..............................................................................................................................................
Features ..................................................................................................................................................
Package Contents ...................................................................................................................................
Product Highlights ...................................................................................................................................
Remote Control Close-up ........................................................................................................................
Getting Started ........................................................................................................................................
Operations ...............................................................................................................................................
Set-Up ................................................................................................................................................
Selecting Which Media to Use ...........................................................................................................
Viewing Photos ...................................................................................................................................
Adjust Speed of Slideshow .................................................................................................................
Adjust Slide Transition Effect ..............................................................................................................
Listen to Music ...................................................................................................................................
Music Play Mode ................................................................................................................................
View Videos ........................................................................................................................................
Video Play Mode ................................................................................................................................
Copy Files Between Memory Cards / Internal Memory ......................................................................
Delete Files Between Memory Cards / Internal Memory ...................................................................
Change the Display Language ................................................................................................................
Set the Date and Time ........................................................................................................................
Set the Alarm ......................................................................................................................................
Technical Support ....................................................................................................................................
Radio and TV Interference Statement .....................................................................................................
Warranty ..................................................................................................................................................
04
05
06
07
08
09
09
09
10
11
12
13
14
15
16
17
18
19
20
21
22
23
24
25
Introduction
More than just a digital photo frame, Aluratek raises the bar with its new Digital Lifestyle Device
(DLD). View hi-resolution pictures, music files, movies and home videos easily by inserting your
camera or camcorder’s digital media card or an USB thumb drive directly onto Aluratek’s (DLD).
Setup photo slideshows with background music with the touch of a button. Switch to video mode
and enjoy amazing video and audio quality. Browse and listen to all of your favorite music files. With
Aluratek’s new (DLD) share all your digital pictures, videos, and music files. Whether it is at work or
at home, let the fun begin!
In addition to making sure only quality materials are used for manufacturing, Aluratek® is also
dedicated to provide the best customer satisfaction and support.
The goal of Aluratek is to embody “Simple Elegance” in every product it designs, manufactures and sells.
The product focus of Aluratek is to bring simple yet elegant connectivity solutions to the consumers
to enhance their consumer electronics, communications and computing experience. Each product
is carefully designed with the consumer in mind. Each product is solution-driven to address the
need of the consumers and deliberately planned to provide the ultimate user experience.
Read this guide thoroughly and follow the installation and operation procedures carefully to prevent
any damage to the unit and / or any of the devices it connects to.
4
Features
• Easy operation as most file formats are automatically recognized
• High quality wooden frame
• High quality built-in speakers
• Memory included
• 15” TFT true color LCD
• Supports most memory card formats such as: CF / SD / SDHC
• Supports various photo, video and audio formats
• Connect your personal computer, memory card and USB hard drive / thumb drive to easily transfer
your favorite pictures, music, or videos with hi-speed USB 2.0
• Can be displayed either on a table top with the included stand or mounted on a wall
• Ease of operation and control with the included remote
Memory Card
There is no need to create a special folder on the memory card to be inserted to the digital picture
frame as all picture formats will be recognized by the frame. You just insert the memory card directly
from your digital camera into the frame and you can view all pictures / videos.
5
Features cont.
USB Host / Device Functions
Any MP3 or USB mass storage device (formatted in FAT32) can be inserted into Type A USB port on
the digital picture frame. It will be shown as “USB-C” on the digital picture frame. You can access all
files on the device just like any other memory cards.
Package Contents
Your order has been carefully packaged and inspected. The following should be included in your package. Please inspect the contents of the package to ensure that you have received all items and that
nothing has been damaged. If you discover a problem, please contact us immediately for assistance.
• 15” Digital Photo Frame
• Remote Control
• USB 2.0 Cable (Type A to mini-B)
• Power Adapter
• Instructional Manual
• Warranty / Registration Card
6
15” Digital Photo Frame Highlights
1
15” viewing area
2
Quality wood frame
3
Built-in speakers
4
Menu selection buttons
5
Power on/off switch
6
USB 2 port (mini-B)
7
USB 1 port
8
Power adapter port
9
Memory card slots
10
Frame stand
11
Wall mount holes
1
3
11
4
9
2
6
7
8
10
5
7
Remote Control Close-Up
9
1
3
6
4
7
5
8
10
2
11
8
1. Power On/Off
2. Volume + / Volume 3. Mode - Select between photo, music and video modes
4. Menu - Returns to the previous menu
5. Setup - Takes you to the setup menu settings
6. Play / Pause
7. Up, Down, Left, Right Arrows - Use arrow keys to navigate
your way throught various menus
8. Enter
9. Mute
10. Previous / Rewind
11. Next / Fastforward
Getting Started
Step 1:
Remove the protective film covering the LCD.
Step 2:
Remove the plastic insulator from the battery on the remote control.
Operations
Set-Up
STEP 1:
Plug the power adapter in then turn the power switch on.
STEP 2:
Please insert your memory card (SD, MMC, CF, MS) at this time. You may also insert a USB thumb
/ flash drive into the on-board USB 2.0 port which will be detected automatically. Slideshow will start
automatically when the card is inserted. (The slideshow will start from the internal memory if no
memory card is detected)
9
Operations cont.
STEP 3, optional:
With the built-in memory feature, you may also transfer pictures, movies and/or music files directly
from your computer to your digital photo frame by attaching the included USB cable to your computers USB port. Once you connect the USB cable to the computer, you will see “PC Connected”
on your photo frame. The digital photo frame will appear as an external/removable drive on your
computer. You can find them when you double click on “My Computer” in Windows system. There
will be multiple drives as the card reader slots on the frame also show as an external drive. The
internal memory is usually the last one in the list. Simply drag and drop the photo, music, and/or
video files you would like to have stored on your digital photo frame at this time. You may add or
remove these files at any time by reattaching the frame to your computer’s USB port.
Note: You must disconnect the USB cable from your computer after transferring. You will not be
able to scroll with the remote while the USB connection is established.
Selecting Which Media to View
Press the “Menu” button until you can view different types of media you have inserted into your
picture frame or the included memory in the main menu.
To create a custom slideshow with pictures in a particular order, please copy one picture at a time
to the memory card as the order is determined by the time stamp of the file when it is copied.
10
Operations cont.
Viewing Photos
1. Select the “Photo” icon on the screen.
2. Select the photo you desire by using the up and down keys on your remote control.
3. Once you have selected your photo press “Enter”.
4. You may zoom in on your photos by pressing the “Zoom” button on the remote. You may also
reposition the photo using the up, down, left and right buttons on the remote once you zoom in
for detailed viewing. You may also rotate the picture by pressing the “Rotate” button on the remote.
5. You can also press the “OSD” button for more viewing options.
Special Functions for Viewing Photos
You may adjust your photo viewing options settings including: Speed interval for slideshow, and
multiple slide transition options by entering the “Setup” menu from the main menu.
11
Operations cont.
Adjust Speed of Slideshow
1. Select “Setup” and press “Enter” from the main menu.
2. Use the up or down key to select “Slideshow Time”.
3. Use the left or right key to select the time interval from 3sec to 1hour then press “Enter”.
4. Press “Menu” to return to the main menu.
12
Operations cont.
Adjust the Slide Transition Effect
1. Select “Setup” and press “Enter” from the main menu.
2. Use the up or down key to select “Slideshow Mode”.
3. Use the left or right key to select your desired slide transition effect then press “Enter”.
4. Press “Menu” to return to the main menu.
13
Operations cont.
Listen to Music
1. Select the “Music” icon on the screen.
2. A list of MP3 files stored on your media will appear on the screen. Use the up and down keys on
the remote control to select the desired song then press “Enter”. You can press the “
” to
pause / play.
3. The next song will play automatically on the song list. You may also select another song using
the up and down keys on your remote control.
14
Operations cont.
Music Play Mode
1. Select “Setup” and press “Enter” from the main menu.
2. Use the up or down key to select “Music Repeat Mode”.
3. Use the left or right key to select “Repeat One”, “Repeat All” or “Repeat Off” then press “Enter”.
4. Press “Menu” to return to the main menu.
15
Operations cont.
View Videos
1. Select the “Movie” icon on the screen.
2. A list of video files stored on your media will appear on the screen. Use the up and down keys on
the remote control to select the desired video then press “Enter”. You can press the “
” to
pause / play.
3. You may zoom in on the video by pressing the “Zoom” button on the remote.
4. The next video will play automatically on the list. You may also select another video using the up
and down keys on your remote control.
16
Operations cont.
Video Play Mode
1. Select “Setup” and press “Enter” from the main menu.
2. Use the up or down key to select “Movie Repeat Mode”.
3. Use the left or right key to select “Repeat One”, “Repeat All” or “Repeat Off” then press “Enter”.
4. Press “Menu” to return to the main menu.
17
Operations cont.
Copy Files Between Memory Cards / Internal Memory
1. Select the “File” icon on the screen.
2. Select the photo you want to copy using the up and down keys on your remote control and press
the “
” key. You will see a
next to the file name
3. Press the “OSD” button.
4. Select “Copy” and press “Enter” on the remote.
5. Select the memory card or internal memory that you want to copy to and press the “
” key.
6. Press the “Enter” key to start copy
7. Press the “Enter” key when you see “Finish” to exit.
18
Operations cont.
Delete Files From Memory Cards / Internal Memory
1. Select the “File” icon on the screen.
2. Select the photo you want to delete using the up and down keys on your remote control and
press the “
” key. You will see a
next to the file name.
3. Press the “OSD” button.
4. Select “Delete” and press “Enter” on the remote.
5. Select the “check mark” and press the “Enter” key to delete the file.
6. Press the “Enter” key when you see “Finished” to exit.
19
Operations cont.
Change the Display Language
1. Select “Setup” and press “Enter” from the main menu.
2. Use the up or down key to select “Language”.
3. Use the left or right key to select the desired language then press “Enter”.
4. Press “Menu” to return to the main menu.
20
Operations cont.
Set the Date and Time
1. Select “Setup” and press “Enter” from the main menu.
2. Use the up or down key to select “Time”.
3. Use the left or right key to select what you want to change and use the up or down key to
change to the correct value then press “Enter”.
4. Press “Menu” to return to the main menu.
21
Operations cont.
Set the Alarm
1. Select “Setup” and press “Enter” from the main menu.
2. Use the up or down key to select “Alarm”.
3. Use the left or right key to select what you want to change and use the up or down key to change
to the correct value then press “Enter”. The 1st number is the hour follow by the minute. The next
item is ring tone selection, Ring1/Ring2. The last item is the alarm status “off”, “once”, “every”.
4. Press “Menu” to return to the main menu.
22
Technical Support
If you need further assistance, please contact Aluratek support department prior to returning this device.
E-mail: [email protected]
Web: www.aluratek.com/support
Local (Irvine, CA): 949-419-6504
Toll free: 1-866-580-1978
23
Radio and TV Interference Statement
WARNING!!! This equipment has been tested and found to comply with the limits of a Class B
digital device, pursuant to part 15 of the FCC rules. These limits are designed to provide reasonable
protection against harmful interference in a residential installation
This equipment generates, uses and can radiate radio frequency energy and, if not installed and
used in accordance with the instruction, may cause harmful interference to radio communications.
However, there is no guarantee that interference will not occur in a particular installation. If this
equipment does cause harmful interference to radio or television reception, which can be determined by turning the equipment off and on, the user is encouraged to try to correct the interference
by whatever measures may be required to correct the interference.
24
Warranty
Aluratek warrants this product against defect in material or workmanship for 120 Days from the
date of purchase.
This warranty becomes invalid if the factory-supplied serial number or “warranty void” sticker has
been removed or altered on the product.
This warranty does not cover:
A) Cosmetic damage or damage due to acts of God
B) Accident, misuse, abuse, negligence or modification of any part of the product.
C) Damage due to improper operation or maintenance, connection to improper equipment,
or attempted repair by anyone other than Aluratek.
D) Products sold AS IS or WITH FAULTS.
IN NO EVENT SHALL ALURATEK’S LIABILITY EXCEED THE PRICE PAID FOR THE PRODUCT
FROM DIRECT, INDIRECT, SPECIAL, INCIDENTAL, OR CONSEQUENTIAL DAMAGES RESULTING
FROM THE USE OF THE PRODUCT, IT’S ACCOMPANYING SOFTWARE, OR IT’S DOCUMENTATION.
Aluratek makes no warranty or representation, expressed, implied, or statutory, with respect to it’s
products, contents or use of this documentation and all accompanying software, and specifically
disclaims it’s quality, performance, merchantability, or fitness for any particular purpose. Aluratek
reserves the right to revise or update it’s product, software or documentation without obligation to
notify any individual or entity.
25
aluratek.com
Aluratek, Inc.
12A Mauchly Irvine, CA 92618
[email protected]
949.419.6504 • office
949.419.6477 • fax