1
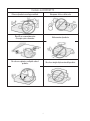
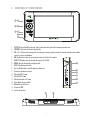
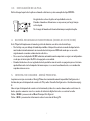
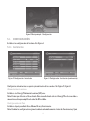
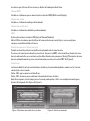
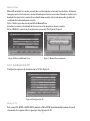
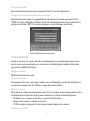
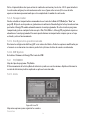
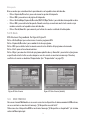
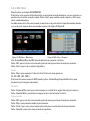
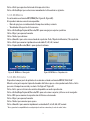
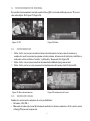
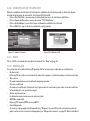
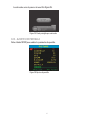
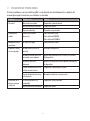
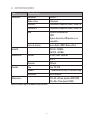
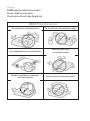
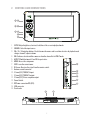
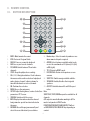
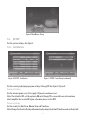
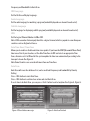
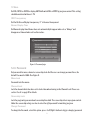
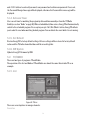
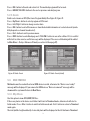
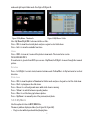
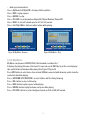
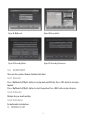
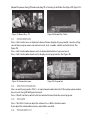
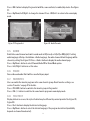
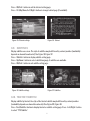
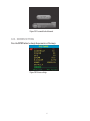
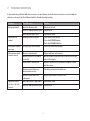
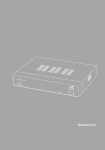
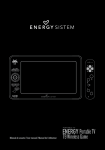
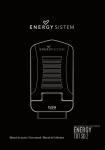
Portable MultiMedia lCd tV
Manual de Usuario / User Manual
ENERGY
TV1070/90
TV2070/90
Manual de Usuario
1. INSTRUCCIONESDESEGURIDAD
Para garantizar tu seguridad y la de los demás asegúrate de leer estas instrucciones antes de utilizar
este producto.
Guarda este manual para futura referencia.
PRECAUCIÓN: Para reducir el riesgo de incendios o descargas eléctricas no exponga este aparato a
la lluvia.
Consideraciones sobre seguridad
≥ Coloca los cables a fin de que no se puedan pisar, pinchar o cortar.
≥ No uses el dispositivo en condiciones húmedas.
≥ No permitas que el dispositivo se moje.
≥ No expongas el dispositvo a goteos o salpicaduras.
≥ No coloques objetos llenos de agua tales como floreros en la parte superior del dispositivo.
≥ No coloques fuentes de llama desnuda, como velas, en la parte superior del dispositivo.
Ventilación
Las ranuras y aberturas en el dispositivo son para la ventilación. No las cubras o bloquees, ya que
puede causar un sobrecalentamiento.
NUNCA permitas que los niños introduzcan nada en los orificios o ranuras.
Tratamiento de las pilas agotadas
Nunca deseches las baterías tirándolas al fuego o con otros residuos domésticos.
Consulta con la autoridad local sobre la normativa de residuos.
Limpieza
Desconecta siempre el EnergyTV antes de limpiarlo.
No utilices limpiadores líquidos o en aerosol.
Limpia el EnergyTV con una tela suave y húmeda (no mojada).
3
CuidadodelENERGyTV
Colocar el producto en un lugar ventilado.
No exponer al frío o a la luz solar.
Dejar 10 cm. como mínimo entre
el receptor y otros elementos.
No desmontar el producto.
No colocar recipientes con líquido sobre el
producto.
No colocar ningún objeto encima del producto.
4
2. CONTROLESyCONEXIONES
1 2
3 4
5 6
7
8
1. SETUP: Ajusta el brillo/contraste/color/saturación de la pantalla en modo reproducción.
2. SOURCE: Selecciona la fuente de entrada.
3. CH+/- V+/-: Botones de navegación. Usados para navegar por los menús. En modo reproducción cambia
canales o ajusta el volumen.
4. OK: Confirma la selección en un menú o muestra la lista de canales.
5. ASPECT: Cambia entre la relación de aspecto 4:3 y 16:9.
6. MENU: Accede al menú de configuración.
7. EXIT: Sale del menú actual.
8. Sensor IR: Recibe la señal de mando a distancia.
9. Conector de antena coaxial.
10. Entrada A/V 3.5 mm.
11. Salida A/V 3.5 mm.
12. Salida auriculares 3.5 mm.
13. Interruptor de encendido.
14. Alimentación eléctrica.
15. Conector USB.
16. Lector de tarjetas.
15
16
5
9
10
11
12
13
14
3. MANDOADISTANCIA
3.1. DESCRIPCIÓNDELOSBOTONES
1 2
MUTE
EPG
INFO
RECORD
12 13
3
PAUSE
1
2
3
4
FAV
4
5
6
5
TV/
RADIO
7
8
9
6
STOP
0
AUDIO
15
TTX
16
14
CH+
7 8
VOL
+
OK
VOL
-
CH-
9
MENU
10 11
SETUP
SCREEN
1. MUTE: Activa/desactiva el sonido.
2. EPG: Guía electrónica de programación.
3. PAUSE: Pausa o reinicia la reproducción en
4.
5.
6.
7.
8.
9.
10.
11.
12.
13.
14.
EXIT/
RECALL
SUBTITLE
17 18
SPEAKER
ASPECT
19 20
números en los menús.
15. AUDIO: Selecciona entre las pistas de audio disponibles o el modo LR (estéreo), LL (izquierda) o
RR (derecha).
16. TTX: Teletexto.
17. EXIT/RECALL: Vuelve a la pantalla o menú
anterior.
18. SUBTITLE: Cambia entre los subtítulos
disponibles.
19. SPEAKER: Activa/desactiva los altavoces
integrados.
20. ASPECT: Cambia entre modo normal y
panorámico.
Notas:
La disponibilidad de SUBTITLES/TEXT/AUDIO
depende del emisor del canal.
La salida A/V está desabilitada cuando está seleccionada la entrada A/V.
FUNCTION/SCREEN/SPEAKER/ASPECT atcúan como
ROJO/VERDE/AMARILLO/AZUL dependiendo del
contexto.
curso.
FAV: Accede a los canales favoritos.
TV/RADIO: Cambia entre canales de TV y de
radio.
STOP: Detiene la grabación/reproducción en
curso.
CH+/- V+/-: Botones de navegación. En modo
TDT cambia canales y aumenta o disminuye el
volumen. En timeshift: avance/retroceso.
OK: Confirma una selección en un menú.
MENU: Menú principal.
SETUP: Menú para ajustar brillo/contraste/color/
saturación de la pantalla.
SCREEN: Enciende/apaga la pantalla.
INFO: Muestra información adicional del canal.
RECORD: Inicia la grabación con el tiempo
seleccionado.
Teclas numéricas: Seleccionan canales o
6
3.2. INSTALACIÓNDELAPILA
Retira la tapa/soporte de la pila en el mando a distancia y coloca una pila de tipo CR2025.
Asegúrate de colocar la pila con la polaridad correcta.
2
1
Cuando el mando a distancia no se vaya a usar por largo tiempo
retira la pila.
Si el rango del mando a distancia disminuye reemplaza la pila.
4. BATERÍARECARGABLEINCORPORADA(MODELOS2070/2090)
Esta TV portátil emplea un sistema de gestión de batería con detección de nivel bajo.
≥ Si el voltaje cae por debajo del umbral permitido el dispositivo entrará en modo de baja batería
mostrando intermitentemente un icono de batería baja en el OSD indicando que se necesita
urgentemente conexión a alimentación eléctrica.
≥ Si se conecta el adaptador AC/DC la batería automáticamente empezará a cargar con independencia de que el interruptor On/Off esté apagado o encendido.
≥ Cuando la batería está casi agotada tanto la pantalla como el sonido se apagarán pero el sistema
queda hibernado cierto tiempo de tal manera que, si se conecta a alimentación, se reanudará la
reproducción en curso.
5. INTERFAZDEUSUARIO-MENÚPRINCIPAL
La primera vez que enciendas el EnergyTV mostrará automáticamente la pantalla Configuración->
Instalación para la búsqueda de canales de TV y radio. Consulte Configuración->Instalación en pág.
8.
Una vez que la búsqueda de canales está terminada y todos los canales almacenados en la base de
datos, puedes comenzar a ver los canales de televisión digital terrestre o escuchar la radio.
Pulsa <MENU> para acceder al Menú Principal. Ver Figura 1.
Pulsa <INFO> para mostrar información sobre la versión del EnergyTV.
7
Figura 1. Menú principal - Configuración
5.1. CONFIGURACIÓN
Establece la configuración del sistema. Ver Figura 1.
5.1.1. Instalación
Figura 2. Configuración - Instalación
Figura 3. Configuración - Instalación (continuación)
Configura la sintonización, recepción y visualización de los canales. Ver Figura 2, Figura 3.
Alimentación de antena
Establece si el EnergyTV alimenta la antena (5V) o no.
Nota: El valor por defecto es Desactivado. Selecciona Activado sólo si el EnergyTV está conectado a
una antena activa que amplifica la señal de RF recibida.
Configuración de País
Establece el país para Auto Scan, Manual Scan y Zona horaria.
Nota: Cambiar la configuración regional cambiará automáticamente el valor de Zona horaria y fijará
8
los valores por defecto de Frecuencias y Ancho de banda para Auto Scan.
Idioma OSD
Establece el idioma en que se muestran los textos del OSD (On Screen Display).
Idioma de audio
Establece el idioma de audio predeterminado.
Idioma de subtítulos
Establece el idioma de subtítulos predeterminado.
LCN
Activa o desactiva el sistema LCN (Logical Channel Number).
Nota: LCN es un número que identifica de forma exclusiva un canal lógico, se usa en algunos
europeos como Reino Unido o Francia.
Auto Zona horaria / Zona horaria
Permite activar/desactivar la actualización automática de la zona horaria.
Si conoces la zona horaria donde te encuentras (respecto a GMT) selecciona Desactivado y la zona
horaria adecuada. En caso contrario activa Auto Zona horaria para que el EnergyTV actualice la zona
horaria automáticamente gracias a la información presente en la señal TDT. Ver Figura 3.
Auto Scan
La función Auto Scan borrará toda la base de datos y hará una búsqueda de canales en las frecuencias del país seleccionado.
Pulsa <OK> para comenzar el Auto Scan.
Pulsa <OK> de nuevo para confirmar el borrado de la base de datos
Auto Scan requiere cierto tiempo pero el usuario puede pulsar <Exit> en cualquier momento para
detener la búsqueda. Ver Figura 4, Figura 5.
Figura 4. Confirmar borrado de base de datos
Figura 5. AutoScan terminado
9
Manual Scan
Manual Scan añade los canales encontrados en la búsqueda, no borra la base de datos. El usuario
tiene que conocer la frecuencia y ancho de banda que le interesa escanear. Cuando se explora una
banda de frecuencias los canales de esa banda almacenados se borrarán para poder guardar los
resultados de la búsqueda más reciente.
Pulsa <Verde> para mostrar la pantalla de Manual Scan.
Introduce los valores de la banda de frecuencias en la que quieres buscar canales.
Pulsa <OK/Exit> para iniciar la exploración o para salir. Ver Figura 6, Figura 7.
Figura 6. Edición de Manual Scan
Figura 7. Manual Scan terminado
5.1.2.ConfiguraciónTV
Configura las opciones de visualización en TV. Ver Figura 8.
Figura 8. Configuración TV
Modo de TV
Selecciona PAL, NTSC o AUTO. AUTO cambiará a PAL o NTSC dependiendo del formato del canal
sintonizado. Este ajuste debe ser igual que el del aparato de TV.
10
Transparencia OSD
Ajusta la transparencia de los menús en pantalla. El nivel ‘1’ es el más transparente.
Tiempo de presencia de la banda de información
Ajusta el tiempo que permanece en pantalla la barra de información cuando se presiona el botón
<INFO>. Si el valor establecido es ‘Siempre’ la barra de información permanecerá en pantalla hasta
que presione el botón <EXIT>. En otro caso desaparece al cabo del tiempo especificado.
Figura 9. Configuración de contraseña
5.1.3.Contraseña
Establece si el menú, los canales marcados como bloqueados y los programas que superan cierto
nivel de censura estarán protegidos por contraseña o no. También puedes cambiar la contraseña
(por defecto es 6666). Ver Figura 9.
Bloqueo del Menú
Bloqueo del menú de contraseña.
Bloqueo de canales
Si esta opción está activa, cada vez que cambies a un canal bloqueado se pedirá que introduzcas la
contraseña para poder verlo. Ver “Bloqueo” on page 13 para más detalles.
Bloqueo censura
Fija el umbral de calificación del programa a partir del cual se pedirá contraseña para poder ser visto.
La información de clasificación del programa es emitida por la cadena sintonizada. Opciones:
≥ Sin bloqueo: no se requiere contraseña sea cual sea la clasificación.
≥ Bloqueo total: siempre se requiere contraseña.
≥ 02-18: se requiere contraseña si la clasificación supera el umbral seleccionado.
Cambiar contraseña
11
Pulsa <izquierda/derecha> para activar el cambio de contraseña y las teclas <0-9> para introducir
la contraseña antigua y la contraseña nueva dos veces (para evitar errores). En caso de éxito
aparecerá un mensaje anunciando que se ha completado el cambio de contraseña.
5.1.4.Temporizador
Puedes establecer temporizadores manualmente o a través de la Guía de TV/Radio(ver “Guía” on
page 14). El tipo de acción puede ser grabación o visualización. Cuando llega la fecha y hora de un temporizador el EnergyTV cambia automáticamente al canal programado. Si estás viendo un programa
temporizado y pulsas cualquier botón excepto <Vol-/Vol+/Mute>, el EnergyTV preguntará si quieres
abandonar el canal programado. El usuario puede eliminar un temporizador siempre que no se haya
activado y esté en funcionamiento.
5.1.5.Configuraciónpredeterminada
Restaura la configuración del EnergyTV a sus valores de fábrica. Todas las opciones modificadas por
el usuario se restaurarán a los valores por defecto y la base de datos de canales será borrada.
5.1.6.SWUpdate
Actualiza el firmware del EnergyTV a través de USB.
5.2. TV/RADIO
Hay dos tipos de programa: TV y Radio.
El funcionamiento de la Lista y Guía de televisión y radio son casi las mismas. Aquí describiremos la
versión de televisión y todo lo explicado se aplica a la versión radio.
5.2.1.Lista
Figura 10. Lista TV
Hay varias opciones para organizar los canales.
Favoritos
12
El usuario puede desplazarse rápidamente por la lista de programas favoritos pulsando <CH-/CH+>.
Hay 8 grupos de favoritos configurables por el usuario: Noticias, Deportes, Película, Música, Compras, Viajes, Chico y Chica. Pulse <1-8> para incluir o eliminar un canal de una categoría de favoritos.
Bloqueo
Pulsa <OK> para activar o desactivar la condición de bloqueo del canal seleccionado. Si está
activada la opción Configuración->Contraseña->Bloqueo de canales pedirá la contraseña para ver
este programa. Ver “Bloqueo de canales” on page 11 para más detalles.
Editar
Puedes editar el nombre del canal. La longitud máxima del nombre es 20 caracteres.
≥ Pulsa <Izquierda/Derecha> para seleccionar la opción de editar y <Arriba/Abajo> para seleccionar el programa.
≥ Pulsa <OK> para mostrar información del canal y pulsa <OK> otra vez para editar el nombre del
canal.
≥ Pulsa <Arriba/Abajo/Izquierda/Derecha/0~9/Rojo/Verde> para seleccionar el carácter.
≥ Pulsa <OK> para terminar la edición y volver a la pantalla de información del canal.
≥ Pulsa <Rojo> para guardar el nombre del canal modificado y regresar a la lista o pulsa <Exit>
para regresar a la lista sin guardar los cambios.
Mover
Cambia la posición de los canales en la lista.
Nota: Esta función no aparecerá cuando esté activada la opción Configuración -> Instalación -> LCN.
Ordenar
Ordena los canales por orden alfabético A<->Z o De Pago<->Gratuito.
Nota: Esta función no aparecerá cuando esté activada la opción Configuración -> Instalación -> LCN.
Saltar canal
Activa/desactiva la opción mediante la tecla <OK>. Los canales que tengan este atributo activo no
serán accesibles mediante las teclas <CH+/CH->.
Eliminar
Elimina permanentemente el canal seleccionado de la base de datos. Para recuperarlo es necesario
volver a hacer una búsqueda de canales (manual o automática).
Pulsa <OK/Verde> para seleccionar entre eliminar un canal o eliminarlos todos.
Nota: Esta función no aparecerá si al entrar en la lista de canales se pidió contraseña al usuario y no
introdujo la contraseña correcta.
13
Búsqueda
Busca canales que coincidan total o parcialmente con la palabra clave introducida.
≥ Pulsa <Izquierda/Derecha> para seleccionar la opción de búsqueda.
≥ Pulsa <OK> para entrar en la página de búsqueda.
≥ Pulsa <Arriba/Abajo/Izquierda/Derecha/OK/0~9/Rojo/Verde> para introducir una palabra clave.
≥ Pulsa <OK> para realizar la búsqueda. Cuando concluya se mostrará una lista de canales cuyo
nombre coincide con la palabra clave introducida.
≥ Pulsa <Verde/Amarillo> para moverte por la lista de canales resultado de la búsqueda.
5.2.2.Guía
EPG: Electronic Program Guide. Ver Figura 11, Figura 12.
Pulsa <Arriba/Abajo> para seleccionar el canal o programa EPG.
Pulsa <Izquierda/Derecha> para cambiar la fecha o programa.
Pulsa <OK> para salir de todos los menús o mostrar los detalles del programa seleccionado.
Pulsa <Exit> para volver al menú anterior.
Pulsa <Rojo> para mostrar la lista de programas planificados y <Amarillo> para incluir el programa
especificado en la lista. En caso de solaparse con otro evento se mostrará un mensaje. Si no hay
conflictos el evento se añadirá al Temporizador (ver “Temporizador” on page 12).
Figura 11. Guía - Evento
Figura 12. Guía - Evento (detalle)
5.3. MULTIMEDIA
Para usar el menú Multimedia es necesario conectar un dispositivo de almacenamiento USB externo,
en caso contrario se mostrará el mensaje: “¡El dispositivo no está listo!”.
Si desconectas el dispositivo USB se mostrará el mensaje “¡El dispositivo se ha quitado!” y el sistema
volverá al Menú principal.
14
5.3.1.MisFotos
Visualiza fotos en formato JPEG/BMP/GIF.
Si hay fotos en la carpeta raíz del dispositivo se mostrarán en modo miniaturas, en caso contrario se
mostrará la estructura en modo carpeta. Pulsa <Azul> para cambiar a modo carpeta y <Exit> para
volver a modo miniaturas.
Las dimensiones de la foto seleccionada se muestran en la parte inferior izquierda en modo miniaturas y en la parte superior derecha en modo carpetas. Ver Figura 13,Figura 14.
Figura 13. Mis Fotos - Miniaturas
Figura 14. Mis Fotos - Carpetas
Usa <Arriba/Abajo/Derecha/OK> para desplazarte por carpetas y ficheros.
Pulsa <OK> para ver la foto seleccionada y pulsa de nuevo para lanzar el modo presentación.
Pulsa <Info> para ver los controles disponibles.
Zoom
Pulsa <Rojo> para aumentar / reducir la foto. El factor de zoom puede ser:
25 - 50 - 100 - 150 - 200 %
Si el factor de zoom es mayor de 100% puedes pulsar <Arriba/Abajo/Izquierda/Derecha> para
desplazarte por la imagen aumentada.
Rotación
Pulsa <Izquierda/Derecha> para rotar la imagen en sentido de las agujas del reloj o a la inversa.
Pulsa <Amarillo/Azul> para voltear la imagen en dirección horizontal o vetical.
Presentación
Pulsa <OK> para ver la foto seleccionada y pulsa de nuevo para lanzar el modo presentación.
Pulsa <Rojo> para pausar/reanudar la presentación.
Pulsa <Verde> para seleccionar la música de fondo para escuchar durante la presentación.
Pulsa <Amarillo> para seleccionar el modo de repetición.
15
Pulsa <Azul> para ajustar el intervalo de tiempo entre fotos.
Pulsa <Arriba/Abajo> para seleccionar manualmente la foto anterior o siguiente.
5.3.2.MiMúsica
Escucha música en formato MP3/WMA (Ver Figura 15, Figura 16).
Al reproducir música se mostrará en pantalla:
≥ Barra de progreso con indicación del tiempo trascurrido y restante.
≥ Visualizador del espectro de frecuencias.
Pulsa <Arriba/Abajo/Izquierda/Derecha/OK> para navegar por carpetas y archivos
Pulsa <Rojo> para pausar/reanudar.
Pulsa <Verde> para detener.
Pulsa <Amarillo> para seleccionar el modo de repetición: Todo / Repetición Aleatoria / Sin repetición.
Pulsa <Azul> para avanzar rápidamente a velocidad x2 / x3 / x4 / normal.
Pulsa <Izquierda/Derecha/Mute> para ajustar el volumen.
Figura 15. Mi Música - Navegador
Figura 16. Mi Música - Reproducción
5.3.3.MisPelículas
Reproduce la mayor parte de películas de resolución estándar en formato MPEG2, DivX, Xvid.*
Muestra en la parte superior izquierda el nombre del fichero que se está reproduciendo. Pulsa <Info>
para ver el tiempo transcurrido y restante. Ver Figura 17, Figura 18.
Pulsa <Info> para ver la barra de controles disponibles en modo reproducción.
Pulsa <Arriba/Abajo/Izquierda/Derecha/OK> para seleccionar carpetas y ficheros en el navegador.
Pulsa <OK> para comenzar la reproducción del fichero seleccionado.
Pulsa <Rojo> para pausar/reanudar.
Pulsa <Verde> para avanzar paso a paso.
Pulsa <Amarillo> para avanzar rápidamente a velocidad x2, x4, x8, x16, x32, normal.
* No se garantiza la compatibilidad con cualquier tipo de archivo contenedor y/o codec de audio / video.
16
Figura 17. Mis Películas - Navegador
Figura 18. Mis Películas - Reproducción
5.3.4.MisGrabaciones
Dentro de Mis Grabaciones puedes ver los programas grabados y configurar las opciones de
grabación.
Nota: el sistema de ficheros del dispositivo de almacenamiento externo debe ser FAT o FAT32.
≥ Lista de Grabaciones
Reproduce o borra los programas grabados.
≥ Dispositivo de grabación
Selecciona el dispositivo de almacenamiento y la partición donde se guardarán las grabaciones.
También ofrece la posibilidad de formatear. Usa esta opción con precaución puesto que borrará
todos los datos del disco <Verde> / partición <Rojo> seleccionado.
≥ Preferencias de grabación
Capacidad Time Shift
El tamaño dedicado a Time Shift se calcula automáticamente dependiendo de la capacidad del
dispositivo de almacenamiento y no puede ser modificado por el usuario.
Time Shift
Pause: Timeshift activo al pulsar <Pause>
Auto: Timeshift activo continuamente
Off: Timeshift desactivado
Grabación con una tecla
Activado: con sólo pulsar el botón <Record> comience la grabación.
Desactivado: al pulsar <Record> aparece un menú donde deberás seleccionar la duración de la
grabación
Periodo de grabación por defecto
Selecciona el periodo de grabación por defecto desde 15 minutos hasta 8 horas en intervalos de
15 minutos.
17
Figura 19. Mis Grabaciones
Figura 20.Lista de grabaciones
Figura 21. Dispositivo de grabación
Figura 22. Preferencias de grabación
5.4. ACCESSORIOS
Hay tres opciones: Gomoku, Calendario y Calculadora.
5.4.1.Gomoku
Pulsa <Arriba/Abajo/Izquierda/Derecha> para establecer el modo de juego y la dificultad. Pulsa
<OK> para iniciar el juego.
Pulsa <Arriba/Abajo/Izquierda/Derecha> para seleccionar la posición. Pulsa <OK> para colocar la
pieza.
5.4.2.Calendario
Muestra el año, mes y día.
5.4.3.Calculadora
Realiza cálculos sencillos.
18
6. FUNCIONAMIENTONORMAL
Se considera funcionamiento normal cuando el EnergyTV está siendo utilizado para ver TV o escuchar radio digital. Ver Figura 23, Figura 24, .
Figura 23. TV
Figura 24. Radio
6.1. INFORMACIÓN
1. Pulsa <Info> una vez para visualizar la barra de información. La barra muestra: número y
nombre de canal, hora actual, programa actual y próximo, información de teletexto y subtítulos e
indicadores de los atributos ‘favorito’, ‘codificado’ y ‘bloqueado’. Ver Figura 25.
2. Pulsa <Info> otra vez para visualizar información detallada del programa actual.
3. Pulsa <Info> por tercera vez para mostrar la información del canal actual. Ver Figura 26.
Figura 25. Barra de información
Figura 26. Información del canal
6.2. CAMBIARCANAL
Cambia de canal usando cualquiera de estas posibilidades:
≥ Pulsando <CH+/CH->
≥ Marcando el número del canal directamente mediente los botones numéricos. Si el canal no existe
el EnergyTV ignorará la operación.
19
≥ Pulsando <Recall> para cambiar al canal sintonizado anteriormente.
6.3. VOLUMEN
Pulsa <Vol-/Vol+> para ajustar el volumen. Pulsa <Mute> para desactivar el sonido.
Si ajustas el volumen mientras el sonido está desactivado (Mute) se activará el sonido.
6.4. LISTADECANALES
Pulsa <OK> para mostrar la lista de canales con su número, nombre, bloqueo, etc. Ver Figura 27.
≥ Pulsa <Arriba/Abajo/Izquierda/Derecha> para cambiar el canal.
≥ Pulsa <OK/Exit> para volver al modo de reproducción normal.
Figura 27. Lista de canales
Figura 28. Canales de audio
6.5. AUDIO
Cambia el canal de sonido y el modo de sonido: LR (estéreo), LL (izquierdo) o RR (derecho). Si has
establecido el idioma de audio en Configuración->Instalación->Idioma de audio, el canal de idioma de
audio por defecto será el especificado en esa opción. Ver Figura 28.
≥ Pulsa <Audio> para mostrar la configuración del canal de audio.
≥ Pulsa <Arriba/Abajo> para seleccionar el canal / PID de audio o la opción Modo de sonido.
≥ Pulsa <Izquierda/Derecha> para ajustar el valor.
6.6. PAUSA
Pausa la imagen y el sonido. Al presionar cualquier tecla se reanudará la reproducción.
6.7. FAVORITOS
Para detalles acerca de cómo incluir un canal en una categoría de favoritos, ver la sección “Favoritos” en pág. 12. El grupo seleccionado aparece marcado en la barra de información.
≥ Pulsa <Amarillo> para cambiar el grupo de favoritos en la Lista de canales.
≥ Pulsa <CH+/CH-> para cambiar de un canal a otro dentro del mismo grupo de favoritos.
20
6.8. TELETEXTO
Muestra en pantalla el teletexto. El estilo del teletexto puede ser diferente dependiendo del proveedor de contenidos. Ver Figura 29, Figura 30.
≥ Pulsa <Text> para mostrar la pantalla de opciones de teletexto.
≥ Pulsa <Arriba/Abajo> para seleccionar el idioma del teletexto.
≥ Pulsa <OK/Exit> para salir de la pantalla de opciones de teletexto.
≥ Pulsa <0~9/Arriba/Abajo/Izquierda/Derecha> para cambiar la página de teletexto.
Figura 29. Configuración de Teletexto
Figura 30. Teletexto
6.9. SUBTÍTULOS
Muestra subtítulos en pantalla. El estilo de los subtítulos puede ser diferente dependiendo del
proveedor de contenidos. Ver Figura 31, Figura 32.
≥ Pulsa <Subtitle> para mostrar la pantalla de opciones de subtítulos.
≥ Pulsa <Arriba/Abajo> para seleccionar el idioma de subtítulos.
≥ Pulsa <OK/Exit> para salir de la pantalla de opciones de subtítulos.
Figura 31. Opciones de Subtítulos
Figura 32. Subtítulos
6.10. SUBTÍTULOSDETELETEXTO
Muestra subtítulos de teletexto. El estilo de los subtítulos de teletexto puede ser diferente dependiendo del proveedor de contenidos. Ver Figura 33, Figura 34.
≥ Pulsa <Text/Subtitle> para mostrar la pantalla de opciones de teletexto o subtítulos.
≥ Pulsa <Izquierda/Derecha> para seleccionar “TTX Subtítulos”.
≥ Pulsa <Arriba/Abajo> para seleccionar el idioma de subtítulos de teletexto.
≥ Pulsa <OK/Exit> para salir de la pantalla de configuración.
Figura 33. Idioma Teletexto
Figura 34. Subtítulos TTX
6.11. GUÍA
Pulsa <EPG> en el modo de reproducción normal. Ver “Guía” on page 14.
6.12. MENSAJES
Para informar del estado el EnergyTV pueden utilizar los mensajes explicados a continuación:
≥ No hay señal
El EnergyTV no recibe correctamente la señal. Por ejemplo, el cable de antena está desconectado.
≥ Sin servicio
El canal sintonizado no está emitiendo ningún programa.
≥ Servicio codificado
El canal está codificado. Contactar con el proveedor de contenidos para saber cómo descodificarlo (normalmente son canales de pago).
≥ Sobrecarga de antena
La alimentación de la antena está sobrecargada.
≥ HDTV No compatible
El EnergyTV soporta SDTV pero no HDTV.
≥ Canal bloqueado
El canal (o el programa) está bloqueado (ver “Bloqueo” on page 13) y está activada la opción de
pedir contraseña si el canal está bloqueado (ver “Bloqueo de canales” on page 11). Debes introducir
la contraseña correcta para ver el canal. Ver Figura 35.
Figura 35. Canal protegido por contraseña
6.13. AJUSTESDEPANTALLA
Pulsa el botón SETUP para cambiar los parámetros de pantalla.
Figura 36. Ajustes de pantalla
23
7. SOLUCIÓNDEPROBLEMAS
Si tienes problemas con el uso del EnergyTV o su instalación lee detenidamente los capítulos del
manual que hagan referencia a esos términos y esta tabla.
Problema
Posible causa
Solución
Sin señal
Antena desconectada
Comprobar conexión antena
Antena dañada/desalineada
Comprobar antena
Fuera de cobertura
Consultar con proveedor
Sin imagen ni
sonido
Salida seleccionada
incorrecta
Pulsa el botón DTV/AV
Pulsa el botón SCREEN
Pulsa el botón SPEAKER
Mensaje de canal
encriptado
El canal es de pago
Seleccionar otro canal
El mando a distancia no responde
El dispositivo está desconectado
Enciende el dispositivo
El mando a distancia no está
orientado correctamente
Apunta directamente hacia el sensor en el frontal
del dispositivo
El panal frontal está
obstruido
Apartar los obstáculos entre el mando a distancia y
el dispositivo
La pila del mando a distancia
está insertada al revés
Comprobar la polaridad de las pilas
La pila del mando a distancia
está agotada
Reemplazar la pila en caso necesario
La antena puede no ser
compatible
Comprobar con el proveedor
Pixelación de la
imagen o imagen
congelada
Antena dañada/desorientada Comprobar antena
24
8. ESPECIFICACIONES
Item
Especificaciones
Conectores
Entrada RF
IEC 169-2
Audio estéreo
3.5 mm jack
Salida A/V
3.5 mm video compuesto (CVBS) + audio L/R
Entrada A/V
3.5 mm video compuesto (CVBS) + audio L/R
USB
Reproducción multimedia
FAT32
Algunos dispositivos USB pueden no ser
compatibles
Lector de tarjetas
Secure Digital / MMC / Memory Stick
Señal RF
Alimentación
VHF: 174 - 230 MHz
UHF: 470 - 862 MHz
Entrada
AC 100—240 V 50/60 Hz
DC 12 V
Pantalla
Consumo
12 W máx.
Tipo
Color TFT-LCD
Tamaño
7” (modelos 1070/2070) o 9” (modelo 2090)
Resolución
480 x 234 pixels
Dimensiones
220 x 125 x 31.5 mm (modelos 1070/2070)
265 x 155 x 32 mm (modelo 2090)
Especificaciones sujetas a cambios sin previo aviso
25
GARANTÍA
Durante un periodo de 36 meses a partir de la fecha de la primera compra del producto por el consumidor, de conformidad con el RDL 1/2007, Energy Sistem Soyntec S.A. responderá ante cualquier
falta de conformidad que exista en el momento de la entrega del Bien, en los términos y bajo las
condiciones establecidas en la citada norma.
En el caso de que el Bien no fuera conforme al contrato, y previa entrega del ticket de compra o
factura, se reconoce al comprador el derecho a la reparación del bien, a su sustitución o, subsidiariamente, a la rebaja del precio o a la resolución del contrato, de conformidad con la citada Norma.
Esta garantía no será aplicable si el defecto ha sido causado por el comprador y/o por cualquier
tercero debido a uso indebido, negligencia, uso o empleo del Bien distinto a aquel para el que fue concebido, uso o instalación del producto no conforme con las instrucciones del manual, o por cualquier
otra causa no relacionada con defectos de material o fabricación.
Esta garantía es independiente y compatible con la Garantía Legal establecida por el RD 1/2007.
FUNCIONAMIENTODELAGARANTÍA
1. Entrando en http://support.energysistem.com y tras seleccionar su producto podrá encontrar
FAQ’s (respuestas a preguntas más frecuentes), manuales, guías de usuario, drivers y actualizaciones.
2. Si no obtiene en la sección de soporte la solución, puede hacernos llegar su consulta o solicitud
de gestión de garantías a través del email: [email protected]
3. También ponemos a su disposición el teléfono para la gestión de garantía 902 294 294 (teléfono
de soporte técnico válido solo para España). Antes de efectuar la llamada telefónica tenga a
mano el Ticket o Factura de compra y el número de serie del producto.
4. Opcionalmente se puede dirigir al lugar donde compró el producto, presentando su Factura o
Ticket de compra.
Teléfono de Atención al Cliente (en España): 902 294 294
Las especificaciones están sujetas a cambios sin previo aviso.
© 2010 por Energy Sistem®. Todos los derechos reservados.
MARCASCOMERCIALES
Toda compañía, marca y nombres de producto son marcas comerciales o marcas comerciales
registradas de sus respectivas compañías.
26
DECLARACIÓNDECONFORMIDAD
Nombre del suministrador: Energy Sistem Soyntec S. A.
NIF: A53107488
Dirección: Pol. Ind. Finestrat – C/ Calpe, 1 – 03509 Finestrat Alicante
Tel: 902 388 388
Fax: 902 119 034
Declaramos bajo nuestra exclusiva responsabilidad la conformidad de los productos:
Energy Sistem® TV Multimedia Portátil Energy™ TV1070 Black
Energy Sistem® TV Multimedia Portátil Energy™ TV1090.
Energy Sistem® TV Multimedia Portátil Energy™ TV2070 Black/White/Pink
Energy Sistem® TV Multimedia Portátil Energy™ TV2090 Black
País de fabricación: China
A los que se refiere esta declaración, con la(s) norma(s) u otros documento(s) normativo(s) de
acuerdo con las disposiciones de la Directiva 93/68/CEE, del Parlamento Europeo y del Consejo de
22 julio de 1993, transpuesta a la legislación española mediante el Real Decreto 1950/1995, de 1 de
Diciembre de 1995.
27
User Manual
1. INTRODUCTION
To ensure your safety and the safety of others, please ensure that you read all the safety information
before operating this product.
Keep this information in a safe place for future reference.
WARNING: To reduce the risk of fire or electric shock, do not expose this apparatus to rain or
moisture.
Safety Considerations.
≥ Position the cables so that they cannot be walked on or pinched by items placed on or against
them.
≥ Do not use the device in humid or damp conditions.
≥ Do not allow the device to get wet.
≥ Do not expose the device to dripping or splashing.
≥ Do not place water filled objects such as vases on top of the device.
≥ Do not place naked flame sources, such as candles, on the top of the device.
Ventilation
The slots and openings on the device are for ventilation. Do not cover or block them as it may cause
overheating.
NEVER let children push anything into the holes or slots on the case.
Battery Disposal
Please ensure batteries are disposed of safely.
Never dispose of batteries in a fire or with other household waste.
Check with your local authority for disposal regulations.
3
Cleaning
ALWAYS unplug the product before you clean it.
Do not use liquid or aerosol cleaners.
Clean the device with a soft, damp (not wet) cloth.
ENERGyTVhandlingandcare
Place the product in a well-ventilated area
Don’t install it in the cold or under direct sunlight
Leave a minimum 10cm gap all around the product
Do not disassemble, repair,
or reorganize the product
Don’t place cups with water or other liquids
on the top of the product
Don’t place objects on the top of the product
4
2. CONTROLSANDCONNECTIONS
1 2
3 4
5 6
7
8
1. SETUP: Adjust brightness/contrast/color/hue of the screen in playback mode.
2. SOURCE: Select the input source.
3. CH+/- V+/-: Navigation buttons. Used to browse the menus and to confirm selection. In playback mode
changes channel / adjusts volume.
4. OK: Confirm a selection within a menu or show the channel list in DVB-T mode.
5. ASPECT: Switch between 4:3 and 16:9 aspect ratios.
6. MENU: Access the setup menu.
7. EXIT: Leave the current menu.
8. IR Sensor: Receives the signal from the remote control.
9. Antenna coaxial connector.
10. 3.5 mm (1/8”) TRRS A/V input.
11. 3.5 mm (1/8”) TRRS A/V output.
12. 3.5 mm (1/8”) Stereo earphone output.
13. Power Switch.
14. DC Power connection DC (12 V).
15. USB connector.
16. Card reader.
15
16
5
9
10
11
12
13
14
3. REMOTECONTROL
3.1. BUTTONDESCRIPTION
1 2
MUTE
EPG
INFO
RECORD
12 13
3
PAUSE
1
2
3
4
FAV
4
5
6
5
TV/
RADIO
7
8
9
6
STOP
0
AUDIO
15
TTX
16
14
CH+
7 8
VOL
+
OK
VOL
-
CH-
1.
2.
3.
4.
5.
6.
7.
8.
9.
10.
11.
12.
13.
9
MENU
10 11
SETUP
SCREEN
MUTE: Mute/unmute the sound.
EPG: Electronic Program Guide.
PAUSE: Pause or resume the playback.
FAV: Access your favorite channels.
TV/RADIO: Switch between TV and radio
channels.
STOP: Stops the playback or recording.
CH+/- V+/-: Navigation buttons. Used to browse
the menus and to confirm selection. In playback
mode changes channel / adjusts volume. In
timeshift mode work as reverse/forward.
OK: Confirms the selection.
MENU: Access the main menu.
SETUP: Adjust the brightness/contrast/color/hue
parameter of TFT screen.
SCREEN: Switch on/off the screen.
INFO: Display information about the channel
being viewed or special function indicated on
the menu.
RECORD: Record the program manually and
select the record duration if pressed twice.
EXIT/
RECALL
SUBTITLE
17 18
SPEAKER
ASPECT
19 20
14. Number keys: Select channels by number or use
when numerical input is required.
15. AUDIO: Selects between available audio tracks
or sets the sound mode as LR (stereo), LL (left)
or RR (right).
16. TTX: Teletext in DVB-T mode.
17. EXIT/RECALL: Return to the previous screen
or menu.
18. SUBTITLE: Switch among available subtitles.
19. SPEAKER: Enables/disables the integrated
speakers.
20. ASPECT: Switch between 4:3 and 16:9 aspect
ratios.
Note:
SUBTITLES/TEXT/AUDIO may not be available for all
channels.
A/V output is unavailable when working in A/V in
mode: it only works in DVB-T mode.
FUNCTION/SCREEN/SPEAKER/ASPECT will act
as RED/GREEN/YELLOW/BLUE key depending on
context.
6
3.2. BATTERy
Pull the battery loader out and insert a CR2025 battery.
Make sure to place the battery in the correct direction.
2
1
When not using the remote control for a long time remove the
battery.
When operating range reduces replace the battery.
4. BUILT-INRECHARGEABLEBATTERy(2070/2090MODELSONLy)
This portable TV uses a smart battery management system with low-battery detection.
≥ If the battery voltage falls below a specific value, the unit will enter low battery mode displaying a
flashing low battery icon in the OSD, indicating the user needs to recharge the TV immediately.
≥ If the AC/DC adapter is connected the battery will be charged whatever the power switch is on or
off.
≥ When the battery is almost exhausted a blinking empty battery icon will be displayed on the leftup corner. The screen and audio will be disabled but the system is still working. If the user plugs
the DC adaptor soon enough the system will resume playback.
5. USERINTERFACE
Note that the first time you use EnergyTV it will automaticaly show the Setup->Installation screen in
order to scan for TV and radio channels. Please refer to Setup->Installation in page 8.
Once the channel scan is finished and all the channels are stored into the database, you can start to
watch the digital terrestrial TV channel or listen to the radio broadcast, some typical operations are
given in this chapter.
Press <Menu> to enter Main Menu. See Figure 1.
Press <Info> to display EnergyTV version information.
7
Figure 1. Main Menu - Setup
5.1. SETUP
Set the system settings. See Figure 1.
5.1.1. Installation
Figure 2. SETUP - Installation
Figure 3. SETUP - Installation (continued)
Set the receiving and playing program settings of EnergyTV. See Figure 2, Figure 3.
Antenna Setting
Set the antenna power on or off to supply +5V power to antenna or not.
Note: The default is OFF, set this option to ON only if EnergyTV is connected to an active antenna
which amplifies the received RF signal, otherwise please set it to OFF.
Country Setting
Set the country for Auto Scan, Manual Scan and Time Zone.
Note: Change the Country Setting will automatically change the default Time Zone and set the default
8
Frequency and Bandwidth for Auto Scan.
OSD Language
Set the On Screen Display Language.
Audio Language
Set the audio language for watching a program (availability depends on channel broadcaster).
Subtitle Language
Set the language for displaying subtitle program (availability depends on channel broadcaster).
LCN
Set the Logical Channel Number to ON or OFF.
Note: LCN is a number that uniquely identifies a logical channel, which is popular in some European
countries such as England or France.
Auto Time Zone / Time Zone
Allows you to enable or disable auto time zone update. If you know the GMT (Greenwich Mean Time)
time zone offset of your location, set the Auto Time Zone to OFF and select an appropriate Time
Zone, otherwise set it to ON and let the system update the time zone automatically according to the
transport stream. See Figure 3.
Note: Some Countries are covered with more than one Time Zone.
Auto Scan
Auto Scan will erase the database first, and scan default frequency and bandwidth by Country
Setting.
Press <OK> button to start Auto Scan.
Press <OK> button to confirm clear action and start Auto Scan.
It costs time to do Auto Scan, you can press <Exit> button to exit at anytime. See Figure 4, Figure 5.
Figure 4. Clear database message
Figure 5. AutoScan Finished
9
Manual Scan
Press <GREEN> button to start Manual Scan.
Manual Scan adds the scanning results into database, it doesn’t erase the database. But you have to
indicate the Frequency and Bandwidth for scanning. If you scan the same Frequency and Bandwidth
more than once, the previous programs will be overwritten.
Press <GREEN> button to enter Manual Scan Page.
Press <Up/Down> button to select Frequency option.
Press <0~9> button to input the Frequency value.
Press <Up/Down> button to select Bandwidth option.
Press <Left/Right> button to set Bandwidth value.
Press <OK/Exit> button to start scan or exit. See Figure 6, Figure 7.
Figure 6. Manual Scan edit
Figure 7. Manual Scan finished
5.1.2.TVSetup
Setup the display mode for TV. See Figure 8.
Figure 8. TV Setup
10
TV Mode
Set PAL, NTSC or AUTO for display. AUTO will switch PAL or NTSC by program content. This setting
should be matched with user’s TV.
OSD Transparency
Set the On Screen Display transparency. “1” is the most transparent.
Banner Display Time
Set Banner display time. Banner does not automatically disappear when set as “Always” and
disappears at timeout when set to other values.
Figure 9. Password page
5.1.3.Password
Set password for menu, channel or censorship lock. And the user can change password here, the
default Password is 6666. See Figure 9.
Menu Lock
Password-lock the menus.
Channel Lock
Lock the channel which has been set to lock status when turning on the Channel Lock. Please see
section “Lock” on page 13 for details.
Censorship Lock
Lock the program by password and censorship threshold. The censorship info is in program content.
Under the censorship rating, user has to enter the right password for watching program.
Change Password
To change the Password, select this option, press <Left/Right> button to trigger changing password
11
and <0~9> buttons to enter old password, new password and confirm new password. If succeed,
the Password Changed message will be displayed, otherwise the Password Error message will be
displayed.
5.1.4.AdvanceTimer
User can set timer for watching the program by date and time manually or from the TV/Radio
Guide(see section “Guide” on page 14). When scheduled date/time arrives, EnergyTV will automatically
switch to the scheduled program. Press any key except <Vol-/Vol+/Mute> button, EnergyTV will ask
you to abort it or not when watching booked program. You can delete the event while it is not running.
5.1.5.SetDefault
Restore EnergyTV to factory default settings. All user settings will be restored to factory default
values and the TV/radio channel database will be erased together.
5.1.6.SWUpdate
Updates EnergyTV firmware by USB.
5.2. TV/RADIO
There are two types of programs: TV and Radio.
The operation of the List and Guide of TV and Radio are almost the same. Herein take TV as an
example.
5.2.1.List
Figure 10. TV List
There are several options to manage channels:
Favorites
12
User can quickly arrange the favorite programs by favorite filter. There are 8 groups of favorite
channels: News, Sport, Movie, Music, Shopping, Travel, Boy and Girl. Press <1~8> button to set or
clear the favorite group when Favorites option is selected.
Lock
Lock will ask for the password before watching this program when Setup -> Password ->Channel
Lock is turned on. Please see section “Channel Lock” on page 11 for details. Press <OK> button to set
or clear lock status when Lock option is selected.
Edit
You can edit the program name, maximum length is 20 characters.
Press <Left/Right> button to select Edit option and <Up/Down> button to select the program.
Press <OK> button to display program info and press it again to edit program name.
Press <Up/Down/Left/Right/0~9/RED/GREEN> button to select the character.
Press <OK> button to finish the editing and return to previous program info page.
Press <RED> button to save the editing and return to List or press <Exit> button to return to List
without saving.
Move
Move will allow you to move the position of the channels in the list.
Note: This option will not appear when SETUP->Installation->LCN is set to ON.
Sort
Sort will allow you to sort the channels by A<->Z or Pay<->Free.
Note: This option will not appear when SETUP->Installation->LCN is set to ON.
Skip
Skip will skip the program when changing a program by CH+/-. Press <OK> button to set or clear skip
status when Skip option is selected.
Delete
Delete will delete the program permanently from the database. You must rescan to recover it.
Press <OK/GREEN> button to set delete one or delete all when Delete option is selected.
Search
User can search the program name by partial keyword.
Press <Left/Right> button to select Search option.
Press <OK> button to entry search page.
Press <Up/Down/Left/Right/OK/0~9/RED/GREEN> button to input keyword.
13
Press <OK> button to Search and return List. The matched program will be focused.
Press <GREEN/YELLOW> button to the next or previous matched program.
5.2.2.Guide
Guide is also known as EPG (Electronic Program Guide). See Figure 11, Figure 12.
Press <Up/Down> button to select program or EPG event.
Press <Left/Right> button to change event or date.
Press <OK> button to exit all the menus or show the detailed information of a selected event (availability depends on channel broadcaster).
Press <Exit> button to exit to previous menu.
Press <RED> button to enter Book page and <YELLOW> button to save after edition. If it’s in conflict
with itself or other event, a conflict message will be displayed. The successful booking will be added
to Main Menu-> Setup-> Advanced Timer(see section 5.1.4 on page 12).
Figure 11. Guide - Event
Figure 12. Guide - Event (detail)
5.3. MULTIMEDIA
Multimedia must be used with external USB device inserted, otherwise the “Device is not ready!”
message will be displayed. If you remove the USB device a “Device is removed!” message will be
shown and the system will return to Main Menu.
5.3.1.MyAlbum
Use this option to view JPEG/BMP/GIF files.
If there are photos in the device root folder it will start in Thumbnail mode, otherwise it will start in
Folder mode. Press <Blue> button to switch to Folder mode and <Exit> button to return to Thumbnail
mode again.
The info (width x height and date) of selected photo will be displayed at the left bottom in Thumbnail
14
mode and right up in Folder mode. See Figure 13,Figure 14.
Figure 13. My Album - Thumbnails
Figure 14. My Album - Folder
Use <Up/Down/Right/OK> to browse folders or files.
Press <OK> to view the selected photo and press again to start slide show.
Press <Info> to view the available functions.
Zoom
Press <RED> to zoom in / zoom out the photo in view mode. The zoom factor can be:
25-50-100-150-200 %
If zoom factor is greater than 100% you can use <Up/Down/Left/Right> to move through the zoomed
picture.
Rotation
Press <Left/Right> to rotate clock/counterclockwise and <Yellow/Blue> to flip horizontal or vertical
direction.
Slide show
Press <OK> to view the photo in Thumbnail or Folder mode and press it again to start the slide show.
Press <Red> to play/pause the slide show.
Press <Green> to set background music while slide show is running.
Press <Yellow> to switch between repeating modes.
Press <Blue> to set the time gap between photos.
Press <Up/Down> to manually select the previous/next photo.
5.3.2.MyMusic
Use this option to listen to MP3/WMA files.
The music jukebox display includes (see Figure 15, Figure 16):
≥ Progress bar with elapsed and total playing time.
15
≥ Audio spectrum visualizer.
Press <Up/Down/Left/Right/OK> to browse folders and files.
Press <RED> to play or pause.
Press <GREEN> to stop.
Press <YELLOW> to set play mode as Repeat All / Repeat Random / Repeat Off.
Press <BLUE> to set fast forward speed as x2 / x3 / x4 / normal.
Press <Left/Right/Mute> button to adjust volume while playing.
Figure 15. My Music - Browser
Figure 16. My Music - Play
5.3.3.MyMovie
My Movie can play most of MPEG2, DivX, Xvid standard-resolution files.*
It displays the playing file name at the top left corner and use the INFO key to get the current playing
time and total time information while playing. See Figure 17, Figure 18.
Press INFO button to select device if an external USB hub connected while browsing, and to show the
control info bar while playing.
Press <UP/DOWN/LEFT/RIGHT/OK> to select folders and files during browsing
Press <OK> button to select a file to play.
Press <RED> button to play or pause while playing.
Press <GREEN> button to play the frame one by one while playing.
Press <YELLOW> button to set fast backguard speed as x2,x4,x8,x16,x32, normal.
16
Figure 17. My Movie - Browser
Figure 18. My Movie - Play
* Multimedia files compatibility depends on container file format and audio / video codec
5.3.4.MyRecord
Within My Record you can view the programs already recorded and configure recording options.
Note: the external storage device file system must be FAT or FAT32.
≥ Recorded List
View or delete recorded programs.
≥ Recording Device
Select the storage device and partition where the recordings will be stored.
≥ Recording Preference
Time Shift Size
Note that Time Shift Size is calculated automatically according to the current storage device or
partition and cannot be modified.
Time Shift
Pause: Timeshift starts when <Pause> button is pressed.
Auto: Timeshift is continuously active.
Off: Timeshift disabled
One Button recording
On: EnergyTV starts recording with a simple <Record> button press.
Off: After pushing <Record> you have to specify the lenght of the recording.
Default recording period
Specify the default recording period from 15 minutes to 8 hours in 15-minutes steps.
17
Figure 19. My Record
Figure 20.Recorded list
Figure 21. Recording Device
Figure 22. Recording Preferences
5.4. ACCESSORy
There are three options: Gomoku, Calendar, Calculator.
5.4.1.Gomoku
Press <Up/Down/Left/Right> button to set play mode and difficulty. Press <OK> button to start play
Gomoku.
Press <Up/Down/Left/Right> button to select the position. Press <OK> button to place the piece.
5.4.2.Calendar
Displays the year, month and day.
5.4.3.Calculator
For mathematical calculations.
6. NORMALPLAy
18
Normal Play means EnergyTV under watching TV or listening to the Radio. See Figure 23, Figure 24, .
Figure 23. Normal Play - TV
Figure 24. Normal Play - Radio
6.1. INFORMATION
Press <Info> button once to display info banner. Banner displays the program No., favorite setting,
current time, program name, now and next event, lock, scramble, subtitle and teletext info. See
Figure 25.
Press <Info> button when banner exists to display detailed info of a present event
Press <Info> button when detail exist to display current program info. See Figure 26.
Figure 25. Information banner
Figure 26. Program Info
6.2. SWITCHPROGRAM
User can switch program by <CH+/-> or input channel number directly. If the input program number
doesn’t exist, EnergyTV will ignore the input.
Press <Recall> button to switch to the last watched channel from the current program.
6.3. VOLUME
Press <Vol-/Vol+> button to adjust the volume. Press <Mute> button to mute.
If you adjust the volume while on mute, mute will be cancelled.
6.4. PROGRAMLIST
19
Press <OK> button to display Program List with No., name and lock/scramble/skip status. See Figure
27.
Press <Up/Down/Left/Right> to change the channel. Press <OK/Exit> to return to the normal play
mode.
Figure 27. Program List
Figure 28. Audio Channels
6.5. AUDIO
Switch the sound channel and switch sound mode to LR(stereo) or LL(left) or RR(right). If setting
audio language at Setup->Installation->Audio Language, the audio channel default language will be
chosen by setting. See Figure 28. Press <Audio> button to display the audio channel page.
Press <Up/Down> button to select Channel/Audio PID or Sound Mode option.
Press <Left/Right> button to set the value.
6.6. PAUSE
Pause video and audio. But it will be cancelled by any input.
6.7. FAVORITES
User can switch the favorite programs in the same favorite group. About favorites settings, see
section “Favorites” on page 12 for details.
Press <YELLOW> button to switch to the favorite group in Program list.
Press <CH +/-> button to switch to the same favorite program in normal play mode.
6.8. TELETEXT
Display teletext on screen, the style of teletext may be different by content provider. See Figure 29,
Figure 30.
Press <Text> button to display the teletext setting page.
Press <Up/Down> button to select the teletext language if the program has teletext (availability
depends on channel broadcaster).
20
Press <OK/Exit> button to exit the teletext setting page.
Press <0~9/Up/Down/Left/Right> button to change teletext page (if available).
Figure 29. Teletext settings
Figure 30. Teletext
6.9. SUBTITLES
Display subtitles on screen. The style of subtitles may be different by content provider (availability
depends on channel broadcaster). See Figure 31, Figure 32.
Press <Subtitle> button to display subtitle setting page.
Press <Up/Down> button to select subtitle language, if subtitles are available.
Press <OK/Exit> button to exit subtitle setting page.
Figure 31. Subtitle settings
Figure 32. Subtitles
6.10. TELETEXTSUBTITLE
Display subtitle by teletext, the style of the teletext subtitle may be different by content provider
(availability depends on channel broadcaster). See Figure 33, Figure 34.
Press <Text/Subtitle> button to display teletext or subtitle setting page. Press <Left/Right> button
to select “TTX Subtitle”.
21
Press <Up/Down> button to select teletext subtitle language. Press <OK/Exit> button to exit the
setting page.
Figure 33. Teletext language
Figure 34. Teletext subtitles
6.11. GUIDE
Press <EPG> button at normal play state, see section “Guide” on page 14 for details.
6.12. MESSAGES
There are some messages to inform user the current status of the EnergyTV.
≥ No Signal
If the EnergyTV can’t get the signal, for example if the antenna cable is disconnected.
≥ No Service
Program doesn’t have any contents to play.
≥ Encoded Service
Program is encoded for payment, you need to contact with the content provider to know how to
decode it.
≥ Antenna Overload
The power of antenna is overloaded.
≥ HDTV Not Support
If the program content is HDTV format, EnergyTV doesn’t support it.
≥ Channel Locked
Program is locked by setting lock (see section “Lock” on page 13) and turning on channel lock in
password setting (see section “Channel Lock” on page 11). You must input the correct password to
watch the channel. See Figure 35.
22
Figure 35. Password-locked channel
6.13. SCREENSETTING
Press the SETUP button to change the parameters of the image.
Figure 36. Picture settings
23
7. TROUBLESHOOTING
If you experience problems with this receiver or its installation, in the first instance please read carefully the
relevant sections of this User Manual and this Troubleshooting section.
Problem
Possible cause
Solution
No signal found
Aerial is disconnected
Check aerial lead
Aerial is damaged/misaligned Check aerial
Out of digital signal area
Check with dealer
No picture or
sound
Viewing incorrect output
Press the DTV/AV button
Press the SCREEN button
Press the SPEAKER button
Encrypted channel
message
It’s a pay-per-view channel
Select an alternative channel
No response from
remote control
Device is switched off
Plug in and turn on the device
Remote control is not aimed
correctly
Aim the remote control directly at the sensor on the
front of the player
Front panel is obstructed
Remove any obstacles between the remote control
and the sensor
Remote control batteries
inserted incorrectly
Check the polarity of the batteries
Remote control batteries
exhausted
Replace the batteries if necessary
Aerial may not be compatible
Check with dealer
Square blocks in
picture or picture
freezes
Aerial is damaged/misaligned Check aerial
24
8. SPECIFICATIONS
Item
Specification
Connectors
RF in
IEC 169-2 female connector
Stereo headphones
3.5 mm jack
A/V out
3.5 mm Composite video (CVBS) + audio L/R
A/V in
3.5 mm Composite video (CVBS) + audio L/R
USB
Multimedia playback
FAT32
Some external hard disks may not be
supported
Card Reader
Secure Digital / MMC / Memory Stick
RF signal
Power
VHF: 174 - 230 MHz
UHF: 470 - 862 MHz
Input
AC 100—240 V 50/60 Hz
DC 12 V
Screen
Consumption
12 W max.
Type
Color TFT-LCD
Size
7” (1070/2070 models) or 9” (2090 model)
Resolution
480 x 234 pixels
Dimensions
220 x 125 x 31.5 mm (1070/2070 models)
265 x 155 x 32 mm (2090 model)
Specifications are subject to change without further notice.
25
WARRANTy
Energy Sistem Soyntec S.A. warrants its products to be free from defects in materials and workmanship at the time of purchase.
The warranty period is 36 months from the date of purchase.
WARRANTyPROCEDURE
≥ Visit the Support section at http://support.energysistem.com and select your product to view the
FAQ (Frequently Asked Questions). The solution to your problem is very likely to have been already
published there. You will also be able to download user manuals, user guides, drivers and updates.
≥ If you cannot find an appropriate solution in the Support section, you may send us your enquiry or
warranty service request by email: [email protected]
≥ Alternatively, you may prefer to contact the distributor from which you purchased the product,
presenting the purchase receipt or invoice.
Specifications are subject to change without notice.
© 2010 by Energy Sistem®. All rights reserved.
TRADEMARKS.
All company, brand and product names are trademarks or registered trademarks of their respective
companies.
DECLARATIONOFCONFORMITy
Manufacturer Name: Energy Sistem Soyntec S. A.
Address: Pol. Ind. Finestrat – C/ Calpe, 1 – 03509 Finestrat Alicante
Tel: 902 388 388
Fax: 902 119 034
NIF: A53107488
We declare under our own exclusive responsibility that the products:
Energy Sistem® Portable Multimedia TV Energy™ TV1070 Black
Energy Sistem® Portable Multimedia TV Energy™ TV1090
Energy Sistem® Portable Multimedia TV Energy™ TV2070 Black/White/Pink
Energy Sistem® Portable Multimedia TV Energy™ TV2090 Black
Are in compliance with the essential directives, norms and standards of the European Union 89/336/
EEC (EMC Directive).
Manufacturing country: China
26
www.energysistem.com