1
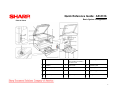
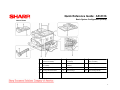
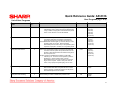
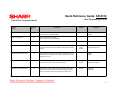
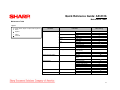
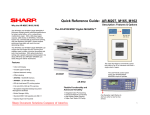
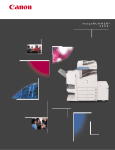
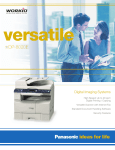
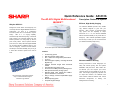
Quick Reference Guide: AR-5316
The AR-5316 Digital Multifunctional
IMAGER™
Why the AR-5316…
Designed for small offices and workgroups, the
new Sharp AR-5316 Digital IMAGER delivers the
performance you need in a multifunction
document system—all in a cost-efficient, compact
design.
With 11” x 17” copying capability,
standard 600 dpi host-based printing, a 250-sheet
paper capacity, and 100-sheet bypass tray, this
efficient performer can easily keep up with the
pace of busy offices. With an optional network
print server, the Sharp AR-5316 Digital IMAGER
can be easily shared by additional users in your
office or workgroup. Combine all these features
with Sharp’s world-class reliability, and you’ve got
a small office document system that’s hard to
beat.
Efficient, High-Quality Copying
The AR-5316 IMAGER provides many flexible
copy features designed to grow with your
business.
copy
With a speedy, 16 page-per-minute
speed
and
the
capability
to
output
documents at 11” x 17”, the AR-5316 IMAGER
delivers advanced flexibility for any small office or
workgroup.
With customer-replaceable supplies
that are easy to install, you can rest assured that
your workflow will always keep moving.
Shown with optional 40-sheet document feeder.
Features
9
9
9
16 PPM copy speed
600 dpi true laser quality output
25% - 400% zoom range with 8 preset ratios
9
X/Y Zoom
9
350-sheet paper capacity, including 100-sheet
Bypass Tray
Optional 40-sheet Single Pass Document
Feeder
Cost-effective Toner-Save mode
Scan-Once Print-Many Memory Management
600 dpi host-based PC printing system
Standard IEEE 1284 parallel and USB-1.1
ports for flexible PC connections
Easy to change, customer-replaceable supply
system
Network printing option
Compact wingless design
9
9
9
9
9
The user-friendly control panel makes it
easy to use the AR-5316 Imager’s
advanced copy features.
Description: Features & Options
9
9
9
Advanced Network Printing
Growing businesses or small workgroups can
easily add network printing with the optional
PRICOM™ 3100 print server. With a built-in RJ45 Ethernet port, this compact print server
connects directly into the parallel port of the AR5316. With simple, plug-and-play operation and
an easy-to-use interface, the PRICOM 3100
server delivers advanced features that include
web-based
management,
IP
filtering,
and
intelligent device monitoring.
1
Quick Reference Guide: AR-5316
Pre-Setup: Tools, Documentation, & Admonitions
Special Tools & Service Documentation
Description
Toolbox Basics
AR-5316, Service Manual
Mechanical
• Screwdriver, Phillips #2
• Screwdriver, Flat #1
Electrical
SM_AR-5316
Code: 00ZAR5316/A1E
AR-5316, Parts Guide
PG_AR-5316
Code: 00ZAR5316/P1E
*AR-RP6 / AR-SP6 Service
Manual
SM_AR-RP6 / AR-SP6
Code: 00ZARSP6//A1E
• Wrench, 1.5mm Hex head
• Feeler gauges
Part No.
Product
Code
Toner developer
cartridge (Black)
F-31381
AR-016DR
Drum cartridge
F-01381
* Download MSDSs at http://www.sharp-service.com
* Optional equipment
WARNING:
Electrical hazard.
Employ proper precautions when
working with high-voltage electrical
equipment.
• 30x lighted viewing device
Miscellaneous
• Alcohol
MSDS No.
AR-016TD
• Approved surge suppressor
• Clean, soft, lint-free cloths
Description
Electrical/Electronic Component
Admonitions
• Voltmeter
• ESD wrist or ankle strap
Material Safety Data Sheets
(MSDSs)*
!
Laser Admonition
For your protection, do
not remove protective
covers or bypass safety
interlocks.
E
S
D
CAUTION: Improper handling of
electronic components can damage
the equipment.
Properly ground and wear an
electro-static device (ESD) on your
wrist or ankle when working with
electronic modules. Similarly, use
anti-static bags to protect electronic
components during storage or
shipping.
2
Quick Reference Guide: AR-5316
Basic System Configuration
External Views
1
Glass cleaner
2
Document feeder cover
(when the SPF is installed) /
document cover
3
Document glass
4
Handles
5
Power switch
6
Operation panel
7
Paper output tray
8
Front cover
9
Paper trays
1
0
Side cover
11
Side cover handle
12
Bypass tray guides
1
3
Bypass tray
14
Bypass tray extension
15
Charger cleaner
3
Quick Reference Guide: AR-5316
Basic System Configuration (cont’d)
Internal Views
18
Document feeder tray (when
the SPF is installed)
19
Original guides (when the SPF
is installed)
20
Feeding roller cover (when the
SPF is installed)
21
Right side cover (when the SPF
is installed)
22
Exit area (when the SPF is
installed)
23
TD cartridge
24
TD cartridge strap
25
TD cartridge lock release lever
26
Roller rotating knob
27
Fusing unit release levers
28
Drum cartridge
29
Drum cartridge handle
30
Fusing unit paper guide
4
Quick Reference Guide: AR-5316
Optional Equipment
Optional Equipment
No.
Option Name
Model
1
40-Sheet Single Pass Feeder
AR-SP6N
2
Network Print Server
AR-PS3100
5
Quick Reference Guide: AR-5316
Adjustments
Adjustment Item List
Section
A
Adjustment Item
Process section
B
Mechanism section
Adjustment Procedure/SIM No.
(1)
Developing doctor gap adjustment
Developing doctor gap adjustment
(2)
MG roller main pole position adjustment
MG roller main pole position adjustment
(3)
Developing bias voltage check
(4)
Main charger voltage check
(1)
Image position adjustment
SIM-50
(2)
Main scanning direction (FR direction) distortion
balance adjustment
No. 2/3 mirror base unit installing position adjustment
(3)
Main scanning direction (FR direction) distortion
adjustment
Rail height adjustment
(4)
Sub scanning direction (scanning direction) distortion
adjustment
Winding pulley position adjustment
(5)
Main scanning direction (FR direction) magnification
ratio adjustment
SIM 48-1
(6)
Sub scanning direction (scanning direction)
magnification ratio adjustment
OC mode in copying (SIM 48-1)
Off center adjustment
OC mode (SIM 50-12)
(7)
Copy lamp unit installing position adjustment
SPF mode in copying (SIM 48-5)
SPF mode (SIM 50-12)
C
Image density
adjustment
(8)
SPF white correction pixel position adjustment
(required in an SPF model when replacing the lens
unit)
SIM 63-7
(1)
Copy mode
SIM 46-1
6
Quick Reference Guide: AR-5316
Simulation
Simulation
Entering the Simulation Mode
Perform the following procedure to enter the simulation mode.
SIM Codes
Please refer to the SIM Codes list (pages 1 through 4) that follows.
“#” key → Interrupt key → “C” key → Interrupt key →
Main code → Start key → Sub code → Start key
Canceling the Simulation Mode
When the clear all key is pressed, the simulation mode is cancelled.
When the interruption key is pressed, the process is interrupted and
the screen returns to the sub code entering display.
Note 1:
After canceling the simulation mode, be sure to turn the
OFF/ON power switch to the ON position.
Note 2:
If the machine is terminated by a jam error or paper empty
during copying in the adjustment by the simulation, recopying
is required.
7
Quick Reference Guide: AR-5316
Simulation (Pg. 1 of 4)
SIM Codes
Main
Code
Sub
Code
01
01
02
06
01
02
03
08
11
01
02
03
01
02
10
01
06
08
01
02
03
06
02
05
06
07
08
Contents
Mirror scanning operation
Mirror home position sensor (MHPS) status display
Mirror scanning operation aging
Single paper feeder (SPF) Aging
SPF sensor status display
SPF motor operation check
SPG paper feed solenoid operation check
SPF PS release solenoid operation check
Operation panel display check
Fusing lamp and cooling fan operation check
Copy lamp lighting check
Paper feed solenoid operation check
Resist roller solenoid operation check
Cassette semi-circular roller cleaning
Warm-up display and aging with jam
Intermittent aging
Shifting with warm-up display
Developing bias output
Main charger output (Grid = HIGH)
Main charger output (Grid = LOW)
Transfer charger output
8
Quick Reference Guide: AR-5316
Simulation (Pg. 2 of 4)
SIM Codes
(cont’d)
Main
Code
Sub
Code
10
14
16
20
21
22
01
01
01
02
03
04
05
08
09
12
13
14
15
17
18
21
22
Contents
Toner motor operation
Trouble cancel (except for U2)
U2 trouble cancel
Maintenance counter clear
Maintenance cycle setting
Maintenance counter display
Maintenance preset display
Jam memory display
Jam total counter display
Total counter display
SPF counter display
Paper feed counter display
Drum counter display
CRUM type display
P-ROM version display
Trouble memory display
Copy counter display
Printer counter display
Scanner counter display
SPF jam counter display
9
Quick Reference Guide: AR-5316
Simulation (Pg. 3 of 4)
SIM Codes
(cont’d)
Main
Code
Sub
Code
24
01
02
04
06
07
08
09
13
14
01
10
02
03
05
06
07
18
30
31
36
38
39
42
43
51
25
26
Contents
Jam total counter clear
Trouble memory clear
SPF counter clear
Paper feed counter clear
Drum counter clear
Copy counter clear
Printer counter clear
Scanner counter clear
SPF jam total counter clear
Main motor operation check
Polygon motor operation check
Size setting
Auditor setting
Count mode setting
Destination setting
Machine condition check (CPM)
Toner save mode setting
CE mark conformity control ON/OFF
Auditor mode exclusive setup
Cancel of stop at maintenance life over
Cancel of stop at drum life over
Memory capacity check
Transfer ON/OFF timing control setting
Side void amount setting
Copy temporary stop function setting
10
Quick Reference Guide: AR-5316
Simulation List (Pg. 4 of 4)
SIM Codes
(cont’d)
Main
Code
Sub
Code
30
42
43
01
01
01
12
13
34
40
01
02
09
10
11
18
19
44
46
48
49
50
51
53
61
63
64
20
29
30
31
01
05
01
12
01
06
10
12
02
08
10
03
01
07
01
Contents
Paper sensor status display
Developing counter clear
Fusing temperature setting
Standby mode fusing fan rotation setting
Fusing paper interval control allow/inhibit setting
Transfer current setting
Setting of rotation time before toner supply
Copy density adjustment (300 dpi)
Copy density adjustment (600 dpi)
Copy exposure level adjustment, individual setting (Text) 300 dpi
Copy exposure level adjustment, individual setting (Text) 600 dpi
Copy exposure level adjustment, individual setting (Photo) 600 dpi
Image contrast adjustment (300 dpi)
Exposure mode setting (Gamma table setting/AE operation mode setting/Photo image process
setting
SPF exposure correction
Image contrast adjustment (600 dpi)
AE limit setting
Image sharpness adjustment
Main scanning magnification ratio adjustment
SPF mode sub scanning magnification ratio adjustment in copying
Flash ROM program writing mode
Standby mode fusing fan RPM setting
Image lead edge adjustment
Copy lead edge position adjustment (SPF)
Paper off-center adjustment
Document off-center adjustment
Resist amount adjustment
SPF scanning position automatic adjustment
SPF scan position change-over setting
HSYNC output check
Shading check
SPF automatic correction
Self print
11
Quick Reference Guide: AR-5316
User Programs (Pg. 1 of 2)
List of User Programs
Program
Name
Program
No.
Description
Default
Parameters
Auto clear time
1
“Auto clear time” automatically returns the copy settings to the
initial settings when a certain period of time elapses after
a copy is made. This program is used to select the period
of time. “Auto clear time” can also be disabled.
60 sec
1 (OFF)
2 (10 sec)
3 (20 sec)
4 (60 sec)
5 (90 sec)
6 (120 sec)
Preheat mode
2
This function automatically switches the machine to a low power
consumption state if the set duration of time elapses
without the machine being used when the power is on.
The POWER SAVE indicator lights up, however, the keys on the
operation panel can be used. Normal operation
automatically resumes when a key on the operation panel
is pressed, a print job is received, or an original is placed.
1 min
1 (1 min)
2 (5 min)
3 (30 min)
4 (60 min)
5 (120 min)
6 (240 min)
Auto power shut-off timer
3
This function automatically switches the machine to a state that
consumes even less power than preheat mode if the set
duration of time elapses without the machine being used
when the power is on.
All lights except the POWER SAVE indicator and ON LINE
indicator go off. To resume normal operation, press the
[START] key. Normal operation also resumes
automatically when a print job is received or scanning is
begun from a computer. While in auto power shut-off
mode, no keys (except the [START] key) can be used.
5 min
1 (5 min)
2 (30 min)
3 (60 min)
4 (120 min)
5 (240 min)
Stream feeding mode
4
When copying using the SPF, during the period of time that the
SPF indicator blinks after an original has been scanned
(about 5 seconds), a subsequent original can be placed
and automatically fed into the machine.
OFF
0 (OFF)
1 (ON)
Auto power shut-off setting
5
Use this setting to enable or disable auto power shut-off.
ON
0 (OFF)
1 (ON)
12
Quick Reference Guide: AR-5316
User Programs (Pg. 2 of 2)
List of User Programs (cont’d)
Program
Name
Program
No.
Description
Default
OFF
Parameters
Auditing mode
10
Use to enable or disable “Auditing mode”.
“Auditing mode” is initially disabled.
0 (OFF)
1 (ON)
Account number entry
11
Use to set up account numbers.
Up to 20 accounts can be established.
--
--
Account number change
12
Use to change an account number.
--
--
Account number deletion
13
Use to delete an account number.
A single account number can be deleted, or all account numbers
at once.
Delete
Single
Account
Number of copies per account
14
This displays the number of copies made by each account. The
maximum count is 49,999. If this number is exceeded, the count
will start over from 0.
--
Resetting account
15
Use to reset the copy count of an account to 0. The copy count
of a single account or of all accounts can be reset.
Reset single
account
Resolution in Auto/Text mode
23
This setting is used to change the copy resolution in AUTO and
TEXT mode from 600 x 300 dpi to 600 x 600 dpi (high-quality
mode). Scanning is slower when high-quality mode is used.
300 dpi
0 (Delete single account)
1 (Delete all accounts)
0 (OFF)
1 (ON)
0 (Reset single account)
1 (Reset all accounts)
1 (300 dpi)
2 (600 dpi)
13
Quick Reference Guide: AR-5316
Maintenance Table
Maintenance Table
Legend
X Check (Clean, adjust, or replace when required.)
O Clean
Replace
∆
Unit Name
Optical section
Adjust
Part Name
Lamp unit
No. 2/3 mirror unit
Lubricate
CCD peripheral
Glass
Other
LSU○
Paper feed section
Paper transport section
Fusing section
Drive section
Paper exit section
Multi-paper feed section
Reflector
Mirror
Mirror
Pulley
Lens
Table glass
White plate
Drive wire
Rail
Document cover
Document size sensor
Dust-proof glass
Take-up roller
(manual/SPF)
Paper feed roller
Spring clutch
PS roller
Transport (paper exit)
rollers
Spring clutch
Upper heat roller
Pressure roller
Pressure roller bearing
Upper separation pawl
Lower separation pawl
Cleaning pad
Gears
Belts
Ozone filter
When Calling
○
○
○
X
○
○
○
X
X
○
○
○
○
○
○
○
○
○
○
○
X
X
X
X
X
X
X
14