1
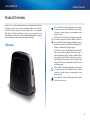
User Guide
Linksys WUMC710 Wireless-AC Universal Media Connector
Linksys WUMC710
Contents
Contents
Product Overview
Administration > Factory Defaults . . . . . . . . . . . . . . . . . . 12
LED panel . . . . . . . . . . . . . . . . . . . . . . . . . . . . . . . . . . . 2
Ports panel . . . . . . . . . . . . . . . . . . . . . . . . . . . . . . . . . . 3
Administration > Upgrade Firmware . . . . . . . . . . . . . . . . . 13
Factory Defaults
Upgrade Firmware
12
13
Status > Device . . . . . . . . . . . . . . . . . . . . . . . . . . . . . . 13
Device Information
Local Network
Wireless Security Checklist
Change the default wireless network name or SSID
Change the default password
Enable MAC address filtering
Enable encryption
4
4
4
4
General Network Security Guidelines . . . . . . . . . . . . . . . . . 4
Additional Security Tips . . . . . . . . . . . . . . . . . . . . . . . . . . 5
13
13
Status > Wireless Network . . . . . . . . . . . . . . . . . . . . . . . 13
Wireless
13
Troubleshooting
WUMC710 . . . . . . . . . . . . . . . . . . . . . . . . . . . . . . . . . . 14
Advanced Configuration
Specifications
How to access the browser-based utility . . . . . . . . . . . . . . . 6
Setup > Basic Setup . . . . . . . . . . . . . . . . . . . . . . . . . . . . 7
WUMC710 . . . . . . . . . . . . . . . . . . . . . . . . . . . . . . . . . . 15
Language
Network Setup
7
7
Wireless > Basic Wireless Settings . . . . . . . . . . . . . . . . . . . . 7
Basic Wireless Settings
Wireless Security
Wi-Fi Protected Setup
8
8
9
Wireless > Wireless Network Site Survey . . . . . . . . . . . . . . . 10
Wireless Network Site Survey
10
Wireless > QoS . . . . . . . . . . . . . . . . . . . . . . . . . . . . . . . 11
Wireless
11
Administration > Management . . . . . . . . . . . . . . . . . . . . 12
Management
12
i
Linksys WUMC710
Product Overview
Product Overview
Thank you for choosing the Linksys Wireless-AC Universal Media Connector.
The media connector can connect any wired Ethernet device to your wireless
network. The media connector is based on Wireless-AC, so it is compatible
with Wireless-N (5 GHz) and Wireless-A routers or access points. For firsttime installation, follow the steps in the Quick Installation Guide. To configure
advanced settings, use the convenient browser-based utility.”
LED panel
Wireless (Blue) The Wireless LED lights up when there
is a wireless connection. The LED flashes when the media
connector is actively sending or receiving data over the
wireless network.
Wi-Fi Protected Setup Button If your router supports WiFi Protected Setup and uses WPA or WPA2 security, then
you can use Wi-Fi Protected Setup to automatically connect
the media connector. To use Wi-Fi Protected Setup, refer to
“Wireless > Basic Wireless Settings” on page 7.
Wi-Fi Protected Setup LED (Blue/Amber) The LED flashes
blue for two minutes during Wi-Fi Protected Setup. It
lights up blue when wireless security is enabled. If there
is an error during the Wi‑Fi Protected Setup process, then
the LED lights up amber. Make sure the network router
supports Wi‑Fi Protected Setup. Wait until the LED is off,
and then try again.
Ethernet (Blue) The Ethernet LED lights up when there
is a wired connection. The LED flashes when the media
connector is actively sending or receiving data over the
Ethernet port(s).
Power (Blue) The Power LED lights up when the media
connector is powered on.
2
Linksys WUMC710
Product Overview
Ports panel
Ethernet These four Ethernet ports connect the media
connector to a computer or other Ethernet network
device.
Power The Power port connects the media connector
to the included power adapter.
Reset (on bottom) There are two ways to reset the
media connector’s factory defaults. Either press and
hold the Reset button for approximately five seconds,
or restore the defaults from Administration > Factory
Defaults in the media connector’s browser-based
utility. The Reset button is located on the bottom.
3
Linksys WUMC710
Wireless Security Checklist
Wireless Security Checklist
Wireless networks are convenient and easy to install, so homes with highspeed Internet access are adopting them at a rapid pace. Because wireless
networking operates by sending information over radio waves, it can be more
vulnerable to intruders than a traditional wired network. Like signals from your
cellular or cordless phones, signals from your wireless network can also be
intercepted. Since you cannot physically prevent someone from connecting to
your wireless network, you need to take some additional steps to keep your
network secure.
Enable MAC address filtering
Change the default wireless network name or SSID
Enable encryption
Wireless devices have a default wireless network name or Service Set Identifier
(SSID) set by the factory. This is the name of your wireless network, and can be
up to 32 characters in length. You should change the wireless network name
to something unique to distinguish your wireless network from other wireless
networks that may exist around you, but do not use personal information (such
as your Social Security number) because this information may be available for
anyone to see when browsing for wireless networks.
Encryption protects data transmitted over a wireless network. Wi-Fi Protected
Access (WPA/WPA2) and Wired Equivalent Privacy (WEP) offer different levels of
security for wireless communication.
Change the default password
WEP is an older encryption standard and may be the only option available on
some older devices that do not support WPA.
For wireless products such as access points and routers, you will be asked for
a password when you want to change their settings. These devices have a
default password set by the factory. The Linksys default password is admin.
Hackers know these defaults and may try to use them to access your wireless
device and change your network settings. To thwart any unauthorized changes,
customize the device’s password so it will be hard to guess.
Linksys routers give you the ability to enable Media Access Control (MAC)
address filtering. The MAC address is a unique series of numbers and letters
assigned to every networking device. With MAC address filtering enabled,
wireless network access is provided solely for wireless devices with specific MAC
addresses. For example, you can specify the MAC address of each computer in
your home so that only those computers can access your wireless network.
A network encrypted with WPA/WPA2 is more secure than a network encrypted
with WEP, because WPA/WPA2 uses dynamic key encryption. To protect the
information as it passes over the airwaves, you should enable the highest level
of encryption supported by your network equipment.
General Network Security Guidelines
Wireless network security is useless if the underlying network is not secure.
••
Password protect all computers on the network and individually
password protect sensitive files.
••
Change passwords on a regular basis.
••
Install anti-virus software and personal firewall software.
••
Disable file sharing (peer-to-peer). Some applications may open file
sharing without your consent and/or knowledge.
4
Linksys WUMC710
Wireless Security Checklist
Additional Security Tips
••
Keep wireless routers, access points, or gateways away from exterior
walls and windows.
••
Turn wireless routers, access points, or gateways off when they are not
being used (at night, during vacations).
••
Use strong passphrases that are at least eight characters in length.
Combine letters and numbers to avoid using standard words that can be
found in the dictionary.
5
Linksys WUMC710
Advanced Configuration
Advanced Configuration
Après avoir configuré le connecteur multimédia en suivant les étapes du
guide d’installation rapide, le connecteur multimédia est prêt à être utilisé.
Cependant, si vous souhaitez modifier ses paramètres avancés, utilisez
l’utilitaire basé sur le navigateur Web du connecteur multimédia. Le présent
chapitre explique chaque page Web de l’utilitaire et les principales options
proposées sur chacune. Vous pouvez accéder à l’utilitaire depuis un navigateur
Web sur un ordinateur connecté au réseau du connecteur multimédia.
The browser-based utility has these main tabs: Setup, Wireless, Administration,
and Status. Additional tabs will be available after you click one of the main tabs.
How to access the browser-based utility
Use a web browser to access the browser-based utility.
If the media connector is connected to a network with a DHCP server (usually
the network router), then the media connector will obtain its IP address from
the DHCP server. If there is no DHCP server, then the media connector will use
its default IP address, 10.100.1.1 (for example, if the media connector is not
connected wirelessly to any device but is connected directly to a computer
with an Ethernet cable). If you set a permanent static IP address on the media
connector through the browser-based utility, then enter the static IP address
instead.
NOTE
If you do not know the media connector’s IP address, then find its
IP address in the DHCP clients table of your router. (Refer to the
documentation for your router.)
If you cannot locate the media connector’s IP address, you can reset
the media connector; press the Reset button on the media connector
for approximately five seconds, using a straightened paper clip. This
will reset the media connector back to the factory default settings.
The media connector will request an IP address from the DHCP server
(usually the network router). If no DHCP server is found (for example,
if the media connector is not connected wirelessly to any device but
is connected directly to a computer with an Ethernet cable), then the
media connector will use its default IP address, 10.100.1.1, until it
detects a DHCP server and is assigned a dynamic IP address.
Launch your web browser, and enter the media connector’s IP address (the
default setting is 10.100.1.1) in the Address field. Press Enter.
A password request screen appears. (Non-Windows 7 users will see a similar
screen.) Leave the User name field blank. Enter the password you created. If you
did not create a new password, use the default password admin. (You can set
a new password from the Administration > Management screen.) Click OK to
continue.
NOTE
If the password request screen does not appear, wait two minutes
and try again.
6
Linksys WUMC710
Advanced Configuration
Setup > Basic Setup
Network Setup
The first screen that appears is the Basic Setup screen. Use this screen to change
the browser-based utility’s language, or to change the media connector’s wired
Ethernet network settings.
This section determines if the media connector’s IP address is obtained
automatically from a DHCP server, such as your network router (Automatic
Configuration - DHCP), or set manually (Static IP).
Device IP If your network has a DHCP server, such as your network router,
assigning IP addresses to your network devices, then keep the default,
Automatic Configuration - DHCP. The media connector will request an
IP address from the DHCP server (usually the network router). If no DHCP
server is found, then the media connector will use its default static IP address,
10.100.1.1, until it detects a DHCP server and is assigned a dynamic IP address.
If you want to set a permanent static IP address for the media connector, then
select Static IP.
If you select Static IP, then complete the following fields:
••
Static IP Address Enter a unique IP address that will be used to access the
browser-based utility.
••
Subnet Mask Enter the subnet mask of your wired network.
••
Default Gateway Enter the IP address of the default gateway for your
network (in most cases, this is your router).
Click Save Settings to apply your changes, or click Cancel Changes to cancel
your changes.
Wireless > Basic Wireless Settings
Language
Language This is used to set the language displayed by the browser-based
utility. Select the desired language from the drop-down menu.
Use the Basic Wireless Settings screen to configure the media connector’s basic
wireless and security settings.
There are two ways to configure the media connector’s settings, manual and
Wi-Fi Protected Setup. Wi-Fi Protected Setup is a feature that makes it easy to
set up your wireless network. If your network router supports Wi-Fi Protected
Setup and uses WPA or WPA2 security, then you can use Wi‑Fi Protected Setup
to automatically connect the media connector.
Configuration View To manually configure your wireless network, select
Manual. Refer to Basic Wireless Settings, page 8. To use Wi-Fi Protected
Setup, select Wi-Fi Protected Setup. Refer to Wi-Fi Protected Setup, page 9.
7
Linksys WUMC710
Basic Wireless Settings
Advanced Configuration
WPA Personal
WPA is a security standard stronger than WEP encryption.
Network Name (SSID) The SSID is the network name shared among all
points in a wireless network. The SSID must be identical for all devices in the
wireless network. It is case-sensitive and must not exceed 32 characters (use
any characters on the keyboard). Make sure this setting matches the setting on
your wireless router or access point.
Wireless Security
Passphrase Enter the key shared by the media connector and your wireless
router or access point. It must have 8-63 characters.
Click Save Settings to apply your changes, or click Cancel Changes to cancel
your changes.
WPA2 Personal
WPA2 is a more advanced, more secure version of WPA.
The media connector supports the following wireless security options: WPA
Personal, WPA2 Personal, and WEP. WPA (Wi‑Fi Protected Access) and WPA2
are stronger security methods than WEP (Wired Equivalent Privacy). For more
information about wireless security, refer to “Wireless Security Checklist” on
page 4.
Security Mode
Select the security method for your wireless network. If you do not want to use
wireless security, keep the default, Disabled.
NOTE
Remember that each device in your wireless network MUST use
the same security method and passphrase/key, or else the wireless
devices will not be able to communicate with each other.
Passphrase Enter the key shared by the media connector and wireless router
or access point. It must have 8-63 characters.
Click Save Settings to apply your changes, or click Cancel Changes to cancel
your changes.
8
Linksys WUMC710
Advanced Configuration
WEP
Wi-Fi Protected Setup
WEP is a basic encryption method, which is not as secure as WPA or WPA2.
There are two methods available. Use the method that applies to the router
you are using.
Key 1 Enter the WEP key of your network.
Tx Key Key 1 is the transmit key used by the media connector.
Authentication The default is Open, which uses open system authentication,
so the sender and recipient do not use a WEP key for authentication. Select
Shared to use shared key authentication, in which the sender and recipient
use a WEP key for authentication. Select Auto to allow either Open system or
Shared key authentication to be used.
Click Save Settings to apply your changes, or click Cancel Changes to cancel
your changes.
Method #1
Use this method if your router has a Wi-Fi Protected Setup button.
1. Click or press the Wi-Fi Protected Setup button on the router.
2. Within two minutes, click the Wi‑Fi Protected Setup button on the
media connector’s Wi-Fi Protected Setup screen.
3. After the media connector has been configured, click Close.
The Wi-Fi Protected Setup screen displays the Link Status, Network Name (SSID),
and Security method.
Method #2
Use this method if your router requests the PIN number of the media connector.
1. On the router’s Wi-Fi Protected Setup screen, enter the PIN number on
the media connector’s Wi-Fi Protected Setup screen. Then click Register
or the appropriate button. (It is also listed on the label on the bottom of
the media connector.)
2. On the media connector’s Wi-Fi Protected Setup screen, click OK.
3. After the media connector has been configured, click Close.
The Wi-Fi Protected Setup screen displays the Link Status, Network Name (SSID),
and Security method.
9
Linksys WUMC710
Wireless > Wireless Network Site Survey
Advanced Configuration
WPA
Click the Wireless Network Site Survey tab to begin a site survey. The Wireless
Network Site Survey screen lists the wireless networks detected by the media
connector.
Network Name (SSID) The name of the network you selected is automatically
displayed.
Security Mode WPA Personal is automatically displayed.
Passphrase Enter the key shared by the media connector and wireless router
or access point. It must have 8-63 characters.
Click Refresh to update the on-screen information.
After you have entered the security settings, click Connect.
Wireless Network Site Survey
WPA2
Number of Wireless Networks The number of wireless networks detected by
the media connector is displayed.
Select To connect to a wireless network, click Select. Then click Connect.
Wireless Network Name The network name or SSID of the wireless network
is displayed.
Signal The percentage of signal strength is displayed. 100% is the strongest
signal strength possible; 0% is the weakest possible.
Security If the network supports Wi‑Fi Protected Setup, the Wi-Fi Protected
Setup icon
is displayed. The security method used by the wireless network
is displayed.
Network Name (SSID) The name of the network you selected is automatically
displayed.
Security Mode WPA2 Personal is automatically displayed.
Passphrase Enter the key shared by the media connector and wireless router
or access point. It must have 8-63 characters.
Click Refresh to update the on-screen information.
Click Refresh to update the on-screen information.
After you have selected a network, click Connect. A new screen appears. Follow
the instructions for the security method of your network.
After you have entered the security settings, click Connect.
10
Linksys WUMC710
WEP
Advanced Configuration
No Acknowledgement If you want to disable the media connector’s
Acknowledgement option so the media connector does not re-send data if an
error occurs, select Enabled. Otherwise, keep the default, Disabled.
Network Name (SSID) The name of the network you selected is automatically
displayed.
Security Mode WEP is automatically displayed.
Encryption Select a level of WEP encryption, 40/64 bits (10 hex digits) or
104/128 bits (26 hex digits).
Key 1 Enter the WEP key of your network.
Tx Key Key 1 is the transmit key used by the media connector.
Authentication The default is Auto, which allows either Open system or Shared
key authentication to be used. Select Open to use open system authentication;
the sender and recipient do not use a WEP key for authentication. Select
Shared to use shared key authentication; the sender and recipient use a WEP
key for authentication.
Click Refresh to update the on-screen information.
After you have entered the security settings, click Connect.
Wireless > QoS
Wireless
WMM Support Wi-Fi Multimedia (WMM) is a wireless Quality of Service feature
that improves quality for audio, video, and voice applications by prioritizing
wireless traffic. To use this feature, your wireless router or access point must
support Wireless WMM. To disable this option, select Disabled. Otherwise,
keep the default, Enabled.
11
Linksys WUMC710
Administration > Management
Use this screen to manage specific media connector functions: access to the
browser-based utility, backup of the configuration file, and reboot.
Advanced Configuration
Backup and Restore
Backup To back up the media connector’s configuration file, click Backup
Configurations. Then follow the on-screen instructions.
Restore Click Browse and select the configuration file. Then click Restore
Configurations.
System Reboot
Reboot To reboot or restart the media connector, click Start to Reboot.
Click Save Settings to apply your changes, or click Cancel Changes to cancel
your changes.
Administration > Factory Defaults
Use this screen to restore the media connector’s configuration to its factory
default settings.
Management
Device Access
Use a password to protect access to the browser-based utility.
Device Password Enter a new Password for the media connector.
Factory Defaults
Restore Factory Defaults To reset the media connector’s settings to the
factory defaults, click Restore Factory Defaults. Any settings you have saved
will be lost when the default settings are restored.
Re-enter to confirm Enter the Password again to confirm.
Idle Timeout The login times out after a period of inactivity that you specify.
The range is 60 to 3600 seconds. The default is 600.
Web Access
Access via Wireless If you are using the media connector in a public domain
where you are giving wireless access to your guests, you can disable wireless
access to the media connector’s browser-based utility. You will only be able
to access the browser-based utility via a wired connection if you disable the
setting. Keep the default, Enabled, to allow wireless access to the media
connector’s browser-based utility, or select Disabled to block wireless access
to the utility.
12
Linksys WUMC710
Advanced Configuration
Administration > Upgrade Firmware
Device Information
Use this screen to upgrade the media connector’s firmware. Do not upgrade
the firmware unless you are experiencing problems with the media connector
or the new firmware has a feature you want to use.
Firmware Version The media connector’s current firmware is displayed.
Local Network
Local MAC Address The media connector’s MAC Address, as seen on your
local Ethernet network, is displayed.
Device IP Address The media connector’s IP Address, as seen on your local
Ethernet network, is displayed.
Subnet Mask The Subnet Mask configured for your local network is displayed.
Status > Wireless Network
Information about your wireless network is displayed.
Before upgrading the firmware, download the media connector’s firmware
upgrade file from the Linksys website, www.Linksys.com/support.
Upgrade Firmware
Please select a file to upgrade the firmware Click Browse and select the
firmware upgrade file. Then click Start to Upgrade and follow the on-screen
instructions.
Status > Device
The media connector’s current status information is displayed.
Wireless
Link Status The status of the connection to your wireless network is displayed.
MAC Address The media connector’s MAC Address, as seen on your local
wireless network, is displayed.
Network Name (SSID) The wireless network name or SSID is displayed.
Channel Width The channel width, in MHz, used by your wireless network is
displayed.
Channel The channel setting is displayed.
Security The security method of your wireless network is displayed.
13
Linksys WUMC710
Troubleshooting
Troubleshooting
WUMC710
Your computer or other wired, Ethernet device cannot communicate with the
wireless router.
1. Access the media connector’s browser-based utility.
2. On the Basic Wireless Settings screen, make sure the Network Name (SSID)
matches the name of your wireless network.
3. Make sure the security settings (WPA, WPA2, or WEP) match the security
settings of your wireless network.
The media connector’s IP address needs to be changed.
If the media connector is connected to a network with a DHCP server (usually
the network router), then the media connector will obtain its IP address from
the DHCP server. If there is no DHCP server, then the media connector will use
its default, static IP address, 10.100.1.1.
If you want the media connector to always use a static IP address, then follow
these instructions:
1. Access the media connector’s browser-based utility.
2. Click the Setup tab, then open the Basic Setup page.
3. From the Network Setup drop-down menu, select Static IP.
••
Make sure all devices are on the same IP network, using compatible IP
addresses.
The browser-based utility does not accept your password.
Check the following:
••
The password is case-sensitive. Make sure that you are using the correct
case(s) when entering the password.
••
If you forget your password, you can reset the media connector to its
factory defaults.
Press and hold the media connector’s Reset button for approximately
five seconds; the password will be reset to its factory default, admin. All
other media connector settings will be reset to the factory defaults as
well. (To access the browser-based utility, enter admin in the Password
field.)
After you make changes through the browser-based utility, the new settings
are not displayed on-screen.
On your web browser, click Refresh. If the new settings are not displayed, then
follow these instructions:
1. Unplug the power adapter from the media connector.
4. Complete the Static IP Address, Subnet Mask, and Default Gateway fields.
2. Wait five seconds, and then plug the power adapter back into the media
connector.
5. Click Save Settings.
3. On your web browser, click Refresh.
The media connector-enabled computer or other wired, Ethernet device will
not communicate with another wireless-enabled device (such as a computer
or printer).
WEB
If your questions are not addressed here, refer to the Linksys
website at Linksys.com/support
Check the following:
••
Make sure the wireless-enabled device is on the same wireless network
as the computer or other wired, Ethernet device connected to the media
connector.
••
Make sure that the same Network Name (SSID) is used for all devices on
the wireless network.
14
Linksys WUMC710
Specifications
Specifications
WUMC710
Environmental
Model
WUMC710
Dimensions
6.97” x 5.04” x 2.68”
(177 x 128 x 68 mm)
Description
Wireless-AC Universal Media Connector
Weight
9.5 oz. (269 g)
LEDs
Power, Ethernet, Wi-Fi Protected Setup™,
Wireless, individual Ethernet link and activity
Ports
Gigabit Ethernet (4), Power
Certification
FCC, UL/cUL, ICES-003, RSS210, CE, Wi-Fi
(IEEE 802.11n/a), WPA2™,
Wi-Fi Protected Setup, WMM®
Buttons
Reset, Wi-Fi Protected Setup
Power
12V, 1.5A
Cabling Type
CAT5e
Operating Temperature
32 to 104ºF (0 to 40ºC)
Antennas
3 (internal)
Storage Temperature
-4 to 140ºF (-20 to 60ºC)
Antenna Connector Type
N/A
Operating Humidity
10 to 80% Noncondensing
Detachable (Yes/No)
No
Storage Humidity
5 to 90% Noncondensing
Wireless Security WEP, Wi-Fi Protected Access™ (WPA),
Wi-Fi Protected Access™ 2 (WPA2)
Specifications are subject to change without notice.
Security Key Bits
Up to 128-bit encryption
15
Linksys.com/support
Cisco, the Cisco logo, and Linksys are trademarks or registered trademarks of Cisco and/or its affiliates in the United States and other countries.
A listing of Cisco’s trademarks can be found at www.cisco.com/go/trademarks. All other trademarks mentioned in this document are the property of their respective owners.
© 2012 Cisco and/or its affiliates. All rights reserved.
3425-01624B
120724MS