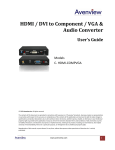
1
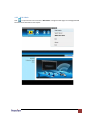
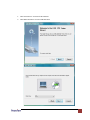
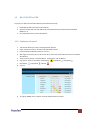
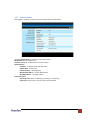
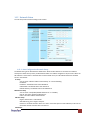
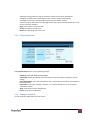
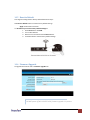
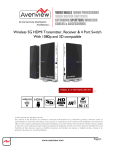
Wireless VGA Extender User’s Guide Models WL-VGA-EXT © 2008 Avenview Inc. All rights reserved. The contents of this document are provided in connection with Avenview Inc. (“Avenview”) products. Avenview makes no representations or warranties with respect to the accuracy or completeness of the contents of this publication and reserves the right to make changes to specifications and product descriptions at any time without notice. No license, whether express, implied, or otherwise, to any intellectual property rights is granted by this publication. Except as set forth in Avenview Standard Terms and Conditions of Sale, Avenview assumes no liability whatsoever, and disclaims any express or implied warranty, relating to its products including, but not limited to, the implied warranty of merchantability, fitness for a particular purpose, or infringement of any intellectual property right. Reproduction of this manual, or parts thereof, in any form, without the express written permission of Avenview Inc. is strictly prohibited. www.avenview.com 1 Table of Contents Section 1: Getting Started ...................................................................................................................... 3 1.1 Important Safeguards ............................................................................................................ 3 1.2 Safety Instructions ................................................................................................................. 3 1.3 Regulatory Notices Federal Communications Commission (FCC) ......................................... 4 1.4 Introduction ........................................................................................................................... 4 1.5 Package Contents................................................................................................................... 4 1.6 Before Installation.................................................................................................................. 4 1.7 Installation ............................................................................................................................. 5 1.8 Client Utility ........................................................................................................................... 7 1.8.1 Starting Program ................................................................................................................ 7 1.8.2 Buttons Descriptions .......................................................................................................... 7 1.8.3 Web Admin ........................................................................................................................ 8 1.9 WL-VGA-EXT for PDA ........................................................................................................... 10 1.10 Conference Control .............................................................................................................. 10 1.11 System Status ....................................................................................................................... 11 1.12 Network Status .................................................................................................................... 12 1.12.1 Auto-Configuration Network Setup ............................................................................. 12 1.13 Projection Setup .................................................................................................................. 13 1.14 Change Password ................................................................................................................. 13 1.15 Reset to Default ................................................................................................................... 14 1.16 Firmware Upgrade ............................................................................................................... 14 www.avenview.com 2 Section 1: Getting Started 1.1 Important Safeguards Please read all of these instructions carefully before you use the device. Save this manual for future reference. What the warranty does not cover Any product, on which the serial number has been defaced, modified or removed. Damage, deterioration or malfunction resulting from: Accident, misuse, neglect, fire, water, lightning, or other acts of nature, unauthorized product modification, or failure to follow instructions supplied with the product. Repair or attempted repair by anyone not authorized by us. Any damage of the product due to shipment. Removal or installation of the product. Causes external to the product, such as electric power fluctuation or failure. Use of supplies or parts not meeting our specifications. Normal wear and tear. Any other causes which does not relate to a product defect. Removal, installation, and set-up service charges. 1.2 Safety Instructions The WL-VGA-EXT Wireless VGA Extender has been tested for conformance to safety regulations and requirements, and has been certified for international use. However, like all electronic equipments, the C-COMP-VGA should be used with care. Read the following safety instructions to protect yourself from possible injury and to minimize the risk of damage to the unit. Do not dismantle the housing or modify the module. Dismantling the housing or modifying the module may result in electrical shock or burn. Refer all servicing to qualified service personnel. Do not attempt to service this product yourself as opening or removing housing may expose you to dangerous voltage or other hazards Keep the module away from liquids. Spillage into the housing may result in fire, electrical shock, or equipment damage. If an object or liquid falls or spills on to the housing, unplug the module immediately. Have the module checked by a qualified service engineer before using it again. www.avenview.com 3 1.3 Regulatory Notices Federal Communications Commission (FCC) This equipment has been tested and found to comply with Part 15 of the FCC rules. These limits are designed to provide reasonable protection against harmful interference in a residential installation. Any changes or modifications made to this equipment may void the user’s authority to operate this equipment. 1.4 Introduction Avenview WL-VGA-EXT wireless VGA extender is an ideal solution for meeting rooms. With WL-VGA-EXT, you can display up to four presentations in split screen on a single projector or VGA screen. You can save your presentation in provided USB key and connect to your projector wirelessly. WL-VGA-EXT supports conference control function for moderating the conference. The conference moderator can control projection from connected PCs through a web-based interface - 1.5 Plug & Present – no installation required 4 x 1 Split Screen projection – turn one projector into four displays Web-based interface for managing different displays. Supports Windows VISTA, XP, 200 and Mobile 5/6 Supports session security login, wireless WEB key and Gatekeeper function to protect presentation contents. Package Contents Before you start the installation of the converter, please check the package contents. - WL-VGA-EXT Power Adapter (+5VDC, 2.5A) USB Key x1 x1 x1 - User’s Manual x1 1.6 Before Installation Put the product in an even and stable location. If the product falls down or drops, it may cause an injury or malfunction. Don’t place the product in too high temperature (over 50°C), too low temperature (under 0°C) or high humidity. www.avenview.com 4 1.7 Use the DC power adapter with correct specifications. If inappropriate power supply is used then it may cause a fire. Do not twist or pull by force ends of the optical cable. It can cause malfunction. Installation To setup Avenview WL-VGA-EXT follow these steps for connecting to a device: 1. Connect projector VGA cable to WL-VGA-EXT’s VGA connector and turn on the projector power 2. 3. Turn on WL-VGA-EXT When projector shows the default menu on the screen as shown below, it indicates the WL-VGA-EXT box is ready for operation. www.avenview.com 5 4. 5. Make sure PC WLAN is enabled and connect the PC to WL-VGA-EXT In your default browser, enter 192.168.101.15 or refer to default IP address of WL-VGA-EXT shown on projector screen. 6. Download the client software from WL-VGA-EXT web-based interface. Select the appropriate software for your system (Windows VISTA, XP, 200 or Mobile 5/6) Once the software is installed, it will create a shortcut to your desktop. Make sure VPS (Video Presentation Software) is allowed to pass through system firewall if it is enabled. Enter the LOGIN CODE. LOGIN CODE is displayed on the projector screen 7. 8. 9. 10. Click the “PLAY” button to start displaying on the projector www.avenview.com 6 1.8 Client Utility 1.8.1 Starting Program After you have downloaded and installed the VPS Windows program via web-based interface successfully, then follow these steps to start. 1. 2. 3. 4. 1.8.2 Click VPS icon to execute the program Program will automatically try to locate the WL-VGA-EXT. If WL-VGA-EXT is found, then “Login Code” dialog box will pop up. Enter “Login Code” as displayed on the projector screen. Buttons Descriptions After login is successful, you will see main UI of VPS Project desktop screen to Full screen or split screen Full Screen projection Project to Split #1 Project to Split #2 Project to Split #3 Project to Split #4 Pause projecting Stop projecting Refresh projecting screen Server Login Code While projecting in progress, this icon is blinking Function menu Minimize the program Exit the program www.avenview.com 7 1.8.3 Web Admin Click to open function menu and select “Web Admin” management web page. The web page detailed functions will be described on next chapter. www.avenview.com 8 1. 2. Click “Search Server” to search for WL-VGA-EXT Click “Make VPS Token” to make a USB VPS Token www.avenview.com 9 1.9 WL-VGA-EXT for PDA To project your PDA screen with WL-VGA-EXT, please follow these steps: 1. 2. 3. Enable WiFi of PDA and connect to WL-VGA-EXT Open the browser and enter 192.168.101.15 to download and install VPS for PDA with Windows Mobile 5 or 6 Once installation is done, launch VPS software 1.10 Conference Control 1. 2. 3. 4. 5. This function allows you to host a meeting with WL-VGA-EXT Select “Conference Control” function from web-based interface Enter password, the default password is “trainer”. After login is successful, you can see the user list on the screen which indicates all users connected to WL-VGA-EXT There are three columns, “Computer Name”, “Play Control” and “IP Address” 6. Play Control: There are six buttons, including Play 7. 8. Play Split #3 User List: 9. To Login as ADMIN, click on “Admin” and enter default password “admin” , Play Split #4 , and Stop , Play Split #1 , Play Split #2 , . www.avenview.com 10 1.11 System Status Once logged in as Admin you will see menu for System Status as shown below By Clicking System Status, it will show current system status. Model Name: Product model name Firmware version no.: Product firmware version number. Network Status: IP address:IP address of WL-VGA-EXT device. Subnet Mask:subnet mask Default Gateway:default gateway Wireless MAC address:wireless MAC address Wire MAC address:wire MAC address Connection Status: Projecting status: which is “Waiting for projecting” or “Projecting” Total Users: It shows how many users login into WL-VGA-EXT. www.avenview.com 11 1.12 Network Status You can setup various network settings in this section: 1.12.1 Auto-Configuration Network Setup The default setting of the WL-VGA-EXT is DHCP client. When the WL-VGA-EXT is connected to a LAN that already has a DHCP server present, the WL-VGA-EXT takes an IP address assigned to it by the server. When the WL-VGA-EXT is connected to a LAN that does not have a DHCP server, the WL-VGA-EXT becomes the DHCP server in the network. IP Setup You can select “obtain IP address automatically” or “Use the following IP address” IP Address: The default value is 192.168.100.10. Subnet Mask: The default value is 255.255.255.0 Default Gateway: The default value is 192.168.100.10 DHCP Server Setup You can select “auto(Enable/Disable DHCP Server” or “Disable”) Start IP: The start IP address of DHCP Server. End IP: The end IP address of DHCP Server. Wireless Setup Region: default value is “Worldwide”. SSID: SSID string, max. Length is 32 bytes. Channel: to set fixed channel or Auto. The “Auto” means after power on WL-VGA-EXTd, it will scan all of wireless channel and select clear one channel Gatekeeper www.avenview.com 12 Gatekeeper is designed for ensuring the enterprise network security within WL-VGA-EXT ♦ All Block can block Guest Users(through wireless) to access all office network(LAN), ♦ All Allow can pass Guest Users(through wireless) to access all office network ♦ Internet Only can block Guest Users (through wireless) from office network (LAN) but still reserve internet connection capability. Apply : press button to select this mode Cancel: press button to abort action. Back: Back to Operating mode main menu 1.13 Projection Setup Click Projection Setup button to set the following settings: Resolution: 1024*768, 1280x768 and 800*600. Color Depth: provide WL-VGA-EXT output with 16bit or 32 bit color depth. It depends on your PC settings. Screen Refresh Rate: This is VGA output refresh rate, it supports 60 Hz and 75Hz to suit for different kinds of projectors. Login Code: You can select “Disable”, “Random”, or “Use the following code” to set a specified 4-characters Number. Apply: Confirmation and Save modifications Cancel: Cancel all the modifications 1.14 Change Password You can change the default password in this section. www.avenview.com 13 1.15 Reset to Default To change the settings back to factory default follow these steps: Click Reset to Default button to restore factory default settings. Apply: Confirmation and action. *** Another way to restore Factory Default Settings is: 1. Press Reset button and Hold. 2. Turn on WL-VGA-EXT. 3. Wait for over 10 seconds and relief Reset button. 4. It will take effect to restore factory default settings. 1.16 Firmware Upgrade To upgrade the firmware click on Firmware Upgrade link. DO NOT power off WL-VGA-EXT while firmware upgrade is in process. www.avenview.com 14 Disclaimer While every precaution has been taken in the preparation of this document, Avenview Inc. assumes no liability with respect to the operation or use of Avenview hardware, software or other products and documentation described herein, for any act or omission of Avenview concerning such products or this documentation, for any interruption of service, loss or interruption of business, loss of anticipatory profits, or for punitive, incidental or consequential damages in connection with the furnishing, performance, or use of the Avenview hardware, software, or other products and documentation provided herein. Avenview Inc. reserves the right to make changes without further notice to a product or system described herein to improve reliability, function or design. With respect to Avenview products which this document relates, Avenview disclaims all express or implied warranties regarding such products, including but not limited to, the implied warranties of merchantability, fitness for a particular purpose, and non-infringement. www.avenview.com 15