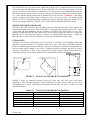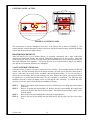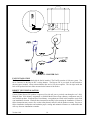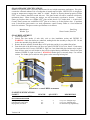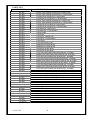
1
COUNTRY FLAME TECHNOLOGIES
BAYVUE DIRECT VENT GAS STOVE
MODEL DV 30 & DV 46
NATURAL GAS OR PROPANE CAPABLE
USA & CANADA TEST STANDARD:
Harmonized ANSI Z21.50 - 2000
CSA 2.22 – 2000, CAN/CGA 2.17
TESTED BY:
WARNOCK HERSEY
Suitable for Bedroom
Installation
WARNING: If the directions contained in this manual are not followed
exactly, a fire or explosion may result causing property damage, personal injury
or loss of life.
•
•
•
•
•
IF YOU SMELL GAS
FOR YOUR SAFETY
Do not light any appliance.
Do not touch electrical switches; do not use the phone in your
building.
Immediately call the gas company from a neighbor’s phone.
Follow gas company instructions.
Call the Fire Department if Gas Company doesn’t answer.
FOR YOUR SAFETY
Do not store or use gasoline or any flammables (vapors or liquids) in the vicinity of
this or any other appliance.
Installation and repair must be performed by a qualified service person or gas supplier.
Country Flame Technologies
A Division of American Products, LLC
900 George Street
Marshfield, MO 65706
417-859-0990
417-859-0192
www.countryflame.com
© 2004
COUNTRY FLAME
TABLE OF CONTENTS
INTRODUCTION ................................................................................................................... 3
SAFETY INFORMATION ..................................................................................................... 4
INSTALLATION, GENERAL................................................................................................ 5
PRESSURE TESTING.................................................................................................... 5
ALTITUDE LIMITATIONS........................................................................................... 6
GAS SUPPLY CONNECTION ...................................................................................... 6
MINIMUM/MAXIMUM Btu RATES ............................................................................ 7
CLEARANCES ............................................................................................................... 7
MINIMUM CLEARANCES ........................................................................................... 9
CEILING CLEARANCES .............................................................................................. 9
TOOL LIST ..................................................................................................................... 9
UNPACKING.................................................................................................................. 9
LOG PLACEMENT ...................................................................................................... 10
CONTROL PANEL ACCESS ...................................................................................... 12
HEARTH REQUIREMENTS ....................................................................................... 12
VALVE ASSEMBLY REMOVAL............................................................................... 12
FUEL CONVERSION KITS......................................................................................... 13
PR CONVERSION KIT BV-4604 CONTENTS .......................................................... 14
PR CONVERSION KIT BV-3004 CONTENTS .......................................................... 14
NG CONVERSION KIT BV-4603 CONTENTS: ........................................................ 14
NG CONVERSION KIT BV-3003 CONTENTS ......................................................... 14
PROPANE CONVERSION KIT......................................................................... 15
NATURAL GAS CONVERSION KIT ............................................................... 15
PROPANE CONVERSION .......................................................................................... 15
INTAKE AND EXHAUST CONDITIONS.......................................................................... 18
SEALED VENTING SYSTEM .................................................................................... 18
THERMOSTAT/FAN CIRCUIT .................................................................................. 18
FAN INSTALLATION ......................................................................................................... 19
DIRECT VENT INSTALLATION ....................................................................................... 19
GENERAL..................................................................................................................... 19
INSTALLATION PRECAUTIONS.............................................................................. 20
INSTALLER SAFETY PRECAUTIONS..................................................................... 20
VENTING PARTS LIST....................................................................................................... 20
BASIC VENT KITS ...................................................................................................... 21
INSTALLATION PLAN....................................................................................................... 22
VENT (FRESH AIR) REQUIREMENTS..................................................................... 22
DIRECT VENT TERMINATION ................................................................................ 24
VENT TERMINALS..................................................................................................... 24
STANDARD HORIZONTAL TERMINAL ................................................................. 24
SNORKEL TERMINAL (14" OR 36")......................................................................... 24
VERTICAL TERMINAL.............................................................................................. 24
CHIMNEY PIPE ........................................................................................................... 24
STANDARD HORIZONTAL VENT ........................................................................... 24
VERTICAL AND HORIZONTAL VENT.................................................................... 27
VENT GRAPHS............................................................................................................ 28
VENT GRAPH (cont'd)................................................................................................. 29
Version 1.0h
1
TABLE OF CONTENTS
SNORKEL VENT ......................................................................................................... 30
VERTICAL VENT........................................................................................................ 30
CATHEDRAL CEILINGS............................................................................................ 31
MAINTENANCE .................................................................................................................. 32
CLEANING BURNERS AND CONTROLS ...................................................... 32
REPLACE OLD EMBERS ................................................................................. 32
CHECK FLAME AND PILOT ........................................................................... 33
GLASS CLEANING ........................................................................................... 33
CHECK VENT SYSTEM ................................................................................... 33
GLASS-CERAMIC SPECIFICATIONS ...................................................................... 34
GLASS REPLACEMENT ............................................................................................ 34
GASKET SPECIFICATIONS....................................................................................... 34
GENERAL VENT INSPECTION................................................................................. 36
GENERAL CLEANING ............................................................................................... 36
GENERAL SAFETY .................................................................................................... 36
GENERAL PERIODIC INSPECTIONS....................................................................... 36
CLEANING A PAINTED SURFACE .......................................................................... 36
CLEANING PLATED SURFACES ............................................................................. 37
DOOR INSTALLATION.............................................................................................. 37
DOOR SEAL................................................................................................................. 37
MAIN ORIFICES.......................................................................................................... 38
GAS FLAME INSPECTION ........................................................................................ 38
RELIEF VALVE INSPECTON .................................................................................... 39
SIT 820 NOVA mV GAS CONTROL VALVE.................................................................... 40
WARRANTY ........................................................................................................................ 41
TROUBLE SHOOTING GUIDE .......................................................................................... 42
TROUBLE SHOOTING GUIDE (cont’d) ............................................................................ 43
PARTS LIST ......................................................................................................................... 44
PARTS LIST (cont’d)............................................................................................................ 45
OPERATING INSTRUCTIONS ........................................................................................... 46
LIGHTING INSTRUCTIONS ...................................................................................... 46
TO TURN OFF GAS TO BAYVUE DV ...................................................................... 46
FIRST FIRE................................................................................................................... 46
SAFETY LABEL .......................................................................................................... 47
Version 1.0h
2
INTRODUCTION
THANK YOU and CONGRATULATIONS on the purchase of a new gas appliance manufactured by
Country Flame Technologies. This purchase makes you part of our family of literally tens of thousands of
previous customers who have bought Country Flame’s gas and wood products over the past several
decades. Country Flame shares our customer’s concerns to protect the environment, obtain value for their
purchase, and know that they have purchased one of the most reliable gas products the market has to offer.
Each and every employee at Country Flame pledges to ensure each and every one of our customers has our
commitment to product support. Product support is dedicated to ensuring our customers achieve the
greatest level of satisfaction from the proper use of our products. Thank you for selecting Country Flame.
We look forward to hearing from you as this product becomes part of your home heating solution.
This manual is written to provide information that will assure proper installation, proper maintenance, and
correct operation of an American made gas fireplace called the Bayvue DV (Direct Vent). It is imperative
that the certified professional installer and homeowner read, understand, and follow all information
included in this manual to ensure safety and correct operation. If there are questions on installation,
operation, or maintenance issues, please re-read and understand all directions and instructions contained in
this manual. In the event of any issues or confusion, contact Country Flame or a certified professional
before undertaking the installation or operation of this appliance. Installation must be in accordance with
local codes, gas supplier restrictions, and conform to current National Fuel Gas Code ANSI Z223.1 (USA)
or current CAN/CGA B149 Installation Codes (Canada).
Country Flame wishes you a lifetime of warmth and happiness.
Version 1.0h
3
SAFETY INFORMATION
-
-
-
-
-
Do not store or use gasoline or other flammables in the vicinity of this appliance.
Do not place clothing or flammable material on or near this appliance.
Due to high operating temperatures, this appliance should be located out of high traffic areas and away
from furniture and draperies.
Children and adults should be alerted to the hazards of high surface temperatures and should maintain
safe clearances (stay away) to avoid burns or clothing ignition.
Always supervise young children playing in the same room as this operating appliance.
Any safety screen, guard or other parts removed for servicing this appliance must be replaced prior to
operation.
ALL INSTALLATION AND REPAIR SHOULD BE COMPLETED BY A CERTIFIED GAS
TECHNICIAN. THIS APPLIANCE SHOULD BE INSPECTED BEFORE USE AND AT LEAST
ANNUALLY, BY A CERTIFIED GAS PROFESSIONAL.
The interior of a gas stove is subject to surface rust due to moisture in the combustion air as well as
condensation created during the initial warm up and firing of the gas appliance. At a minimum,
annually clean and repaint the interior surfaces to prevent deterioration. More frequent cleaning may be
required due to carpet lint, bedding material, dust, etc. being drawn into the appliance. It is imperative
that this appliance’s control compartment, burners, circulating air system is kept clean.
WARNING: IMPROPER INSTALLATION, ADJUSTMENT, ALTERATION, SERVICE OR
MAINTENANCE CAN CAUSE INJURY OR PROPERTY DAMAGE. REFER TO THIS MANUAL
FOR ASSISTANCE OR FOR ADDITIONAL INFORMATION CONSULT A QUALIFIED
INSTALLER, SERVICE AGENCY, OR GAS SUPPLIER.
ALWAYS use high temperature rated silicone or sealing compound at 600OF (316OC) or higher.
This appliance was designed as a sealed unit and as such, the glass doors must be fully intact and closed
when operating this gas product.
This appliance was NOT designed, tested, or approved for installation in OEM mobile homes,
permanently installed mobile homes, or recreational vehicles and should not be used in such
applications.
This appliance was NOT designed, tested, or approved for installation as a fireplace insert. Do not use
this appliance in such applications.
PLEASE KEEP THESE INSTRUCTIONS FOR FUTURE REFERENCE
Version 1.0h
4
INSTALLATION, GENERAL
The Bayvue DV installation must ensure adequate combustion air and ventilation air is available for proper
stove operation. Refer to the venting section for further combustion air requirements. Installation must
conform to local codes and gas supplier restrictions. In the absence of local codes, an installation must
conform to the current National Fuel Gas Code which at the writing of this manual is ANSI Z223.1
(reference NFPA-54 for natural gas or reference NFPA-58 for propane products). In Canada, an
installation must conform to CAN/CGA-B149 code.
This appliance must be electrically connected and grounded in accordance with local codes, or in the
absence of local codes, with the current NFPA 70 National Electric Code or in Canada, with CSA C22.1
Canadian Electrical Code.
IT IS IMPERATIVE THAT THIS APPLICANCE’S CONTROL COMPARTMENT, BURNER, AND
CIRCULATING AIR PASSAGE WAYS ARE KEPT CLEAN AND CLEAR OF OBSTRUCTIONS.
ALWAYS PROVIDE FOR ADEQUATE COMBUSTION AIR AND ENSURE PROPER OPERATION
AT ALL TIMES. PROVIDE ADEQUATE CLEARANCES AROUND AIR OPENINGS AND
NECESSARY ACCESSIBILITY FOR ROUTINE OPERATION AND SERVICE. NEVER OBSTRUCT
ANY OPENINGS ON THIS APPLIANCE OR NEVER OBSTRUCT THE DIRECT VENT
TERMINATION ON THE EXTERIOR OF THE BUILDING.
MINIMUM CLEARANCES TO COMBUSTIBLES MUST BE MAINTAINED DURING
INSTALLATION. THE HEATER MUST HAVE ADEQUATE SPACE FOR PROPER OPERATION
AND SERVICING. MAINTAIN MINIMUM CLEARANCES AND VENT/AIR INTAKE PIPE
CLEARANCES.
TABLE 1:
Altitude
Manifold pressure
Minimum Inlet Gas Pressure
Maximum. Inlet Gas Pressure
BTU Input Rating (High)
BTU Input Rating (Low)
*Efficiency with fan (steady
state)
*Efficiency no fan (steady
state)
*A.F.U.E.
Front Burner Orifice
Middle Burner Orifice
Rear Burner Orifice
BAYVUE DV SPECIFICATIONS
BAYVUE DV-46
BAYVUE DV-30
NATURAL
GAS
PROPANE
NATURAL
GAS
PROPANE
0 - 4500’
3.5” W.C.
4.5” W.C.
7.0” W.C.
46,000
29,000
35,700
0 - 4500’
10” W.C.
11” W.C.
14.0” W.C.
46,000 BTUH
34,500 BTUH
36,800 BTUH
0 - 4500’
3.5” W.C.
4.5” W.C.
7.0” W.C.
32,000
21,000
24,000
0 - 4500’
10” W.C.
11” W.C.
14.0” W.C.
30,000 BTUH
21,500 BTUH
23,100 BTUH
37,200
39,100 BTUH
22,800
22,000 BTUH
68.77%
55 DMS
45 DMS
40 DMS
70.67%
69 DMS
55 DMS
53 DMS
60.19%
57 DMS
50 DMS
45 DMS
62.22%
70 DMS
59 DMS
55 DMS
*ANSI standards are SAFETY STANDARDS not PERFORMANCE STANDARDS.
A.F.U.E.
(efficiency standards) and efficiency test protocol are established by the U. S. Department of Energy.
PRESSURE TESTING
This appliance MUST BE isolated from the gas supply piping system during any pressure testing of the
gas supply piping system at test pressures equal to or less than ½ pounds per square inch gauge (psig) (3.5
kPa or 14” W.C.) Isolate the appliance by closing the manual shutoff valve during pressure testing.
Failure to isolate the appliance will cause damage and can require replacement of the SIT 820 NOVA mV
gas control valve. If test pressures will be in excess of ½ psig, then the SIT 820 NOVA mV gas control
valve must be disconnected from the gas supply line. Refer to FIGURE 27 for SIT 820 NOVA mV valve
information.
Version 1.0h
5
Country Flame’s Bayvue DV stove must be vented vertically or horizontally through an outside wall. This
appliance and all its components are tested and safe to operate when installed in accordance with the
instructions contained in this manual. Read and understand all instructions before beginning installation to
ensure maximum efficiency and safety is achieved. Failure to follow the instructions contained in this
manual will void the warranty and may present a fire hazard. Immediately, upon unpacking the product,
report any glass or parts damaged, to both the shipping company and the local Country Flame Dealer.
Country Flame
FIGURE 1:
BAYVUE DV DIMENSIONS
ALTITUDE LIMITATIONS
United States input ratings of this unit are based on sea level operation. No appliance input rating needs to
be changed for any operation at elevations up to 2000 feet (600m). For operation at elevations above 2000
feet, the Bayvue DV’s input rating shall be reduced at the rate of 4% for each 1000 feet above sea level.
Exception: As permitted by the authority having jurisdiction.
Canadian input ratings of this unit are based on seal level operation. No appliance input rating needs to be
change up to 4500 feet above sea level in Canada. Installation of this appliance at altitudes above 4500
feet is subject to field test of the individual installation and approval by the local authority having
jurisdiction.
GAS SUPPLY CONNECTION
A gas supply line must be installed by a qualified professional and must conform to National Standards;
NFPA 54 (natural gas) or NFPA 58 (propane) as well as local codes. Connection of the gas supply line
shall be made near the lower rear of the appliance. The gas supply line shall be purged of air before
connection is made to the appliance. This shut-off valve must be located within 3 feet of the appliance or
to the existing local code standard. The Bayvue DV has been tested and approved for installation using a
(7/8" O.D. / 1/2" I.D.) Model #1650 N Dormont Flex Connector supplied with the unit. REMEMBER:
the gas supply line connection must be equipped with an easily visible shut-off valve. Do not run gas
supply lines through chimneys, gas vents, dumb waiters, elevator shafts, clothes chutes, or air ducts.
Piping should be sloped ¼” for every 12 feet of horizontal run. The slope will run from the gas meter
down to the appliance and the horizontal run shall be supported every 10 feet by suitable gas pipe hangars
or straps. Install gas supply line drip leg traps where condensate might accumulate. Sediment traps may
be required by code. Traps collect moisture and sediment that might block orifices or valves from
operating properly. Depending on the total length of gas supply line being run from the gas company
meter to the appliance, different size piping is required. Check with the local gas company for
requirements but NEVER use plastic or galvanized pipe.
Version 1.0h
6
The SIT 820 NOVA mV gas control value, installed in the Bayvue DV, is supplied with pressure test ports
for checking input and output fuel pressures. Refer to FIGURE 27 for valve test port locations. Valve test
ports are located below the off/pilot/on control knob. The right port is the OUT (Manifold Pressure) test
port and the left port is the IN test port. Pressure is checked by turning the capture screw counterclockwise
2 or 3 turns and then placing tubing from the manometer over the test point. WARNING: After taking
pressure readings, turn the capture screw clockwise to reseal. Do not over torque. The installer should
provide a 1/8" N.P.T. plugged tapped hole** immediately upstream of the gas supply line connection to be
used for a test gauge connection. **NOTE: N.P.T. means American Standard Taper Pipe Thread
MINIMUM/MAXIMUM Btu RATES
The Bayvue DV’s SIT 820 NOVA mV gas control valve has a HI/LOW knob that is used to regulate the
appliance’s manifold gas pressure. Refer to FIGURE 27 for location of this manifold control valve. When
a pilot flame has been established and the appliance’s OFF/PILOT/ON control knob is in the “ON”
position, the manifold HI/LOW control knob can be used to adjust the appliances Btu rates. Turning the
HI/LOW valve to “HI” allows the appliance to operate at its maximum Btu output rating. Turning the
HI/LOW valve to “LOW” allows the appliance to operate at its minimum Btu output rating.
CLEARANCES
The Bayvue DV will heat nearby surfaces when in operation. A safe Bayvue DV installation requires that
minimum or greater clearances be maintained between the stove and nearby combustible materials.
Failure to maintain proper minimum clearances will cause overheating of combustible materials that can
lead to personal property damage or loss of life. Clearances around the appliance must allow for proper
servicing of the product. If there is any question about clearances please contact Country Flame or a
certified professional. Never reduce clearances below the minimums stated in this manual.
1"
6"
1"
36"
6"
1"
6"
30"
FIGURE 2:
BAYVUE DV MINIMUM CLEARANCES
FIGURE 2 shows the minimum clearances required for back wall, side wall, corner, and ceiling
installations. These minimum clearances must be maintained in order to ensure proper service can be
accomplished and to ensure overheating of combustible materials does not occur. TABLE 2 lists the
minimum clearances.
TABLE 2:
CLEARANCE FROM
LEFT/RIGHT SIDE WALL
FLOOR TO CEILING
BACK WALL
UNIT TOP TO CEILING
HORIZONTAL FLUE
APPLIANCE CORNER
Version 1.0h
BAYVUE DV MINIMUM CLEARANCES
DISTANCE (INCHES)
6
66
6
36
1
1
7
DISTANCE (MILIMETERS)
152
1676
152
914
25
25
FIGURE 3: CLEARANCE REQUIREMENTS
A
= 12 in.
B
= 12 in.
Clearances above grade,
veranda, porch, deck or balcony
I
Clearances to window or door
that may be opened
J
C
= 9 in. (U.S.A)
12 in(Canada)
Clearance to permanently closed
window
D*
= 18 in.
Vertical clearance to ventilated
soffit located above the terminal
within a horizontal distance of 2
feet (60 cm) from the center-line
of the terminal
E*
= 18 in.
Clearance to unventilated soffit
F
= 9 in.
Clearance to outside corner
G
= 6 in.
Clearance to inside corner
H
= 3 ft. (Canada)
*
**
***
K
**L
= 3ft. (U.S.A)
= 6ft (Canada)
= 9 in.(U.S.A)
= 12 in. (Canada)
= 3ft. (U.S.A)
= 6ft (Canada)
= 7 ft.
Clearance to service
regulator vent outlet
Clearance to non
mechanical air supply
inlet to building or the
combustion air inlet to
any other appliance
Clearance to a mechanical
air supply inlet
Clearance above paved
sidewalk or a paved
driveway located on
public property
Not to be installed above a gas
***M
= 18 in.
Clearance under
meter/regulator assembly within
veranda, porch, deck
3 feet (90cm) horizontally from
or balcony
the center-line of the regulator
WARNING: In the U.S.A.: Vent system termination is
30 in. minimum for vinyl clad soffits
NOT permitted in screened porches. Follow all sidewall,
A vent shall not terminate directly above a overhang and ground clearances as stated in the instructions.
sidewalk or paved driveway that is located
between two single family dwellings and In Canada: Vent system termination is NOT permitted in
screened porches. Vent system termination is permitted in a
serves both dwellings.
porch area with two or more sides open. Follow all
Only permitted if veranda, porch, deck or sidewalls, overhang and ground clearances as stated in the
balcony is fully open on a minimum of 2 instructions.
sides beneath the floor.
Country Flame Technologies assumes no responsibility for
NOTE: Local codes or regulations may the improper performance of the fireplace when the venting
system does not meet requirements.
require different clearances.
TABLE 3: CLEARANCE DEFINITIONS
Version 1.0h
8
MINIMUM CLEARANCES
The Bayvue DV is installed by maintaining minimum clearances to all combustibles including any
projections such as shelves, window sills, or fireplace mantles that are located above or around the
appliance. Refer to FIGURE 2, FIGURE 3, TABLE 2, and TABLE 3 for clearances.
Sidewalls, both left and right sidewalls where applicable, must maintain minimum clearances to the
appliance. Overheating of sidewall material or framing material can occur without proper clearance.
All clearances listed in this manual are considered minimum clearances. All actual installation appliance
clearances MUST conform to local installation codes AND MUST conform to any clearance requirements
imposed by the local gas supplier.
CEILING CLEARANCES
The minimum ceiling height measured from the top of the appliance to the ceiling is thirty six inches (914
mm). The minimum clearance measured from any part of the horizontal vent pipe to the ceiling is one
inch (25 mm).
TOOL LIST
The following tools or equipment are recommended to the certified professional installer to be required
during the installation process. Other tools or equipment may be required depending on site specific
conditions:
Various open end wrenches, including 7/16”, ½”, 9/16”, and crescent wrenches as needed.
Various nut drivers’ and torx drivers, as required.
Pipe wrenches.
Phillips and flat bladed screw drivers.
Proper gas pipe fitting sealant compound.
Leak test fluid “U” tube manometer or pressure gauge (0 – 16” WC scale) test equipment.
Volt/ohm meter.
UNPACKING
STEP 1
STEP 2
STEP 3
STEP 4
STEP 5
Unbolt the stove from the pallet. Discard pallet and packaging material.
Open the stove door on the unit and unpack all components located inside the firebox.
Inspect the interior and exterior of the stove for any shipping damage.
Review the materials list provided with the appliance to ensure all parts needed for
installation are present. This should include:
a) One set of ceramic fiber logs, (total 3 logs). Handle logs with care, extremely fragile.
b) One bag of ember material.
c) One installation, operation, and maintenance manual with warranty.
Verify the adjustable air shutter setting is correct per TABLE 4. FIGURE 4 shows the air
shutter welded into the end of each burner. There are three air shutters to be checked.
FIGURE 4, item A shows the location of the air shutter locking screw, if adjustment is
required.
FIGURE 4: ADJUSTABLE BURNER AIR SHUTTER
Version 1.0h
9
Bayvue DV-46
Bayvue DV-30
NATURAL GAS
FRONT BURNER
MIDDLE BURNER
REAR BURNER
0 – 2000 FEET
1/8 INCH
3/16 INCH
3/8 INCH
> 2000 FEET
SAME
SAME
SAME
0 – 2000 FEET
1/8 INCH
1/4 INCH
3/8 INCH
> 2000 FEET
SAME
SAME
SAME
0 – 2000 FEET
1/8 INCH
FULL OPEN
FULL OPEN
> 2000 FEET
SAME
SAME
SAME
0 – 2000 FEET
1/8 INCH
5/32INCH
3/8 INCH
> 2000 FEET
SAME
SAME
SAME
PROPANE
FRONT BURNER
MIDDLE BURNER
REAR BURNER
TABLE 4: AIR SHUTTER ADJUSTMENT
LOG PLACEMENT
The ceramic logs provided with this appliance are extremely fragile. Please handle these three logs with
the utmost care. Small chips off of the logs can be covered up using high temp paint. FIGURE 5 and the
following steps present log installation instructions. WARNING: IMPROPER LOG PLACEMENT
INSIDE THE FIREBOX CAN CAUSE IMPROPER FUEL BURN, EXCESSIVE CARBON
MONOXIDE (a colorless, odorless, toxic gas) PRODUCTION AND RESULT IN SOOTING AN
ENTIRE HOUSE. MONITOR THE FIRST FEW FIRES TO ENSURE NO SOOTING.
STEP 1
STEP 2
STEP 3
STEP 4
Center the rear log down onto the log retainer’s two keys into the log notches. See FIGURE 5a.
Set the front log into the log retainer using the two outside log grate arms as guides. See
FIGURE 5b. Rest front log arm against the back log. Note grooves for top log positioning.
The top log lays on the left grooves nested on the back and front logs. See FIGURE 5c.
Embers are placed into and over the front of the "V" shaped front burner. See FIGURE 5d.
FIGURE 5a: REAR LOG PLACEMENT
FIGURE 5B: FRONT LOG PLACEMENT
Version 1.0h
10
FIGURE 5c: LOG SET (3 PIECES EACH)
FIGURE 5d: LOG SET WITH EMBERS
FIFGURE 5d also provides a view of a proper flame pattern for the Bayvue DV when the manifold
pressure is turned to high or its maximum Btu setting. Note that the embers that are close to the log grate
are glowing red. Further, these same embers have a blue flame being emitted from them. This “effect” is
because the front burner is designed not only to hold the embers but also to produce a small flame that
creates the burning ember effect. The middle and rear burner are designed to produce the “fire” and turn
the larger logs red. Note that a blue gas flame can be observed by looking down the front edge of the front
log. This flame should be touching “not floating above” the burner. The flame tips will be yellow but no
soot should be seen rising from the logs. It should be a very clean burn as shown in FIGURE 5d. Contact
a local Country Flame Dealer or certified professional if there is any issue with the flame appearance.
Version 1.0h
11
CONTROL PANEL ACCESS
HI
FA N S PEED
LO
VALVE
CONTROL
HI
FAN S PE ED
HI
OFF
LO
FLAM E COM FORT
CONTROL
C ou ntry F lam e
HI
O FF
P IE Z O
IG N IT O R
LO
V A L VE
C ONTROL
LO
FLA M E COM FORT
C O N T RO L
C o u ntry F lam e
P IE Z O
IG N IT O R
35 .05 00.0 0
35.0500.00
FIGURE 6: CONTROL PANEL
The control panel is accessed through the front door of the Bayvue DV as shown in FIGURE 6. The
control panel has controls that adjust the blower fan speed, adjusts the burning setting, includes the burning
control, and the piezoelectric igniter control.
HEARTH REQUIREMENTS
When the Bayvue DV is to be installed directly on carpeting, combustible tile or other combustible
material other than wood flooring, the carpet or combustible material must be covered first. Other than
wood flooring, the floor must be covered with metal, non-combustible tile or wood paneling extending the
full width and depth of the appliance. The Bayvue DV can sit on a raised hearth as long as all chimney
pipe and all stove minimum clearances are maintained.
VALVE ASSEMBLY REMOVAL
From time to time, it may be necessary to remove the valve assembly. This assembly includes the SIT 820
control valve, the base mounting plate for the burner assembly, the pilot system, the three burner spud (a
spud is a removable cap or plug) orifice assemblies, and miscellaneous tubing. If it is ever necessary to
remove the valve assembly, take care not to damage any parts. Further, this system, once removed, should
be inspected by a certified professional before the valve assembly is reinstalled. The following steps
should be followed to ensure no damage occurs in removing the valve assembly. To reinstall the valve
assembly, reverse the steps as listed during the installation procedure.
STEP 1
STEP 2
STEP 3
STEP 4
Version 1.0h
Remove the control panel front access door by removing the screw hinge pins at the bottom
of the door.
Remove by pulling the rheostat knob off. Remove the four screws holding the control panel
front bezel in place and remove the bezel plate. Disconnect the piezoelectric igniter’s wire
from the igniter.
Remove the four screws holding the control panel support brackets.
Remove the two screws holding the heat shield that is directly above the valve access door
area.
12
STEP 5
STEP 6
STEP 7
STEP 8
Remove the glass door, logs, and embers. Refer to the specific section for each of these items
for further instructions on removal and installation of the glass door, logs, and embers.
Remove the three burner retaining screws and slide the burners off the burner spud orifice
holders and remove the front, middle, and rear burners. It is critical to ensure each burner is
marked so the correct burner is located in the same position it was removed from.
Remove the nine screws sealing the complete burner assembly to the bottom of the stove.
Disconnect the wiring to the terminal block and disconnect the gas.
Lift the complete gas valve assembly out of the stove. FIGURE 7 shows the assembly.
FIGURE 7: GAS VALVE ASSEMBLY
FUEL CONVERSION KITS
WARNING: Conversion kits shall be installed by a qualified service agency in accordance with
the manufacturer’s instructions and all applicable codes and requirements of the authorized
agency having juristriction. If the information in these manufacturer’s instructions are not
followed exactly, a fire, explosion or production of carbon monoxide may result causing property
damage, personal injury or loss of life. The qualified service agency is responsible for the proper
installation of this kit. The installation is not proper and complete until the operation of the
converted appliance is checked as specified in the owner instructions supplied with the
conversion kit.
The next several pages explain the conversion kits and step by step procedures to complete conversions.
This information is provided for homeowner reference but all conversions are to be completed by a certified
professional.
In the event of any problem with a Country Flame conversion kit or the installation of the kit, please contact
a local authorized Country Flame Dealer or contact Country Flame directly to obtain additional information
and assistance in properly resolving the problem.
Version 1.0h
13
PR CONVERSION KIT BV-4604 CONTENTS:
ITEM
Regulator
Pilot Orifice
Front Spud Orifice
Middle Spud Orifice
Rear Spud Orifice
Conversion Label
Instructions
QTY
PART NUMBER
1
1
1
1
1
1
1
GC-3906-01
BV-4614
BV-4626
BV-4627
BV-4628
35-0500-01
BV-4650
ITEM DESCRIPTION
SIT 820 NOVA mV Gas Valve
#35 Pilot Injector Orifice
69 DMS LP Front Orifice Spud
55 DMS LP Middle Orifice Spud
53 DMS LP Rear Orifice Spud
Conversion NG to LP
Conversion Kit Instructions
PR CONVERSION KIT BV-3004 CONTENTS:
ITEM
Regulator
Pilot
Front Spud Orifice
Middle Spud Orifice
Rear Spud Orifice
Middle Burner
Rear Burner
Conversion Label
Instructions
QTY
PART NUMBER
ITEM DESCRIPTION
1
1
1
1
1
1
1
1
1
GC-3906-01
BV-4614
BV-4632
BV-4633
BV-4634
BV-4620
BV-4622
35-0500-03
BV-4650
SIT 820 NOVA mV Gas Valve
#35 Pilot Injector Orifice
70 DMS LP Front Orifice Spud
59 DMS LP Middle Orifice Spud
55 DMS LP Rear Orifice Spud
Middle Burner for 30,000Btu
Rear Burner for 30,000Btu
Conversion NG to LP
Conversion Kit Instructions
NG CONVERSION KIT BV-4603 CONTENTS:
ITEM
Regulator
Pilot
Front Spud Orifice
Middle Spud Orifice
Rear Spud Orifice
Conversion Label
Instructions
QTY
PART NUMBER
ITEM DESCRIPTION
1
1
1
1
1
1
1
GC-3905-01
BV-4613
BV-4623
BV-4624
BV-4625
35-0500-02
BV-4650
SIT 820 NOVA mV Gas Valve
#51 Pilot Injector Orifice
55 DMS NG Front Orifice Spud
45 DMS NG Middle Orifice Spud
40 DMS NG Rear Orifice Spud
Conversion LP to NG
Conversion Kit Instructions
NG CONVERSION KIT BV-3003 CONTENTS:
ITEM
Regulator
Pilot
Front Spud Orifice
Middle Spud Orifice
Rear Spud Orifice
Middle Burner
Rear Burner
Conversion Label
Instructions
QTY
PART NUMBER
ITEM DESCRIPTION
1
1
1
1
1
1
1
1
1
GC-3905-01
BV-4613
BV-4629
BV-4630
BV-4631
BV-4620
BV-4622
35-0500-04
BV4650
SIT 820 NOVA mV Gas Valve
#51 Pilot Injector Orifice
57 DMS NG Front Orifice Spud
50 DMS NG Middle Orifice Spud
45 DMS NG Rear Orifice Spud
Middle Burner for 30,000Btu
Rear Burner for 30,000Btu
Conversion LP to NG
Conversion Kit Instructions
NOTE: Conversion kits are available only for natural gas and propane fuel.
NOTE: A Country Flame conversion kit is to be installed only by certified service technicians.
NOTE: Check kit contents for all parts. Do not attempt conversion with items missing.
NOTE: A Torx T20 Tamper-Proof screwdriver may be separately ordered if needed.
NOTE: D.M.S. (DMS is Drill Manufacturer's Standard) Standard twist drill or steel wire gauge number.
WARNING: The gas supply MUST BE SHUT OFF prior to disconnecting the electrical power and
before proceeding with ANY conversion kit installation.
Version 1.0h
14
A certified service technician will require one of the following Country Flame certified conversion kits,
depending on the type of conversion being planned.
PROPANE CONVERSION KIT
To convert from natural gas to propane fuel follow conversion Steps 1 through 15 starting on this page,
using one of the following conversion kits:
Bayvue DV-46N to DV46P Kit BV-4604
Bayvue DV-30N to DV46P Kit BV-3004
NATURAL GAS CONVERSION KIT
To convert from propane to natural gas fuel follow conversion Steps 1 through 15 starting on this page,
using one of the following conversion kits:
Bayvue DV46P to DV46N Kit BV-4603
Bayvue DV30P to DV46N Kit BV-3003
PROPANE CONVERSION
Bayvue DV appliances are shipped from the Country Flame factory set for 46,000 Btu Natural Gas fuel
usage; however, conversion kits may be purcahsed from Country Flame to convert the Bayvue DV to
different fuels (propane or natural gas) or lower the heat outuput to 30,000 Btu. Depending on the specific
model owned and being converted, conversion kits contain different repalcement parts that are kit specific.
Conversion requires adjustment to the regulators, the burners, and the pilot system. Refer to TABLE 1 and
page 4 and page 5 for the correct gas pressures corresponding to the conversion kit being used.
WARNING: This conversion kit shall be installed by a qualified service agency in accordance
with the manufacturer’s instructions and all applicable codes and requirements of the
authorized agency having juristriction. If the information in these instructions are not followed
exactly, a fire, explosion or production of carbon monoxide may result causing property damage,
personal injury or loss of life. The qualified service agency is responsible for the proper
installation of this kit. The installation is not proper and complete until the operation of the
converted appliance is checked as specified in the owner instructions supplied with the kit.
STEP 1
STEP 2
STEP 3
STEP 4
Turn the control knob to the OFF position and turn off the gas supply to the valve.
Remove control knob extentions from the valve. Allow system to cool before proceeding.
Remove the control panel by removing the two screws located at the top of the panel.
Disconnect the wire from back of piezoelectric igniter. Disconnect wires from on/off switch
and variable speed control if required.
Refer to FIGURE 8 and using a Torx T20 screwdriver, remove and discard the three pressure
regulator mounting screws (Item A), the pressure regulator tower (Item B), and the diaphragm
assembly (Item C).
FIGURE 8: SIT 820 NOVA mV GAS CONTROL VALVE
Version 1.0h
15
STEP 5
STEP 6
STEP 7
STEP 8
STEP 9
STEP 10
STEP 11
STEP 12
Refer to FIGURE 8. Ensure that the rubber gasket (Item D) is properly positioned and install
the new HI/LO pressure regulator assembly to the valve using the supplied screws (Item E).
Tighten screws securely.
Attach the enclosed "conversion" label near the certification label.
Re-attach all wiring to the fan control knob and the piezoelectric igniter. Replace the access
panel and tighten the two screws. Replace the control knobs.
Remove the door, the logs, and the embers, noting the position of each log as it is removed.
Remove the two screws holding the ember tray in place. Lift up the ember tray and remove.
Remove the three burners. Mark each burner as to their location. Refer to FIGURE 4 and
TABLE 4 for proper air shutter adjustment for each burner. Adjust each burner’s air shutter to
meet fuel conversion requirements. NOTE: Use the shank of an appropriately sized drill bit
as an air shutter gauge. Pass the gauge through both sides of the air shutter, adjust and lock
the shutter removing the gauge when finished making adjustments.
Use a 3/8-inch (10mm) wrench to remove and discard the burner spud orifices. Place the new
burner spud orifices in the appropriate location per the conversion kit instruction or refer to
page 12 for the proper location of each labeled burner spud orifice.
Remove and replace the pilot gas orifice located in the PILOT FLAME DIFFUSER BODY.
a) Remove the pilot flame diffuser (FIGURE 9, Item B) by pulling up on it.
The retainer clip (FIGURE 9, Item A) should release the pilot flame diffuser
with a light pulling motion.
b) Remove the pilot gas orifice (FIGURE 10, Item F) by using a 5/32 hex head
wrench (Allen wrench) placed in the top of the pilot gas orifice.
c) Verify the correct pilot gas orifice number per page 14 kit definitions.
Reinstall and tighten the new pilot gas orifice and replace the pilot flame
diffuser by reinserting it into the retainer clip.
FIGURE 9: PILOT VALVE (back side)
Version 1.0h
16
FIGURE 10: PILOT VALVE
STEP 13
Refer to FIGURE 11, Note (X). The piezoelectric igniter cannot be installed incorrectly unless
it is damaged. The piezoelectric igniter should be in a parallel plane to the pilot flame diffuser
body. Each time the igniter button is pressed, a blue arc should occur from the piezoelectric
igniter to the pilot flame diffuser body. Replace the burners, the ember tray, the logs, the
embers, and the door, ensuring correct position of all components.
FIGURE 11: PILOT VALVE
Version 1.0h
17
STEP 14
Open the gas supply and perform gas leak test. One of the best methods used to check for gas
leaks is soap bubbles. Soap bubbles are made by mixing liquid detergent with a little water
and shaking vigorously to create soap bubbles. Cover the gas pipe joint or valve component
with these soap bubbles. If soap bubbles grow in size or the bubbles are blown off the
connection, a gas leak exists. Make necessary repairs and retest until no change in soap
bubbles is seen at any joint or valve connection.
WARNING: DO NOT USE AN OPEN FLAME TO CHECK FOR GAS LEAKS
STEP 15
Re-light the appliance. Check the flame control operation.
NATURAL GAS CONVERSION
Conversion from propane to natural gas follows the same 15 steps listed above using the parts from a
natural gas conversion kit. Adhere to the following:
NOTE: Conversion kits are to be installed by qualified service technicians.
NOTE: Do not install a kit IF conversion items are missing; check kit for all parts needed.
NOTE: A Torx T20 Tamper-Proof screwdriver may be ordered separately if needed.
INTAKE AND EXHAUST CONDITIONS
WARNING:
(Safety relief valves) Operation of this appliance with an improperly installed or an
improperly maintained venting system could result in carbon monoxide poisoning. Make sure that all
safety relief valves are closed and free from obstruction at all times. This is crucial in terms of operational
safety. IT IS STRONGLY RECOMMENDED THAT A CARBON MONOXIDE DETECTOR BE
PLACED IN THE VACINITY OF THIS PRODUCT TO ENSURE MAXIMUM SAFETY. IF
BATTERY OPERATED DETECTORS ARE USED, REPLACE THE BATTERY ANNUALY.
SEALED VENTING SYSTEM
The Bayvue DV is designed for a sealed vent system. This means that all flue connections, including all
seams and joints, are to be sealed with high temperature silicone rated for a minimum of 600OF (316OC) to
ensure that a proper draft occurs during appliance operation. If it becomes necessary to disassemble the
venting, proper care must be used to reassemble and reseal the vent air intake assembly.
THERMOSTAT/FAN CIRCUIT
The Bayvue DV is pre-wired to accept a millivolt wall thermostat and includes as standard, a room air
blower fan assembly. This blower is equipped with a three-prong 120 VAC grounded power cord that
protects against shock hazard. This plug should be connected directly into a properly grounded threeprong receptacle. Do not cut or remove the grounding pin from the blower’s plug.
The room air blower fan system is activated once the power cord explained in the preceding paragraph has
been plugged in. The fan circuit is activated along with the heat sensing thermo-disc and the fan speed
control rheostat. A wall thermostat can be connected to the terminal block on the back of the pedestal.
Simply remove the factory installed jumper and wire in the thermostat. Refer to FIGURE 12. CAUTION:
Label all wires prior to disconnection when servicing the controls or the blower system. Wiring errors can
cause improper and dangerous operational conditions. ALWAYS verify proper operation of the Bayvue
DV product after any servicing. Should any problems or operational issues be noted after servicing has
been completed, DO NOT USE THE SYSTEM until corrections have been made.
Version 1.0h
18
FIGURE 12: BLOWER FAN
FAN INSTALLATION
The Bayvue DV comes standard with the fan kit installed. The Fan Kit consists of a blower system. The
fan is connected to the Bayvue DV’s wiring harness. The Bayvue DV is pre-wired for and includes a
rheostat (speed control), a heat activated thermo-disc and a 120 volt receptacle. The fan slips inside the
back of the pedestal into two slides mounted to the bottom of the firebox.
DIRECT VENT INSTALLATION
GENERAL
Country Flame Bayvue DV product is approved for side wall vent or vertical vent through a roof. Only
Simpson Dura Vent chimney components or Selkirk Model Direct-Temp chimney components may be
used with this product. Simpson Dura Vent chimney vent products are listed in this manual to assist with
vent installation selection. Read all these instructions carefully before starting the installation. Failure to
follow instructions may create a fire or other safety hazard, and will void the product warranty. Be sure to
follow installation instructions and maintain proper venting and maintain clearances to combustible that
will vary from one installation to another.
Version 1.0h
19
INSTALLATION PRECAUTIONS
The Simpson Dura Vent Direct Vent System and the Selkirk Model Direct-Temp System are engineered
products that have been designed and tested for use with the Country Flame Bayvue DV product. The
chimney pipe product warranty will be voided and serious fire, health, or other safety hazards may result
from any of the following actions:
Installation of any damaged venting component.
Unauthorized modification of the venting system.
Installation of any component part not approved by Country Flame.
Installation other than as instructed by these instructions.
Conform to all local building codes during product installation.
WARNING
Always maintain required clearances (air space) to nearby combustibles to prevent a fire hazard. Do not fill air
space with insulation. Minimum clearance between vent pipes and combustible surfaces is 1 inch (25mm) except
where stated otherwise. Be sure to check the vent termination clearance requirements from decks, window soffits,
gas regulators, air supply inlets, and public walkways, as specified in these installation instructions and local
building codes. (Refer to the drawing for horizontal termination locations).
The gas appliances and vent system must be vented directly to the outside of the building, and never be attached to
a chimney serving a separate solid fuel or gas-burning appliance. This direct vent gas appliance must use its own
separate vent system. Common vent systems are prohibited and void the warranty.
INSTALLER SAFETY PRECAUTIONS
Wear gloves and safety glasses for protection.
Take note of all power lines when using ladders or working on roof tops.
Be aware of electrical wiring locations in walls and ceilings.
Properly use ladders and ensure safe angles for use.
VENTING PARTS LIST
The Simpson Dura Vent Direct Vent System offers a complete line of component parts for installation of
both horizontal and vertical installations. Many items are offered in decorative black, as well as
galvanized finish. The galvanized pipe and fittings are used for concealed locations such as attics, or
spaces where corrosion is a factor, such as above the roof line. Decorative plated trim kits are available for
both wall thimbles and ceiling support boxes. Snorkel terminations are available for applications which
may require vertical rise on the building exterior. The components listed in TABLE 5 have been approved
for use with the Country Flame Bayvue DV Stoves.
Version 1.0h
20
Country Flame Part #
Dura-Vent Part #
Description
CF-11010
CF-11011
CF-11012
CF-11013
CF-11014
CF-11015
CF-11016
CF-11017
CF-11018
CF-11019
CF-11020
CF-11030
CF-11031
CF-11032
CF-11033
CF-11051
CF-11058
CF-11052
CF-11055
CF-11056
CF-11054
CF-11057
CF-11043
CF-11044
CF-11040
CF-11041
CF-11050
908B
907B
906
906B
904
904B
903
903B
902
902B
911B
945
945B
990
990B
940
942
941
943
953
963
988
981
982
984
983
950
6" Pipe Length, Black
9" Pipe Length, Black
12" Pipe Length
12" Pipe Length, Black
24" Pipe Length
24" Pipe Length, Black
36" Pipe Length
36" Pipe Length, Black
48" Pipe Length
48" Pipe Length, Black
11" to 14-5/8" Pipe, Adjustable, Black
45 Degree Elbow
45 Degree Elbow, Black
90 Degree Elbow
90 Degree Elbow, Black
Round Support Box/ Wall Thimble cover
Wall Thimble
Cathedral Ceiling Support Box
Flashing, 0/12 to 6/12 Roof Pitch
Storm Collar
Ceiling Fire stop
Wall Strap
Snorkel Termination (36")
Snorkel Termination (14")
Horizontal Square Termination
Vertical Termination
Vinyl Siding Standoff
TABLE 5: DURA-VENT PARTS LIST
BASIC VENT KITS
CF-11000 This standard termination kit includes the following:
CF-11033
1 each - 90 Degree Black Elbow
CF-11051
1 each - Round Ceiling Support/ Wall Thimble Cover
CF-11040
1 each - Horizontal Square Cap
Note: The above kit is not a complete termination system. Order straight pipe lengths, as needed.
In Canada, a wall thimble is required to complete an installation.
CF-11001
CF-11033
CF-11051
CF-11040
CF-11015
CF-11020
Note:
This standard termination kit includes the following:
1 each - 90 Degree Black Elbow
1 each - Round Ceiling Support/ Wall Thimble Cover
1 each - Horizontal Square Cap
1 each - 24" Black Pipe
1 each - 11" - 14 5/8" Black Adjustable Pipe
In Canada, a wall thimble is required to complete an installation.
CF-11002
CF-11055
CF-11056
CF-11041
Note:
This vertical termination kit includes the following:
1 each - Flashing 0/12 - 6/12
1 each - Storm Collar
1 each - Vertical Termination Cap
The support box is not included in the kit.
Version 1.0h
21
INSTALLATION PLAN
VENT (FRESH AIR) REQUIREMENTS
The Bayvue DV burns fuel by combining the proper amount of natural gas or propane with fresh air to
obtain complete combustion. During heavy natural gas demand periods (extremely cold consecutive days)
the local gas supplier may provide “filler gasses” with the natural gas fuel supply. This mixed gas may
cause a change in burner flame appearance. This may cause soot to form on the logs and viewing
windows. In the event any change in the burn pattern is noticed, contact the local gas supplier to obtain
additional information and contact a certified professional to clean and adjust the appliance, if necessary.
It is imperative to ensure delivery of the proper amount of fresh combustion air to gas appliances. The
Bayvue DV (direct vent) chimney system brings all combustion fresh air requirements through a dual
chimney pipe and exhausts the spent combustion gasses back through the chimney pipe system. Failure to
properly seal the direct vent chimney system will allow leaks that will prevent the proper amount of fresh
air from being available for combustion or can potentially leak harmful combustion gasses back into the
home. Failure to provide adequate combustion air will cause operational problems, increased maintenance
issues, and potential failure of the gas stove to perform to its designed standard. For specific details on
combustion air requirements, refer to the current NFPA-54 (natural gas) or NFPA-58 (propane) and the
current ANSI Z223.1 standards. Although direct vent gas appliances are designed to minimize fresh air
issues, the homeowner should understand fresh air requirements for all fuel burning appliances in a home
and also understand the interaction these appliances can have on each other and the availability of fresh air
in the home. The next several paragraphs explain and provide examples of fresh air issues.
Modern construction techniques are making new homes tighter and tighter to air infiltration. This is good
in one sense as it reduces the amount of energy required to maintain a home at a comfortable temperature;
however, this is bad in another sense because without an adequate fresh air supply, these new air tight
homes become “stale or depleted of fresh air.” Most new airtight homes come with air exchange systems
that replace inside home air with fresh outside air so many times an hour. This air exchange system is
balanced to the number of occupants and the fuel burning appliances located in the home. If additional
combustion devices are added to a home, a certified professional should rebalance the air exchanger.
Rebalancing the system adjusts for the fresh air usage of any new combustion appliance. Rebalancing the
air exchanger ensures proper amounts of fresh air for the home occupants and other appliances. If your
home contains an air exchange system, contact a local certified professional to have a fresh air analysis
done while the Country Flame appliance is being installed.
A homeowner needs to understand the terms “restricted” and “unrestricted” air space. Even though
properly installed direct vent chimney systems eliminate combustion air requirements there is still the
requirement for ventilation air. If a home is not air tight, depending on room configuration and other fresh
air barriers, a gas appliance can still be installed in too small a room and “starved or restricted” from
receiving the proper amount of necessary air. Again, this is not true of Direct Vent appliances whose
chimneys provide for combustion air; however, direct vent appliance chimney systems do not provide for
ventilation air requirements. Determining the amount of fresh air available to a gas appliance is a
relatively easy mathematical exercise. Get out the old calculator and follow the examples provided. First,
here are the “official” definition of terms:
a)
Space: a room where a gas appliance is to be placed. The total space required to ensure proper
fresh air to a gas appliance can include additional space or room(s) if there is no restriction to airflow
between the space(s) or room(s). “Unrestricted” space means (i) no closable doors can exist between
rooms or (ii) there must be proper sized grills (non-closing) placed between adjoining spaces or rooms. If
closable doors exist or no grills exist between adjoining rooms, then the adjoining space next to where the
gas appliance is to be located cannot be included in the calculation to determine if adequate fresh air exists
for proper operation of the gas appliance.
b)
Unrestricted space: is defined as an area that provides at least 50 cubic feet of air volume for
each 1,000 Btu per hour of input heat rating of a gas appliance. The 50 cubic feet of fresh air volume is
made up of primary (combustion) and secondary (heated) air requirements. Vented gas appliances use 10
Version 1.0h
22
cubic feet of the available volume of air for primary (combustion) air. Again, Direct Vent gas appliances
fulfill combustion air requirements by providing this air through the chimney system. The additional 40
cubic feet of fresh air is heated and moved throughout the home as secondary (ventilation) air. Thus, for
the Bayvue DV to operate properly the appliance requires 1,840 cubic feet of unrestricted air space. This
requirement was determined by taking the 46,000 Btu/H and dividing it by 1,000 Btu/H which equals 46.
Now multiply 46 times the 40 cubic feet (ventilation air only) requirement which equals 1,840 cubic feet
of room space. If a Country Flame vented appliance was being installed, the minimum room size would
increase to 2,300 square feet as combustion air would have to be supplied by the room. Always use the
highest Btu/H rating of an appliance to determine the maximum fresh air requirement before an appliance
is placed in a room. NOTE: Cubic feet equals the length times width times height of the room where the
gas appliance is to be installed. Adjoining spaces air volume can be included only if the spaces are
connected by doorless passageways or non closing grills that connects to the room where the gas appliance
is installed.
c)
Restricted space: is defined as an area that has less than 50 cubic feet of air volume for each
1,000 Btu per hour of input heat rating of the gas appliances installed in that area. WARNING: NEVER
install a gas appliance in a restricted space unless adequate airflow is provided for proper
combustion and ventilation (primary and secondary air) to that restricted space.
EXAMPLE 1: A basement room is going to have a gas heater installed. The room is 8’4” by 18’7” by
23’0” for a total air volume of 3,561.8 cubic feet. Divide the rooms cubic feet of air space by 50 cubic feet
(40 cubic feet if a direct vent system was being installed) which gives 71.24. Multiply 71.24 times 1,000
Btu/H. This means that as long as the appliance being installed in this particular room has less than a
71,236 Btu/H input rating, there is enough air volume to support proper combustion and ventilation air.
This specific example would be classified as an unrestricted space.
EXAMPLE 2: A room will have a direct vent fireplace installed that has an input rating of 26,200 Btu/H.
An adjoining room connected by a doorless passageway contains a 60,000 Btu/H rated furnace. The room
where the direct vent appliance will be installed is 10’ by 15’ by 8’ with an air volume of 1,200 cubic feet.
The adjoining room is 12’ by 16’ by 8’ for an air volume of 1,536 cubic feet. Total air volume of the two
rooms is 2,736 cubic feet. Divide 1,200 cubic feet by 40 cubic feet equals 30. Divide 1,536 cubic feet by
50 cubic feet equals 30.72. Add the two numbers (30 plus 30.72) equals 60.72. Multiply 60.72 times
1,000 Btu/H equals 60,720 Btu/H. This final number (60,720) indicates the maximum input rating any
appliance the adjoining room’s air volume can properly provide combustion and ventilation air for. At the
same time, the total Btu/H input ratings of the appliances that will be installed is 86,200 Btu/H. This
means EXAMPLE 2 rooms are classified as RESTRICTED AIR SPACE because 86,200 Btu/H appliance
use is greater 60,720 Btu/H room air. Additional air must be provided to this area to meet air requirements
when both appliances are operating at the same time. RESTRICTED AIR SPACE can be ventilated in a
number of different ways to meet the combustion and ventilation air requirements of the appliances
installed.
METHOD A: Vent the area directly to the outdoors. Use one square inch of opening for each
4,000 Btu/H of additional air required. For EXAMPLE 2, there is a requirement for an additional 25,480
Btu/H of air requirement. Divide 25,480 by 4,000 equals 6.37. Thus, an opening would have to be
provided to the outdoors that has an open area of 6.37 square inches in order to satisfy the air requirements
for the appliances and room sizes given in EXAMPLE 2.
METHOD B: Additional air can also be accomplished by creating doorless passages to other
rooms or providing venting grills to other rooms. If venting grills are to be used, they would need to
provide a minimum of 50 square inches of opening and any one side must be greater than 5 inches. At the
same time a minimum of two grills are required. One grill should be located within 12 inches from the
floor and one grill should be 12 inches from the ceiling. Again, refer to the National Fuel Codes for
information concerning restricted or confined air space.
Version 1.0h
23
DIRECT VENT TERMINATION
There are two types of direct vent termination that can be used with the Bayvue DV appliance:
Horizontal Termination
Vertical Termination
VENT TERMINALS
There are four types of vent terminals available for the Bayvue DV appliances. Three of these vent
terminal types apply to horizontal terminations.
Standard Horizontal Terminal
14” Snorkel, Horizontal Terminal
36” Snorkel, Horizontal Terminal
Vertical Terminal
STANDARD HORIZONTAL TERMINAL
All horizontal terminations require a minimum of 24" of vertical flue measured from the top of the stove.
SNORKEL TERMINAL (14" OR 36")
For installations close to the ground you must use a snorkel (extended terminal) that has the vertical rise
built into it. The 36" snorkel is designed for below grade installation. WARNING: Direct vent terminals
will not be recessed into a wall or siding.
VERTICAL TERMINAL
Vertical terminals are measured from the top of the stove and can be no more than a maximum of 34 feet
from stove to flue cap. Where floors or attic space are penetrated by chimney vent pipe, safety requires
that a round support box/fire stop be installed to ensure minimum clearances to any combustible material is
maintained.
CHIMNEY PIPE
When planning the installation, it is necessary to select the proper length of vent pipe for a particular
requirement. The Venting Graphs provided on the following pages will aid the installer in determining the
proper relationship between vertical and horizontal side wall venting. These Venting Graphs should assist
the installer in determining the various vent pipe lengths allowed for a specific installation. It is also
important to note the wall thickness. Select the amount of vertical rise desired for "vertical -to- horizontal"
type installations. To determine the length of a pipe required for vertical installation, measure the distance
from the application flue outlet to ceiling, the ceiling thickness, the vertical rise in an attic, or second story,
and allow for sufficient vent height above the roof-line. For two story applications, fire stops are required
at each floor level. If an offset is needed in the attic, additional pipe and elbows will be required.
STANDARD HORIZONTAL VENT
STEP 1. Set the gas appliance in the desired location. Check to determine if wall studs are in the way
where the venting system is to be attached. If wall studs become obstructions to venting, adjust the
appliance location, if possible, to minimize the requirement to cut wall studs.
STEP 2. All direct vent chimney pipe and fittings are designed with special twist-lock connections. To
allow easy connection to the venting system, a twist lock adapter has been built into the Bayvue DV.
Assemble the desired combination of black pipe and elbows to the appliance adapter with pipe seams
oriented towards the wall or floor, as much out of view as possible.
Version 1.0h
24
NOTE (1)
Four indentations, located on the female ends of pipes and fittings, are
designed to slide straight into the male ends of pipes and fittings. Orient the four pipe
indentations to match the four entry slots on the male ends of the pipe. Push the pipe
sections together. Twist-lock one section clockwise approximately one-quarter turn, until the
two sections are fully locked. The female locking lugs will not be visible from the outside on
the black pipe or fittings. Locate them by examining the inside of the female ends.
NOTE (2)
Horizontal vent runs must be supported every three feet with wall straps. All
intake air seams, including elbows, are required to be sealed with high temperature 600OF
rated silicone sealant or equivalent.
STEP 3. With the adapter and pipe attached to the stove, slide the stove into its correct location, and mark
the wall for a 10" x 10" square hole. The center of the square hole should line up with the centerline of the
horizontal pipe. Cut and frame the 10" square hole in the exterior wall where the vent will be terminated.
If the wall being penetrated is constructed of non-combustible material, i.e. masonry block or concrete, a
7" diameter hole is fine.
NOTE (1) The horizontal vent must rise a 1/4" for every 1 foot of run towards from the
appliance to the termination. Never allow any vent to run downward from the stove. This
will create high temperature pockets and will create the potential for a house fire.
NOTE (2) The location of the horizontal vent termination on an exterior wall must meet all
local and national building codes, and must not be easily blocked or obstructed.
NOTE (3) Install a two-piece wall thimble (wall penetration heat shield) in the 10" x 10"
square hole.
STEP 4
Position the horizontal vent termination in the center of the 10 inch square hole. Attach the
horizontal vent termination to the exterior wall with the four wood screws provided as shown
in FIGURE 13. Before attaching the Vent Termination to the exterior wall, run a bead of nonhardening mastic around its outside edges. This mastic will provide a weather seal between
the horizontal vent termination and the exterior wall. The arrow on the horizontal vent cap
should be pointing up. Ensure that proper clearances to combustible materials are maintained
in all installations.
NOTE (1) The four wood screws provided should be replaced with appropriate fasteners for
stucco, brick, concrete, or other types of sidings.
NOTE (2) For buildings with vinyl sidings, a Vinyl Siding Standoff (Part 950), should be
installed between the vent cap and the exterior wall. . Attach the Vinyl Siding Standoff to the
Horizontal Vent Termination. The Vinyl Siding Standoff prevents excessive heat from
overheating the vinyl siding or the framing material underneath.
STEP 5
Before connecting the horizontal run of vent pipe to the vent termination, slide the black
decorative wall thimble cover over the vent pipe.
STEP 6
Position the appliance and vent against the wall. Insert the vent pipe into the vent cap
assembly. It is important that the vent pipe extend into the vent cap sufficient distance so as to
result in a minimum pipe overlap of 1-1/4". Secure the connection between the vent pipe and
the cap by attaching the two sheet metal strips extending from the vent cap assembly into the
outer wall of the vent pipe. Use the two sheet metal screws to connect the strips to the pipe
section. Bend any remaining portion of the sheet metal strip back towards the vent cap, so it
will be concealed by the decorative wall thimble cover. Refer to FIGURE 14.
STEP 7
Slide the decorative wall thimble up FIGURE 16 to the wall surface and attach with screws
provided. Apply decorative plated trim if desired as shown in FIGURE 15.
Version 1.0h
25
Vinyl Siding
Apply Sealant
to all Four Sides
WOOD SCREWS
Screws
Bolt Terminal
to vinyl
standoff
HOT
Vinyl Siding
Standoff
Wall Penetration
Heat Shield (Wall Thimble)
Duravent Part #942
FIGURE 13: HORIZONTAL VENTING
Wall
Thimble
Fold and
Sheet Metal
Screw Strap
Wall
Thimble
Wood
Screws
Strap
FIGURE 14: HORIZONTAL VENT
FIGURE 15: DECORATIVE TRIM
Ceiling
Joists
10"
10"
1 1/2" Wood
Screws
FIGURE 16: ROUND SUPPORT BOX/WALL THIMBLE
Version 1.0h
26
VERTICAL AND HORIZONTAL VENT
STEP 1. Determine the amount of horizontal run for a specific installation. Note the minimum vertical
run and ensure it is met for a specific application as shown in FIGURE 17 below.
STEP 2. FIGURE 18 or 19 provides the minimum vertical rise required for a specific horizontal run
VERTICAL TERMINATION
Vertical
Termination
Cap
Storm Collar
Flashing
Ceiling
Firestop
HORIZONTAL TOP FLUE INSTALLATION
Standard
Horizontal
Terminal
Min. 24" Pipe
Length (if
installation
requires less
vertical it must
be installed as
per horizontal
rear flue
instructions
90 Deg.
Elbow
Round Support
Box/Wall
Thimble
Pipe
Lengths
Cathedral
Ceiling
Support
Box
FIGURE 17: HORIZONTAL & VERTICAL VENT SYSTEM
Version 1.0h
27
VENT GRAPHS
Vent graphs are provided to assist the certified installer in determining the correct horizontal and vertical
lengths of chimney pipe to be utilized for both a specific application and the specific fuel that will be used
with a specific Bayvue DV model fireplace. Note: The Bayvue DV 46 and DV 30 have separate vent charts
both per model and type of fuel being used. Ensure that the correct Chart is referenced during installation
planning.
1. Determine which fuel graph chart is to be used. (Natural Gas or Propane)
2. Determine the height from the top of the stove to the 7" elbow. Draw a horizontal line until it
intersects with the slanted graph line.
3. From the point of this intersection, draw a vertical line to the bottom of the graph.
4. Select the indicated dimension, and position the unit in accordance with the same.
Example 1: (Natural Gas Graph DV 46) If the vertical dimension from the top of the stove
is 7 feet, the horizontal run to the outer wall flange must not exceed 9 feet.
Example 2: (Propane Gas Graph DV 46) If the vertical dimension from the top of the stove
is 21 feet, the horizontal run to the outer wall flange must not exceed 8 feet.
FIGURE 18: BAYVUE DV VENT GRAPHS, MODEL DV 46
VENTING GRAPH FOR
DV 46 PROPANE
VENTING GRAPH FOR
DV 46 NATURAL GAS
Max. Vertical
Installation
34'
Min. Vertical
6'
34
34
32
32
30
30
28
28
26
26
24
24
22
22
20
20
18
18
16
16
14
14
12
12
10
10
8
8
7'
6
6
4
4
2
2
Min. Horizontal 11"
Max. Horizontal 21" at 2
2' Vertical
4
6
8
10
12
14
2
16
4
6
8
10
12
Max. Horizontal 9'
VENT TERMINATION MUST FALL IN THE GREY AREA
Version 1.0h
28
14
16
VENT GRAPH (cont'd)
Note:
Note:
Note:
Note:
Note:
Maximum propane horizontal vent run is 13' (3960mm) when the vertical vent rise is 10' (3048mm)
Minimum vertical rise is 2' (908 mm)
Minimum horizontal run is 11" (279mm) on a vertical to horizontal installation.
Minimum wall thickness 4" (100mm)
Maximum wall thickness 20" (508mm).
FIGURE 19: BAYVUE DV VENT GRAPHS, MODEL DV 30
VENTING GRAPH FOR
DV 30 NATURAL GAS
VENTING GRAPH FOR
DV 30 PROPANE
34
34
32
32
30
30
28
28
26
26
24
24
22
22
20
20
18
18
16
16
14
14
12
12
10
10
8
8
6
6
4
4
2
2
2
4
6
8
10
12
14
16
2
4
6
8
10
12
VENT TERMINATION MUST FALL IN THE GREY AREA
A vent shall not terminate:
A.
Within six feet (1.8 meters) of a mechanical air supply inlet to a building.
B.
Above a utility meter within three feet (1 meter) horizontally of its vertical center line.
C.
Within six feet (1.8 meters) of any gas service regulator vent outlet.
Version 1.0h
29
14
16
D.
E.
Within twelve inches (305 millimeter) of an unventilated soffit.
Less than twelve inches (305 millimeter) above grade level from the bottom of the vent terminal.
A vent shall not terminate directly above a side-walk or paved driveway which is located between two
single family dwellings and serves both dwellings.
Clearance of 12" (30cm) minimum is only permitted if the veranda, porch, deck, or balcony, is fully open
on a minimum of 2 sides beneath the floor.
For USA installations, follow current National Fuel Gas Code ANSI Z 223.1 with reference to NFPA 54
(natural gas) or NFPA 58 (propane.) In CANADA refer to CGA B149 Installation Codes Note: Local
Codes or Regulations may require different clearances.
SNORKEL VENT
For installations requiring a vertical rise on the exterior of the building, follow the same installation
procedures as used for standard Horizontal Terminations up to STEP 3, then continue with STEP 4 below.
If the Snorkel Termination must be installed below grade, use the 36" snorkel. Proper drainage must be
provided to prevent water from entering the Snorkel Termination.
Note: The maximum 90 degree elbows permitted per side wall (horizontal)
installation is one. An additional 45 degree is permitted for corner installation.
VERTICAL VENT
Vertical termination assumes no horizontal run of exhaust pipe is involved in the venting system. The
maximum vertical rise allowed for the Bayvue DV appliance is 34 feet when measured from the top of the
appliance to the bottom of the Flue Cap. The maximum number of 45 degree elbows permitted for a
vertical installation is four elbows. Installation of the four elbows does not decrease the allowable vertical
rise of the Bayvue DV appliance.
STEP 1
Do not pack air spaces between combustibles and the vent pipe with insulation.
STEP 2
Set the gas appliance in the desired location. Drop a plumb bob down from the ceiling to the
position of the appliance flue exit, and mark the location where the vent will penetrate the
ceiling. Drill a small hole at this point. Next, drop a plumb bob from the roof to the hole
previously drilled in the ceiling. Mark the spot where the vent will penetrate the roof.
Determine if ceiling joists, roof rafters, or other framing will obstruct the venting system. You
may wish to relocate the appliance to avoid cutting load-bearing members.
STEP 3
To install the round support box/wall thimble in a flat ceiling, cut a 10" square hole in the
ceiling, centered on the hole drilled in STEP 2. The hole should be of sufficient size to meet the
minimum requirements of 1" to combustibles. Frame the hole as shown in FIGURE 16.
STEP 4
If the twist-lock adapter has not been installed on the stove by the manufacturer; install it now in
accordance with the stove instruction manual.
STEP 5
Assemble the desired lengths of black pipe necessary to reach from the appliance adapter up
through the round support box. Insure that all pipe and elbow connections are in their fully
twist-locked position.
Version 1.0h
30
STEP 6
Continue to assemble lengths of pipe and elbows necessary to reach from the ceiling support box
up through the roof line. Galvanized pipe and elbows may be utilized in the attic, as well as
above the roof line. The galvanized finish is desirable above the roof line, due to its higher
corrosion resistance.
ROOF PITCH
Flat to 6/12
7/12 to 9/12
10/12 to 12/12
13/12 to 16/12
17/12 to 21/12
FEET
1
2
3
6
8
METERS
0.3
0.6
1.2
1.8
2.4
NOTE: For direct vent appliances, the
vent/air intake termination clearances above
the high side of an angled roof are listed
above.
FIGURE 20: CHIMNEY VENT
STEP 7
Slip the flashing over the pipe sections protruding through the roof. Secure the base of the
flashing to the roof with roofing nails. Insure the roofing material overlaps the top edge of the
flashing to the roof with roofing nails. Insure the roofing material overlaps the top edge of the
flashing as shown. Verify that you have at least 1" clearance to combustibles at the roof line.
STEP 8
Continue to add pipe sections until the height of the vent cap meets the minimum building code
requirements. Note that for steep roof pitches, the vent height must be increased. In high wind
conditions, nearby trees, adjoining roof lines, steep pitched roofs, and other similar factors can
result in poor draft, or down-drafting. In these cases, increasing the vent height may solve this
problem.
STEP 9
Twist lock the vent cap onto the top of the chimney system.
Note (1):
For multi-story vertical installations, a ceiling fire stop (Part 963)
is required at the second floor, and any subsequent floors. The opening should
be framed to 10" x 10" inside dimensions. Any occupied areas above the first
floor, including closets and storage spaces, which the vertical vent passes
through, must be enclosed. The enclosure may be framed and sheet-rocked with
standard construction materials, leaving a 1" minimum clearance between the
outside of the vent pipe, and the combustible surfaces of the enclosure. Do not
fill any of the required air spaces with insulation.
Note (2):
For direct vent appliances, the vent/air intake termination
clearances above the high side of an angled roof are as follows:
CATHEDRAL CEILINGS
STEP 1
Follow installation Steps 1 and 2 under Vertical Terminations.
STEP 2
Using a plumb bob mark the centerline of the venting system on the ceiling. Drill a small hole
through the ceiling and roof at this point. From the roof, locate the drill hole and mark the
outline of the cathedral ceiling support box.
Version 1.0h
31
STEP 3
Remove shingles or other roof covering as necessary to cut the rectangular hole for the support
box. Cut the hole 1/8" larger than the support box outline.
STEP 4
Lower the support box through the hole in the roof until the bottom of the support box protrudes
at least 2 inches below the ceiling. Align the support box in place through the inside walls and
into the roof sheathing.
STEP 5
Using tin snips, cut the support box from the top corners down to the roof line, and fold the
resulting flaps over the roof sheathing. Before nailing it to the roof, run a bead of non-hardening
mastic around the top edges of the support box, to make a seal between the box and the roof.
Clean out any combustible material from inside the support box.
STEP 6
Complete the cathedral ceiling installation by following the same procedures outlined in Steps 4
through 9 for vertical terminations.
MAINTENANCE
The frequency of performing fireplace maintenance depends on site-specific conditions and the frequency
of homeowner use of this product. Country Flame recommends that a certified service technician perform
an annual check-up on an appliance prior to the start of each heating season. Follow the general guidelines
provided below for each specific maintenance task. If there are any questions about maintenance or proper
service, contact the local Country Flame dealer or a certified service technician for clarification of any
issue.
IMPORTANT: TURN OFF THE FIREPLACE AND SHUT OFF THE GAS BEFORE SERVICING
ANY FIREPLACE.
SPECIFIC TASKS
CLEANING BURNERS AND CONTROLS
FREQUENCY: Once during annual inspection.
PERFORMED BY: Qualified service technician.
TASK PERFORMED: Clean the control compartment. Remove and clean logs (careful not to damage
ceramic logs). While logs are removed, clean and inspect 3 burners, inspect and clean pilot assembly, and
inspect and clean surrounding burner area.
REPLACE OLD EMBERS
FREQUENCY: Once during annual inspection.
PERFORMED BY: Qualified service technician.
TASK PERFORMED: Replace ember material with new ember material. Additional ember material can
be purchased from a local authorized Country Flame Dealer. (Only use genuine Country Flame ember
material)
Version 1.0h
32
CHECK FLAME AND PILOT
FREQUENCY: Periodically.
PERFORMED BY: Qualified service technician or homeowner.
TASK PERFORMED: Visually inspect the three burner’s flame height and burn patterns. The front burner
flame will be barely visible through the glowing embers. The middle and back burner flames are steady and
not lifting or floating from away from the burner surfaces. Refer to FIGURE 5d for a picture representation
of the proper flame with logs and embers installed. Visually inspect that the pilot light is burning with four
blue flame nodes, FIGURE 21, protruding from the pilot flame diffuser, FIGURE 21, Item B. There should
be no sputter or blockage of any of the pilot flame or its four flame nodes. There should be a blue flame
surrounding the outside edge of the pilot flame diffuser, FIGURE 21, Item B. In the event any abnormality
is observed in the burner flame pattern or the pilot light flame pattern, contact a local authorized Country
Flame Dealer or certified technician.
FIGURE 21: STANDING PILOT
WARNING:
DO NOT ATTEMPT TO CLEAN GLASS UNTIL APPLIANCE IS COOL
GLASS CLEANING
FREQUENCY: Before the first use and after first four hours of use the glass should be cleaned; thereafter,
clean as necessary.
PERFORMED BY: Homeowner.
TASK PERFORMED: Remove the door assembly by unhooking the four locks (2 locks on each side).
Use a household glass cleaner or a Hearth Industry approved gas stove glass cleaner. Replace the door
assembly and close the four locks to properly seal the door to the body of the Bayvue DV.
WARNING:
DO NOT USE ABRASIVE CLEANERS ON GLASS SURFACE
CHECK VENT SYSTEM
FREQUENCY: Once during annual inspection. See General Inspection for additional requirements.
PERFORMED BY: Qualified service technician or homeowner.
TASK PERFORMED: Check complete vent system for corrosion, moisture problems, pin holes or broken
seals. Remove chimney cap and inspect vent and cap for debris. Ensure clean and open vent system.
Version 1.0h
33
GLASS-CERAMIC SPECIFICATIONS
KERA LITE® glass-ceramic is specially manufactured for use in high temperature applications. This glassceramic has a thermal endurance far exceeding that of normal tempered glass. KERA LITE® is designed to
operate at temperatures ranging from -4000F to +14000F. Despite its superior thermal properties, KERA
LITE® stove windows should be treated with care. This glass-ceramic can still be scratched or broken by
mechanical abuse. When cleaning the window, use only non-caustic, non-abrasive cleaners. Country
Flame gas fireplace doors use a KERA LITE® glass-ceramic that is 0.197 inches thick +/- 0.008 inches.
Country Flame custom cuts each KERA LITE® glass at its factory to fit the fireplace door. If problems
occur or should the glass-ceramic ever need replacement, contact Country Flame or a local authorized
dealer for assistance. The glass-ceramic specifications are as follows:
Manufacturer
Window Type
Euro Kera
Glass-Ceramic, Kera Lite®
GLASS REPLACEMENT
1.
2.
3.
4.
Turn off gas valve.
Unlock four door latches (2 each side), refer to door installation section and FIGURE 23.
WARNING: Once door latches are unhooked, nothing holds door assembly to Bayvue DV. Do not
let the door assembly drop, handle with care.
Remove the door assembly from the Bayvue DV guide pins and lay it on a padded flat surface.
From the inside of the door remove the door rope gasket, FIGURE 22, left view, Item E. Undo twenty
#6 nuts and four #10/32 screws, FIGURE 22, right view, Item J that holds glass retainer strips in place.
Store all loose parts in a safe location as they will be required during reinstallation. Remove the glass
retainers, FIGURE 22, right view, Item I. WARNING: Broken glass is extremely sharp. Use extreme
caution. Use leather gloves and wear safety glasses when removing broken glass.
FIGURE 22: GLASS REPLACEMENT
GASKET SPECIFICATIONS
GASKET
_____
BAYVUE DOOR SYSTEM
Fiberglass tape side glass
Fiberglass tape center glass
Rope gasket, front door
Version 1.0h
LENGTH
QUANTITY
36”
41”
88”
2
1
1
34
DESCRIPTION
¾” by 1/16” fiberglass tape
¾” by 1/16” fiberglass tape
3/4” diameter rope, high density
5.
Clean the doorframe as necessary to prepare for new glass. All old glass tape, broken glass, and debris
should be removed from the frame in order for the new glass and glass tape to fit properly in place.
6. Position and install the three glass panels, FIGURE 22, left view, Item D and Item F in the doorframe.
The third glass panel is not shown in FIGURE 22. All glass comes pre-taped with fiberglass
insulation, FIGURE 22, left view, Item B.
7. Set glass retainers, FIGURE 22, right view, Item H in place over the glass. Reinstall twenty #6 nuts
and four #10/32 screws, FIGURE 22, right view, Item J onto Item I to hold retainers in place. DO
NOT over tighten.
8. Install door rope gasket, FIGURE 22, left view, Item F, using small amount of rope cement to hold
rope gasket in place.
9. Reinstall assembly, FIGURE 24 to stove body. Close door latches, securing assembly to Bayvue DV.
10. The door assembly is a sealed unit. Refer to door seal section. Reread test procedures and check door
seal. Perform test seal procedure to ensure door assembly fits properly to Bayvue DV body. Contact a
local authorized Country Flame Dealer or a certified professional if there are any issues with the seal.
WARNING:
THIS PRODUCT IS A SEALED APPLIANCE. THE DOOR ASSEMBLY
MUST SEAL AGAINST STOVE BODY FOR PROPER OPERATION.
NEVER
OPERATE THE STOVE WITH BROKEN GLASS OR WITH THE DOOR OPEN. ANY
LEAKAGE MAY CAUSE DANGEROUS INDOOR AIR POLLUTION. DO NOT ABUSE
DOOR GLASS, SUCH AS SLAMMING THE DOOR OR STRIKING THE GLASS.
WARNING:
USE COUNTRY FLAME REPLACMENT PARTS (EXACT PART NUMBERS). REPLACE
PARTS AS COMPLETE ASSEMBLY WHERE NECESSARY. REFER TO GLASS CLEANING SECTION.
Version 1.0h
35
GENERAL VENT INSPECTION
Inspect the venting system periodically. Additional areas to inspect are as follows:
1. Check areas of the venting system which are exposed to the elements for corrosion. These will appear as
rust spots or streaks, and in extreme cases, can be holes. These components must be replaced to ensure the
integrity of the system and the safety of the homeowner.
2. Remove the chimney cap and shine a flashlight down the vent. Remove all debris, bird nests, or other
foreign material found in the vent system.
3. Check for evidences of excessive condensate, such as water droplets forming in the inner liner, and
subsequently dripping out of vent joints. Continuous condensate can cause corrosion of caps, pipe and
fittings. Condensation may be caused by having excessive horizontal runs, too many elbows, and exterior
portions of the system being exposed to cold weather. Consult a certified professional to correct.
4. Inspect joints, to verify that no pipe sections or fittings have been disturbed or consequently loosened.
Also check mechanical supports such as wall straps or plumbers' tape for proper integrity/support.
5. For all direct vent systems, proper re-assembly and resealing of the vent-air intake system is mandatory.
If the vent-air system is disassembled for any reason, reinstall each part per instruction provided for the
initial installation.
GENERAL CLEANING
General cleaning of the appliance should be completed routinely to remove all dust, lint, or other debris that
has built up during non-use in the off season. The three burners should be cleaned per specific tasks listed
in this manual. The burners can be blown out with dry air or be vacuumed to remove dust or other debris.
If any burners look to be damaged or degraded in appearance, contact a certified professional to verify their
working order.
No lubrication of any part is required in the Bayvue DV appliance. It is recommended that at a minimum,
annual inspection of the venting system be conducted by a certified professional. At no time should the
combustion air or ventilation air of this appliance be allowed to become obstructed. Free airflow is crucial
to the proper operation of this appliance. The pilot and burner should be checked for proper flame pattern.
Flame patterns should not appear to be suspended about the pilot tube or the burners. Nor should the pilot
or burner flame appear lifeless or smoking in its burn pattern. Have the operational burn patterns checked
by a certified professional in the event there is any question about gas burn patterns. Do not use this
appliance if any part or component of this appliance has ever been under water. Immediately call a certified
professional to inspect or replace any part or control system that has been under water.
GENERAL SAFETY
-Always shut off the gas supply and allow the heater to cool down before attempting any service work.
-Always check for leaks, after servicing.
-Always check for correct combustion and ventilation air flow after performing any service.
-Always make sure the heater is away from any combustible or flammable materials.
-Always ensure proper re-assembly and re-sealing of all vent-air intake parts. If any part of the system is
disassembled, reinstall those parts per the instructions provided in this manual.
GENERAL PERIODIC INSPECTIONS
Check the venting system annually and make sure the system is clear of any debris.
Check flame patterns periodically.
Allow 15 minutes for the flame to reach maximum color and height.
CLEANING A PAINTED SURFACE
Occasionally dry rag dust to keep the painted surface looking new. Paint can be touched up as needed.
Clean the areas to be painted with fine steel wool. Remove all trim or cover all trim and controls with
masking tape. Then, touch up the stove with Stove Bright® high temperature stove paint.
Version 1.0h
36
CLEANING PLATED SURFACES
When cleaning plated trim, special care needs to be taken to avoid damage. Do not use chemical or
abrasive cleaners. Wipe only with a very soft damp cotton cloth to maintain original brilliance.
CAUTION: Vigorous wiping may remove or discolor the plated finish.
DOOR INSTALLATION
The door is installed or removed by closing or opening four door latches, two on each side of the Bayvue
DV. FIGURE 23 shows a split view of the door latch and door guide system. FIGURE 23 left view; Item
A shows the top door latch in its closed position. FIGURE 23 right view; Item A shows the bottom door
latch in its open position. Each latch has an adjustment screw to ensure a good tight latch can be obtained
which in turn will ensure proper sealing of the door to the Bayvue DV. FIGURE 23, Item B shows the
guide pin that is located on each side of the Bayvue DV to assist in proper location of the door assembly.
Never operate the stove with the door open. Correct Bayvue DV operation requires the door assembly be
mounted to the stove and locked during all operations, except during maintenance.
FIGURE 23: DOOR INSTALLATION
DOOR SEAL
Always open the two magnetically latched side panels before opening the large viewing door. Test for a
good seal around the face of the door to the body of the appliance. To test the seal, place a piece of paper
between the body of the stove and the door, close and latch the door. Try pulling the paper from the door.
If the paper is easily removed, tighten the latches and secure the latch with the locking nuts. Once
adjustments have been made, test the door seal again. The test should be tried at several locations around
the doorframe. If the paper is easily pulled out no matter where the test is taken, it is probably time to
replace the heavy door rope gasket shown in FIGURE 24 below. If there is any concern about a proper seal
or the condition of the door rope gasket or glass tape, contact a local authorized Country Flame Dealer or a
certified technician for assistance.
FIGURE 24: DOOR ASSEMBLY
Version 1.0h
37
MAIN ORIFICES
FIGURE 25, left view, illustrates the front burner spud orifice (Item A) unthreaded from the orifice holder
(Item B). Do not over tighten the orifice spud. Do not leave the orifice spud finger tight as gas may leak
from the loose fitting. Note that the front, middle, and rear spud orifices are identified as Item A. FIGURE
25 also shows the pilot assembly (Item C) for reference purposes.
FIGURE 25, right view, shows the burner assembly with a partial view of all three burners; front burner
(Item D), middle burner (Item E), and the rear burner (Item F) installed. Be careful, when removing
burners. The front burner is uniquely different but the middle and rear burner look very similar. When any
one or all of the burners are removed, ensure they are marked from the spot they were taken and returned to
the same position. The burners are NOT interchangeable and must be placed in the proper position to
prevent sooting from occurring and to ensure proper burning.
FIGURE 25: BURNER ASSEMBLY
GAS FLAME INSPECTION
The flames will be blue during the first 5 minutes or so but over the period of 15 minutes they will
gradually turn yellow. Flame intensity and the glowing logs vary with the specific type of fuel and venting
conditions. Refer to FIGURE 5d for a picture that shows a proper flame for natural gas.
IMPORTANT INFORMATION: IT IS NORMAL FOR GAS PRODUCTS, FABRICATED FROM
STEEL, TO GIVE OFF SOME EXPANSION AND/OR CONTRACTION NOISES DURING THE
START UP OR COOL DOWN CYCLE. SIMILAR NOISES ARE FOUND WITH YOUR
FURNACE HEAT EXCHANGER OR CAR ENGINE.
Version 1.0h
38
RELIEF VALVE INSPECTON
Relief valves are located on the left and right side of the Bayvue DV. In order to inspect these relief valves,
the magnetically latched side doors (left and right side) will need to be opened. FIGURE 26, Item A, shows
a relief valve located on the right side of the appliance. NOTE: The right side magnetically latched door is
not shown for clarity. A relief valve must be free to move in a direction perpendicular to the body of the
appliance. FIGURE 26, Item C shows the normal direction of travel of the relief valve. A spring provides
tension to hold the relief valve against the body of the stove. Relief plates should be free to slide on the
tracks provided, shown in FIGURE 26, as Item B in order to relieve any pressure buildup in the combustion
chamber. To test the relief valve, apply light lifting pressure, in the direction of Item C, to ensure a relief
plate moves freely. Once the pressure is removed, a relief plate should return to the normal position against
the stove body. If there is any question about the proper operation of the relief valve, contact a local
authorized Country Flame Dealer or a certified service technician.
FIGURE 26: RELIEF VALVE
Version 1.0h
39
SIT 820 NOVA mV GAS CONTROL VALVE
The 820 Gas Control Valve is shown below in FIGURE 27.
1.
The left knob controls the ON/PILOT/OFF functions.
2.
The right knob controls the manifold pressure to the burners and is labeled HI/LO.
3.
There is a PILOT ADJSUT screw that should only be adjusted by a certified technician.
4.
The SIT 820 has an input pressure test port labeled IN.
5.
The SIT 820 has an output pressure test port labeled OUT.
To use either of the pressure test ports to measure pressure requires test equipment and knowledge required
by a certified service technician. Improperly adjusting the pilot adjust or the manifold pressure can cause
damage to the SIT 820 control valve and should only be accomplished by a certified professional. For
lighting instructions refer to the section on first fire in this manual or on the units control panel.
PILOT
IN
ON
HI
PILOT
ADJ
OFF
LO
OUT
FIGURE 27: SIT 820 mV NOVA GAS VALVE
NOTE: TP stands for thermopile, TH for thermostat, and TP TH for thermopile and thermostat. See
FIGURE 28.
PILOT BURNER
1/16" to 1/8"
IGNITER
THERMOCOUPLE
THERMOPILE
PIEZOELECTRIC
IGNITER
PILOT
ADJ
ON/OFF SWITCH
HI
PILOT
TH
ON
THERMOSTAT
TERMINAL BLOCK
TP
OFF
LO
TP TH
IN
OUT
SIT 820 mV CONTROL VALVE
OPTIONAL (millivolt)
THERMOSTAT
OPTIONAL (millivolt)
REMOTE RECEIVER
ON
OFF
OPTIONAL (millivolt)
REMOTE SENDER
FIGURE 28: SIT 820 mV NOVA GAS VALVE WIRING DIAGRAM
Version 1.0h
40
WARRANTY
LIMITED LIFETIME WARRANTY FOR GAS HEATING APPLIANCES
Country Flame Technologies warrants a gas heating appliance to the original retail purchaser for the lifetime of the
appliance, to be free from defects in workmanship. This warranty gives the original retail purchaser specific rights.
Other rights may be available that vary from state to state or province to province.
This limited Lifetime Warranty covers items such as but is not limited to combustion chamber, heat exchangers, and
the doorframe. Labor to repair or replace these parts is not covered.
All parts suspected of failure must be returned, at the original retail purchaser’s expense, for inspection and
replacement approval by Country Flame Technologies prior to repair or replacement. No repair or replacement will
be honored without prior approval of Country Flame Technologies.
This Country Flame Technologies product must be installed by a competent, authorized service contractor. This
product must be installed and operated at all times in accordance with this owner’s manual, as well as in accordance
with any and all applicable national codes, local codes, and gas supplier restrictions. Any alteration, willful abuse,
accident, or misuse of the product shall void this warranty.
Any installation, construction, transportation, or other related costs or expenses arising from defective part(s), repair
or replacement will not be covered by this warranty. Country Flame Technologies will not assume responsibility for
any costs associated with the installation, construction, transportation, or other related costs or expenses arising from
defective parts. Further, Country Flame Technologies has no control over the installation, construction, or
transportation of this product and will not be responsible for any incidental, indirect, or consequential damages,
except as provided by law.
All electrical components such as but not limited to blowers, wiring, switches, speed controls, thermo-disc switches,
igniters, burners, and gas valves are covered under Country Flame Technologies one year warranty program.
Country Flame Technologies will not be responsible for any alteration to the unit which causes sooting that results in
damage to the interior or exterior of the building in which this appliance is installed.
This warranty is void if the stove has been stored or operated in atmospheres contaminated by chlorine, fluorine, or
other damaging chemicals. This warranty is void if the stove is subjected to prolonged periods of dampness or
condensation, or there is any damage to the stove or other components due to water or weather damage which is the
result of, but not limited to, improper chimney or venting installation.
This limited Lifetime Warranty does not extend to or include paint, glass, door gasket(s), glass gasket(s), log
supports, embers, decorative grates or andirons or ceramic insulating materials.
The limited Lifetime Warranty does not cover installation or operational-related problems such as damage due to
over firing (warped parts), downdrafts or spillage caused by environmental conditions, nearby trees, buildings,
hilltops, mountains, inadequate venting or ventilation, excessive offsets, or negative air pressures caused by
mechanical systems such as furnaces, fans, clothes dryers, etc.
This limited Lifetime Warranty does not apply to venting components, hearth components or other accessories used
in conjunction with the installation of this product not manufactured by Country Flame Technologies.
This limited Lifetime Warranty is effective on all gas stoves sold after January 1, 2004 and supersedes any and all
warranties currently in existence.
If any part of the stove becomes defective during the period of this warranty, send part or stove AND
COPY OF INVOICE SHOWING DATE OF PURCHASE, freight prepaid to the address below.
Country Flame Technologies
900 George Street
Marshfield, Missouri, 65706
417-859-0990
Version 1.0h
41
TROUBLE SHOOTING GUIDE
SYMPTOM
Pilot will not light
PROBLEM
CORRECTIVE ACTION
No spark at the pilot burner
Thermocouple shorting
Faulty valve
Faulty thermocouple
Check that the wire is connected to the
push button igniter.
Check if the push button igniter needs
tightening.
Replace pilot assembly if ceramic
insulator is cracked or broken.
Spark gap should be 1/16" to 1/8"
from the electrode tip and the pilot
burner. Light the pilot with a match
and adjust the electrode tip to the
required spark gap and proper
location.
Check that the manual valve(s) is
(are) turned on.
Check the pilot orifice for
blockage.
Replace the valve.
Call the gas distributor.
Fill the tank
Purge the gas line.
Fill the tank.
Turn up the pilot flame.
Gently twist the pilot head to
improve the flame pattern around
the generator (thermocouple).
Clean the thermocouple.
Replace valve.
Replace thermocouple.
Pilot burning: no
gas to main burner;
gas knob “on”
Main burner goes
out; pilot stays on
Main burner is plugged
Remove stoppage in the orifice.
Pilot flame is not large enough or
not engulfing the thermocouple
Thermocouple
Shorting
Clean thermocouple and valve
terminals
Burner Flame
yellow and lazy
Dirt in the burner orifice
Wrong orifice
Clogged flue
Improper gas pressure
Turn the pilot flame. Gently twist
the pilot head to improve the flame
pattern around the thermocouple.
Check that the thermocouple
insulation is not frayed and
grounding out on the fireplace
housing or burner support.
Remove and clean.
Replace orifice.
Clean flue.
Adjust regulator.
Spark gap is incorrect
No gas at the pilot burner
Pilot goes out when
the gas knob is
released
Version 1.0h
Out of Propane
System is not correctly purged
Out of Propane gas
Pilot flame is not large enough
Pilot flame is not engulfing the
generator (thermocouple)
42
TROUBLE SHOOTING GUIDE (cont’d)
SYMPTOM
PROBLEM
CORRECTIVE ACTION
Combustion Odors
Dirt in the burner orifice
Improper gas pressure
Dirt in burner orifice
Improper gas pressure
Dirt in the burner orifice
Wrong orifice
Too much draft
Improper gas pressure
Underrated Appliance
Venting System not sealed
Overheats
Dirt on Valve seat
Remove and clean
Adjust regulator
Remove and clean
Adjust regulator
Remove and clean
Replace orifice
Check vent installation
Adjust regulator
Correct burner orifice size
Call installer and do not fire
unit.
Faulty control
Replace control
Burner pops off
Flame in mixing
tube
Not heating
properly (Not
enough or too
slow)
Version 1.0h
43
PARTS LIST
PART NUMBER
BV-3001
BV-3002
BV-3003
BV-3004
BV-4601
BV-4602
BV-4603
BV-4604
BV-4609
BV-4610
BV-4611
BV-4612
BV-4613
BV-4614
BV-4617
BV-4618
BV-4619
BV-4620
BV-4621
BV-4622
BV-4623
BV-4624
BV-4625
BV-4626
BV-4627
BV-4628
BV-4629
BV-4630
BV-4631
BV-4632
BV-4633
BV-4634
BV-4640
BV-4641
BV-4642
BV-4644
BV-4646
BV-4647
BV-4648
BV-4650
BV-4651
BV-4652
BV-4653
BV-4654
BV-4655
GC-3905
GC-3905-01
Version 1.0h
DESCRIPTION
Burner Valve Assembly 30,000 BTUH - Natural Gas
Burner Valve Assembly 30,000 BTUH - Liquid Propane
Conversion Kit 30,000 BTUH - Natural Gas
Conversion Kit 30,000 BTUH - Liquid Propane
Burner Valve Assembly 46,000 BTUH - Natural Gas
Burner Valve Assembly 46,000 BTUH - Liquid Propane
Conversion Kit 46,000 BTUH - Natural Gas
Conversion Kit 46,000 BTUH - Liquid Propane
Pilot Assembly - Natural Gas
Pilot Assembly - Liquid Propane
Thermocouple
Thermopile
Pilot Orifice - Natural Gas
Pilot Orifice - Liquid Propane
Front Burner
Front Burner Mixer Tube
Middle Burner 46,000 BTUH
Middle Burner 30,000 BTUH
Rear Burner 46,000 BTUH
Rear Burner 30,000 BTUH
Front Orifice Spud Natural Gas 46,000 BTUH - # 55DMS
Middle Orifice Spud Natural Gas 46,000 BTUH - # 45DMS
Rear Orifice Spud Natural Gas 46,000 BTUH - # 40DMS
Front Orifice Spud Liquid Propane 46,000 BTUH - # 69DMS
Middle Orifice Spud Liquid Propane 46,000 BTUH - # 55DMS
Rear Orifice Spud Liquid Propane 46,000 BTUH - # 53DMS
Front Orifice Spud Natural Gas 30,000 BTUH - # 57DMS
Middle Orifice Spud Natural Gas 30,000 BTUH - # 50DMS
Rear Orifice Spud Natural Gas 30,000 BTUH - # 45DMS
Front Orifice Spud Liquid Propane 30,000 BTUH - # 70DMS
Middle Orifice Spud Liquid Propane 30,000 BTUH - # 59DMS
Rear Orifice Spud Liquid Propane 30,000 BTUH - # 55DMS
Front Ceramic Glass with fiberglass tape gasket
Side Ceramic Glass with fiberglass tape gasket , one each
Valve Plate Gasket
Dura Vent Gasket (Set)
Rear Log
Front Log
Top Log
Owner's Manual
Gasket, Door Rope
Tape, Side Glass, one each
Tape, Front Glass
Retainer, Glass Top or Bottom, one each
Retainer, Glass Side, one each
Gas Valve - Natural Gas
Regulator - Natural Gas
44
PARTS LIST (cont’d)
PART NUMBER
GC-3906
GC-3906-01
GC-3913
GC-3914
GC-3931
GC-3932
GC-3934
GC-3989
DESCRIPTION
Gas Valve - Liquid Propane
Regulator - Liquid Propane
On/Pilot/Off Pilot Extension Knob
Hi/Low Extension Knob
Deluxe Remote Control Kit w/ built In Thermostat and Timer
Standard On/Off Remote Kit
Snap Disc Thermostat
Ember Material
All parts for the Bayvue DV product can be purchased by contacting a local authorized Country Flame
Dealer. In the event there is no local Country Flame Dealer, contact Country Flame direct by writing,
calling, or emailing at the following address:
Country Flame Technologies
900 George Street
Marshfield, Missouri 65706
417-859-0990 (telephone)
417-859-0192 (facsimile)
www.countryflame.com
[email protected]
Version 1.0h
45
OPERATING INSTRUCTIONS
FOR YOUR SAFETY READ BEFORE LIGHTING
WARNING: If you do not follow these instructions exactly, a fire or explosion
may result causing property damage, personal injury, or loss of life.
A.
B.
The Bayvue DV has a pilot light system that must be lit by hand.
Follow these instructions exactly, when lighting the pilot.
BEFORE LIGHTING the pilot light, it is important to smell all around
the Bayvue DV for potential gas leaks. Be sure to smell next to the
floor because some gas fuel is heavier than air and will settle to the
lowest point.
WHAT TO DO IF YOU SMELL GAS
• Do not try to light the Bayvue DV.
• Do not touch any electrical switch; do not use any phone in your
building.
• Immediately call your gas supplier from a neighbor’s phone.
Follow the gas supplier’s instructions.
• If you cannot reach your gas supplier, call the fire department.
C.
D.
Use hand pressure to push in or turn the
ON/PILOT/OFF control knob. Do not use a
tool. If the control knob will not push in or
turn by hand, do not attempt repair. Call a
qualified service technician. Attempted repair
may result in fire or explosion.
Do not use the Bayvue DV if any part has
been under water.
Immediately call a
qualified service technician to inspect the
Bayvue DV and replace any part of the
control system and any gas control that has
been under water.
LIGHTING INSTRUCTIONS
1.
STOP! Read the safety information above this section.
2.
Turn off all electrical power to the Bayvue DV.
Open the Bayvue DV bottom panel to expose the gas control panel.
Push in on the ON/PILOT/OFF control knob slightly and turn
clockwise to “OFF.”
Wait five minutes to clear out any gas. Then smell for gas including
near the floor. If you smell gas, STOP! Follow “B” of the safety
information above.
Turn ON/PILOT/OFF control knob counterclockwise to “PILOT.”
Push in the ON/PILOT/OFF control knob and hold in. By repeatedly
pressing the piezoelectric igniter, a pilot flame should appear. If
flame goes out repeat steps 5 thru 10. If flame stays lit, go to Step 10.
3.
4.
5.
6.
7.
8.
9.
10.
11.
Push in and turn the ON/PILOT/OFF control
knob counterclockwise to “ON.”
Close the Bayvue DV bottom access panel.
Turn on electrical power to Bayvue DV.
The pilot flame should be visible through the
door glass in the lower right hand corner
between the front and middle logs. See the
picture below for parts description and view
of normal pilot flame pattern.
PILOT
IN
ON
OFF
HI
PILOT
ADJ
LO
OUT
TO TURN OFF GAS TO BAYVUE DV
1.
When servicing the Bayvue DV, turn off electrical power.
3.
2.
Open the Bayvue DV bottom access panel to see control panel.
4.
Push in ON/PILOT/OFF control knob and
turn clockwise to “OFF.” Do not force.
Close the Bayvue DV bottom access panel.
FIRST FIRE
Reduce odor by ventilating the room the first few times the unit is operated. Burn the first two fires no more than 1520 minutes. Allow the Bayvue DV to completely cool between burns. Burn the third fire 30-40 minutes and allow
proper cooling time. Operate the appliance according to the instructions contained in this manual.
Version 1.0h
46
SAFETY LABEL
Version 1.0h
47