1
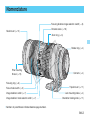
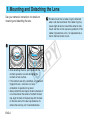
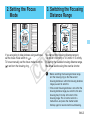
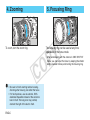
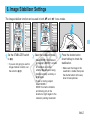
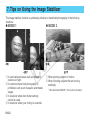
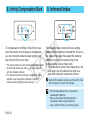
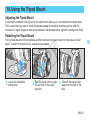
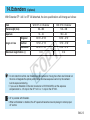
EF70-200mm F2.8L IS USM
Instruction
Thank you for purchasing a Canon USM lens.
The Canon EF 70-200mm f/2.8L IS USM is a
high-performance, telephoto zoom lens
dedicated to Canon EOS cameras. It is equipped
with an Image Stabilizer to help preventing blurred
shots due to camera shake during slow shutter
speeds.
In the lens name, "IS" stands for Image
Stabilizer, and "USM" for Ultrasonic Motor.
a Handling Cautions
If the lens is taken from a cold environment into
a warm one, condensation may develop on the
lens surface and internal parts. To prevent
condensation in this case, first put the lens into
an airtight plastic bag before taking it from a cold
to warm environment. Then take out the lens
after it has warmed gradually. Do the same when
taking the lens from a warm environment into a
cold one.
Features
1. The four UD elements help capture very sharp
and clear pictures with outstanding image
delineation.
2. The Image Stabilizer gives the equivalent
effect of a shutter speed three stops faster.
3. Ultrasonic motor (USM) for fast, quiet focusing.
4. Manual focusing enabled during AF
(autofocusing).
5. A truly round aperture hole results in a nicer
background blur.
6. Compatible with Extenders.
7. Sealed construction for higher resistance
against dust and moisture.
Conventions used in this instruction
Warning to prevent bad influence on picture
taking.
Supplementary notes on using the lens and
taking pictures.
ENG-1
a Safety Precautions
This device complies with Part 15 of the FCC Rules.
Operation is subject to the following two conditions: (1)
This device may not cause harmful interference, and (2)
this device must accept any interference received,
including interference that may cause undesired
operation.
Do not make any changes or modifications to the
equipment unless otherwise specified in the
instructions. If such changes or modifications should be
made, you could be required to stop operation of the
equipment.
This equipment has been tested and found to comply
with the limits for a class B digital device, pursuant to
part 15 of the FCC Rules. These limits are designed to
provide reasonable protection against harmful
interference in a residential installation. This equipment
generates, uses and can radiate radio frequency energy
and, if not installed and used in accordance with the
instructions, may cause harmful interference to radio
communications.
However, there is no guarantee that interference will not
occur in a particular installation. If this equipment does
cause harmful interference to radio or television
reception, which can be determined by turning the
equipment off and on, the user is encouraged to try to
correct the interference by one or more of the following
measures:
ENG-2
• Reorient or relocate the receiving antenna.
• Increase the separation between the equipment and
receiver.
• Consult the dealer or an experienced radio/TV
technician for help.
This digital apparatus does not exceed the Class B
limits for radio noise emissions from digital apparatus as
set out in the interference-causing equipment standard
entitled “Digital Apparatus”, ICES-003 of the Industry
Canada.
N118
Nomenclature
Focusing distance range selection switch (→ 5)
Hood mount (→ 12)
Distance scale (→ 10)
Zoom ring (→ 6)
Rubber ring (→ 4)
Filter mounting
thread (→ 12)
Contacts (→ 4)
Focusing ring (→ 6)
Focus mode switch (→ 5)
Image stabilizer switch (→ 7)
Image stabilizer mode selector switch (→ 7)
Tripod mount (→ 11)
Lens mounting index (→ 4)
Orientation locking knob (→ 11)
• Numbers in parentheses indicate reference page numbers.
ENG-3
1. Mounting and Detaching the Lens
See your camera’s instructions for details on
mounting and detaching the lens.
• After detaching the lens, put it down with the
contacts upwards, to avoid damaging the
contacts or lens surface.
• If the contacts are dirty, scratched, or soiled with
fingerprints, etc., corrosion or a faulty
connection or operation may result.
• Always attach the dust cap to the lens whenever it
is not mounted on the camera. To attach the dust
cap, align the mark on the dust cap with the mark
on the lens and turn the dust cap clockwise. To
remove the dust cap, turn it counterclockwise.
ENG-4
The lens mount has a rubber ring for enhanced
water- and dust-resistance. The rubber ring may
cause slight abrasions around the camera's lens
mount, but this will not cause any problems. If the
rubber ring becomes worn, it is replaceable by a
Canon Service Center at cost.
2. Setting the Focus
Mode
If you are going to take pictures using autofocus,
set the focus mode switch to
.
To focus manually, set the focus mode switch to
and turn the focusing ring.
3. Switching the Focusing
Distance Range
You can set the focusing distance range to
1.4 m/4.6 ft. to infinity or 2.5 m/8.2 ft. to infinity.
By setting the suitable focusing distance range,
the actual autofocusing time can be shorter.
• Before switching the focusing distance range,
turn the focusing ring so that the current
focusing distance is within the focusing distance
range you want to switch to.
• If the current focusing distance is not within the
focusing distance range you switch to, the lens
focusing may first stop at the start of the
focusing range. This is normal and not a
malfunction. Just press the shutter button
halfway again to resume normal autofocusing.
ENG-5
4. Zooming
To zoom, turn the zoom ring.
5. Focusing Ring
The focusing ring can be used at any time
regardless of the focus mode.
• After autofocusing with the camera in ONE SHOT AF
mode, you can adjust the focus by keeping the shutter
button pressed halfway and turning the focusing ring.
• Be sure to finish zooming before focusing.
Zooming after focusing can affect the focus.
• For flash pictures, use an external, EOSdedicated Speedlite instead of the camera's
built-in flash. The long lens may partially
obstruct the light of the built-in flash.
ENG-6
6. Image Stabilizer Settings
The image stabilizer function can be used in both
Set the STABILIZER switch
to
.
• If you are not going to use the
image stabilizer function, set
the switch to
.
and
focus modes.
Select the stabilizer mode.
• Select MODE 1 for standard
photography. MODE 1 corrects
all vibrations no matter
whether the camera is being
held horizontally, vertically, or
at an angle.
• To pan a moving subject,
select MODE 2.
MODE 2 corrects vibrations
and shaking only in the
direction at right angles to the
camera’s panning movement.
Press the shutter button
down halfway to check the
stabilization.
• Make sure the image in the
viewfinder is stable, then press
the shutter button all the way
down to take pictures.
ENG-7
7. Tips on Using the Image Stabilizer
The image stabilizer function is particularly effective for hand-held photography in the following
situations:
● MODE 1
● MODE 2
q In semi-darkened areas such as indoors or
outdoors at night.
w In locations where flash photography is
prohibited, such as art museums and theater
stages.
e In situations where fast shutter settings
cannot be used.
r In situations where your footing is uncertain.
q When panning subjects in motion.
w When following subjects that are moving
erratically.
ENG-8
* We recommend MODE 1 for all other situations.
Tips on Using the Image Stabilizer
• The Image Stabilizer cannot compensate for a
blurred shot caused by a subject that moved.
• Set the STABILIZER switch to
when you
are taking pictures using the Bulb setting (long
exposures). If the STABILIZER switch is set to
, the image stabilizer function may introduce
errors.
• The Image Stabilizer might not be fully effective
in the following cases:
• You move the camera for a panned shot.
• You shoot while riding on a bumpy road.
• Compared to using a normal non-IS lens, fewer
shots can be taken when you use an Image
Stabilizer lens because more power is
consumed.
• The image stabilizer operates for about two
seconds even when your finger is off the shutter
button. Do not remove the lens while the
stabilizer is in operation. This will cause a
malfunction.
• With the EOS-1V/HS, 3, 30/33/Elan7/7E,
30V/33V/Elan7N/7NE, Elan ll/Elan ll E/50/50 E,
300/Rebel2000, IX, and D30, the Image
Stabilizer will not work during self-timer
operation.
• When you use a tripod, the Image Stabilizer
should be turned off to save battery power.
• The stabilizer is equally effective for hand-held
photography and photography with a monopod.
• The Image Stabilizer function also operates
when the lens is used with the EF12 II or EF25
II Extension Tube, and the EF1.4X II or EF2X II
Extender.
• If you set the camera’s Custom Function to
change the assigned button to operate the AF,
the Image Stabilizer will operate when you press
the newly assigned AF button.
ENG-9
8. Infinity Compensation Mark
To compensate for shifting of the infinity focus
point that results from changes in temperature,
you can rotate the distance scale slightly past
the normal infinity focus mark.
• The infinity position at normal temperature is the point
at which the vertical line of the
mark is aligned
with the distance indicator.
• For accurate manual focusing on subjects at infinity
distance, look through the viewfinder to confirm
focusing while rotating the focusing ring.
9. Infrared Index
The infrared index corrects the focus setting
when using monochrome infrared film. Focus on
the subject manually, then adjust the distance
setting by moving the focusing ring to the
corresponding infrared index mark.
• The compensation amount differs depending on the
focal length. Use the indicated focal length as a
guide when setting the compensation amount.
Some EOS cameras cannot use infrared film. See
the instructions for your EOS camera.
• The infrared index position is based on a
wavelength of 800 nm.
• Be sure to observe the manufacturer’s
instructions when using infrared film.
• Use a red filter when you take the picture.
ENG-10
10. Using the Tripod Mount
Adjusting the Tripod Mount
Loosening the orientation locking knob on the tripod mount allows you to turn the lens and camera freely.
This is useful when you want to switch the camera between horizontal and vertical positions while it is
mounted on a tripod. Once you have set the camera to the desired position, tighten the locking knob firmly.
Detaching the Tripod Mount
First remove the lens from the camera and then remove the tripod mount from the lens as shown
below. To attach the tripod mount, reverse the procedure.
Loosen the orientation
locking knob.
Turn the tripod collar to align
the red dots on the collar
and lens.
Slide off the tripod collar
away from the rear of the
lens.
ENG-11
11. Hood
12. Filters
(Optional)
You can attach filters to the filter mounting thread
on the front of the lens.
• If you need a polarizing filter, use Canon’s
PL-C 77 mm ll polarizing filter. Note that you must
remove the hood before adjusting the polarizing filter.
• When the PL-C 77mm ll polarizing filter is attached,
the lens cap cannot be attached.
The ET-86 hood can keep unwanted light out of the lens,
and also protects the front of the lens from rain, snow,
and dust.
To attach the hood, align the hood’s attachment position
mark with the red dot on the front of the lens, then turn
the hood clockwise until the lens’s red dot is aligned with
the hood’s stop position mark.
The hood can be reverse-mounted on the lens for storage.
• Part of the picture may be blocked if the hood is
not attached properly.
• To attach (remove) the hood, grasp the base of
the hood and turn it clockwise
(counterclockwise). Do not hold the hood by the
outer rim as this could result in the hood being
distorted if too much pressure is applied.
ENG-12
13. Extension Tubes
(Optional)
With Extension Tube EF 12 ll or EF 25 ll, the
camera-to-subject distance and image
magnification will be as follows:
EF12 ll
EF25 ll
70mm
200mm
70mm
200mm
Camera-to-Subject
Distance (mm)
Near
Far
550
624
1110
3401
402
407
929
1737
Magnification
Near
0.22×
0.24×
0.41×
0.32×
Far
0.17×
0.06×
0.38×
0.14×
14. Extenders
(Optional)
With Extender EF 1.4X ll or EF 2X llattached, the lens specifications will change as follows:
Item
With EF1.4X ll Extender
With EF2X ll Extender
Focal length (mm)
98 – 280
140 – 400
Aperture
f/4 – 45
f/5.6 – 64
25°20’ – 9°20’
16°20’ – 6°10’
Diagonal
Angle of view
Vertical
13°50’ – 5°10’
9°10’ – 3°30’
Horizontal
20°50’ – 7°40’
13°39’ – 5°10’
0.24
0.36
Maximum magnification (×)
• Do not attach more than one Extender on the same lens. Having more than one Extender on
the lens will degrade the optical performance and cause exposure errors by the camera's
built-in exposure metering.
• If you use an Extender on the lens mounted on a EOS A2/A2E/5, set the exposure
compensation to -1/2 stop for the EF 1.4X ll or -1 stop for the EF 2X ll.
• AF is possible with Extender.
• When an Extender is attached, the AF speed will become slower by design to retain proper
AF control.
ENG-13
15. Specifications
Image Size
24 × 36 mm
Focal Length & Max. Aperture
70 – 200 mm, f/2.8
Lens Construction
23 elements in 18 groups
Min. Aperture
f/32
Angle of View
Diagonal: 34° – 12°
Vertical: 19°30’ – 7°
Horizontal: 29° –10°
Min. Focusing Distance
1.4 m / 4.6 ft.
Max. Magnification & Field of view
0.17 × (at 200 mm), 373 × 559 – 140 × 211mm / 14.6 × 21.8 – 5.5 × 8.2 inch (at 1.4 m)
φ 77 mm
Filter Diameter
Lens Hood
•
•
•
•
•
Max. Diameter & Length
ET-86
φ 86.2 × 197mm / φ 3.4 × 7.7 inch
Weight
1470g / 51.5oz (or 1590g / 55.7oz with the tripod collar)
Lens Cap
E-77U
Case
LZ 1324
The lens length is measured from the mount surface to the front end of the lens.
The size and weight listed are for the lens only, except as indicated.
Aperture settings are specified on the camera.
All the specifications above are based on Canon’s testing and measuring standards.
Specifications and appearance are subject to change without notice.
ENG-14
CT1-7533-005
© CANON INC. 2002
2006.9.1