1
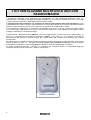
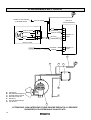
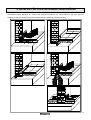
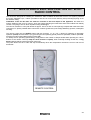
ISTRUZIONI PER L’INSTALLAZIONE USO E MANUTENZIONE
KIT VENTILAZIONE MULTIFUOCO 2003 CON RADIOCOMANDO
EINBAU- UND BEDIENUNGSANLEITUNG
GEBLÄSE MULTIFUOCO 2003 MIT FUNKSTEUERUNG
INSTALLATION, USE AND MAINTENANCE INSTRUCTIONS
MULTIFUOCO 2003 VENTILATION KIT WITH RADIO CONTROL
COMPRENDE I MODELLI: KV03/R RICEVITORE E REGOLATORE MOTORE
KV03/T RADIOCOMANDO
UMFASST DIE MODELLE: KV03/R EMPFÄNGER UND MOTOREGLER
KV03/T FUNKGESTEUERT
INCLUDES THE MODELS: KV03/R RECEIVER AND MOTOR CONTROL
KV03/T WIRELESS CONTROL
Per l’installazione, l’utilizzo e manutenzione leggere prima attentamente le istruzioni.
Bevor Sie mit dem Einbau beginnen, lesen Sie die Bedienungsanleitung aufmerksam durch.
Please read the instructions carefully before proceeding with installation.
Il libretto istruzioni è parte integrante del prodotto.
Die Anleitung ist Bestandteil des Produktes.
The instruction booklet is an integral part of the product.
Gentile Cliente,
La ringraziamo per aver preferito uno dei nostri prodotti, frutto di lunga esperienza e di una continua
ricerca per un prodotto superiore in termini di sicurezza, affidabilità e prestazioni.
In questo manuale troverà tutte le informazioni ed i consigli utili per poter utilizzare il suo prodotto nel
massimo della sicurezza ed efficienza.
INDICAZIONI IMPORTANTI
-
Questo libretto istruzioni è stato redatto dal
costruttore e costituisce parte integrante del
prodotto. Le informazioni in esso contenute sono
indirizzate all’acquirente, e a tutte quelle persone
che a vario titolo concorrono all’installazione, all’uso
e alla manutenzione del prodotto.
-
L’attenta progettazione e l’analisi dei rischi fatti dal
Gruppo Piazzetta S.p.A. hanno permesso la
realizzazione di un prodotto sicuro; tuttavia prima di
effettuare qualsiasi operazione, si raccomanda di
attenersi scrupolosamente alle istruzioni riportate nel
seguente documento, e di tenerlo sempre a
disposizione.
-
Leggete con attenzione le istruzioni e le informazioni
tecniche contenute in questo manuale, prima di
procedere all’installazione, all’utilizzo e a qualsiasi
intervento sul prodotto.
-
L’istallazione e l’utilizzo del prodotto deve essere in
conformità: con le istruzioni del fabbricante, con le
normative europee, con le normative nazionali e
regolamenti locali.
-
L’osservanza delle indicazioni contenute nel
presente libretto istruzioni garantisce la sicurezza
dell’uomo e del prodotto, l’economia di esercizio ed
una più lunga durata di funzionamento.
-
Ogni intervento deve essere eseguito a corrente
disinserita e da personale qualificato.
-
Il
Gruppo
Piazzetta
S.p.A.
declina
ogni
responsabilità riguardo la inosservanza alle norme di
installazione uso e manutenzioni indicate nel libretto
di istruzioni, alle modifiche del prodotto non
autorizzate o ricambi non originali.
Per i termini, limiti ed esclusioni fare riferimento al certificato di garanzia legato al prodotto.
Il costruttore nell’intento di perseguire una politica di costante sviluppo e rinnovamento del prodotto può apportare,
senza preavviso alcuno, le modifiche che riterrà opportune.
Questo documento è di proprietà del Gruppo Piazzetta S.p.A.; non può essere divulgato totalmente o in
parte a terzi senza autorizzazione scritta del Gruppo Piazzetta S.p.A. Il Gruppo Piazzetta S.p.A. si riserva
tutti i diritti a rigore di legge.
2
Hinweis des Herstellers:
Die Ofenverkleidung besteht aus einer feuerfesten Kachel (nicht zu verwechseln mit anderen Materialien
wie z. B. Porzellan).
Die Krakeleerisse oder Pickel in der Glasur sind herstellungsbedingte, charakteristische Eigenschaften
des Materials und beeinträchtigen nicht die Funktionalität und Lebensdauer des Produktes.
WICHTIGE HINWEISE
-
Diese Betriebsanleitung wurde vom Hersteller
verfasst und ist Bestandteil des Produktes. Die darin
enthaltenen Informationen sind für den Käufer sowie
für alle Personen, die für die Aufstellung und
Wartung zuständig sind, bestimmt.
-
Das Aufstellen und die Bedienung des Produktes
muss gemäß den Anweisungen des Herstellers
erfolgen und den örtlichen Vorschriften entsprechen.
-
Lesen Sie die Anweisungen und technischen
Informationen in dieser Aufbauanleitung sowohl vor
dem Aufbau, als auch vor Heizbeginn und vor
jeglicher Tätigkeit aufmerksam durch.
-
Alle Tätigkeiten dürfen nur bei herausgezogenem
Stecker und von Fachkräften ausgeführt werden.
-
Die von Gruppo Piazzetta S.p.A. durchgeführte
Planung
und
Gefahrenanalyse
haben
die
Realisierung eines sicheren Produktes ermöglicht.
Es wird jedoch empfohlen, sich bei jedem Eingriff
sorgfältig an die Anweisungen zu halten und diese
immer griffbereit zu haben.
-
Die von Gruppo Piazzetta S.p.A. durchgeführte
Planung
und
Gefahrenanalyse
haben
die
Realisierung eines sicheren Produktes ermöglicht.
Es wird jedoch empfohlen, sich bei jedem Eingriff
sorgfältig an die Anweisungen zu halten und diese
immer griffbereit zu haben.
Sonstige Gewährleistungsbestimmungen
Liefergegenstandes zu lesen.
und
Haftungsbeschränkungen
sind
in
der
Garantiekarte
des
Pläne und Zeichnungen werden kostenlos als Anschauungsmaterial mitgeliefert. Der Hersteller behält sich jedoch
vor, aufgrund ständiger technologischer Entwicklung und Erneuerung des Produktes, ohne vorherige
Ankündigung, Änderungen daran vorzunehmen.
Diese Aufbauanleitung ist Eigentum der Gruppo Piazzetta S.p.A.. Sie darf nicht ohne vorherige schriftliche
Genehmigung seitens des Herstellers für Dritte teilweise oder im Ganzen vervielfältigt werden. Gruppo
Piazzetta S.p.A. behält sich alle Rechte vor.
3
Dear Customer,
Thank you for having chosen one of our products, which is the result of years of experience and
continuous research aimed at making a superior product in terms of safety, reliability and performance.
This booklet contains information and advice for safe and efficient use of your product.
IMPORTANT RECOMMENDATIONS
-
This booklet has been prepared by the manufacturer
and must always accompany the product. The
information it contains is for the buyer and all those
persons who are concerned with installing, using
and maintaining the product.
-
-
-
-
Carefully read the instructions and the technical
information contained in this booklet before installing
or using the product or carrying out any work on it.
Meticulous design and risk analysis by Gruppo
Piazzetta S.p.A. have resulted in the manufacture of
a safe product. It is, however, strongly
recommended that when carrying out any operation
on the product you scrupulously comply with the
instructions given in the following booklet and keep it
in a handy place for reference.
-
The observance of the instructions and technical
information in this instruction booklet guarantees the
safety of persons and property; it also ensures more
efficient operation and an increased lifespan.
Installation of the product must be in conformity with
the manufacturer's instructions, as well as with
European and national legislation and local
regulations.
-
All work must be carried out by qualified persons
with the electricity supply cut off.
Gruppo Piazzetta S.p.A. cannot be held responsible
for damage or injury due to failure to comply with the
instructions for installation, use and maintenance
given in this booklet, or due to unauthorised
alterations or to the use of other than original spare
parts.
See the guarantee certificate enclosed with the product for the terms, limitations and exclusions.
In line with its policy of constant product improvement and renewal, the manufacturer may make changes without
notice.
This document is the property of Gruppo Piazzetta S.p.A.; no part of it may be disclosed to third parties
without the written permission of Gruppo Piazzetta S.p.A.
All rights reserved by Gruppo Piazzetta S.p.A..
4
AUFBAUANLEITUNG_______________________________________________________________________________________________________ 13
ASSEMBLY INSTRUCTIONS _________________________________________________________________________________________________ 24
INDICE
1.
KIT VENTILAZIONE MULTIFUOCO 2003 CON RADIOCOMANDO ________________________________ 6
2.
INSTALLAZIONE DEL KIT VENTILAZIONE PRIMA DEL POSIZIONAMENTO DEL MONOBLOCCO _ 7
3.
INSTALLAZIONE DEL KIT VENTILAZIONE DOPO IL POSIZIONAMENTO DEL MONOBLOCCO E
DEL RIVESTIMENTO _________________________________________________________________________ 7
4.
RAFFREDDAMENTO DEL VENTILATORE ______________________________________________________ 7
5.
ESEMPI DI ALLACCIAMENTO TUBI FLESSIBILI________________________________________________ 8
6.
USO _________________________________________________________________________________________ 9
7.
MANUTENZIONE ____________________________________________________________________________ 11
8.
SCHEMA ELETTRICO _______________________________________________________________________ 12
9.
RISOLUZIONE PROBLEMI ___________________________________________________________________ 13
5
1. KIT VENTILAZIONE MULTIFUOCO 2003 CON
RADIOCOMANDO
I monoblocchi Piazzetta, sono predisposti per l'installazione del "Kit ventilazione Multifuoco 2003 con
radiocomando". Tale sistema, brevettato dal Gruppo Piazzetta S.p.A. consente il riscaldamento di uno o più locali
in modo omogeneo evitando la stratificazione dell’aria calda a soffitto.
L’installazione del Kit ventilazione non comporta un aumento della potenza termica del monoblocco, bensì
il riscaldamento del locale (o locali) in modo omogeneo, in quanto tale sistema (che consente l'aspirazione dell'aria
dall'alto e uscita dal basso) crea un ricircolo d'aria che ne impedisce la stratificazione a soffitto.
3
Il Kit ventilazione è costituito da: un ventilatore (con portata di circa 220 m /h ed una potenza di 47 Watt) cablato
con cavo e scatola radiocomando; sonda PT; radiocomando portatile con 4 tasti (alimentato da batterie a basso
voltaggio); distanziatori; minuteria di fissaggio.
Il radiocomando è dotato di un tasto (ON/OFF) che ha una doppia funzione ossia “accensione / spegnimento”, un
tasto per il passaggio al funzionamento automatico (AUTO) e due tasti (+/-) che regolano la velocità di
funzionamento del ventilatore (velocità minima V1, velocità media V2, velocità medio massima V3, velocità
massima V4).
Per identificare la velocità di funzionamento del ventilatore impostata è sufficiente ascoltare il numero di bip emessi
quando si premono i tasti + e - del radiocomando (1 bip per ogni incremento di velocità), quando si spegne
manualmente il ventilatore si udirà un bip lungo che identifica l’avvenuto spegnimento del sistema.
La sonda permette l’avviamento o l’arresto in automatico del ventilatore quando la temperatura raggiunge
rispettivamente la soglia di accensione o quella di spegnimento.
RADIOCOMANDO
6
2. INSTALLAZIONE DEL KIT VENTILAZIONE PRIMA
DEL POSIZIONAMENTO DEL MONOBLOCCO
Per l’installazione procedere come segue:
prevedere nelle vicinanze del monoblocco una presa di corrente elettrica.
Togliere un dado per vite dalla flangia del ventilatore, predisporre il ventilatore nella parte inferiore del
monoblocco, fissare il tutto con i dadi e le rondelle appena tolte.
Nei modelli 400, 500, 510, 555, 650, 2010 le viti per il fissaggio del Kit ventilazione sono predisposte nella
parte inferiore del monoblocco: preparare il ventilatore togliendo le viti e i dadi, fissarlo al monoblocco
inserendo tra i due elementi i supporti antivibramento in silicone utilizzando una delle viti per fissare il terminale
ad occhiello del filo giallo-verde di messa a terra.
Svitare la vite ad alette della staffa reggisonda che si trova sul
fondo del monoblocco, inserire il bulbo della sonda PT per circa
30 cm nel tubo porta-sonda presente nella parte posteriore del
camino, fissare la sonda con la staffa e avvitare il tutto; nel
modello 510 far passare la sonda nello spazio tra la flangia del
ventilatore e il fondo del monoblocco.
Nel caso in cui il prodotto disponga di due motori (es.
mod.600) l’operazione va ripetuta due volte.
Inserire la spina della scatola comando nella presa di corrente
a 220V da voi precedentemente predisposta.
Proseguire con l’allacciamento dei tubi uscita aria calda dal
ventilatore alle bocchette. Il ventilatore è dotato di un raccordo
a Y a cui si possono collegare fino a quattro bocchette creando
uno sdoppiamento della linea con appositi “elementi ad Y “.
Nel caso si volesse condurre l’aria anche in ambienti adiacenti
scegliere il percorso più breve limitando così le dispersioni di
calore. Si raccomanda quindi di non far compiere al tubo flessibile
percorsi troppo lunghi e di isolarlo nel modo migliore.(Vedere le
istruzioni allegate al monoblocco)
Il Gruppo Piazzetta S.p.A. fornisce a richiesta i tubi flessibili ø75, le
bocchette per l’uscita dell’aria, gli “elementi ad Y” e le fascette
stringitubo per il montaggio.
N.B. Si raccomanda di tenere la scatola radiocomando distante da
fonti di calore quali, per esempio, tubi di convogliamento aria calda
o parti metalliche che si possono riscaldare.
3. INSTALLAZIONE DEL KIT VENTILAZIONE DOPO IL
POSIZIONAMENTO DEL MONOBLOCCO E DEL
RIVESTIMENTO
Per l’installazione procedere come segue:
togliere il piano fuoco, il cassetto cenere e, con l’ausilio di un cacciavite, la protezione inferiore levando le viti di
fissaggio. Quindi procedere come ai punti citati del paragrafo precedente.
4. RAFFREDDAMENTO DEL VENTILATORE E DELLA
SCATOLA RADIOCOMANDO
Il raffreddamento del ventilatore avviene attraverso la presa d’aria esterna quando questa è posizionata nella zona
retrostante o sotto il monoblocco. Quando la suddetta presa d’aria non c’è, il raffreddamento è affidato all’aria
ambiente ed è necessario praticare nella parete inferiore del rivestimento un’apertura di almeno 120 cm².
7
5. ESEMPI DI ALLACCIAMENTO TUBI FLESSIBILI
Vi illustriamo qui di seguito alcuni esempi di allacciamento e di sistemazione del tubo flessibile a parete e a
pavimento (per una miglior resa è necessario rivestire il tubo flessibile con una guaina isolante adeguata).
8
6. USO
ATTENZIONE: DOPO AVER DATO TENSIONE AL KIT VENTILAZIONE, ATTENDERE QUALCHE SECONDO
PRIMA DI PREMERE I TASTI DEL RADIOCOMANDO AL FINE DI PERMETTERE IL CECK-UP DELLE
SCHEDE ELETTRONICHE.
Tramite il radiocomando si possono scegliere diversi tipi di impostazioni.
FUNZIONAMENTO AUTOMATICO :
Per avviare il ventilatore in funzionamento automatico, procedere come segue:
- Accendere il fuoco
- premere il tasto AUTO (il numero di bip emessi indica la velocità in cui si trova impostato il ventilatore)
- impostare la velocità desiderata tramite una leggera pressione dei tasti +/- del radiocomando scegliendo tra
quattro diverse velocità di funzionamento (V1 – V2 – V3 – V4)
- il ventilatore si avvia solo quando la sonda rileva la temperatura di accensione
- lo spegnimento del ventilatore avverrà quando la temperatura rilevata dalla sonda scenderà sotto la soglia
minima
- in qualsiasi momento è possibile spegnere il ventilatore in funzione cliccando il tasto ON/OFF (il bip lungo
identifica lo spegnimento del sistema) e non si accenderà anche se la sonda non raggiungerà la temperatura di
avviamento
Per riavviare il ventilatore si deve necessariamente premere il tasto “ON/OFF” oppure “AUTO”.
N.B.: Se il ventilatore si spegne in automatico, ripartirà in tale modalità se la sonda rileva un valore di temperatura
superiore alla soglia di accensione.
FUNZIONAMENTO MANUALE:
Per avviare il ventilatore in funzionamento manuale, procedere come segue:
- premere il tasto ON/OFF (il numero di bip emessi indica la velocità in cui si trova impostato il ventilatore)
- impostare la velocità desiderata tramite una leggera pressione dei tasti +/- del radiocomando scegliendo tra
quattro diverse velocità di funzionamento (V1 – V2 – V3 – V4)
- il ventilatore si avvia immediatamente a focolare freddoquando la temperatura rilevata dalla sonda supera il
valore di accensione il tipo di funzionamento si commuta in automatico predefinito e si spegnerà quando la
sonda raggiunge la temperatura di spegnimento
- in qualsiasi momento è possibile spegnere il ventilatore in funzione cliccando il tasto ON/OFF (il bip lungo
identifica lo spegnimento del sistema)
N.B.: Se il sistema viene avviato in modalità manuale a focolare freddo e la sonda non rileva la temperatura
necessaria per attivare il funzionamento automatico, il ventilatore continuerà a funzionare fino a che non si preme il
tasto ON/OFF.
IMPOSTAZIONE DEL SET VELOCITA’ PER STUFE CON CANALIZZAZIONE
A seconda del tipo di canalizzazione, si può scegliere tra due tipi di set velocità:
- il SET 1, per il kit ventilazione con uscita frontale o frontale/posteriore con una breve canalizzazione (set
preimpostato di serie);
- il SET 2, per il kit ventilazione con canalizzazione più lunga.
Per variare l’impostazione da un set all’altro, dopo aver acceso il ventilatore in modalità AUTOMATICA o
MANUALE, è sufficiente tenere premuti contemporaneamente, per circa 3 secondi, i tasti “ON/OFF” e “-” (il
segnale acustico in SET 2 è di 2 bip seguito da i bip della velocità impostata).
Ripremendo contemporaneamente, per circa 3 secondi, i tasti “ON/OFF” e “-” si ripassa in modalità SET 1 (il
segnale acustico in SET1 è di 1 bip seguito da i bip della velocità impostata).
9
Esempio:
se ci troviamo in SET 1 ed a VELOCITA’ 3 e teniamo premuti contemporaneamente i tasti “ON/OFF” e “-“ per
passare a SET 2 sentiremo prima 2 bip che identificano il nuovo set (SET 2) e poi si udiranno 3 bip che
identificano la velocità impostata (in questo caso VELOCITA’ 3).
Per ritornare in SET 1 basta ripremere contemporaneamente i tasti “ON/OFF” e “-“, in questo caso si udiranno
prima 1 bip (SET 1) e poi 3 bip (VELOCITA’ 3).
Una volta impostato il SET a seconda del Vostro tipo di canalizzazione non è necessario modificarlo di seguito.
Nell’impostazione della velocità di funzionamento (V1 – V2 – V3 – V4), scegliete le velocità più alte per portare in
temperatura il più velocemente possibile i locali da riscaldare; usate velocità più basse per mantenere la
temperatura raggiunta nei locali.
SCHEMA IMPOSTAZIONE VELOCITA’
VELOCITA’
VELOCITA’
VELOCITA’
VELOCITA’
1
2
3
4
SET 1
80V
115V
150V
220V
SET 2
115V
150V
185V
220V
NOTA: lo schema indica la tensione con cui funziona la centralina, la portata può variare a seconda del
monoblocco e del tipo di canalizzazione.
SE MANCA LA TENSIONE ELETTRICA:
Nel caso mancasse la tensione elettrica e si fosse in modalità AUTO, al ripristino della stessa il ventilatore ripartirà
alla velocità in cui si trovava prima della mancanza di tensione, solo se la sonda rileva una temperatura superiore
al limite di accensione; nel caso la temperatura fosse inferiore il ventilatore rimane spento e la centralina si
posiziona nell’ultima velocità impostata.
Anche in caso di modalità MANUALE al ripristino della tensione il ventilatore ripartirà alla velocità ultima impostata.
10
7. MANUTENZIONE
Periodicamente disinserire il collegamento elettrico del ventilatore e pulirlo dalla polvere che si può accumulare
nelle feritoie della protezione in plastica e nelle palette rotanti.
Per la pulizia del ventilatore si eseguono le stesse operazioni di smontaggio e rimozione che si fanno per
l’installazione del Kit ventilazione a monoblocco e rivestimento installato.
In caso di malfunzionamento tutti gli interventi sull’apparecchio e sul cablaggio devono essere eseguiti da
personale qualificato.
ATTENZIONE! OGNI INTERVENTO DEVE ESSERE ESEGUITO A CORRENTE
DISINSERITA E DA PERSONALE QUALIFICATO.
1.
2.
3.
4.
5.
6.
7.
Ventilatore
Scatola radiocomando
Sonda PT
Radiocomando portatile
Guarnizione
Protezione inferiore
Piano fuoco
11
8. SCHEMA ELETTRICO
TERRA DA COLLEGARE
AL MONOBLOCCO
M
GIALLO-VERDE
SCATOLA
RADIOCOMANDO
N
L
NERO
BLU
MARRONE (L)
1
2
3
4
5
6
ROSSO
ROSSO
1
2
BLU
MARRONE
GIALLO-VERDE
GIALLO-VERDE
MARRONE
BLU (N)
MORSETTO
6 POLI
VENTILATORE
SONDA
MORSETTO
2 POLI
F
G
B
C
D
A.
B.
C.
D.
E.
F.
G.
Ventilatore
Morsetto alimentazione
Scatola radiocomando
Morsetto sonda PT
Sonda PT
Cavo di alimentazione
Filo di terra
E
A
ATTENZIONE: OGNI INTERVENTO DEVE ESSERE ESEGUITO A CORRENTE
DISINSERITA E DA PERSONALE QUALIFICATO
12
9. RISOLUZIONE PROBLEMI
MODIFICA DEL CODICE DI FREQUENZA
In caso ci siano altri apparecchi con il codice di frequenza uguale al Vostro radiocomando potete modificare il
canale di trasmissione agendo come segue:
APRIRE IL RADIOCOMANDO SVITANDO CON UN CACCIAVITE A STELLA LA VITE POSTA NEL
RETRO DEL COPERCHIO
POSIZIONARE I MICROINTERRUTTORI IN UNA DELLE 16 COMBINAZIONI POSSIBILI SOTTO
ELENCATE
COMBINAZIONI CANALI TRASMISSIONE
TR A SM .
TR AS M .
TR A S M .
TR A SM .
1
1 2 3 4
5
1 2 3 4
9
1 2 3 4
13
1 2 3 4
2
1 2 3 4
6
1 2 3 4
10
1 2 3 4
14
1 2 3 4
3
1 2 3 4
7
1 2 3 4
11
1 2 3 4
15
1 2 3 4
4
1 2 3 4
8
1 2 3 4
12
1 2 3 4
16
1 2 3 4
MICROINTERRUTTORI
RICHIUDERE IL COPERCHIO DEL RADIOCOMANDO
TOGLIERE ALIMENTAZIONE ALLA SCATOLA RADIOCOMANDO STACCANDO LA SPINA O
INTERROMPENDO L’ALIMENTAZIONE AGENDO SULL’INTERRUTTORE GENERALE DI ZONA
RIDARE TENSIONE ED ENTRO 5 SECONDI PREMERE CONTEMPORANEAMENTE I TASTI “AUTO” E
“+” PER 3 SECONDI (UDIRETE UN BIP CHE SEGNALA L’AVVENUTA MODIFICA DEL CODICE)
LA SPIA DEL RADIOCOMANDO NON SI ACCENDE:
Controllare lo stato di carica della batteria del radiocomando.
In caso di sostituzione procedere come segue: utilizzando un cacciavite a croce di piccole dimensioni togliere la
vite presente nella parte posteriore del radiocomando; quindi mantenendolo capovolto togliere il guscio posteriore .
A questo punto sostituirla con una nuova , tipo A 23 12V, prestando attenzione a non invertire la polarità (tipo di
batteria e polarità sono comunque riportati anche sulla scheda del radiocomando come visibile nella foto sopra).
Quindi richiudere il radiocomando e smaltire la batteria vecchia gettandola negli appositi contenitori presenti presso
i supermercati, centri di raccolta, isole ecologiche, ecc.
N.B. Se il problema persiste contattare un rivenditore o centro assistenza.
IL RADIOCOMANDO FUNZIONA MA IL RICEVITORE NON RISPONDE:
Se schiacciando il tasto del radiocomando la spia si accende ma il ricevitore non risponde controllare:
1. che la spina di alimentazione sia inserita nella presa di corrente;
2. che i connettori siano correttamente inseriti;
3. il fusibile della scatola radiocomando sia integro, eventualmente sostituirlo con uno nuovo (T1,6AL250V);
N.B. Se il problema persiste contattare un rivenditore o centro assistenza.
AUFBAUANLEITUNG
13
INHALT
1.
GEBLÄSE - BAUSATZ MULTIFUOCO SYSTEM 2003 MIT FERNBEDIENUNG ______________________ 15
2.
EINBAU DES GEBLÄSES VOR AUFSTELLUNG DES HEIZEINSATZES ____________________________ 16
3.
EINBAU DES GEBLÄSES NACH AUFBAU DES HEIZEINSATZES UND ANBRINGUNG DER
VERKLEIDUNG _____________________________________________________________________________ 16
4.
ABKÜHLEN DES GEBLÄSES __________________________________________________________________ 16
5.
BEISPIEL FÜR FLEX-SCHLAUCH-ANSCHLÜSSE _______________________________________________ 17
6.
BENUTZUNG ________________________________________________________________________________ 18
7.
WARTUNG __________________________________________________________________________________ 20
8.
STROMLAUFTPLAN _________________________________________________________________________ 21
9.
BESEITIGUNG VON STÖRUNGEN_____________________________________________________________ 22
14
1. GEBLÄSE - BAUSATZ MULTIFUOCO SYSTEM 2003 MIT
FERNBEDIENUNG
Die Kamineinsätze von Piazzetta sind vorgesehen für den Einbau eines Gebläse - Bausatzes „Multifuoco System
2003 mit Fernbedienung“. Dieses patentierte System der Gruppo Piazzetta S.p.A. ermöglicht eine gleichmäßige
Erwärmung eines oder mehrerer Räume, ohne daß sich die Warmluft unter der Decke sammelt.
Der Einbau des Gebläses bewirkt keine höhere Wärmeleistung, sondern dient dazu, den Raum (Räume)
gleichmäßig zu beheizen, da durch ein Ansaugen der Luft von oben und einem Luftaustritt von unten eine
Luftzirkulation entsteht, die einen Wärmestau unter der Raumdecke verhindert.
Der Gebläse - Bausatz besteht aus einer Platte, auf der das Gebläse (ca. Nutzleistung 220 m³/h, Leistung 47
Watt), das mit dem Schaltgehäuse der Funksteuerung verkabelt ist, der Temperaturmessfühler PT, die tragbare
Fernbedienung mit 4 Tasten (für Niedervoltbatterien) sowie Abstandshalter und Befestigungsmaterial befestigt
sind.
Die Fernbedienung hat eine Taste (ON/OFF) mit Doppelfunktion “Anschalten/Ausschalten”, eine Taste für den
Automatikbetrieb (AUTO) und zwei Tasten (+/-) die die Geschwindigkeit des Gebläses regulieren
(Mindestgeschwindigkeit V1, mittlere Geschwindigkeit V2, mittelhohe Geschwindigkeit V3, Höchstgeschwindigkeit
V4).
Drückt man die Tasten + e - der Fernbedienung ist die eingestellte Geschwindigkeit des Gebläses ist an der
Anzahl der akustischen Signale zu erkennen (1 Signal für jede Geschwindigkeitsstufe). Wird das Gebläse
manuell ausgeschaltet, ist ein längeres Signal zu hören.
Der Temperaturmessfühler ermöglicht das automatische An- bzw. Ausschalten des Gebläses, wenn die
Temperatur die jeweils entsprechende Höhe erreicht hat.
FERNBEDIENUNG
15
2. EINBAU DES GEBLÄSES VOR AUFSTELLUNG DES
HEIZEINSATZES
Vor dem Einbau wie folgt vorgehen:
in der Nähe des Kamineinsatzes einen elektrischen Anschluss vorsehen.
Die Muttern am Flansch des Gebläses lösen; das Gebläse unter dem Heizeinsatz anbringen und mit den
Muttern befestigen. Bei den Modellen 400, 500, 510, 555, 650, 2010 befinden sich die Befestigungsschrauben
unten am Heizeinsatz. Den Gebläse vorbereiten indem die Schrauben und Muttern abgeschraubt werden. Das
Gebläse unter dem Heizeinsatz anschrauben, dazwischen die Schwingungsdämpfer aus Silikon anbringen und
mit einer Schraube das gelb-grüne Erdungskabel befestigen.
Die
Flügelschrauben
für
die
Befestigung
des
Temperaturmessfühlers, der sich auf dem Boden des
Heizeinsatzes befindet, lösen, den Temperaturmessfühler ca.
30 cm in das sich hinten am Heizeinsatz befindende Rohr
einführen und mit der Halterung befestigen und alles sorgfältig
festschrauben;
Bei
dem
Modell
510
muss
der
Temperaturmessfühler zwischen dem Befestigungsflansch des
Gebläses und dem Boden des Heizeinsatzes angebracht
werden.
Falls der Kamineinsatz mit 2 Gebläsen ausgerüstet ist (z.B.
Mod.600), soll das ganze Verfahren wiederholt werden.
Den Stecker der Funksteuerung in die dafür vorgesehene 220 V
Steckdose stecken.
Die Warmluftaustrittsschläuche an die entsprechenden
Öffnungen anschließen. Das Gebläse ist mit einem Y-Stück
ausgestattet, so dass bis zu vier Luftaustrittsöffnungen
vorgesehen werden können, die mit Hilfe von Y-Stücken eine
Verdoppelung des Luftführung ermöglichen.
Wir die Warmluft auch in angrenzende Räume geleitet, so sollte
immer der direkte Weg gewählt werden, um einen Wärmeverlust zu
vermeiden. Es ist daher anzuraten, möglichst kurze Wege mit dem
flexiblen Rohr zurückzulegen und dieses so gut wie möglich zu
isolieren (siehe Bedienungsanleitung für Heizeinsatz).
Die Gruppo Piazzetta S.p.A. liefert auf Anfrage Flexrohre ø75,
Luftaustrittsgitter, Y-Rohre und Schlauchschellen für die Montage.
Bitte beachten: Es wird empfohlen, das Gehäuse der
Funksteuerung nicht in der Nähe von Wärmequellen wie z.B.
Warmluftrohre oder Metallteilen, die heiß werden können,
anzubringen.
3. EINBAU DES GEBLÄSES NACH AUFBAU DES
HEIZEINSATZES UND ANBRINGUNG DER VERKLEIDUNG
Vor dem Einbau wie folgt vorgehen:
Feuerraumboden und Aschekasten herausnehmen. Mit einem Schraubenzieher das untere Schutzblech
abschrauben und ebenfalls herausnehmen und wie oben angegeben vorgehen.
4. ABKÜHLEN DES GEBLÄSES UND DER FUNKSTEUERUNG
Das Abkühlen des Gebläses erfolgt durch Frischluftzufuhr, die hinter oder unter dem Heizeinsatz angebracht wird.
Ist das nicht möglich, so muss die Abkühlung durch die Raumluft erfolgen, wobei im unteren Teil der Verkleidung
eine Öffnung von mindestens 120 cm² vorzusehen ist.
16
5. BEISPIEL FÜR FLEX-SCHLAUCH-ANSCHLÜSSE
Nachstehend einige Beispiele für
Wand- und Fußbodenanschlüsse mit Flex-Schläuchen (für eine optimale
Leistung müssen die Schläuche mit einer entsprechenden Isolierung versehen werden).
17
6. BENUTZUNG
ACHTUNG: NACH DEM ANLEGEN VON SPANNUNG AN DEN GEBLÄSE-BAUSATZ EINIGE SEKUNDEN
WARTEN, BEVOR SIE DIE TASTEN DER FUNKSTEUERUNG BETÄTIGEN, DAMIT DIE SELBSTPRÜFUNG
DER ELEKTRONIKKARTE ERFOLGEN KANN.
Über die Funksteuerung sind zwei Funktionsarten wählbar.
AUTOMATIKBETRIEB:
Zur Inbetriebnahme des Gebläses im automatischen Betrieb gehen Sie bitte wie folgt vor:
Zünden Sie das Feuer an
Drücken Sie die Taste „AUTO“ (die Anzahl der ausgesandten Signaltöne gibt die Geschwindigkeit an, auf die
das Gebläse eingestellt ist)
Stellen Sie die gewünschte Geschwindigkeit durch leichten Druck auf die Tasten +/- der Funksteuerung ein;
Sie können zwischen vier verschiedenen Betriebsgeschwindigkeiten wählen (V1 - V2 - V3 - V4)
Das Gebläse springt nur an, wenn der Temperaturmessfühler die Anschalttemperatur misst
Die Abschaltung des Gebläses erfolgt, wenn die von dem Messfühler gemessene Temperatur unter den
unteren Schwellenwert fällt
Das im Betrieb befindliche Gebläse kann jederzeit mit Hilfe der Taste „ON/OFF“ abgeschaltet werden (der
lange Signalton zeigt die Abschaltung des Systems an). Es springt auch dann nicht wieder an, wenn der
Temperaturmessfühler
die
Anschalttemperatur
misst.
Zur erneuten Aktivierung des Gebläses muss auf jeden Fall die Taste „ON/OFF" oder die Taste "AUTO“
betätigt werden
Schaltet sich das Gebläse im Automatikbetrieb ab, startet es in diesem Modus auch wieder, wenn der
Temperaturmessfühler eine Temperatur über dem Schwellenwert für Anschalten misst.
MANUELLER BETRIEB:
Zur Inbetriebnahme des Gebläses im Handbetrieb gehen Sie bitte wie folgt vor:
Drücken Sie die Taste „ON/OFF“ (die Anzahl der ausgesandten Signaltöne gibt die Geschwindigkeit an, auf
die das Gebläse eingestellt ist)
Stellen Sie die gewünschte Geschwindigkeit durch leichten Druck auf die Tasten +/- der Funksteuerung ein;
Sie können zwischen vier verschiedenen Betriebsgeschwindigkeiten wählen (V1 - V2 - V3 - V4)
Das Gebläse schaltet sich sofort, bei kaltem Ofen ein
Wenn die von der Sonde ermittelte Temperatur den Einschaltwert übersteigt, stellt sich die Betriebsart auf den
zuvor definierten Automatikbetrieb um und schaltet ab, wenn der Temperaturmessfühler die
Abschalttemperatur erreicht
Das im Betrieb befindliche Gebläse kann jederzeit mit Hilfe der Taste „ON/OFF“ abgeschaltet werden (der
lange Signalton zeigt die Abschaltung des Systems an)
Wird das System im Handbetrieb bei kaltem Ofen in Gang gesetzt und ermittelt der Temperaturmessfühler nicht
die Temperatur, die zur Aktivierung des Automatikbetriebs erforderlich ist, läuft das Gebläse weiter, bis die Taste
„ON/OFF“ betätigt wird.
EINSTELLUNG DES GESCHWINDIGKEITSBEREICHS FÜR ÖFEN MIT LUFTWEITERLEITUNG
Je nach Art der Luftleitung kann man zwischen zwei Geschwindigkeitsbereichen (Sets) wählen:
SET 1 für den Gebläse-Bausatz mit Ausgang nach vorn oder vorn/hinten und kurzer Luftleitung (serienmäßig
vorgesehenes Set);
SET 2 für den Gebläse-Bausatz mit längerer Luftleitung.
Zum Umstellen von einem Set in den anderen genügt es, nach dem Einschalten des Gebläses in der Betriebsart
AUTOMATIK oder MANUELL die Tasten „ON/OFF“ und „-“ vorübergehend gedrückt zu halten (das akustische
Signal in SET 2 besteht aus 2 Signaltönen, gefolgt von den Signaltönen für die eingestellte Geschwindigkeit).
Drückt man die Tasten „ON/OFF“ und „-“ erneut, kehrt man in den Modus SET 1 zurück (das akustische Signal in
SET 1 besteht aus 1 Signalton, gefolgt von den Signaltönen für die eingestellte Geschwindigkeit).
18
Beispiel:
Befindet man sich in SET 1 und GESCHWINDIGKEIT 3 und hält dann die Tasten „ON/OFF“ und „-“ vorübergehend
gedrückt, um auf SET 2 umzuschalten, wird man erst 2 Signaltöne hören, die den neuen Bereich (SET 2) angeben,
und anschließend ertönen 3 Signaltöne, welche die eingestellte Geschwindigkeit anzeigen (in diesem Fall
GESCHWINDIGKEIT 3).
Zur Rückkehr in SET 1 genügt es, die Tasten „ON/OFF“ und „-“ vorübergehend gedrückt zu halten; in diesem Fall
hört man zuerst 1 Signalton (SET 1) und danach 3 Signaltöne (GESCHWINDIGKEIT 3).
Wenn das SET einmal auf Ihren Luftleitungstyp eingestellt ist, muss es nicht mehr verändert werden.
Wählen Sie bei der Einstellung der Betriebsgeschwindigkeit (V1 - V2 - V3 - V4) die höchste Geschwindigkeit, um
die zu beheizenden Räume so schnell wie möglich auf Temperatur zu bringen, und benutzen Sie eine niedrigere
Geschwindigkeit, um die Raumtemperaturen zu halten.
EINSTELLSCHEMA FÜR GESCHWINDIGKEIT
SET 1
GESCHWINDIGKEIT 1
80V
GESCHWINDIGKEIT 2
115V
GESCHWINDIGKEIT 3
150V
GESCHWINDIGKEIT 4
220V
SET 2
115V
150V
185V
220V
HINWEIS: Das Schema gibt die Spannung an, mit der die Steuerungseinheit arbeitet, die Förderleistung kann je
nach Ofen und Luftleitung unterschiedlich sein.
STROMAUSFALL
Fällt der Strom aus und befindet man sich in der Betriebsart AUTO, startet das Gebläse bei Wiedereinschalten des
Stroms nur dann wieder mit der Geschwindigkeit, in der es sich vor dem Stromausfall befand, wenn der
Temperaturmessfühler eine Temperatur über dem Grenzwert für Einschalten misst. Falls die Temperatur niedriger
ist, bleibt das Gebläse ausgeschaltet und die Steuerungszentrale geht auf die zuletzt eingestellte Geschwindigkeit.
Auch in der Betriebsart MANUELL startet das Gebläse wieder mit der zuletzt eingestellten Geschwindigkeit.
19
7. WARTUNG
Das Gebläse regelmäßig reinigen und dabei den Staub in den Schlitzen des Plastikschutzes und an den
Ventilatorflügeln entfernen. Den Stecker vorher herausziehen.
Bei der Reinigung des Gebläses genauso wie beim Ein- und Ausbau des Gebläse – Bausatzes bei bereits komplett
aufgebauten Ofens vorgehen.
Bei Funktionsstörungen müssen alle Tätigkeiten am Gerät und an den Elektrokabeln von Fachkräften ausgeführt
werden.
ACHTUNG ! ALLE TÄTIGKEITEN DÜRFEN NUR BEI HERAUSGEZOGENEM STECKER
UND VON FACHKRÄFTEN AUSGEFÜHRT WERDEN.
1.
2.
3.
4.
5.
6.
7.
20
Gebläse
Funksteuerungsgehäuse
Temperaturmessfühler
Fernbedienung
Dichtung
Unteres Schutzblech
Feuerraumboden
8. STROMLAUFTPLAN
ERDE FÜR ANSCHLUSS
AN DEN HEIZEINSATZ
GELB-GRÜN
FUNKSTEUERUNG
BLAU
GELB-GRÜN
M
BRAUN
GELB-GRÜN
BRAUN
SCHWARZ
BLAU
N
L
BLAU (N)
BRAUN (L)
1
2
3
4
5
6
6-POLIGE
KLEMM
GEBLÄSE
ROT
TEMPERATURMESSFÜHLER
ROT
1
2
2-POLIGE
KLEMM
F
G
B
C
A Gebläse
B Klemme
C Funksteuerung
D Klemme für Messfühler
E Temperaturmessfühler Typ PT
F Stromkabel
G Erdungsdraht
D
E
A
ACHTUNG ! ALLE TÄTIGKEITEN DÜRFEN NUR BEI HERAUSGEZOGENEM STECKER
UND VON FACHKRÄFTEN AUSGEFÜHRT WERDEN.
21
9. BESEITIGUNG VON STÖRUNGEN
ÄNDERUNG DES FREQUENZCODES
Falls noch weitere Geräte mit dem gleichen Frequenzcode wie Ihre Funksteuerung vorhanden sind, können Sie
den Übertragungskanal ändern. Gehen Sie dabei wie folgt vor:
ÖFFNEN SIE DIE FUNKSTEUERUNG, INDEM SIE MIT EINEM KREUZSCHLITZSCHRAUBENDREHER
DIE SCHRAUBE AN DER HINTEREN SEITE DES DECKELS HERAUSDREHEN
BRINGEN SIE DIE MIKROSCHALTER IN EINE DER 16 UNTEN AUFGEFÜHRTEN, MÖGLICHEN
KOMBINATIONEN
KOMBINATIONEN DER ÜBERTRAGUNGSKANÄLE
SENDER
SENDER
SENDER
SENDER
1
1234
5
1234
9
1234
13
1234
2
1234
6
1234
10
1234
14
1234
3
1234
7
1234
11
1234
15
1234
4
1234
8
1234
12
1234
16
1234
MIKROSCHALTER
SCHLIESSEN SIE DEN DECKEL DER FUNKSTEUERUNG WIEDER
UNTERBRECHEN SIE DIE STROMZUFUHR ZUM GEHÄUSE DER FUNKSTEUERUNG, INDEM SIE DEN
STECKER ZIEHEN, ODER UNTERBRECHEN SIE DIE STROMZUFUHR MIT HILFE DES
HAUPTSCHALTERS FÜR DEN BETREFFENDEN BEREICH
SCHALTEN SIE DEN STROM WIEDER EIN UND DRÜCKEN SIE INNERHALB VON 5 SEKUNDEN DIE
TASTEN "AUTO“ UND „+“ 3 SEKUNDEN LANG (SIE HÖREN EINEN SIGNALTON, DER DIE
ERFOLGTE ÄNDERUNG DES CODES ANZEIGT)
DIE KONTROLLLEUCHTE DER FUNKSTEUERUNG LEUCHTET NICHT:
Batterie überprüfen.
Bei Austausch wie folgt vorgehen: die hinten an der Funksteuerung befindliche Schraube mit einem kleinen
Kreuzschlitzschraubenzieher abschrauben. Die Funksteuerung auf den Kopf stellen, das hintere Gehäuse
abnehmen und Batterie gegen eine neue Typ A 23 12 V austauschen. Dabei darauf achten, dass die Polarität (Art
der Batterie und Polarität sind jedoch auf der Funksteuerung gemäß Abbildung angegeben) nicht vertauscht wird.
Funksteuerung wieder schließen und die alte Batterie an den entsprechenden Sammelstellen entsorgen.
Besteht das Problem weiterhin, so wenden Sie sich an einen Händler oder Kundendienst.
DIE FUNKSTERUNG FUNKTIONIERT, ABER DER EMPFÄNGER REAGIERT NICHT:
Leuchtet beim Einschalten die Kontrollleuchte auf, aber der Empfänger reagiert nicht, überprüfen:
1. ob sich der Stecker richtig in der Steckdose befindet;
2. ob die Steckverbinder richtig eingeführt sind;
3. ob die Sicherung der Funksteuerung in Ordnung ist, eventuell austauschen gegen eine neue Typ T1,6AL250V;
Besteht das Problem weiterhin, so wenden sie sich an einen Händler oder Servicecenter
22
23
ASSEMBLY INSTRUCTIONS
INDEX
1.
MULTIFUOCO 2003 VENTILATION KIT WITH RADIO CONTROL________________________________ 25
2.
INSTALLING THE VENTILATION KIT BEFORE POSITIONING THE STOVE ______________________ 26
3.
INSTALLING THE VENTILATION KIT AFTER INSTALLING THE STOVE AND SURROUND ________ 26
4.
COOLING THE FAN__________________________________________________________________________ 26
5.
EXAMPLES OF CONNECTION FOR HOSES ____________________________________________________ 27
6.
USE_________________________________________________________________________________________ 28
7.
MAINTENANCE _____________________________________________________________________________ 29
8.
WIRING DIAGRAM __________________________________________________________________________ 30
9.
TROUBLESHOOTING ________________________________________________________________________ 31
24
1. MULTIFUOCO 2003 VENTILATION KIT WITH
RADIO CONTROL
The stoves are designed for installing the “Multifuoco 2003 Ventilation kit with radio control. This system, patented
by Gruppo Piazzetta S.p.A., makes it possible to heat one or more rooms uniformly thus preventing layering of hot
air near the ceiling.
Installation of the fan kit does not entail an increase in the heat output of the appliance, but rather the
uniform heating of the room (or rooms), since this system (allowing air intake from above and outflow from below)
creates a recycling of hot air which impedes ceiling stratification.
3
The Fan kit consists of: a fan (with airflow of approx. 220 m /h and 47 watt capacity) complete with cable and radio
control box; PT probe; portable radio control with 4 buttons (powered by low-voltage batteries); spacers; small parts
for fixing.
The remote control has an ON/OFF button with two functions, i.e. “on / off”, a button for switching to automatic
operation (AUTO) and two buttons (+/-) governing the fan operating speed (minimum speed V1, medium speed V2,
maximum medium speed V3, maximum speed, V4).
To identify the fan operating speed setting, simply listen to the number of beeps emitted when pressing the + and buttons of the remote control (1 beep for each increase in speed); when manually shutting off the fan, a long
beep indicates that the system has been turned off.
The probe allows the fan to start and stop automatically when the temperature reaches the turn-on and turn-off
thresholds.
REMOTE CONTROL
25
2. INSTALLING THE VENTILATION KIT BEFORE
POSITIONING THE STOVE
Proceed as follows:
ensure that there is an electric power socket near the stove.
Remove the nuts from the screws on the fan flange; put the fan in the lower part of the stove and fix the whole
assembly using the nuts and washers that have just been removed. In the 400, 500, 510, 555, 650, 2010
models, the screws for fixing the ventilation kit are to be found in the lower part of the stove: prepare the fan by
removing the screws and nuts and fix it to the stove, inserting the vibration-isolation mountings between the
two components and using one of the screws to fasten the eyelet terminal of the yellow-green earth wire.
Unscrew the wing nut from probe-holder bracket located on the
bottom of the stove, insert the bulb of the PT probe about 30 cm
into the probe-holder tube in the rear part of the flue, fasten the
probe to the bracket and tighten all the screws and nuts; in
model 510, put the probe into the space between the fan flange
and the bottom of the stove.
If the product is fitted with two motors (e.g. mod. 600) this
step must be repeated.
Insert the radio-control box plug into the 220V socket already
provided.
Connect the fan to the hot air outlets through hoses. The fan is
fitted with one Y-element, but the line can be split up by using
two Y-elements thereby making it possible to connect up with
four outlets.
If you also wish to send hot air to adjacent rooms, choose the
shortest route, thus limiting loss of heat. It is advisable to avoid
running the hoses along very long routes, and to insulate them
properly. (See instructions enclosed with stove).
Gruppo Piazzetta S.p.A. supplies ø75 hoses, air outlet nozzles, Yelements and hose clamps for assembly, on request.
N.B. It is advisable to keep the radio-control box away from heat
sources, such as hot air ducts or mechanical parts which tend to get
hot.
3. INSTALLING THE VENTILATION KIT AFTER
INSTALLING THE STOVE AND SURROUND
Proceed as follows:
remove the grate and the ash drawer, loosen the fixing screws with a screwdriver and remove the lower guard.
Then proceed as described above.
4. COOLING THE FAN AND THE RADIOCONTROL BOX
The fan is cooled by the external air intake when the latter is positioned behind or under the stove. In the absence
of an air intake, cooling is assured by environmental air, so an opening of at least 120 cm² in the lower part of the
surround must be provided.
26
5. EXAMPLES OF CONNECTION FOR HOSES
Here are a few examples showing how to connect and arrange the hose for walls and floors (for better efficiency
the hose must be lagged with adequate insulated sheathing).
27
6. USE
CAUTION: AFTER HAVING POWERED THE FAN KIT, WAIT A FEW SECONDS BEFORE PRESSING THE
REMOTE CONTROL BUTTONS TO ALLOW THE CHECK-UP OF THE ELECTRONIC BOARDS.
Two types of settings can be selected with the remote control.
AUTOMATIC OPERATION:
To start the fan in the automatic mode, proceed as follows:
- light the fire
- press the AUTO button (the number of beeps emitted indicates the speed at which the fan is set)
- set the required speed by lightly pressing the +/- buttons on the remote control, choosing from among four
different operating speeds (V1 – V2 – V3 – V4)
- the fan starts only when the probe detects the turn-on temperature
- the fan will shut-off when the temperature detected by the probe falls below the minimum threshold
- even when in operation, the fan can be turned off at any time by pressing the ON/OFF button (the long
beep signals the shutting-down of the system); after this the fan will not start even if the probe reaches the
start-up temperature
- to restart the fan, it is necessary to press the “ON/OFF” or also the “AUTO” button
If the fan shuts off automatically, it will start again in the same mode if the probe detects a temperature greater than
the turn-on threshold.
MANUAL OPERATION:
To start the fan in the manual operation mode, proceed as follows:
- press the ON/OFF button (the number of beeps emitted indicates the speed at which the fan is set)
- set the required speed by lightly pressing the +/- buttons on the remote control, choosing from among four
different operating speeds (V1 – V2 – V3 – V4)
- the fan starts immediately
- when the temperature detected by the probe exceeds the turn-on value, the type of operation changes to
the preset automatic mode and will shut down when the probe reaches the shutdown temperature
- the fan in operation may be shut-off at any time by pressing the ON/OFF button (the long beep indicates
the shutting down of the system)
N.B.: if the system is started up in the manual mode with a cold stove and the probe does not detect the
temperature necessary for activating automatic operation, the fan will continue to operate until the ON/OFF button
is pressed.
SETTING THE FAN SPEED FOR DUCTED STOVES
Depending upon type of ductwork, two types of speed settings can be chosen:
- SETTING 1, for the fan kit with front or front/rear outlet with a short duct (standard factory setting);
- SETTING 2, for the fan kit with longer ductwork.
To change from one setting to another, after having turned on the fan in the AUTOMATIC or MANUAL mode,
simply press the “ON/OFF” and “-” buttons simultaneously (the acoustic signal in SETTING 2 consists of 2 beeps
followed by the beeps for the speed setting).
Press the “ON/OFF” and “-” buttons simultaneously again for approx. 3 seconds and the system passes to the
SETTING 1 mode (the acoustic signal in SETTING 1 consists of 1 beep followed by the speed setting beeps).
Example:
if we are in SETTING 1 and at SPEED 3 and we hold the “ON/OFF” and “-“ buttons pressed simultaneously to pass
to SETTING 2 we will initially hear 2 beeps which identify the new setting (SETTING 2) and then 3 beeps will be
heard which identify the speed setting (in this case SPEED 3).
To return to SETTING 1 simply press the “ON/OFF” and “-“ buttons simultaneously again, in this case an initial
beep will be heard (SETTING 1) and then 3 beeps (SPEED 3).
28
Having completed the SETTING according to your type of ductwork, further modifications will not be needed.
When setting the operating speed (V1 – V2 – V3 – V4), select the highest speed to bring the rooms to be heated to
the desired temperature as quickly as possible; use lower speeds to maintain the temperature reached in the room.
SPEED
SPEED
SPEED
SPEED
1
2
3
4
SPEED SETTINGS
SETTING 1
80V
115V
150V
220V
SETTING 2
115V
150V
185V
220V
NOTE: the above table indicates the voltage at which the control unit operates; the airflow can vary depending
upon the stove and the type of ductwork.
IN A BLACKOUT:
If there is a power failure while in the AUTO mode, when power is restored, the fan will start at the speed it was at
before the blackout only if the probe detects a temperature higher than the turn-on limit; should the temperature be
lower, the fan remains off and the control unit shifts to the speed most recently set.
Also in the MANUAL mode the fan will start at the speed most recently set when the power returns.
7. MAINTENANCE
Disconnect the fan periodically from the power supply and clean the dust that may have been deposited in the slits
in the plastic covering and on the rotating blades.
To clean the fan, follow the procedure described for the disassembly and removal operations involved in installing
the ventilation kit after the stove and surround are installed.
In the event of malfunction, only qualified persons must carry out work on the appliance and the wiring.
CAUTION! ALL WORK MUST BE CARRIED OUT BY QUALIFIED PERSONNEL WITH THE
POWER CUT OFF
KEY
1.
2.
3.
4.
5.
6.
7.
Fan
Radio-control box
PT probe
Portable radio-control
Seal
Lower guard
Fire grid
29
8. WIRING DIAGRAM
GROUNDING
YELLOW-GREEN
RADIO-CONTROL BOX
BLUE
YELLOW-GREEN
M
BROWN
BLACK
BLUE
1
2
3
4
5
6
BROWN
YELLOW-GREEN
N
L
BLUE (N)
BROWN (L)
6-POLE
TERMINAL
FAN
1
2
RED
THERMOSTATIC
PROBE
RED
2-POLE
TERMINAL
F
G
B
C
KEY
A.
B.
C.
D.
E.
F.
G.
Fan
Power supply terminal
Radio-control box
PT probe terminal
PT probe
Power cord
Earth wire
D
E
A
CAUTION! ALL WORK MUST BE CARRIED OUT BY QUALIFIED PERSONNEL WITH THE
POWER CUT OFF
30
9. TROUBLESHOOTING
CHANGING THE FREQUENCY CODE
If there is other equipment with the same frequency code as your remote control you can change the
transmission band as follows:
LOOSEN THE SCREW ON THE BACK OF THE COVER WITH A PHILIPS SCREWDRIVER AND OPEN
THE REMOTE CONTROL
POSITION THE MICROSWITCHES IN ONE OF THE 16 POSSIBLE COMBINATIONS LISTED BELOW
TRANSMISSION CHANNEL COMBINATIONS
TRASM.
TRASM.
TRASM.
TRASM.
1
1234
5
1234
9
1234
13
1234
2
1234
6
1234
10
1234
14
1234
3
1234
7
1234
11
1234
15
1234
4
1234
8
1234
12
1234
16
1234
MICROSWITCHES
REPLACE THE REMOTE CONTROL COVER
CUT OFF THE POWER SUPPLY TO THE REMOTE CONTROL BOX BY PULLING OUT THE PLUG OR
SHUTTING OFF THE POWER AT THE GENERAL CUT-OUT SWITCH FOR THE AREA
CONNECT TO THE POWER SUPPLY AGAIN AND WITHIN 5 SECONDS PRESS THE “AUTO” AND “+”
BUTTONS SIMULTANEOUSLY FOR 3 SECONDS (YOU WILL HEAR A BEEP INDICATING THAT THE
CODE HAS BEEN CHANGED)
THE WIRELESS CONTROL LIGHT DOES NOT COME ON:
Check the radio-control battery charge.
To replace the battery proceed as follows: using a small Phillips-head screwdriver, remove the screws in the rear
part of the radio control; then keeping it turned face down, remove the rear cover. Replace the battery with a new
one, A 23 12V type, taking care not to reverse the polarity (battery type and polarity are in any case also given on
the radio control card as shown in the photo above). Then close the radio control and dispose of the old battery in
the special containers located in supermarkets, waste collection centres, ecological islands, etc.
N.B. If the problem persists, contact a vendor service centre.
THE WIRELESS CONTROL FUNCTIONS BUT THE RECEIVER DOES NOT RESPOND:
If the radio control indicator light comes on when pressing the button, but the receiver does not respond, check that:
1.
2.
3.
the electrical power plug is inserted in the electrical socket
the connectors are inserted properly
the fuse in the radio control box is in good condition, if necessary replace it with new one (T1.,6AL250V)
N.B. If the problem persists, contact a vendor service centre.
31
C A M I N E T T I
&
S T U F E
Dichiarazione di conformità
Declaration of Conformity
Il sottoscritto, dichiara che il prodotto
The undersigned declares that the product
Descrizione / Description
Modello / Model
KIT MULTIFUOCO® (unità del ricevitore)
(receiver unit)
KV03/R
è conforme a tutte le norme tecniche relative al prodotto entro il campo di applicabilità
delle Direttive Comunitarie 73/23/CEE , 89/336/CEE e 99/5/CEE:
is in conformity with all the technical regulations applicable to the product within the scope of Community
Directives 73/23/EEC, 89/336/EEC and 99/5/EC:
EN 60335-1 (1994); EN 60335-1/Ec (1995) ; EN 60335-1/A11 (1995) ; EN 60335-1/A1 (1996);
EN 60335-1/A12 (1996); EN 60335-1/A13 (1998); EN 60335-1/A14 (1998); EN 60335-1/A15 (2000);
ETSI EN 301 489-3 (2000) + ETSI EN 301 489-1 (2000)
ETSI EN 300 220-3 (2000)
EN 55014-1 (1993) + EN 55014-1/A1(1997) + EN 55014-1/A2(1999);
EN 61000-3-2 (1995) + EN 61000-3-2 /A1 (1998) + EN 61000-3-2/A14 (2000) + EN 61000-3-2 /A2
(1998); EN 61000-3-3 (1995)
EN 55014-2 (1997)
Sono state eseguite tutte le necessarie prove di radiofrequenza.
All essential RF tests have been carried out.
COSTRUTTORE o RAPPRESENTANTE AUTORIZZATO:
MANUFACTURER or AUTHORISED REPRESENTATIVE:
Gruppo Piazzetta S.p.A.
Via Montello, 22
31010 Casella D'Asolo (TV) – ITALY
Questa dichiarazione viene emessa sotto la sola responsabilità del costruttore e, se applicabile,
del suo rappresentante autorizzato
This declaration is issued under the sole responsibility of the manufacturer and, if applicable, his
authorised representative.
COPIA
3
(Luogo, data di emissione)
(Firma)
(Place, date of issue)
(Signature)
(Nome and posizione in stampatello)
(Name and title in block letters)
GRUPPO PIAZZETTA S.p.A. - 31010 Casella d’Asolo (TV) - Via Montello,22 - Tel.0423/527.1 - Fax 0423/55178 - Fax Uff. Comm. 0423/527250
Codice Fiscale e Partita IVA 00200000263-Capitale Sociale Interamente Versato € 3.096.000 i.v.-REA TV 105772-Registro Imprese TV 5974
32
C A M I N E T T I
&
S T U F E
Dichiarazione di conformità
Declaration of Conformity
Il sottoscritto, dichiara che il prodotto
The undersigned declares that the product
Descrizione / Description
Modello / Model
REMOTE CONTROL (unità del trasmettitore)
(transmitter unit)
KV03/T
è conforme a tutte le norme tecniche relative al prodotto entro il campo di applicabilità
delle Direttive Comunitarie 73/23/CEE , 89/336/CEE e 99/5/CEE:
is in conformity with all the technical regulations applicable to the product within the scope of Community
Directives 73/23/EEC, 89/336/EEC and 99/5/EC:
EN 60950 (1992)
ETSI EN 301 489-3 (2000) + ETSI EN 301 489-1 (2000)
ETSI EN 300 220-3 (2000)
Sono state eseguite tutte le necessarie prove di radiofrequenza.
All essential RF tests have been carried out.
COSTRUTTORE o RAPPRESENTANTE AUTORIZZATO:
MANUFACTURER or AUTHORISED REPRESENTATIVE:
Gruppo Piazzetta S.p.A.
Via Montello, 22
31010 Casella D'Asolo (TV) – ITALY
Questa dichiarazione viene emessa sotto la sola responsabilità del costruttore e, se
applicabile, del suo rappresentante autorizzato
This declaration is issued under the sole responsibility of the manufacturer and, if applicable,
his authorised representative.
COPIA
3
(Luogo, data di emissione)
(Firma)
(Place, date of issue)
(Signature)
(Nome and posizione in stampatello)
(Name and title in block letters)
GRUPPO PIAZZETTA S.p.A. - 31010 Casella d’Asolo (TV) - Via Montello,22 - Tel.0423/527.1 - Fax 0423/55178 - Fax Uff. Comm. 0423/527250
Codice Fiscale e Partita IVA 00200000263-Capitale Sociale Interamente Versato € 3.096.000 i.v.-REA TV 105772-Registro Imprese TV 5974
33
Notes
---------------------------------------------------------------------------------------------------------------------------
---------------------------------------------------------------------------------------------------------------------------
---------------------------------------------------------------------------------------------------------------------------
---------------------------------------------------------------------------------------------------------------------------
---------------------------------------------------------------------------------------------------------------------------
---------------------------------------------------------------------------------------------------------------------------
---------------------------------------------------------------------------------------------------------------------------
---------------------------------------------------------------------------------------------------------------------------
---------------------------------------------------------------------------------------------------------------------------
---------------------------------------------------------------------------------------------------------------------------
---------------------------------------------------------------------------------------------------------------------------
---------------------------------------------------------------------------------------------------------------------------
34
35
Questo apparecchio (comprendente i modelli KV03/R e KV03/T) è destinato ad essere utilizzato nei seguenti Stati:
Austria, Croazia, Finlandia, Francia, Germania, Grecia, Inghilterra, Italia, Spagna, Svizzera.
Dieses Gerät (umfasst die Modelle KV03/R und KV03/T) ist für den Gebrauch in folgenden Ländern bestimmt:
Österreich, Kroatien, Finnland, Frankreich, Deutschland, Griechenland, England, Italien, Spanien, Schweiz.
This appliance (including the KV03/R and KV03/T models) is intended to be used in the following countries:
S.p.A.
Via Montello, 22
I - 31011 Casella d’Asolo (TV) Italy
Tel. 0039.0423.527.1 - Fax 0039.0423.55178
http://www.piazzetta.it
e-mail:[email protected]
36
Gruppo Piazzetta S.p.A. Technical Department Cod. H07003370 / DT2000088 – Rev. 01 – (04/2007)
Austria, Croatia, Finland, France, Germany, Greece, England, Italy, Spain, Switzerland.