1
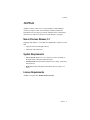
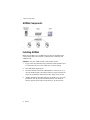
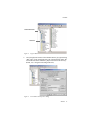
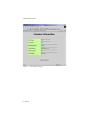
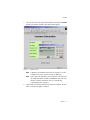
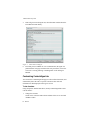
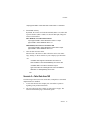
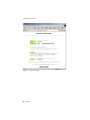
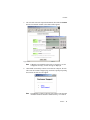
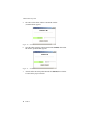
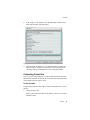
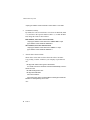
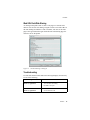
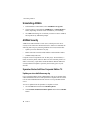
AltiWeb™ Manual 2/2008 4404-0001-5.2 WARNING! Toll fraud is committed when individuals unlawfully gain access to customer telecommunication systems. This is a criminal offense. Currently, we do not know of any telecommunications system that is immune to this type of criminal activity. AltiGen Communications, Inc., will not accept liability for any damages, including long distance charges, which result from unauthorized and/or unlawful use. Although AltiGen Communications, Inc., has designed security features into its products, it is your sole responsibility to use the security features and to establish security practices within your company, including training, security awareness, and call auditing. NOTICE While every effort has been made to ensure accuracy, AltiGen Communications, Inc., will not be liable for technical or editorial errors or omissions contained within the documentation. The information contained in this documentation is subject to change without notice. This documentation may be used only in accordance with the terms of the AltiGen Communications, Inc., License Agreement. AltiGen Communications, Inc. 4555 Cushing Blvd. Fremont, CA 94538 Telephone: 510-252-9712 Fax: 510-252-9738 E-mail: [email protected] Web site: www.altigen.com TRADEMARKS AltiGen, AltiServ, AltiWare, AltiContact Manager, AltiLink, AltiConsole, AltiAdmin, ACM Admin, AltiVRPlayer, AltiWeb, Zoomerang, AltiMobile Extension, IPTalk, AltiReport, and SuperQ are trademarks or registered trademarks of AltiGen Communications, Inc. All other brand names mentioned are trademarks or registered trademarks of their respective manufacturers. Copyright © AltiGen Communications, Inc. 2008. All rights reserved. 4404-0001-5.2 Contents New in Previous Release, 5.1 . . . . . . . . . . . . . . . . . . . . . . . . . . . . . . 1 System Requirements . . . . . . . . . . . . . . . . . . . . . . . . . . . . . . . . . . . . 1 License Requirements . . . . . . . . . . . . . . . . . . . . . . . . . . . . . . . . . . . 1 AltiWeb Components . . . . . . . . . . . . . . . . . . . . . . . . . . . . . . . . . . . . 2 Installing AltiWeb . . . . . . . . . . . . . . . . . . . . . . . . . . . . . . . . . . . . . . 2 AltiWeb Directory Files . . . . . . . . . . . . . . . . . . . . . . . . . . . . . . . . . . 4 Collecting Form Data, IVR Data, and URL History . . . . . . . . . . 4 Tagging Pages for URL History . . . . . . . . . . . . . . . . . . . . . . . . . . 4 Scenario 1—Caller Data from Web Page. . . . . . . . . . . . . . . . . . . 5 Customizing Contactaltigen.htm . . . . . . . . . . . . . . . . . . . . . . . . . 8 Scenario 2—Caller Data from IVR . . . . . . . . . . . . . . . . . . . . . . . 9 Customizing Contact.htm . . . . . . . . . . . . . . . . . . . . . . . . . . . . . . 13 Web URL Push/Web Sharing. . . . . . . . . . . . . . . . . . . . . . . . . . . 15 Troubleshooting . . . . . . . . . . . . . . . . . . . . . . . . . . . . . . . . . . . . . 15 Uninstalling AltiWeb . . . . . . . . . . . . . . . . . . . . . . . . . . . . . . . . . . . 16 AltiWeb Security . . . . . . . . . . . . . . . . . . . . . . . . . . . . . . . . . . . . . . 16 Symantec Norton AntiVirus Corporate Edition 7.5 . . . . . . . . . . 16 Enable Real-Time scan . . . . . . . . . . . . . . . . . . . . . . . . . . . . . . . . 17 Schedule Daily Full Scan on all drives. . . . . . . . . . . . . . . . . . . . 18 AltiWeb i AltiWeb ii AltiWeb AltiWeb AltiWare Contact Center (ACC) 5.2 and AltiWare Contact Manager (ACM) 5.2 integrate VoIP, Auto Attendant, and Microsoft Internet Information Services (IIS) to provide the AltiWeb feature, which allows internet users to talk to an extension via VoIP and share web pages. New in Previous Release, 5.1 Beginning with Release 5.1, AltiWeb uses SIP IPTalk to replace H.323 IP talk. • Supports connection through CTProxy • SIP-based VoIP connection System Requirements • Server System: With ACC 5.2 or ACM 5.2 (or above) running on Windows 2003 or Windows XP Professional • Client System: Microsoft Internet Explorer 6.0 or better, sound card, Internet access • Web Server: Microsoft Internet Information Services (IIS) 5.0 or above License Requirements AltiWeb 5.2 requires the AltiWeb Feature License. AltiWeb 1 AltiWeb Components AltiWeb Components Figure 1. AltiWeb Component Overview Installing AltiWeb Make sure AltiWare ACC/ACM Release 5.2 has been installed on the system and the link to the network is enabled before continuing with AltiWeb setup. Important: Only one AltiWeb client can be opened on a PC. 1. Log in to the client machine using a domain account and make sure it is connected to the network on which ACC/ACM is running. 2. Exit all Windows applications. 3. Insert the AltiWeb CD into the CD ROM drive of the IIS web server, open the AltiWeb folder, and run the Setup.exe program. Follow the step-by-step installation instructions as they appear on the screen. 4. 2 AltiWeb installs into the Home directory of the IIS server. To verify installation, start IIS, and select Default Web Site. The WebCall directory appears at the bottom of the directory, as shown below. AltiWeb AltiWeb Default Web Site WebCall Figure 2. Logical AltiWeb installation in IIS 5. Verify the physical location of the AltiWeb directory by right-clicking “Web Call,” on the Virtual Directory tab of the Properties dialog, the Local Path field shows AltiWeb’s physical location on the drive (by default, it is C:\Program Files\Altigen\altiweb). Figure 3. Local Path in IIS Properties dialog AltiWeb 3 AltiWeb Directory Files AltiWeb Directory Files The following are some of the AltiWeb directory files needed to run the AltiWeb application. • Contact.htm—Customer Information page for use with Auto Attendant • WebCallNew.htm—displays web call GUI • webcall.js—script for web call • WebCallCtrl.cab—ActiveX control for web call Collecting Form Data, IVR Data, and URL History You can configure AltiWeb to display Form Data, IVR Data, and URL History when a web call is answered by an extension with the AltiAgent application. The IVR data comes from the Auto Attendant/Collect Digit action. The Form Data come from the <form name=infoForm> fields in the source code of Contact.htm or Contactaltigen.htm pages. The URL History shows all URL paths to tagged html pages the caller visited prior to the call. Figure 4. Caller Data window in AltiAgent Tagging Pages for URL History To appear in the URL history, the pages the caller visits prior to the call must be tagged, as shown below: <head> 4 AltiWeb AltiWeb <script language="JavaScript" src="Webcall.js"></script> <script language="JavaScript"> tagURL(location.href) </script> </head> For more information on configuring: • IVR Data: Refer to “Web URL Push/Web Sharing” on page 15. • Form Data: “Customizing Contactaltigen.htm” on page 8 or “Customizing Contact.htm” on page 13. Scenario 1—Caller Data from Web Page The following scenario, based on contactaltigen.htm, exemplifies the simplest implementation of AltiWeb. 1. A web caller browses the company web site and has a question regarding some product information. 2. The web caller clicks the "contact us" link on the web page. The Customer Information page (contactaltigen.htm) opens. AltiWeb 5 AltiWeb Directory Files Figure 5. Contactaltigen.htm page 6 AltiWeb AltiWeb 3. The web caller enters the required information, then clicks the Submit button. The AltiWeb window (AltiwebNew.htm) appears. Figure 6. AltiWeb window Note: If IPTalk is not installed on the caller’s computer (or it’s not configured correctly), an error message is displayed. Note: This scenario directly dials a preset extension. You can also set the AltiWeb window to display a DialPad the caller can use to dial any extension. For details, refer to “Customizing Contactaltigen.htm” on page 8. 4. Once IPTalk successfully connects to an AltiGen VoIP port, the web caller is routed to the proper extension. AltiWeb 7 AltiWeb Directory Files 5. If the call goes to an AltiAgent user, the Caller Data window shows the Form Data and URL history. Figure 7. Caller Data in AltiAgent 6. From this point, in addition to voice communication, the agent can push and share web pages with the caller. For procedures, refer to the section on “Viewing, Sharing, or Pushing Data” in the AltiAgent Manual. Customizing Contactaltigen.htm You can use the Contactaltigen.htm page to collect caller information, and automatically direct the call to a specific extension. This collected information is then displayed on the agent’s screen. To alter form data: Using Notepad or another html editor, modify Contactaltigen.htm source code as follows: 1. Change the ServerIP. Set the value of the ServerIP to the IP address of the server on which AltiWare resides. 8 AltiWeb AltiWeb <input type="hidden" name="ServerIP" value="206.111.153.203"> 2. Set DialPad visibility. By default, the code is set to hide the Dial Pad (value = "0") and to dial a specific number (value = "300"). To show the Dial pad, change the values as shown below: Show DialPad, Let Caller Dial Extension <input type="hidden" name="Extension" value=""><input type="hidden" name="DialPad" value="1"> Hide DialPad, Autoconnect to Extension 300 <input type="hidden" name="Extension" value="300"><input type="hidden" name="DialPad" value="0"> 3. Alter the data collection fields. Shown below is the form row that collects the caller’s first name. Copy, modify, or delete variables to your company’s specifications. <tr> <td width="240" bgcolor="#CCFF99"><font size="2" face="Verdana"><b>First Name </b></font></td> <td width="282"><font face="Verdana"><input type="text" size="20" maxlength="40" name="FirstName" tabindex="1"> </font></td> </tr> Scenario 2—Caller Data from IVR The following scenario, based on contact.htm, exemplifies a customized implementation of AltiWeb. 1. A web caller browses the company web site and has a question regarding some product information. 2. The web caller clicks the "contact us" link on the web page. The Customer Information page (contact.htm) opens. AltiWeb 9 AltiWeb Directory Files Figure 8. Contact.htm page 10 AltiWeb AltiWeb 3. The web caller enters the required information, then clicks the Submit button. The AltiWeb window (AltiwebNew.htm) appears. Figure 9. AltiWeb window with DialPad visible Note: If IPTalk is not installed on the caller’s computer (or it’s not configured correctly), an error message is displayed. 4. Once IPTalk successfully connects to an AltiGen VoIP port, the web caller sees the Customer Support page, and hears a prompt requesting the selection of Sales or Tech support. Note: The DialPad is visible to allow the web caller to close the IVR Attendant windows and dial a number directly, if so desired. AltiWeb 11 AltiWeb Directory Files 5. The caller selects Sales, and the Customer ID window (customerid.htm) appears. Figure 10. Customer ID window 6. Once the caller enters the customer ID and clicks Submit, the Product ID window (productid.htm) appears. Figure 11. Product ID window 7. After the caller enters the product ID and clicks Submit, the web caller is routed to the proper extension. 12 AltiWeb AltiWeb 8. If the call goes to an AltiAgent user, the Caller Data window shows Form data, IVR data, and URL history. Figure 12. Caller Data window in AltiAgent 9. From this point, in addition to voice communication, the agent and caller can share web pages. For procedures, refer to the section on “Viewing, Sharing, or Pushing Data” in the AltiAgent manual. Customizing Contact.htm You can use the Contact.htm page to collect caller information, and then automatically direct the call to a specific extension. This caller information is then displayed on the agent’s screen. To alter form data: Using Notepad or another html editor, modify Contact.htm source code as follows: 1. Change the ServerIP. Set the value of the ServerIP to the IP address of the server on which AltiWare resides. AltiWeb 13 AltiWeb Directory Files <input type="hidden" name="ServerIP" value="206.111.153.203"> 2. Set DialPad visibility. By default, the code in contact.htm is set to show the Dial Pad (value = "1") and not to dial a specific number (value = ""). To hide the DialPad, change the values as shown below: Hide DialPad, Autoconnect to Extension 300 <input type="hidden" name="Extension" value="300"><input type="hidden" name="DialPad" value="0"> Show DialPad, Let Caller Dial Extension <input type="hidden" name="Extension" value=""><input type="hidden" name="DialPad" value="1"> 3. Alter the data collection fields. Shown below is the form row that collects the caller’s full name. Copy, modify, or delete variables to your company’s specifications. <tr> <td align="left" width="128" bgcolor="#CCFF99"> <b><small><font face="Verdana">Customer Name </font></ small></b></td> <td width=22 align=left></td> <td align=left width=282> <font face=Verdana> <input type="text" name="CustomerName" maxlength=40 size=20 tabindex=1> </font></td> </tr> 14 AltiWeb AltiWeb Web URL Push/Web Sharing An AltiAgent can push a URL or share a web page to a customer who makes a web call. For web sharing, an agent can select one of the URLs in the URL sharing list and share it with a customer, who can see the same page as the agent. When the agent clicks the link in the sharing page, the customer can see the update. Figure 13. Web Push/Sharing in AltiAgent Troubleshooting If a web caller cannot connect and an error message displays, the cause may be one of the following: Error Message Cause Server connection failed. Please try again later. • • • ACC/ACM IP address is not correct ACC/ACM is not running Firewall is not open No more available sessions. Please try again later. • All session licenses are used or there are no session licenses at all. AltiWeb 15 Uninstalling AltiWeb Uninstalling AltiWeb 1. In the Windows Control Panel, select Add/Remove Programs. 2. Choose AltiWeb 5.2 and click the Add/Remove or Change/Remove button, depending on which version of Windows you’re running. 3. Click OK in the dialog box to confirm you want to remove AltiWeb, and respond to any additional prompts. AltiWeb Security AltiWeb uses Microsoft IIS as a web server, which poses web server security issues common to all Microsoft users. AltiGen recommends the following basics steps to protecting AltiWare from viruses and worms: • Update your virus definition every day • Enable real-time scan and exclude AltiServ and PostOffice folders • Schedule Daily Full Scan Computer viruses can penetrate a PC in many ways: network shares, emails, OS security holes, and more. Here are some common practices to follow. If necessary, open shares for READ ONLY. Monitor Microsoft security bulletins for updates. Open only the necessary ports on your firewall. Symantec Norton AntiVirus Corporate Edition 7.5 Update your virus definition every day For a Corporate Edition version, administrators can receive updates from either a dedicated local server or the Symantec LiveUpdate web site. Please refer to Norton Administration menu on how to set up a dedicated local server. To receive updates from the Symantec LiveUpdate web site. 1. Click the File menu and choose Schedule Updates. 2. Check Enable scheduled automatic updates and click the Schedule button. 16 AltiWeb AltiWeb 3. Set it for Daily at 8:00 PM Figure 14. Norton AntiVius Realtime Protection window To receive updates on the fly, click the File menu, choose LiveUpdate, and get the latest virus definition. Enable Real-Time scan 1. Click the Configuration menu and choose File System Realtime Protection. 2. Check Enable File System Realtime Protection. 3. Choose All Files for File Types. 4. Check Display message on infected computer. 5. (optional) Click the Advanced button and bring up advanced options. 6. (optional) Uncheck backup files before attempting repair if your system disk space is small. 7. Check Exclude selected files and folders and click the Exclusions button. 8. Enable Check file for exclusion before scanning and click the Files/ Folders button. 9. Find and check Altiserv and Postoffice folders and click OK. AltiWeb 17 AltiWeb Security Schedule Daily Full Scan on all drives 1. Choose Edit menu and New Scheduled Scan. 2. Edit the job name, ex, Daily Full Scan. Click Next. 3. Set the frequency as Daily 9:00 PM and click Next. 4. Check all the local hard drives and click Options. 5. Choose All Files for File Types and set the CPU utilization for 50%. 6. Click OK and Save. Now you have set it for daily scan for all files on your hard drives. 18 AltiWeb