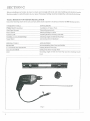
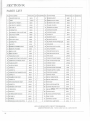
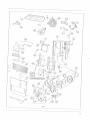
1
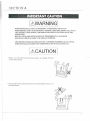
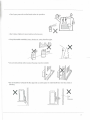
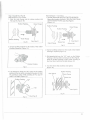
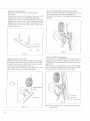
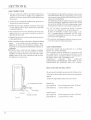
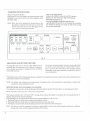
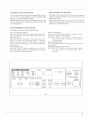
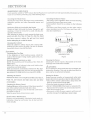
SAFETY ALERT SYMBOL
These symbols appear as important safety precautions and should be understood
and followed by the owner to assure safe operation of the heater.
For Quick Reference
SECTION A: Important Caution
SECTION B: Specifications
-.
Special Features
Safety Features
:
SECTION C: Tools Needed for Heater Installation
;
Accessories You May Need
Flue Pipe Extensions
SECTION D: Notice Before Installation
Heater Installation
Flue Pipe Clearances
SECTION E: Gas Connection
SECTION F: Operating Instructions
•
Starting'lnstructions
Adjusting Room Temperature
Turning Off the Heater
Relighting the Heater
:
Programming the Heater
Programming for Automatic Heater Operation
Manual Operation
SECTION G: Protective Features
Loss of Power-Automatic Reset, Child Lock
Electrical Fuse
Overheat Prevention
SECTION H: Maintenance and Check
SECTION I: Trouble Shooting Guide
SECTION J : Wiring DiagramBlock Diagram
SECTION K: Parts List
•
•
COPYRIGHT © MONITOR PRODUCTS, INC.,
•
Page
1
5
5
5
6
7
8
9
: 10
11
16
17
18
18
19
19
19
20
20
21
21
21
21
22
23
'••-••24-24
26
SECTION A
WARNING
IMPROPER INSTALLATION, ADJUSTMENT, ALTERATION, SERVICE OR
MAINTENANCE CAN CAUSE PROPERTY DAMAGE, PERSONAL INJURY OR LOSS OF
LIFE, REFER TO THE OWNER'S INFORMATION MANUAL PROVIDED WITH THIS
APPLICANCE.
INSTALLATION AND SERVICE MUST BE PERFORMED BY A QUALIFIED
INSTALLER, SERVICE AGENCY OR THE GAS SUPPLIER,
THIS PRODUCT MUST BE INSTALLED BY A LICENSED PLUMBER OR GAS FITTER
WHEN INSTALLED WITHIN THE COMMONWEALTH OF MASSACHUSETTS.
CAUTION
Make sure that flue pipe (exhaust pipe, air supply hose) is
connected properly.
Keep heater clean and do not store any flammable items on or
near the heater.
Don't use the heater for drying clothes.
Should anything abnormal occur in the heater, remain calm,
turn it off (do not unplug) and contact your Monitor dealer.
Risk of burns.
Flue pipe and louver may have high surface
temperature.
Do not place yourself or others too close to the heater.
Installation of heater in extreme humidity or dust areas is not
recommended.
Any removal of unit parts or remodeling is strictly forbidden.
Do not sit on the heater.
Placing ornaments or plants on the heater is not recommended.
Excess heat may cause damage to ornament or plant and
overwatering or spilling of water may cause shock to you or
damage to the heater.
Don't spray aerosols on the heater when in operation.
Don't allow children to insert articles in the louvers.
Keep flammable materials, trees, shrubs etc. away from flue pipe.
I//
Do not vent unit into other rooms. Flue pipe must be outside.
k
Do not install nor exhaust the flue pipe into a crawl space or underneath floor nor into a flue or
chimney.
-Flue
or
Chimney
• In areas of heavy snow accumulation, the flue pipe may need to be installed higher to avoid being buried.
In open areas with strong wind, a wind break may be necessary to avoid exhaust gases being blown
back into the intake and causing poor combustion.
(60cm) i
eS
Long
Extension
kit
Must be higher.
1
Exhaust pipe must be kept clear of flammable materials.
This heater is not designed to be built in.
J
1)
fr-
I
SECTION B
SPECIFICATIONS
Model No.
Type of Appliance
Input Rating
Output Rating
Efficiency
Electrical Rating
Power Consumption
Heated Air Delivery
Flue Pipe Hole
Dimensions
Weight
Inlet Gas Supply Pressure
Manifold Test Pressure
GF 3800
Fan type direct vent wall furnace
Nat. Gas 38,000 BTU/hour
LP. Gas 34,500 BTU/hour
Nat. Gas 30,700 BTU/hour
LP. Gas 27,900 BTU/hour
83%
120V, 60Hz, Less than 2 amperes
80 Watts
High
388 Cubic feet/minute
Low
300 Cubic feet/minute
2.5 inches diameter
Height: 26.6 inches (67.56cm)
Width: 28.7 inches (72.90cm)
Depth: 14.0 inches (35.50 cm)
82 pounds
Nat. Gas Max. 10.5 inch W.C. (267 mmHzO)
Min.
5.1 inch W.C. (130 mmHaO)
LP. Gas Max. 13.0 inch W.C. (330 mmHzO)
Min. 11.0 inch W.C. (279 mmH2O)
Nat. Gas
3.4 inch W.C. (86 mmHzO)
LP. Gas
3.!5inch W.C. (80mmH2O)
The minimum and maximum inlet gas supply pressure are for the purpose of input adjustment.
The efficiency rating of this appliance is a product of thermal efficiency rating determined under
continuous operating conditions and was determined independently of any installed system.
SPECIAL FEATURES
SAFETY FEATURES
AUTOMATIC IGNITION
MEMORY BACK UP: Set memory can be kept in case of
power failure for up to30minutes.
DUAL BLOWERS: Separate fans for combustion and
room air circulation.
THERMOSTATICALLY CONTROLLED: Adjusts to the
desired room temperature.
BUILT-IN TIMER: Heater will automatically operate as
programmed by the user.
AUTOMATIC RESET AFTER POWER FAILURE: Heater
will automatically resume operation after power is
restored.
INDICATOR LIGHTS: Easy-to-see signals show when
heater is in operation, when timer is activated, and
when the burner is operating.
SAFE RE-LIGHTING: Heater will not restart until its
combustion chamber has cooled.
ELECTRICAL PROTECTION: Heater automatically shuts
off in the unlikely event of a malfunction in the electrical
circuitry or disruption of the power supply.
NO EXHAUST IN ROOM: Products of combustion are
discharged outdoors.
FLUE PIPE: Outside air is drawn through a pipe-withina-pipe venting system. This process preheats
combustion air and regains heat from exhaust gases.
CLEAN OPERATION: Products of combustion are vented
outside.
CONSUMES NO ROOM AIR: Air for combustion is drawn
from outside.
EASY INSTALLATION: Includes all parts required for
standard installation.
/|\ CAUTION: ALTERNATE POWER SOURCES
The Monitor GF3800 may not operate when powered
by sources such as an auxiliary generator, UPS
(Uninterrupted Power Source), inverters, etc.
Check with your dealer for guidance on specific
applications.
SECTION C
Before installing your heater, be sure to check and comply with local and state building and electrical codes
that may apply to vented heaters in your area. Permanent wiring must be installed by a licensed electrician.
TOOLS NEEDED FOR HEATER INSTALLATION
Check the following charts to be sure you have all the tools required to install your Monitor GF3800 Heating System.
STANDARD TOOLS
Phillips Head Screwdriver
Steel Tape Measure
Pen or Pencil
Exterior Caulk
Yardstick or Long Straight Edge
Soapy Water
APPLICATION
Installation of Heater Parts
Taking Measurements
Marking Drilling Location
Caulking Between Packing and Wall
Checking Angle of Hole for Flue Pipe
Lubricating Sleeve Hardware '
SPECIAL TOOLS
Electric Drill
2 V? inch Hole Saw Attachment
Long 'A inch Drill Bit
Level
APPLICATION
Accommodating Hole Saw and Drill Bit
Cutting Hole for Flue Pipe
Drilling Pilot Hole Through Wall
Checking Angle of Hole for Flue Pipe and for checking heater
level.
Fig. 1
ACCESSORIES YOU MAY NEED
Check the list below and see your MPI dealer for accessories you may need or want for installation of your heatingsystem.
/!\ CAUTION: Only use the flue pipe supplied with the Monitor GFSS^or the approved accessory kits available from
your Monitor or dealer.
ACCESSORY
Medium Adjustable Flue Pipe Kit
Long Adjustable Flue Pipe Kit
APPLICATION
P/N 8051
P/N 8052
Extra Short, Short, Medium or
Long Extension Kit or Elbow Adapter Kit
(See Flue Pipe Extensions, page 8)
For use where wall thickness is up to 121A inches(31.5cm)
For use where wall thickness is up to 20 inches C50.5cm)
For use where "standard" installation is not practical
FLUE PIPE EXTENSIONS
Four standard extension kits are available from your
Monitor dealer. Most installations can be made with
one of these kits. In special cases, custom installations
may be required. These may be made with components
purchased from your dealer.
In any installation the following limitations MUST NOT
BE EXCEEDED:
2. These elbows should include the one used at the
heater but not the one on the air supply hose nor the
integral bends in the flue pipe. (See Figure 2)
3. The correct damper as shown on Page 14 must be
used.
4. Follow carefully the instruction included with each
kit.
1. Trie total length of the intake or exhaust pipe should
not exceed 10 feet (3.05m) with 3 elbows, 13 feet
(3.96m) with 2 elbows, or 16'/2 feet (5.3m) with 1 elbow.
Air Supply Hose
Exhaust Elbow
90° Joint
Flue Pipe
Do not count
Fig. 2
SECTIOND
NOTICE BEFORE INSTALLATION
The heater must be installed by a qualified service
person according to this installation instruction .
The installation must conform with local codes or, in the
absence of local codes, the National fuel Gas Code,
ANSIZ223.1/NFPA54.
The installation must conform with local codes or, in the
absence of local codes, the current CAN 1-B149
INSTALLATION CODE.
For mobile housing and recreational vehicle installation the
current Standard" CSA Z 240.4 GAS EQUIPPED
RECREATIONAL VEHICLES AND MOBILE HOUSING.
A manufactured home (mobile home) installation must
conform with the Manufactured Home Construction
and Safety Standard, Title 24 CFR, Part 3280, or, when
such a standard is not applicable, the Standard for
Manufactured Home installations, ANSI A 225.1/NFPA
501A.
Due to high temperatures, the appliance should be
located out of traffic and away from furniture and
draperies.
Children and adults should be alerted to the hazards of
high surface temperatures and should stay away to
avoid burns or clothing ignition.
Young children should be carefully supervised when
they are in the same room as the appliance.
Clothing or other flammable material should not be
placed on or near the appliance.
Make sure that the flow of combustion and ventilation
air is not obstructed.
Any safety or guard removed for servicing an appliance
must be replaced prior to operating the appliance.
/!\ WARNING
Do not operate appliance with the panel removed,
cracked or broken. Replacement of the panel should be
done by a licensed or qualified service person.
For manufactured home (USA only) or mobile home or
residential installation convertible for use with natural,
gas and liquefied petroleum gases when provision is
made for the simple conversion from one gas to the other.
Installation and repair should be done by a qualified
service person. The appliance should be inspected
before use and at least annually by a qualified service
person. More frequent cleaning may be required due to
excessive lint from carpeting, bedding material, etc. It is
imperative that control compartments, burners and
circulating air passageways of the appliance be kept
clean.
Do not use this heater if any part has been under water.
Immediately call a qualified service technician to inspect
the heater and to replace any part of the control system
and any gas control which has been under water.
The appliance, when installed, must be electrically
grounded in accordance with local codes or, in the
absence of local codes, with the National Electrical
Code, ANSI/NFPA 70 .
The appliance, when installed, must be electrically
connected and grounded in accordance with local codes
or, in the absence of local codes, with the current CSA
C22.1 CANADIAN ELECTRICAL CODE.
WARNING
THIS APPLIANCE IS EQUIPPED WITH A THREE-PRONG
(GROUNDING) PLUG FOR YOUR PROTECTION
AGAINST SHOCK HAZARD AND SHOULD BE
PLUGGED DIRECTLY INTO A PROPERLY GROUNDED
THREE-PRONG RECEPTACLE. DO NOT CUT OR
REMOVE THE GROUNDING PRONG FROM THIS PLUG.
/i\WARNING
IN MANUFACTURED/MOBILE HOMES WIRED FOR
120/240V, ENSURE THAT THE GF3800 IS ONLY
PLUGGED INTO A 120 VOLT CIRCUIT.
A CAUTION
Before converting the GF3800 gas type (to Liquid
Propane or Nat Gas), Read instructions in Section E,
Page 16.
HEATER INSTALLATION
Step 1: Fill Out Owner Registration Card
Remove your owner registration card from the plastic
envelope containing the owner's guide. It should be
filled out and mailed as soon as possible.
•The wall where flue pipe hole will be cut should be free of
plumbing pipes, electrical wires, studs, air ducts and other
obstacles.
NOTE: Use the cardboard template provided with your
heater for flue pipe location.
Step 2: Check for Parts
Before discarding packing materials, be sure you have
located the following:
Manual Gas Valve
Conversion Kit
Flue Pipe
Sleeve Nut
Tray
Room Temp. Sensor (attached to the rear of the
heater)
Cardboard Template
"STANDARD" Damper
"EXTENSION" Damper
Wall Clamps (2)
Rubber Packing
Joint Pipe
Cloth Insulation Cover
Outer Flange
Pipe Holder
Small Bag of Screws
Tapping, Type A - #8x 3 A
Tapping, Type A - #8x 5 /ie
(Jxxs>
(}££Q£XX>
For securing
sleeve and
wall clamps
For securing
wall clamps
SIZE
#8 X 3/4
Tapping
#8 X Vie
Tapping
Fig. 3
Step 3: Choose a Location for Your Heater
In choosing a location for your heater, the following
guidelines must be considered:
•The heater may be installed on combustible flooring on
the metal tray provided.
•The area around the heater should be free of obstacles
that might interfere with the free flow of air. Allow the
clearances shown in Figure 4.
•The heater must not be installed in a fireplace.
•An AC wall outlet must be within reach of the heater's
power cord. Extension cords must not be used.
•The area outside where the flue pipe will emerge should
be free of foliage, fuel storage tanks and flammable
objects. Air should circulate freely in the area. Allow the
clearances shown in Rgure 6 on the next page.
•Refer to Figure 4 to provide adequate accessibility clearances
for servicing.
10
( 99.06 cm)
Fig. A
Step 4: Drill a Pilot Hole
NOTE:The following directions apply to "standard"
installation. For other methods, follow instructions
included with accessory kits.
For walls up to 8'/z inches (22.0cm) thick, use a
standard flue pipe; for walls up to 12 '/z inches
(31.5cm) thick, use a medium adjustable flue pipe
kit; and for walls up to 20 inches (50.5cm) thick,
use a long adjustable flue pipe kit.
Use the template to position the hole to be drilled. The
"blue dot" indicates the exact center of the hole. Using
an electric drill and a long drill bit, make a pilot hole
through the wall (Figure 5). Be sure the hole extends
through the outside wall.
Positic n nf h<">lp
— Template
r=teaSi-t=S-
<,
^x^
/
Fig. 5
^CAUTION: The opening on the inside wall should
be approximately 'A inch higher than on the outside
wall so the flue pipe will slope downward when
installed. This will allow condensation to drain
outdoors.
FLUE PIPE CLEARANCES
• Vent terminal must be located at least 3 feet above any forced air inlet located within 10 feet.
• The vent terminal of a direct vent appliance with an input of 50,000 Btu per hour or less shall be located at least 9
inches from any opening through which flue gases could enter a building, and such an appliance with an input over
50,000 Btu per hour shall require a 12-inch vent termination clearance. The bottom of the vent terminal and the air
intake shall be located at least 12 inches above grade.
• Flue pipe installations should provide for venting to a confined space through which there is a free flow of outdoor
air. Clearances to adjacent walls or obstacles must comply with the requirements shown below.
Frontal Clearance
Combustible """"'"""'"i"
f
/ts
ll\ CAUTION :
minimim
24' (61cm)
or more
Do not attach anything onto the outlet
of the flue pipe.
(13.5cm)
-Wall
3"
(7.5
cm)
Of
more
Body Clamp
Any construction
above Flue Pipe
must not come _
within 24" (60cm)
of front obstacle
24'(60cm)
or more
_Flue Pipe
Front Obstacle
8" (20cm)
or more
Heater
Ground or slab surface
Side Clearance
Overhead Clearance
Non-combustible
Combustible
Body
Clamp
Combustible
Side obstacle
iniimnlllliiinimmiHiiiiHill
18' (45cm)
or more
Flue Pipe
-Wall
Heater-
Ground or slab surface
IMPORTANT:
(1) In areas of heavy snow falls, ground surface clearance
must be increased according to average snow falls, to
prevent flue pipe from being buried.
(2) In open area with strong wind, a wind break may be
necessary.
— 24"min
(61 cm)
Long
Extension
kit
Musi be higher.
Fig. 6
11
Step 5: Cut the Hole for the Flue pipe
Using a hole saw attachment and an electric drill, cut a 2'/2
inch diameter hole through the inner and outer walls
(Figure 7).
After the hole is cut, use a straight edge and a level to
be sure the inside opening is approximately 'A inch
higher than the outside opening.
Room
1/4(0.6 4 c-*)
Flue Pipe A
NOTE: After cutting the inside wall, remove the
insulation. Make sure there are no obstructions
inside the wall, such as electrical wiring, water
pipes, hot air ducts, etc.
.V.'J Outdoof
(6.35cm)
(0.64cm)
Fig. 7
Step 6:The Flue Pipe is two Sections, Flue Pipe A
and Flue Pipe B
Install the Flue Pipe A
From INSIDE the building, insert the flue pipe A (with
arrow pointing "up") into the hole. Fasten the flue pipe
with the 3#8X 3/4 tapping screws (Figure8and 9 ).
(See Figure for screw size and application.)
NOTE: Top center port is an extra exhaust port.
tapping screw
Fig. 8
\z
Fig. 9
Step 7:lnstall Flue Pipe B
Wall Thickness: 5-8'/? inches
1. Slide the outer flange and the rubber packing onto
Flue pipe B. (Figure 10)
Rubber Packing
Wall Thickness: 3/s -5 inches
1. Set the Sleeve nut onto Flue Pipe B by turning the
Sleeve Nut counter-clockwise. Slide the Outer Flange
and the Rubber Packing onto Flue Pipe B.
(Figure 13)
Outer Flange
Rubber Packing
Outer Flange
Rubber Packing
y,\
Rubber Packing
, ~
Outer Flange
Fig. 10
Flue Pipe B
Outer Flange
Sleeve Nut
Flue Pipe B
Sleeve Nut
Fig. 13
2. Spread caulking material on the inside of the rubber
packing if required. (Figure 11)
2. Spread caulking material on the inside of the Rubber
Packing if required. (Figure 11)
3. It is important to keep the "UP" mark on the Rubber
Packing at the top while screwing in the Flue Pipe B.
Hold the Rubber packing in place while screwing in
the Flue Pipe B until it is the tight. (Figure 12)
Rubber Packing
4. Turn the Sleeve Nut clockwise and tighten.
(Figure 14)
Fig. 11
3. It is imprlant to keep the "UP" mark on the rubber
packing at the top while screwing in Flue pipe B. Hold
the packing in place while screwing in Flue pipe B
until it is the tight. (Figure 12)
Flue Pipe A
Rubber Packing
/
Outer Flange
Sleeve Nut
Rubber Packing
Flue Pipe B
Fig. 14
Fig. 12
Flue Pipe B
13
Step 8: Level the cabinet
Place tray on the floor where you plan to locate
your heater.
Position the heater on the tray so the legs of the
cabinet fit into the circular indentations in the tray.
In order for heater to operate properly. It must be
positioned on a level surface. Ensure proper leveling by
adjusting each leg and by using a carpenters level to
check both side to side, and front to back level
condition. (Figure 15)
Legs
Step 10: Connect the Heater to the Flue Pipe
Move the heater toward the wall, guiding the joint pipe
into the center port of the flue pipe (Figure 17).
Be sure the joint pipe is completely inserted into the
flue pipe.
Tray
Fig. 17
Fig. 15
Step 9: Install the Joint Pipe
At the rear of the heater, slide the large end opening of
the joint pipe into the exhaust port outlet of the heater.
Be sure the joint pipe is fully seated. Slide the cloth
insulation cover over the joint pipe (Figure 16).
The o-rings that seal the joint pipe may be dry and
tight. A little soapy water will ease installation.
Step 11: Install the Air Damper
If installation is standard (that is, no extension kits are
required), place the air damper marked with a
"STANDARD" over the air intake flange on the flue pipe
(Figure 18).
Place the hose band around the end of the air supply
hose. Push the air supply hose onto the air intake
flange and secure the hose with the hose band.
Cloth Insulation
Cover
Air Damper
Joint Pipe
Hose Band
Air Supply Hose
Fig. 18
Fig. 16
14
NOTE: Do not place intake hose onto metal capped
exhaust port.
NOTE: The "STANDARD" damper is to be used with
extension kits up to a total overall length of 20
inches and a maximum of 3 bends (90° elbow).
The "EXTENSION" damper must be used when
extension kit or kits exceed 20 inches.
Step 14: Recheck the Heater
Before proceeding, check again to be sure there are no
flammable materials close to the heater. Re-check that
the heater is level.
Examine the flue pipe to be sure connections are tight.
Step 12: Install the Flue Pipe Holder
Place the ring of flue pipe holder around the metal capped
exhaust port. The other side of the holder hooks in a slot '
directly above the joint pipe at the rear of the heater
(See Figure 19).
Flue Pipe Holder
WARNING: Failure to position the parts in accordance
with these diagrams or failure to use only parts specifically
approved with this appliance may result in property damage
or personal injury.
Fig. 19
Step 13: Secure the Heater
Insert the narrow ends of the 2 wall clamps into sockets
on the rear of the heater.
Loosen the 2 #8X5/16 adjustment screws and extend
the clamps until they touch the wall. Fasten the clamps
to the wall with 2 #8X3/4 tapping screws.
Fasten the adjustment screws.
IS
SECTION E
GAS CONNECTION
I.The gas supply line shall be gas-tight, sized and so
installed as to provide a supply of gas sufficient to
meet the maximum demand of the heater without loss
of pressure.
2. A shut off valve should be installed in the upstream of
the gas line to permit servicing.
3. Flexible pipe and any appliance connector valve used
for gas piping shall be types approved by nationally
recognized agencies.
4. Any compound used on the threaded joint of the gas
piping shall be a type which resists the action of
liquefied petroleum gas.
5. Supplied gas pressure must be within the limits shown
in the specifications.
6. After completion of gas connections, all joints;including
those
at the heater must be checked for gastightness by means of leak detector solution, soap
and water, or an equivalent nonflammable solution, as
applicable.
ACAUTION: Since some leak test solutions, including
soap and water, may cause corrosion or stress
cracking, the piping shall be rinsed with water after
testing, unless it has been determined that the leak
test solution is noncorrosive.
7. The appliance and its appliance main gas valve must be
disconnected from the gas supply piping system during
any pressure testing of that system at test pressures in
excess of 1/2 psi(3.5kPa).
The appliance must be isolated from the gas piping
system by closing its equipment shutoff valve during
any pressure testing of the gas supply piping system
at test pressure equal to or less than 1/2 psi(3.5kPa).
8. A 1/8" test plug is provided for testing of manifold
pressure see schematic for location (page 27)
At time of installation installer must supply a 1/8"
N.P.T. plugged tapping, accessible for test gauge
connection, immediately upstream of the gas supply
connection of the appliance.
9. The minimum and maximum inlet gas supply pressure
are for the purpose of input adjustment.
GAS CONVERSION
Conversion should only be performed by a qualified
Monitor GF service technician.
The conversion shall be carried out in accordance with
the requirements of the provincial authorities having
jurisdiction and in accordance with the requirements of
the CAN 1-B149.1 and .2 installation code.
CAREFULLY
FOLLOW
THE
COMPLETE
CONVERSION INSTRUCTIONS CONTAINED IN THE
CONVERSION KIT SUPPLIED WITH THE GF3800.
HIGH ALTITUDE INSTALLATION
All units must be installed according to the following chart
to determine which orifice will be used for the appropriate
altitude
'Obtain the High altitude orifice from your Dealer
Threaded connection
Natural Gas
Up to 2000 feet
2000-6000 feet
Do not Change the orifice. (3.50mm)
*3.35mm drill size orifice
Gas Piping
Liquid Propane
Gas Inlet
Manual Gas Valve
F;3.20
Up to 2000 feet
2000-6000 feet
Do Not Change the orifice. (2.64mm)
*2.53mm drill size orifice
SECTION F
FOR YOUR SAFETY READ BEFORE OPERATING
!\ WARNING: If you do not follow these instructions exactly, a fire or explosion may result causing property
damage, personal injury or loss of life.
A. This appliance does not have a pilot. It is equipped
with an ignition device which automatically lights the
burner. Do not try to light the burner by hand.
B. BEFORE OPERATING smell all around the appliance
area for gas. Be sure to smell next to the floor
because some gas is heavier than air and will settle
on the floor.
WHAT TO DO IF YOU SMELL GAS
• Do not try to light any appliance.
• Do not touch any electric switch; do not use any
phone in your building.
• Immediately call your gas supplier from a neighbor's
phone. Follow the gas supplier's instructions.
• If you cannot reach your gas supplier, call the fire
department.
C. Use only your hand to push in or turn the gas control
knob. Never use tools. If the knob will not push in or
turn by hand, don't try to repeat it, call a qualified
service technician. Force or attempted repair may
result in a fire or explosion.
D. Do not use this appliance if any part has been under
water. Immediately call a qualified service technician
to inspect the appliance and to replace any part of
the control system and any gas control which has
been under water.
OPERATING INSTRUCTIONS
STOP! Read the safety information above on this label.
1. Set the thermostat to lowest setting.
2. Turn off all electric power to the appliance via the
ON/OFF switch on the control panel.
3. This appliance is equipped with an ignition device
which automatically lights the burner. Do not try to
light the burner by hand.
4. Turn manual valve at rear of unit clockwise to the full
OFF position. ^~>
5. Wait five (5)minutes to clear out any gas. Then smell for
gas, including near the floor. If you then smell gas, STOP!
Follow "B" in the safety information above on this label.
If you don't smell gas, go to next step.
6.Turn manual gas valve to the full ON position. /^
/.Turn on all electric power to the appliance.
8. Set the thermostat to desired setting.
9. If the appliance will not operate, follow the Instructions
"To Turn Off Gas To Appliance" and call your service
technician or gas supplier.
TO TURN OFF GAS TO APPLIANCE
1. Turn off electric power to the appliance using the ON/OFF switch located on the front of unit.
2. Turn manual valve clockwise to the full OFF position. /~^
NOTE: The fan will continue to operate until the appliance is cool, do not turn the appliance off by unplugging it from
the wall.
Unplug the appliance only after unit is cooled down.
17
STARTING INSTRUCTIONS
Step 2: Set "ON" Button
Depress the ON/OFF button to the "ON" position
(Figure 21). The "Operation" light will illuminate,
indicating the heater is on.
Burn lamp will light and ignition will start after
approximately 20 seconds. In 90 seconds the circulation
fan will start to operate, and warm air will be felt coming
through the cabinet grill.
Step 1: Plug in the Heater
Plug in the AC cord, and route it away from the area of the
flue pipe. It is recommended that no other appliance share
the same outlet.
NOTE: When the unit is operated for the first time or the
gas piping is replaced, the unit may not come ON
the first few times since air is in the piping. In this
case, repeat the starting procedures.
Mon
Tue
Wed
O
O
O
Thu
o
o
o o
Fri
Sat
Sun
DAY SET CLOCK SET TIMER SET
O
O
CD
OPERATION
TIMER SELECTOR
SELECT
i. 2!
ADJUSTING ROOM TEMPERATURE
Pressing either the "Up" or "Down" button will increase or
decrease the set temperature by 2 degree increments.
Once desired temperature is displayed, press set button
to lock into memory.
The heater will automatically change its heat output until
the desired room temperature is reached. While it cycles,
you may hear the circulation fan change speed.
Depending on the output required to maintain the desired
room temperature.
The heater will shut itself off temporarily when the desired room temperature has been reached and restart automatically when
necessary to maintain room temperature.
NOTE: The heater may display room temperature 4 degrees above set temperature, depending on heater load
conditions, before shutting itself off.
INSTRUCTIONS FOR ECONOMY PLUS MODE
To engage the economy plus mode, simply press down the button labeled "Economy Plus", to disengage press again.
NOTE: Operation switch must be "ON" and in manual mode.
This feature minimizes the "ON" and "OFF" cycling of the unit by allowing it to overshoot the set temperature by 8
degrees instead of the normal 4 degrees.
The advantages of this feature are to increase the overall efficiency of the unit by:
1. Reducing heat loss during the prepurge and postpurge cycles.
2. Reducing inefficient combustion associated with start up and shut down.
3. Prolonging component life by decreasing expansion and contraction of internal parts.
NOTE: This feature could be compared to driving an automobile in stop and go traffic (regular mode) versus highway
driving with cruise control engaged (Economy Plus mode).
TURNING OFF THE HEATER
RELIGHTING THE HEATER
To turn off the heater, press the Operation Button to put
it in the "Off" position (Figure 21). The operation light
will go out, and the fuel flow will stop.
After turning heater off the fans will continue to run until
unit has cooled down to the point where the fans will
automatically stop.
Automatic controls prevent your heater from relighting
after the Operation Button has been set to "Off" until
heater has cooled.
If the Operation Button is put in the "On" position
during the cooling period, the heater will automatically
relight at the end of the period.
PROGRAMMING THE HEATER
SETTING THE DAY OF WEEK ANDTHETIME
Step 1 :Set the Day of Week
Press the "SELECT" Button, at which time the "DAY SET"
Light will illuminate. The "Mon" Light will illuminate and
flash at this point.
Illuminate and flash the Light of the current day of the
week (e.g.; "Wed") by pressing the "UP" or "DOWN"
Button, and then press the "SET" Button to lock into
memory. The current day (e.g.; "Wed") light will illuminate
continuously.
Step 3:Set the Hour
Press the "HOUR" Button until the correct hour (either
A.M. or P.M.) appears in the window.
NOTE:The "HOUR" and "MINUTE" Buttons can be
pressed and held or pressed momentarily to
change the time.
Step 4:Set the Minute
Press the "MINUTE" Button until the correct time appears
in the window.
Immediately press the "SET" Button.
NOTE:lf the "SET" Button is not pressed within Iminute
after the time set, the programming will be
cancelled.
Step 2:Set theTime
Press the "SELECT" Button, at which time the "CLOCK
SET" Light will illuminate. The LED indicator in the Display
Window will show 88:88 at this point.
SET
Mon
Tue
O
O
O
O O
Fri
DAY SET
Sat
Wed
CD
Sun
ROOM
TEMP
CD AM
PM
CLOCK SET TIMER SET
Hold down lor 3 sec.
CD BURN
Thu
/0\
ICONOMT
\PLUS7
/Ox
CHILD
\LOCK
OPERATION
TIMER SELECTOR
O
ON/OFF
SELECT
Fig. 22
19
PROGRAMMING THE WEEKLY TIMER FOR AUTOMATIC HEATER OPERATION
The Monitor GF3800 Heating System is capable of providing
up to 4 different temperature settings tor 4 different times
of each day of the week. Not all 4 settings have to be
used; 2, 3 or 4 settings can be used. A clear
understanding of programming temperatures, time and
day of the week from the previous pages is needed before
programming the automatic settings. Also, the present
time and the day of the week must have been set.
This system is capable of programming Monday to Friday,
Saturday and Sunday to same 4 programs as shown in
the table or each day can have a different set of 4
programs. Also, this system is capable of programming all
7days to have the same set.
Suggested weekday and weekend programs are shown
below;
Suggested Programs
Mon - Fri
Time
Temperature
6:00 AM
1st
68°F
2nd
8:30 AM
60°F
3rd
68°F
5:00 PM
4th
1 1 :00 PM
58°F
Sat - Sun
Time
Temperature
7:00 AM
68eF
1st
10:00 AM
2nd
60°F
3rd
4:00 PM
68°F
1 1 :00 PM
4th
58°F
Step 1:Setting the 1st program of Monday
Pressing the "SELECT" Button will illuminate the "TIMER
SET" Light. The "Mon" Light will illuminate and flash, and
the "TIMER SELECTOR" LED indicator in the Display
Window will show " 7 " at this point.
Pressing the "TIME/TEMP" Button will illuminate the ": "
Light in the Display Window, and then set the 1st desired
time by pressing the "HOUR" and "MINUTE" Buttons.
Once the desired time "AM or PM" is displayed, press the
"SET" Button to lock into memory.
Press the "TIME/TEMP" Button again. Set the desired
temperature for the 1st time setting by using the "UP" and
"DOWN" Buttons. Once the desired temp is displayed,
press the "SET" Button to lock into memory.
Step 2:Setting the 2nd, 3rd and 4th programs of
Monday
Pressing the "1st-4th" Button will show "2 " at the "TIMER
SELECTOR" LED indicator in the Display Window.
Follow same steps as above, except for 2nd time/temp.
(ie; 2nd 8:30AM 60°F)
Repeat 3rd and 4th settings by same steps.
Step 3:Setting the programs of Tuesday - Sunday
Pressing the "SELECT" Button will illminate and flash the
"Tue" Light, and the "TIMER SELECTOR" LED indicator
in the Display Window will show " / " at this point.
Follow same steps as above, set the programs of
Tuesday. Set the programs of remaining days in the same
manner.
Step 4:Setting the program by using Copy function
Tuesday - Friday
You can easily duplicate Monday's program for the
remainder of the week, or any group of days, by using the
Copy function.
20
After having set the program for Monday, press the "1st4th" Button until "COPY " flashes in the LED display
window. Note that "Mon" is also flashing in the Weekly
Timer Control panel. To copy Monday's program to
Tuesday, press the "UP" or "DOWN" button to flash the
"Tue" light. Both "Mon" and "Tue" lights are flashing.
Press the "SET" button, and "Tue" is steady, and "COPY"
and "Mon" lights are flashing.
Next. Press the "UP" or "DOWN" button to illuminate
"Wed" and then press "SET". "Tue" and "Wed" are both
steady, but "Mon" and "COPY" are flashing.
Repeat the above sequence for "Thu" and "Fri".
Then hold down the "SET" button for 3 seconds, or until
you hear the "BEEP" and observe that "COPY " stops
flashing. The programs for Tue, Wed, Thu, and Fri are now
copied and set.
In about 10 seconds, only "Mon" will be flashing.
Press the SELECT button to select the current day, and
the TIME will appear in the display window.
Saturday - Sunday
Follow same steps as above to set the "Saturday"
program. (Steps 1 and 2)
Press "1st-4th" button until "COPY" flashes in the display
window.
Press the "UP" or "DOWN" button to illuminate "Sun"
which will flash.
Press "SET" button and "Sun" will light steady.
Then, press "SET" button for 3 seconds, or until you hear
the "BEEP" sound and "COPY" light stops flashing.
The Sunday program has been copied from Saturday.
Step 5:Activate Automatic Operation
For the heater to operate on automatic once the settings
are in memory, simply press the "AUTO" Button on the
control panel. The "AUTO" Light will illuminate to confirm
the heater is in the automatic operation mode. The heater
will now maintain the programmed temp for that time of
day of the week.
IMPORTANT: The heater will not operate in automatic
unless the ON/OFF switch is in the "ON"
position.
Step 6: Clearing An Automatic Setting
If you wish to clear any automatic
"SELECT" and "1st-4th" Button to the
and press the "CLEAR" Button. A new
be entered otherwise the old setting
minute.
setting, press the
appropriate setting
setting will need to
will return after 1
MANUAL OPERATION
To deactivate the automatic operation, simply press
the "AUTO" Button. The "AUTO" Light will no longer be
illuminated and the heater will run on a manual setting.
This setting will be determined by the previous auto
setting for that time of day, unless reset. The automatic
settings will remain in memory even if the unit is
running in manual, unless there is a power outage for
more than 30 minutes.
SECTION G
PROTECTIVE FEATURES
OVERHEAT PREVENTION
LOSS OF POWER-AUTOMATIC RESET:
If your heater overheats, a thermostatic switch will
automatically stop the flow of gas, and extinguish
the flame. The Display Window shows "E 17".
Restore heater operation by following the steps below
NOTE:Other symptoms listed in the trouble shooting chart
may cause the display window to show "E 17".
besides an overheat situation.
NOJE:lf power to the heater is interrupted, a thud-like
noise may be heard in the combustion chamber.
This is normal, and should not cause alarm.
For power interruptions of up to 30 minutes, the
set memory is kept and will resume operation
automatically with the set memory.
For power interruptions beyond 30 minutes, if your
heater was in MANUAL operation before the power
interruption, it will resume operation (after a 3
minute cool down period) in the y\ANUAL mode and
maintain room temperature at the last manually
selected and set temperature. In the case of
AUTOMATIC
operation
before
the
power
interruption, the heater will resume operation at a
reset temperature of 60° F.
When the heater resumes operation, The Display
Window will show 88:88 indicating the need to
reset the clock and the day of the week tor
automatic operation.
CHILD LOCK:
NOTE:The CHILD LOCK will help to prevent accidental
operation as well as small children from altering
controls.
To operate the CHILD LOCK simply hold the "CHILD
LOCK" Button down for 3 seconds, or until you hear two
short beeps. The function is activated immediately and the
"CHILD LOCK" Light will illuminate.
To deactivate the CHILD LOCK simply hold the "CHILD
LOCK" Burton down for 3 seconds, or until you hear two
short beeps. The "CHILD LOCK" Light will go out.
The lock can be deactivated at any time in this way.
During normal operation the CHILD LOCK may be
activated and all controls other than the OFF switch will
be locked. Deactivating the lock releases the controls. If
the lock is activated while the heater is turned OFF, then
all functions will be locked. If the heater is Turned OFF
while the CHILD LOCK is activated, it cannot be turned
ON again until the lock is deactivated.
Step 1: Turn the Heater Off
Press the Operation Button to put it in the "Off" position.
Step 2: Allow the Heater to Cool
Wait approximately 30 to 45 minutes for the heater to
cool completely.
Step 3: Unplug the Heater from the Wall Outlet.
Step 4: Remove Obstructions
The overheated condition may be caused by obstructions
blocking the air flow to the heater . Check:
• The front of the heater
• The circulation fan (on the back of the heater).
• The flue pipe (outside)
Step 5: Remove Front Cover and Grill Assys
Remove the screws from each side of the cabinet securing
the Front Cover. Carefully remove the Front Cover. Remove
the 7 screws,(three on each side and one in the center)
securing the Grill Assembly to the heater. Remove the Grill
Assembly.
Remove any accumulation of dust or other matter that
may be covering the burn chamber and the heat
exchangers inside the heater.
step 6:Replace the Front Cover and Grill Assemblies
Step 7: Plug in the Heater
Step 8: Re-program the Healer
Step 9: Turn Heater On
/\ CAUTION: If the unit overheats a second time, turn
it off and contact your MPI dealer lor
service.
'ELECTRICAL FUSE
In the unlikely event of a failure in the heater's
electrical system, a fuse will "blow" and interrupt the
power. Do not attempt to change the fuse.
Contact your MPI dealer for the name of a trained
and certified service representative in your area.
NO TE: Using a surge protector can minimize the chances
of a blown fuse caused by power surges.
21
SECTION H
MAINTENANCE AND CHECK
Push operation switch to "OFF" remove the AC Plug from the wall outlet and wait approximately 30 minutes for the
heater to cool before performing any of the following steps.
Checking the Heater Area
Should be kept clean and free from combustible
materials, gasoline and other flammable vapors and
liquids.
Retrieving Objects from Inside the Heater
Should an object fall inside the heater, through the grill
openings, it must be removed to avoid affecting the
operation of the heater.
After allowing the heater to cool, remove the front cover
panel and grill. (See Step 5, Page 21.) After the object
has been removed, replace the grill and front panel
before attempting to re-start the heater.
Cleaning the Cabinet
When the cabinet is soiled, wipe it with a damp cloth.
Restore the shine with a dry cloth. The use of abrasive
household cleaners may dull the finish.
ACAUTION:
Checking the Flue Pipe
At the beginning of each heating season, check the
inside of the flue pipe. Foreign matter, spider webs, etc.
must be removed.
Be sure all fittings and joints are tight.
NOTE: Reassembly and Reseating of,the Vent-Air
Intake Pipes
Make sure that all exhaust pipe and intake pipe
connections are firmly mated.
Make sure that the connections between the flue pipe
and exhaust/air intake pipe and hose are secured by the
pipe holder (P/N 4006) and the hose band (P/N 4008).
Cleaning the Interior
Remove the front cover and grill assemblies (See Step 5,
Page 21), and vacuum and wipe away dust and other
accumulation.
Cleaning the Blower Guard
Heating efficiency will be reduced if the blower guard at
rear of the cabinet is blocked with dirt or dust.
Blockage also produces a rise in heat that could cause
the heater to shut off.
Wipe the guard clean at least once a week.
Electric Motor Maintenance
Motors are permanently lubricated and need no
lubrication. Keep fan and motor free of dust and dirt
clean annually.
22
Checking the Burner Flame
The burner of this appliance does not need cleaning,
but check the burner flame once a year.
Flame pattern should be as shown in the following
figures.
The burner must flame evenly over the entire surface
when operating correctly. The flame must burn with a
clear blue stable flame.
Blue Flame
SATISFACTORY
Yellow Flame
UNSATISFACTORY
Fig.23
Cleaning the Burner
Cleaning the burner requires disassemble of the heat
exchanger and combustion chamber.
/t\ WARNING:
Do not attempt to disassemble the heat exchanger and
combustion chamber. This work is critical and must be
done only by an authorized technician.
Storing the Heater
During summer months or long periods when your
heater will not be in operation, take the following steps:
• Clean off the exterior cabinet with a damp cloth, and
brush or vacuum dust from the grills.
• Cover the heater to protect it from dust.
• DO NOT DISASSEMBLE the heater or extension kits.
Replacement of lost parts is an unnecessary expense.
• Shut off fuel supply to unit.
• Disconnect or shut off power supply to unit to prevent
possible damage from lightning or power surge.
SECTION I
TROUBLESHOOTING GUIDE
Should symptoms appear during the operation of your heater, refer to the chart below. If you are unable to restore
normal operation, contact your MPI dealer for service.
SYMPTOM
CAUSE
REMEDY
Heater does not go on with
operation switch.
Timer is in Auto.
Press Auto Button again.
AC cord is disconnected from
wall outlet. Power failure.
Check plug and power source.
Reset circuit breaker.
Heater does not ignite.
Air in gas pipe.
Purge air. Repeat starting
procedure.
Heater extinguishes after
lighting.
Flue pipe obstructed.
Louver obstructed.
Clear obstruction.
Erratic changes in room
temperature. (Slight
differences in room
temperature are normal.)
Poor location of heat sensor.
Poor air movement.
Relocate the sensor.
Make sure clearances are kept around
unit.
Add room fans to better circulate air
throughout area.
Automatic timer does not
start heater.
Operation switch is not
in the "ON" position.
Depress operation button to "ON"
position.
Timer is in Manual.
Press Auto Button.
Timer improperly
programmed.
See "Programming for Automatic
Operation" , page 20.
Power interruption.
See "Loss of Power", page 21.
Poor flame, sounds of
combustion, soot at the
rear of the heater.
Loose flue pipe.
Allow heater to cool completely;
tighten all connections.
Soot on inside of burner
window or exhaust ports
of flue pipe.
Obstruction of combustion
air intake system or
combustion fan failure.
Inspect air intake system and air
supply elbow for blockage. Clean with
a brush, if necessary, and carefully
reconnect.
Heater switches from
automatic to manual operation:
display window shows 88: 88.
Power interruption; automatic reset.
See "Loss of Power"
page 21.
(Note 2)
NOTE: Several of the symptoms mentioned above may a/so be signs that your unit is due for routine maintenance,
especially if it is several years old. Contact your Monitor dealer for an appointment.
Note 2: The GF is equipped with a blocked vent shut-off system to safely shut off the unit if the vent becomes blocked
with snow or other obstruction. In the event that the GF unit fails to operate, contact an authorized service
technician or a qualified service agency.
SECTION J
A CAUTION:
• Label all wires prior to disconnection when
servicing controls. Wiring errors can cause
improper and dangerous operation.
Verify proper operation after servicing.
• If any of the original wire as supplied with the
appliance must be replaced, it must be
replaced with a wire of at least a 105°C
temperature rating.
WIRING DIAGRAM
TRANSFORMER
GAS CONTROL
VALVE
CODE
BLOWER MOTOR
RESISTOR
...
MOTEUR DE
Bk
Bl
Br
G
Or
R
W
Y
Gr
Br
ACUOV
eoHi
PS
TF
COLOR
Black
Blue
Brown
Gray
Orange
Red
White
Yellow
Green
OHT
Fig. 24-
BLOCK DIAGRAM
MARK
BM
ER
F
FM
FR
FT
OHT
PS
RC1-4
R1~4
SL
SP
SV1
SV2
TA1-4
TF
TH
TR
PARTS NAME
COMBUSTION BLOWER MOTOR
ELECTRODE
CURRENT FUSE
CIRCULATION FAN MOTOR
FLAME ROD
FAN THERMOSTAT
OVERHEAT THERMOSTAT
AIR PRESSURE SWITCH
RECTIFICATION CIRCUIT
RELAY
SOLENOID
SPARKER
SOLENOID VALVE 1
SOLENOID VALVE 2
TRIAC
THERMAL FUSE
THERMISTOR
TRANSFORMER
5K- Grounded inside chassis at bottom of unit.
GAS CONTROL
VALVE
Fig. 25
SECTION K
PAETS LIST
NO
PARTS NAME
PARTS N
QTY
REMARK:> NO
PARTS NAME
PARTS NO
QTY REMARKS
1
ADJUSTABLE LEG
5019
4
37
BURNER ASSY
6637
1
2
TRAY
6903
1
38
MIXING PLATE ASSY
6638
1
3
AIR SUPPLY HOSE A
6301
1
39
BURNER PORT ASSY
6639
1
4
AIR SUPPLY HOSE B
6302
1
40
FLAME HOLDER
6640
1
5
AIR LINE B
6603
1
41
BURNER PACKING
6641
1
6
ORING(PIO)
6604
1
42
ORIFICE HOLDER
6642
1
7
AUTOMATIC GAS VALVE UNIT
6606
1
43 ORIFICE GUIDE
6643
1
8
GAS INLET JOINT
6608
1
44
GASKET 4
6644
1
9
ORING(P11)
6609
1
45
BLOWER ASSY
69/2
1
10
GAS PIPE JOINT
6804
1
46
BLOWER MOTOR
6348
1
11
ORING(P14)
6805
1
47
BLOWER CAPACITOR(2.5/jF)
6322
1
12
GASKET 1
6614
1
48
SOLENOID
6406
1
1
49 SUCTION CASE A ASSY
6324
1
50 SEAL PACKING
6144
1
13
BURNER CHAMBER ASSY
6908
6616
1
15
MICA PLATE
6617
,1
16
MICA HOLDER
6618
1
14 WINDOW PACKING
6461
9
52
PWB SPACER CUP B
6462
3
53
PWB ASSY
(,1 DO
1
54
POWER TRANSFORMER
t?°7
1
1
6620A
1
GNITION ELECTRODE ASSY
6621
1
55
FAN CAPACITOR(1.8pF)
6?o/
1
PLUG HOLDER
CABINET ASSY
PLUG BASE ASSY
18
FLAME DETECTIVE PLUG ASSY
19
20
PWB SPACER CLIP A
6619
17
21
/•
51
LUG PACKING
6622
1
56
6lo4
1
6623
1
57
RUBBER BUSH
6136
2
22
GASKET 5
6624
1
58
STRAIN RELIEF BUSHING
4833
1
23
GASKET 6
6625
1
59
OWER SUPPLY CORD
6706
1
6707
2
24
OMBUSTION CHAMBER ASSY
6626
1
60
25
ASKET 7
6627
1
61
26
HAMBER CAP ASSY
27
ASKET 8
28
CARRYNG HANDLE
ENSORASSY
6708
1
1
62
METAL WIRE WAY B
6455
1
6313
1
63
METAL WIRE WAY A
6455
1
EAT EXCHANGER ASSY
67-0?
1
64
AN ASSY
6075
1
29
ASKET 9
6122
1
65
IRCULATION MOTOR
6453
1
30
XHAUST DUCT ASSY
6630
1
66
LOWER GUARD ASSY
6454
1
6176
1
67
NDER COVER
6711
1
31
RING(P39)
6628A
32
ASKET 2
6631
1
68
OUVER ASSY
6712
1
33
R PRESSURE SWITCH
£?//'
1
69
LASTIC BUTTON PANEL
6<(o6
1
34
R LINE A
6633
1
70
6714
1
.AMP PANEL
35
PARKER
6634
1
71
ONTROL COVER
6715
1
36
RESSUHE DETECTIVE PIPE
69/0
1
72
WITCH & LAMP ASSY
6716
1
NOTE : TO OBTAIN PARTS, CONTACT YOUR DEALER OR.
MONITOR PRODUCTS, INC. P.O. BOX 3408. PRINCETON. NEW JERSEY 08543
NO
PARTS NAME
PARTS NO QTY REMARK
NO
PARTS NAME
PARTS NO QTY REMARKS
73
FRONT COVER
6905
1
108 ORIFICE(LP HA)
6662
1
74
FAN THERMOSTAT
6914
1
109 MICROPROCESSOR
6913
1
75
OVER HEAT THERMOSTAT
6704
1
110 FUSE(250V, 2A)
6173
1
76
THERMAL FUSE
6652
1
111 PHOTO TRIAC(IC2)
6701
1
77
TOP COVER
6718
1
112 PHOTO TRIAC(IC3)
6257
1
78 WALL CLAMPS
6194
1
113 PHOTO TRIAC(IC4)
6258
1
79
VENT CONNECTOR
4004
1
114 PHOTO TRIAC(ICS)
6259
1
80
PIPE HOLDER
4006
1
115 TR ARRAY (M54563P)
6187
1
81
AIR SUPPLY HOSE ASSY
6145
1
116 TRIAC(Q1)
6255
1
6203
1
6664
1
IC11
82
FLUE PIPE A/B
8050
1
117 BUZZER
83
SLEEVE NUT
6723
1
118 GF500 FLAME ROD/ELECTRODE ASSY
84
SLEEVE FLANGE SET
6148
1
85
EXHAUST OUTLET CAP
4014
1
4016
1
86
_i AIR PORT O RING
87
AIR OUTLET CAP
4805
1
88
HOSE BAND
4008
2
89 AIR DAMPER NAT S
6653
1
90 AIR DAMPER NAT E
6654
1
AIR DAMPER LP S
6655
1
92 AIR DAMPER LP E
6656
1
93 ORIFICE(NAT GAS)
91
6657
1
94
ORIFICE(LP GAS)
6658
1
95
GAS PIPE ASSY
6659
1
96
MANUAL GAS VALVE
6601
1
97
Combustion Blower Assy Nut
6348A
1
1
nd Retaining Washer
98
RESISTOR
6338
99
SCREW SET FOR FLUE PIPE
6197
1
100 CARTON BOX
6738
1
101 CUSHION SET
6721
1
102 OWNERS GUIDE
1158
1
103
OUCH-UP PAINT(WHITE)
8216
1
104
OUCH-UP PAINT(M2400 GREY)
6722
1
105
abinet Screw Assortment
6735
1
106
LUNGER ASSY
6406A
1
107
RIFICEfNAT HA)
6661
1
NOTE : TO OBTAIN PARTS, CONTACT YOUR DEALER OR,
MONITOR PRODUCTS. INC. P.O. BOX 3408, PRINCETON, NEW JERSEY 08543
(9£) Screw Set for Flue Pipe
(ho) Carton Box
(jo/) Cushion Set
Owners Guide
Touch-up Paint (White)
Touch-up Paint (Grey)
Cabinet Screw Assortment
Fig. 26
Monitor GE3800 Vented Heating Systems Limited Warranty^
MONITOR PRODUCTS, INC., warrants each MONITOR
GF3800 Vented Heating System sold by it to be free from
defects in material and workmanship, under normal use
and service, for two years after date of original retail
purchase, subject to the terms and conditions stated
below. An extended parts only warranty period of 36
months is provided for combustion chamber and heat
exchanger. "Die remainder of the unit is subject to the 12
months warranty as provided herein.
1. WARRANTOR: This warranty is granted by Monitor
Products, inc., P.O. Box 3408, Princeton, New Jersey
08543.
2. PARTIES TO WHOM WARRANTY IS EXTENDED: This
warranty shall be extended only to the original retail
purchaser.
3. PARTS COVERED: All products and parts manufactured
by or for Monitor Products, inc., except as provided for
herein. Replacement parts are warranted only for the
balance of the original warranty period.
4. PARTS NOT COVERED: The following-parts are not
covered by this warranty: venting kits, extension kits,
fuses, and all parts damaged by lightning.
5. REMEDY: If within the applicable warranty period, any
product or part included in this warranty proves to be
defective in material and/or workmanship, then
Monitor Products, inc., shall repair or replace, at its
option, the defective product or part. Service at the
point of installation (not including dealer travel, time)
will be provided at no charge to the customer, but
must be performed by a Monitor Products, inc.. dealer
authorized to sell and service the MONITOR GF3800
Vented Heating System.
6. PROCEDURE FOR OBTAINING PERFORMANCE
UNDER THIS WARRANTY: In order to obtain
performance of the obligations under this warranty, the
original purchaser must promptly (in no event later
than thirty (30) days after discovery of the defect)
notify the local Monitor Products, inc., dealer
authorized to sell and service the MONITOR GF3800
Vented Heating System.
Service will be provided during normal business hours
within a reasonable time after the dealer has been
notified of the need for service. If you are unable to
locate a local Monitor Products, inc., dealer authorized
to sell and service the MONITOR GF3800 Vented
Heating System, call or write: SERVICE DEPARTMENT,
MONITOR PRODUCTS, INC., P.O. BOX 3408,
PRINCETON, NEW JERSEY 08543, 732-329-0900.
Any claim made under this warranty must be
accompanied by proof of original purchase date, sales
invoice or canceled check showing the serial number
as satisfactory evidence.
PARTNO. 1158 -Rev.6/02
7. SOLE REMEDY; The remedy and liability for any
breach of warranty, express or implied, set forth
above is the sole and exclusive remedy and the limit
of liability for any such breach.
8. EXCLUSIONS AND IMPLIED WARRANTIES: THIS
.WARRANTY DOES NOT EXTEND TO ANY DEFECT
DUE TO THE NEGLIGENCE OF OTHERS, FAILURE
TO INSTALL, OPERATE OR MAINTAIN THE HEATER
IN ACCORDANCE WITH THE INSTALLATION,
OPERATION AND MAINTENANCE INSTRUCTION
•• FURNISHED WITH EACH NEW HEATER,
UNREASONABLE USE, ACCIDENTS, ACTS OF GOD,
FIRE, SNOW, FLOODS, LIGHTNING, ALTERATION,
ORDINARY WEAR AND TEAR, THE USE OF
UNAUTHORIZED OR NON-STANDARDIZED PARTS
OR ACCESSORIES. ALL IMPLIED WARRANTIES, IF
ANY, ARISING UNDER STATE LAW IN CONNECTION
WITH THE SALES BY MONITOR PRODUCTS, INC.,
OF ANY NEW HEATER ARE LIMITED IN DURATION
TO THE DURATION OF THIS WRITTEN WARRANTY.
THERE ARE NO WARRANTIES, EXPRESS OR
IMPLIED, OF MERCHANTABILITY, FITNESS FOR A
PARTICULAR PURPOSE OR OTHERWISE WHICH
EXTEND BEYOND THIS WARRANTY. MONITOR
PRODUCTS, INC., SHALL NOT BE RESPONSIBLE
FOR ANY INCIDENTAL OR CONSEQUENTIAL
DAMAGES. WHETHER AS A RESULT OF BREACH
OF WARRANTY, NEGLIGENCE, STRICT LIABILITY IN
TORT OR OTHERWISE.
NOTE: SOME STATES DO NOT ALLOW: (A) LIMITATIONS
ON HOW LONG AN IMPLIED WARRANTY LASTS;
OH (B) THE EXCLUSION OR LIMITATION OF
INCIDENTAL OR CONSEQUENTIAL DAMAGES,
SO THE ABOVE LIMITATIONS OR EXCLUSIONS
MAY NOT APPLY TO YOU.
9. NO VARIATION OF TERMS: THE PARTIES INTEND
THAT THIS WARRANTY BE THE EXCLUSIVE AND
FINAL EXPRESSION OF THEIR AGREEMENT.
No person has the authority to orally, in writing or in any
other way vary the terms, conditions or exclusions, of
this warranty or to make any express warranties other
than those contained herein.
10. LEGAL RIGHTS: This warranty gives you specific
legal rights and you may also have other rights which
vary from state to state.
MONITOR PRODUCTS, INC.
P.O. BOX 3408
PRINCETON, NJ. 08543
COPYRIGHT ©2002 MONITOR PRODUCT, INC.,