1
ESET
Remote Administrator 4
Installation Manual and User Guide
ESET Remote Administrator 4
Copyright © 2011 by ESET, spol. s r.o.
ESET Remote Administrator 4 was developed by ESET, spol. s r.o.
For more information visit www.eset.com.
All rights reserved. No part of this documentation may be reproduced,
stored in a retrieval system or transmitted in any form or by any means,
electronic, mechanical, photocopying, recording, scanning, or
otherwise without permission in writing from the author.
ESET, spol. s r.o. reserves the right to change any of the described
application software without prior notice.
Customer Care Worldwide: www.eset.eu/support
Customer Care North America: www.eset.com/support
REV. 10/7/2011
Contents
3.5.5
3.5.6
1. Introduction
..................................................5
1.1
What's new
........................................................................5
1.2
Program architecture ........................................................................7
2. Installation
..................................................8
of ERA Server and ERA Console
2.1
Date/Timetab
Othersettingstab
3.6 Display modes
3.7
......................................................................................31
......................................................................................31
........................................................................32
ESET Configuration Editor
........................................................................32
3.7.1
Configurationlayering......................................................................................33
3.7.2
Keyconfigurationentries
......................................................................................34
4. Installation
..................................................35
of ESET client solutions
Requirements
........................................................................8
2.1.1
Softwarerequirements......................................................................................8 4.1 Direct installation ........................................................................35
2.1.2
Performancerequirements
......................................................................................8
4.2 Remote installation ........................................................................35
2.1.3
Portsused
......................................................................................10
4.2.1
Requirements
......................................................................................37
2.2 Basic Installation guide
........................................................................11
4.2.2
Configuringtheenvironment
......................................................................................38
forremoteinstallation
2.2.1
Environment overview......................................................................................11
(networkstructure)
4.2.3
RemotePushInstall ......................................................................................39
2.2.2
Beforeinstallation
......................................................................................11
4.2.4
Logon/emailremoteinstall
......................................................................................41
2.2.3
Installation
......................................................................................12
4.2.5
Customremoteinstall......................................................................................43
2.2.3.1
InstallationofERAServer
.......................................................................................12
4.2.6
Upgrade
......................................................................................44
2.2.3.1.1
ClusterModeInstallation
......................................................................................13
4.2.7
Avoidingrepeated installations
......................................................................................45
2.2.3.2
InstallationofERAConsole
.......................................................................................13
4.3 Installation in an Enterprise
........................................................................45
environment
2.2.3.3
Mirror
.......................................................................................13
2.2.3.4
Databasetypessupported
.......................................................................................14
byERAServer
..................................................47
client computers
2.2.3.4.1 Basicrequirements ......................................................................................14 5. Administering
2.2.3.4.2 Databaseconnectionsetup
......................................................................................15
5.1 Tasks
........................................................................47
2.2.3.4.3 Installingoveranexisting
......................................................................................16
database
5.1.1
ConfigurationTask ......................................................................................48
2.3 Scenario - Installation........................................................................16
in an Enterprise environment
5.1.2
On-demand ScanTask......................................................................................49
2.3.1
Environment overview......................................................................................16
(networkstructure)
5.1.3
UpdateNow Task ......................................................................................49
2.3.2
Installation
......................................................................................17
5.1.4
SysInspectorScript Task
......................................................................................49
2.3.2.1
Installationat headquarters
.......................................................................................17
5.1.5
Restore/DeletefromQuarantine
......................................................................................50
Task
2.3.2.2
Branchoffice:Installation
.......................................................................................17
ofERAServer
5.1.6
GenerateSecurityAudit
......................................................................................50
LogTask
2.3.2.3
Branchoffice:Installation
.......................................................................................17
ofHTTPMirrorserver
5.1.7
Show NotificationTask
......................................................................................50
2.3.2.4
Branchoffice:Remoteinstallation
.......................................................................................17
to clients
5.1.8
InteractiveTask
......................................................................................50
2.3.3
Otherrequirementsfor......................................................................................18
Enterpriseenvironments
5.2 Group Manager
........................................................................51
5.2.1
StaticGroups
......................................................................................52
3. Working..................................................19
with ERAC
5.2.2
ParametricGroups ......................................................................................52
5.2.3
ActiveDirectorySynchronization
......................................................................................53
3.1 Connecting to ERAS ........................................................................19
5.3
Policies
........................................................................53
3.2 ERAC - main window........................................................................20
5.3.1
Basicprinciplesand operation
......................................................................................53
3.3 Information filtering ........................................................................21
5.3.2
How to createpolicies......................................................................................54
3.3.1
Filter
......................................................................................21
5.3.3
Virtualpolicies
......................................................................................55
3.3.2
Context menu
......................................................................................22
5.3.4
Roleand purposeofpolicies
......................................................................................55
inthepolicytreestructure
3.3.3
View mode
......................................................................................23
5.3.5
Viewingpolicies
......................................................................................56
5.3.6
Importing/Exportingpolicies
......................................................................................56
3.4 Tabs in ERAC
........................................................................23
5.3.7
Assigningpoliciesto clients
......................................................................................56
3.4.1
Generaldescriptionoftabs
......................................................................................23
and clients
5.3.7.1
Default PrimaryClients.......................................................................................56
Policy
3.4.2
Replication& information
......................................................................................23
inindividualtabs
5.3.7.2
Manualassigning
.......................................................................................56
3.4.3
Clientstab
......................................................................................24
5.3.7.3
PolicyRules
.......................................................................................57
3.4.4
Threat Logtab
......................................................................................27
5.3.8
Deletingpolicies
......................................................................................58
3.4.5
FirewallLogtab
......................................................................................27
5.3.9
Specialsettings
......................................................................................58
3.4.6
Event Logtab
......................................................................................28
5.3.10
Policy
deployment
scenarios
......................................................................................59
3.4.7
ScanLogtab
......................................................................................28
5.3.10.1
Eachserverisastandalone
.......................................................................................59
unit and policiesaredefined locally
3.4.8
MobileLogtab
......................................................................................29
5.3.10.2 Eachserverisadministered individually-policiesaremanaged
3.4.9
Quarantinetab
......................................................................................29
locallybut theDefault Parent Policyisinherited fromtheupper
3.4.10
Taskstab
......................................................................................30
server
.......................................................................................60
3.4.11
Reportstab
......................................................................................30
5.3.10.3
Inheriting
policies
from
.......................................................................................61
anupperserver
3.4.12
Remoteinstalltab ......................................................................................30
5.3.10.4 Assigningpoliciesonly.......................................................................................62
fromtheupperserver
3.5 ERA Console setup ........................................................................30
5.3.10.5 Usingpolicyrules
.......................................................................................62
3.5.1
Connectiontab
......................................................................................30
5.3.10.6 Usinggroups
.......................................................................................63
3.5.2
Columns-Show /Hide
......................................................................................30
tab
5.4
Notifications
........................................................................63
3.5.3
Colorstab
......................................................................................30
5.4.1
NotificationManager ......................................................................................64
3.5.4
Pathstab
......................................................................................30
5.4.1.1
NotificationsviaSNMP
.......................................................................................69
Trap
5.4.2
Rule
......................................................................................69
creation
5.5 Detailed
........................................................................70
information from clients
5.6 Centralized
........................................................................71
quarantine
6. Firewall
..................................................72
Rules Merge Wizard
7. Reports
..................................................73
7.1 Example
........................................................................75
report scenario
11.2 Removing
........................................................................91
existing profiles
11.3 Export
........................................................................92
and other features of client XML configuration
11.4 Combined
........................................................................93
update for notebooks
11.5 Installation
........................................................................94
of third party products using ERA
12. ESET
..................................................95
SysInspector
12.1 Introduction
........................................................................95
to ESET SysInspector
12.1.1
Starting
......................................................................................95
ESET SysInspector
12.2 User
........................................................................96
Interface and application usage
12.2.1
Program
......................................................................................96
Controls
12.2.2
Navigating
......................................................................................97
in ESET SysInspector
12.2.3
Compare
......................................................................................98
8.1 Security
........................................................................76
12.3 Command
........................................................................99
line parameters
8.2 Server
........................................................................76
Maintenance
12.4 Service
........................................................................100
Script
8.3 Mirror
........................................................................77
server
12.4.1
......................................................................................100
Generating Service script
8.3.1
Operation
......................................................................................77
of the Mirror server
12.4.2
......................................................................................100
Structure of the Service script
8.3.2
Types
......................................................................................78
of updates
12.4.3
......................................................................................103
Executing Service scripts
8.3.3
How
......................................................................................78
to enable and configure the Mirror
12.5
Shortcuts
........................................................................103
8.3.4
Mirror
......................................................................................80
for clients with NOD32 version 2.x
8. ESET Remote Administrator Server
(ERAS)
..................................................76
setup
........................................................................104
requirements
8.4 Replication
........................................................................80 12.6 System
........................................................................104
8.5 Logging
........................................................................82 12.7 FAQ
8.6 License
........................................................................82
management
8.7 Advanced
........................................................................83
settings
8.8 Other
........................................................................84
settings
13. ..................................................106
ESET SysRescue
13.1 Minimum
........................................................................106
requirements
13.2 How
........................................................................106
to create rescue CD
9. ESET Remote Administrator
Maintenance
..................................................85
Tool
13.3 Target
........................................................................106
selection
13.4 Settings
........................................................................107
13.4.1
Folders
......................................................................................107
9.1 ERA........................................................................85
Server Information
13.4.2
ESET Antivirus
......................................................................................107
9.2 Task........................................................................85
Type
13.4.3
Advanced settings
......................................................................................107
9.2.1
Stop
......................................................................................85
ERA Server
13.4.4
......................................................................................108
Internet protocol
9.2.2
Start
......................................................................................85
ERA Server
13.4.5
......................................................................................108
Bootable USB device
9.2.3
Database
......................................................................................85
Transfer
13.4.6
......................................................................................108
Burn
9.2.4
Database
......................................................................................86
Backup
13.5 Working
........................................................................108
with ESET SysRescue
9.2.5
Database
......................................................................................86
Restore
13.5.1
......................................................................................109
Using ESET SysRescue
9.2.6
Delete
......................................................................................86
Tables
9.2.7
Install
......................................................................................86
New License Key
9.2.8
Modify
......................................................................................86
server configuration
10. Troubleshooting
..................................................87
10.1 FAQ........................................................................87
10.1.1
Problems installing ESET Remote Administrator to
Windows
......................................................................................87
server 2000/2003
10.1.2
What
......................................................................................87
is the meaning of the GLE error code?
10.2 Frequently
........................................................................87
encountered error codes
10.2.1
Error messages displayed when using ESET Remote
Administrator to remotely install ESET Smart
Security
......................................................................................87
or ESET NOD32 Antivirus
10.2.2
Frequently
......................................................................................88
encountered error codes in era.log
10.3 How........................................................................88
to diagnose problems with ERAS?
11. Hints
..................................................89
& tips
11.1 Scheduler
........................................................................89
1. Introduction
ESET Remote Administrator (ERA) is an application which allows you to manage ESET’s products in a networked
environment, including workstations and servers – from one central location. With ESET Remote Administrator‘s builtin task management system, you can install ESET security solutions on remote computers and quickly respond to new
problems and threats.
ESET Remote Administrator itself does not provide any other form of protection against malicious code. ERA depends
on the presence of an ESET security solution on workstations or servers, such as ESET NOD32 Antivirus or ESET Smart
Security.
To perform a complete deployment of an ESET security solutions portfolio, the following steps must be taken:
Installation of ERA Server (ERAS),
Installation of ERA Console (ERAC),
Installation on client computers (ESET NOD32 Antivirus, ESET Smart Security, Linux ESET Security client, etc…).
NOTE: Some parts of this document use system variables which refer to an exact location of folders and files:
%ProgramFiles% = typically C:\Program Files
%ALLUSERSPROFILE% = typically C:\Documents and Settings\All Users
1.1 What's new
ESET Remote Administrator Version 4.0
- support for ESET Smart Security/ESET NOD32 Antivirus 4.2
- support for ESET Mail Security 4 for Microsoft Exchange Server
- support for Linux/Mac desktop security solution (ESET NOD32 Antivirus 4)
- support for ESET Mobile Security
New features
- Remote Installation - new design
- Group Management - new design (Static groups, Parametric Groups, improved Active Directory synchronization)
- Filter - improved functionality (policy filters, static and parametric groups filters)
- Policies - new parameters in policy rules (support for parametric groups), import/export of policies and policy rules,
scheduler tasks merging, Policy Rules Wizard
- Notifications - support for parametric groups + several minor improvements
- Centralized view on clients' quarantine (for v4 and higher ESS/EAV clients)
- Reports - support for static and parametric groups, new types of reports (mobile log, quarantine, firewall), new
templates
- Firewall rules merge wizard - wizard for merging rules created in learning mode
- Windows/Domain authentication of ERA Console user
- Windows Passive Cluster support
- Supports reinstallation of older ERA versions (3.x, 2.x, 1.x) including data migration support
- Communication encryption with AES-256
New ESET Configuration Editor
- support for new ESET Security products
- support for new ERA Server features
- zipped license files
- possibility to add predefined scheduled tasks
ESET Remote Administrator Version 3.0
5
- support for ESET Security products 4.x
- support for Linux solutions
New features
- Policy Management
- Notification Manager
- Read-Only Console access
- support for ESET SysInspector
- enhanced data transfer scalability
- deletion of replicated clients
- license key merging /License Manager/
- Mirror for ESET NOD32 Antivirus 2.x
- new setup
- domain-based filtering option added in Find Unregistered Computers
- compression of server logs (zip)
- minor bugs fixed and several minor features added
- Rescue CD
Internal Server enhancements
- support for additional databases (MS Access, MS SQL Server, Oracle, MySQL)
New ESET Configuration Editor
- support for ESET Security products 4.x
ESET Remote Administrator Version 2.0
- support of new ESET Security Products version 3 (ESET Smart Security, ESET NOD32 Antivirus)
- new logs (new columns, ESET Personal Firewall logs)
- new client state information for version 3 clients (Protection Status, Protection Features, System Information)
- tasks (configuration, update now, on-demand scan, interactive task)
- still supports NOD32 version 2 products
New features
- extended client identification (MAC address added)
- extended remote installation (support of msi and custom packages)
- security enhancements (encryption possibility for all new server clients)
- performance improvements (compression in communication protocol)
- added forwarding of ThreatSense.Net data via ERA Server
- GUI improvements (new graphics, enhanced state coloring, extended filters, resizable dialogs)
- new report template (ESS Scheme)
- server performance monitoring (data, queries)
- update functionality in ERA Server (allows updating of important information)
- mirror functionality in ERA Server
- extended remote installation (support of msi and custom packages, possibility of ERA remote installation, diagnostics)
Internal Server enhancements
- new replication (replication priority, better multi-level replication)
- new database structure
- new directory structure
- internal security improvements
New ESET Configuration Editor
- supports ESET Security Products version 2 and version 3
- possibility to configure ERA Server
- other minor new features (search, custom settings)
6
New installer (MSI)
- database migration from previous versions
New documentation (help, manual)
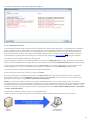
1.2 Program architecture
Technically, ESET Remote Administrator consists of two separate components: ERA Server (ERAS) and ERA Console
(ERAC). You can run an unlimited number of ERA Servers and Consoles on your network as there are no limitations in
the license agreement for their use. The only limitation is the total number of clients your installation of ERA can
administer.
ERA Server (ERAS)
The server component of ERA runs as a service under the following Microsoft Windows® NT-based operating systems:
NT4 SP6, 2000, XP, 2003, Vista, 7 and 2008. The main task of this service is to collect information from clients and to
send them various requests. These requests, including configuration tasks, remote installation requests, etc., are
created through the ERA Console (ERAC). ERAS is a meeting point between ERAC and client computers – a place where
all information is processed, maintained or modified before being transferred to clients or to ERAC.
ERA Console (ERAC)
ERAC is the client component of ERA and is usually installed on a workstation. This workstation is used by the
administrator to remotely control ESET solutions on individual clients. Using ERAC, the administrator can connect to
the server component of ERA – on TCP port 2223. The communication is controlled by the process console.exe, which is
usually located in the following directory:
%ProgramFiles%\ESET\ESET Remote Administrator\Console
When installing ERAC, you may need to enter the name of an ERAS. Upon startup, the console will automatically
connect to this server. ERAC can also be configured after installation.
7
2. Installation of ERA Server and ERA Console
2.1 Requirements
ERAS works as a service, and therefore requires a Microsoft Windows NT-based operating system (NT4 SP6, 2000, XP,
2003, Vista, 7, or 2008). Although the Microsoft Windows Server Edition is not necessary for ERAS to work, we
recommend installing ERAS on server-based operating systems for smooth operation. A computer with ERAS installed
on it should always be online and accessible via computer network by:
Clients (usually workstations)
PC with ERA Console
Other instances of ERAS (if replicated)
NOTE: ESET Remote Administrator 4 fully supports installation over older versions (3.x, 2.x, 1.x) including data
migration.
2.1.1 Software requirements
ERA Server
32 bit operating systems:
Windows NT4 SP6 and later
64 bit operating systems:
Windows XP and later
Databases:
Microsoft Access (built-in)
Microsoft SQL Server 2005 and later
MySQL 5.0 and later
ORACLE 9i and later
Windows Installer:
2.0
ERA Console
32 bit operating systems:
Windows 2000 and later
64 bit operating systems:
Windows XP and later
Windows Installer:
2.0
Internet Explorer:
recommended 6.0, minimum 4.0 (some reports may not be displayed correctly)
2.1.2 Performance requirements
The server performance may vary depending on the following parameters:
1. Database used
MS Access database - installed with the server by default. We recommend this solution when servicing hundreds
of clients. However, there is a 2GB size limit for the database. Consequently, you will need to activate cleanups on
the server and define an interval (under Tools > Server Options > Server Maintenance) for removing old data.
Other databases (MySQL, MSSQL, ORACLE) require a separate installation, but may result in better server
performance. It is essential to use suitable hardware for each database engine (mainly ORACLE) following the
technical recommendations of its distributor.
If you choose ORACLE as your database solution, you must set the number of cursors higher than the
Maximum number of active connections value (under Tools > Server Options > Advanced >
Edit Advanced Settings > Advanced; the default is set to 500). The final number of cursors must take into
account the number of lower servers, (if replication is used) and cursors that are used by other applications
accessing the database engine.
Typically, the server's performance is higher when using external databases (i.e. installed on a different physical/
8
virtual machine).
2. Client connection interval
The client connection interval is set to 10 minutes by default in ESET Smart Security / ESET NOD32 Antivirus
versions 4.2 and later. If you need the client status to update more or less frequently than the default interval,
you can change the setting.Keep in mind that a shoerter client connection interval will affect server performance.
3. Average number of events reported by clients per connection
Any information sent from client to server is listed under the particular event (e.g. threat log, event log, scan log,
configuration change). This parameter cannot be changed directly, but it can be altered if other settings relevant
to it are changed. For example, in advanced server configuration (under Tools > Server Options >
Server Maintenance) you can setup the maximum amount of logs that can be accepted by the server (this
setting includes clients that connect directly as well as replicated clients).In regular operation the long-term
average can be estimated at 1 event every 4 hours per client.
4. Hardware and operating system used
We strongly recommend using the minimum hardware recommended for your server's operating system,
accounting for the number of clients to be serviced.
Overload
If a server is overloaded (e.g., we connect 20,000 clients to a server only able to service 10,000 clients at an interval of
every 10 minutes) it will skip some of the clients connected. On average every second client connection will be serviced,
as if the client connection interval were set to 20 minutes instead of 10 minutes. Every service denial will be logged as
follows: "<SERVERMGR_WARNING> ServerThread: maximum number of threads for active connections reached (500), the
server will skip this connection”. Service denials may also occur during temporary server overloads.
You can change the value under the Maximum number of active connections (the default is 500) in the advanced
server settings, but we recommend to do so only in exceptional cases (e.g. when solving specific issues). Should there
be an overabundance of system resources and database engine performance you can use this setting to adjust the
overall server performance.
Data transfer over a network
During a server's standard operation, we can estimate a client connecting every 10 minutes will report 0.04 events per
connection, which is 1 event reported every 4 hours per client. This will produce ~2 kilobytes of traffic per connection.
In a virus outbreak scenario, with a client reporting 7 events every time it connects traffic may increase up to 240
kilobytes per connection. If you use compression (default) the data transferred will be approximately 50% smaller in
size, i.e. about 120 kilobytes per connection.
The data includes direct client connections, omitting replicated connections. Replication occurs much less often and
serves to send new events from lower servers. Events to be automatically replicated and their verbosity level can be
configured in the advanced settings of the server (under Tools > Server Options > Advanced >
Edit Advanced Settings > Replication). In the Server maintenance section you can configure the maximum level of
logs, that the upper server will accept - this setting applies to both directly connecting clients and replicated clients.
Storage capacity requirements
Clean installation of the product with an MS Access database takes up to 60 MB of disk space.
Most of the storage space is taken up by client events, that are stored in the database and to a repository on the disk
(default directory is C:\Documents and Settings\All Users\Application Data\Eset\ESET Remote Administrator\Server). ERA
requires that at least 5% of the disk be free. If this minimum is exceeded the server will stop receiving some of the client
events. This setting can be found under Tools > Server Options > Advanced > Edit Advanced Settings > Advanced >
Maximum disk space usage. Approximately 10GB per 1000 clients of free disk space is required for regular operation
under the default cleanup settings (deleting events older than 3 months).
Case study
A server using an MS Access database that has clients connecting to it every 5 minutes and reporting 7 events (e.g.
threat log, event log, scan log, configuration change etc.) per connection in average can temporarily service up to 3000
clients. This scenario depicts a temporary overload situation, such as reporting during a virus outbreak etc.
If the server uses an external MySQL database and the client connection interval is set to 10 minutes (generating 0.02
events per connection) the maximum number of clients the server will be able to service increases to 30,000. Such a
scenario exhibits optimal database performance, with clients reporting a relatively small number of events.
9
In regular operation, using an MS Access database and a client connection interval of 10 minutes enables the server to
service a maximum of 10,000 clients.
2.1.3 Ports used
The chart below lists the possible network communications used when ERAS is installed. The process EHttpSrv.exe
listens on TCP port 2221 and the process era.exe listens on TCP ports 2222, 2223, 2224 and 2846. Other communications
occur using native operating system processes (e.g., ”NetBIOS over TCP/IP”).
Protocol
Port
Description
Default port used by the Mirror feature integrated in ERAS (HTTP
version)
TCP
2221 (ERAS listening)
TCP
2222 (ERAS listening)
Communication between clients and ERAS
TCP
2223 (ERAS listening)
Communication between ERAC and ERAS
If all the program features are in use, the following network ports need to be open:
Protocol
Port
Description
Communication between the agent einstaller.exe and
TCP
2224 (ERAS listening)
ERAS during remote install
TCP
2846 (ERAS listening)
ERAS replication.
TCP
139 (target port from the point of view of ERAS)
Copying of the agent einstaller.exe from ERAS to a
client using the share admin$
UDP
137 (target port from the point of view of ERAS)
“Name resolving” during remote install.
UDP
138 (target port from the point of view of ERAS)
“Browsing” during remote install
TCP
445 (target port from the point of view of ERAS)
Direct access to shared resources using TCP/IP during
remote install (an alternative to TCP 139)
The predefined ports 2221, 2222, 2223, 2224 and 2846 can be changed if they are already in use by other applications.
To change the default ports used by ERA, click Tools > Server Options… To change port 2221, select the Updates tab
and change the HTTP server port value. Ports 2222, 2223, 2224 and 2846 can be modified in the Ports section on the
Other Setings tab in the Server options.
The predefined ports 2222, 2223, 2224 and 2846 can also be modified during the advanced install mode (ERAS).
10
2.2 Basic Installation guide
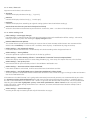
2.2.1 Environment overview (network structure)
A company network usually consists of one local area network (LAN), therefore we suggest installing one ERAS and
one Mirror server. The Mirror server can either be created in ERAS or in ESET NOD32 Antivirus Business Edition / ESET
Smart Security Business Edition.
Suppose all clients are Microsoft Windows 2000/XP/Vista/7 workstations and notebooks, networked within a domain.
The server named GHOST is online 24/7 and can be a Windows workstation, Professional, or Server Edition (it does not
have to be an Active Directory Server). In addition, suppose that notebooks are not present in the company’s network
during the installation of ESET client solutions. The network structure may resemble the one displayed below:
2.2.2 Before installation
Before installing, the following installation packages should be downloaded from ESET’s website:
ESET Remote Administrator components:
ESET Remote Administrator – Server
ESET Remote Administrator – Console
ESET client solutions:
ESET Smart Security 4.x
ESET Smart Security 3.x
ESET NOD32 Antivirus 4.x
ESET NOD32 Antivirus 3.x
ESET NOD32 Antivirus 2.7
Only download the client solutions you will use on client workstations.
11
2.2.3 Installation
2.2.3.1 Installation of ERA Server
Install ERAS on the server named GHOST (see the example in Environment overview
or Advanced installation mode.
11
). You can select either Typical
If you select Typical mode, the program will prompt you to insert a license key – a file with the extension .lic or .zip that
provides operation of ERAS for the period defined in the license. Next, the program will ask you to set the update
parameters (username, password and update server). You can also proceed to the next step and enter the update
parameters later.
If you select the Advanced installation mode, the installer will offer additional parameters to be set. These parameters
can be modified later via ERAC, but in most cases this is not necessary. The only exception is server name, which should
match the DNS name, or %COMPUTERNAME% value of your operating system or the IP address assigned to the
computer. This is the most essential piece of information for performing the remote installation. If a name is not
specified during installation, the installer will automatically supply the value of the system variable %COMPUTERNAME
%, which is sufficient in most cases.It is also important to select the correct database to which ERAS information will be
stored. For more information see the chapter titled Database types supported by ERA Server 14 .
Important: Recent versions of Microsoft Windows (Windows Vista, Windows Server 2008 and Windows 7) enforce
security policies limiting local user account permissions, meaning the user may not be able to execute specific network
operations. If your ERA service is running on a local user account, push installation issues may occur in certain specific
network configurations (e.g. when installing remotely from domain to workgroup). When using Windows Vista,
Windows Server 2008 or Windows 7, we recommend running the ERA service on accounts with sufficient networking
rights. You can specify the user account on which you want to run ERA in the Advanced installation scenario.
Note: Although ERA Server has full Unicode support, there are situations when the server converts characters to ANSI
or vice versa (e.g. email, computername). In such situations the Language for non-Unicode programs setting is used.
We recommend you change this setting to match the server environment locale, even if you are not using a localized
version of ERA (i.e. you are using the English language mutation). You can find this setting under Control panel >
Regional and language options on the Advanced tab.
ERAS program components are installed by default in the following folder:
%ProgramFiles%\ESET\ESET Remote Administrator\Server
Other data components such as logs, install packages, configuration, etc. are stored in:
%ALLUSERSPROFILE%\Application Data \ESET\ESET Remote Administrator\Server
The ERAS service is launched automatically after the installation. The activity of the ERAS service is recorded in the
following location:
%ALLUSERSPROFILE%\Application Data\ESET\ESET Remote Administrator\Server\logs\era.log
Command line installation
ERAS can be installed with the following command line parameters:
/q - Silent installation. No user intervention is possible. No dialog windows are displayed.
/qb - No user intervention is possible, but the installation process is indicated by a progress bar.
Example: era_server_nt32_ENU.msi /qb
Parameters and configuration of the command line installation can be further supplemented by the administrator's .xml
configuration file the "cfg.xml", which must be in the same folder as the ERA .msi installation file. The configuration file
can be created in the ESET Configuration Editor and allows you to configure various ERA settings. See chapter ESET
Configuration Editor 32 for more details.
12
2.2.3.1.1 Cluster Mode Installation
The Advanced installation scenario also allows you to activate the Cluster Mode Installation. If the Cluster Mode
Installation is enabled you will need to specify the path to a cluster shared data folder that is fully accessible for all
cluster nodes (i.e. all nodes must have read/write permissions for this folder). It can either be a quorum disk or a UNC
shared folder. If a shared folder is used, you must enable sharing for Computers in the shared folder's properties. The
cluster node name must then be added to Share Permissions with full rights.
It is necessary to install ERA Server individually on all cluster nodes. If anything other than the built-in MS Access
database is used, it is important to make sure that all ERA Server nodes connect to the same database. In the next
steps it is also important to set the name of the cluster node where ERA is to be installed as the server name.
Important: It is necessary to configure the <%ESET_REMOTE_ADMNISTRATOR%> Server service (ERA_SERVER) as the
cluster's Generic Service in the Cluster Administrator console.
If you plan to uninstall ERA Server, you must disable the cluster node before uninstalling.
1) Break the cluster by bringing down one of the nodes.
2) Let failover complete to make sure the other node(s) are working.
3) Uninstall ESET Remote Administrator from the disabled node.
4) Restart the node
5) Relink the node
6) Repeat the steps above for any additional node(s) in the cluster
2.2.3.2 Installation of ERA Console
Install the ESET Remote Administrator Console to the administrator’s PC/notebook. If you choose the advanced
installation mode, at the end you can enter the name of the ERA Server (or its IP address) to which ERAC will
automatically connect at startup. It is labeled GHOST in our example.
After installation launch ERAC and check the connection to ERAS. By default, no password is required to connect to an
ERA Server (the password text field is blank), but we strongly recommend that one be established. To create a
password to connect to an ERA Server click File > Change Password… and then modify the Password for Console by
clicking the Change... button.
The administrator can specify a password for Administrator Access and for Read-Only Access (which only allows users
to view the ERAS configuration, not edit it).
2.2.3.3 Mirror
You can use the ERA Console to activate the LAN Update server – the Mirror in the ERA Server. This server can then be
used to update workstations located in the LAN. By activating the Mirror you will decrease the volume of data
transferred through your Internet connection.
Proceed as follows:
1) Connect the ERA Console to the ERA Server by clicking File > Connect.
2) From the ERA Console click Tools > Server Options… and click the Updates tab.
3) From the Update server drop-down menu, select Choose Automatically, leave Update interval at 60 minutes.
Insert Update username (EAV-***) and then click Set Password... and type or paste the password you received with
your username.
4) Select the Create update mirror option. Leave the default path for mirrored files and HTTP server port (2221). Leave
Authentication at NONE.
5) Click the Advanced tab and click Edit Advanced Settings… In the advanced setup tree, navigate to ERA Server >
Setup > Mirror > Create mirror for the selected program components. Click Edit on the right-hand side and select
the program components to be downloaded. Components for all language versions that will be used in the network
should be selected.
6) In the Updates tab, click Update now to create the Mirror.
13
For more detailed Mirror configuration options, please see chapter How to enable and configure the Mirror
78
.
2.2.3.4 Database types supported by ERA Server
By default, the program uses the Microsoft Access (Jet Database) engine. ERAS 4.0 also supports the following
databases:
Microsoft SQL Server 2005 and later
MySQL 5.0 and later
Oracle 9i and later
The database type can be selected during the Advanced installation mode of ERAS. After the installation it is not
possible to change the database type directly from ERA, however, you can do so using the ERA Maintenance Tool
85
.
NOTE:
Microsoft Access database is not supported on Windows Server 2008 Core.
SQL Server Express has 4 GB database size limit.
2.2.3.4.1 Basic requirements
First, it is necessary to create the database on a database server. The ERAS installer is capable of creating an empty
MySQL database, which is automatically named ESETRADB.
By default, the installer automatically creates a new database. To create the database manually, select the option
Export Script. Make sure that the Create tables in the new database automatically option is deselected.
Collation Settings
Sorting will be realized according to the default settings of each database. It is required to activate CASE INSENSIVITY
(CI).
To activate:
- For MS SQL and MySQL a COLLATE must be set up with the CI activated
- For ORACLE a NLS_SORT must be set up with the CI activated
- For MS Access no action is required because CI is already activated
Character set
It is important to use the UNICODE character set (UTF-8 is recommended), especially when clients have specific locales
or if ERA itself is working in a localized version. If there is no plan for replication and all clients connect to the same
server, you can use the character set for the locale of ERA that you want to install.
MARS (Multiple Active Result Sets)
If a MS SQL database is used, an ODBC driver with MARS support is required for smooth operation. Otherwise the
server will operate less effectively and log the following error message to the server log:
Database connection problem. It is strongly recommended to use odbc driver that supports multiple active result sets (MARS).
The server will continue to run but the database communication may be slower. See the documentation or contact ESET support
for more information.
If the problem occurs with other than a MS SQL database the server logs the following message to the server log and
stops:
Database connection problem. Updating the odbc driver may help. You can also contact ESET support for more information.
Drivers without MARS support:
- SQLSRV32.DLL (2000.85.1117.00)
- SQLSRV32.DLL (6.0.6001.18000) - natively contained in Windows Vista and Windows Server 2008
14
Native driver with MARS support:
- SQLNCLI.DLL (2005.90.1399.00)
2.2.3.4.2 Database connection setup
After a new database is created, you must specify connection parameters for the database server using one of two
options:
1. Using DSN (data source name)
To open DSN manually, open the ODBC
Date Source Administrator
(Click Start > Run – and type odbcad32.exe).
Example of a DSN connection:
DSN =ERASqlServer
Important: The use of the System DSN is recommended for ERA to work properly.
Important: On a 64-bit operating system, odbcad32.exe must be run from the %SystemRoot%\SysWOW64\ foder.
To make the installation under MSSQL with Windows/Domain authentication successful make sure you use DSN
format when entering the connection string.
2. Directly, using a complete connection string
All required parameters must be specified – driver, server and name of database.
This is an example of a complete connection string for MS SQL Server:
Driver ={SQL Server}; Server =hostname; Database =ESETRADB
This is an example of a complete connection string for Oracle Server:
Driver ={Oracle in instantclient10_1}; dbq =hostname: 1521/ESETRADB
This is an example of a complete connection string for MySQL Server:
Driver ={MySQL ODBC 3.51 Driver}; Server =hostname; Database =ESETRADB
Then set the Username and Password for the connection (the Set button). Oracle and MS SQL Server databases also
require a Schema Name (for MS SQL Server this is usually the same as username).
Click Test Connection to verify the connection to the database server.
Note: We recommend using the database server authentication, instead of windows/domain authentication.
15
2.2.3.4.3 Installing over an existing database
If there are existing tables in the database, the installer will display a notification. To overwrite contents of an existing
table, select Overwrite (Warning: this command deletes the contents of tables and also overwrites their structure!).
Select Ignore to leave tables untouched.
NOTE: Selecting Ignore may under certain conditions cause database inconsistency errors; especially when tables are
damaged or incompatible with the current version.
To cancel installation of ERAS and analyze the database manually, click Cancel.
2.3 Scenario - Installation in an Enterprise environment
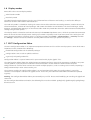
2.3.1 Environment overview (network structure)
Below is a copy of the previous network structure with one additional branch office, several clients and one server
named LITTLE. Let’s suppose there is a slow VPN channel between the headquarters and the branch office. In this
scenario, the Mirror server should be installed on the server LITTLE. We will also install a second ERA Server on LITTLE
in order to create a more user-friendly environment and minimize the volume of transferred data.
16
2.3.2 Installation
2.3.2.1 Installation at headquarters
Installations of ERAS, ERAC and client workstations are very similar to the previous scenario. The only difference is in
the configuration of the master ERAS (GHOST). In Tools > Server Options… > Replication select the
Enable “from” replication check box and enter the name of the secondary server in Allowed servers. In our case, the
lower server is named LITTLE.
If there is a password for replication set on the upper server (Tools > Server Options… > Security >
Password for replication), then that password must be used for authentication from the lower server.
2.3.2.2 Branch office: Installation of ERA Server
As in the example directly above, install the second ERAS and ERAC. Again, enable and configure the replication
settings. This time select the Enable “to” replication check box (Tools > Server Options… > Replication) and define
the name of the master ERAS. We recommend using the IP address of the master server, which is the IP address of the
server GHOST.
2.3.2.3 Branch office: Installation of HTTP Mirror server
The Mirror server installation configuration in the previous scenario can also be used in this case. The only changes are
in the sections defining the username and password.
As in the figure from Environment overview 16 chapter, updates for the branch office are not downloaded from ESET’s
update servers, but from the server at the headquarters (GHOST). The update source is defined by the following URL
address:
http://ghost:2221 (or http://IP_address_of_ghost:2221)
By default, there is no need to specify a username or password, because the integrated HTTP server requires no
authentication.
For more information on configuring the Mirror in ERAS, see the chapter titled Mirror Server
77
.
2.3.2.4 Branch office: Remote installation to clients
Once more, the previous model can be used, except that it is suitable to perform all operations with the ERAC
connected directly to the ERAS of the branch office (in our example: LITTLE). This is done to prevent installation
packages from being transferred via the VPN channel, which is slower.
17
2.3.3 Other requirements for Enterprise environments
In larger networks, multiple ERA Servers can be installed to perform remote installs of client computers from servers
which are more accessible. For this purpose, ERAS offers replication (see chapter Installation at headquarters 17 and
Branch office: Installation of ERA Server 17 ), which allows stored information to be forwarded to a parent ERAS (upper
server). Replication can be configured using ERAC.
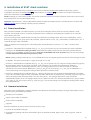
The replication feature is very useful for companies with multiple branches or remote offices. The model deployment
scenario would be as follows: Install ERAS in each office and have each replicate to a central ERAS. The advantage of
this configuration is especially apparent in private networks which are connected via VPN, which is usually slower – the
administrator will only need to connect to a central ERAS (the communication marked by the letter A in the figure
below). There is no need to use VPN to access individual departments (the communications B, C, D and E). The slower
communication channel is bypassed through the use of ERAS replication.
The replication setup allows an administrator to define which information will be transferred to upper servers
automatically at a preset interval, and which information will be sent upon request from the upper server
administrator. Replication makes ERA more user-friendly and also minimizes network traffic.
Another advantage of replication is that multiple users can log in with various permission levels. The administrator
accessing the ERAS london2.company.com with the console (communication E) can only control clients connecting to
london2.company.com. The administrator accessing the central company.com (A) can control all clients located at
company headquarters and departments/branches.
18
3. Working with ERAC
3.1 Connecting to ERAS
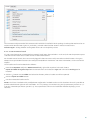
Most features in ERAC are only available after connecting to ERAS. Define the server by name or IP address before
connecting:
Open the ERAC and click File > Edit Connections… (or Tools > Console Options…) and click the Connection tab.
Click the Add/Remove… button to add new ERA Servers or to modify currently listed servers. Pick the desired server in
the Select connection drop-down menu. Then, click the Connect button.
Other options in this window:
Connect to selected server on the console startup
If this option is selected, the console will automatically connect to the selected ERAS on startup.
Show message when connection fails
If there is a communication error between ERAC and ERAS, an alert will be displayed.
There are two authentication types available:
ERA Server
The user authenticates with ERAS credentials. By default no password is required to connect to an ERAS, but we
strongly recommend that one be established. To create a password to connect to an ERAS:
Click File > Change Password… (or Tools > Server Options > Security) and then click the Change… button to the right
of Password for Console.
When entering a password you can check the Remember password option. Please consider the possible security risks
associated with this option. To delete all remembered passwords click File > Clear Cached Passwords….
Select the access type from the Access drop-down menu (options are either Administrator or Read-Only), enter your
password and click OK.
Windows/Domain
The user authenticates with Windows/Domain user credentials. In order for the Windows/Domain authentication to
work properly ERAS needs to be installed under the Windows/Domain account with sufficient rights. You must also
enable this feature in Tools > Server Options… > Advanced tab > Edit Advanced Settings… > ESET Remote
Administrator > ERA Server > Setup > Security:
Allow Windows/Domain authentication - enables/disables Windows/Domain authentication
Administrator groups - allows you to define groups for which Windows/Domain authentication will be enabled
Read only groups - allows you to define groups with read-only access
When communication has been established the program’s header will change to Connected [server_name].
Alternatively you can click File > Connect to connect to ERAS.
NOTE: Communication between ERAC and ERAS is encrypted (AES-256)
19
3.2 ERAC - main window
The current communication status between ERAC and ERAS is displayed in the status bar (1). All necessary data from
ERAS is refreshed regularly (Default is every minute. See Tools > Console Options…). The refresh progress can also be
seen in the status bar.
NOTE: Press F5 to refresh displayed data.
Information is divided into several tabs in order of importance (2). In most cases data can be sorted in ascending or in
descending order by clicking on an attribute (5), while a drag-and-drop operation can be used for reorganization. If
multiple data rows are to be processed, you can limit them by using the Items to show drop-down menu and the
browse page by page buttons. Select the View mode to display attributes according to your need (for further details,
see chapter Information filtering 21 ).
The Server section (4) is important if you replicate ERA Servers. This section displays summary information about the
Console to which ERAS is connected, as well as information about child or ”lower” ERA Servers. The Servers drop-down
menu in section 4 will influence the scope of information displayed in section 5.
Use All Servers
Displays information from all ERA Servers – section (5).
Use Only Selected Servers
Displays information from selected ERA Servers – section (5).
Exclude Selected Servers
Excludes information from selected ERA Servers.
Columns in Section 4:
Server Name
Displays name of server.
20
Clients
Total number of clients connecting to or in the database of the selected ERAS.
Virus Signature DB Range
Version of virus signature databases among the clients of the selected ERAS.
Least Recent Connection
Time elapsed since the least recent connection to the server.
Last Threat Alerts
Total number of virus alerts (see the attribute Last Threat Alert in section 5).
Last Firewall Alerts
The total number of firewall alerts.
Last Event Warnings
Total number of current events (see the attribute Last Event in section 5).
If you are not currently connected, you can right-click in the Server section (4) and select Connect to This Server to
connect to the chosen ERAS.
More information will be displayed in the Server section (4) if replication is enabled.
The most important features of ERAC are accessible from the main menu or from the ERAC toolbar (3).
The last section is Computer filter criteria (6) – see the chapter titled Information filtering
21
.
3.3 Information filtering
ERAC offers several tools and features which provide user-friendly administration of clients and events. Having an
advanced filtering system can often be priceless, especially on systems with a large number of clients, when the
displayed information needs to be grouped and easily manageable. There are several tools in ERAC that allow you to
efficiently sort and filter information about the connected clients.
3.3.1 Filter
Filter allows the administrator to display only information related to specific servers or client workstations. To show the
filter options, click View > Show/Hide Filter Pane from the ERAC menu.
To activate filtering, select the Use filter option in the upper left side of the ERAC. Any future modifications to the filter
criteria will automatically update displayed data, unless configured otherwise in the Tools > Console Options… >
Other Settings tab.
Define the filtering criteria in the Client filter criteria section. Clients can belong to multiple groups and policies.
Assigning a client to a Static or Parametric group can prove very useful, not only for filtering purposes, but also for
activities such as reporting. To learn more about Group management see the chapter titled Group Manager 51 . Using
Policies for client segregation can also serve multiple functions; for more information about Policy creation and
management see the chapter titled Policies 53 .
The first filtering tool is the Group and Policy selecting section. There are three options available:
Clients in checked
Clients in selected groups/policies will be displayed in the Clients panel
Clients in not checked
Clients in groups/policies that are not selected and clients in no groups will be displayed in the Clients panel
Clients in no groups
Only clients that do not belong to any group/policy will be displayed
NOTE: When selecting a Group from the list, all its subgroups will be displayed as well.
In the lower part of the Filter section you can specify another set of parameters:
Only clients (using whole words)
Output only includes clients with names identical to the string entered.
Only clients beginning like (?,*)
Output will only list clients with names beginning with the specified string.
21
Only clients like (?,*)
Output will list only clients with names containing the specified string.
Exclude clients (using whole words), Exclude clients beginning like (?,*), Exclude clients like (?,*)
These options will yield results opposite to the previous three.
The Primary server, Client name, Computer name and MAC Address fields accept whole strings. If any of these are
populated, a database query will be run and results will be filtered based on the populated field; the logical operator
AND is used.
The last option is problem based filtering – outputs will only include clients with the specified type of problem. To
display the list of problems, select the Only show problems option and click Edit…. Select the problems to be displayed
and click OK to show clients with the selected problems.
All changes made in the filtering setup will be applied after clicking the Apply Changes button. To restore defaults, click
Reset. To automatically generate new outputs at each modification of filter settings, select the Tools >
Console Options... > Other Settings... > Auto apply changes option.
3.3.2 Context menu
Use the right mouse button to invoke the context menu and adjust output in columns. Context menu options include:
Select All
Selects all entries.
Select by ‘...’
This option allows you to right-click on any attribute and automatically select (highlight) all other workstations or
servers with the same attribute. The string ... is automatically replaced by the value of the current tab.
Inverse Selection
Performs inverted selection of entries.
Hide Selected
Hides selected entries.
Hide Unselected
Hides all unselected entries in the list.
Show/Hide Columns
Opens the Console Options > Columns - Show/Hide window where you can define columns that will be available in
the selected pane.
The Hide Selected/Unselected options are effective if further organization is needed after using previous filtering
methods. To disable all filters set by the context menu, click View > Cropped View, or click the icon on the ERAC
toolbar. You can also press F5 to refresh displayed information and disable filters.
Example:
To only display clients with threat alerts:
In the Clients tab, right-click on any empty pane with Last Virus Alert and choose Select by ‘…‘ from the context
menu. Then, again from the context menu, click Hide Selected.
To display threat alerts for clients ”Joseph” and ”Charles”:
Click the Threat Log tab and right-click any attribute in the Client Name column with the value Joseph. From the
context menu click Select by ‘Joseph’. Then, press and hold the CTRL key, right-click and click Select by ‘Charles’.
Finally, right-click and select Hide Unselected from the context menu and release the CTRL key.
The CTRL key can be used to select/deselect specific entries and the SHIFT key can be used to mark/unmark a group of
entries.
NOTE: Filtering can also be used to facilitate the creation of new tasks for specific (highlighted) clients. There are many
ways to use filtering effectively, please experiment with various combinations.
22
3.3.3 View mode
In the Clients tab, the number of columns displayed can be adjusted by using the View mode drop-down menu on the
far right side of the Console. The Full View Mode displays all columns, while the Minimal View Mode only shows the
most important columns. These modes are predefined and cannot be modified. To activate the Custom View, select
Custom View Mode. It can be configured in the Tools > Console Options… > Columns > Show/Hide tab.
3.4 Tabs in ERAC
3.4.1 General description of tabs and clients
Most of the information on tabs is related to the connected clients. Each client connected to ERAS is identified by the
following attributes:
Computer Name (client name) + MAC Address + Primary Server
The behavior of ERAS related to certain network operations (such as renaming a PC) can be defined in ERAS Advanced
Setup. This can help prevent duplicate entries in the Clients tab. For example, if one of the computers in the network
has been renamed, but its MAC address remained unchanged, you can avoid creating a new entry in the Clients tab.
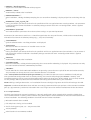
Clients that connect to ERAS for the first time are designated by a Yes value in the New User column. They are also
marked by a small asterisk in the upper right corner of the client’s icon (see the figure below). This feature allows an
administrator to easily detect a newly connected computer. This attribute can have different meanings depending on
the administrator’s operating procedures.
If a client has been configured and moved to a certain group, the New status can be disabled by right-clicking the client
and selecting Set/Reset Flags > Reset ”New“ Flag. The client's icon will change to the one shown in the figure below
and the value in the New User column will switch to No.
NOTE: The Comment attribute is optional in all three tabs. The administrator may insert any description here (e.g.,
”Office No. 129”).
Time values in ERAS can be displayed either in the relative mode (“2 days ago”), in the absolute mode (20.5.2009) or in
the system mode (Regional settings).
In most cases data can be sorted in ascending or in descending order by clicking on an attribute, while a drag-and-drop
operation can be used for reorganization.
Clicking on certain values activates other tabs in order to display more detailed information. For example, if you click on
a value in the Last Threat Alert column, the program will move to the Threat Log tab and display Threat Log entries
related to the given client. If you click on a value which contains too much information to be displayed in a tabbed view,
a dialog window will open showing detailed information about the corresponding client.
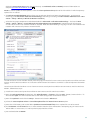
3.4.2 Replication & information in individual tabs
If ERAC is connected to an ERAS which is operating as an upper server, clients from the lower servers will be displayed
automatically. The types of replicated information can be configured on the lower server in Tools > Server Options >
Replication > Replicate "to" settings.
In this scenario, the following information may be missing:
Detailed alert logs (Threat Log tab)
Detailed On-demand scanner logs (Scan Log tab)
Detailed current client configurations in the.xml format (the Clients tab, the Configuration column,
Protection Status, Protection Features, System Information)
Information from the ESET SysInspector program may also be missing. ESET SysInspector is integrated with generation
4.x ESET products and later.
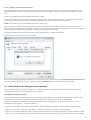
If the information cannot be found in the dialog windows of the program, click the Request button (available under
23
Actions > Properties > Configuration). Clicking this button will download missing information from a lower ERAS.
Since replication is always initiated by a lower ERAS, the missing information will be delivered within the preset
replication interval.
Fig: Click Request to retrieve missing information from lower ERA Servers.
On the upper server you can set the level of logs that will be received by the server (Tools > Server Options >
Advanced > Edit Advanced Settings... > ESET Remote Administrator > ERA Server > Setup > Server Maintenance
> .... logs to accept).
NOTE: This option applies to all clients connected to the server (not only the replicated ones).
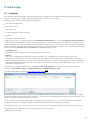
3.4.3 Clients tab
This tab displays general information about individual clients.
Attribute
Client Name
Description
Name of Client (Can be changed in the Client's properties dialog - tab General)
Computer Name
Name of workstation / server (hostname)
MAC Address
MAC address (network adapter)
Primary Server
Name of ERAS with which a client is communicating
Domain
Domain / group name, to which a client belongs (these are not groups created in ERAS)
IP
IP address
Product Name
Name of ESET security product
Product Version
Version of ESET security product
Policy Name
Name of policy assigned to a client
Last Connected
Time that client last connected to ERAS (All other data collected from clients includes this
timestamp, except for some data obtained by replication)
Protection Status
Text
Current status of the ESET security product installed on a client
Virus Signature DB
Version of virus signature database
Last Threat Alert
Last virus incident
Last Firewall Alert
Last event detected by the ESET Smart Security Personal firewall (Events from the Warning level
and higher are shown)
24
Attribute
Last Event Warning
Description
Last error message
Last Files Scanned
Number of scanned files during the last On-demand scan
Last Files Infected
Number of infected files during the last On-demand scan
Last Files Cleaned
Number of cleaned (or deleted) files during the last On-demand scan
Last Scan Date
Time of last On-demand scan
Restart Request
Is a restart required (e.g., after a program upgrade)
Restart Request Date Time of first restart request
Product Last Started Time that client program was last launched
Product Install Date Date that the ESET security product was installed on the client
Roaming User
Clients with this attribute will perform the ”update now” task each time they establish a
connection with the ERAS (recommended for notebooks). The update is only performed if the
client's virus signature database is not up to date.
New Client
Newly connected computer (see chapter General description of tabs and clients
OS Name
Name of client operating system
OS Platform
Operating system platform (Windows / Linux…)
HW Platform
32-bit / 64-bit
Configuration
Client’s current.xml configuration (including date/time that the configuration was created)
Protection Status
General status statement (Similar in nature to the Configuration attribute)
Protection Features
General status statement for program components (Similar to Configuration attribute)
System Information
Client submits system information to ERAS (including time that the system information was
submitted)
SysInspector
Clients with versions containing the ESET SysInspector tool can submit logs from this
complementary application.
Custom Info
Custom Information to be displayed specified by the administrator (this option can be configured
in ERAC through Tools > Server Options… > Advanced tab > Edit Advanced Settings… > ESET
Remote Administrator > ERA Server > Setup > Other settings > Client custom info).
Comment
A short comment describing the client (entered by the administrator)
23
)
NOTE: Some values are for informational purposes only and may not be current when the administrator views them at
the Console. For example, at 7 a.m. there may have been an update error, but at 8 a.m. it was performed successfully.
These values may include Last Threat Alert and Last Event Warning. If the administrator knows this information is
obsolete, it can be cleared by right-clicking and selecting Clear Info > Clear “Last Threat Alert” Info or
Clear “Last Event Warning” Info . Information about the last virus incident or last system event will be deleted.
25
Fig.: Obsolete events from the Last Threat Alert and Last Event Alert Warning columns can easily be removed.
Fig.: Detailed information about a client workstation.
The Clients tab offers several options after double-clicking on a client:
General
Contains similar information to that displayed in the Clients tab. Here you can specify the Client Name – the name
under which this client is visible in ERA, plus an optional comment.
Member Of Groups
This tab lists all groups to which the client belongs. For more information, see chapter Information filtering
21
.
Tasks
Tasks related to the given client. For more information see chapter Tasks
47
.
Configuration
This tab allows you to view or export the current client configuration to an.xml file. Later in this manual, we will explain
how .xml files can be used to create a configuration template for new/modified.xml configuration files. For more
information see chapter Tasks 47 .
26
Protection Status
This is a general status statement regarding all ESET programs. Some of the statements are interactive and allow
immediate intervention. This functionality is useful in that it prevents the need to manually define a new task to solve
a given protection problem.
Protection Features
Component status for all ESET security features (Antispam, Personal firewall, etc.)
System Information
Detailed information about the installed program, its program component version, etc.
SysInspector
Detailed information about startup processes and processes running in the background.
Quarantine
Contains a list of quarantined files. Quarantined files can be requested from a client and saved to a local disk.
3.4.4 Threat Log tab
This tab contains detailed information about individual virus or threat incidents.
Attribute
Client Name
Description
Name of client reporting the threat alert
Computer Name
Workstation/server name (hostname)
MAC Address
MAC address (network adapter)
Primary Server
Name of ERAS with which a client is communicating
Date Received
Time at which the event was logged by ERAS
Date Occurred
Time at which the event occurred
Level
Alert level
Scanner
Name of security feature which detected the threat
Object
Object type
Name
Usually a folder where the infiltration is located
Threat
Name of the detected malicious code
Action
Action taken by the given security feature
User
Name of the user that was identified when the incident occurred
Information
Information about the detected threat
Details
Client log submission status
3.4.5 Firewall Log tab
This tab displays information related to client firewall activity.
Attribute
Client Name
Description
Name of client reporting the event
Computer Name
Workstation/server name (hostname)
MAC Address
MAC address (network adapter)
Primary Server
Name of ERAS with which a client is communicating
Date Received
Time at which the event was logged by ERAS
27
Date Occurred
Time at which the event occurred
Level
Alert level
Event
Description of the event
Source
Source IP address
Target
Target IP address
Protocol
Protocol concerned
Rule
Firewall Rule concerned
Application
Application concerned
User
Name of the user that was identified when the incident occurred
3.4.6 Event Log tab
This tab shows a list of all system-related events.
Attribute
Client Name
Description
Name of client reporting the event
Computer Name
Name of workstation / server (hostname)
MAC Address
MAC address (network adapter)
Primary Server
Name of ERAS with which a client is communicating
Date Received
Time at which the event was logged by ERAS
Date Occurred
Time at which the event occurred
Level
Alert level
Plugin
Name of the program component reporting the event
Event
Description of the event
User
Name of the user associated with the event
3.4.7 Scan Log tab
This tab lists results of On-demand computer scans that were started remotely, locally on client computers, or as
scheduled tasks.
Attribute
Scan Id
Description
ID of the corresponding entry in the database (ID is in the form: Scan Number)
Client Name
Name of client where the scan was performed
Computer Name
Name of workstation / server (hostname)
MAC Address
MAC address (network adapter)
Primary Server
Name of the ERA Server a client is communicating with
Date Received
Time at which the scan event was logged by ERAS
Date Occurred
Time at which the scan took place on client
Scanned Targets
Scanned files, folders and devices
Scanned
Number of checked files
Infected
Number of infected files
Cleaned
Number of cleaned (or deleted) objects
Status
Status of the scan
28
User
Name of the user that was identified when the incident occurred
Type
User type
Scanner
Scanner type
Details
Client log submission status
3.4.8 Mobile Log tab
This tab displays detailed logs from the mobile phones connected to ERA Server.
Attribute
Mobile Id
Description
Network ID of the mobile device
Client Name
Name of client where action was performed
Computer Name
Name of workstation / server (hostname)
MAC Address
MAC address (network adapter)
Primary Server
Name of the ERA Server a client is communicating with
Date Received
Time at which the event was logged by ERAS
Date Occurred
Time at which the event took place on client
Level
Alert level
Log Type
Type of a log (e.g. Security Audit Log, SMS Antispam Log)
Event
Description of the event
Object Type
Object to which the event is related (e.g. SMS, file, ...)
Object Name
Particular object to which the event is related (e.g. SMS sender phone number, path to file, ...)
Action
Action performed (or error encountered) during the event
3.4.9 Quarantine tab
This tab consolidates all quarantine entries in your network.
Attribute
Quarantine Id
Description
ID number of the quarantined object assigned in order of occurrence
Hash
File hash code
DateReceived
Time at which the scan event was logged by ERAS
Occurred First
Time passed from the first occurrence of the quarantined item
Occurred Last
Time passed from the latest occurrence of the quarantined item
Object Name
Usually a folder where the infiltration is located
File Name
Name of the quarantined file
Extension
Type of extension of the quarantined file
Size
Size of the quarantined file
Reason
Reason for quarantining - usually a description of the threat type
Client Count
Number of clients quarantining the object
Hits
Number of times the object was quarantined
File
Indicates whether the object was requested to be downloaded to the server
29
3.4.10 Tasks tab
The meaning of this tab is described in the chapter titled ”Tasks”. The following attributes are available:
Attribute
State
Description
Task status (Active = being applied, Finished = task was delivered to clients)
Type
Task type
Name
Task name
Description
Task description
Date to deploy
Task execution time /date
Date Received
Time at which the event was logged by ERAS
Details
Task log submission status
Comment
A short comment describing the client (entered by the administrator)
3.4.11 Reports tab
This tab contains features which can be used to archive the activity in the network over certain time periods. The
Reports tab is used to organize statistical information in graph or chart form. For more information, see chapter
Reports 73 .
3.4.12 Remote install tab
This tab provides options for several remote installation methods of ESET Smart Security or ESET NOD32 Antivirus on
clients. For detailed information, see chapter Remote Installation 35 .
3.5 ERA Console setup
ERAC can be configured in the Tools > Console Options… menu.
3.5.1 Connection tab
This tab is is used to configure the connection from ERAC to ERAS. For more detail, see chapter Connecting to ERAS
.
19
3.5.2 Columns - Show / Hide tab
This tab allows you to specify which attributes (columns) are displayed in individual tabs. Changes will be reflected in
the Custom View Mode (Clients tab). Other modes cannot be modified.
3.5.3 Colors tab
This tab allows you to associate different colors with specific system-related events, in order to better highlight
problematic clients (Conditional Highlighting). For example, clients with a slightly outdated virus signature database (
Clients: Previous Version) could be distinguished from clients with an obsolete one (Clients: Older Versions or N/A).
3.5.4 Paths tab
This tab allows you to specify the directory to which ERAC will save reports downloaded from ERAS. By default, reports
are saved to:
%ALLUSERSPROFILE%\Application Data\Eset\ESET Remote Administrator\Console\reports
30
3.5.5 Date / Time tab
Appearance of the date / time columns:
Absolute
Console will display absolute time (e.g., "14:30:00").
Relative
Console will display relative time (e.g., ”2 weeks ago”).
Regional
Console will display time according to regional settings (taken from the Windows settings).
Recalculate UTC time to your local time (use local time)
Select this check box to recalculate to your local time. Otherwise, GMT – UTC time will be displayed.
3.5.6 Other settings tab
Filter settings > Auto apply changes
If enabled, filters in individual tabs will generate new outputs upon each modification of filter settings. Otherwise,
filtering will only take place after clicking the Apply Changes button.
Remote Administrator updates
This section allows you to enable checking for new versions of ESET Remote Administrator. We recommend the
default value of Monthly. If a new version is available, ERAC displays a notification at program startup.
Other settings > Use automatic refresh
If selected, data in individual tabs is automatically refreshed according to the designated interval.
Other settings > Show gridlines
Select this option to separate individual cells in all tabs by gridlines.
Other settings > Prefer showing Client as ”Server/Name” instead of ”Server/Computer/MAC”
Affects the display mode for clients in some dialog windows (e.g., New task). This option has only a visual effect.
Other settings > Use systray icon
ERA Console will be represented by an icon in the Windows notification area.
Other settings > Show on taskbar when minimized
If the ERAC window is minimized, it will be accessible from the Windows task bar.
Other settings > Use highlighted systray icon when problematic clients found
Select this option in conjunction with the Edit button to define events which will trigger a change in color to the ERAC
icon in the notification area.
If the ERAC on the administrator’s PC is going to be connected permanently to ERAS, we recommend that you select
the Show on taskbar when minimized option and leave the Console minimized when inactive. If a problem occurs,
the icon in the notification area will turn red – which is a signal for the administrator to intervene. We also recommend
adjusting the option Use highlighted systray icon when problematic clients found in order to specify which
events will trigger a color change of the ERAC icon. However, the ERAC will disconnect if database compression is
enabled on the server.
Other settings > Tutorial messages
Enables (Enable All) or Disables (Disable All) all informative messages.
31
3.6 Display modes
ERAC offers the user two display modes:
Administrative mode
Read-only mode
The administrative mode of ERAC gives the user full control over all features and settings, as well as the ability to
administer all client workstations connected to it.
The read-only mode is suitable for viewing the status of ESET client solutions connecting to ERAS; creation of tasks for
client workstations, creation of install packages and remote installation are not allowed. The License Manager, Policy
Manager and Notification Manager are also inaccessible. Read-only mode does allow the administrator to modify ERAC
settings and generate reports.
The Display mode is selected at each console startup in the Access drop-down menu, while the password to connect to
ERAS can be set for either display mode. Setting a password is especially useful if you want some users to be given full
access to ERAS and others read-only access. To set the password, click Tools > Server Options... > Security and click
the Change... button next to Password for Console (Administrator Access) or (Read-Only Access).
3.7 ESET Configuration Editor
The ESET Configuration Editor is an important component of ERAC and is used for several purposes. Some of the most
important are the creation of the following:
Predefined configurations for installation packages
Configurations sent as tasks or policies to clients
A general (.xml) configuration file
Configuration Editor is a part of ERAC and is represented mainly by the cfgedit.* files.
The Configuration Editor allows the administrator to remotely configure many of the parameters available in any ESET
security product, especially those installed on client workstations. It also allows the administrator to export
configurations to .xml files which can later be used for multiple purposes, such as creating tasks in ERAC, importing a
configuration locally in ESET Smart Security, etc.
The structure used by the Configuration Editor is an .xml template which stores the configuration in a tree-like
structure. The template is stored in the cfgedit.exe file. That is why we recommend that ERAS and ERAC be updated
regularly.
Warning: The Configuration Editor allows you to modify any .xml file. Please avoid modifying or rewriting the cfgedit.xml
source file.
For the Configuration Editor to function, the following files must be available: eguiEpfw.dll, cfgeditLang.dll, eguiEpfwLang.
dll and eset.chm.
32
3.7.1 Configuration layering
If a value is changed in the Configuration Editor, the change is marked by a blue symbol
icon has not been changed and will not be written to the .xml output configuration.
. Any entry with the grey
When applying a configuration to clients, only modifications which have been saved to the .xml output configuration
file will be applied ( ) All other items ( ) will remain unchanged. This behavior allows for gradual application of several
different configurations without undoing previous modifications.
An example is shown in the figure below. In this configuration the username EAV-12345678 and password are inserted
and using a proxy server is prohibited.
The second configuration (shown in the figure below) sent to clients will ensure that previous modifications are
preserved, including the username EAV- 12345678 and password. This configuration will also allow the use of a proxy
server and defines its address and port.
33
3.7.2 Key configuration entries
In this section, we explain several of the key configuration entries for ESET Smart Security and ESET NOD32 Antivirus,
available through the ESET Configuration Editor:
ESET Smart Security, ESET NOD32 Antivirus > ESET Kernel > Setup > Remote administration
Here you can enable communication between client computers and the ERAS (Connect to Remote Administrator
server). Enter the name or IP address of ERAS (Server address). The Interval between connections to server option
should be left at the default value of five minutes. For testing purposes, this value can be decreased to 0, which will
establish a connection every ten seconds. If a password is set, use the one which was specified in ERAS. For more
information, see the Password for Clients option in the Security tab 76 chapter. Additional information on password
configuration can also be found in this section.
ESET Kernel > Setup > License keys
Client computers require no license keys to be added or managed. License keys are only used for server products.
ESET Kernel > Setup > ThreatSense.Net
This branch defines the behavior of the ThreatSense.Net Early Warning System, which allows submission of
suspicious files for analysis to ESET’s labs. When deploying ESET solutions to a large network, the
Submit suspicious files and Enable submission of anonymous statistical information options are particularly
important: If these are set to Do not submit or No, respectively, the ThreatSense.Net System is completely disabled.
To submit files automatically without user interaction, select Submit without asking and Yes, respectively. If a proxy
server is used with the Internet connection, specify the connection parameters under ESET Kernel > Setup >
Proxy server.
By default, the client products submit suspicious files to ERAS, which submits them to ESET’s servers. Therefore, the
proxy server should be correctly configured in ERAS (Tools > Server Options > Advanced > Edit Advanced Settings
> ERA Server > Setup > Proxy server).
Kernel > Setup > Protect setup parameters
Allows the administrator to password-protect the setup parameters. If a password is established, it will be required in
order to access the setup parameters on client workstations. However, the password will not affect any changes to
the configuration made from ERAC.
Kernel > Setup > Scheduler / Planner
This key contains the Scheduler/Planner options, which allow the administrator to schedule regular antivirus scans,
etc.
NOTE: By default, all ESET security solutions contain several predefined tasks (including regular automatic update and
automatic check of important files on startup). In most cases, it should not be necessary to edit or add new tasks.
ESET Kernel > Setup > Default user interface values
The settings under Default user interface values (i.e., Show splash screen/Don’t show splash screen) only apply
modifications to the client’s default settings. The client’s settings can then be managed on a per-user basis and
cannot be changed remotely. To change the setting remotely the Suppress user settings option must be set to Yes.
The Suppress user settings option is only available for clients running 4.0 or later ESET security products.
Update
This branch of the Configuration Editor allows you to define how update profiles are applied. Normally, it is only
necessary to modify the predefined profile My profile and change the Update server, Username and Password
settings. If Update server is set to Choose Automatically, all updates will be downloaded from ESET’s update
servers. In this case, please specify the Username and Password parameters which were provided at the time of
purchase. For information on setting client workstations to receive updates from a local server (Mirror), please see
the chapter titled Mirror server 77 . For more information on using the scheduler, see chapter Scheduler 89 .
NOTE: On portable devices such as notebooks, two profiles can be configured – one to provide updating from the
Mirror server and the other to download updates directly from ESET’s servers. For more information, see chapter
Combined update for notebooks 93 at the end of this document.
34
4. Installation of ESET client solutions
This chapter is dedicated to the installation of ESET client solutions for Microsoft Windows operating systems.
Installations can be performed directly 35 on workstations, or remotely 35 from ERAS. This chapter also outlines
alternative methods of remote installation.
NOTE: Although it is technically feasible, we do not recommend that the remote installation feature be used to install
ESET products to servers (workstations only).
Important: Administrators, who use Microsoft Remote Desktop connection to access remote client PCs should read
following article before remotely installing security solutions.
4.1 Direct installation
With a direct installation, the administrator is present at the computer where the ESET security product is to be
installed. This method requires no further preparation and is suitable for small computer networks or in scenarios
where ERA is not used.
This task can be greatly simplified with the help of a predefined.xml configuration. No further modification, such as
defining an update server (username and password, path to a Mirror server, etc.), silent mode, scheduled scan, etc., is
required during or after installation.
There are differences in applying the .xml configuration format between versions 4.x, 3.x and 2.x of ESET client
solutions:
Version 4.x: Download the installation file (e.g., ess_nt32_enu.msi) from eset.com and create your own installation
package in the Installation Packages Editor. Edit/Select the configuration that you want to associate with this
package, press the Copy... button next to the Package for Windows NT xx bit systems field and save the package
as ESET Install Msi File With Configuration (*.msi).
NOTE: Adding a configuration to the .msi installation file means the digital signature of this file will no longer be valid.
In addition, the steps from version 3.x apply to version 4.x as well.
Version 3.x: Download the installation file (e.g., ess_nt32_enu.msi) from eset.com. Copy the configuration file (cfg.xml)
to the directory where the install file is located. Upon execution, the installer will automatically adopt the
configuration from the .xml configuration file. If the .xml configuration file has a different name or is located
somewhere else, the parameter ADMINCFG =”path_to_xml_file” can be used (e.g., ess_nt32_enu.msi ADMINCFG =”\
\server\xml\settings.xml” to apply the configuration stored on a network drive).
Version 2.x: Download the installation file (e.g., ndntenst.exe) from eset.com. Extract the downloaded file to a folder
using a file extraction program such as WinRAR. The folder will contain installation files, including setup.exe. Copy the
nod32.xml configuration file to the folder. Run the setup.exe file – the configuration within nod32.xml will be
automatically applied. If the .xml configuration file has a different name, or is located somewhere else, the parameter
/cfg =”path_to_xml_file” can be used. (e.g. setup.exe /cfg =”\\server\xml\settings.xml” to apply the configuration stored
on a network drive).
4.2 Remote installation
ERA offers several methods of remote installation. Distribution of installation packages to target workstations can be
performed using the following methods:
Remote push installation
Logon script remote installation
Email remote installation
Upgrade
Remote installation by means of ERA consists of these steps:
Creation of installation packages
Distribution of packages to client workstations (push installation method, logon script, email, upgrade, external
solution)
35
The first step is initiated through ERAC, but the install package itself is located in ERAS, in the following directory:
%ALLUSERSPROFILE%\Application Data\Eset\ESET Remote Administrator\Server\packages
To launch installation packages through ERAC, click the Remote Install tab, select the Computers tab and right-click
anywhere within its contents. Select Manage packages from the context menu.
Each installation package is defined by a Name. See (1) in the figure above. The remaining sections of the dialog window
are related to the content of the package, which is applied after it has been successfully delivered to a target
workstation. Each package contains:
ESET client solution installation files (2)
.xml configuration file for ESET client solutions (3)
Command line parameters assigned to the package (4)
The Type drop-down menu in section (1) provides access to additional ERA features. In addition to remote installation,
ESET security products can be uninstalled remotely using the Uninstall ESET Security Products and NOD32 version 2
option. Remote installation of an external application can also be performed by selecting Custom package. This is
particularly useful if you want to run various scripts and executables on the remote machine, including uninstall tools
for third-party security products or standalone cleaning tools. You can specify custom command-line parameters for
use by the Package Entry File. See the Installation of third party products using ERA 94 chapter for more details.
Each package is automatically assigned an ESET Remote Installer agent, which allows for seamless installation and
communication between target workstations and ERAS. The ESET Remote Installer agent is named einstaller.exe and
contains the ERAS name and the name and type of package to which it belongs. The following chapters provide a
detailed description of the agent.
There are several parameters which can affect the installation process. They can be used either during direct installation
with the administrator present at the workstation, or for remote installation. For remote installations, parameters are
selected during the process of configuring installation packages – selected parameters are then applied automatically
on target clients. Additional parameters for ESET Smart Security and ESET NOD32 Antivirus can be typed after the
name of the .msi installation package (e.g., eav_nt64_ENU.msi /qn):
/qn
Quiet installation mode – no dialog windows are displayed.
/qb!
No user intervention is possible, but the installation process is indicated by a progress bar in %.
36
REBOOT =”ReallySuppress”
Suppresses restart after installation of the program.
REBOOT =”Force”
Automatically reboots after installation.
REBOOTPROMPT =””
After installation, a dialog window prompting the user to confirm rebooting is displayed (can’t be used along with /qn
).
ADMINCFG =”path_to_xml_file”
During installation, parameters defined in the specified.xml files are applied to ESET security products. The parameter
is not required for remote installation. Installation packages contain their own .xml configuration, which is applied
automatically.
PASSWORD=”password”
You need to add this parameter when the ESS/EAV settings are password protected.
Parameters for ESET NOD32 Antivirus 2.x should be typed after the setup.exe filename, which can be extracted along
with other files from the installation package (e.g., setup.exe /silentmode):
/SILENTMODE
Quiet installation mode – no dialog windows are displayed.
/FORCEOLD
Will install an older version over an installed newer version.
/CFG =”path_to_xml_file”
During installation, parameters defined in the specified .xml files are applied to ESET client solutions. The parameter is
not required for remote installation. Installation packages contain their own .xml configuration which is applied
automatically.
/REBOOT
Automatically reboots after installation.
/SHOWRESTART
After the installation, a dialog window prompting the user to confirm rebooting is displayed. This parameter can only
be used if combined with the SILENTMODE parameter.
/INSTMFC
Installs MFC libraries for the Microsoft Windows 9x operating system that are required for ERA to function correctly.
This parameter can always be used, even if the MFC libraries are available.
Under Create/Select installation package contents (2), the administrator can create a standalone install package
with a predefined configuration from an already existing and saved install package (the Save As... button). Such
installation packages can be run on the client workstation where the program is to be installed. The user only needs to
run the package and the product will install without connecting back to ERAS during the installation.
NOTE: Adding a configuration to the .msi installation file means the digital signature of this file will no longer be valid.
Important: On Microsoft Windows Vista and later we strongly recommend that you perform a silent remote installation
(the /qn, /qb parameter). Otherwise interaction with a user might cause the remote installation to fail due to timeout.
4.2.1 Requirements
The basic requirement for remote installation is a correctly configured TCP/IP network which provides reliable client
server communication. Installing a client solution using ERA imposes stricter conditions on the client workstation than
a direct installation. The following conditions should be met for remote installation:
Microsoft network client enabled
File and printer sharing service enabled
The file sharing ports (445, 135 – 139) are accessible
TCP/IP protocol
Administrative share ADMIN$ enabled
37
Client can respond to PING requests
Connectivity of ERAS and ERAC (ports 2221- 2224 are accessible)
Administrator username and password exists for client workstations (username cannot be left blank)
Simple file sharing disabled
Server service enabled
Remote Registry service enabled
NOTE: Recent versions of Microsoft Windows (Windows Vista, Windows Server 2008 and Windows 7) enforce security
policies limiting local user account permissions so that the user may not be able to execute specific network operations.
If your ERA service is running on a local user account, push installation issues may occur in certain specific network
configurations (e.g. when installing remotely from domain to workgroup). When using Windows Vista, Windows
Server 2008 or Windows 7, we recommend running the ERA service on accounts with sufficient networking rights. To
specify the user account on which you want to run ERA, navigate to Start ? Control Panel Administrative Tools
Services. Select ESET Remote Administrator Server service from the list and click the Log On tab. ESET Remote
Administrator 4 embeds this setting in the Advanced installation scenario so you must select Advanced
Fully customized installation during the installation. If you are using Push Installation on Windows Vista, Windows
Server 2008, or Windows 7 target workstations, make sure that your ERA Server as well as the target workstations are
in a domain.
We highly recommend that you check all requirements before installation, especially if there are multiple workstations
in the network (on the Remote Install tab select the Computers tab, right-click the relevant client(s) and select
Diagnostics of Push Installation from the context menu).
4.2.2 Configuring the environment for remote installation
Before installing ESET security products to network computers, the administrator should appropriately prepare the
environment to avoid installation failures.
The Network View section in Remote Install tab provides a customizable view for the network. There are two ways to
explore the network.
Console
The Console view provides standard NetBios search from the computer on which ERAC is installed. It shows all
available domains and workgroups which can be (un)checked in order to filter the view.
Server
The Server view provides more filtering options. Aside from the NetBios search, you can view computers in Active
Directory, existing ERA clients and also create your own, custom filters.
The custom filters include two items — Custom List and IP Search, both of which allow you to create your own groups
manually.
In the Custom list, you can add computers to a group either manually, by typing their names into the
Computers in group section, or by importing them from a .txt file. In both cases the computer names must be written
one by one, as a list.
The IP Search section allows you to create computer IP ranges and groups of computer IP ranges, where the IP range
serves as a filtering criterion.
NOTE: The Console/Server branches specify whether computers are browsed from ERAS or ERAC. We recommend
taking this into consideration if you are connecting to ERAS from a different network.
The Filter Options section provides two additional filtering options:
Unregistered computers — shows computers that are not listed in the current server database.
Clients with last connected warning — shows computers that are listed in the current server database and have
incurred the last connected warning.
After setting up all necessary conditions in the Network View and Filter Options sections, you can see a list of
workstations suitable for installation of a client solution on the right side of the window in the Computers tab. You can
run push installation diagnostics on computers that are found and displayed in the list by right-clicking on the selected
computers and selecting Diagnostics of Push Installation from the context menu. The diagnostics help you check
38
installation requirements and identify potential problems.
4.2.3 Remote Push Install
This method of remote install pushes ESET client solutions to remote target computers. Target computers should be
online. Supposing that all workstations are turned on, the push installation method is the most effective method.
Before starting a push install, you must first download the .msi install files for ESET Smart Security or ESET NOD32
Antivirus from ESET’s website and create an installation package. You can create an .xml configuration file that will
automatically be applied when the package runs. Please see the chapter on Requirements 37 prior to installation.
To initiate a push installation, follow the steps below:
1) Once computers suitable for remote installation are listed in the Computers tab, you can select all or some of them
and run a push installation task by right-clicking in the window and selecting Push Installation from the context menu.
2) Set the logon information for computers in the list (Set, Set All). This must be done while using an account with
administrator rights. You can still add clients to the list in this step by using the Add Clients Special feature.
3) Select the desired install package to deliver to target workstations.
4) Set the time when the task is to be run and press Finish.
You can view the push installation task status in the Install Tasks tab. For details of diagnostic results, select the
desired task and press F4. The Properties window shows up at the Details tab, where you can view remote install
diagnostics results by pressing View All Logs/View Selected Logs.
NOTE: The maximum number of concurrent push installation threads is set to 20 by default. If you send a push
installation task to a number of computers exceeding this limit, the additional computers will be put into queue and will
wait for the threads to be free. We do not recommend increasing this value for performance reasons; however, if you
consider it necessary, you can change the limit in the configuration editor (ESET Remote Administrator > ERA Server
> Setup > Remote Install).
Details of the remote installation process are described below:
5) ERAS sends the einstaller.exe agent to the workstation with the help of the administrative share admin$.
39
6) Agent starts as a service under the system account.
7) Agent establishes communication with its ”parent” ERAS and downloads the corresponding install package on TCP
port 2224.
8) Agent installs the package under the administrator account defined in step 2; the corresponding .xml configuration
and command line parameters are also applied.
9) Immediately after the installation is complete, the agent sends a message back to ERAS. Some ESET security
products require a reboot and will prompt you if necessary.
The context menu (right-click) of the Computers tab window offers these options:
Manage Packages
Runs the Installation Package Editor. See Remote installation
35
for details.
Upgrade client
Runs the upgrade task. Use this option if you want to install a newer version of ESS/EAV over the older one.
40
Diagnostics of Push Installation
Checks the availability of clients and services to be used during the remote install. For more information, see the
chapter titled Configuring the environment for remote installation 38 .
Push installation
Runs the remote install task.
Export to Folder or Logon Script
See Logon / email remote install 41 for details.
Send via E-mail
See Logon / email remote install
41
for details.
Set Default Logon for E-mail and Logon Script Installations
Opens the Default Logon window where you can specify user name and password of an administrator account of
the target computer(s).
Properties
Opens Client Properties window, where you can find all important information about the client.
For the other context menu options, please see chapter Context menu
22
.
4.2.4 Logon /email remote install
The logon and email remote install methods are very similar. They only vary in the way that the einstaller.exe agent is
delivered to client workstations. ERA allows the agent to run via logon script or via email. The einstaller.exe agent can
also be used individually and run via other methods (for more information, see chapter Custom remote install 43 ).
The logon method is well suitable for notebooks which are often outside the local network. The installation is
performed after they logon to the domain. For these devices, the logon script method is suggested.
While the logon script runs automatically when the user logs on, the email method requires intervention on the part of
the user, who must launch the einstaller.exe agent from the email attachment. If launched repeatedly, einstaller.exe
will not trigger another installation of ESET client solutions. For more information, see chapter Avoiding repeated
installations 45 .
The line calling the einstaller.exe agent from the logon script can be inserted using a text editor or other proprietary tool.
Similarly, einstaller.exe can be sent as an email attachment by any email client. Regardless of the method used, make
sure you are using the correct einstaller.exe file.
For einstaller.exe to launch, the currently logged in user does not necessarily have to be an administrator. The agent
adopts the required administrator username/password/domain from ERAS. For more information, see the end of this
chapter.
Enter the path to einstaller.exe in the logon script:
1) Right-click an entry on the Remote Install tab, click Export to Folder or Logon Script and select the Type and name
of the Package to be installed.
2) Click the … button next to Folder and select the directory where the einstaller.exe file will be located and available
within the network and click OK.
3) In the Share field, make sure that the path is correct, or edit it if necessary.
4) Click the button next to Script Folder to select the folder where the script is located and modify the mask if
necessary (Files).
5) In the Files section, select the file to which the line (calling einstaller.exe) will be inserted.
6) Click Export to Logon Script to insert the line.
7) Location of the line can be modified by clicking Edit >> and saved by clicking the Save button.
41
Attaching the agent (einstaller.exe) to email:
1) Click Email… on the Remote Install tab and select the Type and name of the Package you wish to install.
2) Click To… to select addresses from the address book (or insert individual addresses).
3) Enter a Subject in the corresponding field.
4) Type a message into the Body.
5) Check the Send compressed as .zip file option if you wish to send the agent as a zipped package.
6) Click Send to send the message.
During the remote installation process, backward connection to ERAS takes place and the agent (einstaller.exe) adopts
settings from the Set Default Logon for Email and Logon Script Installations settings in the context menu.
42
The username and password of the account under which the installation of the package is to be performed must be an
account with administrator rights or, preferably, a domain administrator account. Values inserted in the
Default Logon… dialog window are forgotten after each service (ERAS) restart.
4.2.5 Custom remote install
It is not a requirement to use ERA tools to remotely install ESET client solutions. In the end, the most important aspect
is to deliver and execute the einstaller.exe file on client workstations.
For einstaller.exe to launch, the user currently logged in does not necessarily have to be an administrator. The agent
adopts the required administrator username/password/domain from ERAS. For more information, see the end of this
chapter.
The einstaller.exe file can be obtained as follows:
From the Computers tab (in the Remote Install tab), right-click anywhere in the tab, choose
Export to Folder or Logon Script from the context menu and select the Type and name of the Package to be
installed.
Click the
button next to Folder and select the directory where einstaller.exe will be exported.
Click the Export to Folder button.
Use the extracted einstaller.exe file.
NOTE: The ”Direct installation with predefined XML configuration” method can be used in situations where it is possible to
provide administrator rights for the installation. The .msi package is launched using the /qn parameter (version s 4.x, 3.
x) or the /silentmode parameter (version 2.x). These parameters will run the installation without displaying a user
interface.
43
The username and password of the account under which the installation of the package is to be performed must be an
account with administrator rights or, preferably, a domain administrator account.
During the remote installation process, backward connection to ERAS takes place and the agent (einstaller.exe) adopts
settings from the Set Default Logon for E-mail and Logon Script Installations option.
If the einstaller.exe agent is started manually on a target workstation, the remote installation is handled in the following
way:
The einstaller.exe agent sends a request to ERAS (TCP port 2224)
ERAS starts a new push installation (with a new agent) of the corresponding package (sent via the share admin$). The
agent waits for an answer from ERAS (sending the package via the share admin$). In the event that no answer
arrives, the agent will attempt to download the install package (via the TCP/IP port 2224). In this case, the
administrator username and password specifed in Remote Install > Logon ... on the ERAS is not transferred and the
agent attempts to install the package under the current user. On the operating systems Microsoft Windows 9x/Me,
the administrative share cannot be used, therefore the agent automatically establishes a direct TCP/IP connection to
the server. The new agent then starts downloading the package from ERAS via TCP/IP protocol.
The installation of the package is launched, applying the associated .xml parameters under the account defined in ERAS
(the Set Default Logon for E-mail and Logon Script Installations option).
4.2.6 Upgrade
This type of installation is designated for clients with ESS/EAV version 4.2 and later. Beginning with version 4.2, a new
upgrade mechanism was implemented that allows ERA to initiate the upgrade process on the client side without the
need of the einstaller.exe agent. This mechanism works in a manner similar to the program component update, - or
PCU, which upgrades clients to a newer version of the program. For version 4.2 and later ESS/EAV clients, we strongly
recommend this type of upgrade.
NOTE: If a custom configuration file has been defined for the installation package it will be ignored during the upgrade.
44
4.2.7 Avoiding repeated installations
Immediately after the agent successfully completes the remote installation process, it marks the remote client with
a flag prohibiting repeated installations of the same installation package. The flag is written to the following registry
key:
HKEY_LOCAL_MACHINE\Software\ESET\ESET Remote Installer
If the Type and Name of the package defined in the einstaller.exe agent match the data in the registry, the installation
will not be performed. This prevents repeated installations from targeting the same workstations.
NOTE: The remote push install method ignores this registry key.
ERAS provides an additional feature to prevent repeated installations that activates when the installer establishes
backward connection to ERAS (TCP 2224). If there is an error message related to the workstation, or the installation has
been successfully completed any additional installation attempts will be denied.
The agent records the following error to the installer log located in %TEMP%\einstaller.log:
Eset Installer was told to quit by the server ‘X:2224’.
To prevent repeated installations from being denied by ERAS the related entries in the Remote Install Task details tab
must be removed. To delete an entry, select it, click on the Delete button and confirm by pressing Yes.
4.3 Installation in an Enterprise environment
When deploying programs in large networks, it is important to use a tool capable of performing remote program
installations on each and every computer in the network.
Installing through Group Policy
In the Active Directory environment, this task can be elegantly solved by a Group Policy installation. Installation uses
the MSI installer, which is distributed directly to all clients connecting to the domain via Group Policy.
To configure a domain controller to automatically install ESET Smart Security or ESET NOD32 Antivirus on each
workstation after logging in, proceed as follows:
1) Create a shared folder on your domain controller. All workstations should have ”read” permission to this folder.
2) Copy the ESET Smart Security or ESET NOD32 Antivirus installation package (.msi) to the folder.
3) Insert an .xml configuration file, which is to be applied to the program, to the same folder. The file should be named
cfg.xml. To create a configuration file, the ESET Configuration Editor can be used. For more information see chapter
45
ESET Configuration Editor
32
.
4) Click Start > Programs > Administrative tools > Active Directory Users and Computers.
5) Right-click the domain name and select Properties > Group Policy > Edit > User Configuration.
6) Right-click Software Settings and select New > Package.
7) In the Open window, specify the UNC path to the shared installation package, i.e. \
\computer_name\path\installation_package.msi and click Open. Do not use the Browse option to locate the
installation package, because it will be displayed as a local network path rather than a UNC network path.
8) In the next dialog window select the Assigned option. Then click OK to close the window.
By following the steps above, the installer package will be installed on each computer that enters the domain. To install
the package to computers which are currently up and running, those users should log out and log back in again.
If you wish to give users the ability to accept or deny the installation of the package, select Publish instead of Assigned
in step 8. The next time the user logs in, the package will be added to Control Panel > Add or Remove programs >
Add new program > Add programs from your network. The package will then be available to users for future
installations from that location.
46
5. Administering client computers
5.1 Tasks
Client workstations that are correctly connected to ERAS and displayed in ERAC can be configured and administered
using various types of tasks.
The general workflow below applies for all tasks described in the following sub-chapters except the Interactive Task
(see the chapter for an explanation of the workflow).
50
Stage I - New Task
Tasks can be applied to multiple clients, or to one or more groups of clients.
1) To apply a task to one or more client workstations, select and right-click the workstations in the Clients pane.
2) Click New Task and select the type of task you wish to perform.
NOTE: Alternatively, the task wizard can be opened from the ERAC main menu by clicking Actions > New Task.
Stage II - Select one of the following tasks:
Configuration Task
48
On-demand Scan (Cleaning Disabled)
On-demand Scan (Cleaning Enabled)
Update Now
49
49
49
SysInspector Script Task
49
Restore/Delete From Quarantine Task
Generate Security Audit Log
Show Notification
50
50
50
3) After choosing the desired task you will have to perform the task-specific actions described in each of the chapters
(see links above).
Stage III - Select Clients
4) You can modify your client selections in the Select Clients window, which will appear once you have set up the task.
You can refine your client selection by adding clients from the All items client overview tree (left half of the window)
to the Selected items list (right half of the window) or by removing the client entries that are already on the list.
NOTE: Click Add Special ... to open a new window in which you can add clients from the Clients pane or add clients
by Server and/or Groups.
Stage IV - Task Report, Finish
5) The last dialog window, Task Report shows a preview of the configuration task. Enter a name or description for the
task (optional). The Apply task after option can be used to set the task to run after a specified date/time. The Delete
tasks automatically by cleanup if successfully completed option deletes all tasks which have been successfully
delivered to target workstations.
6) Click Finish to register the task to run.
The following subchapters outline the individual types of tasks for client workstations, with an accompanying example
scenario for each task type.
47
5.1.1 Configuration Task
Configuration tasks are used to modify protection settings on client workstations. These tasks are delivered to client
workstations in configuration packages which contain the modification parameters. The .xml files created in the ESET
Configuration Editor or exported from clients are also compatible with configuration tasks.All parameters are organized
into a comprehensive structure and all items in the Editor are assigned an icon. Clients will only adopt active parameters
(marked by a blue icon). All inactive (greyed out) parameters will remain unchanged on target computers. The same
principle applies to inherited and merged policies – a child policy will adopt only active parameters from a parent policy.
The example below demonstrates how to create a configuration task that changes the username and password on
target computers. Any switches and options not used in this example will follow at the end of this chapter.
First, designate the workstations to which the task is to be delivered. Mark those workstations in the Clients pane in
ERAC.
1) Right-click any of the selected workstations and select New Task > Configuration Task from the context menu.
2) The Configuration for Clients window will open, which serves as a configuration task wizard. You can specify the
source of the configuration file by clicking Create..., Select..., or Create from Template...
3) Click the Create button to open the ESET Configuration Editor and specify the configuration to be applied. Navigate
to ESET Smart Security, ESET NOD32 Antivirus > Update Module > Profile > Setup > Username and Password.
4) Insert the ESET-supplied username and password and click Console on the right to return to the task wizard. The
path to the package is displayed in the Create/Select configuration field.
5) If you already have a configuration file that contains the desired modifications, click Select, find the file and assign it
to the configuration task.
6) Alternatively, you can click Create from Template, select the .xml file and make changes if needed.
7) To view or edit the configuration file that you have just created or edited, click the View or Edit buttons.
8) Click Next to proceed to the Select Clients window which shows the workstations to which the task will be
delivered. In this step, you can add more clients (or 2 from selected Servers or Groups). Click Next to proceed to the
next step.
9) The last dialog window, Task Report shows a preview of the configuration task. Enter a name or description for the
task (optional). The Apply task after option can be used to set the task to run after a specified date/time. The Delete
tasks automatically by cleanup if successfully completed option deletes all tasks which have been successfully
delivered to target workstations.
10) Click Finish to register the task to run.
NOTE: If you want to delete existing exclusions or scheduled tasks on a client with a configuration task, you have go to
the ESET Configuration Editor by editing the task, select the exclusions and scheduled tasks and mark them for deletion
using the Mark for deletion button. The option Remove only removes the exclusions and scheduled tasks from the
list, but does not enforce the deletion on a client. This is best done by using an already existing configuration from a
task forced to clients and editing it. In the Clients tab, mark a Client and press F4, the Configuration will open where
you can save the configuration (In the Tasks tab, mark the task and press F4, the Properties will open and then click on
the Configuration tab). If you check the box Then run ESET Configuration Editor to edit the file before saving the
configuration, you can edit it right after. Click the Save As... button and the configuration will be saved. If you want to
create a new task, check the box Use the downloaded configuration in the new configuration task and click the
New Task button. The saved configuration will be used in a new task where you can edit it and then continue to create
a task (as described above).
Warning: If you edit an existing configuration downloaded from a client and you plan to use it for other clients in the
network, be aware that most of the parameters of such a configuration are active (marked by a blue icon) and these will
be forced to a client. Therefore you have to deactivate the parameters you do not want to change on clients - i.e.
change the blue icon to grey (right-click on a parameter and select Unmark from the context menu).
48
5.1.2 On-demand Scan Task
The New Task context menu option contains two variants of the On-demand scan. The first option is On-demand
scan (cleaning disabled) – this scan only creates a log, no action is taken on infected files. The second option is Ondemand scan (cleaning enabled).
The On-demand Scan window contains the same default settings for both variants, aside from the
Scan without cleaning option. This option determines whether the scanner should or should not clean infected files.
The example below demonstrates how to create an On-demand scan task.
1) The Configuration Section drop-down menu allows you to select the type of ESET product for which the Ondemand scan task is being defined. Select those that are installed on target workstations.
NOTE: The Exclude this section from On-demand scan option disables all settings in the window for the selected
product type – they will not be applied on workstations with the product type defined in Configuration section.
Therefore, all clients with the specified product will be excluded from the list of recipients. If the administrator marks
clients as receivers and excludes the product using the above-mentioned parameter, then the task will fail with
a notification that the task could not be applied. To avoid this, the administrator should always specify clients to
which the task will be assigned.
2) In Profile name you can select a scanning profile to be applied for the task.
3) In the Drives to scan section, select the types of drives to be scanned on client computers. If the selection is too
general, you can add an exact path to objects to be scanned. Use the Path field or the Add Path button for this
purpose. Select Clear History to restore the original list of drives to scan.
4) Click Next to proceed to the dialog windows labeled Select Clients and Task Report which are described in detail in
the Tasks 47 chapter.
5) After the task is finished executing on the client workstations, the results are sent back to the ERAS and they can be
viewed in ERAC in the Scan Log pane.
5.1.3 Update Now Task
The purpose of this task is to force updates on target workstations (virus signature database updates as well as
program component upgrades).
1) Right-click on any workstation from the Clients pane and select New Task > Update Now.
2) If you wish to exclude certain types of ESET security products from the task, select them in the
Configuration section drop-down menu and select the Exclude this section from Update Task option.
3) To use a specific update profile for the Update Now task, enable the Specify profile name option and select the
desired profile. You can also select User defined profile name and enter the profile name; the value of the field will
return to default if you click Clear History.
4) Then click Next to proceed to the dialog windows, Select Clients and Task Report. For a description of these
dialogs, see chapter Tasks 47 .
5.1.4 SysInspector Script Task
The SysInspector Script task lets you run scripts on target computers. It is used to remove unwanted objects from the
system. For more details see the ESET SysInspector 95 help page.
1) After completing Stage I and Stage II described in chapter Tasks
workstation.
47
click Select to choose a script to run on the target
2) Click View & Edit to adjust the script.
3) Click Next to proceed to the Select Clients and Task Report dialog windows which are described in detail in the
Tasks 47 chapter.
4) After the task finishes on the client workstation, the information will display in the State column of the Tasks pane.
NOTE: SysInspector script tasks are supported only by ESET Smart Security/ESET NOD32 Antivirus version 4.0 and
later.
49
5.1.5 Restore/Delete from Quarantine Task
With this task you can restore or delete specified quarantined objects from the client quarantine.
1) After you open the Restore/Delete from Quarantine window (see chapter Tasks 47 ) click the Restore/Delete radiobutton depending on the kind of action you would like to perform with the quarantined object.
NOTE: When you restore a quarantined object that is still detected as a threat you might want to select the option
Add exclusion too, otherwise the antivirus may stop the action or add the object to the quarantine again.
2) Select a condition to specify which quarantined objects you would like to restore/delete and click Next.
NOTE: If you opened the Restore/Delete from Quarantine window by right-clicking a quarantine entry directly from
the Quarantine tab (and selecting the Restore/Delete from Quarantine task option) you will not need to specify
conditions (the By hash option will be automatically selected and the hash code of the quarantined file used as an
identifier).
3) Select the clients for your restore/delete operation (see chapter Tasks
47
) and click Next.
4) Review your settings in the Task Report window, name your task, specify the time you would like to apply the task
and cleanup options, if desired, and then click Finish to confirm. See chapter Tasks 47 for more details.
5.1.6 Generate Security Audit Log Task
This task applies to ESET Mobile Security only.
Security Audit checks: battery level, Bluetooth status, free disk space, device visibility, home network and running
processes. A detailed report will be generated, indicating whether or not the item value is below the specified threshold
or if it could represent a potential security risk (e.g., device visibility turned on, etc.).
To run security audit on the phone:
1) Right-click the client’s name from the Clients pane and select New Task > Generate Security Audit Log from the
context menu.
2) Click Next to proceed to the Select Clients and Task Report windows. For a description of these windows, see the
chapter titled Tasks 47 .
5.1.7 Show Notification Task
This task applies to ESET Mobile Security only.
To send a notification (e.g., a warning message) to the phone:
1) Right-click the client’s name from the Clients pane and select New Task > Show Notification from the context
menu.
2) Type the notification Title and message Body in the appropriate fields and select the notification Verbosity.
3) Click Next to proceed to the Select Clients and Task Report windows. For a description of these windows, see the
chapter titled Tasks 47 .
5.1.8 Interactive Task
This task is different from all other tasks described here in its execution and application.
From the Clients tab, you can see the Protection Status Text column monitoring the protection status of all
connected ESET clients. A blank field denotes that the protection status of a specific client is on the
Maximum protection level. If the protection level of a client is lower than maximum, a protection status warning
highlighted in red or orange will appear in the Protection Status Text (e.g., ESET Personal firewall is disabled).
ERA enables the administrator to manipulate these settings from the Clients tab as follows:
1) Double-click a relevant client entry on the Client tab.
2) In the Properties window, click the Protection Status tab.
50
Figure: Click the suggested solution text to send an interactive task to the client.
3) The Protection status field will contain one or more warnings. Click the blue text suggesting a solution at the end of
each message.
4) Click Yes to confirm execution of the interactive task.
5) After repeating steps 3 and 4 for every message displayed, click Refresh several times to see if the status message(s)
disappear.
Once you have resolved all the issues successfully, the protection status message will change to Protection
status: System is secure.
NOTE: The Interactive task feature is supported by ESET Smart Security/ESET NOD32 version 3 and later.
5.2 Group Manager
Group Manager is a powerful tool for managing your clients, separating them into different groups and applying
different settings, tasks, restrictions, etc. It is easily accessible via Tools > Group Manager or CTRL+G. Groups are
independent for each ERAS and are not replicated.
You can create your own groups to fit your needs in your company network, or simply synchronize ERAC client groups
with your Microsoft Active Directory using the Active Directory Synchronization wildcard from the main Group
Manager window.
There are two main types of client groups:
Static Groups
Parametric Groups
Both Static and Parametric Groups can be used in various places within ERA, which significantly improves client
management capabilities.
51
5.2.1 Static Groups
Static groups are created to separate clients in your network into named groups and subgroups; i.e. you can create a
Marketing group that will contain all marketing clients and also create specialized division subgroups — Local sales,
EMEA Management, etc.
The Static Groups main window is divided into two parts. The left side contains existing, hierarchically displayed groups
and subgroups. Clients included in the selected group are listed on the right side of the window. By default, only clients
in the selected group are listed. If you wish to see clients included in subgroups of the currently selected group, check
the Show clients in subgroups check box on the right side of the window.
To create a new group, click Create and select a name for the group. A new group is created as a subgroup of the
currently selected parent group. If you wish to create a new main group, select the root of the hierarchical tree —
Static Groups. The Parent group field contains the name of the parent group for the newly created group (i.e. "/" for
the root). We recommend using a name that indicates where the computers are located (e.g. Business Department,
Support etc.). The Description field can be used to further describe the group (e.g. "Computers in office C", "HQ
workstations" etc.). Newly created and configured groups can also be edited later.
NOTE: When a task is sent to the Parent group, all stations that belong to its subgroup(s) will accept this task as well.
It is also possible to create empty groups for future use.
Click OK to create the group. Its name and description will appear on the left and the Add/Remove button will become
active. Click this button to add clients you would like included in the group (either double-click or drag-and-drop them
from left to right). To find and add clients, enter all or part of a client name in the Quick search field and all clients
containing the typed string will be displayed. To mark all clients, click Select All. Click the Refresh button to check for
any new clients recently connected to the server.
If manually selecting clients is not convenient you can click the Add Special... button for more options.
Select the Add clients loaded in the Clients pane option to add all clients displayed in the client section, or select the
Only selected option. To add clients that already belong to another server or group, select them from the lists on the
left and right and click Add.
Click OK in the Add/Remove dialog window to return to the main Static Group Manager window. The new group
should be displayed with its corresponding clients.
Click the Add/Remove button to add or remove clients from groups, or click the Delete button to delete an entire
group. Click the Copy to Clipboard button to copy the client and group lists. To refresh the group clients press the
Refresh button.
You can also Import/Export currently selected group clients to an .xml file.
5.2.2 Parametric Groups
In addition to Static Groups, Parametric Groups can be very useful. Client stations are dynamically assigned to a certain
parametric group when the group's conditions are met. The advantage of parametric groups is the ability to use them
in various places, including filters, policies, reports and notifications.
The Parametric Groups main window is composed of four sections. Parametric Groups lists the parent groups and
subgroups that have been created. When you have selected a certain group from Parametric Groups, clients that
belong to the currently selected group are listed in the Selected Group part.
NOTE: When a parent group is selected, the list contains subgroup members as well.
Parameters set for a selected group are listed in the Parameters section of the window. You can edit or add parameters
at any time by clicking the Edit... button.
The Synchronization status part displays a progress bar for the synchronization process.
To create a new group, simply click the Create... button. The new group will be created as a subgroup of the currently
selected parent group. If you wish to create a main group, select the root of the hierarchical tree — Parametric Groups.
The Parent group field contains the name of the parent group for the newly created group (i.e. "/" for the root). Enter
name and a short description for the new group. The next step is the creation of Client filter parameters, which can
be done by selecting options after pressing the Edit... button. If you enable the Sticky check box, clients will be
automatically added to this group when they match the conditions, but will never be removed. The content of a sticky
group can be reset manually at the root level.
NOTE: This parameter can only be set when creating a new group.
52
To edit an existing group, simply select it from the Parametric Groups list and then press the Edit... button in the
bottom of the window. For group deletion, select the desired group and press the Delete button.
You can manually refresh the group list by pressing the Refresh button. To import a group from a file select a group in
the Parametric Groups section under which you want the new group to be imported and click the Import... button.
Confirm your selection by clicking Yes. Locate the file you want to import and click Open. The group (and all of its
subgroups) will be imported under the selected location. To export a group (and all of its subgroups) select it in the
Parametric Groups section, click the arrow on the Import... button and select Export... Confirm by clicking Yes, select
a name and a location for your export file and click Save.
NOTE: You can use your mouse to drag and drop groups already in the Parametric Groups section.
5.2.3 Active Directory Synchronization
The Active Directory Synchronization uses automatic group creation (with corresponding clients) based on the
structure defined by Active Directory. It allows the administrator to sort clients to groups, as long as the client name
matches the object type computer at the side of Active Directory (AD) and belongs to groups in the AD.
There are two main options that determine the manner of synchronization:
The Synchronize groups option allows you to choose which AD groups will be synchronized. The All groups option
results in synchronization of the complete AD tree structure whether or not the AD groups contain ERA clients. The
next two options (Only groups containing ERA Server clients and Only groups containing ERA primary server
clients) mean stricter synchronization and result in the synchronization of only groups containing existing ERA clients.
With the Synchronization type option you define whether the AD groups to be synchronized will be added to the
existing AD groups (AD groups import) or if the existing AD groups will be completely replaced by those to be
synchronized (AD groups synchronize).
The Synchronize option allows you to schedule the AD synchronization to a certain time interval.
Detailed configuration of Active Directory synchronization can be done using the Configuration Editor (ESET Remote
Administrator > ERA Server > Setup > Groups > Active Directory Synchronization options). By default, only
Computer security groups and Computer organization units are synchronized. However, you can add other Active
Directory objects by checking the desired option.
NOTE: For ERAS to synchronize with Active Directory, ERAS does not need to be installed on your Domain Controller.
The Domain Controller only needs to be accessible from the computer where your ERAS is located. To configure
authentication to your Domain Controller, go to Tools > Server Options > Advanced > Edit Advanced Settings >
ESET Remote Administrator > ERA Server > Setup > Active directory. The format of the server name is LDAP://
servername or GC://servername. When empty, global catalog (GC) is used.
5.3 Policies
Policies are in many ways similar to Configuration tasks, except they are not one-shot tasks sent to one or more
workstations. Rather, they provide continuous maintenance of certain configuration settings for ESET security
products. In other words, a Policy is a configuration that is repeatedly forced to a client.
5.3.1 Basic principles and operation
Access the Policy Manager by selecting Tools > Policy Manager... The Policy Tree on the left lists the policies that are
present on individual servers. The right side is divided into four sections – Policy settings, Policy configuration,
Policy action and Global policy settings – the options in these sections enable an administrator to manage and
configure policies.
The primary functions of the Policy Manager include creating, editing and removing policies. Clients receive policies
from ERAS. ERAS can use multiple policies which can inherit settings from each other or from policies from an upper
server.
The system of adopting policies from an upper server is called inheritance; policies that are created as a result of
inheritance are referred to as merged policies. Inheritance is based on the Parent – Child principle, i.e. a child policy
inherits settings from a parent policy.
53
5.3.2 How to create policies
The default installation only implements one policy labeled ”Server Policy”. This name can be changed in the
Policy settings > Policy name field. The policy itself is configurable from the ESET Configuration Editor – click Edit and
define parameters for the selected ESET security product (or client). All parameters are organized into a comprehensive
structure and all items in the Editor are assigned an icon. Clients will only adopt active parameters (marked by a blue
icon). All inactive (greyed out) parameters will remain unchanged on target computers. The same principle applies to
inherited and merged policies – a child policy will adopt only active parameters from a parent policy.
If you want to delete existing exclusions or scheduled tasks on a client with a policy, you have go to the ESET
Configuration Editor by editing the policy, select the exclusions and scheduled tasks and mark them for deletion using
the Mark for deletion button . The option Remove only removes the exclusions and scheduled tasks from the list, but
does not enforce the deletion on a client.
ERA Servers allow for multiple policies (Add New Child Policy). The following options are available for new policies:
policy name, linking to a Parent policy and configuration (configuration can be empty, copied from an existing policy,
or copied from an .xml configuration file). Policies can only be created on the server you are currently connected to via
ERAC. To create a policy on a lower server you need to connect directly to that server.
Each policy has two basic attributes – Override any child policy and Down replicable policy. These attributes define
how active configuration parameters are adopted by child policies.
Override any child policy – Forces all active parameters to inherited policies. If the child policy differs, the merged
policy will contain all active parameters from the parent policy (even though the Override… is active for the child
policy). All inactive parameters from the parent policy will adjust to the child policy. If the attribute
Override any child policy is not enabled, settings in the child policy have priority over those in the parent policy for the
resulting merged policy. Such merged policies will be applied to other policies, if they are linked to it as their parent
policy.
Down replicable policy – Activates replication to child policies – i.e., it can serve as a default policy for lower servers
and can also be assigned to clients connected to lower servers.
Policies can also be imported/exported from/to an .xml file or imported from Groups. For more information see chapter
titled Importing/Exporting policies 56 .
54
5.3.3 Virtual policies
In addition to created policies, as well as those replicated from other servers (see chapter Replication tab 80 ), the Policy
Tree also contains a Default Parent Policy and Default Primary Clients Policy, which are referred to as virtual policies.
The default Parent Policy is located on an upper server in the Global Policy Settings and selected as
Default policy for lower servers. If the server is not replicated, this policy is empty (will be explained later on).
The default Primary Clients Policy is located on the given server (not on upper server) in Global Policy Settings and
picked up in Default policy for primary clients. It is automatically forced to newly connected clients (primary clients) of
the given ERAS, unless they have already adopted some other policy from Policy Rules (for more information, see
chapter Assigning policies to clients 56 . Virtual policies are links to other policies located on the same server.
5.3.4 Role and purpose of policies in the policy tree structure
Each policy in the Policy Tree is assigned an icon on the left. The meaning of icons are as follows:
1) Policies with blue icons refer to those present on the given server. There are three subgroups of blue icons:
Icons with white targets – Policy was created on that server. In addition, it is not down replicable, which means it is
not assigned to clients from lower servers and also it does not serve as a parent policy for the child servers. These
policies can only be applied within the server – to clients connected to the server. It can also serve as a parent policy for
another policy from the same server.
Icons with blue targets – Policy was also created on the server, however, the option Override any child policy is
selected (for more information, see chapter How to create policies 54 ).
Icons with downward arrows – these policies are replicated – the option Down replicable policy is enabled. You
can apply these policies on the given server and on its child servers.
2) Policies with grey icons originate from other servers.
Icons with upward arrows – These policies are replicated from child servers. They can only be viewed or deleted with
the option Delete Policy Branch. This option will not delete the policy itself, it will only remove the policy from the
Policy Tree. Therefore they can reappear after replication. If you do not want to display policies from lower servers, use
the option Hide foreign servers policies not used in policy tree.
Icons with downward arrows – These policies are replicated from upper servers. They can be used as Parent policies
for other policies, assigned to clients (Add Clients) or removed (Delete Policy). Please note that deleting will only
delete the policy – it will reappear after replication from the upper server (unless the attribute Down replicable policy
has been disabled on the upper server).
NOTE: To move and assign policies within the structure, you can either select the parent policy, or drag-and-drop it
with the mouse.
Existing policy rules can be imported/exported from/to an .xml file by clicking on the Import.../Export... button. Name
conflicts during the import (existing and imported policy with the same name) are solved by assigning a random string
after the name of an imported policy.
55
5.3.5 Viewing policies
Policies in the Policy Tree structure can be viewed directly in the Configuration Editor by clicking View... or
View Merged....
View Merged – Displays the merged policy created as a result of inheritance (the process of inheriting applies settings
from the parent policy). This option is displayed by default, because the current policy is already a merged policy.
View – Displays the original policy before it was merged with a parent policy.
On lower servers, the following options are available for policies inherited from upper servers:
View Merged – Same as above
View Override Part – This button applies for policies with the attribute Override any child policy. This option only
shows the forced part of the policy – i.e. the one which has priority over other settings in child policies.
View Non-force part – Has opposite effect of View Override Part – only displays active items, to which Override… is
not applied.
5.3.6 Importing/Exporting policies
The Policy Manager allows you to import/export policies and policy rules. Existing policies can be imported/exported
from/to an .xml file by clicking the Import Policies.../Export Policies... button. The policies can furthermore be
imported from groups by clicking the Import from Groups... button. Policy rules can be imported/exported by clicking
the Import.../Export... button and, in addition, they can be created using the Policy Rules Wizard.
Name conflicts (the existing and the imported policy names are identical) are solved during the import by adding a
random string to the name of the imported policy. If a conflict cannot be resolved in this fashion (usually due to the new
name being too long) the import finishes with the warning Unresolved policy name conflict. The solution is to delete or
rename the conflicting policies or policy rules.
5.3.7 Assigning policies to clients
There are two main rules for assigning policies to clients:
1. Local (primary) clients can be assigned any local policy or any policy replicated from upper servers.
2. Clients replicated from lower servers can be assigned any local policy with the Down replicable attribute or any
policy replicated from upper servers. They cannot be forced to adopt policies from their own primary server (to do so,
you must connect to that server with ERAC).
An important feature is that each client is assigned some policy (there is no such thing as clients with no policy). Also,
you cannot take a policy away from a client. You can only replace it with another policy. If you do not want to apply
a configuration from any policy to a client, create an empty policy.
5.3.7.1 Default Primary Clients Policy
One method of assigning policies is automatic application of the Default Primary Clients Policy, a virtual policy that is
configurable in Global Policy Settings. This policy is applied to primary clients, i.e. those directly connected to that ERAS.
For more information see chapter Virtual policies 55 .
5.3.7.2 Manual assigning
There are two ways to manually assign policies: Right-click a client in the Clients pane and select Add Policy from the
context menu, or click Add Clients > Add/Remove in the Policy Manager.
Clicking Add Clients in the Policy Manager opens the Add/Remove dialog window. Clients are listed on the left in the
format Server/Client. If the Down replicable policy is selected, the window will also list clients replicated from lower
servers. Select clients to receive the policy by using the drag-and-drop method or clicking >> to move them to
Selected items. Newly selected clients will have a yellow asterisk and can still be removed from Selected items by
clicking the << or C button. Click OK to confirm the selection.
NOTE: After confirming, if you reopen the Add/Remove dialog window, clients cannot be removed from
Selected items, you can only replace the policy.
You can also add clients using the Add Special feature, which can add all clients at once, add selected clients or add
clients from selected servers or groups.
56
5.3.7.3 Policy Rules
The Policy Rules tool allows an administrator to automatically assign policies to client workstations in a more
comprehensive way. Rules are applied immediately after the client connects to the server; they have priority over the
Default Primary Clients Policy and over manual assigning. The Default Primary Clients Policy only applies if the
client does not fall under any current rules. Likewise, if there is a manually assigned policy to be applied and it is in
conflict with the policy rules, the configuration forced by the policy rules will take precedence.
Policy rules have a tab within the Policy Manager, where they can be created and managed. The process of creation and
application is very similar to that of rule creation and management in email clients: each rule can contain one or more
criteria, the higher the rule is in the list, the more important it is (it can be moved up or down).
To create a new rule, click the New... button. Then enter a Name, Description, Client filter parameter and Policy
(a policy that will be applied to any clients matching the specified criteria).
To configure the filtering criteria, click the Edit button.
The available criteria are:
(NOT) FROM Primary Server – if (not) located on primary server
IS (NOT) New Client – if it is (not) a new client
HAS (NOT) New Flag – applies to clients with/without the New Client flag.
Primary Server (NOT) IN (specify) – if name of the primary server contains/does not contain...
ERA GROUPS IN (specify) – if client belongs to the group…
ERA GROUPS NOT IN (specify) – if client does not belong to the group…
DOMAIN/WORKGROUP (NOT) IN (specify) – if client belongs/does not belong to the domain…
Computer Name Mask (specify) – if computer name is ....
HAS IP Mask (specify) – if client belongs to the group defined by the IP address and mask…
HAS IP Range (specify) – if client belongs to the group defined by the IP range…
HAS (NOT) Defined Policy (specify) – if client does (or does not) adopt the policy…
Product Name (NOT) IN - if product name is...
Product Version IS (NOT) - if product version is...
Client Custom Info Mask (NOT) IN - if Client Custom Info contains...
HAS (NOT) Protection Status (specify) - if client´s protection status is...
Virus Signature DB Version IS (NOT) - if virus signature database is...
Last Connection IS (NOT) older than (specify) - if last connection is older than...
IS (NOT) Waiting For Restart - if client is waiting for restart
Policy rules can be imported/exported from/to an .xml file and they can also be created automatically by using the
Policy Rules Wizard, which allows you to create a policy structure based on the existing group structure and map
created policies to groups by creating correspondent policy rules. For more information on importing/exporting policy
rules see chapter titled Importing/Exporting policies 56 .
To remove a policy rule, click the Delete button from the Policy Manager window. Click Run Policy Rules Now if you
want to immediately apply all rules.
57
5.3.8 Deleting policies
As with rule creation, deleting is only possible for policies located on the server you are currently connected to. To
delete policies from other servers, you must directly connect to them with the ERAC.
NOTE: A policy may be linked to other servers or policies (as a parent policy, as a default policy for lower servers, as
a default policy for primary clients, etc.), therefore, in some cases it would need to be replaced rather than deleted. To
see options for deleting and replacing, click the Delete Policy button. The options described below may or may not be
available, depending on the position of the given policy in the policy hierarchy.
New policy for primary clients with the currently deleted policy – Allows you to select a new policy for primary
clients to substitute the one you are deleting. Primary clients can adopt the Default policy for primary clients, as well
as other policies from the same server (either assigned manually – Add Clients or forced by Policy Rules). As
a replacement you can use any policy from the given server or a replicated policy.
New parent policy for the currently deleted policy’s children policies (if existing) – If a policy to be deleted served as
a parent policy for other child policies, it must also be substituted. It can be substituted by a policy from that server, by
a policy replicated from upper servers, or by the N/A flag, which means that child policies will be assigned no substitute
policy. We highly recommend that you assign a substitute even if no child policy exists. Another user assigning a child
policy to that policy during the deletion process would cause a conflict.
New policy for replicated clients with the currently deleted or modified policy – Here you can select a new policy
for clients replicated from lower servers – those that were applied to the one you are currently deleting. As
a replacement you can use any policy from the given server or a replicated policy.
New default policy for lower servers – If the deleted policy serves as a virtual policy (see section Global Policy
Settings), it must be substituted by another one (for more information, see chapter Virtual policies 55 ). As
a replacement you can use any policy from the given server or the N/A flag.
New default policy for primary clients – If the deleted policy serves as a virtual policy (see section Global Policy
Settings), it must be substituted by another one (for more information, see chapter Virtual policies 55 ). You can use a
policy from the same server as a replacement.
The same dialog will also open if you disable the Down replicable option for a policy and click OK, Apply or if you select
another policy from the Policy Tree. This will activate the items New policy for replicated clients with the currently
deleted or modified policy or New default policy for lower servers.
5.3.9 Special settings
Two additional policies are not located in the Policy Manager but in Tools > Server Options > Advanced > Edit
Advanced Settings > ESET Remote Administrator > ERA Server > Setup > Policies.
Interval for policy enforcement (minutes):
This feature applies to policies in the specified interval. We recommend the default setting.
Disable policy usage:
Enable this option to cancel application of policies to servers. We recommend this option if there is a problem with the
policy. If you wish to avoid applying a policy to some clients, then a better solution is to assigning an empty policy.
58
5.3.10 Policy deployment scenarios
5.3.10.1 Each server is a standalone unit and policies are defined locally
For the purpose of this scenario suppose there is a small network with one main and two lower servers. Each server has
several clients. On each server, there is at least one or more policies created. The lower servers are located at the
company’s branch offices; both servers are managed by their local administrators. Each administrator decides which
policies are to be assigned to which clients within their servers. The main administrator does not intervene in the
configurations made by the local administrators and he does not assign any policies to clients from their servers. From a
server policy perspective, this means that Server A has no Default policy for lower servers. It also means that Server B
and Server C have the N/A flag or another local policy (aside from the Default parent policy) set as a parent policy. (e.
g., Servers B and C do not have any parent policies assigned from the upper server).
59
5.3.10.2 Each server is administered individually - policies are managed locally but the Default Parent
Policy is inherited from the upper server
The configuration from the previous scenario also applies to this scenario. However, Server A has the Default Policy for
Lower Servers enabled and policies on the lower servers inherit the configuration of the Default Parent Policy from the
master server. In this scenario, the local administrators are given a large degree of autonomy to configure policies.
While the child Policies on lower servers may inherit the Default Parent Policy, the local administrators can still modify it
by their own policies.
60
5.3.10.3 Inheriting policies from an upper server
The network model for this scenario is the same as the previous two scenarios. In addition, the master server, along
with the Default Parent Policy, contains other policies, that are down replicable and serve as parent policies on the
lower servers. For Policy 1 (see the figure below), the attribute Override any child policy is activated. The local
administrator still has a large degree of autonomy, but the main administrator defines which policies are replicated
down and which of them serve as parent policies for local policies. The attribute Override… dictates that configurations
set in the selected policies override those set on the local servers.
61
5.3.10.4 Assigning policies only from the upper server
This scenario represents a centralized system of policy management. Policies for clients are created, modified and
assigned only on the main server - the local administrator has no rights to modify them. All lower servers have only one
basic policy, which is empty (by default titled Server Policy). This policy serves as the Default Parent Policy for Primary
Clients.
5.3.10.5 Using policy rules
Our next example involves automatically assigning policies based on policy rules. This method is complementary and
should be used in combination with previously described scenarios, rather than as a standalone scenario.
If each server is managed by a local administrator, each administrator can create individual policy rules for their clients.
In this scenario it is important that no conflicts exist between policy rules, such as when the upper server assigns a
policy to clients based on the policy rules, while the lower server simultaneously assigns separate policies based on local
policy rules.
In the end, a centralized system greatly reduces the probability of conflicts, as the entire management process takes
place on the main server.
62
5.3.10.6 Using groups
In some situations, assigning policies to groups of clients can complement previous scenarios. Groups can be created
manually or by using the Active Directory Synchronization option.
Clients can be added to groups either manually (Static Groups) or automatically — by the group properties (
Parametric Groups). See chapter Group Manager 51 for more details.
To assign a policy to a group of clients, you can use the one-time assignment option in Policy Manager (Add Clients >
Add Special), or deliver policies automatically via Policy Rules.
One of the possible scenarios is as follows:
The administrator wants to assign different policies for clients belonging to different AD groups and change the
client's policy automatically when the client is moved to another AD group.
1) The first step is to set Active Directory Synchronization in Group Manager according to your needs. The important
thing here is to properly schedule the AD synchronization (possible options: hourly, daily, weekly, monthly).
2) After the first successful synchronization, the AD groups appear in the Static Groups section.
3) Create a new policy rule and mark ERA Groups IN and/or ERA Groups NOT IN as a rule condition.
4) Specify the AD groups that you want to add to the condition.
5) In the next step define the policy that will be applied to clients matching the rule condition(s) and press OK to save
the rule.
NOTE: Steps 3 - 5 can be replaced by using the Policy Rules Wizard, which allows you to create a policy structure
based on the existing group structure and map created policies to groups by creating corresponding policy rules.
This way it is possible to define a particular policy rule for each AD group. Assigning a certain policy to a certain client
now depends on the client's membership in a certain AD group. Since the AD synchronization is scheduled to occur
regularly, all changes in the client's AD groups membership are refreshed and taken into account when a policy rule is
applied. In other words, policies are applied to clients automatically depending on their AD group. Once the rules and
policies are defined thoroughly, no more intervention regarding policy application is needed from the administrator.
The main advantage of this approach is direct, automatic linking between AD group membership and policy
assignment.
5.4 Notifications
The ability to notify system and network administrators about important events is an essential aspect of network
security and integrity. An early warning about an error or malicious code can prevent enormous losses of time and
money needed to eliminate the problem later on. The next three sections outline the notification options offered by
ERA.
63
5.4.1 Notification Manager
To open the Notification Manager main window, click Tools > Notification Manager.
The main window is divided in two sections. The Notification rules section in the top part of the window contains a list
of existing (either predefined or user defined) rules. A rule in this section must be checked to generate notification
messages. By default, no notifications are enabled. Therefore, we recommend checking whether your rules are active.
The functional buttons under the list of rules include Save (save modifications to a rule), Save as... (save modifications
to a rule with a new name), Delete, Default (restore default settings for selected trigger type), Refresh and
Default Rules (update the list with default rules).
The Options section in the bottom half of the window provides information about the currently selected rule. All fields
and options in this section are described using the sample rule from chapter Rule creation 69 .
In each rule, you can specify the criteria, known as a Trigger, which activates the rule. The following triggers are
available:
Client State – Rule will be run if there is a problem on some of the clients
Server State – Rule will be run if there is a problem on some of the servers
Finished Task Event – Rule will be run after the specified task is finished
New Client Event – Rule will run if there is a new client connecting to the server (including replicated clients)
New Log Event – Rule will run if there is the specified event found in some of the logs
Based on the type of trigger other rule options can be activated or deactivated, therefore we recommend to set the
trigger type first when creating new rules.
The Priority drop-down menu allows you to set the rule priority. P1 is the highest priority, P5 is the lowest priority.
Priority does not in any way affect the functionality of rules. To assign priority to notification messages, the %PRIORITY
% variable can be used. Under the Priority menu, there is a Description field. We recommend that each rule is given
a meaningful description, such as ”rule that warns on detected infiltrations”.
64
As soon as the system detects the trigger event for a certain client or clients and finds a rule to be run, the client filter is
applied. The filter can be assigned to any rules in which clients are involved; to enter the client filter setup, click Edit in
the Client filter section. In the window that opens, define client filtering parameters. When a rule is applied, only
clients meeting the client filter criteria are taken into consideration. The filtering criteria are:
FROM Primary Server – Only clients from primary server; (the negative NOT FROM can also be applied)
Primary Server IN – Includes primary server in the output
HAS New Flag – Clients marked by the flag ”New” (the negative HAS NOT can also be applied).
ERA Groups IN – Clients belonging to the specified group
Domain/Workgroup IN – Clients belonging to the specified domain
Computer Name Mask – Clients with the specified computer name
HAS IP Mask – Clients falling into the specified IP mask
HAS IP Range – Clients within the specified IP address range
HAS Defined Policy – Clients with the specified policy assigned (the negative HAS NOT can also be applied).
After you have specified a client filter for your notification rule, click OK and proceed to the rule parameters. Client
parameters define what condition a client or a group of clients must meet in order to run the notification action. To
view the available parameter, click the Edit… button in the Parameters section.
The availability of parameters depends on the selected Trigger type. The following is a complete list of parameters
available by Trigger type.
The following parameters are available for Client State Triggers:
Protection Status Any Warnings – Any warning found in the Protection Status column
Protection Status Critical Warnings – A critical warning found in the Protection Status column
Virus Signature DB version – Problem with virus signature database (6 possible values)
- Previous – Virus signature database is one version older than the current one
- Older or N/A – Virus signature database is more than one version older than the current one
- Older than 5 versions or N/A – Virus signature database is more than 5 versions older than the current one
- Older than 10 versions or N/A – Virus signature database is more than 10 versions older than the current one
- Older than 7 days or N/A – Virus signature database is more than 7 days older than the current one
- Older than 14 days or N/A – Virus signature database is more than 14 days older than the current one
Last Connected Warning – The last connection was established before the specified time period
Has Last Threat Event – The Threat column contains a threat warning
Has Last Event – The Last Event column contains an entry
Has Last Firewall Event – The Firewall Event column contains a firewall event entry
Has New Flag – Client has the ”New” flag
Waiting For Restart – Client is waiting for restart
Last Scan Found Threat – On client, the specified number of threats was found during the last scan
Last Scan Not Cleaned Threat – On client, the specified number of uncleaned threats was found during the last scan
All parameters can be negated, but not all negations are usable. It is only suitable to negate those parameters that
include two logical values: true and not true. For example,the parameter Has New Flag only covers clients with the
”New” flag. The negative parameter would include all clients that are not marked by the flag.
All conditions above can be logically combined and inverted. The drop-down menu for The rule is applied when offers
two choices:
all of the options are met – Rule will only run if all specified parameters are met
65
any of the options is met – Rule will run if at least one condition is met
The following parameters are available for the Server State Triggers:
Server updated – Server is up-to-date
Server not updated – Server is not up-to-date for longer than specified
Server logs – The server log contains the following entry types:
- Errors – Error messages
- Errors+Warnings – Error messages and warning messages
- Errors+Warnings+Info(Verbose) - Error, warning and informative messages
- Filter log entries by type – Enable this option to specify error and warning entries to be watched in the
server log. Note that for notifications to work properly, the log verbosity (Tools > Server Options > Logging) must be
set to the corresponding level. Otherwise such notification rules would never find a trigger in the server log. The
following log entries are available:
– ADSI_SYNCHRONIZE – Active Directory group synchronization
– CLEANUP – Server cleanup tasks
– CREATEREPORT – On-demand report generating
– DEINIT – Server shutdown
– INIT – Server startup
– INTERNAL 1 – Internal server message
– INTERNAL 2 – Internal server message
– LICENSE – License administration
– MAINTENANCE – Server maintenance tasks
– NOTIFICATION – Notification management
– PUSHINST – Push install
– RENAME – Internal structure renaming
– REPLICATION – Server replication
– POLICY – Policy management
– POLICYRULES – Policy rules
– SCHEDREPORT – Automatically generated reports
– SERVERMGR – Internal server thread management
– SESSION – Server’s network connections
– SESSION_USERACTION - various user actions
– THREATSENSE – ThreatSense.Net – statistical information submission
– UPDATER – Server update and mirror creation
An example of a helpful parameter is UPDATER, which sends a notification message when the Notification Manager
finds a problem related to update and mirror creation in the server logs.
License Expiration – License will expire in the specified number of days, or it already has expired. Select the option
Warn only if this will cause the number of clients in the license fall below the number or actual clients in the
server database to send a notification if expiration will cause the number of clients in the license to fall below the
number of currently connected clients.
Limit license – If percent of free clients falls under the specified value
The following parameters are available for the New Log Event Triggers:
Log type – Select Event Log, Threat Log, or Firewall Log
Log level – Log entry level in the given log
- Level 1 – Critical Warnings – Critical errors only
- Level 2 – Above + Warnings – The same as 1, plus alert notifications
- Level 3 – Above + Normal – The same as 2, plus informative notifications
- Level 4 – Above + Diagnostic – The same as 3, plus diagnostic notifications
1000 occurrences in 60 minutes – Type the number of occurrences and select the time period to specify the event
frequency that must be reached for the notification to be sent. The default frequency is 1000 occurrences in one
hour.
Amount – Number of clients (either absolute or in percent)
66
Other trigger types do not have any specific parameters.
If the specified parameters for a rule are met, the action defined by the administrator is automatically performed. To
configure actions, click Edit… in the Action section. The action editor offers these options:
Email – The program sends the notification text of the rule to the specified email address; enter a Subject and click
To to open the address book.
SNMP Trap – Generates and sends SNMP notification
Execute (on server) – Enable this option and specify the application to run on the server
Log To File (on server) – Generates log entries in the specified log file. The Verbosity of this log is configurable.
Also Log Message - the message body will also be written to the log.
Log To Syslog - sends a syslog message to the specified syslog server on a specified port (default server is localhost,
default port is 514) ; the Verbosity of notifications can be configured.
Logging – Records notifications to server logs; the Verbosity of notifications can be configured. For this feature to
work correctly, you must enable logging in the ERA Server (Tools > Server Options > Logging).
For more information about the Verbosity of the logs see the chapter Logging
82
.
The notification format can be edited in the Message box in the bottom section of the Notification Manager main
window. In the text you can use special variables, using this syntax: %VARIABLE_NAME%. To view the list of available
variables, click Show me options.
Server_Last_Updated – Last update of the server
Primary_Server_Name
Rule_Name
Rule_Description
Client_Filter – Client filter parameters
Client_Filter_Short – Client filter settings (in short form)
Client_List – List of clients
Triggered – Date of the most recent notification sent (repeats excluded)
Triggered Last– Date of the most recent notification sent (repeats included)
Priority – Notification rule priority
Log_Text_Truncated – Log text that activated the notification (truncated)
Task_Result_List – List of finished tasks
Parameters – Rule parameters
Last_Log_Date – Date of the last log
License_Info_Merged – License information (summary)
License_Info_Full – License information (full)
License_Days_To_Expiry – Days left until expiration
License_Expiration_Date - nearest expiration date
License_Clients_Left – Free slots in the current license for clients to connect to the server
License_Customer - license customer (merged)
Actual_License_Count – Number of clients currently connected to the server
Virus_Signature_Db_Version - Latest virus signature database version
Pcu_List - Latest Program Component Update list
67
The last parameter to be specified is time and date. Activation of the rule can be delayed to a time period ranging from
one hour to three months. If you wish to activate the rule as soon as possible, set the Activation after drop-down
menu to ASAP. The Notification Manager is activated every 10 minutes by default, so if you select ASAP, the task
should run within 10 minutes. If a specific time period is selected from this menu, the action will automatically be
performed after the time period has elapsed (provided that the rule condition is met).
The Repeat after every… menu allows you to specify a time interval after which the action will be repeated. However,
the condition to activate the rule must still be met. In Server > Advanced > Edit Advanced Settings > ESET Remote
Administrator > Server > Setup > Notifications > Interval for notification processing (minutes) you can specify the
time interval in which the server will check and execute active rules.
The default value is 10 minutes. We do not recommend decreasing it, since this may cause significant server slowdown.
By default, the Notification Manager window contains predefined rules. To activate a rule, select the check box next to
the rule. The following notification rules are available. If they are activated and the rule conditions are met, they
generate log entries.
More than 10% of primary clients are not connecting – If more than 10 percent of clients have not connected to
the server for more than a week; the rule runs ASAP.
More than 10% of primary clients with critical protection status – If more than 10 percent of clients generated
a Protection status critical warning and have not connected to the server for more than a week; the rule runs ASAP.
Primary clients with protection status warning – If there is at least one client with a protection status warning that
has not connected to the server for at least one week.
Primary clients not connecting – If there is at least one client that has not connected to the server for more than
one week.
Primary clients with outdated virus signature database – If there is a client with a virus signature database two or
more versions older than the current one and has not been disconnected from the server for more than one week.
Primary clients with critical protection status – If there is a client with a critical protection status warning that has
not been disconnected for more than one week.
Primary clients with newer virus signature database than server – If there is a client with a newer virus signature
database than that on the server and that has not been disconnected for more than one week.
Primary clients waiting for restart – If there is a client waiting for restart that has not been disconnected for more
than one week.
Primary clients with a non-cleaned infiltration in computer scan – If there is a client on which a computer scan
could not clean at least one infiltration and that client has not been disconnected for more than one week; the rule
runs ASAP.
Completed task – If there was a task completed on a client; the rule runs ASAP.
New primary clients – If a new client has connected to the server; the rule runs ASAP.
New replicated clients – If there is a new replicated client in the list of clients; the rule runs after one hour.
Possible virus outbreak - If the frequency of Threat log entries on a client has exceeded 1000 critical warnings in one
hour on at least 10% of all clients.
Possible network attack – If the frequency of ESET Personal firewall log entries on a client has exceeded 1000 critical
warnings in one hour on at least 10% of all clients.
Server updated – If the server has been updated
Server not updated – If the server has not been updated for more than five days; the rule runs ASAP.
Error in server text log – If the server log contains an error entry.
License expiration – If the current license will expire within 20 days and after expiration, the maximum number of
client slots will be lower than the current number of clients; the rule runs ASAP.
License limit – If the number of free client slots decreases under 10% of all client slots available.
If not stated otherwise, all rules are run and repeated after 24 hours and are applied to the primary server and primary
clients.
68
5.4.1.1 Notifications via SNMP Trap
SNMP (Simple Network Management protocol) is a simple and wide spread management protocol suitable for
monitoring and identifying network problems. One of the operations of this protocol is TRAP, which sends specific
data. In ERA, we use TRAP to send notification messages.
In order for the TRAP tool to run effectively, the SNMP protocol must be correctly installed and configured on the same
computer as ERAS (Start > Control Panel > Add or Remove programs > Add/Remove Windows Components). The
SNMP service should be configured as described in this article: http://support.microsoft.com/kb/315154. In ERAS, you
need to activate an SNMP notification rule.. In ERAS, you need to activate an SNMP notification rule.
Notifications can be viewed in the SNMP manager, which must be connected to an SNMP server where the
configuration file eset_ras.mib is imported. The file is a standard component of an ERA install, and is usually located in
the folder C:\Program Files\ESET\ESET Remote Administrator\Server\snmp\.
5.4.2 Rule creation
The following steps demonstrate how to create a rule that will send email notification to the administrator if there is
a problem with the Protection Status of any client workstations. The notification will also be saved to a file named log.
txt.
1) Set the Trigger type drop-down menu to Client State.
2) Leave the options Priority, Activation after: and Repeat after every: at the predefined values. The rule will
automatically be assigned priority 3 and will be activated after 24 hours.
3) In the Description field, type protection status notification for HQ clients
4) Click Edit… in the Client filter section and only activate the ERA Groups IN section rule condition. In the lower part
of this window click the link specify and type HQ in the new window. Click Add and then click OK (twice) to confirm.
This designates that the rule is only applied to clients from the HQ group.
5) Further specify parameters for the rule in Parameters > Edit… Deselect all options except for Protection Status Any
Warnings.
6) Proceed to the Action section and click the Edit… button. In the Action window, activate Email, specify recipients (
To…) and Subject for the email. Then select the Log to file check box and enter the name and path of the log file to
be created. As an option, you can select the Verbosity of the log file. Click OK to save the action.
7) Finally, use the Message text area to specify the verbiage that will be sent in the body of the email when the rule is
activated. Example: “The client %CLIENT_LIST% reports protection status problem”.
8) Click Save as… to name the rule, e.g., ”protection status problems” and select the rule in the list of notification rules.
69
The finished rule should resemble the Figure below:
The rule is now active. If there is a problem with the protection status on a client from the HQ group, the rule will be
run. The administrator will receive an email notification with an attachment containing the name of the problematic
client. Click Close to exit the Notification Manager.
5.5 Detailed information from clients
ERA allows you to extract information about running processes, startup programs, etc. from client workstations. This
information can be retrieved using the integrated ESET SysInspector tool, which is integrated directly with ERAS. Along
with other useful functions, ESET SysInspector thoroughly examines the operating system and creates system logs. To
open it, click Tools > ESET SysInspector from the ERAC main menu.
If there are problems with a specific client, you can request an ESET SysInspector log from that client. To do this, rightclick the client in the Clients pane and select Request data – Request SysInspector Information. Logs can only be
obtained from generation 4.x products and later; earlier versions do not support this feature. A window with the
following options will appear:
Create snapshot (remember resulting log also on the client) – Saves a copy of the log to the client computer.
Include comparison to the last snapshot before specified time – Displays a comparative log, comparative logs are
created by merging the current log with a previous log if available. ERA will choose the first log that is older than the
specified date.
Click OK to obtain the selected logs and save them to the server. To open and view the logs, proceed as follows.
ESET SysInspector options for individual client workstations can be found in the Client Properties – SysInspector tab.
The window is divided into three sections; the top section shows text information about the most recent logs from the
given client. Click Refresh to load the most current information.
The middle section of the Request Options window is almost identical to the window which appears in the above
described process of requesting logs from client workstations. The Request button is used to get an ESET SysInspector
log from the client.
70
The bottom section is comprised of these buttons:
View – Opens the log listed in the top section directly in ESET SysInspector
Save As… – Saves the current log to a file. The Then Run ESET SysInspector Viewer to view this file option
automatically opens the log after it is saved (as it would after clicking View).
Generating and displaying new log files can sometimes be slowed by the local client, due to the size of the log and data
transfer speed. The date and time assigned to a log in Client Properties > SysInspector marks the date and time of
delivery to the server.
5.6 Centralized quarantine
Centralized quarantine is a powerful feature that enables administrators to work with quarantined files on clients with
ease. It makes operations like viewing, deleting, restoring quarantined files and excluding them from further scanning
simpler tasks. It is accessible via the Quarantine window in the main console panel or client properties. The main
quarantine window displays complete information about the file and threat name, hash, date/time of the first and last
occurrence, file size and the number of occurrences.
NOTE: Please note that the fields Object Name, File Name and Extension shows first three objects only. For detailed
information open the Properties window either by pressing the F3 key or by double-clicking the selected item.
Centralized quarantine provides an overview of quarantined files which are stored locally on the clients with an option
to request them on demand. When a file is requested, it is copied to the ERA Server in a safe, encrypted form. For safety
reasons, decryption is performed upon saving the file to the disk. For instructions on working with quarantined files,
see chapter Restore/Delete from Quarantine Task 50 .
NOTE: Centralized quarantine requires installation of EAV/ESS version 4.2 or newer on clients.
71
6. Firewall Rules Merge Wizard
Firewall Rules Merge Wizard allows you to merge the firewall rules for selected clients. This is especially useful when you
need to create a single configuration containing all firewall rules that were gathered by clients in learning mode. The
resulting configuration can then be sent to clients via a configuration task or can be applied as a policy.
The wizard is accessible from the Tools drop-down menu and from the context menu in the Clients tab after rightclicking selected clients (the selected clients are then automatically added to the selected items in the first step).
NOTE: To perform this action successfully, all the selected clients must have the latest configuration stored (sent or
replicated) on the server.
The process is as follows. First, you need to choose the clients or groups of clients from which the firewall rules will be
merged. In the next step you can see a list of selected clients and their configuration status. If a client's configuration is
not on the server, you can request it using the Request button. In the last steps you can choose which of the merged
rules will be used in the configuration and save them to an .xml file.
72
7. Reports
The Reports tab is used to turn statistical information into graphs or charts. These can be saved and processed later in
the Comma Separated Value format (.csv) by using ERA tools to provide graphs and graphical outputs. By default, ERA
saves output in HTML format. Most of the reports related to infiltrations are generated from the Threat log.
To browse and select graphical styles, use the Style drop-down menu in the Report section.
ERA provides several predefined templates for reports. To select a report,use the Type drop-down menu:
Top Clients with most Threats
Lists the most ”active” client workstations (measured by number of detected threats).
Top Users with most Threats
Lists the most ”active” users (measured by number of detected threats).
Top Threats
List of the most frequently detected threats.
Top Threats by Spread
Shows top threats by spread
Threats Progress
Progress of malware events (number).
Threats Comparative Progress
Progress of malware events by selected threats (using filter) compared with the total number of threats.
Threats By Scanner
Number of threat alerts from the individual program modules.
Threats By Object
Number of threat alerts according to the way they attempted to infiltrate (emails, files, boot sectors).
Combined Top Clients with most Threats / Top Threats
Combination of the above-mentioned types.
Combined Top Threats / Threats Progress
Combination of the above-mentioned types.
Combined Top Threats / Threats Comparative Progress
Combination of the above-mentioned types.
Clients of Groups
Shows clients count of selected groups.
Clients of Groups to All
Shows ratio of clients count of selected groups to all clients count, in percentage.
Combined Clients of Groups / Clients Report
Shows clients count of selected groups and clients of each group in the table (After you click the name of the group).
Top Clients with most Network Attacks
Shows top clients with most Network Attacks.
Top Network Attacks
Shows top Network Attacks.
Top Network Attacks Sources
Shows top Network Attacks Sources.
Network Attacks Progress
Shows progress of Network Attacks.
Combined Top Clients with most Network Attacks / Top Network Attacks
Shows top clients with most Network Attacks and top Network Attacks for each client in the top table (After you click
the name of the client).
Top Clients with most SMS Spam
Shows top clients with most SMS Spam.
73
Top SMS Spammers
Shows top SMS Spammers for specified Targets.
SMS Spam Progress
Shows progress of SMS Spam.
Combined Top Clients with most SMS Spam / Top SMS Spammers
Shows top clients with most SMS Spam and top SMS Spammers for each client in the top table (After you click the
name of the client).
Clients Report, Threats Report, Firewall Report, Events Report, Scans Report, Tasks Report, Mobile Report,
Quarantine Report
Typical reports that can be viewed in the Clients, Threat Log, Event Log, Scan Log or Tasks tab.
Comprehensive Threats Report
Summary of Combined Top Clients with most Threats/ Top Threats; Combined Top Threats / Threats Comparative
Progress; Threats Progress
Comprehensive Network Attacks Report
Summary of Combined Top Clients with most Network Attacks / Top Network Attacks; Top Network Attacks; Top
Network Attacks Sources; Network Attacks Progress
Comprehensive SMS Spam Report
Summary of Combined Top Clients with most SMS Spam / Top SMS Spammers; Top SMS Spammers; SMS Spam
Progress
In the Filter section you can use the Target clients or Threat drop-down menus to select which clients or viruses will
be included in the report.
Other details can be configured by clicking the Additional Settings… button. These settings apply mostly to data in
the heading and in the types of graphical diagrams used. However, you can also filter data according to the status of
chosen attributes as well as choose which report format will be used (.html, .csv).
The Interval tab allows you to define an interval for which the report will be generated:
Current
Only events which occurred in a chosen time period will be included in the report – e.g., if a report is created on
Wednesday and the interval is set to Current Week, then the events from Sunday, Monday, Tuesday, and
Wednesday will be included.
Completed
Only events which occurred in a chosen, closed period will be included in the report (i.e., the entire month of August,
or a whole week – from Sunday to next Saturday). If the option Add also the current period is selected, the report
will include events from the last completed period up to the moment of creation.
Example:
We want to create a report including events from the last calendar week, i.e., from Sunday to next Saturday. We want
this report to be generated on the following Wednesday (after Saturday).
In the Interval tab, select Completed and 1 Weeks. Remove Add also the current period. In the Scheduler tab set
Frequency to Weekly and select Wednesday. The other settings can be configured according to the administrator‘s
discretion.
From / To
Use this setting to define a period for which the report will be generated.
The Scheduler tab allows you to define and configure an automatic report in chosen time or intervals (Using the
Frequency section).
After scheduling the report, click the Select Target… button to specify where the report is to be saved. Reports can be
saved to ERAS (default), sent via email to a chosen address, or exported to a folder. The latter option is useful if the
report is sent to a shared folder on your organization‘s intranet where it can be can be viewed by other employees.
To send generated reports via email, you need to enter the SMTP server and sender address information in Tools >
Server Options > Other settings.
To save settings of defined reports to a template, click the Save or Save as… buttons. If you are creating a new
template, click the Save as… button and give the template a name.
74
At the top of the Console window in the Report templates section, you can see names of templates that were already
created. Next to the template names, you can find information about time/intervals and when the reports are
generated according to the preset templates. Click the Generate Now button (make sure the Options tab is selected)
to generate a report at any moment regardless of the schedule.
Existing report templates can be imported/exported from/to an .xml file by clicking on the Import.../Export... button.
Name conflicts during the import (existing and imported template with the same name) are solved by assigning a
random string after the name of an imported template.
Previously generated reports can be viewed in the Generated Reports tab. For more options, select individual (or
multiple) reports and use the context menu (right-click).
Templates placed in the Favorites list can be used later to immediately generate new reports. To move a template to
Favorites, right-click the report and click Add to Favorites from the context menu.
7.1 Example report scenario
To maintain your clients’ network security at the top level, you will need to have a good overview of the network’s
security status. You can easily create reports with full details about threats, updates, client product versions, etc. (for
more information, see the Reports 73 section). Typically, a weekly report will provide all the necessary information.
However, there may be situations during which additional vigilance is necessary, as in the event of a found threat.
To provide an example, we will create a parametric group called Quarantine. This group will contain only computers in
which a threat was detected and cleaned during the last-performed on-demand scan. Set this condition by checking
the HAS Last Scan Found Threat option. To create this parametric group, follow the instructions in the Parametric
Groups 52 section.
NOTE: When creating the Quarantine group, verify that the Sticky option is disabled. The computer will be assigned
dynamically and removed once the conditions are no longer met.
Create the Quarantine Computers report. To create a report for this parametric group, follow the instructions in the
Reports 73 section.
The specific settings for our example are as follows:
Options wildcard settings:
Type:
Quarantine Report with Details
Style:
Blue Scheme
Target clients:
Only Selected Groups
Threat:
n/a
Interval wildcard settings:
Current:
Day
Scheduler wildcard settings:
Frequency:
Daily
Every:
1 day
TIP: You can store results to the report database or set a folder where report copies will be stored. Reports can also be
sent via email. All these setting are available after clicking the button Select Target…
Generated reports can be reviewed in the General Reports wildcard in the Reports section.
Summary: We created the parametric group Quarantine, containing computers on which a threat was reported during
the most recent on-demand scan. Next, we created an automated report that will inform us, daily, what computers
belong to the Quarantine group, giving us a good overview of the status of our client network so we can keep potential
threats under control.
TIP: If you want to see the last scan log details, you can use the Scan Report with Details report type.
75
8. ESET Remote Administrator Server (ERAS) setup
8.1 Security
Version 3.x and later ESET security solutions (ESET Smart Security, etc.) offer password protection for decrypted
communication between the client and ERAS (communication at the TCP protocol, port 2222).
Earlier versions (2.x) do not have this functionality. To provide backward compatibility for earlier versions, the Enable
unauthenticated access for Clients mode must be activated.
The Security tab contains options which allow the administrator to use 2.x and 3.x security solutions in the same
network simultaneously.
Password for Console (Administrator Access, Read-Only Access)
Enables specifying a password for the administrator and limited users to protect against unauthorized changes to
ERAC settings.
Password for Clients (ESET Security Products)
Sets password for clients accessing the ERAS.
Password for Replication
Sets password for lower ERA Servers if replicated to the given ERAS.
Password for Eset Remote Installer (Agent)
Sets password for the installer agent to access ERAS. Relevant for remote installations.
Enable unauthenticated access for Clients (ESET Security Products)
Enables access to ERAS for those clients which do not have a valid password specified (if current password is different
from Password for Clients).
Enable unauthenticated access for Replication
Enables access to ERAS for clients of lower ERA Servers which do not have a valid password for replication specified.
Enable unauthenticated access for ESET Remote Installer (Agent)
Enables access to ERAS for ESET Remote Installer which does not have a valid password specified.
NOTE: If authentication is enabled both in ERAS and on all (generation 3.x and later) clients, the Enable
unauthenticated access for Clients option can be disabled.
Use Windows/Domain authentication
Enables Windows/Domain authentication and allows you to define administrator groups (with full access to ERA
Server) as well as groups with read-only access (enabled with the Treat all other users as with read-only access
option).
8.2 Server Maintenance
If correctly configured in the Server Maintenance tab, the ERAS database will be maintained automatically and
optimized, with no need for further configuration. By default, entries and logs older than six months are deleted, and
the Compact & repair task is performed every fifteen days. All server maintenance options are accessible from Tools >
Server Options > Server Maintenance.
The options include:
Delete clients not connected for the last X months (days)
Deletes all clients that have not connected to ERAS for more than the specified number of months (or days).
Delete threat logs older than X months (days)
Deletes all virus incidents older than the specified number of months (or days).
Delete firewall logs older than X months (days)
Deletes all firewall logs older than the specified number of months (or days).
Delete event logs older than X months (days)
Deletes all system events older than the specified number of months (or days).
76
Delete scan logs older than X months (days)
Deletes all scanner logs older than the specified number of months (or days).
Delete mobile logs older than X months (days)
Deletes all mobile logs older than the specified number of months (or days).
Delete quarantine entries with no clients older than X months (days)
Deletes all scanner logs older than the specified number of months (or days).
Cleanup scheduler
Performs the above selected option every ... minutes.
Compact & repair scheduler
Compacts the database in specified time interval at specified hour. Compacting and repairing eliminates inconsistencies
and glitches and makes the communication with the database faster.
8.3 Mirror server
The Mirror feature allows a user to create a local update server. Client computers will not download virus signature
updates from ESET’s servers on the Internet, but will connect to a local Mirror server on your network instead. The main
advantages of this solution are to save Internet bandwidth and to minimize Internet network traffic, since only the
mirror server connects to the Internet for updates, rather than hundreds of client machines. This configuration means it
is important for the Mirror server to always be connected to the internet.
Warning: A Mirror server which performed a program component upgrade (PCU) and has not been rebooted may cause
an outage. In this scenario, the server would be unable to download ANY updates or distribute them to client
workstations. DO NOT SET AUTOMATIC PROGRAM COMPONENT UPGRADES FOR ESET SERVER PRODUCTS! This
does not apply to Mirrors created in ERAS.
The Mirror feature is available in two locations:
ESET Remote Administrator (Mirror physically running within ERAS, manageable from ERAC)
ESET Smart Security Business Edition or ESET NOD32 Antivirus Business Edition (provided that the Business Edition
has been activated by a license key).
The administrator selects the method for activating the Mirror feature.
In large networks it is possible to create multiple Mirror servers (e.g., for various company departments), and establish
one as central (at company headquarters) in cascade-style – similar to an ERAS configuration with multiple clients.
The administrator must insert the product license key for a purchased product and enter the username and password
to enable the Mirror feature in ERAS. If the administrator uses a license key, username and password for ESET NOD32
Antivirus Business Edition, then later upgrades to ESET Smart Security Business Edition, the original license key,
username and password must be replaced as well.
NOTE: ESET NOD32 Antivirus clients can also be updated using a ESET Smart Security license, but not vice versa.
8.3.1 Operation of the Mirror server
The computer hosting the Mirror server should always be running, and connected to the Internet or to an upper Mirror
server for replication. Mirror server update packages can be downloaded in two ways:
1. Using the HTTP protocol (recommended)
2. Using a shared network drive (SMB)
ESET‘s update servers use the HTTP protocol with authentication. A central Mirror server should access the update
servers with a username (usually in the following form: EAV-XXXXXXX) and password.
The Mirror server which is a part of ESET Smart Security/ESET NOD32 Antivirus has an integrated HTTP server (variant
1).
NOTE: If you decide to use the integrated HTTP server (with no authentication), please ensure that it will not be
accessible from outside your network (i.e., to clients not included in your license). The server must not be accessible
77
from the Internet.
By default, the integrated HTTP server listens at TCP port 2221. Please make sure that this port is not being used by any
other application.
NOTE: If the HTTP server method is in use, we recommend a maximum of 400 clients updating from one mirror. In
large networks with more clients, we recommend balancing mirror updates among more ERA (or ESS/EAV) mirror
servers. If the mirror needs to be centralized on a single server, we recommend using another type of HTTP server, such
as Apache or IIS. ERA also supports additional authentication methods (e.g., on Apache Web Server the .htaccess
method is used).
The second method (shared network folder) requires sharing (“read” rights) of the folder containing update packages. In
this scenario, the username and password of a user with ”read” rights for the update folder must be entered into the
client workstation.
NOTE: ESET client solutions use the SYSTEM user account and thus have different network access rights than a
currently logged-in user. Authentication is required even if the network drive is accessible for ”Everyone” and the
current user can access them, too. Also, please use UNC paths to define the network path to the local server. Using the
DISK:\ format is not recommended.
If you decide to use the shared network folder method (variant 2), we recommend that you create a unique username
(e.g., NODUSER). This account would be used on all client machines for the sole purpose of downloading updates. The
NODUSER account should have ”read” rights to the shared network folder which contains the update packages.
For authentication to a network drive, please enter the authentication data in the full form: WORKGROUP\User or
DOMAIN\User.
In addition to authentication, you must also define the source of updates for ESET client solutions. The update source is
either a URL address to a local server (http://Mirror_server_name:port) or UNC path to a network drive: (\
\Mirror_server_name\share_name).
8.3.2 Types of updates
In addition to virus signature database updates (which can include ESET software kernel updates), program component
upgrades are also available. Program component upgrades add new features to ESET security products and require a
reboot.
The Mirror server allows an administrator to disable automatic downloading of program upgrades from ESET‘s update
servers (or from an upper Mirror server) and disable its distribution to clients. Distribution can later be triggered
manually by the administrator, if he is sure there will be no conflict between the new version and existing applications.
This feature is especially useful if the administrator wishes to download and use virus signature database updates when
there is also a new program version available. If an older program version is used in conjunction with the most recent
virus database version, the program will continue to provide the best protection available. Still, we recommend that
you download and install the newest program version to gain access to new program features.
By default, program components are not automatically downloaded and must be manually configured in ERAS. For
more information see chapter How to enable and configure Mirror 78 .
8.3.3 How to enable and configure the Mirror
If the Mirror is directly integrated into ERA (a Business Edition component), connect to ERAS using ERAC and follow
these steps:
From the ERAC click Tools > Server Options… > Updates.
From the Update server: drop-down menu, select Choose Automatically (updates will be downloaded from ESET’s
servers), or enter the URL/UNC path to a Mirror server.
Set the Update interval for updates (we recommend sixty minutes).
If you selected Choose Automatically in the previous step, insert the username (Update username) and password
(Update password) which were sent after purchase of your license. If accessing an upper server, enter a valid
domainuser name and password for that server.
Select the Create update mirror option and enter a path to the folder where the update files will be stored. By
default this is a relative path to the Mirror folder in the ERA data folder (%AllUsersProfile%/Application Data/ESET/ESET
Remote Administrator) and can be changed to an absolute path according to your needs. To enable update via http,
select the Provide update files via internal HTTP server option. HTTP server will be available on the HTTP port
78
defined in HTTP server port option (by default 2221). Set Authentication to NONE (For more information see
chapter Operation of the Mirror server 77 ).
NOTE: In case of problems with updates, select the Clear Update Cache option to flush the folder in which temporary
update files are stored.
The Mirror Downloaded PCU option allows you to activate mirroring of program components. To set up PCU
mirroring go to Advanced > Edit Advanced Settings and configure settings in ESET Remote Administrator > ERA
Server > Setup > Mirror (or Mirror for NOD32 version 2).
Select the language components to be downloaded in Advanced > Edit Advanced Settings… the branch ERA
Server > Setup > Mirror > Create Mirror for the selected program components. Components for all language
versions to be used in the network should be selected. Note that downloading a language version not installed in the
network will unnecessarily increase network traffic.
The Mirror feature is also available directly from the program interface in ESET Smart Security Business Edition and ESET
NOD32 Antivirus Business Edition. It is left to the administrator’s discretion as to which is used to implement the Mirror
server.
To activate and launch the Mirror server from ESET Smart Security Business Edition or ESET NOD32 Antivirus Business
Edition, follow these steps:
1) Install ESET Smart Security Business Edition or ESET NOD32 Antivirus Business Edition
2) From the Advanced Setup window (F5), click Miscellaneous > Licenses. Click the Add… button, browse for the *.lic
file and click Open. This will install the license and allow configuration of the Mirror feature.
3) From the Update branch click the Setup… button and select the Mirror tab.
4) Select the Create update mirror and Provide update files via internal HTTP server option.
5) Enter the full directory path to the folder (Folder to store mirrored files) where update files are to be stored.
6) The Username and Password serve as authentication data for client workstations attempting to gain access to the
Mirror folder. In most cases, it is not required to populate these fields.
7) Set Authentication to NONE.
79
8) Select components to be downloaded (components for all language versions which will be used in the network
should be selected). Components are only displayed if they are available from ESET’s update servers.
NOTE: To maintain optimal functionality, we recommend that you enable downloading and mirroring of program
components. If this option is disabled, only the virus signature database is updated, not program components. If the
Mirror is used as a part of ERA, this option can be configured in ERAC through Tools > Server Options… > Advanced
tab > Edit Advanced Settings… > ESET Remote Administrator > ERA Server > Setup > Mirror. Enable all program
language versions present in your network.
8.3.4 Mirror for clients with NOD32 version 2.x
ESET Remote Administrator also allows an administrator to create update file copies for client computers with ESET
NOD32 Antivirus 2.x installed. To do this, click Tools > Server Options > Updates > Create update mirror NOD32
version 2 products. This only applies to ERA; the Mirror included in the client solution of the Business Edition (v 3.x)
does not contain this option.
If you have a mix of 2.x and 3.x clients in your network, we recommend that you use the Mirror integrated in ERA. If
both Mirrors are activated on the same computer – one in ERAS for 2.x clients, and the other in a Business Edition client
for 3.x clients – it could result in a conflict between two HTTP servers using the same TCP port.
Updates for 2.x clients are stored in the folder ”nod32v2”, a subfolder of the main Mirror folder. It is accessible via the URL
address:
http://Mirror_server_name:port/nod32v2
or UNC path to a network drive:
\\Mirror_server_name\share_name\nod32v2
ERA is also capable of downloading program components for 2.x clients. To select program components to be
downloaded, navigate to Tools > Server Options… > Advanced tab > click Edit Advanced Settings… and expand the
branch ESET Remote Administrator > ERA Server > Setup > Mirror for NOD32 version 2. To minimize the volume of
downloaded data, only select language versions that are present on your network.
8.4 Replication
Replication is used in large networks where multiple ERA Servers are installed (e.g., a company with several branches).
For more information, see chapter Installation 17 .
The options in the Replication tab (Tools > Server Options...) are divided into two sections:
Replication “to“ settings
Replication “from“ settings
The Replication ”to“ settings section is used to configure lower ERA Servers. The Enable “to” replication option must
be enabled and the IP address or name of the master ERAS (Upper server) entered. Data from the lower server is then
replicated to the master server. The Replication ”from“ settings allow master (upper) ERA Servers to accept data from
lower ERA Servers, or to transfer them to their master servers. The Enable “from“ replication must be enabled and
names of lower servers should be defined (delimited by a comma).
Both of these options must be enabled for ERA Servers located anywhere in the middle of the replication hierarchy (i.e.,
they have both upper and lower servers).
All of the previously mentioned scenarios are visible in the figure below. The beige computers represent individual ERA
Servers. Each ERAS is represented by its name (which should be the same as %Computer Name% to avoid confusion)
and the corresponding settings in the replication dialog window.
80
Other options that influence the replication behavior of servers include:
Replicate threat log, Replicate firewall log, Replicate event log, Replicate scan log, Replicate mobile log,
Replicate quarantine log
If these options are selected, all information displayed on the Clients, Threat Log, Firewall Log, Event Log, Scan
Log, Mobile Log, Quarantine Log and Tasks tab is replicated in individual columns and lines. Information not stored
directly in the database, but in individual files (i.e., .txt or.xml format), may not be replicated. Enable these options to
also replicate entries in those files.
Automatically replicate threat log details, Automatically replicate scan log details, Automatically replicate
client details, Automatically replicate mobile log details, Automatically replicate quarantine files
These options enable automatic replication of the complementary information stored in individual files. They can also
be downloaded on demand by clicking the Request button).
NOTE: Some logs are automatically replicated, while detailed logs and client configuration logs are only replicated on
demand. This is because some logs contain large amounts of data that may not be relevant. For example, a scan log
with the Log all files option enabled will consume a significant amount of disk space. Such information is usually not
necessary and can be requested manually. Child servers do not automatically submit information about deleted clients.
Therefore upper severs may continue to store information about deleted clients from lower servers. If you want to
delete a client from the Client tab on upper servers, select the Enable deletion of replicated clients option on the
underlying server located in Server Options > Advanced > Edit Advanced Settings > Setup > Replication.
To set the log maintenance level in ERAS, click Tools > Server Options > Advanced > Edit Advanced Settings… >
Setup > Server Maintenance.
If you want to only replicate clients with a status change, select the Tools > Server Options > Replication > Mark all
clients for replication by “Replicate Up Now” option.
81
8.5 Logging
While running, ERAS creates a log (Log filename) about its activity which is configurable (Log verbosity). If the Log to
text file option is selected, new log files will be created (Rotate when greater than X MB) and deleted on a daily basis (
Delete rotated logs older than X days).
The Log to OS application log option allows information to be copied to the system event viewer log (Windows
Control Panel > Administrative Tools > Event viewer).
The Database Debug Log option should be disabled under normal circumstances.
The Log to Syslog option sends a syslog message to the specified syslog server on a specified port (default server is
localhost, default port is 514) .
For advanced syslog settings go to Tools > Server Options > Advanced >Edit Advanced Settings… > Setup >
Logging . Here you can edit the syslog options - syslog server name, syslog server port, syslog facility and the syslog
verbosity.
By default, the text file output is saved to the following location:
%ALLUSERSPROFILE%\Application data\Eset\ESET Remote Administrator\Server\logs\era.log
We recommend leaving the Log verbosity set to Level 2 – Above + Session Errors. Change the log level only if you are
experiencing problems, or if you are advised to do so by ESET Customer Care.
Click Tools > Server Options > Advanced > Edit Advanced Settings… > Setup > Logging > Rotated debug log
compression to configure compression level for individual rotated logs.
The Verbosity of a log means the level of details in a log and the information included.
Level 1 - Critical Information - Faulty behavior (in this case, please contact the ESET technical support).
Level 2 - Above + Important Session Information - Information about the server communication (who, when and
why logged on to the ERA Server).
Level 3 - Above + Various Information - Information about internal processes in the ERA Server.
Level 4 - Above + Installer - Information about the einstaller.exe agent (information about the ERA Server - agent
connection/disconnection and the results).
Level 5 - Above + Clients - Client informations (information about the ERA Server - client connection/disconnection
and the results).
8.6 License management
In order for ERA to function properly, a license key must be uploaded. After purchase, license keys are delivered along
with your username and password to your email. The License manager serves to manage licenses.
In ERA 3.x and later, support for multiple license keys has been added. This feature makes management of license keys
more convenient.
The main License Manager window is accessible from Tools > License manager.
To add a new license key:
1) Navigate to Tools > License manager or press CTRL + L on your keyboard.
2) Click Browse and find the desired license key file (license keys have the extension .lic).
3) Click Open to confirm.
4) Verify that the license key information is correct and select Upload to Server.
5) Click OK to confirm.
The Upload to Server button is only active if you have selected a license key (using the Browse button). Information
about the currently viewed license key is shown in this part of the window. This allows for a final check before the key is
copied to the server.
The central part of the window displays information about the license key which is currently used by the server. To see
82
details about all license keys present on the server, click the Details… button.
ERAS is capable of selecting the most relevant license key and merging multiple keys into one. If there is more than one
license key uploaded, ERAS will always try to find the key with the most clients and furthest expiration date.
The ability to merge multiple keys works if all keys are owned by the same customer. Merging licenses is a simple
process which creates a new key containing all clients involved. The expiration date of the new license key becomes the
expiration date of the key that would expire first.
The bottom part of the License Manager window is dedicated to notifications when there is a problem with licenses.
The available options include:
Warn if the server is about to expire in 20 days – Displays a warning X days before license expires
Warn only if this will cause the number of clients in the license to fall below the number or actual clients in the
server database – Activate this option to only show a warning if the expiration of the license key or a part of the
license will cause a decrease in the number of clients below the number of currently connected clients, or clients in the
ERAS database
Warn if there is only 10% free clients left in the server license – Server will display a warning if the number of free
client slots falls under specified value (in %)
ERAS is capable of merging multiple licenses from multiple customers. This feature must be activated by a special key. If
you need a special key, please specify it in your order, or contact your local ESET distributor.
8.7 Advanced settings
To access ERA Advanced settings, click Tools > Server Options > Advanced > Edit Advanced Settings.
Advanced settings include the following:
Maximum disk space usage (percent)
When exceeded, some server features may not be available. When connecting to ERAS, ERAC displays a notification
if the limit is exceeded.
Communication protocol encoding
Defines the type of encoding. We recommend the default setting.
Enable MAC address renaming (from unknown to valid)
After reinstalling from an ESET client solution that does not support sending a MAC address (e.g., ESET NOD32
Antivirus 2.x) to a client solution that does (e.g., a 3.x client), the old client record will be converted to the new one.
We recommend the default setting (Yes).
Enable MAC address renaming (from valid to unknown)
After reinstalling from an ESET client solution that does support sending a MAC address (e.g., ESET NOD32 Antivirus
3.x) to a client solution that does not (e.g., a 2.x client), the old client record will be converted to the new one. We
recommend the default setting (No).
Enable MAC address renaming (from valid to another valid)
Enables renaming of valid MAC addresses. The default value does not allow for renaming, which means that the MAC
address is a part of the unique identification of clients. Disable this option if there are multiple entries for one PC. We
also recommend disabling this option if a client is identified as the same client after the MAC address has been
changed.
Enable computer name renaming
Allows for renaming of client computers. If disabled, the computer name will be a part of the unique identification of
clients.
Also use default server logon during push installation
ERAS allows the user to set the username and password for logon script and email remote installation only. Enable
this option to use the predefined values also for remote push installations.
83
8.8 Other settings
SMTP settings
Some features in ERA require correct SMTP server configuration. Those features include remote email installation and
generating reports to be sent by email.
New clients
Allow new clients
If disabled, no new clients will be added in the Clients tab – even if new clients communicate with ERA Servers, they will
not be visible in the Clients tab.
Automatically reset “New“ flag by new clients
If enabled, the New flag is removed from clients connecting to ERAS for the first time. For more information please see
chapter Clients tab 24 .
Ports
Enables you to customize ports where ERAS is listening to communications, established by Console (by default 2223),
Client (by default 2222), the replication process (Replication port – by default 2846), ESET Remote Installer (by
default 2224).
ThreatSense.Net
If enabled, ERAS will forward suspicious files and statistical information from clients to ESET’s servers in specified
interval. Note that it is not always possible for client workstations to submit this information directly, due to the
network configuration.
84
9. ESET Remote Administrator Maintenance Tool
The purpose of the ESET Remote Administrator Maintenance Tool is to execute specific tasks for server operation and
maintenance. It can be accessed by clicking Start > Program Files > ESET Remote Administrator > Server. When you
launch the ERA Maintenance tool, an interactive wizard will display to help you in performing the required tasks.
NOTE: For ERA Maintenance Tool to work properly on Windows NT4 SP6, Internet Explorer v5.0 and later is required,
or at least to upgrade the Common Controls library (comctl32.dll). ComCtl32 library is a part of Platform SDK Comctl32
Redistributables and can be downloaded from Microsoft website.
9.1 ERA Server Information
The tool displays summary information about the ERA Server installed. The displayed information can be viewed in
more detail in a separate window by clicking More Information, it can be copied by clicking Copy to clipboard and it
can be refreshed by clicking Refresh. After you verify the information, proceed to the next step by clicking Next.
9.2 Task Type
The Maintenance tool contains a list of available tasks. At the end of each task setup, you can save the settings for the
current task by clicking Save all settings to a file. The settings can be then used at any time in the future by clicking
Load all settings from a file. Each individual step in a task setup also has the option to Save all settings to a file or
Load all settings from a file.
9.2.1 Stop ERA Server
This task stops the ESET Remote Administrator Server service.
9.2.2 Start ERA Server
This task starts the ESET Remote Administrator Server service.
9.2.3 Database Transfer
This task allows you to convert the database format. The tool can convert between the following databases:
MS Access
MS SQL Server
Oracle
My SQL
The first step is to select the database.
If the database is an MS Access database, specify the path to the .mdb file. The path specified during ERA Server
installation is used by default.
All other database formats require additional parameters to be set:
Connection string: Special string used to identify the source database
Username: Username for accessing the database
Password: Password for accessing the database
Schema name: Name of a schema (available for Oracle and MS SQL only)
Click Load current server configuration to use the current ERA Server settings. Click Test Connection to test the
database connection. If the connection cannot be established, check the parameters for errors. After the database test
is successful, continue by clicking Next.
Select the target database. Select Replace server connection settings to connect the server and use the new database
after successful conversion. Not selecting this option will cause the new database to be created without the server
updating to the new database version.
85
For all database types besides MS Access database, select whether to create the database tables automatically (Create
tables in the database automatically) or insert the tables into the database later (View Script > Save to File) in the
next step. For an MS SQL database, the Create a new database ESETRADB automatically option automatically
creates a new MYSQL database named ESETRADB. The final step is to confirm the database conversion.
9.2.4 Database Backup
This tool allows you to create a backup file of the database. The settings in the first window are similar to those in the
database conversion (see chapter Database Transfer 85 ); in this window the source database is selected. The source
database will be copied to a backup file specified in the next step.
Optional parameters in the lower part of the window enable you to overwrite the existing file (Overwrite if exists) as
well as to stop ESET Remote Administrator Server during the backup process (Stop server during processing task).
Click Next to confirm the task execution.
9.2.5 Database Restore
This task allows you to restore the database from a backup file. The settings in the first window are similar to those in
the database conversion (see chapter Database Transfer 85 ); in this window the database type is selected.
For all database types besides MS Access database select whether to create the database tables automatically (Create
tables in the database automatically) or insert the tables into the database later (View Script > Save to File) in the
next step. For an MS SQL database the Create a new database ESETRADB automatically option automatically
creates a new MySQL database named ESETRADB. The final step is to confirm the database conversion.
Select the file from which the database is to be restored in the next step. Optional parameters in the lower part of the
window enable you to import a file from a different database type as selected in the previous step (Allow import from
a different type of database) as well as to stop ESET Remote Administrator Server during database restore (Stop
server during processing task). Click Next to confirm the task execution.
9.2.6 Delete Tables
This deletes data in current tables in the database. As a result, the database will return to the state from right after ERA
Server installation. The settings in the first window are similar to those in the database conversion (see chapter
Database Transfer 85 ); in this window the database type is selected. In the next step you will be prompted to confirm
the action. Select Yes, I agree and then click Next to confirm the action.
NOTE: It is necessary that you stop ERA Server service before deleting the tables, otherwise the deletion will fail.
If an MS Access database is used, it will be replaced with the default empty database.
9.2.7 Install New License Key
To insert a new license key to be used by the server enter the location of the new license key.
Overwrite the existing license key if required (Overwrite if exists) and restart the server if required (Force server start
(in case it is not running)). Click Next to confirm and complete the action.
9.2.8 Modify server configuration
This task launches the Configuration Editor (if installed). Finishing the task opens the Configuration Editor window and
allows you to edit advanced ERA Server settings. These settings are also accessible via Tools > Server Options >
Advanced > Edit Advanced Settings.
NOTE: In order for this feature to work, ERA Console must be installed.
86
10. Troubleshooting
10.1 FAQ
This chapter contains solutions to the most frequently asked questions and problems related to installation and
operation of ERA.
10.1.1 Problems installing ESET Remote Administrator to Windows server 2000/2003
Cause:
One of the possible causes may be the Terminal Server running on the system in the execution mode.
Solution:
Microsoft advises switching the Terminal Server to “install” mode while installing programs to a system with Terminal
Server service running. This can be done either through Control Panel > Add/Remove programs or by opening
a command prompt and issuing the change user /install command. After installation, type change user /execute to return
the Terminal Server to execution mode. For step-by-step instructions on this process, see the following article: http://
support.microsoft.com/kb/320185.
10.1.2 What is the meaning of the GLE error code?
Installing ESET Smart Security or ESET NOD32 Antivirus via the ESET Remote Administrator Console can occasionally
generate a GLE error. To find the meaning of any GLE error number, follow the steps below:
1) Open a command prompt by clicking Start > Run. Type cmd and click OK.
2) At the command prompt, type: net helpmsg error_number
Example: net helpmsg 55
Example result: The specified network resource or device is no longer available.
10.2 Frequently encountered error codes
During the operation of ERA, you may encounter error messages which contain error codes indicating a problem with
some feature or operation. The following chapters outline the most frequently encountered error codes when
performing push installs, as well as errors that can be found in the ERAS log.
10.2.1 Error messages displayed when using ESET Remote Administrator to remotely install ESET Smart
Security or ESET NOD32 Antivirus
SC error code 6, GLE error code 53 Could not set up IPC connection to target computer
To set up an IPC connection, these requirements should be met:
1. TCP/IP stack installed on the computer where ERAS is installed, as well as on the target computer.
2. File and Printer Sharing for Microsoft Network must be installed.
3. File sharing ports must be open (135-139, 445).
4. The target computer must answer ping requests.
SC error code 6, GLE error code 67 Could not install ESET installer on target computer
The administrative share ADMIN$ must be accessible on the client’s system drive.
SC error code 6, GLE error code 1326 Could not set up IPC connection to target computer, probably due to a wrong
username or password
Administrator’s username and password have not been typed correctly or have not been entered at all.
SC error code 6, GLE error code 1327 Could not set up IPC connection to target computer
Administrator’s password field is blank. A remote push installation cannot work with a blank password field.
SC error code 11, GLE error code 5 Could not install ESET installer on target computer
The installer cannot access the client computer due to insufficient access rights (Access Denied).
87
SC error code 11, GLE error code 1726 Could not install NOD32 Installer onto target computer
This error code displays after repeated attempts to install if the Push Installation window was not closed after the first
attempt.
10.2.2 Frequently encountered error codes in era.log
0x1203 – UPD_RETVAL_BAD_URL
Update module error – incorrectly entered update server name.
0x1204 – UPD_RETVAL_CANT_DOWNLOAD
This error can appear:
when updating through HTTP
- update server returns an HTTP error code between 400- 500 except for 401, 403, 404, and 407
- if updates are downloaded from a CISCO based server and the HTML authentication response format has been
changed
when updating from a shared folder:
- returned error does not fall into the categories bad authentication or file not found (e.g., connection interrupted or
non existing server, etc.)
both update methods
- if all of the servers listed in the file upd.ver could not be found (the file is located in %ALLUSERSPROFILE%\Application
Data\ESET\ESET Remote Administrator\Server\updfiles)
- failed to contact the failsafe server (probably due to deletion of the corresponding ESET entries in the registry)
incorrect proxy server configuration in ERAS
- The administrator must specify proxy server in the format
0x2001 – UPD_RETVAL_AUTHORIZATION_FAILED
Authentication to update server failed, incorrect username or password.
0x2102 – UPD_RETVAL_BAD_REPLY
This update module error can be encountered if a proxy server is used to mediate Internet connection – namely
Webwasher proxy.
0x2104 – UPD_RETVAL_SERVER_ERROR
Update module error indicating an HTTP error code higher than 500. If the ESET HTTP server is being used, error 500
indicates a problem with memory allocation.
0x2105 – UPD_RETVAL_INTERRUPTED
This update module error can be encountered if a proxy server is used to mediate the Internet connection – namely
Webwasher proxy.
10.3 How to diagnose problems with ERAS?
If you suspect that there is something wrong with ERAS or if it is not functioning correctly, we recommend that you
follow these steps:
1) Check the ERAS log: Click Tools > Server Options from the ERAC main menu. From the Server Options window,
click the Logging tab and then click View log.
2) If you see no error messages, increase the Log verbosity level in the Server Options window to Level 5. After you
have tracked down the problem, we recommend switching back to the default value.
3) You may also be able to troubleshoot problems by turning on the database debug log in the same tab – see section
Debug Log. We recommend that you only activate the Debug log when attempting to duplicate the problem.
4) If you see any error codes other than those mentioned in this documentation, please contact ESET Customer Care.
Please describe the behavior of the program, how to replicate the problem or how to avoid it. It is very important to
include the program version of all ESET security products involved (i.e., ERAS, ERAC, ESET Smart Security, ESET
NOD32 Antivirus).
88
11. Hints & tips
11.1 Scheduler
ESET NOD32 Antivirus and ESET Smart Security contain an integrated task scheduler which allows for scheduling
regular computer scans, updates, etc. All specified tasks are listed in the Scheduler.
Following types of tasks can be configured using ERA:
Run external application
Log maintenance
Computer scan
Create a computer status snapshot
Update
Automatic startup file check
In most cases, there is no need to configure a Run external application task. The task Automatic startup file check is
a default task and we recommend not changing its parameters. If no changes have been made after installation, ESET
NOD32 and ESET Smart Security contain two predefined tasks of this type. The first task checks system files at each user
logon, the second task does the same after a successful virus signature database update. From an administrator’s point
of view, the tasks Computer scan and Update are probably the most useful:
Computer scan
It provides regular antivirus scan (usually of local drives) on clients.
Update
This task is responsible for updating ESET client solutions. It is a predefined task and by default runs every
60 minutes. Usually there is no reason to modify its parameters. The only exception is for notebooks, since their
owners often connect to the Internet outside of the local networks. In this case, the update task can be modified to
use two update profiles within one task. This will allow notebooks to update from the local Mirror server, as well as
from ESET’s update servers.
The Scheduler setup can also be found in the ESET Configuration Editor in ESET Smart Security / ESET NOD32
Antivirus > ESET Kernel > Setup > Scheduler/Planner > Scheduler/Planner > Edit.
For more information see chapter ESET Configuration Editor
32
.
The dialog window may contain existing tasks (click Edit to modify them) or it may be empty. It depends on whether
you have opened a configuration from a client (e.g., from a previously configured and working client) or opened a new
file with the default template containing no tasks.
Every new task is assigned an attribute ID. Default tasks have decimal IDs (1, 2, 3…) and custom tasks are assigned
hexadecimal keys (e.g., 4AE13D6C), which are automatically generated when creating a new task.
If the check box for a task is selected, it means that the task is active and that it will be performed on the given client.
The buttons in the Scheduled tasks window function in the following way:
Add – Adds a new task
89
Edit – Modifies selected tasks
Change ID – Modifies ID of selected tasks
Details – Summary information about the selected tasks
Mark for deletion – Application of .xml file will remove tasks (with the same ID) selected by clicking this button from
target clients.
Remove from list – Deletes selected tasks from the list. Please note that tasks removed from the list in the.xml
configuration will not be removed from target workstations.
When creating a new task (Add button) or when editing an existing one (Edit), you must specify when it will run. The
task can repeat after a certain period of time (each day at 12, each Friday, etc.) or it can be triggered by an event (after
a successful update, the first time the computer starts each day, etc.).
The last step of the task On-demand computer scans shows the special settings window, where you can define which
configuration will be used for scanning – i.e., which scanning profile and scan targets will be used.
The last step of the Update task specifies what update profiles will run within the given task. It is a predefined task and
runs every 60 minutes by default. Usually there is no reason to modify its parameters. The only exception is for
notebooks, since their owners also connect to the Internet from outside of company networks. The last dialog allows
you to specify two different update profiles, covering updates either from a local server or from ESET’s update servers.
90
11.2 Removing existing profiles
Occasionally you may come across duplicate profiles (either update or scan profiles) that were created by mistake. To
remove those profiles remotely without damaging other settings in the Scheduler, follow the steps below:
From ERAC, click the Clients tab and then double-click a problematic client.
From the Client Properties window, click the Configuration tab. Select the Then Run ESET Configuration Editor to
edit the file and Use the downloaded configuration in the new configuration task options and then click the New
Task button.
In the new task wizard, click Edit.
In the Configuration Editor, press CTRL + D to deselect (grey) all settings. This helps prevent accidental changes, as
any new changes will stand out in blue.
Right-click on the profile you wish to remove and select Mark profile for deletion from the context menu. The profile
will be deleted as soon as the task is delivered to clients.
91
Click the Console button in the ESET Configuration Editor and save the settings.
Verify that the client you selected is in the Selected items column on the right. Click Next and then click Finish.
11.3 Export and other features of client XML configuration
From ERAC, select any clients in the Clients tab. Right-click and select Configuration… from the context menu. Click
Save As… to export the assigned configuration of the given client to an .xml file (.xml configuration files can also be
extracted directly from the ESET Smart Security program interface). The .xml file can be used afterwards for various
operations:
For remote installations, the .xml file can be used as a template for a predefined configuration. This means that no
new .xml file is created and the existing .xml file is assigned (Select…) to a new install package. The .xml configuration
files can also be extracted directly from the ESET Smart Security program interface.
For configuring multiple clients, selected clients receive a previously downloaded .xml file and adopt the settings
which are defined in the file (no new configuration is created, only assigned by the Select… button).
Example
An ESET security product is only installed on one workstation. Adjust the settings directly through the program’s user
interface. When finished, export the settings to an .xml file. This .xml file can then be used for remote installations to
other workstations. This method can be very useful for tasks such as fine-tuning firewall rules, if the ”Policy-based” mode
is to be applied.
92
11.4 Combined update for notebooks
If there are any mobile devices in your local network (i.e., notebooks), we recommend that you configure a combined
update from two sources: ESET’s update servers and the local Mirror server. First, notebooks contact the local Mirror
server, and if the connection fails (they are outside of the office), they download updates directly from ESET’s servers.
To allow for this functionality:
Create two update profiles, Export and other features of client XML configuration 92 one directed to the Mirror
server (referred to as ”LAN” in the following example) and the second one to ESET’s update servers (INET)
Create a new update task or modify an existing update task through the Scheduler (Tools > Scheduler from the main
program window of ESET Smart Security or ESET NOD32 Antivirus).
The configuration can be made directly on notebooks or remotely using the ESET Configuration Editor. It can be
applied either during installation or anytime later as a configuration task.
To create new profiles in ESET Configuration Editor, right-click the Update branch and select New profile from the
context menu.
The result of modifications should resemble the one displayed below:
The profile LAN downloads updates from the company’s local Mirror server (http://server:2221), while the profile INET
connects to ESET’s servers (Choose Automatically). Next, define an update task which runs each update profile in
succession. To do this, navigate to ESET Smart Security, ESET NOD32 Antivirus > Kernel > Setup > Scheduler/
Planner in the ESET Configuration Editor. Click the Edit button to display the Scheduled tasks window.
93
To create a new task, click Add. From the Scheduled task drop-down menu, select Update and click Next. Enter the
Task name (e.g., ”combined update”), select Repeatedly every 60 minutes and proceed to the selection of a primary
and secondary profile.
If the notebook workstations should contact the Mirror server first, the Primary profile should be set to LAN and the
Secondary profile should be set to INET. The profile INET would only be applied if the update from LAN fails.
Recommendation: Export the current .xml configuration from a client (for more information, see chapter How to
diagnose problems with ERAS? 88 ) and perform the above-mentioned modifications on the exported .xml file. This will
prevent any duplication between the Scheduler and non-working profiles.
11.5 Installation of third party products using ERA
In addition to remote installation of ESET products, ESET Remote Administrator is capable of installing other programs.
The only requirement is that the custom install package must be in the .msi format. The remote installation of custom
packages can be performed using a process very similar to the one described in chapter Remote installation 35 .
The main difference is in the package creation process, which is as follows:
1) From ERAC, click the Remote Install tab.
2) Click the Packages… button.
3) From the Package type drop-down menu select Custom package.
4) Click Add…, click Add file and select the desired .msi package.
5) Select the file from the Package Entry File drop-down menu and click Create.
6) After returning to the original window you can specify command line parameters for the .msi file. The parameters are
the same as for a local installation of the given package.
7) Click Save as… to save the package.
8) Click Close to exit the installation package editor.
The newly created custom package can be distributed to client workstations in the same manner as the remote
installations described in previous chapters. A remote push install, logon or email push install will send the package to
target workstations. From the moment the package is executed, installation is handled by the Microsoft Windows
Installer service.
94
12. ESET SysInspector
12.1 Introduction to ESET SysInspector
ESET SysInspector is an application that thoroughly inspects your computer and displays gathered data in a
comprehensive way. Information like installed drivers and applications, network connections or important registry
entries can help you to investigate suspicious system behavior be it due to software or hardware incompatibility or
malware infection.
You can access ESET SysInspector two ways: From the integrated version in ESET Security solutions or by downloading
the standalone version (SysInspector.exe) for free from ESET’s website. Both versions are identical in function and have
the same program controls. The only difference is how outputs are managed. The standalone and integrated versions
each allow you to export system snapshots to an .xml file and save them to disk. However, the integrated version also
allows you to store your system snapshots directly in Tools > ESET SysInspector (except ESET Remote Administrator).
Please allow some time while ESET SysInspector scans your computer. It may take anywhere from 10 seconds up to a
few minutes depending on your hardware configuration, operating system and the number of applications installed on
your computer.
12.1.1 Starting ESET SysInspector
To start ESET SysInspector, simply run the SysInspector.exe executable you downloaded from ESET's website. If you
already have one of the ESET Security solutions installed, you can run ESET SysInspector directly from the Start Menu (
Programs > ESET > ESET Remote Administrator). Please wait while the application inspects your system, which could
take up to several minutes depending on your hardware and data to be gathered.
95
12.2 User Interface and application usage
For clarity the Main window is divided into four major sections – Program Controls located on the top of the Main
window, the Navigation window on the left, the Description window on the right in the middle and the Details window
on the right at the bottom of the Main window. The Log Status section lists the basic parameters of a log (filter used,
filter type, is the log a result of a comparison etc.).
12.2.1 Program Controls
This section contains the description of all program controls available in ESET SysInspector.
File
By clicking File you can store your current system status for later investigation or open a previously stored log. For
publishing purposes we recommend that you generate a log Suitable for sending. In this form, the log omits sensitive
information (current user name, computer name, domain name, current user privileges, environment variables, etc.).
NOTE: You may open previously stored ESET SysInspector reports by simply dragging and dropping them into the
Main window.
Tree
Enables you to expand or close all nodes and export selected sections to Service script.
List
Contains functions for easier navigation within the program and various other functions like finding information online.
Help
Contains information about the application and its functions.
96
Detail
This setting influences the information displayed in the Main window to make the information easier to work with. In
"Basic" mode, you have access to information used to find solutions for common problems in your system. In the
"Medium" mode, the program displays less used details. In "Full" mode, ESET SysInspector displays all the information
needed to solve very specific problems.
Item filtering
Item filtering is best used to find suspicious files or registry entries in your system. By adjusting the slider, you can filter
items by their Risk Level. If the slider is set all the way to the left (Risk Level 1), then all items are displayed. By moving
the slider to the right, the program filters out all items less risky than current Risk Level and only display items which are
more suspicious than the displayed level. With the slider all the way to the right, the program displays only known
harmful items.
All items labeled as risk 6 to 9 can pose security risk. If you are not using a security solution from ESET, we recommend
that you scan your system with ESET Online Scanner if ESET SysInspector has found any such item. ESET Online
Scanner is a free service.
NOTE: The Risk level of an item can be quickly determined by comparing the color of the item with the color on the Risk
Level slider.
Search
Search can be used to quickly find a specific item by its name or part of its name. The results of the search request are
displayed in the Description window.
Return
By clicking the back or forward arrow, you may return to previously displayed information in the Description window.
You may use the backspace and space keys instead of clicking back and forward.
Status section
Displays the current node in Navigation window.
Important: Items highlighted in red are unknown, which is why the program marks them as potentially dangerous. If an
item is in red, it does not automatically mean that you can delete the file. Before deleting, please make sure that files are
really dangerous or unnecessary.
12.2.2 Navigating in ESET SysInspector
ESET SysInspector divides various types of information into several basic sections called nodes. If available, you may
find additional details by expanding each node into its subnodes. To open or collapse a node, double-click the name of
the node or alternatively click or next to the name of the node. As you browse through the tree structure of nodes
and subnodes in the Navigation window you may find various details for each node shown in the Description window.
If you browse through items in the Description window, additional details for each item may be displayed in the Details
window.
The following are the descriptions of the main nodes in the Navigation window and related information in the
Description and Details windows.
Running processes
This node contains information about applications and processes running at the time of generating the log. In the
Description window you may find additional details for each process such as dynamic libraries used by the process and
their location in the system, the name of the application's vendor and the risk level of the file.
The Detail window contains additional information for items selected in the Description window such as the file size or
its hash.
NOTE: An operating system comprises of several important kernel components running 24/7 that provide basic and
vital functions for other user applications. In certain cases, such processes are displayed in the tool ESET SysInspector
with file path beginning with \??\. Those symbols provide pre-launch optimization for those processes; they are safe for
the system.
Network connections
The Description window contains a list of processes and applications communicating over the network using the
97
protocol selected in the Navigation window (TCP or UDP) along with the remote address where to which the
application is connected to. You can also check the IP addresses of DNS servers.
The Detail window contains additional information for items selected in the Description window such as the file size or
its hash.
Important Registry Entries
Contains a list of selected registry entries which are often related to various problems with your system like those
specifying startup programs, browser helper objects (BHO), etc.
In the Description window you may find which files are related to specific registry entries. You may see additional details
in the Details window.
Services
The Description window Contains a list of files registered as windows Services. You may check the way the service is set
to start along with specific details of the file in the Details window.
Drivers
A list of drivers installed in the system.
Critical files
The Description window displays content of critical files related to the Microsoft windows operating system.
System information
Contains detailed information about hardware and software along with information about set environmental variables
and user rights.
File details
A list of important system files and files in the Program Files folder. Additional information specific for the files can be
found in the Description and Details windows.
About
Information about ESET SysInspector.
12.2.3 Compare
The Compare feature allows the user to compare two existing logs. The outcome of this feature is a set of items not
common to both logs. It is suitable if you want to keep track of changes in the system, a helpful tool for detecting
activity of malicious code.
After it is launched, the application creates a new log which is displayed in a new window. Navigate to File > Save log
to save a log to a file. Log files can be opened and viewed at a later time. To open an existing log, use File > Open log.
In the main program window, ESET SysInspector always displays one log at a time.
The benefit of comparing two logs is that you can view a currently active log and a log saved in a file. To compare logs,
use the option File > Compare log and choose Select file. The selected log will be compared to the active one in the
main program windows. The comparative log will display only the differences between those two logs.
NOTE: If you compare two log files, select File > Save log to save it as a ZIP file; both files are saved. If you open this file
later, the contained logs are automatically compared.
Next to the displayed items, ESET SysInspector shows symbols identifying differences between the compared logs.
Items marked by a can only be found in the active log and were not present in the opened comparative log. Items
marked by a were present only in the opened log and are missing in the active one.
98
Description of all symbols that can be displayed next to items:
new value, not present in the previous log
tree structure section contains new values
removed value, present in the previous log only
tree structure section contains removed values
value / file has been changed
tree structure section contains modified values / files
the risk level has decreased / it was higher in the previous log
the risk level has increased / it was lower in the previous log
The explanation section displayed in the left bottom corner describes all symbols and also displays the names of logs
which are being compared.
Any comparative log can be saved to a file and opened at a later time.
Example
Generate and save a log, recording original information about the system, to a file named previous.xml. After changes
to the system have been made, open ESET SysInspector and allow it to generate a new log. Save it to a file named
current.xml.
In order to track changes between those two logs, navigate to File > Compare logs. The program will create a
comparative log showing differences between the logs.
The same result can be achieved if you use the following command line option:
SysIsnpector.exe current.xml previous.xml
12.3 Command line parameters
ESET SysInspector supports generating reports from the command line using these parameters:
/gen
/privacy
/zip
/silent
/help, /?
generate a log directly from the command line without running the GUI
generate a log excluding sensitive information
store the resulting log directly on the disk in a compressed file
suppress the display of the log generation progress bar
display information about the command line parameters
Examples
To load a specific log directly in the browser, use: SysInspector.exe "c:\clientlog.xml"
To generate a log to a current location, use: SysInspector.exe /gen
To generate a log to a specific folder, use: SysInspector.exe /gen="c:\folder\"
To generate a log to a specific file/location, use: SysInspector.exe /gen="c:\folder\mynewlog.xml"
To generate a log excluding sensitive information directly in a compressed file, use: SysInspector.exe /gen="c:\mynewlog.
zip" /privacy /zip
To compare two logs, use: SysInspector.exe "current.xml" "original.xml"
NOTE: If the name of the file/folder contains a gap, then should be taken into inverted commas.
99
12.4 Service Script
Service script is a tool that provides help to customers that use ESET SysInspectorby easily removing unwanted objects
from the system.
Service script enables the user to export the entire ESET SysInspector log, or its selected parts. After exporting, you can
mark unwanted objects for deletion. You can then run the modified log to delete marked objects.
Service Script is suited for advanced users with previous experience in diagnosing system issues. Unqualified
modifications may lead to operating system damage.
Example
If you have a suspicion that your computer is infected by a virus which is not detected by your antivirus program, follow
the step-by-step instructions below:
Run ESET SysInspector to generate a new system snapshot.
Select the first item in the section on the left (in the tree structure), press Ctrl and select the last item to mark all items.
Right click the selected objects and select the Export Selected Sections To Service Script context menu option.
The selected objects will be exported to a new log.
This is the most crucial step of the entire procedure: open the new log and change the – attribute to + for all objects
you want to remove. Please make sure you do not mark any important operating system files/objects.
Open ESET SysInspector, click File > Run Service Script and enter the path to your script.
Click OK to run the script.
12.4.1 Generating Service script
To generate a script, right-click any item from the menu tree (in the left pane) in the ESET SysInspector main window.
From the context menu, select either the Export All Sections To Service Script option or the Export Selected
Sections To Service Script option.
NOTE: It is not possible to export the service script when two logs are being compared.
12.4.2 Structure of the Service script
In the first line of the script’s header, you can find information about the Engine version (ev), GUI version (gv) and the
Log version (lv). You can use this data to track possible changes in the .xml file that generates the script and prevent
any inconsistencies during execution. This part of the script should not be altered.
The remainder of the file is divided into sections in which items can be edited (denote those that will be processed by
the script). You mark items for processing by replacing the “-” character in front of an item with a “+” character. Sections
in the script are separated from each other by an empty line. Each section has a number and title.
01) Running processes
This section contains a list of all processes running in the system. Each process is identified by its UNC path and,
subsequently, its CRC16 hash code in asterisks (*).
Example:
01) Running processes:
- \SystemRoot\System32\smss.exe *4725*
- C:\Windows\system32\svchost.exe *FD08*
+ C:\Windows\system32\module32.exe *CF8A*
[...]
In this example a process, module32.exe, was selected (marked by a “+” character); the process will end upon execution
of the script.
02) Loaded modules
This section lists currently used system modules.
100
Example:
02) Loaded modules:
- c:\windows\system32\svchost.exe
- c:\windows\system32\kernel32.dll
+ c:\windows\system32\khbekhb.dll
- c:\windows\system32\advapi32.dll
[...]
In this example the module khbekhb.dll was marked by a “+”. When the script runs, it will recognize the processes using
that specific module and end them.
03) TCP connections
This section contains information about existing TCP connections.
Example:
03) TCP connections:
- Active connection: 127.0.0.1:30606 -> 127.0.0.1:55320, owner: ekrn.exe
- Active connection: 127.0.0.1:50007 -> 127.0.0.1:50006,
- Active connection: 127.0.0.1:55320 -> 127.0.0.1:30606, owner: OUTLOOK.EXE
- Listening on *, port 135 (epmap), owner: svchost.exe
+ Listening on *, port 2401, owner: fservice.exe Listening on *, port 445 (microsoft-ds), owner:
System
[...]
When the script runs, it will locate the owner of the socket in the marked TCP connections and stop the socket, freeing
system resources.
04) UDP endpoints
This section contains information about existing UDP endpoints.
Example:
04) UDP endpoints:
- 0.0.0.0, port 123 (ntp)
+ 0.0.0.0, port 3702
- 0.0.0.0, port 4500 (ipsec-msft)
- 0.0.0.0, port 500 (isakmp)
[...]
When the script runs, it will isolate the owner of the socket at the marked UDP endpoints and stop the socket.
05) DNS server entries
This section contains information about the current DNS server configuration.
Example:
05) DNS server entries:
+ 204.74.105.85
- 172.16.152.2
[...]
Marked DNS server entries will be removed when you run the script.
06) Important registry entries
This section contains information about important registry entries.
101
Example:
06) Important registry entries:
* Category: Standard Autostart (3 items)
HKLM\SOFTWARE\Microsoft\Windows\CurrentVersion\Run
- HotKeysCmds = C:\Windows\system32\hkcmd.exe
- IgfxTray = C:\Windows\system32\igfxtray.exe
HKCU\SOFTWARE\Microsoft\Windows\CurrentVersion\Run
- Google Update = “C:\Users\antoniak\AppData\Local\Google\Update\GoogleUpdate.exe” /c
* Category: Internet Explorer (7 items)
HKLM\Software\Microsoft\Internet Explorer\Main
+ Default_Page_URL = http://thatcrack.com/
[...]
The marked entries will be deleted, reduced to 0-byte values or reset to their default values upon script execution. The
action to be applied to a particular entry depends on the entry category and key value in the specific registry.
07) Services
This section lists services registered within the system.
Example:
07) Services:
- Name: Andrea ADI Filters Service, exe path: c:\windows\system32\aeadisrv.exe, state: Running,
startup: Automatic
- Name: Application Experience Service, exe path: c:\windows\system32\aelupsvc.dll, state: Running,
startup: Automatic
- Name: Application Layer Gateway Service, exe path: c:\windows\system32\alg.exe, state: Stopped,
startup: Manual
[...]
The services marked and their dependant services will be stopped and uninstalled when the script is executed.
08) Drivers
This section lists installed drivers.
Example:
08) Drivers:
- Name: Microsoft ACPI Driver, exe path: c:\windows\system32\drivers\acpi.sys, state: Running,
startup: Boot
- Name: ADI UAA Function Driver for High Definition Audio Service, exe path: c:\windows\system32
\drivers\adihdaud.sys, state: Running, startup: Manual
[...]
When you execute the script, the drivers selected will be unregistered from the system and removed.
09) Critical files
This section contains information about files that are critical to the operating system.
Example:
09) Critical files:
* File: win.ini
- [fonts]
- [extensions]
- [files]
- MAPI=1
[...]
* File: system.ini
- [386Enh]
- woafont=dosapp.fon
- EGA80WOA.FON=EGA80WOA.FON
[...]
* File: hosts
- 127.0.0.1 localhost
- ::1 localhost
[...]
The selected items will either be deleted or reset to their original values.
102
12.4.3 Executing Service scripts
Mark all desired items, then save and close the script. Run the edited script directly from the ESET SysInspector main
window by selecting the Run Service Script option from the File menu. When you open a script, the program will
prompt you with the following message: Are you sure you want to run the service script “%Scriptname%”? After you
confirm your selection, another warning may appear, informing you that the service script you are trying to run has not
been signed. Click Run to start the script.
A dialog window will confirm that the script was successfully executed.
If the script could only be partially processed, a dialog window with the following message will appear: The service
script was run partially. Do you want to view the error report? Select Yes to view a complex error report listing the
operations that were not executed.
If the script was not recognized, a dialog window with the following message will appear: The selected service script is
not signed. Running unsigned and unknown scripts may seriously harm your computer data. Are you sure you
want to run the script and carry out the actions? This may be caused by inconsistencies within the script (damaged
heading, corrupted section title, empty line missing between sections etc.). You can either reopen the script file and
correct the errors within the script or create a new service script.
12.5 Shortcuts
Key shortcuts that can be used when working with the ESET SysInspector include:
File
Ctrl+O
Ctrl+S
opens existing log
saves created logs
Generate
Ctrl+G
Ctrl+H
standard system status check
performs a system check that may also log sensitive information
Item Filtering
1, O
2
3
4, U
5
6
7, B
8
9
+
Ctrl+9
Ctrl+0
fine, risk level 1-9 items are displayed
fine, risk level 2-9 items are displayed
fine, risk level 3-9 items are displayed
unknown, risk level 4-9 items are displayed
unknown, risk level 5-9 items are displayed
unknown, risk level 6-9 items are displayed
risky, risk level 7-9 items are displayed
risky, risk level 8-9 items are displayed
risky, risk level 9 items are displayed
decreases risk level
increases risk level
filtering mode, equal level or higher
filtering mode, equal level only
View
Ctrl+5
Ctrl+6
Ctrl+7
Ctrl+3
Ctrl+2
Ctrl+1
BackSpace
Space
Ctrl+W
Ctrl+Q
view by vendor, all vendors
view by vendor, only Microsoft
view by vendor, all other vendors
displays full detail
displays medium detail
basic display
moves one step back
moves one step forward
expands tree
collapses tree
Other controls
Ctrl+T
goes to the original location of item after selecting in search results
103
Ctrl+P
Ctrl+A
Ctrl+C
Ctrl+X
Ctrl+B
Ctrl+L
Ctrl+R
Ctrl+Z
Ctrl+F
Ctrl+D
Ctrl+E
displays basic information about an item
displays full information about an item
copies the current item's tree
copies items
finds information about selected files on the Internet
opens the folder where the selected file is located
opens the corresponding entry in the registry editor
copies a path to a file (if the item is related to a file)
switches to the search field
closes search results
run service script
Comparing
Ctrl+Alt+O
Ctrl+Alt+R
Ctrl+Alt+1
Ctrl+Alt+2
Ctrl+Alt+3
Ctrl+Alt+4
Ctrl+Alt+5
Ctrl+Alt+C
Ctrl+Alt+N
Ctrl+Alt+P
opens original / comparative log
cancels comparison
displays all items
displays only added items, log will show items present in current log
displays only removed items, log will show items present in previous log
displays only replaced items (files inclusive)
displays only differences between logs
displays comparison
displays current log
opens previous log
Miscellaneous
F1
Alt+F4
Alt+Shift+F4
Ctrl+I
view help
close program
close program without asking
log statistics
12.6 System requirements
For seamless operation of ESET SysInspector, the system should meet the following hardware and software
requirements:
Windows 2000, XP, 2003
400 MHz 32-bit (x86) / 64-bit (x64)
128MB RAM of system memory
10MB available space
Super VGA (800 x 600)
Windows 7, Vista, 2008
1 GHz 32-bit (x86) / 64-bit (x64)
512MB RAM of system memory
10MB available space
Super VGA (800 x 600)
12.7 FAQ
Does ESET SysInspector require Administrator privileges to run ?
While ESET SysInspector does not require Administrator privileges to run, some of the information it collects can only
be accessed from an Administrator account. Running it as a Standard User or a Restricted User will result in it collecting
less information about your operating environment.
Does ESET SysInspector create a log file ?
ESET SysInspector can create a log file of your computer's configuration. To save one, select File > Save Log from the
main menu. Logs are saved in XML format. By default, files are saved to the %USERPROFILE%\My Documents\ directory,
with a file naming convention of "SysInpsector-%COMPUTERNAME%-YYMMDD-HHMM.XML". You may change the
location and name of the log file to something else before saving if you prefer.
104
How do I view the ESET SysInspector log file ?
To view a log file created by ESET SysInspector, run the program and select File > Open Log from the main menu. You
can also drag and drop log files onto the ESET SysInspector application. If you need to frequently view ESET
SysInspector log files, we recommend creating a shortcut to the SYSINSPECTOR.EXE file on your Desktop; you can then
drag and drop log files onto it for viewing. For security reasons Windows Vista/7 may not allow drag and drop between
windows that have different security permissions.
Is a specification available for the log file format? What about an SDK ?
At the current time, neither a specification for the log file or an SDK are available since the program is still in
development. After the program has been released, we may provide these based on customer feedback and demand.
How does ESET SysInspector evaluate the risk posed by a particular object ?
In most cases, ESET SysInspector assigns risk levels to objects (files, processes, registry keys and so forth) using a series
of heuristic rules that examine the characteristics of each object and then weight the potential for malicious activity.
Based on these heuristics, objects are assigned a risk level from 1 - Fine (green) to 9 - Risky (red). In the left navigation
pane, sections are colored based on the highest risk level of an object inside them.
Does a risk level of "6 - Unknown (red)" mean an object is dangerous ?
ESET SysInspector's assessments do not guarantee that an object is malicious – that determination should be made by
a security expert. What ESET SysInspector is designed for is to provide a quick assessment for security experts so that
they know what objects on a system they may want to further examine for unusual behavior.
Why does ESET SysInspector connect to the Internet when run ?
Like many applications, ESET SysInspector is signed with a digital signature "certificate" to help ensure the software was
published by ESET and has not been altered. In order to verify the certificate, the operating system contacts a certificate
authority to verify the identity of the software publisher. This is normal behavior for all digitally-signed programs under
Microsoft Windows.
What is Anti-Stealth technology ?
Anti-Stealth technology provides effective rootkit detection.
If the system is attacked by malicious code that behaves as a rootkit, the user may be exposed to data loss or theft.
Without a special anti-rootkit tool, it is almost impossible to detect rootkits.
Why are there sometimes files marked as "Signed by MS", having a different "Company Name" entry at the same
time ?
When trying to identify the digital signature of an executable, ESET SysInspector first checks for a digital signature
embedded in the file. If a digital signature is found, the file will be validated using that information. If a digital signature
is not found, the ESI starts looking for the corresponding CAT file (Security Catalog - %systemroot%\system32\catroot)
that contains information about the executable file processed. If the relevant CAT file is found, the digital signature of
that CAT file will be applied in the validation process of the executable.
This is why there are sometimes files marked as "Signed by MS", but having a different "CompanyName" entry.
Example:
Windows 2000 includes the HyperTerminal application located in C:\Program Files\Windows NT. The main application
executable file is not digitally signed, but ESET SysInspector marks it as a file signed by Microsoft. The reason for this is a
reference in C:\WINNT\system32\CatRoot\{F750E6C3-38EE-11D1-85E5-00C04FC295EE}\sp4.cat pointing to C:\Program
Files\Windows NT\hypertrm.exe (the main executable of the HyperTerminal application) and sp4.cat is digitally signed by
Microsoft.
105
13. ESET SysRescue
ESET SysRescue is a utility which enables you to create a bootable disk containing one of the ESET Security solutions - it
can be ESET NOD32 Antivirus, ESET Smart Security or even some of the server-oriented products. The main advantage
of ESET SysRescue is the fact that ESET Security solution runs independent of the host operating system, while it has a
direct access to the disk and the entire file system. This makes it possible to remove infiltrations which normally could
not be deleted, e.g., when the operating system is running, etc.
13.1 Minimum requirements
ESET SysRescue works in the Microsoft Windows Preinstallation Environment (Windows PE) version 2.x, which is based
on Windows Vista.
Windows PE is a part of the free package Windows Automated Installation Kit (Windows AIK), and therefore Windows
AIK must be installed before creating ESET SysRescue (http://go.eset.eu/AIK). Due to the support of the 32-bit version
of Windows PE, it is necessary to use a 32-bit installation package of ESET Security solution when creating ESET
SysRescue on 64-bit systems. ESET SysRescue supports Windows AIK 1.1 and higher.
NOTE: Since Windows AIK is over 1 GB in size, a high-speed internet connection is required for smooth download.
ESET SysRescue is available in ESET Security solutions version 4.0 and higher.
Supported operating systems
Windows 7
Windows Vista
Windows Vista Service Pack 1
Windows Vista Service Pack 2
Windows Server 2008
Windows Server 2003 Service Pack 1 with KB926044
Windows Server 2003 Service Pack 2
Windows XP Service Pack 2 with KB926044
Windows XP Service Pack 3
13.2 How to create rescue CD
To launch the ESET SysRescue wizard, click Start > Programs > ESET > ESET Remote Administrator > ESET
SysRescue.
First, the wizard checks for the presence of Windows AIK and a suitable device for the boot media creation. If Windows
AIK is not installed on the computer (or it is either corrupt or installed incorrectly), the wizard will offer you the option to
install it, or to enter the path to your Windows AIK folder (http://go.eset.eu/AIK).
NOTE: Since Windows AIK is over 1 GB in size, a high-speed internet connection is required for smooth download.
In the next step 106 , select the target media where ESET SysRescue will be located.
13.3 Target selection
In addition to CD/DVD/USB, you can choose to save ESET SysRescue in an ISO file. Later on, you can burn the ISO
image on CD/DVD, or use it some other way (e.g. in the virtual environment such as VMware or VirtualBox).
If you select USB as the target medium, booting may not work on certain computers. Some BIOS versions may report
problems with the BIOS - boot manager communication (e.g. on Windows Vista) and booting exits with the following
error message:
file : \boot\bcd
status : 0xc000000e
info : an error occurred while attemping to read the boot configuration data
If you encounter this message, we recommend selecting CD instead of USB medium.
106
13.4 Settings
Before initiating ESET SysRescue creation, the install wizard displays compilation parameters in the last step of the ESET
SysRescue wizard. These can be modified by clicking the Change... button. The available options include:
Folders 107
ESET Antivirus 107
Advanced 107
Internet protocol 108
Bootable USB device 108 (when the target USB device is selected)
Burning 108 (when the target CD/DVD drive is selected)
The Create button is inactive if no MSI installation package is specified, or if no ESET Security solution is installed on the
computer. To select an installation package, click the Change button and go to the ESET Antivirus tab. Also, if you do
not fill in username and password (Change > ESET Antivirus), the Create button is greyed out.
13.4.1 Folders
Temporary folder is a working directory for files required during ESET SysRescue compilation.
ISO folder is a folder, where the resulting ISO file is saved after the compilation is completed.
The list on this tab shows all local and mapped network drives together with the available free space. If some of the
folders here are located on a drive with insufficient free space, we recommend that you select another drive with more
free space available. Otherwise compilation may end prematurely due to insufficient free disk space.
External applications – Allows you to specify additional programs that will be run or installed after booting from a
ESET SysRescue medium.
Include external applications – Allows you to add external programs to the ESET SysRescue compilation.
Selected folder – Folder in which programs to be added to the ESET SysRescue disk are located.
13.4.2 ESET Antivirus
For creating the ESET SysRescue CD, you can select two sources of ESET files to be used by the compiler.
ESS/EAV folder – Files already contained in the folder to which the ESET Security solution is installed on the computer.
MSI file – Files contained in the MSI installer are used.
Next, you can choose to update the location of (.nup) files. Normally, the default option ESS/EAV folder/MSI file
should be set. In some cases, a custom Update folder can be chosen, e.g., to use an older or newer virus signature
database version.
You can use one of the following two sources of username and password:
Installed ESS/EAV – Username and password will be copied from the currently installed ESET Security solution.
From user – Username and password entered in the corresponding text boxes will be used.
NOTE: ESET Security solution on the ESET SysRescue CD is updated either from the Internet or from the ESET Security
solution installed on the computer on which the ESET SysRescue CD is run.
13.4.3 Advanced settings
The Advanced tab lets you optimize the ESET SysRescue CD according to the amount of memory on your computer.
Select 576 MB and more to write the content of the CD to the operating memory (RAM). If you select less than 576 MB
, the recovery CD will be permanently accessed when WinPE will be running.
In the External drivers section, you can insert drivers for your specific hardware (usually network adapter). Although
WinPE is based on Windows Vista SP1, which supports a large range of hardware, occasionally hardware is not
recognized. This will required that you add a driver manually. There are two ways of introducing a driver into an ESET
SysRescue compilation - manually (the Add button) and automatically (the Aut. Search button). In the case of manual
inclusion, you need to select the path to the corresponding .inf file (applicable *.sys file must also be present in this
folder). In the case of automatic introduction, the driver is found automatically in the operating system of the given
computer. We recommend using automatic inclusion only if ESET SysRescue is used on a computer that has the same
107
network adapter as the computer on which the ESET SysRescue CD was created. During creation, the ESET SysRescue
driver is introduced into the compilation so you do not need to look for it later.
13.4.4 Internet protocol
This section allows you to configure basic network information and set up predefined connections after ESET
SysRescue.
Select Automatic private IP address to obtain the IP address automatically from DHCP (Dynamic Host Configuration
Protocol) server.
Alternatively, this network connection can use a manually specified IP address (also known as a static IP address).
Select Custom to configure the appropriate IP settings. If you select this option, you must specify an IP address and,
for LAN and high-speed Internet connections, a Subnet mask. In Preferred DNS server and Alternate DNS server,
type the primary and secondary DNS server addresses.
13.4.5 Bootable USB device
If you have selected a USB device as your target medium, you can select one of the available USB devices on the
Bootable USB device tab (in case there are more USB devices).
Select the appropriate target Device where ESET SysRescue will be installed.
Warning: The selected USB device will be formatted during the creation of ESET SysRescue. All data on the device will be
deleted.
If you choose the Quick format option, formatting removes all the files from the partition, but does not scan the disk
for bad sectors. Use this option if your USB device has been formatted previously and you are sure that it is not
damaged.
13.4.6 Burn
If you have selected CD/DVD as your target medium, you can specify additional burning parameters on the Burn tab.
Delete ISO file – Check this option to delete the temporary ISO file after the ESET SysRescue CD is created.
Deletion enabled – Enables you to select fast erasing and complete erasing.
Burning device – Select the drive to be used for burning.
Warning: This is the default option. If a rewritable CD/DVD is used, all the data on the CD/DVD will be erased.
The Medium section contains information about the medium in your CD/DVD device.
Burning speed – Select the desired speed from the drop-down menu. The capabilities of your burning device and the
type of CD/DVD used should be considered when selecting the burning speed.
13.5 Working with ESET SysRescue
For the rescue CD/DVD/USB to work effectively, you must start your computer from the ESET SysRescue boot media.
Boot priority can be modified in the BIOS. Alternatively, you can use the boot menu during computer startup – usually
using one of the F9 - F12 keys depending on the version of your motherboard/BIOS.
After booting up from the boot media, ESET Security solution will start. Since ESET SysRescue is used only in specific
situations, some protection modules and program features present in the standard version of ESET Security solution
are not needed; their list is narrowed down to Computer scan, Update, and some sections in Setup. The ability to
update the virus signature database is the most important feature of ESET SysRescue, we recommend that you update
the program prior starting a Computer scan.
108
13.5.1 Using ESET SysRescue
Suppose that computers in the network have been infected by a virus which modifies executable (.exe) files. ESET
Security solution is capable of cleaning all infected files except for explorer.exe, which cannot be cleaned, even in Safe
mode. This is because explorer.exe, as one of the essential Windows processes, is launched in Safe mode as well. ESET
Security solution would not be able to perform any action with the file and it would remain infected.
In this type of scenario, you could use ESET SysRescue to solve the problem. ESET SysRescue does not require any
component of the host operating system, and is therefore capable of processing (cleaning, deleting) any file on the disk.
109