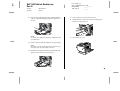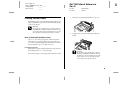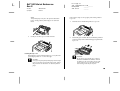
1
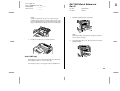
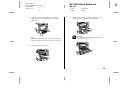
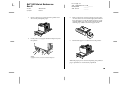
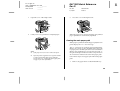
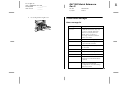
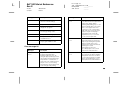
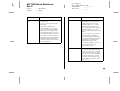
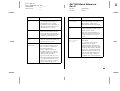
Copyright © 2000 by SEIKO EPSON CORPORATION,Nagano,Japan
Printed in Japan
00.XX-XX
Quick Reference
Color Laser Printer
Color Laser Printer
You can hang this guide on the printer
using the hook provided.
Quick Reference
4012364 Rev.0
Cover-F DIC F43
4012364-00
XXX
4012364
Cover-F
Rev.0
BK
L
R4C1320 Quick Reference
Rev.D
A5 size
6/18/01
Proof Sign-off:
ABE S.Takahashi K.Yoda_______
M.Miyazaki
_______
ABE G.Kok
_______
QUICK.FM
Pass 0
Replacing Consumable Products
You need to replace the following consumable products
when a notice message is displayed on the LCD panel
or the window of the EPSON Status Monitor 3 utility.
Developer Cartridge (Black)
S050033
Developer Cartridge (Yellow)
S050034
Developer Cartridge (Magenta)
S050035
Developer Cartridge (Cyan)
S050036
Photoconductor Kit
(includes a photoconductor unit,
a waste toner collector, and a
print head filter)
S051072
Fuser Kit
(includes a fuser unit and a
second transfer roll)
S05300✽
Fuser Oil Roll
S052003
Waste Toner Collector
S050037
Transfer Belt Unit
S053001
Replacing a developer cartridge
w
Warning:
Do not dispose of used developer cartridges in
❏
fire, as they may explode and cause injury.
Dispose of them according to local regulations.
❏
Do not touch the toner and avoid all contact
with your eyes. If toner gets on your skin or
clothes, wash it off with soap and water
immediately.
Follow these steps to replace a developer cartridge:
1.
Confirm the color of the developer cartridge that
needs to be replaced by checking the LCD panel.
2.
Open the front cover.
This guide contains replacement procedures for the
developer cartridges and the photoconductor kit only.
See the Reference Guide for information on replacing the
fuser kit, fuser oil roll, waste toner collector, and
transfer belt unit.
2
Proof Sign-off:
ABE S.Takahashi K.Yoda_______
M.Miyazaki
_______
ABE G.Kok
_______
3.
Check which color currently appears in the
cartridge installation window.
A5 size
6/18/01
5.
6.
4.
QUICK.FM
Pass 0
Turn the knob counterclockwise until it stops. The
next cartridge appears in the cartridge installment
window.
Repeat steps 4 and 5 until you see the color that you
need to replace.
If you see the color that you need to replace, go to
step 6.
If you see a different color, go to the next step.
R
R4C1320 Quick Reference
Rev.D
Pull the cartridge eject lever until the cartridge
protrudes from the slot, then remove the cartridge.
Press the green button, as shown below.
3
L
R4C1320 Quick Reference
Rev.D
A5 size
6/18/01
Proof Sign-off:
ABE S.Takahashi K.Yoda_______
M.Miyazaki
_______
ABE G.Kok
_______
QUICK.FM
Pass 0
7.
Take a new cartridge of the color to be replaced out
of its package, and gently shake it from side to side
and front to back as shown below to distribute the
toner evenly.
8.
Hold the cartridge as shown below, and insert it all
the way into the developer cartridge slot until it
clicks.
10. Close the front cover.
The photoconductor kit
The photoconductor kit consists of the following items:
❏
Photoconductor unit
❏
Waste toner collector
❏
Print head filter
Always pay attention to the following handling
precautions before replacing the photoconductor unit:
9.
❏
When replacing the photoconductor unit, avoid
exposing it to room light any longer than necessary.
❏
Be sure not to scratch the surface of the drum. Also,
avoid touching the drum, since oil from your skin
may permanently damage its surface and affect
print quality.
If you need to replace another cartridge, repeat
steps 3 to 8.
4
Proof Sign-off:
ABE S.Takahashi K.Yoda_______
M.Miyazaki
_______
ABE G.Kok
_______
❏
To get the best print quality, do not store the
photoconductor unit in an area subject to direct
sunlight, dust, salty air, or corrosive gases (such as
ammonia). Avoid locations subject to extreme or
rapid changes in temperature or humidity.
w
Warning:
Do not dispose of the used photoconductor unit in
fire, as it may explode and cause injury. Dispose of
it according to local regulations.
R
R4C1320 Quick Reference
Rev.D
A5 size
6/18/01
QUICK.FM
Pass 0
Replacing the photoconductor unit, waste
toner collector, and print head filter
Follow these steps to replace the photoconductor kit:
1.
Turn off the printer.
2.
Open the front cover.
3.
Detach the waste toner collector, as shown below.
Always pay attention to the following handling
precautions before replacing the waste toner collector:
❏
Do not reuse toner found in the waste toner
w
Warning:
Do not dispose of the used waste toner collector in
fire, as it may explode and cause injury. Dispose of
it according to local regulations.
Always pay attention to the following handling
precautions before replacing the print head filter:
❏
Do not reuse toner found on the print head filter.
w
Warning:
Do not dispose of the used print head filter in fire, as
it may explode and cause injury. Dispose of it
according to local regulations.
Note:
Be careful not to spill toner when handling the waste
toner collector.
5
L
R4C1320 Quick Reference
Rev.D
A5 size
6/18/01
4.
5.
Proof Sign-off:
ABE S.Takahashi K.Yoda_______
M.Miyazaki
_______
ABE G.Kok
_______
QUICK.FM
Pass 0
Turn and remove the two round caps off the center
of the used waste toner collector and attach them
to the openings. (The illustrations show the
procedure for one cap only.)
Remove the rectangular cap and attach it to the
rectangular opening, as shown in the illustration
below.
6.
Turn the large lever counterclockwise to an upright
position.
7.
Pull the photoconductor unit out of the printer.
8.
Take the new photoconductor unit out of its
package.
6
Proof Sign-off:
ABE S.Takahashi K.Yoda_______
M.Miyazaki
_______
ABE G.Kok
_______
Note:
Install the photoconductor unit with its protective sheet
in place. Do not remove it yet.
9.
R
R4C1320 Quick Reference
Rev.D
A5 size
6/18/01
QUICK.FM
Pass 0
10. While keeping the photoconductor unit in place
with your left hand, pull the ring toward you to
remove the protective sheet.
Hold the photoconductor unit as shown below, and
insert it firmly into the slot making sure that the
bottom of the unit slide into the guide rails.
c
c
Caution:
Make sure the photoconductor unit is inserted
correctly. Otherwise, it may damage the printer.
Caution:
Failure to remove the protective sheet may
damage your printer.
11. Turn the large lever clockwise, until the lever rests
on the photoconductor unit as shown below.
Note:
Make sure that the unit is completely inserted into the
slot. Otherwise, the lever cannot be restored to a position
that accommodates the waste toner collector.
7
L
R4C1320 Quick Reference
Rev.D
A5 size
6/18/01
QUICK.FM
Pass 0
12. Press down on the handle of the print head filter
with your thumb and gently pull it straight out of
the slot.
Note:
Be careful not to spill toner that has accumulated on the
print head filter.
Proof Sign-off:
ABE S.Takahashi K.Yoda_______
M.Miyazaki
_______
ABE G.Kok
_______
15. Take out the new waste toner collector.
16. Attach the new waste toner collector, making sure
that it is securely in place.
17. Close the front cover.
13. Remove the new print head filter from its package.
Note:
Be careful not to touch the glass surface. Oil from your
skin may cause the print quality to decline.
14. Hold the new print head filter by the handle and
gently insert it all the way into the slot.
8
Proof Sign-off:
ABE S.Takahashi K.Yoda_______
M.Miyazaki
_______
ABE G.Kok
_______
Clearing Jammed Paper
R
R4C1320 Quick Reference
Rev.D
A5 size
6/18/01
QUICK.FM
Pass 0
1.
Push the lever and lift the printer’s top cover.
2.
Gently remove any jammed paper with both
hands.
If jammed paper is torn and remains in the printer, or if
paper is jammed in a place not mentioned in this guide,
contact your dealer.
w
Warning:
Be careful not to touch the fuser, which is marked
CAUTION Hot Surface Avoid Contact, or the
surrounding areas. If the printer has been in use, the
fuser and the surrounding areas may be very hot.
Jam A (fuser unit and top cover)
The Jam A error message appears on the LCD panel
when there is a paper jam at the fuser unit or the top
cover. If you don’t find paper jammed in the fuser unit,
always check the top cover and vice-versa.
Clearing the fuser unit
When there is paper jammed at the fuser unit, the LCD
panel displays the Jam A error message.
Follow these steps to clear paper jams in the fuser unit:
c
Caution:
Be careful not to touch the fuser, which is
marked CAUTION Hot Surface Avoid
Contact, or the surrounding areas. If the
printer has been in use, the fuser and the
surrounding areas may be very hot.
9
L
R4C1320 Quick Reference
Rev.D
A5 size
6/18/01
QUICK.FM
Pass 0
Note:
The jammed paper may be in the position illustrated
below. Gently pull the jammed paper out with both
hands.
3.
Proof Sign-off:
ABE S.Takahashi K.Yoda_______
M.Miyazaki
_______
ABE G.Kok
_______
Gently close the top cover until it clicks.
Follow these steps to clear paper jams in the printer’s
top cover:
1.
Push the lever and lift the printer’s top cover.
2.
Rotate the gear in either direction until the jammed
paper is totally removed from the paper path in the
top cover.
Clearing the top cover
When there is paper jammed at the top cover, the LCD
panel displays the Jam A error message.
c
Caution:
Even if you see part of the jammed paper in the output
tray, do not pull it out from the output tray. Follow
the procedures in this section to clear the jammed
paper.
c
Caution:
Be careful not to touch the fuser, which is
marked CAUTION Hot Surface Avoid
Contact, or the surrounding areas. If the
printer has been in use, the fuser and the
surrounding areas may be very hot.
10
Proof Sign-off:
ABE S.Takahashi K.Yoda_______
M.Miyazaki
_______
ABE G.Kok
_______
Note:
If paper is jammed at the top cover while using the
optional Duplex Unit, the jammed paper may be in the
position illustrated below. Gently pull out the jammed
paper with both hands, making sure not to tear the paper.
R
R4C1320 Quick Reference
Rev.D
A5 size
6/18/01
1.
QUICK.FM
Pass 0
Pull the jammed paper out gently.
Note:
If the jammed paper feels tight, do not pull it out by force.
Proceed to the next step.
3.
Gently close the top cover until it clicks.
2.
Open the right side cover. Be careful not to tear the
jammed paper.
Jam B (MP tray)
When there is paper jammed at the MP tray, the LCD
panel displays the Jam B error message.
Follow these steps to clear paper jams at the MP tray:
11
L
R4C1320 Quick Reference
Rev.D
A5 size
6/18/01
3.
QUICK.FM
Pass 0
Lift the inner panel by its handle and remove any
jammed paper inside. Then close the panel.
Note:
If paper is torn, be sure to remove all torn pieces.
w
Proof Sign-off:
ABE S.Takahashi K.Yoda_______
M.Miyazaki
_______
ABE G.Kok
_______
Warning:
Be careful not to touch the transfer belt unit as
it gets hot during use.
4.
Close the right side cover.
Jam C1 (standard lower cassette)
When there is paper jammed at the standard lower
cassette, the LCD panel displays the Jam C1 error
message.
Follow these steps to clear paper jams in the standard
lower cassette:
1.
Open the standard lower cassette’s right cover.
12
Proof Sign-off:
ABE S.Takahashi K.Yoda_______
M.Miyazaki
_______
ABE G.Kok
_______
2.
Gently pull out any jammed paper with both
hands, then close the standard lower cassette’s
right cover.
Note:
If the jammed paper has fed part way into the main paper
path and is difficult to remove, proceed to the next step.
3.
R
R4C1320 Quick Reference
Rev.D
A5 size
6/18/01
4.
QUICK.FM
Pass 0
Lift the inner panel by its handle and remove any
jammed paper inside. Then close the panel.
w
Warning:
Be careful not to touch the transfer belt unit as
it gets hot during use.
Open the printer’s right cover.
13
L
R4C1320 Quick Reference
Rev.D
A5 size
6/18/01
Proof Sign-off:
ABE S.Takahashi K.Yoda_______
M.Miyazaki
_______
ABE G.Kok
_______
QUICK.FM
Pass 0
5.
Remove the paper cassette from the printer and
discard any crumpled paper.
6.
Gently remove any paper that has fed part way into
the printer.
7.
Remove the stack of paper from the cassette, tap it
on a flat surface to even out the edges, then reinsert
it into the paper cassette. Be sure the paper is evenly
aligned and the top of the stack is below the metal
retaining clip and the maximum paper mark.
8.
Reinsert the paper cassette back into the printer.
Note:
If paper is torn, be sure to remove all pieces.
When the paper jam is cleared completely, the jammed
page’s print data is automatically reprinted.
14
Proof Sign-off:
ABE S.Takahashi K.Yoda_______
M.Miyazaki
_______
ABE G.Kok
_______
Jam C2 (optional 500-Sheet Paper Cassette
Unit)
R
R4C1320 Quick Reference
Rev.D
A5 size
6/18/01
2.
QUICK.FM
Pass 0
Gently pull out any jammed paper with both
hands, then close the 500-Sheet Paper Cassette
Unit’s right cover.
When there is paper jammed at the optional 500-Sheet
Paper Cassette Unit, the LCD panel displays the Jam C2
error message. Clearing paper jams at this unit is very
similar to clearing paper jams in the standard lower
cassette.
Follow these steps to clear paper jams in the optional
500-Sheet Paper Cassette Unit:
1.
Open the 500-Sheet Paper Cassette Unit’s right
cover.
Note:
If the jammed paper has fed part way into the standard
lower cassette, refer to steps 1 to 4 of the procedure for
clearing paper jams in the standard lower cassette before
proceeding to the next step. For instructions, see “Jam
C1 (standard lower cassette)” on page 12.
3.
Remove the paper cassette from the unit and
discard any crumpled paper.
15
L
R4C1320 Quick Reference
Rev.D
A5 size
6/18/01
4.
Proof Sign-off:
ABE S.Takahashi K.Yoda_______
M.Miyazaki
_______
ABE G.Kok
_______
QUICK.FM
Pass 0
Gently remove any paper that has fed part way into
the printer.
6.
Reinsert the paper cassette back into the unit.
Note:
If paper is torn, be sure to remove all pieces.
5.
Remove the stack of paper from the cassette, tap it
on a flat surface to even out the edges, then reinsert
it into the paper cassette. Be sure the paper is evenly
aligned and the top of the stack is below the metal
retaining clip and the maximum paper mark.
When the paper jam is cleared completely, the jammed
page’s print data is automatically reprinted.
Jam DM (optional Duplex Unit)
When there is paper jammed in the Duplex Unit, the
LCD panel displays the Jam DM error message.
Follow these steps to clear paper jams in the Duplex
Unit:
16
Proof Sign-off:
ABE S.Takahashi K.Yoda_______
M.Miyazaki
_______
ABE G.Kok
_______
R
R4C1320 Quick Reference
Rev.D
A5 size
6/18/01
QUICK.FM
Pass 0
1.
Open the cover of the Duplex Unit.
3.
2.
Gently remove any jammed or crumpled paper.
When the paper jam is cleared completely, the jammed
page’s print data is automatically reprinted.
Close the cover of the Duplex Unit.
Clearing the main paper path
When paper is jammed at the main paper path, the LCD
panel displays the Jam B error message.
Note:
If the paper is torn, be sure to remove all pieces.
❏
❏
Open the printer’s right side cover if you are unable
to remove the jammed paper from within the
Duplex Unit. See “Clearing the main paper path”
on page 17 for more information.
The Jam B message also indicates paper jammed at the
MP tray. It is always good to check the main paper path
for paper jams even if the jam seems to be located at the
MP tray, the standard lower cassette, the fuser unit, or
the optional Duplex Unit because these components are
all connected to and share the same main paper path.
Follow these steps to clear paper jams in the main paper
path:
1.
Remove any paper that is loaded in the MP tray.
17
L
R4C1320 Quick Reference
Rev.D
A5 size
6/18/01
QUICK.FM
Pass 0
2.
Open the printer’s right cover.
3.
Lift the inner panel by its handle and remove any
jammed paper inside. Then close the panel.
Proof Sign-off:
ABE S.Takahashi K.Yoda_______
M.Miyazaki
_______
ABE G.Kok
_______
w
Warning:
Be careful not to touch the transfer belt unit as
it gets hot during use.
Note:
Paper may be jammed in the location shown below.
Gently remove any jammed paper with both hands.
18
Proof Sign-off:
ABE S.Takahashi K.Yoda_______
M.Miyazaki
_______
ABE G.Kok
_______
4.
Close the printer’s right cover.
R
R4C1320 Quick Reference
Rev.D
A5 size
6/18/01
QUICK.FM
Pass 0
Control Panel Messages
Status message list
Messages
Description
Calibrating
Printer
The printer automatically
calibrates itself when any of its
covers is opened and when
there is no paper jammed
inside. This is not an error
message, and will clear itself
after one minute.
Form Feed
The printer is feeding paper.
HDD CHECK
The printer is checking the
optional Hard Disk Drive.
Job Cancel
The print job sent to your printer
is canceled.
Offline
The printer is not ready to print.
RAM CHECK
The printer is checking the RAM.
Ready
The printer is ready to print.
Reset
The printer's current interface
has been reset and the buffer is
cleared.
Reset All
All printer settings have been
reset to the user default
configuration, or the last settings
that were saved.
19
L
R4C1320 Quick Reference
Rev.D
A5 size
6/18/01
QUICK.FM
Pass 0
Proof Sign-off:
ABE S.Takahashi K.Yoda_______
M.Miyazaki
_______
ABE G.Kok
_______
Messages
Description
Messages
Description
Reset to Save
You should reset the printer to
save the current settings.
Check Duplex Psize
ROM CHECK
The printer is checking the ROM.
Self Test
The printer is running a selfdiagnostic program.
Standby
The printer is turned on, but is in
the energy-saving mode.
Warming Up
The printer is warming up.
Writing ROM A
The printer is writing data onto
the ROM in slot A.
The size of paper being printed
on is different from the specified
paper size during duplex
printing and printing stops. Load
the specified paper source with
the correct paper size. Then
open the cover of the Duplex
Unit and remove any jammed
paper. The jammed page’s
print data is automatically
reprinted once you close the
cover of the Duplex Unit.
Writing ROM P
The printer is writing data onto
the program ROM module.
Check Media
Type
You have loaded media other
than transparencies when the
Paper Type setting in the printer
driver is Transparency. The
printer ejects the sheet without
printing on it. Load
transparencies into the
specified paper source, then
press the Continue button.
Check Paper
Size
The paper size setting is different
from the size of paper loaded in
the printer. Check to see if the
correct size of paper is loaded
in the specified paper source,
then press the Continue button.
Error message list
Messages
Description
Can't Print
Duplex
The printer has encountered
problems during duplex
printing. Make sure you are
using an appropriate type and
size of paper for the Duplex Unit.
The problem could also be a
result of incorrect settings for the
paper source you are using.
Pressing the Continue button will
resume single-side printing.
20
L
R4C1320 Quick Reference
Rev.D
A5 size
6/18/01
QUICK.FM
Pass 0
Proof Sign-off:
ABE S.Takahashi K.Yoda_______
M.Miyazaki
_______
ABE G.Kok
_______
Messages
Description
Messages
Description
Check Paper
Type
This message appears when
Paper Type is specified with
Paper Source set to Auto and
there is no paper feed unit with
paper that matches the Paper
Size and Paper Type settings.
Cover C2 Open
The cover of the optional 500Sheet Paper Cassette Unit is
open. Close the cover and the
error is automatically cleared.
Duplex Mem
Overflow
There is not enough memory for
duplex printing. The printer prints
only on the top side and ejects
the paper. To correct this error,
follow the directions below.
Clean Sensor
Collate was
disabled
Cover C1 Open
The engine sensor is dirty. Open
the front cover and remove the
waste toner collector
temporarily. Turn the large
green lever counterclockwise
to an upright position, then
return it to its original position.
Reinstall the waste toner
collector and close the front
cover to clear this error.
Printing by specifying the
number of copies is no longer
possible due to a lack of
memory (RAM) or free disk
space on the Hard Disk Drive. If
this error occurs, print only one
copy and end printing.
The side cover of the standard
lower cassette is open. Close
the cover and the error is
automatically cleared.
If Auto Cont is set to Off in the
SelecType Config Menu, (1)
press Continue or (2) reset the
printer by pressing the ALT and
Reset buttons at the same time.
If Auto Cont is set to On in the
SelecType Config Menu, the
error is automatically corrected
after a certain period of time.
Format Error
ROM A/Format
Error ROM B
An unformatted ROM module
has been inserted. If the ROM
module has been formatted,
but is unreadable, format it
again. If the ROM is still
unreadable after reformatting,
take it to your dealer for repair
or replacement.
To clear this error, either press
the Continue button or turn off
the printer and remove the
ROM.
21
Proof Sign-off:
ABE S.Takahashi K.Yoda_______
M.Miyazaki
_______
ABE G.Kok
_______
A5 size
6/18/01
QUICK.FM
Pass 0
Messages
Description
Messages
Description
Image Optimum
There is insufficient memory to
print the page at the specified
print quality. The printer
automatically lowers the print
quality so that it can continue
printing. If the quality of the
printout is not acceptable, try
simplifying the page by limiting
the number of graphics or
reducing the number and size of
fonts.
Install Fuser
There is no fuser unit installed, or
the fuser unit is not installed
properly. Install the fuser unit if it
is not installed.
If a fuser unit is already installed,
open the printer’s top cover,
remove the fuser oil roll, and
then remove the fuser unit.
Reinsert the fuser unit, making
sure it fits properly into the slot.
Reinstall the fuser oil roll and
close the top cover. The error
automatically clears itself if the
fuser unit is properly installed.
Press the Continue button or
reset the printer to clear the
message.
Turn the Image Optimum setting
off in the SelecType Config
Menu if you do not want the
printer to automatically lower
the print quality to continue
printing.
R
R4C1320 Quick Reference
Rev.D
Install Oil
Roll
The fuser oil roll is not installed.
Install a fuser oil roll into the
printer.
Install
Photocondctr
The photoconductor unit is not
installed, or is installed
incorrectly. Install the
photoconductor unit if it is not
installed.
You may need to increase the
amount of printer memory to be
able to print at the desired print
quality for your document.
If the photoconductor unit is
already installed, try removing it
and then reinstalling it into the
printer.
Insert Transfer
Belt
There is no transfer belt unit
installed in the printer. Install a
transfer belt unit into the printer.
22
L
R4C1320 Quick Reference
Rev.D
A5 size
6/18/01
QUICK.FM
Pass 0
Proof Sign-off:
ABE S.Takahashi K.Yoda_______
M.Miyazaki
_______
ABE G.Kok
_______
Messages
Description
Messages
Description
Install Waste T
Box
The waste toner collector is not
installed, or is installed
incorrectly. If there is no waste
toner collector installed, install
one into the printer. If there is a
waste toner collector already
installed, try removing it and
reinstalling it.
Jam xxxx
The location, one of Feed, Exit,
or Duplex, where the paper jam
occurred is displayed in place
of xxxx. If a paper jam occurs at
two or more locations
simultaneously, the
corresponding multiple
locations are displayed.
Invalid AUX I/F
Card
This message means that the
printer cannot communicate
with the installed optional
interface card. Turn off the
printer, remove the card, then
reinstall it.
Invalid HDD
Either the Hard Disk Drive is
damaged or it cannot be used
with this printer. Turn off the
power and remove the Hard
Disk Drive.
Invalid PS3
A PostScript 3 ROM module that
cannot be used on this printer is
installed. Turn off the power and
remove the module.
Invalid ROM
A/Invalid ROM B
The printer cannot read the
installed optional ROM module.
Turn off the power and remove
the ROM module.
Jam A: top cover or fuser unit
Jam B: MP tray, main paper path
Jam C1: side cover of standard
lower cassette
Jam C2: side cover of 500-Sheet
Paper Cassette Unit
Jam DM: cover of Duplex Unit
Manual Feed XXX
YYY
XXX: The selected paper source
is indicated.
YYY: The selected paper size is
indicated.
The printer is waiting for media
to be inserted manually.
23
Proof Sign-off:
ABE S.Takahashi K.Yoda_______
M.Miyazaki
_______
ABE G.Kok
_______
A5 size
6/18/01
QUICK.FM
Pass 0
Messages
Description
Messages
Description
Mem Overflow
The printer has insufficient
memory to execute the current
task. To correct the error, press
the Continue button on the
control panel. If the message
remains, reset the printer by
holding down the Alt and Reset
buttons until Reset All appears
on the LCD panel. You can also
clear this message by turning
the printer off, waiting 10
seconds, and then turning it
back on.
Oil Roll Near
Empty
This message warns you that the
fuser oil roll is near the end of its
service life. You can continue to
print until the Replace Oil Roll
error message appears, but
early replacement is
recommended to maintain
high print quality.
Menus Locked
Need Memory
This message appears if you try
to change the printer’s settings
through the control panel when
the buttons are locked. You can
unlock them by using the EPSON
WinAssist utility or WebAssist.
Refer to the Administrator’s
Guide for information.
R
R4C1320 Quick Reference
Rev.D
You can clear this warning by
pressing the Continue button,
resetting the printer, or
replacing the fuser oil roll.
Paper Out XXX
YYY
XXX: The selected paper source
is indicated.
YYY: The selected paper size is
indicated.
There is no paper in the
specified paper source (XXX).
Load paper of the indicated
size (YYY) into the paper source.
The printer has insufficient
memory to execute the current
task. Add more memory to your
printer.
24
L
R4C1320 Quick Reference
Rev.D
A5 size
6/18/01
QUICK.FM
Pass 0
Proof Sign-off:
ABE S.Takahashi K.Yoda_______
M.Miyazaki
_______
ABE G.Kok
_______
Messages
Description
Messages
Description
Paper Set XXX
YYY
XXX: The selected paper source
is indicated.
YYY: The selected paper size is
indicated.
Print Overrun
The required time to process the
print data exceeds the print
engine speed because the
current page is too complex.
Press the Continue button to
resume printing. If this message
appears again, turn on Page
Protect in the SelecType Config
Menu.
The paper loaded in the
specified paper source (XXX)
does not match the required
paper size (YYY). Replace the
loaded paper with the correct
size paper and press Continue.
If you continue to receive this
message when printing a
particular page, try simplifying
the page by limiting the number
of graphics or reducing the
number and size of fonts.
If you press Continue without
replacing the paper, the printer
will print on the loaded paper
even though it does not match
the required size.
You can also add more memory
to the printer for a more
permanent solution.
Printer Open
One or more of the printer’s
covers are open. Make sure that
the front cover, top cover, right
cover, Duplex Unit cover, and
the side covers of the standard
and optional lower cassettes
are all closed properly. The error
clears itself once all the covers
are closed.
25
Proof Sign-off:
ABE S.Takahashi K.Yoda_______
M.Miyazaki
_______
ABE G.Kok
_______
A5 size
6/18/01
QUICK.FM
Pass 0
Messages
Description
Messages
Description
PS3 Hard Disk
full
The writing of PostScript 3
commands on the optional
Hard Disk Drive is no longer
possible as the amount of space
allocated to PostScript 3 on the
Hard Disk Drive is used up.
Replace
TransferBelt
The transfer belt unit has
reached the end of its service
life. Replace it with a new
transfer belt unit into the printer.
Replace Waste T
Box
The waste toner collector is full
of toner. Replace it with a new
waste toner collector.
Replace Fuser
The fuser unit has reached the
end of its service life. The error
automatically clears itself after
you replace both the fuser unit
and the second transfer roll.
Replace Oil
Roll
The fuser oil roll has reached the
end of its service life. Replace it
with a new fuser oil roll.
Replace
Photocondctr
The photoconductor unit has
reached the end of its service
life. You have to replace all
items included in the
photoconductor kit, which
includes the photoconductor
unit, the waste toner collector,
and the print head filter.
The error clears itself once you
have replaced all the items and
close the front and top covers.
The photoconductor counter
level is automatically reset.
R
R4C1320 Quick Reference
Rev.D
The error clears itself after you
have replaced the waste toner
collector and close the front
cover.
Service Req
Exxx/ Service
Req Cxxxx
Exxx/Cxxxx: Any number is
indicated.
A controller error or a print
engine error has been
detected. Write down the error
number listed on the LCD panel
and turn off the printer. Wait at
least 10 seconds and then turn
it back on. If this error still occurs,
turn off the printer, unplug the
power cord, and contact a
qualified service representative.
26
L
R4C1320 Quick Reference
Rev.D
A5 size
6/18/01
QUICK.FM
Pass 0
Proof Sign-off:
ABE S.Takahashi K.Yoda_______
M.Miyazaki
_______
ABE G.Kok
_______
Messages
Description
Messages
Description
Worn Fuser
This message warns you that the
fuser unit is near the end of its
service life. You can continue to
print until the Replace Fuser error
message appears, but early
replacement is recommended
to maintain high print quality.
Worn Transfer
Belt
This message warns you that the
transfer belt unit is near the end
of its service life. You can
continue to print until the
Replace TransferBelt error
message appears, but early
replacement is recommended
to maintain high print quality.
You can clear this warning by
pressing the Continue button,
resetting the printer, or
replacing the fuser unit and the
second transfer roll with new
ones.
Worn
Photoconductor
This message warns you that the
photoconductor unit is near the
end of its service life. You can
continue to print until the
Replace Photocondctr error
message appears, but early
replacement is recommended
to maintain high print quality.
You can clear this warning by
pressing the Continue button,
resetting the printer, or
replacing the transfer belt unit
with a new one.
Waste T Box
Nearfull
The waste toner collector is
nearly full of toner. You can
continue to print until the
Replace Waste T Box error
message appears, but early
replacement is recommended
to maintain high print quality.
You can clear this warning by
pressing the Continue button,
resetting the printer, or
replacing the photoconductor
unit, the waste toner collector,
and the print head filter.
27
Proof Sign-off:
ABE S.Takahashi K.Yoda_______
M.Miyazaki
_______
ABE G.Kok
_______
A5 size
6/18/01
QUICK.FM
Pass 0
Messages
Description
Messages
Description
XXXX Toner Crtg
Out
XXXX: The letters C, M, Y, and/or K
appear in place of XXXX. C, M, Y,
and K stand for Cyan, Magenta,
Yellow, and Black respectively.
XXXX Toner Out
XXXX: The letters C, M, Y, and/or K
appear in place of XXXX. C, M, Y,
and K stand for Cyan, Magenta,
Yellow, and Black respectively.
The indicated (XXXX) toner
cartridge is not installed in the
printer. Install the appropriate
toner cartridge.
R
R4C1320 Quick Reference
Rev.D
No toner is left in the indicated
(XXXX) toner cartridge. Replace
it with a new toner cartridge.
When the black developer
cartridge is not installed, only K
appears on the LCD panel even
though other developer
cartridges may not be installed
as well.
XXXX Toner Low
XXXX: The letters C, M, Y, and/or K
appear in place of XXXX. C, M, Y,
and K stand for Cyan, Magenta,
Yellow, and Black respectively.
The amount of remaining toner
in the indicated (XXXX) toner
cartridge is very small. You can
continue to print until the XXXX
Toner Out error message
appears, but early replacement
is recommended to maintain
high print quality.
Copyright © 2000 by SEIKO EPSON CORPORATION, Nagano, Japan
Printed in Japan 00. XX-XX
28
Copyright © 2000 by SEIKO EPSON CORPORATION,Nagano,Japan
Printed in Japan
00.XX-XX
Quick Reference
Color Laser Printer
Color Laser Printer
You can hang this guide on the printer
using the hook provided.
Quick Reference
4012364-00
XXX
4012364 Rev.0
Cover-F DIC F43
4012364
Cover-F
Rev.0
BK