1
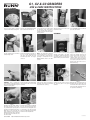
G1, G2 & G3 GRINDERS
COFFEE GRINDING
STEP 1
USE & CARE INSTRUCTIONS
STEP 2
STEP 3
STEP 4
STEP 5
Turn the selector knob to align the Raise the top lid and add the whole Locate the back of a bag behind Allow the bag to rest on the screen Turn the ON/OFF switch to ON and
the dispense chute. (The grinder beneath the chute.
red arrow with the desired grind.
bean coffee. Close the top lid.
press the start switch.
will not operate unless the bag is
behind the chute.) This will activate
the bag switch.
CLEANING
STEP 6
STEP 7
STEP 1
Clean all exterior surfaces using
a damp cloth rinsed in any mild,
nonabrasive, liquid detergent. Care
should be taken not to scratch the
grinder with any abrasive material.
STEP 2
Empty all beans from hopper(s).
Plug in the grinder and place an
empty bag behind the dispense
chute. Press and release the
“START” switch. Run a few cycles
until all coffee in the grind chamber
is dispensed and disconnect the
grinder from the power source.
Remove the bag.
STEP 3
STEP 4
STEP 5
STEP 6
WARNING - Prior to cleaning the Remove the two screws and remove Slide the burr auger rotor/spring Remove the two screws securing
grind chamber, unplug the grinder the dial plate and selector knob assembly off the motor shaft and the stationary burr to the grind
before removal of any panel or grind assembly.
disassemble for cleaning.
chamber.
chamber housing parts.
STEP 7
Wash all parts in a mild solution of
detergent with hot water and a stiff
non metallic bristle brush. Rinse all
parts thoroughly and allow them to
air dry before reinstalling.
Flip the cleaning lever a few times Remove the bag when ground cofas dispensing slows.
fee is no longer dispensed from
the chute. The grinder will stop
automatically when the bag is
removed.
STEP 8
STEP 9
Carefully clean the grind chamber, Align the slot in the motor shaft with
dial plate assembly, chute open- the rotor and reinstall shear plate.
ing and dial plate opening with a Reinstall rotor cup and grind selecdry stiff non metallic bristle brush. tor dial plate to the burr housing.
Wipe with a clean cloth that has Refer to the Operating and Service
been soaking in a mild solution of manual for burr adjustments.
detergent and hot water. Reinstall
the spring and rotor with burr onto
the motor shaft.
39565.0000A 10/06 ©2006 Bunn-O-Matic Corporation
STEP 8
NOTE - The start switch will have
to be pressed again to continue the
cycle if the bag is removed before
grinding is completed. Turn the
ON/OFF/START switch to the OFF
position.
39565 102506
G1, G2 & G3 GRINDERS
TROUBLESHOOTING
A troubleshooting guide is provided to suggest probable causes and remedies for the most likely problems encountered. If the problem remains after
exhausting the troubleshooting steps, contact the Bunn-O-Matic Technical Service Department.
• Inspection, testing, and repair of electrical equipment should be performed only by qualified service personnel.
WARNING –
•
•
•
•
Exercise extreme caution when servicing electrical equipment.
Disconnect the grinder from the power source when servicing, except when electrical tests are specified.
Follow recommended service procedures
Replace all protective shields or safety notices
PROBLEM
PROBABLE CAUSE
REMEDY
Grinder will not start.
1. No power or incorrect voltage.
(A) Plug-in the grinder.
(B) Check the voltage at the wall outlet with a
voltmeter. It must be 120 volts ac for two wire 120
volt models or 230 volts ac for two wire 230 volt
50 Hz models or 240 volts ac for two wire 240 volt
60 Hz models.
2. Off/On/Start Switch.
(A) Press the switch to the “START” position.
(B) Refer to Service - Off/On/Start Switch for testing procedures. See page 16.
Grinder will not shut off.
3. Bag sensor.
(A) The receiving bag must be placed on the tray
screen and have the back of the bag behind the
dispense chute to activate the sensor switch.
(B) Refer to Service - Bag Sensor Switch for testing
and adjustment procedures. See page 9.
4. Motor overload protector
Remove the plug located on the right side of the
housing. Press the red “Reset” button visible
through the opening. Listen carefully for a “click”.
This resets the motor protection circuit and may
indicate that an overload has been encountered by
the motor. (An overload can occur when something
other than coffee is inserted into the hopper for
grinding. Refer to Service - Motor for disassembly.) See page 10 for AC Motors or see page 13
for DC Motors.
1. Off/On/Start Switch
(A) Move the switch to the “OFF” position.
(B) Refer to Service - Off/On/Start Switch for testing procedures. See page 16.
2. Bag Sensor
(A) Remove bag from under the dispense chute.
(B) Refer to Service - Bag Sensor Switch for testing
procedures. See page 9.
Grinder starts, but will not dispense.
3. Relay
Refer to Service - Relay for testing procedures.
See page 18.
1. Hopper
Coffee must be poured into hopper before grinding.
2. Entrance to grind chamber
Foreign materials must not block the opening at
the bottom of the hopper.
3.Shear Plate
Remove both black fillister head screws holding the
grinder selector dial plate to the grinder. Carefully
remove the dial plate and rotor cup. Inspect the
shear plate for wear. Replace if excessively worn
or damaged.
39565 102506