1
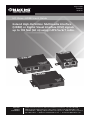
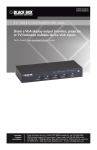
Black Box Tech Support: FREE! Live. 24/7. Tech support the way it should be. Great tech support is just 20 seconds away at 724-746-5500 or blackbox.com. About Black Box Black Box Network Services is your source for more than 118,000 networking and infrastructure products. You’ll find everything from cabinets and racks and power and surge protection products to media converters and Ethernet switches all supported by free, live 24/7 Tech support available in 20 seconds or less. © Copyright 2009. All rights reserved. 724-746-5500 | blackbox.com August 2009 AC3010A AC3011A HD View—HDMI User’s Guide Extend High-Definition Multimedia Interface BLACK (HDMI) or Digital Visual Interface (DVI)BOX signals up to 192 feet (60 m) using CAT5/5e/6/7 cable. ® Customer Support Information Order toll-free in the U.S.: Call 877-877-BBOX (outside U.S. call 724-746-5500) • FREE technical support 24 hours a day, 7 days a week: Call 724-746-5500 or fax 724-746-0746 • Mailing address: Black Box Corporation, 1000 Park Drive, Lawrence, PA 15055-1018 • Web site: www.blackbox.com • E-mail: [email protected] FCC and NOM Statements FEDERAL COMMUNICATIONS COMMISSION AND INDUSTRY CANADA RADIO FREQUENCY INTERFERENCE STATEMENTS This equipment generates, uses, and can radiate radio-frequency energy, and if not installed and used properly, that is, in strict accordance with the manufacturer’s instructions, may cause interference to radio communication. It has been tested and found to comply with the limits for a Class A computing device in accordance with the specifications in Subpart B of Part 15 of FCC rules, which are designed to provide reasonable protection against such interference when the equipment is operated in a commercial environment. Operation of this equipment in a residential area is likely to cause interference, in which case the user at his own expense will be required to take whatever measures may be necessary to correct the interference. Changes or modifications not expressly approved by the party responsible for compliance could void the user’s authority to operate the equipment. This digital apparatus does not exceed the Class A limits for radio noise emission from digital apparatus set out in the Radio Interference Regulation of Industry Canada. Le présent appareil numérique n’émet pas de bruits radioélectriques dépassant les limites applicables aux appareils numériques de la classe A prescrites dans le Règlement sur le brouillage radioélectrique publié par Industrie Canada. Normas Oficiales Mexicanas (NOM) Electrical Safety Statement INSTRUCCIONES DE SEGURIDAD 1.Todas las instrucciones de seguridad y operación deberán ser leídas antes de que el aparato eléctrico sea operado. 2.Las instrucciones de seguridad y operación deberán ser guardadas para referencia futura. 3.Todas las advertencias en el aparato eléctrico y en sus instrucciones de operación deben ser respetadas. 4.Todas las instrucciones de operación y uso deben ser seguidas. 724-746-5500 | blackbox.com Page 1 HD View HDMI 5. El aparato eléctrico no deberá ser usado cerca del agua—por ejemplo, cerca de la tina de baño, lavabo, sótano mojado o cerca de una alberca, etc.. 6. El aparato eléctrico debe ser usado únicamente con carritos o pedestales que sean recomendados por el fabricante. 7. El aparato eléctrico debe ser montado a la pared o al techo sólo como sea recomendado por el fabricante. 8. Servicio—El usuario no debe intentar dar servicio al equipo eléctrico más allá lo descrito en las instrucciones de operación. Todo otro servicio deberá ser referido a personal de servicio calificado. 9. El aparato eléctrico debe ser situado de tal manera que su posición no interfiera su uso. La colocación del aparato eléctrico sobre una cama, sofá, alfombra o superficie similar puede bloquea la ventilación, no se debe colocar en libreros o gabinetes que impidan el flujo de aire por los orificios de ventilación. 10. El equipo eléctrico deber ser situado fuera del alcance de fuentes de calor como radiadores, registros de calor, estufas u otros aparatos (incluyendo amplificadores) que producen calor. 11. El aparato eléctrico deberá ser connectado a una fuente de poder sólo del tipo descrito en el instructivo de operación, o como se indique en el aparato. 12. Precaución debe ser tomada de tal manera que la tierra fisica y la polarización del equipo no sea eliminada. 13. Los cables de la fuente de poder deben ser guiados de tal manera que no sean pisados ni pellizcados por objetos colocados sobre o contra ellos, poniendo particular atención a los contactos y receptáculos donde salen del aparato. 14. El equipo eléctrico debe ser limpiado únicamente de acuerdo a las recomendaciones del fabricante. 15. En caso de existir, una antena externa deberá ser localizada lejos de las lineas de energia. 16. El cable de corriente deberá ser desconectado del cuando el equipo no sea usado por un largo periodo de tiempo. Page 2 724-746-5500 | blackbox.com NOM Statement 17. Cuidado debe ser tomado de tal manera que objectos liquidos no sean derramados sobre la cubierta u orificios de ventilación. 18. Servicio por personal calificado deberá ser provisto cuando: A: El cable de poder o el contacto ha sido dañado; u B: Objectos han caído o líquido ha sido derramado dentro del aparato; o C: El aparato ha sido expuesto a la lluvia; o D: El aparato parece no operar normalmente o muestra un cambio en su desempeño; o E: El aparato ha sido tirado o su cubierta ha sido dañada. 724-746-5500 | blackbox.com Page 3 HD View HDMI TRADEMARKS USED IN THIS MANUAL Black Box and the Double Diamond logo are registered trademarks of BB Technologies, Inc. Any other trademarks mentioned in this manual are acknowledged to be the property of the trademark owners. Page 4 724-746-5500 | blackbox.com Table of Contents Contents 1. Specifications................................................................................................6 2. Overview ...................................................................................................7 2.1 Introduction...........................................................................................7 2.2 Features.................................................................................................7 2.3 What’s Included.....................................................................................7 2.4 Transmitter.............................................................................................8 2.4.1 Side 1..........................................................................................8 2.4.2 Side 2..........................................................................................9 2.5 Receiver...............................................................................................10 2.5.1 Side 1........................................................................................10 2.5.2 Side 2........................................................................................ 11 2.6 Repeater (AC3011A)............................................................................12 2.6.1 Side 1........................................................................................12 2.6.2 Side 2........................................................................................13 2.7 Compatible Cabling.............................................................................14 3. Configuration and Installation....................................................................15 3.1 Pre-Installation Guidelines....................................................................15 3.2 Configuration......................................................................................15 3.3 Connecting the HD View HDMI System..............................................18 3.4 Connecting the Player and Screen.......................................................19 3.5 Selecting the DDC Source...................................................................19 3.5.1 Storing the Screen’s DDC..........................................................20 3.5.2 Reading the Stored DDC...........................................................20 3.5.3 Reading the DDC from the Screen............................................20 3.5.4 Restoring the Default DDC Data...............................................20 3.6 Connecting to the Power Supply.........................................................21 3.7 Repeater Application...........................................................................21 3.8 Adjusting the Video and Audio...........................................................21 4. Troubleshooting..........................................................................................22 4.1 Problems/Solutions..............................................................................22 4.2 Calling Black Box.................................................................................22 4.3 Shipping and Packaging......................................................................23 724-746-5500 | blackbox.com Page 5 HD View HDMI 1. Specifications Audio: HDMI formats Cascade/Daisychain: Cascade up to 7 repeaters at 640 feet (200 m) CAT5 Cable Length (Maximum): 192 ft. (60 m); With cascading: 640 ft. (200 m) Input DDC Signal: 5-volt P-P (TTL) Input Video Signal: 1.2-volt P-P Resolution (Maximum): HDTV 1080p, 1920 x 1080 @ 60 Hz (16:09) HD System Cable: CAT5/6/7 UTP/FTP/STP cable, 24 AWG, solid wire Video Amplifier Bandwidth: 165 MHz Connectors: Transmitter: System in: (1) HDMI; System out: (2) RJ-45 for video and DDC; Receiver: System in: (2) RJ-45 for video and DDC; Screen: (1) HDMI; Repeater: System in: (2) RJ-45 for video and DDC; System out: (1) RJ-45 for video; Screen: (1) HDMI Indicators: Transmitter: (1) LED (on RJ-45 connector); Receiver: (1) LED (on RJ-45 connector); Repeater: (2) LEDs (on RJ-45 connector) Temperature Tolerance: Operating: +41 to +104° F (+5 to +40° C); Storage: -40 to +158° F (-40 to 70° C) Power: Input: 100–240 VAC; Output: 5 VDC, 1 A Size: Transmitter: 3.3"H x x 2.7"W x 1"D (8.2 x 6.8 x 2.5 cm); Receiver: 2.7"H x 1.9"W x 1"D (6.8 x 4.7 x 2.5 cm); Repeater: 4.1"H x 2.9"W x 1"D (10.4 x 7.4 x 2.6 cm) Page 6 724-746-5500 | blackbox.com Chapter 2: Overview 2. Overview 2.1 Introduction With repeaters. the HD View HDMI extends High-Definition Multimedia Interface (HDMI) or Digital Visual Interface (DVI) signals to a distance of 640 feet (200 m) over CAT5/5e/6/7 cable. Without repeaters, the HD View HDMI extends HDMI or DVI signals up to 192 feet (60 m). It delivers rich multimedia content in real-time, without degrading video or sound quality. HD View HDMI supports virtually all types of media players including computers with HDMI video cards, Blu-ray disk players, and game consoles. Plus, it provides digital sound so it’s perfect for applications requiring top sound quality. 2.2 Features • In addition to HDMI signals, HD View HDMI supports DVI equipment. However, DVI support doesn’t include audio. • HD View HDMI supports DDC emulation that optimizes player-screen interaction for the best visual experience. • Includes High-bandwidth Digital Content Protection (HDCP) and Consumer Electronics Control (CEC) support (using two CAT5 cables in an extension application). 2.3 What’s Included Your package should contain the following items. If anything is missing or damaged, contact Black Box Technical Support at 724-746-5500. • Transmitter • Receiver • (2) power supplies • (2) power cables • Quick install guide An optional HD View—HDMI Repeater (part number AC3011A) is also available separately. 724-746-5500 | blackbox.com Page 7 HD View HDMI 2.4 Transmitter 2.4.1 Side 1 of Transmitter Figure 2-1 illustrates the transmitter‘s side 1. Table 2-1 describes its components. 1 2 3 1 Figure 2-1. Transmitter, side 1. Table 2-1. Components on transmitter side 1. No. Component Description 1 Get button Press and hold to restore the default data. 2 Stored/screen selector DIP switch Player reads data from data previously stored in the transmitter. 3 HDMI connector System In connector Page 8 724-746-5500 | blackbox.com Chapter 2: Overview 2.4.2 Side 2 of Transmitter Figure 2-2 shows the components on the transmitter’s side 2. Table 2-2 describes these components. 7 5 10 8 6 11 9 Figure 2-2. Transmitter, side 2. Table 2-2. Components on transmitter side 2. No. Component Description 5 RJ-45 connector Video out port 6 RJ-45 connector DDC port 7 Video out port LED 1Lights when the transmitter detects a signal from the player. 8 DDC port LED 1Lights when the cable from the transmitter is connected to the receiver and the cable from the receiver is connected to a screen. Note that it does not indicate whether the screen is powered on or off. 9 4-pin Molex connector 10 Video out port LED 2Lights when the transmitter is connected to a powered player. 11 DDC port LED 2 Connects to 5-VDC power supply Lights when power is on. 724-746-5500 | blackbox.com Page 9 HD View HDMI 2.5 Receiver Figures 2-3 and 2-4 illustrate the two sides of the receiver. Tables 2-3 and 2-4 describe the components. 2.5.1 Receiver’s Side 1 1 2 3 Figure 2-3. Receiver, side 1. Table 2-3. Components on receiver‘s side 1. No. 1 Component Description Equalization (EQ) In general, the longer the cable, the selector switchhigher the number that has to be set. Adjust the EQ selector one step at a time, up to position “7.” After each adjustment, wait to see the results of the adjustment at the screen. 2 4-pin Molex connector 5-VDC power 3 HDMI connector Video in port Page 10 724-746-5500 | blackbox.com Chapter 2: Overview 2.5.2 Receiver’s Side 2 4 6 5 7 Figure 2-4. Receiver, side 2. Table 2-4. Components on receiver‘s side 2. No. Component 4 RJ-45 connector Video in 5 RJ-45 connector DDC in 6 Dual LEDLights when the Receiver detects a video signal from the Transmitter. 7 DDC LED 2 Description Lights when power is on. 724-746-5500 | blackbox.com Page 11 HD View HDMI 2.6 Repeater (AC3011A) 2.6.1 Repeater’s Side 1 Figure 2-5 illustrates the repeater’s side 1. Table 2-5 describes its components. 2 1 3 Figure 2-5. Repeater, side 1. Table 2-5. Components on repeater’s side 1. No. Component Description 1 RJ-45 connector Video in 2 RJ-45 connector DDC 3 4-pin Molex connector 5-VDC power Page 12 724-746-5500 | blackbox.com Chapter 2: Overview 2.6.2 Repeater’s Side 2 Figure 2-6 shows the repeater’s side 2. Table 2-6 describes its components. 5 4 Figure 2-6. Repeater side 2. Table 2-6. Components on repeater’s side 2. No. Component Description 4 RJ-45 connector Video out 5 HDMI connector HDMI 724-746-5500 | blackbox.com Page 13 HD View HDMI 2.7 Compatible Cabling HD View HDMI works with CAT5/5e/6/7 data cabling. Some skew-free CAT5 cabling is specific to a particular vendor and is not compatible with Black Box products. Because of the manufacturing methods, CAT6 cable can exhibit greater skew than standard CAT5/5e and may require skew compensation beyond what the HD View HDMI offers. NOTE: Transmission distance and performance depend on the cables’ signal resolution, graphics card, and display used in the system. We suggest testing the cable with the product before installation. For maximum distance runs and/or applications in which uptime is critical, we recommend using screened twisted pair (ScTP) cable (EYNC770A [bulk PVC cable], EYNC771A [bulk plenum cable], or EVNSL74-80 [patch cable]) and compatible screened RJ-45 connectors. This minimizes EMI interference from external sources. Page 14 724-746-5500 | blackbox.com Chapter 3: Configuration and Installation 3. Configuration and Installation 3.1 Pre-Installation Guidelines Make sure that the player and the screens are compatible. Check that they work together before connecting the HD View HDMI system. 3.2 Configuration Figure 3-1 illustrates a DVI extension. You can connect one side (either player or screen) to the system with an HDMI connector with the other side (screen or player) connected with a DVI connector. NOTE: In the configuration shown in Figure 3-1, audio transmission is NOT supported. Player DVI Video out Plasma/LCD video screen HDMI DDC Transmitter DVI DDC HDMI Receiver Video in Figure 3-1. DVI transmission. 724-746-5500 | blackbox.com Page 15 HD View HDMI Figures 3-2 and 3-3 illustrate HDMI extensions. Player Video out Plasma/LCD screen, video plus audio HDMI cable Transmitter Video CAT5 cable, up to 192 feet (60 m) HDMI cable Receiver Video in Figure 3-2. HDMI: Video plus audio transmission. Page 16 724-746-5500 | blackbox.com Chapter 3: Configuration and Installation Player Video out Plasma/LCD screen, video plus audio HDMI cable DDC Transmitter DDC cable Video CAT5 cable, up to 192 feet (60 m) HDMI cable Video in Receiver Figure 3-3. HDMI: Video plus audio transmission plus HDCP, CEC support. 724-746-5500 | blackbox.com Page 17 HD View HDMI 3.3 Connecting the HD View HDMI system Connect the Video CAT5 cable as follows: Connect a CAT5 cable up to 192 feet (60 m) to the VIDEO OUT port of the Transmitter and the VIDEO IN port of the Receiver. See Figures 3-4 and 3-5. HDMI connector To player Video out DDC Power Figure 3-4. Transmitter connections. HDMI connector Video out To screen DDC Power Figure 3-5. Receiver connections. Page 18 724-746-5500 | blackbox.com Chapter 3: Configuration and Installation 3.4 Connecting the Player and Screen The HD View HDMI can be used to connect players and screens of HDMI to DVI ports, by using standard HDMI to DVI cables/adapters. HDMI players can be connected to DVI screens and vice versa. For HDMI extension: 1. Connect the player to the Transmitter HDMI port using an HDMI cable. See Figure 3-2. 2. Connect the screen to the Receiver HDMI port using an HDMI cable. See Figure 3-3. For DVI extension: 1. Connect the player to the Transmitter HDMI port using an HDMI to DVI cable/ adapter. See Figure 3-1. 2. Connect the screen to the Receiver HDMI port using an HDMI to DVI cable/ adapter. See Figure 3-1. NOTE: In DVI extensions, only video is transferred. 3.5 Selecting the DDC Source Display Data Channel (DDC) is a VESA standard for communications between a monitor and a video adapter. The player can read DDC data either from: • The screen OR • Data previously stored in the Transmitter as explained below Use the Transmitter’s Stored/Screen selector switch (see Figure 2-1) to choose between the two options. Depending on where you select the DDC from, you may or may not have to connect the DDC CAT5 cable. This is explained in Sections 3.5.1–3.5.4. NOTE: For HDCP and CEC support, the DDC CAT5 cable must be connected between the Transmitter and Receiver and the Stored/Screen selector set to Screen. 724-746-5500 | blackbox.com Page 19 HD View HDMI 3.5.1 Storing the Screen’s DDC To store the screen’s DDC, connect a CAT5 cable between the DDC ports of the Transmitter and Receiver. The position of the STORED/SCREEN selector switch position is not relevant. NOTE: There is no need to connect: • A video CAT5 cable between the Transmitter and Receiver • The Transmitter to a player Press the Transmitter’s GET button for less than three seconds. The Transmitter reads the screen’s DDC and stores it. The DDC port’s LED 1 (see Figure 2-2) blinks twice. If unsuccessful, the LED blinks rapidly ten times. Once stored, there is no need to keep the DDC CAT5 cable connected. 3.5.2 Reading the Stored DDC To read the stored DDC, move the STORED/SCREEN selector to STORED. 3.5.3 Reading the DDC from the Screen To read the DDC from the screen: 1.The DDC CAT5 cable must be connected between the Transmitter and Receiver. 2.Move the STORED/SCREEN selector to SCREEN. 3.5.4 Restoring the Default DDC Data The Transmitter comes with a stored factory default DDC. NOTE: Only use the default DDC if you can’t use the screen’s DDC data, i.e. where the DDC CAT5 cable between the Transmitter and Receiver is not connected and the screen’s DDC was not saved in the Transmitter’s memory. The player will choose one of the resolutions listed in the default DDC data. NOTE: If the screen does not support the resolution chosen by the player, no video will be displayed. To restore the default data: Press and hold down the GET button on the Transmitter for more than three seconds. The DDC port’s LED 1 (see Figure 2-2) blinks twice. If unsuccessful, the LED blinks rapidly ten times. Page 20 724-746-5500 | blackbox.com Chapter 3: Configuration and Installation 3.6 Connecting to the Power Supply Connect the Transmitter and Receiver to the power supply with the 5-VDC, 1-A power adapters provided. Once connected, the system is ready to transmit the video and audio signals. 3.7 Repeater Application Add up to eight HD View—HDMI Repeater units (AC3011A) to add more screens. You can have a mixture of HDMI and DVI screens. Each unit can be up to 96 feet (30 m) away from the previous unit. NOTE: W hen cascading eight levels, use CAT6 UTP cable. The total distance from the transmitter to the receiver using repeaters can be 640 feet (200 m). DVI Player HDMI to DVI cable Transmitter (AC3010A) HD-HDMI Repeater (AC3011A) CAT6 cable (up to 96 ft. [30 m]) HDMI HDMI cable HD-HDMI Repeater (AC3011A) CAT6 cable CAT6 cable (up to 96 ft. (up to 96 ft. [30 m]) [30 m]) HDMI HDMI cable Receiver (AC3010A) Figure 3-6. Mixed repeater application. 3.8 Adjusting the Video and Audio A longer cable between the Transmitter and the Receiver will require more adjustment for audio and video signals. To adjust the HDMI picture quality, use the Receiver’s Equalization (EQ) selector. See Figure 2-3. In general, the longer the cable, the higher the number that has to be set. Adjust the EQ selector one step at a time, up to position “7.” After each adjustment, wait to see the results of the adjustment at the screen. 724-746-5500 | blackbox.com Page 21 HD View HDMI 4. Troubleshooting 4.1 Problems/Solutions Problem: The system isn’t broadcasting. Solution: Make sure that the player and the screens are compatible. Check that they work together before connecting the HD View HDMI system. Problem: What do I do when there are lost pixels? Solutions: 1.Check that the video is OK at the source. 2.Try retuning using the EQ selector as explained above. 3.Check that the cable is not too long. 4.The cable type may be unsuitable for the distance. Problem: No video even with a short cable. Solutions: 1.Check that the video is OK at the source. 2.Check the DDC CAT5 cable or try replacing it. 4.2 Calling Black Box If you determine that your HD View HDMI is malfunctioning, do not attempt to alter or repair the unit. It contains no user-serviceable parts. Contact Black Box Technical Support at 724-746-5500. Before you do, make a record of the history of the problem. We will be able to provide more efficient and accurate assistance if you have a complete description, including: • the nature and duration of the problem. • when the problem occurs. • the components involved in the problem. • any particular application that, when used, appears to create the problem or make it worse. Page 22 724-746-5500 | blackbox.com Chapter 4: Troubleshooting 4.3 Shipping and Packaging If you need to transport or ship your HD View HDMI: • Package it carefully. We recommend that you use the original container. • If you are returning the unit, make sure you include everything you received with it. Before you ship for return or repair, contact Black Box to get a Return Authorization (RA) number. 724-746-5500 | blackbox.com Page 23