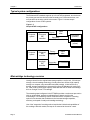
1
...............................
STT8000A
...............................
ATAPI Minicartridge Drive
...............................
...............................
...............................
Product Manual
...............................
© 1998 Seagate Technology, Inc. All rights reserved
No part of this publication may be reproduced in any form without written permission from Seagate
Technology, Inc.
Publication Number 10002475-004, April 1998
Seagate, Seagate Technology, the Seagate logo and Sidewinder are trademarks or registered trademarks of
Seagate Technology, Inc. Other product names are trademarks or registered trademarks of their owners.
Seagate reserves the right to change, without notice, product offerings or specifications. Seagate Technology
provides this manual "as is," without warranty of any kind, either expressed or implied, including, but not limited to,
the implied warranties of merchantability and fitness for a particular purpose. Seagate Technology assumes no
responsibility for the accuracy, completeness, sufficiency, or usefulness of this manual, nor for any problem that
might arise from the use of the information in this manual.
FCC Notice
This equipment generates and uses radio frequency energy and, if not installed and used properly—that is, in strict
accordance with the manufacturer's instructions—may cause interference to radio communications or radio and
television reception. It has been tested and found to comply with the limits for a Class B computing device in
accordance with the specifications in Part 15 of FCC Rules, which are designed to provide reasonable protection
against such interference in a residential installation. However, there is no guarantee that interference will not occur
in a particular installation. If this equipment does cause interference to radio or television reception, which can be
determined by turning the equipment on and off, you are encouraged to try to correct the interference by one or
more of the following measures:
•
Reorient the receiving antenna.
•
Relocate the computer with respect to the receiver.
•
Move the computer into a different outlet so that the computer and receiver are on different branch
circuits.
If necessary, you should consult the dealer or an experienced radio/television technician for additional suggestions.
You may find the following booklet prepared by the Federal Communications Commission helpful: How to Identify
and Resolve Radio-TV Interference Problems
This booklet (Stock No. 004-000-00345-4) is available from the U.S. Government Printing Office, Washington, DC
20402.
Caution.
Changes or modifications made to this equipment which have not been expressly approved
by Seagate Technology may cause radio and television interference problems that could void
the user's authority to operate the equipment.
Further, this equipment complies with the limits for a Class B digital apparatus in accordance with Canadian Radio
Interference Regulations.
Cet appareil numérique de la classe B est conforme au Règlement sur brouillage radioélectrique, C. R. C., ch.
1374.
Additional warnings:
• To prevent fire or electrical shock hazard, do not expose the unit to rain or moisture.
• To avoid electrical shock, do not open the cabinet. Refer servicing to qualified personnel.
Important Information About This Manual
All information contained in or disclosed by this document is considered proprietary by Seagate Technology. By
accepting this material, the recipient agrees that this material and the information contained therein are held in
confidence and in trust and will not be used, reproduced in whole or in part, nor its contents revealed to others,
except to meet the purpose for which it was delivered. It is understood that no right is conveyed to reproduce or
translate any item herein disclosed without express written permission from Seagate Technology.
Seagate Technology provides this manual "as is," without warranty of any kind, either expressed or implied,
including, but not limited to, the implied warranties of merchantability and fitness for a particular purpose. Seagate
Technology reserves the right to change, without notification, the specifications contained in this manual.
Seagate Technology assumes no responsibility for the accuracy, completeness, sufficiency, or usefulness of this
manual, nor for any problem that might arise from the use of the information in this manual.
Table of Contents
Table of Contents
Introduction
1
Drive overview ........................................................................................................ 1
Features ................................................................................................................. 3
Typical system configurations ................................................................................. 4
Minicartridge technology overview........................................................................... 4
Flash EEPROM ...................................................................................................... 5
Software ................................................................................................................. 5
References ............................................................................................................. 5
About this manual ................................................................................................... 6
Specifications
7
Overview ................................................................................................................ 7
Physical specifications ............................................................................................ 7
Power specifications ............................................................................................... 9
Performance specifications ................................................................................... 10
Environmental requirements ................................................................................. 11
Reliability .............................................................................................................. 12
Mean-Time-Between Failures ......................................................................... 12
Mean-Time-To-Repair .................................................................................... 12
Recommended tapes............................................................................................ 13
Tape capacities and formats ................................................................................. 13
Regulatory compliance.......................................................................................... 14
Installation
15
Introduction........................................................................................................... 15
Before you begin................................................................................................... 15
Handling guidelines......................................................................................... 15
Setting jumpers..................................................................................................... 16
Installing the drive................................................................................................. 17
Mounting dimensions ............................................................................................ 18
ATA-2 Interface pin assignments .......................................................................... 20
Drive operation and maintenance
23
Introduction........................................................................................................... 23
Front panel LED.................................................................................................... 23
Using Travan cartridges ........................................................................................ 24
STT8000A Product Manual
Page v
Table of Contents
Loading and unloading cartridges ................................................................... 24
Setting the write–protect switch ...................................................................... 25
Loading revised firmware via Seagate firmware cartridge ...................................... 26
Care and maintenance of the drive and cartridges................................................. 27
Caring for tape cartridges ............................................................................... 27
Caring for the drive ......................................................................................... 27
Cleaning the drive read/write head............................................................ 28
Troubleshooting .................................................................................................... 29
ATAPI interface
31
Introduction........................................................................................................... 31
ATA-2 Interface .................................................................................................... 31
ATA-2 Signals ................................................................................................ 31
DASP-...................................................................................................... 31
PDIAG- .................................................................................................... 31
ATA registers ................................................................................................. 32
Status Register......................................................................................... 32
Error Register........................................................................................... 33
Feature Register ...................................................................................... 33
Supported ATA Commands ............................................................................ 34
Execute Drive Diags (90h)........................................................................ 34
Idle Immediate (E1h) ................................................................................ 34
Standby Immediate (E0h)......................................................................... 34
Check Power Mode (E5h)......................................................................... 34
Sleep (E6h) .............................................................................................. 34
Set Features (EFh)................................................................................... 35
ATAPI Identify Device (A1h)..................................................................... 36
ATAPI Packet Command (A0h) ................................................................ 37
ATAPI Soft Reset (08h)............................................................................ 37
ATAPI interface .................................................................................................... 38
Erase command.................................................................................................... 39
Inquiry command .................................................................................................. 40
Load/Unload command ......................................................................................... 41
Locate command .................................................................................................. 42
Log Select command ............................................................................................ 43
Log Sense command ............................................................................................ 44
Error Counter Page (Read)............................................................................. 45
Tape Capacity Page Code.............................................................................. 46
Mode Select command ......................................................................................... 47
Mode Sense command ......................................................................................... 48
Page vi
STT8000A Product Manual
Table of Contents
Mode Parameter Header ................................................................................ 49
Mode Block Descriptor.................................................................................... 49
Mode Medium Partition Page.......................................................................... 50
Mode Capabilities and Mechanical Status Page.............................................. 50
Mode Tape Parameters Page ......................................................................... 51
Read command .................................................................................................... 52
Read Position command ....................................................................................... 53
Request Sense command..................................................................................... 55
Rewind command ................................................................................................. 57
Space command................................................................................................... 58
Test Unit Ready command.................................................................................... 59
Write command .................................................................................................... 60
Write Filemark command ...................................................................................... 61
Write Buffer (download microcode) command ....................................................... 62
Tape format
63
Introduction........................................................................................................... 63
Tape partitioning ................................................................................................... 63
Track positions ..................................................................................................... 63
Track numbering................................................................................................... 64
Track format ......................................................................................................... 64
Frames........................................................................................................... 64
Blocks ............................................................................................................ 66
Tape reference servo pattern ................................................................................ 66
Write equalization ................................................................................................. 67
Randomization...................................................................................................... 67
Theory of operations
69
Overview .............................................................................................................. 69
Block diagram....................................................................................................... 69
Mechanics ............................................................................................................ 70
Cartridge load mechanism .............................................................................. 70
Capstan drive motor assembly........................................................................ 70
Chassis .......................................................................................................... 70
Control circuits ...................................................................................................... 71
Head design ......................................................................................................... 71
Flash EEPROM .................................................................................................... 71
Sensors and switches ........................................................................................... 71
Media—Travan minicartridges............................................................................... 72
STT8000A Product Manual
Page vii
Table of Contents
Glossary
73
Acronyms and measurements
77
Acronyms and abbreviations ................................................................................. 77
Units of measurement........................................................................................... 79
Page viii
STT8000A Product Manual
Introduction
Chapter 1
1
Introduction
Drive overview
The Seagate STT8000A ATAPI minicartridge drive extends the Seagate family of
one-inch high, DC2000 drives that feature high performance, high reliability, and
quiet operation. The drive transfers data at up to 36 megabytes per minute
(Mbytes/min) without compression. With optimal system resources and
compressible data structures, nominal transfer rates of up to 60 Mbytes/min can be
observed using software data compression (assumes 2:1 compression ratio).
Data compression is available within the Seagate Backup software package for
DOS and Windows and typically provides for up to a 2:1 compression ratio. The
compression ratio is dependent on the specific system and the nature of the files
being compressed.
This drive optimizes throughput through the Seagate feature FastSenseTM. This
feature enables the drive to automatically sense the fastest supportable data
transfer rate of the host system and choose a transfer speed of either 600, 450, or
300 kilobytes/second (Kbyte/sec). This process maximizes system throughput by
eliminating tape repositioning, which is typically required when the tape drive
operates faster than the host computer.
This drive is available as an internal device in either a 3.5-inch or half-high 5.25-inch
configuration. The drive form factors are tailored for easy installation in today's
computers.
The drive supports the QIC-3095 format standard and will provide 4 gigabytes
uncompressed storage capacity, 8 gigabytes compressed, with a Travan TR-4
cartridge.
The drive will also write and read tapes conforming to the QIC-3080 standard,
providing 1.6 and 2.0 gigabytes respectively on 400 foot minicartridges or 400 foot
QIC-Wide cartridges.
A precision burst intelligent positioning system is used to achieve high track
densities.
STT8000A Product Manual
Page 1
Chapter 1
Introduction
The STT8000A conforms to the QIC-3095 development standard adopted by
Quarter-Inch Cartridge Drive Standards Inc. (QIC). The drive records in a serpentine
fashion utilizing a 1,7 RLL (Run Length Limited) data encoding method, and
provides for 72 data tracks and one (1) directory track on Travan TR-4 media.
The drive offers electronically erasable, programmable, read-only memory (flash
EEPROM), which enables qualified Seagate OEMs to download revised firmware to
the drive.
With the availability of greater capacity disk drives and the growth of small networks,
the need for cost-effective, high-capacity storage has grown. The STT8000A is ideal
for high-end standalone computers, workstations, and small networks.
Built using long-wearing materials and custom Large Scale Integration (LSI)
components, the ATAPI drive was engineered for heavy-duty computer applications.
Providing carefully controlled tape handling and rapid, smooth operation, the design
promotes long life for key components such as the motors, drive heads, and the
media itself. One major benefit of this new, computer grade engineering is low
power consumption.
Figure 1-1 illustrates the STT8000A ATAPI minicartridge internal drive. Figure 1-2
illustrates the internal drive equipped with mounting brackets.
Figure 1-1
STT8000A internal drive without mounting brackets
Page 2
STT8000A Product Manual
Introduction
Chapter 1
Figure 1-2
Internal STT8000A with mounting brackets
Features
The STT8000A embodies Seagate's commitment to engineer reliable and durable
tape drive products. Key features of the drive are as follows:
•
Two Internal form factors for installation in 5.25-inch half-high or 3.5-inch by
one-inch drive bays
•
Capability to write and read Travan TR-4 (QIC-3095) media, as well as
minicartridge or QIC-Wide media conforming to the QIC-3080 standard
•
QIC-3095-MC tape format compliance for compatibility and information exchange
•
Typical uncompressed capacities of 4 Gbytes on 740-foot TR-4 media; 2
Gbytes on 400-foot QIC-Wide media; and 1.6 Gbytes on 400-foot quarter-inch
minicartridge media
•
Typical compressed capacities of 8 Gbytes on 740 foot TR-4 media; 4 Gbytes on
400-foot QIC-Wide media; 3.2 Gbytes on 400-foot quarter-inch minicartridge media
•
Transfer rate optimized with FastSense—automatic selection of fastest
supportable data transfer rate (600, 450, or 300 Kbytes/sec)
•
ATAPI interface that supports DMA and PIO modes 0, 1, or 2 with 512 Kbytes ondrive data buffer to facilitate the most efficient use of the host computer and tape
drive.
•
Uncorrectable error rate of less than 1 in 1015 bits
•
Flash EEPROM to enable electrically upgradeable drive firmware
•
Custom Seagate -designed LSI circuitry to reduce component count and boost
drive reliability
•
Low power consumption—less than 15.0 Watts (typical) for internal drives
STT8000A Product Manual
Page 3
Chapter 1
Introduction
Typical system configurations
The Enhanced IDE standard supports up to four ATAPI peripherals: two devices on
the primary port and two devices on the secondary port. Of the two devices, one
must be slave to the other, which is the master. Figure 1-3 shows sample
configurations for two ATAPI systems.
Figure 1-3
Sample ATAPI configurations
Computer
system
Enhanced
IDE
controller
Primary
IDE bus
Hard
disc
CD-ROM
(master)
Secondary
IDE bus
STT20000A
(slave)
Computer
system
Enhanced
IDE
controller
Acculogic
IDE
controller
Primary
IDE bus
Hard
disc
Secondary
IDE bus
STT20000A
Minicartridge technology overview
Having evolved from the original mass-storage medium—reel-to-reel, 1/2-inch tape
storage—the minicartridge technology of today offers fast, efficient, high-capacity
storage in a compact, easy-removable hard-shell package. In little more than a
decade, storage capacities have increased from some 60 Mbytes on 9 tracks (QIC24, 1982) to the to the 8-Gbyte capacity achievable with the STT8000 minicartridge
drive on a single Travan TR-4 cartridge.
The streaming-tape intelligence in the STT8000A provides a continuous tape motion
with an uninterrupted, precisely coordinated flow of data to and from the
minicartridge. This "streaming" motion combined with the "serpentine" recording
method is one element that contributes to the increased storage capacities,
efficiency, and speed of today's minicartridge technology.
Use of the "serpentine" recording method exploits the bi-directional capabilities of
the cartridge. With this method, the tape is not rewound at the end of a track.
Page 4
STT8000A Product Manual
Introduction
Chapter 1
Instead, the write-read heads are logically or mechanically switched to a different
position on the tape and another track is written or read in the reverse direction.
That is, the drive first records track 1 in one direction and when the end of the tape
is reached, the head is moved and the direction of tape motion is reversed to record
track 2. This serpentine process continues until the entire tape is recorded. The
individual tracks are sequential to minimize the amount of head motion as the heads
change position for each track.
Flash EEPROM
The STT8000A incorporates leading-edge technology in the flash EEPROM, which
is useful should the drive's firmware need to be upgraded at some point. With the
permanently installed, electrically upgradeable, flash EEPROM memory, revised
firmware for the drive can be loaded via any one of two methods:
•
Seagate OEM firmware cartridge (See chapter 4)
•
Host IDE bus
This feature enables qualified OEMs needing to revise the drive firmware to do so
rapidly and at a reduced cost. Flash EEPROM should also prolong the life cycle of a
drive because many new techniques—such as increasing the capacity of the drive
through support for longer tapes—may require only a firmware upgrade.
Software
The STT8000A is a cost-effective means of backing up fixed disks. The drive is
compatible with DOSTM version 5.0 or later, Microsoft WindowsTM 3.1 or later,
Microsoft Windows 95, or Windows NT and will operate with many of the popular
backup software applications such as Seagate 's Backup for DOS and Windows,
Windows 95, NetWare, or Windows NT.
References
The following standards documents describe some of the technology incorporated in
the drives referenced in this manual.
•
QIC-170—Preformatted magnetic minicartridge
•
QIC-157—ATAPI command set for streaming tape
•
QIC-3095-MC—Serial recorded magnetic tape minicartridge
•
QIC-3080-MC—Serial recorded magnetic tape minicartridge
For more information about a particular QIC standard, contact Quarter-Inch
Cartridge Standards, Inc., c/o Freeman Associates, 311 East Carrillo Street, Santa
Barbara, California 93101.
STT8000A Product Manual
Page 5
Chapter 1
Introduction
About this manual
The remaining chapters and the appendices in this manual are briefly described in
the following table. A glossary of terms is also included.
Chapter
Page 6
Title
Description
2
Specifications
Contains physical, performance, environmental,
reliability, power, and minicartridge specification
tables.
3
Installation
Provides cautions, unpacking tips, inspection
information, installation/connection instructions,
mounting dimensions, and connector pinouts.
4
Drive operation and
maintenance
Explains the operation of the drive, and provides
maintenance and troubleshooting instructions
5
ATAPI Interface
Lists general information about the interface.
6
Tape format
Provides an overview of the QIC-3095 tape
format.
7
Theory of operation
Details the functional operation of various
assemblies of the ATAPI drive.
Appendix A
Glossary
Defines key terms.
Appendix B
Acronyms and
measurements
Lists the acronyms and measurements used in the
manual.
STT8000A Product Manual
Specifications
Chapter 2
Specifications
2
Overview
The STT8000A provides exceptional reliability in storing large amounts of computer
data. This chapter includes the following specifications and requirements:
•
Physical specifications
•
Power requirements
•
Drive performance specifications
•
Environmental requirements
•
Reliability
•
Recommended tapes
•
Tape capacities and formats
•
Regulatory compliance
Physical specifications
The physical specifications of the STT8000A are listed in the following table.
Specification
Drive for 3.5-Inch
Mount
Drive for 5.25Inch Mount
Height
1.0 in/ 25 mm
1.7 in/ 43 mm
Width
4.0 in/102 mm
5.87 in/149.1 mm
Length
6.2 in/157.5 mm
6.36 in/161.5 mm
Weight
1.0 lbs/0.5 kg
1.5 lbs/0.7 kg
Figures 2-1 and 2-2 show the general dimensions of the STT8000A in 3.5-inch
configuration (without mounting brackets) and in the 5.25-inch configuration (with
mounting brackets).
STT8000A Product Manual
Page 7
Chapter 2
Specifications
Figure 2-1
STT8000A (3.5-Inch mount) general dimensions
4.00 in (101.6 mm)
6.19 in (157.2 mm)
0.157 in
(4 mm)
4.00 in (101.6 mm)
1.00 in
(25.4 mm)
Figure 2-2
STT8000A (5.25-Inch mount) general dimensions
0.86" (21.8mm)
5.49" (139.4mm)
5.76" (146.4mm)
0.20" (5.0mm)
5.87"
(149.0mm)
DRIVE ACTIVE
(GREEN)
Page 8
1.685"
(42.8mm)
STT8000A Product Manual
Specifications
Chapter 2
Power specifications
The following table lists the power specifications for the STT8000A. (Power
specifications are measured at the tape drive power connector and are nominal
values.)
Specification
Measurement
DC Voltage
+12 VDC
+5 VDC
Voltage Tolerance
± 10%
± 5%
Operational Current
2.0 amps
1.0 amp
Standby Current
0.2 amp
0.6 amp
Peak
2.2 amps max.
—
Power Sequence
None
None
Ripple (peak to peak)
≤ 100 mV
≤ 100 mV
Power use
(nominal)
< 15 Watts
(excluding surge)
< 15 Watts
(excluding surge)
The following table lists pin assignments for the power connector for the drive.
STT8000A Product Manual
Pin
Assignment
1
+12 VDC
2
+12 return
3
+5 return
4
+5 VDC
Page 9
Chapter 2
Specifications
Performance specifications
The following table lists the performance specifications for the STT8000A.
Feature
Page 10
Specification
Capacity
4.0 gigabytes—900Oe 740' Travan cartridge (uncompressed)
8.0 gigabytes—900Oe 740’ Travan cartridge (compressed)
Effective backup rate
30 Mbytes/min typical native; 45 Mbytes/min typ. compressed
Data transfer rate
300 / 450 / 600 Kbytes per second FastSense
Tape speed
Read/Write
Search/Rewind
33, 51, 77 ips
90 ips maximum
Recording method
Serpentine
Recording format
QIC-3095-MC
Recording code
1,7 RLL
Error recovery
Reed Solomon ECC
Recording unrecoverable
errors
Less than 1 in 1015 data bits
Head configuration
Wide write/narrow read
Recording media
900-Oe 740' Travan TR-5
Cartridge size
3.2 in. x 2.4 in. x 0.4 in. (81 mm x 61 mm)
Data density
67,733 bits per inch
Tracks
72 data tracks, one (1) directory track
STT8000A Product Manual
Specifications
Chapter 2
Environmental requirements
The following table lists the environmental specifications for the STT8000A. The
drive may be mounted either vertically or horizontally.
Specification
Operational
Non-operational
Temperature
+41° to +113° F1
(+ 5° to + 45° C)
–40° to +149oF2
(–40° to + 65oC)
Thermal gradient
1° C per minute
(no condensation)
20° C per hour
Relative humidity
20% to 80%
non-condensing1
5% to 95%
non-condensing2
Maximum wet bulb temperature 78.8° F (26° C)
No condensation
–1000 to +15,000 feet
–1000 to +50,000 feet
Peak to Peak
Displacement
0.005 in. max.
(5 to 44.3 Hz)
0.1 in. max.
(5 to 17 Hz)
Peak Acceleration
0.50 g max.
(44.3 to 500 Hz)
1.5 g max.
(17 to 500 Hz)
Acoustic level operational
(A-wt sum)
55 dBA maximum
(measured in suitable
enclosure at 3-ft distance
and operator height)
—
Shock (1/2 sine wave)
2.5 g’s peak, 11 msec
100 g's peak, 11 msec
Altitude
Vibration
1
Specification applies to drive mechanism and media
2
Specification applies to drive mechanism only
STT8000A Product Manual
Page 11
Chapter 2
Specifications
Reliability
The STT8000A is designed for maximum reliability and data integrity. The following
table summarizes the reliability specifications.
Feature
Specification
Non-recoverable error rate
< 1 in 10 bits
Error recovery and control
Reed-Solomon Error Correction Code techniques
15
Error monitoring and reporting (Error Log)
Media pre-written
Retry on read
Data randomization
Mean-Time-Between-Failures
(MTBF)
More than 200,000 hours
Mean-Time-To-Repair (MTTR)
Less than 0.33 hour
Mean-Time-Between Failures
The Mean-Time-Between Failures (MTBF) is greater than 200,000 hours. This
specification includes all power-on and operational time but excludes maintenance
periods. Operational time is assumed to be 20% of the power-on time. Operational
time is the time the tape is loaded.
Note:
Seagate does not warrant the stated MTBF as representative of any
particular unit installed for customer use. The failure rate quoted here is
derived from a large database of test samples. Actual rates may vary from
unit to unit.
Mean-Time-To-Repair
The Mean-Time-To-Repair (MTTR) is the average time required by as qualified
service technician to diagnose a defective drive and install a replacement drive. The
MTTR for the drive is less than 0.33 hour (20 minutes).
The STT8000A is a field replaceable unit. If a problem occurs with a subassembly or
component in the drive, the entire unit should be replaced. The faulty drive should
be returned to the factory in its original packaging. Contact your distributor, dealer,
your computer system company, or your Seagate sales representative to arrange
the return.
Page 12
STT8000A Product Manual
Specifications
Chapter 2
Recommended tapes
The STT8000A uses pre-formatted minicartridges. The following cartridges are
recommended:
Description
Seagate
Sony
3M/Imation
Travan (740 ft)
(QIC-3095)
4.0 GB capacity
•
8.0 GB capacity with
•
data compression
8000TT
—
TR-4
Standard 900 Oe (400 ft)
(QIC-3080)
1.6 GB capacity
•
3.2 GB capacity with
•
data compression
—
—
miniMAGNUSTM
3080
4000QT
QW 3080XLF
—
QIC Wide 900 Oe(400 ft)
(QIC-3080)
2 GB capacity
•
4 GB capacity with
•
data compression
Tape capacities and formats
The following table gives the uncompressed capacities for the drive.
Media Type
QIC-3095-MC
Travan TR-4
4.0 GB
QIC-3080-MC
400 ft QIC-Wide
2.0 GB
400 ft minicartridge
1.6 GB
The STT8000 ATAPI minicartridge drive reads and writes the QIC-3095-MC and
QIC-3080-MC formats. When used with the appropriate software, the drive reads
the QIC 80, QIC-3010, and QIC-3020 formats.
STT8000A Product Manual
Page 13
Chapter 2
Specifications
Regulatory compliance
The STT8000A complies with the regulations listed in the following table.
Agency
Regulation
CSA
C22.2, No. 950-M89
TUV & IEC-RHEINLAND
EN 60 950/IEC 950
UL
1950
Canadian Dept. of Communications
Class B
EN55022 (CISPR-22)
with additional CE-Mark test requirements
Class B
FCC
Class B, Part 15
Use the STT8000A only in equipment where the combination has been determined
to be suitable by an appropriate certification organization (for example, Underwriters
Laboratories Inc. or the Canadian Standards Association in North America). You
should also consider the following safety points.
Page 14
•
Install the drive in an enclosure that limits the user's access to live parts, gives
adequate system stability, and provides the necessary grounding for the drive.
•
Provide the correct voltages (+5 VDC and +12 VDC) based on the regulation
applied—Extra Low Voltage (SEC) for UL and CSA and Safety Extra Low
Voltage for BSI and VDE (if applicable).
STT8000A Product Manual
Installation
Chapter 3
3
Installation
Introduction
This chapter explains how to install the STT8000A. The following paragraphs briefly
outline the organization of this chapter.
•
The following section, Before you begin contains general information that you
should read before you begin the installation.
•
Setting jumpers shows the master/slave jumpers and describes their uses.
•
Installing the drive explains how to mount the internal drive unit.
Before you begin
Handling guidelines
Because the drive unit can be damaged by electrostatic discharge, an electrostatic
grounding strap is recommended. This strap prevents an electrostatic discharge
from damaging the electronic components on or in the drive unit
If you do not have an electrostatic grounding strap, perform the installation at a
static-safe workstation. If one is not available, follow these guidelines as you install
the drive unit:
•
Work in an uncarpeted area.
•
To protect the drive from static electricity, DO NOT remove the drive from its
anti-static bag until you are ready to install it.
•
Before you remove the drive from the anti-static bag, touch a metal or grounded
surface to discharge any static electricity buildup from your body.
Caution:
If you touch static-sensitive parts of the drive (such as the printed circuit
board) electronic components may be damaged.
•
Hold the drive by the edges only. Avoid direct contact with any printed circuit
board.
•
Lay the drive only on top of its anti-static bag or return the drive to its bag when
you need to lay the drive down.
Caution:
STT8000A Product Manual
If you substitute an ATAPI adapter card or longer cables, or if you chain the
tape drive to an existing ATAPI adapter or peripheral, the compatibility
and/or operation of the tape subsystem may be seriously affected.
Page 15
Chapter 3
Installation
Setting jumpers
Review the jumper settings to ensure that the jumpers are properly configured for
your system. Figure 3-1 shows the location of the jumper block. Figure 3-2 shows
the jumper block.
Note:
Record your jumper settings prior to installation. They are not visible after
the drive has been installed.
The default setting is Slave mode with a jumper over pin 3 and pin 4.
Your system setting may vary, so be sure to check your computer or ATAPI
controller manual to determine the proper configuration choice for your system.
Figure 3-1
Location of jumper block and connectors
NOTE:
Bottom of drive shown.
JUMPER
BLOCK
PIN 1
IDE
CONNECTOR
IDE PIN 1
POWER
CONNECTOR
Figure 3-2
Jumper block and jumper settings
(TOP OF TAPE DRIVE)
1
3
5
7
2
4
6
8
NOT USED
JUMPER ON
MASTER
SLAVE
CABLE SELECT
Page 16
JUMPER OFF
STT8000A Product Manual
Installation
Chapter 3
Installing the drive
The internal drive can be installed in a one-half-inch high by 3.5-inch form factor
drive bay or in an inch-high by 5.25-inch form factor (with mounting brackets). The
drive can be installed in three different orientations: horizontally (LED to the left) and
vertically (on either side).
The following section provides directions for mounting the drive in either a 3.5-inch
enclosure or in a 5.25-inch enclosure.
1.
Before you install the drive, write down the serial number and model number
shown on the drive and put this information in a safe place. You need this
information if you ever call for service.
2.
With the computer cover removed, remove the face plate from the drive bay in
which you plan to install the drive. Refer to the manual that you received with
your computer for instructions about removing the face plate if necessary.
Note:
If devices are installed in any drive bays adjacent to the one you are using
for the internal drive, partially removing those devices might give you more
working space.
3.
Attach any special mounting hardware to the drive that your system might
require. Refer to the manual that you received with your computer for
requirements.
4.
Locate the mounting screw holes in the drive brackets. Each side contains two
sets of holes. Use the set that aligns the drive properly within the drive bay.
5.
Slide the tape drive into the computer so that the drive bezel and the computer
face plate are flush. Then, align the mounting holes as shown in Figure 3-3.
Figure 3-3
Aligning the drive in the computer
STT8000A Product Manual
Page 17
Chapter 3
Installation
6. Secure the drive using the mounting screws. The threaded mounting brackets
are designed for M3.0 metric screws. If you are mounting the drive in a 3.5-inch
bay, use the screw supplied with the drive. Do not substitute other screws.
Using longer screws may damage the drive. If slide rails are needed, use the
plastic slide rails (supplied with the drive in some configurations).
7.
Connect an available power cable to the power connector on the drive. Figure
3-1 shows the location of the power connector. The recommended power
mating connector requires an AMP 1-48024-0 housing with AMP 60617-1 pins
or equivalent.
Note:
8.
Connect the interface cable with the connector on the rear of the unit. When
you make the connection, be sure pin 1 of the connector aligns with pin 1 on
the cable connector. See Figure 3-1 for the location of the connector and the
Pin 1 location.
Note:
9.
Turn off all power before inserting connectors.
Pin 1 on the connector on the rear of the drive is to your right as you look at
the back of the drive (right side up). (See Figure 3-1.) Your cable should
have Pin 1 highlighted by a color or dark strip. Be sure to mate Pin 1 on the
cable to Pin 1 on the drive. Failure to do so could make the drive
inoperative. Also, the cable is keyed to prevent incorrect installation. Make
sure that the blocked pin in the cable connector coincides with the missing
pin on the connector on the rear of the drive. (See Figure 3-1.)
Replace the computer cover. Be sure to reconnect any peripherals that you
disconnected during the installation.
10. Plug the computer and any peripherals into an AC power outlet.
11. Start the computer and install your tape backup software.
Mounting dimensions
Figures 3-4 and 3-5, respectively, show the location of the mounting holes for the
internal drive without and with mounting brackets.
Page 18
STT8000A Product Manual
Installation
Chapter 3
Figure 3-4
Mounting holes on internal drive (without mounting brackets)
0.2 in (5 mm)
3.7 in (94 mm)
0.315 in
(8 mm)
2.758 in
(70 mm)
3.543 in
(90 mm)
6.2 in
(159 mm)
2.382 in
(60 mm)
1.220 in
(31 mm)
0.984 in
(25 mm)
4.0 in (102.6 mm)
0.157 in
(4 mm)
1.0 in
(25.4 mm)
Figure 3-5
Mounting holes on internal drive (with mounting brackets)
0.4 in
(10.2mm)
0.62 in
(15.7mm)
0.86 in
(21.8mm)
.075 in (1.9mm)
2 PLACES
5.76 in (146.4mm)
3.12 in
(79mm)
3.12 in
(79,2mm)
5.49 in
(139mm)
2.36 in
(60mm)
2.08 in
(53mm)
1.81 in
(45.9mm)
5.87 in (149.0mm)
0.197 in
(5mm)
STT8000A Product Manual
1.7 in
(43mm)
0.51 in
(13.0mm)
Page 19
Chapter 3
Installation
ATA-2 Interface pin assignments
The STT8000A provides a standard ATA-2 connector. The pin assignments for this
connector are listed in the following table for your reference.
Page 20
Pin
Assignment
Description
Source
1
RESET
Reset
Host
2
Gnd
Ground
N/A
3
DD7
Data Bus bit 7
Host/Device
4
DD8
Data Bus bit 8
Host/Device
5
DD6
Data Bus bit 66
Host/Device
6
DD9
Data Bus bit 9
Host/Device
7
DD5
Data Bus bit 6
Host/Device
8
DD10
Data Bus bit 10
Host/Device
9
DD4
Data Bus bit 4
Host/Device
10
DD11
Data Bus bit 11
Host/Device
11
DD3
Data Bus bit 3
Host/Device
12
DD12
Data Bus bit 12
Host/Device
13
DD2
Data Bus bit 2
Host/Device
14
DD13
Data Bus bit 13
Host/Device
15
DD1
Data Bus bit 1
Host/Device
16
DD14
Data Bus bit 14
Baby sitting
17
DD0
Data Bus bit 0
Baby sitting
18
DD15
Data Bus bit 15
Host/Device
19
GND
Ground
N/A
20
---
Key pin
N/A
21
DMARQ
DMA Request
Device
22
GND
Ground
N/A
23
DIOW-
I/O Write
Host
STT8000A Product Manual
Installation
STT8000A Product Manual
Chapter 3
Pin
Assignment
Description
Source
24
–REQ
Ground
N/A
25
–I/O
I/O Read
Host
26
GND
Ground
N/A
27
IORDY
I/O Ready
Device
28
CSEL
Cable Select
Device
29
DMACK
DMA Acknowledge
Host
30
GND
Ground
N/A
31
INTRQ
Interrupt Request
Device
32
10CS16-
16-Bit I/O
Device
33
DA1
Device Address Bit 1
Host
34
PDIAG
Passed Diagnostics
Device
35
DA0
Device Address Bit 0
Host
36
DA2
Device Address Bit 2
Host
37
CS0-
Chip Select 0
Host
38
CD1-
Chip Select 1
Host
39
DASP-
Device Active or Slave
Present
Device
40
Ground
Ground
N/A
Page 21
Chapter 3
Installation
Notes
Page 22
STT8000A Product Manual
Drive operation and maintenance
Chapter 4
Drive operation and maintenance
4
Introduction
This chapter describes important operational procedures for the STT8000A. It
covers the following topics:
•
Use of the front panel LED
•
Using cartridges
•
Loading revised firmware (updating flash EEPROM)
•
Drive maintenance and troubleshooting instructions.
Front panel LED
The front panel of the Travan drive (see Figure 4-1) contains the cartridge opening
and one amber light-emitting diode (LED). This LED is lit any time that the tape is
NOT at the beginning of the tape. Thus, the LED indicates tape movement.
Figure 4-1
Front panel—internal drive
DRIVE ACTIVE
(AMBER)
STT8000A Product Manual
Page 23
Chapter 4
Drive operation and maintenance
Using Travan cartridges
The minicartridges recommended for use with the STT8000A are listed in chapter 2.
This section describes some operations using the cartridges.
Loading and unloading cartridges
Your tape drive has a flip-up door that covers the cartridge opening when a tape
cartridge is not installed in the drive. Once a cartridge is inserted, it is held firmly in
place by the drive's positive locking mechanism.
Caution:
DO NOT remove a tape cartridge while the drive is active. Complete
any tape operations and wait until the amber LED is OFF before
removing the cartridge.
To load a cartridge, insert it with the metal base plate down and the tape access
door facing into the drive. Figure 4-2 illustrates the loading of a cartridge.
To unload a cartridge, wait until the drive activity LED is OFF and then pull the
cartridge straight out. Figure 4-3 illustrates the unloading of a cartridge.
Figure 4-2
Loading a Travan cartridge
Page 24
Figure 4-3
Unloading a Tape cartridge
STT8000A Product Manual
Drive operation and maintenance
Chapter 4
Setting the write–protect switch
Travan minicartridges feature a sliding write protect tab located in the upper left
corner of the cartridge. You can set the tab to keep data from being written on the
tape. Use this switch when you want to make sure that important data on the tape
will not be overwritten.
Figure 4-4 shows the cartridge with the switch in the non-protected (read/write) or
unlocked position.
Figure 4-4
Travan cartridge write-protect switch—unlocked position
Figure 4-5 shows the tab in the protected (read only) or locked position.
Figure 4-5
Travan cartridge write-protect switch—locked position
To return a cartridge to the "writeable" state, push the switch toward the end of the
cartridge or to the unlocked position.
STT8000A Product Manual
Page 25
Chapter 4
Drive operation and maintenance
Loading revised firmware via Seagate firmware cartridge
The STT8000A uses flash EEPROM. Flash EEPROM enables you to download new
firmware when revisions to firmware are released. Firmware revisions are released
on specially encoded cartridges that are automatically recognized by these drives.
These firmware revisions are available for qualified OEMs only from Seagate
Technology, Inc.
To load a firmware upgrade tape, follow these steps.
1.
Power on the host system and the STT8000A drive. Allow the system boot up
process to reach the point where there is no ATAPI bus activity.
2.
Place the firmware upgrade cartridge record switch to the non-record position.
Insert the firmware upgrade cartridge in the drive and observe the amber LED
light on the front of the drive.
3. After the upgrade cartridge is inserted, tape motion begins. The drive LED
flashes on and off. Approximately 15 seconds later, tape motion stops, and the
LED continues to flash.
4. The LED flashes on and off at a steady rate as the firmware upgrade continues.
Approximately 45 seconds later, the drive resets internally, and the tape moves
back and forth, then stops.
5. The LED light will go off and remain off. Double check that the LED remains off .
Make sure that there is not further tape motion. Remove the upgrade cartridge.
6. The firmware is now upgraded to the new revision. The drive is operational and
the new firmware is active. Turning power off at this time does not affect the
firmware revision level.
Note:
Once the firmware upgrade cartridge is inserted in the drive, it is important
that no power interruption occurs while the firmware is loading. DO NOT
POWER OFF THE DRIVE AT THIS TIME. If a power interruption occurs,
the firmware may not be loaded correctly, and the drive may not operate
properly.
If a problem occurs during the firmware loading process, the LED on the front panel
goes out. In that case, the firmware upgrade cartridge may be defective, or the drive
may not be operating correctly.
If after a repeat loading of the firmware cartridge, the same condition is observed,
contact your Seagate sales representative.
Firmware upgrade cartridges are available to qualified Seagate OEM customers.
Contact your Seagate sales representative for information.
Page 26
STT8000A Product Manual
Drive operation and maintenance
Chapter 4
Care and maintenance of the drive and cartridges
Minimal maintenance is needed to ensure that your STT8000A minicartridge drive
operates at peak condition. This section explains how to care for tape cartridges and
how to clean the drive head.
Caring for tape cartridges
Although minicartridge tape cartridges are ruggedly built, they must be handled with
care to preserve the data that they contain. The following points are guidelines for
storing and using minicartridges.
•
Do not open the tape access door of the cartridge or touch the tape itself. One
fingerprint can prevent the drive from reading the tape.
•
Keep the cartridge away from sources of electromagnetic fields, such as
telephones, dictation equipment, mechanical or printing calculators, motors, and
bulk erasers. Do not lay cartridges on the computer monitor or on the base unit
of the computer.
•
Keep the cartridge away from direct sunlight and heat sources, such as
radiators or warm air ducts.
•
Keep the cartridge free of moisture. Do not wet or submerge a cartridge in any
liquid.
•
Do not expose the cartridge to temperature extremes. Allow the cartridge to
assume room temperature slowly.
•
Retensioning the tape cartridge is always recommended for optimal
performance, particularly after exposure of the cartridge to temperature changes
or shock. Retensioning restores the proper tape tension to the media.
Caring for the drive
Follow these guidelines to help ensure that your drive provides long, reliable service:
•
Operate the drive in a clean, dust-free environment.
•
Never apply a lubricant to the drive.
•
Under normal operation, you should clean the drive heads and captstan once a
month. See the following page for details.
STT8000A Product Manual
Page 27
Chapter 4
Drive operation and maintenance
Cleaning the drive read/write head
To maintain the tape drive, you should periodically clean the read/write head. No
other periodic maintenance is required. For new cartridges, clean the head after two
hours of tape movement. Thereafter the drive can be cleaned as per normal
operations.
Caution.
Never clean the read/write head of the drive with anything other than a
lint-free swab or an approved cleaning cartridge. Do not touch the head
with anything other than a lint-free swab.
You can clean the drive head by one of two methods: you can use the Seagateapproved 3M DC2000 cleaning cartridge DC051111 (12947), P/N CKDC2000, which
is available through Seagate Express 1-800-531-0968, or you can manually clean
the drive head. To manually clean the drive head, follow these steps.
1.
Moisten a clean, lint-free swab in 90% isopropyl alcohol so that it is wet but not
dripping. (Never use a dry swab.)
2.
Hold the drive access door open and wipe the head gently using a side-to-side
motion. The upright rectangle with the stripe in Figure 4-6 is the head.
Figure 4-6
Cleaning the drive head and capstan
Capstan
Page 28
Tape Head
3.
Use a new swab saturated with 90% isopropyl alcohol to wipe the capstan. The
capstan is the flat, roller to the left of the head as shown in Figure 4-6. Rotate
the capstan until its entire surface is clean.
4.
Allow the drive to dry for 3 minutes before using.
STT8000A Product Manual
Drive operation and maintenance
Chapter 4
Troubleshooting
If you experience problems after you install the drive, take the following actions to
try to solve the problems.
1.
Make sure that all cable connections are secure.
2.
Check the drive to be sure that the jumper settings are correct.
If a power interruption occurs during a backup or restore operation, start over when
the power is restored. If the drive appears to fail during a backup or restore
operation, try the following steps:
1.
Remove and replace the cartridge and try again. Make sure you are using the
correct type of tape cartridge.
2.
Turn off all power to the computer and drive. Wait for the computer to power
down and then start over.
3.
Try a different tape—preferably one that has never been used.
4.
Check all cable connections for proper contact.
5.
Clean the tape drive head as previously instructed. Then try the operation
again.
If problems persist, contact your tape drive supplier or Seagate technical support at
US and Canada
1-800-SEAGATE (1-800-732-4283)
Outside US and Canada
1-405-936-1234
Seagate Web Site
http://www.seagate.com
Seagate BBS
1-405-936-1630
Before you call technical support, be sure that you have the documentation for your
computer and for all installed peripheral devices.
STT8000A Product Manual
Page 29
Chapter 4
Drive operation and maintenance
Notes
Page 30
STT8000A Product Manual
ATAPI Interface
Chapter 5
ATAPI interface
5
Introduction
The STT8000A provides an ATA Packet Interface (ATAPI) controller for
communications between the host computer and the drive. The drive supports the
QIC-157 standard interface.
Note:
Refer to the QIC-157 Standard for detailed information about the this
interface.
This chapter clarifies the use of several ATA-2 signals and ATAPI commands that
are either vague or optional in the QIC-157 specification.
ATA-2 Interface
The information about the ATA-2 interface is presented in the following topics: ATA2 Signals, ATA Registers, and ATA Commands.
ATA-2 Signals
Only the DASP and PDIAG- signals are described in the following paragraphs.
DASP-
This signal is used during power-up handshake sequences for master/slave
identification per ATA-2 specifications.
Because the device has its own front-panel activity LED, this signal is not driven by
this device (to indicate activity) after power-up is complete.
PDIAG-
This signal is used during power-up handshake sequences for master/slave
identification per ATA-2 specifications.
STT8000A Product Manual
Page 31
Chapter 5
ATAPI Interface
ATA registers
The following table lists the values for the registers during register initialization.
Register
POR
RESET–
(Hard Reset)
ATA Reset
(SRST Bit)
ATAPI Soft
Reset
Read/Identify
Device Cmds
STATUS
00h
00h
00h
10h
41h
(DRDY+ERR)
ERROR
01h
(No
Error)
01h
01h
01h
04h
(ABRT)
Sector Count
(ATAPI Intr.
Reason)
01h
01h
01h
01h
—
Sector Num.
(ATAPI
Reserved)
01h
01h
01h
01h
—
Cylinder Low
(ATAPI Byte
Count High)
14h
14h
14h
14h
14h
Cylinder High
(ATAPI Byte
Count High)
EBh
EBh
EBh
EBh
EBh
Drive/Head
00
00
00
—
—
During an ATA soft reset or aborted ATA command, the host view of the DSC bit (Status
register) will be cleared, along with the DRDY bit. Any ATAPI command including ATAPI
Identify) can be used to set DRDY true and to re-enable host view of DSC bit.
Status Register
The following layout represents the Status Register. The CORR and IDX bits are not
used by the drive.
Page 32
7
6
5
4
3
2
1
0
BSY
DRDY
(0)
DSC
DRQ
CORR
(0)
IDX
(0)
CHECK
Bit
Mnemonic
Description
7
BSY
Busy—set when only drive has access to ATA registers.
6
DRDY
Drive Ready—set when DSC is valid.
4
DSC
Drive Seek Complete—set when drive ready for command.
3
DRQ
Data Request—set when data ready to be transferred.
0
CHECK
Check—set when an error has occurred.
STT8000A Product Manual
ATAPI Interface
Chapter 5
Error Register
The following layout represents the Error Register.
7
6
5
4
Sense Key [3..0]
3
2
1
0
MCR
ABRT
EOM
ILI
Bit(s)
Mnemonic
Description
7-4
Sense Key
Set to indicate the reason for the CHECK bit being set in
the Status Register.
3
MCR
Media Change Request—Always 0.
2
ABRT
Aborted Command—Set when an ATA or ATAPI
command is aborted.
1
EOM
End Of Media—The end of the current partition was
detected. On a WRITE command, unrecoverable data
might be left in the buffer.
0
ILI
Illegal Length Indication—This bit is set when an illegal
length block is read. Sense Status also indicates ILI.
Feature Register
The following layout represents the Feature Register.
7
6
5
4
3
2
1
0
.
.
.
.
.
.
.
DMA
Bit
Mnemonic
Description
0
DMA
DMA Data Transfer—When this bit is a 1, the data transfer
is in DMA mode. If the bit is 0, PIO data transfer is used.
All ATAPI packet commands are transferred in PIO mode.
The value in this register must be set before every ATAPI command that transfers
data (including log/mode set/sense) to determine the transfer method. This register
is overwritten by the drive after every command completion to present Error
STT8000A Product Manual
Page 33
Chapter 5
ATAPI Interface
information. If you do not program this register correctly, the drive "hangs" in the
BSY state. To correct this problem, reset operations.
Supported ATA Commands
The ATA commands are briefly described in the following paragraphs.
Execute Drive Diags (90h)
This command is executed regardless of the state of the DRV bit. The command
causes an actual microprocessor reset (drive loses all logical position information).
Power-up diagnostics are performed, and the PDIAG/DASP handshake is
performed per ATA-2 specification. The master device will generate an interrupt.
Idle Immediate (E1h)
This command causes the device to set its Power Mode state to Idle and to
generate an interrupt. Although the drive has no actual power saving features, this
command is emulated for software compatibility.
Standby Immediate (E0h)
This command causes the device to set its Power Mode state to Standby and to
generate an interrupt. Although the drive has no actual power saving features, this
command is emulated for software compatibility.
Check Power Mode (E5h)
This command causes the device to return its Power Mode state in the Int Reason
register, and generate an interrupt. If the drive is in Standby mode, this command
returns 00h in the Int Reason register, otherwise this command returns FFh in the
Int Reason register (indicating IDLE mode).
Previous Cmd
Int Reason
Reset/Power-up
FFh (Idle)
Standby Immed.
00h (Standby)
Idle Immediate
FFh (Idle)
Any Other Cmd
FFh (Idle)
Sleep (E6h)
This command is treated as an Idle command and does NOT prevent the drive from
responding to further commands.
Page 34
STT8000A Product Manual
ATAPI Interface
Chapter 5
Set Features (EFh)
If an unsupported feature is selected, the command is aborted. Otherwise, the
indicated parameter is set. The following list indicates the supported features:
Feature Number
Set Feature Commands
03h
Set Transfer Mode from Sector Count register
66h
Disable reverting to power-on defaults (no-op)
CCh
Enable reverting to power-on defaults (no-op)
Set Transfer Mode Feature
If the Set Transfer Mode feature (03h) is received, the Sector Count (ATAPI
Interrupt Reason) register is used to set the transfer mode based on the following
table. Any transfer modes not listed in the table cause the command to be aborted.
STT8000A Product Manual
Sector
Transfer Mode
00h
PIO Transfer Mode 4 (default)
01h
PIO Transfer Mode 2 (explicit IORDY disable)
08h
PIO Transfer Mode 0
09h
PIO Transfer Mode 1
0Ah
PIO Transfer Mode 2
0Bh
PIO Transfer Mode 3
0Ch
PIO Transfer Mode4
10h
Single Word DMA Mode 0
11h
Single Word DMA Mode 1
12h
Single Word DMA Mode 2
20h
Multi-word DMA Mode 0
21h
Multi-word DMA Mode 1
22h
Multi-word DMA Mode 2
Page 35
Chapter 5
ATAPI Interface
Issuing PIO and DMA transfer modes does not actually select these operations;
however, issuing these modes selects the rate of either type of transfer, as selected
by the DMA bit (bit 0) of the ATAPI Features register.
ATAPI Identify Device (A1h)
The protocol and timing of this command conforms to a standard ATA type
command as defined in ATA-2.
Note:
This command is similar to the ATA Identify Device command except it uses
a different op-code. The ATA Identify Device command is aborted.
This command is generally intended to be used by a low-level ATAPI driver to
determine the number and type of ATA/ATAPI devices attached to the interface.
This driver might be able to program transfer rates and other parameters in the host
ATA (IDE) interface.
The following table defines the values returned by the drive.
Word
Description
Value
Meaning
0
General Configuration
81C0h
ATAPI Streaming Tape, Removable
Accelerated DRQ, 12 byte packets
Page 36
1-3
Disk info: cylinders, heads
0000h
Unsupported
4-6
Disk info: track, sector sizes
0000h
Unsupported
7-9
Reserved
0000h
—
10-19
Serial Number (20 ASCII characters)
"N...N"
Serial Number
20
Buffer Type
4002h
Cap & Mech Sts bytes 6 and 7
21
Buffer Size
02D8h
14 frames of 52 data blocks=728
22
ECC Bytes Available
0000h
Unsupported
23-26
Firmware Revision (8 ASCII
characters)
"N.NN"
Firmware Revision
27-46
Model Number (40 ASCII characters)
47,48
Disk info: mult-xfer, double word I/O
0000h
Unsupported
49
Capabilities
0F00h
IORDY supported. Logical Blocks
Addressing and DMA supported
50
Reserved
0000h
—
51
PIO Data Transfer Cycle Timing
0200h
Mode 2
52
DMA Data Transfer Cycle Timing
0200h
Mode 2
Model Number. "Seagate STT8000A"
STT8000A Product Manual
ATAPI Interface
Chapter 5
Word
Description
Value
Meaning
53
Field Validity
0002h
Fields 54-58 not valid.
Fields 64-70 valid
54-56
Current Cylinder/Heads/Sectors
0000h
Unsupported
57-58
Current Capacity
0000h
Unsupported
59
Reserved
0000h
—
60-61
User Addressable Sectors
0000h
Unsupported
62
Single Word DMA Mode
0407h
Selected DMA mode 2 (Upper Byte),
DMA modes 2,1,0 Supported.
63
Multi Word DMA Mode
0407h
Selected DMA mode 2 (Upper Byte)
DMA modes 2, 1, 0 supported.
64
Enhanced PIO Mode
0003h
PIO Mode 3 and 4 Supported
65
Minimum Multi Word DMA Cycle Time
0078h
Mode 2 (120 nanoseconds)
66
Recommended Multi Word DMA Cycle
Time
0078h
Mode 2 (120 nanoseconds)
67
Minimum PIO Cycle Time w/o IORDY
0078h
Mode 4 (120 nanoseconds)
68
Minimum PIO Cycle Time with IORDY
0078h
Mode 4 (120 nanoseconds)
69-255
Reserved/Vendor Unique
0000h
—
ATAPI Packet Command (A0h)
Before issuing the ATAPI Packet command, the host writes to the Byte Count
register (high and low) the maximum/preferred number of bytes to be transferred in
a single PIO DRQ. For Data Transfer commands (READ and WRITE), this value is
assumed to be greater than or equal to 512 and is ignored.
ATAPI Soft Reset (08h)
The ATAPI Soft Reset command performs a complete microprocessor reset.
Current physical and logical position is lost, and if a tape is present, a LOAD
sequence is performed, resulting in a Ready at BOP0 condition (with Unit Attn).
The DSC is set to 1 before the BSY bit is cleared.
STT8000A Product Manual
Page 37
Chapter 5
ATAPI Interface
ATAPI interface
The following table lists the ATAPI interface commands for the drive. In this table,
DSC restrictive means that the host should wait for DSC to be set before issuing the
command for minimum IDE bus overhead. Note that all ATAPI commands are 12
bytes in length. The command descriptions show only the first 6 or 10 bytes of these
commands, even though the commands are actually 12 bytes long.
Note.
Page 38
Unless otherwise stated, all reserved and unsupported fields are not verified
when the drive accepts a command. These fields are filled with 00s for
future compatibility.
Code
DSC
Restrictive
Command
Comments
00h
Y
TEST UNIT
READY
Not DSC restrictive on some other drives.
01h
Y
REWIND
03h
N
REQUEST
SENSE
Null status if DSC not set.
08h
buffer
READ
Delay occurs if first READ is not READ 0 blocks.
0Ah
buffer
WRITE
Write 0 not required to initialize DSC.
10h
Y
WRITE
FILEMARK
Flush always. WFM 0 to flush.
11h
Y
SPACE
Space forward/reverse Filemarks and space to
EOD only.
12h
N
INQUIRY
DSC not affected.
15h
—
MODE
SELECT
Select speed, FDP, page 2B updates only.
19h
Y
ERASE
Constitutes a logical erase; accepted at BOP0/1
or EOD only.
1Ah
—
MODE
SENSE
1Bh
Y
LOAD/UNL
OAD
UNLOAD to make not ready; LOAD to return to
Ready. LOAD w/Retension any time. (All LOADS
imply REWIND and select partition 0.)
2Bh
Y
LOCATE
Locates logically only; can also select partition.
34h
Y
READ
POSITION
Also used to wait for previous command done.
3Bh
—
WRITE
BUFFER
Use for download only. Drive must be "unloaded".
4Ch
—
LOG
SELECT
Resets Error Counts.
4Dh
—
LOG
SENSE
Contains Error Counts (WRITE and READ) and
tape capacity.
STT8000A Product Manual
ATAPI Interface
Chapter 5
Erase command
Bit=>
7
6
5
4
3
2
1
0
Byte
0
Operation code (19h)
1
Reserved
2
Reserved
3
Reserved
4
Reserved
5
Reserved
1 (Long)
The Erase command is only accepted when the drive is ready and located at either
BOP 0/1 or EOD. Erase at BOP causes the drive to write a Control/Filler Frame at
the beginning of the current partition, followed by an EOD pattern. (The Use Count
field of the Control Frame is incremented from its previous value). This action results
in a logical erasure of the current partition. If partition 0 is erased, partition 1
becomes logically erased because of the use count field. Erase at EOD is accepted,
but no operation is performed except a write flush if following a WRITE command.
This result is because all data following EOD is already logically erased.
The DSC bit is reset (0) after this command is accepted and is set (1) when the
command is complete. REQUEST SENSE can then be used to verify successful
command completion.
STT8000A Product Manual
Page 39
Chapter 5
ATAPI Interface
Inquiry command
Bit
7
6
5
4
3
2
1
0
Byte
0
Operation code (12h)
1
Reserved
2
Reserved
3
Reserved
4-7
Allocation Length
8-15
Vendor ID (8 ASCII characters) ASCII “Seagate “
16-31
Product ID (16 ASCII characters ASCII “STT8000A
“
The INQUIRY command is always accepted, regardless of the state of the DSC bit.
The command does not modify the status of DSC. The INQUIRY command returns
the lesser of 36 bytes or the Allocation Length parameter of information. The
following table defines the returned values.
Note:
Much of the information returned by this command is redundant with the
ATAPI Identify Device command response.
Byte
Description
Value
Meaning
0
Peripheral Device Type
01h
Streaming Tape Drive (QIC121 Architectural Model)
1
Removable Media Bit (RMB)
80h
Removable
2
ISO/ECMA/ANSI Version
02h
ANSI=02
3
Response Data Format
02h
This Format
4
Additional Length
32.
36 total bytes
5-7
Reserved
00h
—
8-15
Vendor ID (8 ASCII characters)
ASCII
"Seagate "
16-31
Product ID (16 ASCII characters)
ASCII
"STT8000A
32-35
Product Revision (4 ASCII characters)
ASCII
"N.NN"
"
The INQUIRY command is not to be used by the low-level driver; rather, it is
intended to be used by applications, which usually have access to the drive only
through the ATAPI protocol.
Page 40
STT8000A Product Manual
ATAPI Interface
Chapter 5
Load/Unload command
Bit
7
6
5
4
3
2
1
0
Re-Ten
Load
Byte
0
Operation code (1Bh)
1
Reserved
2
Reserved
3
Reserved
4
Reserved
5
Reserved
LOAD (with or without Re-tension) is accepted any time a tape is present in the
drive, (even if status indicates it is already loaded). This command includes implicit
rewind and select partition 0 operations. The DSC bit is reset (0) after this command
is accepted and is set (1) when the drive has initialized and is ready. REQUEST
SENSE can then be used to verify successful command completion.
The UNLOAD option(s) re-tensions the tape (if selected) and moves the tape to the
logical BOT or EOT end (as selected), then causes the drive to report not ready to
any subsequent media access commands. Either a manual load operation or LOAD
command is required for the drive to return to ready.
STT8000A Product Manual
Page 41
Chapter 5
ATAPI Interface
Locate command
Bit
7
6
5
4
3
2
1
0
CP
Reserved
Byte
0
Operation code (2Bh)
1
Reserved
2
3
4
Reserved
(MSB)
Logical Block Address
5
6
(LSB)
7
Reserved
8
Partition
9
Reserved
If the Change Partition (CP) bit is set, the drive first changes to the specified
partition, then attempts to locate before the specified logical block. (All addresses
are interpreted as logical.) A locate to Block 0 (in any partition) is treated like a
rewind (to BOP)and does not start a read-ahead. Depending on the exact sequence
of commands, LOCATE to Block 0 might or might not report a Blank Check error.
The DSC bit is reset (0) after this command is accepted and is set (1) when
completed. REQUEST SENSE can then be used to verify successful command
completion.
Page 42
STT8000A Product Manual
ATAPI Interface
Chapter 5
Log Select command
Bit
7
6
5
4
3
2
1
0
PCR
Reserved
Byte
0
Operation code (4Ch)
1
Reserved
2
01(PC)
Reserved
3
Reserved
4
Reserved
5
Reserved
6
Reserved
7
(MSB)
Parameter List Length
8
(LSB)
9
Reserved
The PC (Page Control) field is 01, for current values. The Parameter List Length
field specifies the number of data bytes to transfer. If the PCR bit is 1 and the
Parameter List Length is 0, the error counters are all reset (0).
All of the counters defined in the Log Sense command are reset by the Log Select
command and are otherwise only cleared by a power-on (hard) or ATAPI reset.
STT8000A Product Manual
Page 43
Chapter 5
ATAPI Interface
Log Sense command
Bit
7
6
5
4
3
2
1
0
Byte
0
Operation code (4Dh)
1
Reserved
2
01(PC)
Page Code
3
Reserved
4
Reserved
5
(MSB)
Parameter Pointer
6
7
(LSB)
(MSB)
Allocation Length
8
(LSB)
9
Reserved
The PC (Page Control) field is 01, for current values. The Page Code field identifies
which page of data is being requested. The Parameter Pointer field allows
requested parameter data to begin from a specific parameter code. The Allocation
Length field specifies the number of data bytes to transfer.
The following table presents the supported log pages.
Byte
Description
Value
Meaning
0
Page Code
00h
Supported Log Pages Page
1
Reserved
00h
-
2,3
Page Length
00,04h
4 Supported Pages
4
First Supported Page
00h
Supported Log Pages Page Code
5
03h
Error Counter (Read) Page Code
6
31h
Tape Capacity Page Code
00h
Filler
7
Page 44
Last Supported Page
STT8000A Product Manual
ATAPI Interface
Chapter 5
Error Counter Page (Read)
The following table presents the Error Counter Page layout.
STT8000A Product Manual
Byte
Description
Value
Meaning
0
Page Code
03h
Error Counter (Read) Page
1
Reserved
00h
-
2,3
Page Length
0030h
48 Bytes Following
4,5
Parameter Code
0000h
ECC Corrections Code
6
Parameter Bits
40h
Device Controlled Counter
7
Parameter Length
04h
4-byte Counter
8-11
Number of ECC Corrections
N,N,N,N
Counter Value
12,13
Parameter Code
0001h
Read Retries Code
14
Parameter Bits
40h
Device Controlled Counter
15
Parameter Length
04h
4-byte Counter
16-19
Number of Retries
N,N,N,N
Counter Value
20,21
Parameter Code
8020h
Even Tracks ECC Corrections
Code
22
Parameter Bits
40h
Device Controlled Counter
23
Parameter Length
04h
4-byte Counter
24-27
Even Tracks(reverse) ECC Corrections
N,N,N,N
Counter Value
28,29
Parameter Code
8021h
Odd Tracks ECC Corrections
Code
30
Parameter Bits
40h
Device Controlled Counter
31
Parameter Length
04h
4-byte Counter
32-35
Odd Tracks (forward) ECC Corrections
N,N,N,N
Counter Value
36,37
Parameter Code
8022h
Even Tracks Read Retries Code
38
Parameter Bits
40h
Device Controlled Counter
39
Parameter Length
04h
4-byte Counter
40-43
Even Tracks (reverse) Read Retries
N,N,N,N
Counter Value
44,45
Parameter Code
8023h
Odd Tracks Read Retries Code
46
Parameter Bits
40h
Device Controlled Counter
47
Parameter Length
04h
4-byte Counter
48-51
Odd Tracks (Forward) Read Retries
N,N,N,N
Counter Value
Page 45
Chapter 5
ATAPI Interface
Tape Capacity Page Code
The following table presents the Tape Capacity Page layout.
Byte
Description
Value
Meaning
0
Page Code
31h
Tape Capacity Page
1
Reserved
00h
-
2,3
Page Length
00,20h
32 Bytes Following
4,5
Parameter Code
0001h
Remaining Capacity, Part 0 Code
6
Parameter Bits
40h
Device Controlled Counter
7
Parameter Length
04h
4-byte Counter
8-11
Remaining Capacity, Partition 0 Value
N,N,N,N
12-15
Parameter: Code, Bits, Length
0002h,
Remaining Capacity, Part 1 Code
40h,04h
16-19
Remaining Capacity, Partition 1 Value
N,N,N,N
20-23
Parameter: Code, Bits, Length
0003h,
Maximum Capacity, Part 0 Code
40h,04h
24-27
Maximum Capacity, Partition 0 Value
N,N,N,N
28-31
Parameter: Code, Bits, Length
0004h,
Maximum Capacity, Part 1 Code
40h,04h
32-35
Maximum Capacity, Partition 1 Value
N,N,N,N
The Remaining Capacity for non-current partitions shall be the same as the
Maximum Capacity for that partition. Capacities are multiplied by 1024 to determine
the number of bytes. These values are conservative estimates.
The Parameter bit, TSD (not shown), is zero implying that the drive can save
parameters across resets, etc. Parameters are not saved but are re-computed
correctly from any logical position, regardless of the previous states of the tape
drive.
Page 46
STT8000A Product Manual
ATAPI Interface
Chapter 5
Mode Select command
Bit
7
6
5
4
3
2
1
0
Byte
0
Operation code (15h)
1
Reserved
2
3
1 (PF)
Reserved
Reserved
(MSB)
Parameter List Length
4
(LSB)
5
Reserved
The Mode Select command provides a means to change device parameters. The
PF (Page Format) bit is 1, since the Mode Pages are in SCSI-2 format. The only
changeable parameters are Speed Selection (in the Mode Parameter Header), and
certain fields in Mode Page 2Bh (MFM mode). The Parameter List Length field
specifies the length in bytes of the Mode Select parameter list that are transferred to
the device as data. A Parameter List Length of zero indicates that no data is
transferred.
Mode Sense should be issued prior to Mode Select to determine the supported
pages, page lengths, and other parameters.
The device terminates the Mode Select command with a Check Condition status,
sets the Sense Key to Illegal Request, and sets the Additional Sense Code to
Invalid Field in Parameter List for the following conditions:
•
If an attempt is made to change an unchangeable value in the Mode Select
header, block descriptor, or any page.
•
If an attempt is made to send a page with a length not equal to the parameter
length reported for that page by the Mode Sense command.
•
If an attempt is made to send a value for a parameter that is outside the range
supported by the device.
STT8000A Product Manual
Page 47
Chapter 5
ATAPI Interface
Mode Sense command
Bit
7
6
5
4
3
2
1
0
Byte
0
Operation code (1Ah)
1
Reserved
2
3
DBD
00(PC)
(MSB)
Reserved
Page Code
Allocation Length
4
(LSB)
5
Reserved
The PC (Page Control) field is 00, since only current values are reported. If DBD
(Disable Block Descriptor) is set (1), then the Mode Block Descriptor is not included
in the data returned to the host. The Allocation Length field specifies the number of
data bytes to transfer
The following pages are supported for Mode Select and Mode Sense commands.
Page 48
Page Code
Description
11h
Medium Partition Page
2Ah
Capabilities and Mechanical Status Page
2Bh
Tape Parameters Page (MFM mode)
3Fh
Return All Pages
STT8000A Product Manual
ATAPI Interface
Chapter 5
Mode Parameter Header
The following table describes the Mode Parameter header.
Byte
Description
Value
Meaning
0
Mode Data Length
NN
Select: Reserved
Sense: Length of Available Following Data
1
Medium Type
NN
Tape type
2
Device Specific Parameters
WP,001,Speed
Bit 7 = Write Protect, Bits 6-4 = 001, Bits 30 = Speed Selection
3
Block Descriptor Length
00/08h
If 8, Block Descriptor follows
The only supported Buffered Mode (bits 6-4 of byte 2) is 001, indicating that write
operations are buffered. Only the Speed Selection field can be changed.
The following table defines the tape speeds supported with QIC-3095 tapes.
Speed
Tape Speed
Transfer Rate
0000b
Automatic
Automatic
0001b
46 ips
489 Kbytes/sec
0010b
69 ips
733 Kbytes/sec
0011b
92 ips
1,000 Kbytes/sec
Mode Block Descriptor
The Block Descriptor is returned to the MODE SENSE command unless the DBD bit
in the command packet is set to one. If the Block Descriptor is not sent, the Block
Descriptor Length field (in the Mode Parameter Header) is 0.
Byte
Description
Value
Meaning
4
Density Code
NN
Current Density
5-7
Number of Blocks
000000h
Zero
8
Reserved
00h
—
9-11
Block Length
000200h
Always 512 byte blocks
The Number of Blocks is 0, indicating that all blocks in the media match this
descriptor, (the blocks are fixed 512 byte blocks).
None of the Block Descriptor parameters may be changed (Block Length is fixed).
STT8000A Product Manual
Page 49
Chapter 5
ATAPI Interface
Mode Medium Partition Page
The following table describes the Mode Medium Partition Page layout.
Byte
Description
Value
Meaning
0
Page Code
11h
Medium Partition Page
1
Page Length
06h
6 Bytes of Information
2,3
Maximum Additional Partitions,
00h,00h
Not Supported
Additional Partitions Defined
4
FDP (bit 7), reserved
80h
Fixed Data Partitions
5
Medium Format Recognition
03h
Format and Partition Recognition
6,7
Reserved
00h,00h
—
None of the Medium Partition Page (11h) parameters can be changed.
Mode Capabilities and Mechanical Status Page
The following table describes the Mode Capabilities and Mechanical Status Pages
.Byte
Description
Value
Meaning
0
Page Code
2Ah
Capabilities and Mechanical Status Page
1
Page Length
12h
18 Bytes of Information
2,3
Reserved
00h,00h
—
4
SPREV (bit 5), RO (bit 0)
20h
Space Reverse supported, bit 0 = Write
Protect status
5
QFA (bit 5)
20h
QFA supported
6
ECC (bit 6)
40h
ECC supported
7
BLK1024 (bit 1), BLK512 (bit 0)
03h
512 byte blocks (1024 if floppy tape)
8,9
Maximum Speed Supported
(Kbytes per second)
600.
1,000 Kbytes/sec Maximum
10,11
Maximum Stored Defect List
Entries
0000h
—
12,13
Continuous Transfer Limit (blocks)
0034h
52 blocks per Read/Write command
14,15
Current Speed Selected (Kbytes
per second)
NNNN
Current transfer rate
16,17
Buffer Size (in 512 bytes)
02D8h
14 frames of 52 blocks = 728
18-19
Reserved
00h
—
None of the Mode Capabilities and Mechanical Status Page (2Ah) parameters can
be changed.
Page 50
STT8000A Product Manual
ATAPI Interface
Chapter 5
Mode Tape Parameters Page
Byte
Description
Value
Meaning
0
Page Code
2Bh
Tape Parameters Page
1
Page Length
0Eh
14 Bytes of Information
2
Density in Kilo bits per inch
NN
Density can imply tape format
3
Reserved
00h
—
4
Reserved (Format Fill Byte)
00h
Not used, MFM mode is read only
5
BSEG
20h
Number of Blocks per Segment (32)
6,7
SEGTRK
NNNN
Number of Segments per Track
8,9
TRKS
NN
Number of Tracks (per Tape)
10
MAXSECT
80h
Max MFM Sector Value (128)
11
MAXCYL
NN
Max MFM Cylinder Value
12
MAXHD
NN
Max MFM Head Value
13,14
Reserved
0000h
—
15
WDAM,RM,FW (bits 7-5)
00h
Not Used, MFM mode is read only
This page is used for MFM (Modified Frequency Modulation), or floppy interface
tape formats, such as 2080, 2120, TR1, TR2, TR3, etc. The STT8000A supports the
reading of MFM tapes, but does not support write or format operations on MFM
tapes.
The following fields are changeable: SEGTRK, TRKS, MAXCYL, and MAXHD.
STT8000A Product Manual
Page 51
Chapter 5
ATAPI Interface
Read command
Bit
7
6
5
4
3
2
1
0
Byte
0
Operation code (08h)
1
2
3
Reserved
(MSB)
Transfer Length
4
5
1 (Fixed)
(LSB)
Reserved
The Transfer Length specifies the number of fixed 512 byte blocks to be transferred.
A transfer length of 0 indicates that no data is to be transferred but will initiate a
read-ahead.
The DSC bit is reset (0) after this command is accepted and is set (1) when at least
52 blocks in the buffer are available for the next READ command. Issuing a READ
command when the DSC bit is reset (0) will keep the ATA bus busy (BSY = 1) while
the drive is reading the required data into the buffer. This delay could be more than
a minute if exhaustive retries are required to read the data.
Page 52
STT8000A Product Manual
ATAPI Interface
Chapter 5
Read Position command
Bit
7
6
5
4
3
2
1
0
Byte
0
Operation code (34h)
1
Reserved
2
Reserved
3
Reserved
4
Reserved
5
Reserved
6
Reserved
7
Reserved
8
Reserved
9
Reserved
The following table describes the Read Position layout.
Byte
Description
Value
Meaning
0
BOP, EOP, BPU
nn
80h = Beginning of Partition
40h = End of Partition
04h = Block Position Unknown
1
Partition Number
00/01h
Current Partition (bit 0)
2,3
Reserved
00h
-
4-8
First Block Location
NNNNNNNN
Logical Number of next block to transfer
between host and buffer
NNNNNNNN*
Not Supported
(Host Block Location)
8-11
Last Block Location
(Medium Block
Location)
STT8000A Product Manual
12
Reserved
00h
—
13-15
Blocks in Buffer
000000*
Not Supported
16-19
Bytes in Buffer
00000000*
Not Supported
Page 53
Chapter 5
ATAPI Interface
*These fields might appear to report the number of bytes/blocks in the buffer.
However, this information is not guaranteed to be accurate. You should not rely on
this information.
The only position that is guaranteed is the host logical block position. The First and
Last Block Locations both return the same host location, and Blocks and Bytes in
Buffer are reported as 0.
Because Read Position is DSC restrictive on all ATAPI tape drives, it can be used to
“wait” for any previous command to complete. This can be useful for applications
with ATAPI only access to determine the actual completion of a command. Note,
this will keep the ATA bus busy during the “wait”. DSC polling (to wait for DSC set)
is preferred when possible.
Page 54
STT8000A Product Manual
ATAPI Interface
Chapter 5
Request Sense command
Bit
7
6
5
4
3
2
1
0
Byte
0
Operation code (03h)
1
Reserved
2
Reserved
3
Reserved
4
Allocation Length
5
Reserved
An Allocation Length value of 20 will return all Request Sense data.
The Request Sense command is always accepted, regardless of the state of the
DSC bit, but the status is valid only when DSC or CHK (error) is set (1). If DSC and
CHK are both reset (0), a non-error “null” status is returned. Normally, if CHK is set,
DSC is set. The only time CHK is set and DSC is reset, is during writes at logical
end of media; DSC remains a buffer indicator, and CHK is set to indicate EOM,
which is a warning, not an error.
If a command completes with a check (error) condition, the next command issued, if
not Request Sense or Inquiry, will be aborted, and a deferred error will be reported.
If the command is Request Sense, a non-deferred error is reported. The Inquiry
command does not affect status reporting.
STT8000A Product Manual
Page 55
Chapter 5
ATAPI Interface
The following table describes the REQUEST SENSE layout.
Byte
Description
Value
Meaning
0
Valid, Error Code
70h,71h
80h = Information Field Valid
+ 70h = Current Errors
or 71h = Deferred Errors
1
Reserved (Segment Number)
00
—
2
Filemark, EOM, ILI, Sense Key
NN
80h = Filemark
+ 40h = EOM
+ 20h = ILI
+ Sense Key
3-6
Information
NNNNNNNN
Transfer Residue or
Unwritten Blocks + Filemarks
Page 56
7
Additional Sense Length
0Ah
10 bytes following
8-11
Command Specific Information
00h
Not Supported
12
Additional Sense Code (ASC)
NN
13
Additional Sense Code
Qualifier (ASCQ)
NN
14
Field Replaceable Unit Code
00h
Not Supported
15
SKSV + Sense Key Specific
00h
Not Supported
16,17
Sense Key Specific
0000h
Not Supported
18,19
Pad
0000h
Pad to 4-byte boundary
STT8000A Product Manual
ATAPI Interface
Chapter 5
Rewind command
Bit
7
6
5
4
3
2
1
0
Byte
0
Operation code (01h)
1
Reserved
2
Reserved
3
Reserved
4
Reserved
5
Reserved
The Rewind command first ensures that all buffered write data has been transferred
to the medium, then causes the device to position to BOP of the current partition.
The DSC bit is reset (0) after this command is accepted and is set (1) when the
drive is ready to write at BOP0 (or encountered a hardware error). REQUEST
SENSE can then be used to verify successful command completion.
STT8000A Product Manual
Page 57
Chapter 5
ATAPI Interface
Space command
Bit
7
6
5
4
3
2
1
0
Byte
0
Operation code (11h)
1
2
3
Reserved
Space Code
(MSB)
Count
4
5
(LSB)
Reserved
The only Space codes that are supported are 001b (Filemarks) and 011b (End of
Data on Current Partition). For Space Filemarks, negative count (2s compliment)
indicates Space Filemarks Reverse.
The DSC bit is reset (0) after this command is accepted and is set (1) when the
command is completed and the drive is ready. REQUEST SENSE can then be used
to verify successful command completion.
Page 58
STT8000A Product Manual
ATAPI Interface
Chapter 5
Test Unit Ready command
Bit
7
6
5
4
3
2
1
0
Byte
0
Operation code (00h)
1
Reserved
2
Reserved
3
Reserved
4
Reserved
5
Reserved
This command can be used to determine the readiness of the device to accept a
media access command. It’s purpose is to indicate the cartridge state: no cartridge
(or drive fault), cartridge becoming ready, or cartridge/drive ready.
If the drive is busy with a previous command (DSC reset), the drive will wait for the
previous operation to complete before releasing the ATA bus. On some other ATAPI
tape drives, Test Unit Ready does not wait for DSC set before completing, and if an
application needs to “wait” for an command done via the ATAPI interface, Read
Position should be used instead.
STT8000A Product Manual
Page 59
Chapter 5
ATAPI Interface
Write command
Bit
7
6
5
4
3
2
1
0
Byte
0
Operation code (0Ah)
1
Reserved
1
2
3
Reserved
(MSB)
Transfer Length
4
5
1 (Fixed)
(LSB)
Reserved
The Transfer Length specifies the number of fixed 512 byte blocks to be transferred.
A transfer length of 0 indicates that no data is to be transferred but is used on some
drives to put DSC into write buffer mode.
The DSC bit is reset (0) after this command is accepted and all data has been
transferred. This bit is set (1) when there are at least 52 empty blocks in the buffer
available for the next WRITE command. Issuing a WRITE command when the DSC
bit is reset (0) will keep the ATA bus busy (BSY=1) until buffer
Page 60
STT8000A Product Manual
ATAPI Interface
Chapter 5
Write Filemark command
Bit
7
6
5
4
3
2
1
0
Byte
0
Operation code (10h)
1
Reserved
2
Reserved
3
Reserved
4
Reserved
5
Count
Reserved
After receiving this command, the device sets DSC (0) and returns completion
status. Any data remaining in the buffer is then written to tape (flush/ synchronize),
and if the count is 1, a Filemark is written. In any case, an EOD is then written.
The Immed bit in the command packet is ignored, and the DSC bit is reset (0) after
this command is accepted. The DSC bit is set (1) after the EOD has been
successfully written. REQUEST SENSE can then be used to verify successful
command completion.
STT8000A Product Manual
Page 61
Chapter 5
ATAPI Interface
Write Buffer (download microcode) command
Bit
7
6
5
4
3
2
1
0
Byte
0
Operation code (3Bh)
1
Reserved
101 (Mode)
2
Reserved
3
Reserved
4
Reserved
5
Reserved
6
7
(MSB)
Transfer Length
8
9
(LSB)
Reserved
The Write Buffer command is intended only to provide a method for downloading
new drive microcode (firmware) into Flash EPROM, so the only valid MODE is 101
(download microcode and save). The drive must be Not Ready (unloaded) for this
command to be accepted, and the transfer length is set to the download file size,
which is currently 0x026800. All data is transferred in one command.
Page 62
STT8000A Product Manual
Tape format
Chapter 6
6
Tape format
Introduction
The STT8000 ATAPI minicartridge drive conforms to the QIC-3095-MC recording
format standard. This format is for streaming magnetic tape in a minicartridge that is
to be used for information interchange among information processing systems,
communication systems, and associated equipment.
This chapter provides an overview of the tape format used by the STT8000 ATAPI
minicartridge drive.
Tape partitioning
The drive uses factory pre-written Travan TR-4 media. The tape is always divided
into two partitions:
•
Partition 1 is the directory partition and is recorded on the Directory track only.
•
Partition 0 contains the data (tracks 1 through 71) and is recorded on all tracks
except the Directory track.
Recording data at 67,733 bits per inch (BPI), the drive can store 4.0 GB on the data
partition of one 900-foot long, 0.315-inch (8.0 mm) wide Travan TR-4 tape. Using
software data compression, these capabilities are typically doubled.
The recording format and partitioning support Quick File Access (QFA).
Track positions
The centermost track is called the Directory Track and has larger guard bands on
both sides of it to allow it to be written without interfering with its adjacent tracks.
Track zero is the track immediately below the Directory Track. The even numbered
tracks are positioned sequentially below track 0. Thus, track 2 is below track 0, and
track 4 is below track 2, and so on down to track 70, which is the closest to the
reference edge of the tape. (The reference edge is the edge of the tape that is
nearest to the baseplate of the cartridge.)
Track 1 is the track immediately below the Directory Track. The odd numbered
tracks are positioned sequentially up from track 1. Thus, track 3 is above track 1,
and track 5 is above track 3, and so up to track 71, which is the closest to the upper
edge of the tape.
STT8000A Product Manual
Page 63
Chapter 6
Tape format
Track numbering
All even numbered tracks, and the Directory Track, are recorded in the forward
direction (the direction from the BOT marker to the EOT marker). All odd numbered
tracks are recorded in the reverse direction (the direction from the EOT marker to
the BOT marker). All even numbered tracks are located below the Directory Track;
all odd numbered tracks are above it.
Track format
Tracks are recorded sequentially beginning with track 0, then track 1, and so on.
Before recording, data are grouped into blocks, and blocks are grouped into frames
with 64 blocks per frame.
Two numbering methods are used for blocks: physical numbering and logical
numbering. Both numbers start from 0 at the beginning of each partition.
Physical numbering is related directly to the recorded block on the tape. Each
new block is given a unique physical number, regardless of its contents.
Logical numbering does not relate to the blocks physically recorded on the tape;
rather, this type of numbering is the block numbering system used by the host
computer. Often the host system operates with logical blocks that are a
different size from the 512-byte blocks that are physically recorded on the tape.
The host blocks can be larger or smaller than 512-bytes and can also be fixed
or variable. Fixed host blocks contain the same number of data bytes in each
block. Variable host blocks may contain a different number of data bytes in
each block.
The format provides both a physical block number for each block recorded on the
tape and a logical block number that can span more than one physical block. These
two numbers are recorded in the control field of every block.
Frames
Every track on the tape is recorded in blocks that contain 512 data bytes. The data
bytes are 8-bit bytes, which are numbered b0 to b7 with b7 being the most
significant bit.
A frame is made up of 64 blocks—52 data blocks plus 12 error-correction code
(ECC) blocks. Figure 6-1 illustrates the general track layout of sequentially recorded
frames.
Page 64
STT8000A Product Manual
Tape format
Chapter 6
Figure 6-1
General track layout
Frame N
Frame N+1
Frame N+2
Frame N+3
Frame N+4
Frames are numbered indirectly using the 26 most significant bits of the Physical
Block Address. Frame operation is controlled by the drive and generally invisible to
the host. Frames are used primarily as a means to control the error correction
operations.
Frames can be overwritten with new data frames or an end-of-data (EOD) frame.
Append operations can only begin at EOD.
An underrun is not allowed in the middle of a frame, regardless of the frame type.
Filler blocks can be used to complete a frame as long as they are not used interior
to a logical block.
A frame that cannot be completed on one track is rewritten in its entirety at the
beginning of the following track. Frames are not split around corner turns.
The general frame layout—52 data blocks and 12 ECC blocks—is illustrated in
Figure 6-2.
Figure 6-2
General frame layout
Data
Block
0
Data
Block
1
Data
Block
2
...
Data
Block
51
ECC
Block
0
ECC
Block
1
...
ECC
Block
11
The four types of frames are as follows:
•
Data frames contain data and information blocks in addition to ECC blocks.
•
The Media Header frame contains only Media Header blocks and ECC blocks.
This frame is recorded as the first frame on the Directory Track.
•
Track ID frames are recorded as part of the pre-formatting process of the
cartridge. These frames are easily distinguished from other frame types
because they reside entirely outside of the data region of the tape.
•
An EOD frame is an absolute indicator of the end of the recorded data. It is
recorded after the last frame containing host data upon terminating a Write
process.
STT8000A Product Manual
Page 65
Chapter 6
Tape format
Blocks
Information in the Block Control byte determines the type of block being recorded
except for ECC blocks which are recognized by their block numbers. Also,
information about the number of user data bytes available in each data block is
recorded in the Block Control byte of the block.
The Data Field of the blocks always contain 512 bytes. However, the number of
valid data bytes in the block may be less than 512.
The seven different types of blocks are as follows:
•
Data blocks contain user data. A full Data block contains 512 bytes; however,
data block can contain from 1 through 511 valid data bytes depending on the
selected logical block size of the host.
•
Media Header blocks contain specific host., drive, and vendor information as
well as the Volume Directory. The first frame on the Directory Track is teh Media
Header Frame. This frame contains 52 Media Header blocks (plus the normal
12 ECC blocks).
•
Information blocks—Filemark blocks, Setmark blocks, and Cancelmark
blocks—contain specific types of information. Filemark blocks are physical
blocks written to tape in response to a host WRITE FILEMARKS command.
Setmark blocks are physical blocks written to tape in response to a host WRITE
SETMARKS command. Cancelmark blocks are physical blocks written to tape
under firmware control.
•
Filler blocks contain no valid information in the data area. These blocks are
used to fill incomplete frames.
•
EOD blocks are absolute indicators of the end of recorded data.
•
ECC blocks contain error correction parity bytes that are used to ensure data
integrity during read operations.
•
Track ID blocks are recorded as part of the pre-formatting process of the
cartridge.
Tape reference servo pattern
To increase track density, a track servo reference pattern is prerecorded on the tape
at the factory. The pattern is recorded referenced to servo patterns in the region
between the beginning-of-tape (BOT) hole and the load point market (LP) hole. The
same pattern is recorded between the end-of-tape (EOT) hole and the early warning
(EW) hole. The servo pattern is written across the entire width of the tape.
Page 66
STT8000A Product Manual
Tape format
Chapter 6
Write equalization
The drive uses the technique of write equalization. RLL encoding has a 4:1 ratio in
the minimum and maximum spacing between flux transitions. Write equalization
inserts short pulses in the write current to break up the long spacing intervals. These
pulses are too short to be detected in the read process but result in significant
improvement in read-back resolution.
On 900 Oersted media, write equalization provides the benefit of compatibility with
Magneto-Resistive (MR) heads. MR heads are prone to saturation by low frequency
flux with high energy content. Equalization redistributes this energy to higher
frequencies and eliminates the problem.
Randomization
To reduce problems resulting from long strings of repetitive data with a bad peak
shift or amplitude characteristics, a data randomizer algorithm is used on all bytes in
the data and control area of each block. This randomizing takes place prior to the
encoding of the data.
STT8000A Product Manual
Page 67
Chapter 6
Tape format
Notes
Page 68
STT8000A Product Manual
Theory of operations
Chapter 7
7
Theory of operations
Overview
The STT8000 ATAPI minicartridge drive is based on proven Seagate designs,
Seagate firmware, and the latest technology. This drive uses second generation,
custom LSIs for efficient circuit layout and increased reliability with low power
consumption. The drive also uses flash EEPROM devices for easy firmware
upgrades.
This chapter describes the drive in more detail and explains implementation specific
information.
Block diagram
The electronics of the STT8000 ATAPI minicartridge drive are laid out on one main printed
circuit board (PCB). Figure 7-1 shows a simplified block diagram of the drive components.
Figure 7-1
Simplified block diagram of drive components
256KB
EEPROM
5 Volt
V20 uP
10.0 MHz
40MHz
Crystal
RAWHIDE (DelMar + IDE)
IDE
Interface
Digital ASIC
Buffer Mgr.
ECC
RWW
Read/Write
PHILIPS
Head
STTI or
Read/Rite
No RWW
Stepper
Motor
Motor Control
Nat. Semi.
NDM 3000
Capstan
Motor
IDE ONLY
512KB
DRAM
Shading denotes
differences from
TR-4 (Bali2)
STT8000A Product Manual
Sensors
Cartridge Present
Write Protect
Tape Hole
Top Stop
Page 69
Chapter 7
Theory of operations
The following table shows clock frequencies used by the STT8000 drive
VCO Frequencies—All Derived from System Clock (42 MHz Crystal Oscillator)
Fundamental
Frequency
28 MHz
28 MHz
28 MHz
24.89 MHz
Channel
Frequency
9.33 MHz
7.00 MHz
4.667 MHz
3.11 MHz
Mechanics
The mechanical package for the STT8000 ATAPI minicartridge drive was designed
to provide all the advantages of easy cartridge loading and unloading while
maintaining the positioning accuracy necessary for high-density data recording. The
orientation of the cartridge is the same as the majority of QIC minicartridge drives in
the field.
Cartridge load mechanism
The cartridge is inserted in the drive by sliding it through the aperture in the bezel
and into a tray mechanism. When fully inserted the back portion of the cartridge
protrudes about 3/4-inch from the aperture. A switch is actuated at this point that
causes a microprocessor to complete the loading operation.
When the tape is in motion, the amber LED on the front panel flashes. The LED is
not lit when the tape is positioned at BOT.
Capstan drive motor assembly
In the STT8000 ATAPI minicartridge drive, the cartridge is driven by the
capstan/belt motor assembly, which is on a linear slide. The cartridge is loaded
against the cartridge drive roller which exerts a net radial dynamic force of 18 to 26
ounces. The motor is a brushless DC drive motor with integral capstan which is
designed to provide maximum reliability.
The motor operates from the 12V nominal supply and moves the tape at speeds
from 35 to 100 inches per second (IPS).
Chassis
The drive mechanism is mounted in a molded frame that provides the mounting
holes for the industry standard 3.5-inch by one inch form factor. A 5.25-inch
mounting kit is an available option. The bezel is a simple snap-on design that is
available in several standard and custom colors. The round, front-panel LED is
amber and indicates tape activity.
Page 70
STT8000A Product Manual
Theory of operations
Chapter 7
Control circuits
The control logic module shown in Figure 7-1 includes a buffer manager to handle
data movement between the controller, the buffer, and the tape formatter. This
module also includes logic to perform ECC and CRC generation and testing,
WRITE/READ data formatting, head stepper control, and drive motor control.
The microprocessor directs all functions performed by the control logic. The
instructions are read from a flash EEPROM, which can be updated with new
firmware through a specially written tape cartridge.
The 512-KB DRAM data buffer allows the drive to maintain streaming when the host
cannot provide data continuously at the tape streaming rate.
The write driver receives data from the write formatter and generates write current,
causing data to be written on tape by the tape head.
The read channel amplifies and conditions the signal from the tape head and passes
it back to the read formatter.
The head stepper and drive motor both receive current from the control logic to
control the stepping of the head from track to track and to move the tape forward
and back across the tape head.
Head design
The recording/playback head is a state-of-the art, thin-film design—a thin-film
inductive write head paired with an advanced magneto-resistive read head. This
head design provides the drive with exceptional performance and reliability. The
material composition of the head also results in exceptional wear characteristics,
resulting in stable performance throughout the life of the drive.
Flash EEPROM
Because the drive uses flash EEPROM (electronically erasable, programmable
read-only memory), the drive firmware can be easily upgraded when new revisions
of the firmware are released. The circuitry includes 128 KB of flash EEPROM.
You can load new firmware by using a specially encoded firmware upgrade
cartridge.
Refer to chapter 4 for information about loading new firmware using a Seagate
firmware upgrade cartridge.
Sensors and switches
A number of mechanical and optical sensors and switches are integrated in the drive
design. The Cartridge In switch detects when a cartridge is fully loaded and
positioned against the A-plane datum of the cartridge. The Unsafe switch senses
STT8000A Product Manual
Page 71
Chapter 7
Theory of operations
the position of the SAFE indicator on the cartridge and disables writing of writeprotected (SAFE) cartridges.
The Head-Position Sensor is an electro-optical assembly (LED and photo-transistor)
to determine the approximate head position.
The drive has an electro-optical sensor assembly comprised of a solid-state light
source (LED) and a photo-sensor (photo-transistor) that sense the beginning-of-tape
(BOT), end-of-tape (EOT), load point, and early warning holes of the cartridge.
Media—Travan minicartridges
The drive is designed to use Travan TR-4 cartridges, QIC-3080 quarter-inch
minicartridges, and QIC-3080 QIC-Wide minicartridges. These small (approximately
2 inches x 3 inches x 0.4 inch) cartridges house 900 Oersted Gamma Ferric Oxide
magnetic tape . Figure 7-2 shows a Travan minicartridge.
Figure 7-2
Travan minicartridge
The cartridge also provides for write protection so that existing data on the cartridge
is not overwritten. A write-protected cartridge allows the existing data to be read but
does not allow new data to be written to the tape. The position of the sliding writeprotect tab on the cartridge determines whether or not data can be written to the
tape. See chapter 4 for illustrations of the write-protect position.
Page 72
STT8000A Product Manual
Glossary
Appendix A
Glossary
A
ATA Packet Interface—The interface providing for communications between the host computer and the
drive (standard QIC-157).
Azimuth—The angular deviation, in minutes of arc, of the mean flux transition line from the line normal to
the tape reference edge.
Backup—Copy of a file or collection of files on fixed disk, diskette, or tape. Ensures against data loss.
Beginning of Media (BOM)—Equal to the physical beginning of the tape.
Beginning of Tape (BOT)—Equal to the logical beginning of the tape.
Bezel—Front panel of a drive.
Bit—A single digit in the binary numbering system.
Bit Error Rate—The number of errors divided by the total number of bits written or read.
Block—A group of 512 consecutive data bytes plus additional control bytes recorded as a unit.
BOP—Beginning of Partition. The position at the beginning of the permissible recording region of a partition.
BOT marker—The beginning of tape (BOT) marker is a set of two holes punched side by side in the tape.
Byte—A group of 8 binary bits operated on as a unit.
Cancelmark—A "negative" Filemark or Setmark. When a Cancelmark follows as the first block in the next
frame after a Filemark or Setmark, the drive when reading the tape will logically ignore the Cancelmark and
the Filemark or Setmark it cancels.
Cartridge—An enclosure containing magnetic tape wound on two coplanar hubs.
Control field—A group of 8 bytes recorded before the data area in each block, containing information about
clock address, track address, and block type.
Cyclic Redundancy Check (CRC)—A group of 2 bytes recorded at the end of each block of data for the
purpose of error detection.
Data block—A block containing user valid data in its data field
Data Compression—The process of removing redundant data from a data stream before recording the data
to tape. Compressed data requires less storage space than uncompressed data.
Data Density—The number of single-byte characters stored per unit length of track. Usually expressed as
bits-per-inch (bpi).
Decompression—The process of restoring compressed data to its original state.
STT8000A Product Manual
Page 73
Appendix A
Glossary
Dew—Collection of moisture in a tape drive.
Directory track—The track at the centerline of the tape, identified as track 254 by its Track ID frame.
Disc Drive—A peripheral storage device that rotates the disk, writes data onto it, and reads data from it as
instructed by a program.
ECC—(Error Correction Code) Special drive generated information that can be used to correct bad blocks.
ECC block—A block containing drive-generated ECC data in its data field and part of control field.
Encoding—A method whereby a group of data bits is translated into a group of recording bits.
End-of-Data (EOD)—Indicates the point where the host stopped writing data to the tape.
End-of-Media (EOM)—Equal to the physical end of tape.
End-of-Partition (EOP)—The position at the end of the permissible recording area of a partition.
End of Tape (EOT)—Equal to the logical end of the tape.
Error Correction Codes (ECC)- Information written on tape during the recording operation that can later be
used to reconstruct errors during the data reading operation.
Early Warning (EW)—The early warning marker is a single hole punched in the tape to indicate the
approaching end of the usable recording area in the forward direction.
File—A logical unit of information.
Filler block—A block containing no valid information in its data field.
Fixed Disk—A non-removable hard disk. All data must be transferred to and from the disk via the computer.
Frame—A group of 128 blocks forming a complete logical group.
Full-high (or full-height)—Usually refers to a tape drive fitting in a vertical space of 3-1/2 inches.
Half-high (or half-height)—Refers to the size of tape drive occupying a vertical space of about 1-1/2
inches.
Head Clog—Particles from the tape or from outside the drive adhere to the head gap on a read or write
head and obstruct the reading or writing of data.
Interleaving—The process of shuffling the order of data blocks before writing them to tape so the
consecutive bytes are not recorded physically adjacent.
Magnetic Tape—A tape that accepts and retains magnetic signals intended for input, output, and storage of
data for information processing.
Media Header block—A unique block identifying the type of format being recorded.
Noise—A disturbance of the signal caused by the read channel, write channel, head/tape interaction, or
conducted or radiated sources.
Page 74
STT8000A Product Manual
Glossary
Appendix A
Randomizing—A re-coding of data symbols before they are written to tape in order to provide a consistently
uniform RF envelope level.
RLL (Run Length Limited)—A data encoding method where data bits are encoded so that certain
constraints are met with regard to the maximum and minimum distances between flux transitions.
Serpentine—A recording method in which tracks are laid down sequentially, and the tape is not rewound at
the end of a track. This recording method exploits the bi-directional capabilities of the cartridge.
Streaming—A method of recording on magnetic tape that maintains continuous tape motion without the
requirement to start and stop within an inter-block gap.
Tape Drive—A peripheral storage device that records data onto removable tape cartridges. Used to back up
a disk drive. (See also Disk Drive.)
Track—A longitudinal area on the tape along which magnetic signals can be serially recorded.
Track ID block—A block recorded in the Load Point and Early Warning regions to designate the track
number.
Uncorrected Bit Error Rate—The probability of a bit being in error, without using any error correction
techniques.
Underrun—A condition developed when the host transmits or receives data at a rate less than required by
the device for streaming operation.
STT8000A Product Manual
Page 75
Appendix A
Glossary
Notes
Page 76
STT8000A Product Manual
Acronyms and Measurements
Appendix B
Acronyms and measurements
B
Acronyms and abbreviations
STT8000A Product Manual
Acronym
Meaning
ANSI
American National Standards Institute
BIOS
Basic Input Output System
BOM
Beginning of Media
BOT
Beginning Of Tape
BPI
Bits Per Inch
CD
Compact Disc
CMOS
Complementary Metal-Oxide Semiconductor
CSA
Canadian Standard Association
DMA
Direct Memory Access
ECC
Error Correction Code
ECMA
European Computer Manufacturers Association
EEPROM
Electronically Erasable, Programmable Read-Only
Memory
EOD
End of Data
EOM
End of Media
EOT
End Of Tape
FCC
Federal Communications Commission
FTPI
Flux Transitions Per Inch
IEC
International Electrotechnical Commission
IPS
Inches Per Second
LED
Light Emitting Diode
Page 77
Appendix B
Page 78
Acronyms and Measurements
Acronym
Meaning
LSI
Large Scale Integration
MTBF
Mean Times Between Failures
MTTR
Mean Time To Repair
OEM
Original Equipment Manufacturer
PCB
Printed Circuit Board
QIC
Quarter Inch Cartridge Drive Standards, Incorporated
RAM
Random Access Memory
RLL
Run Length Limited
SCSI
Small Computer System Interface
UL
Underwriters' Laboratories, Inc.
VDC
Volts Direct Current
VDE
Verband Deutscher Electrotechniker
STT8000A Product Manual
Acronyms and Measurements
Appendix B
Units of measurement
Measure
Meaning
A
Amp
C
Celsius or Centigrade
cm
centimeter
dBa
decibels, A-weighted sound power reference one picowatt
F
Fahrenheit
ft
foot or feet
g
acceleration of a free-falling body; equal to 32.17 feet per second2
Gbyte
gigabyte
Hz
Hertz
in.
inch
k
kilo
Kbyte
kilobyte
kg
kilogram
KHz
kilohertz
lb(s)
pound(s)
m
meter
M
mega
Mbits
megabits
Mbyte
megabyte
MHz
megaHertz
min
minute
mm
millimeter
ms
millisecond
RPM
revolutions per minute
V
Volt
W
Watt
STT8000A Product Manual
Page 79
Appendix B
Page 80
Acronyms and Measurements
STT8000A Product Manual