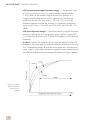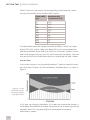
1
Cochlear™
Clinical Guidance Document
CLINICAL GUIDANCE | TABLE OF CONTENTS
SECTION 1 : PROGRAMMING PRINCIPLES
1.1 STREAMLINED PROGRAMMING METHODS 6
1.1.1
Behavioural Procedures
7
1.1.2 NRT/Objective Offset Method
8
1.1.3 NRT/Objective Preset Method
10
1.11 MICROPHONE SENSITIVITY AND VOLUME
SETTING
34
1.11.1 Microphone Sensitivity
34
1.11.2 Volume Setting
35
1.2 ADJUSTMENTS TO CHANNEL GAINS
1.12 NUCLEUS® SMARTSOUND™
1.12.1 ADRO®
1.12.2 Whisper™
1.12.3 Focus (using Beam)
1.12.4 Zoom
36
36
37
39
43
1.13 SMARTSOUND ENVIRONMENTS
46
12
1.3 BASIC SOUND PROCESSOR INFORMATION12
1.3.1 Input Processing/SmartSound™
Options
13
1.3.2 Supported Combinations of
Implant System Components
14
1.4 ELECTRICAL STIMULATION AND MAP
PARAMETERS
15
1.5 STIMULATION MODES
1.5.1 Monopolar (MP) Stimulation
1.5.2 Bipolar (BP) Stimulation
1.5.3 Variable and Pseudomonopolar
(PSMP) Stimulation
1.5.4 Common Ground (CG) Stimulation
17
17
18
1.6 TELEMETRY MEASUREMENTS
20
19
19
1.7 VOLTAGE COMPLIANCE
21
™
1.7.1 CI500 series, Freedom and N24 series
Cochlear Implant Systems
21
®
1.7.2 Nucleus 24 System
22
1.7.3 Nucleus 22 System
23
1.8 POWER OPTIMIZATION
23
1.9 SOUND CODING STRATEGIES
1.9.1 ACE™/ACE (RE)
1.9.2 SPEAK
1.9.3 CIS/CIS (RE)
27
28
29
31
1.10 FREQUENCY-TO-CHANNEL ALLOCATIONS 32
1.14 OBJECTIVE MEASUREMENTS
49
1.14.1 Electrically-evoked Auditory
Brainstem Response (EABR)
49
1.14.2 Cortical Evoked Potentials (CEP)
50
1.14.3 Electrical Stapedius Reflex Test (ESRT)50
1.15 GUIDANCE FOR FM FITTINGS
1.15.1 CP810 Sound Processors
1.15.2 Freedom Sound Processors
51
51
54
SECTION 2: PROGRAMMING RECOMMENDATIONS
FOR SPECIALTY DEVICES
2.1 SPECIALTY DEVICES
2.1.1 ABI
2.1.1.1 Setting Up the ABI Equipment
2.1.1.2 Programming the ABI
2.1.1.3 Managing Side Effects
2.1.1.4 Fine Tuning the ABI
2.1.1.5 Follow up Programming
2.1.1.6 Rehabilitation
2.1.1.7 ABI Worksheets
55
55
56
57
65
66
69
69
70
2.1.2 THE NUCLEUS® 24 DOUBLE ARRAY
2.1.2.1 Programming the Double Array
72
73
1
SECTION ONE | CLINICAL GUIDANCE
The primary aim of programming a sound processor is to customize the device so that the
cochlear implant provides comfortable and usable stimulation to a recipient. A clinician uses
the programming software to deliver electrical stimulation and measure patient-specific
psychophysical parameters.
This Cochlear™ Clinical Guidance Document provides information to assist in understanding
clinical programming practices. Salient parameters and specific technical information about
their clinical application are explained in the Section 1: Programming Principles. Detailed
information regarding programming recommendations for speciality devices can be found
in Section 2: Programming Recommendations. For additional information about how to
modify parameters in the clinical programming software, please refer to the eHelp section of
the Nucleus® Custom Sound™ clinical software as well as information in the Hearing Mentor tab
located within Custom Sound.
2
CLINICAL GUIDANCE | SECTION ONE
SECTION 1 : PROGRAMMING PRINCIPLES
Getting started
At the initial activation, the clinician uses Custom Sound™ to program the
sound processor so that the cochlear implant system delivers sound that is
audible and comfortable to the cochlear implant recipient. The streamlined
programming methods in Custom Sound help the clinician by simplifying the
programming procedure and reducing programming time. This section reviews
important basic programming definitions and describes the various streamlined
programming procedures.
Basic information about electrical stimulation and electrical
stimulation levels
• Electrode – a physical metal contact. The CI500 series, Freedom™, and
Nucleus® 24 series cochlear implant types have 22 intracochlear electrodes
along the array and 2 extracochlear electrodes (ECE). The Nucleus® 22
implants have 22 intra-cochlear electrodes and no extra cochlear electrodes.
• Channel – the combination of an active electrode and one or more
indifferent electrodes. For more information, see Stimulation Modes.
• Charge-balanced, biphasic current pulse – the electrical stimulus
delivered to the nerve, the negative and positive phases are equal so that
no net charge remains (see Figure 1). This form of stimulation is safe for
biological systems.
Figure 1: Current
amplitude and
pulse width
3
SECTION ONE | CLINICAL GUIDANCE
• Current Level (CL) – the amount of electrical current delivered to the
implant recipient expressed in clinical programming units from 1 – 255.
Current Levels represent the amplitude of the biphasic current pulse
in microamperes (µA) on a log scale similar to dB (5.7 CL = 1 dB). The
amplitude range of the cochlear implant stimulator is 10 µA - 1.75 mA (see
Figure 1 on page 3).
• Pulse Width (PW) – the amount of time the stimulator delivers current,
expressed in microseconds (µs) per phase of the biphasic current pulse (see
Figure 1 on page 3).
• Charge per phase of the biphasic current pulse – the product of
current pulse amplitude and width: the greater the charge, the louder
the sound. Increasing the current amplitude or widening the pulse width
results in more charge and a louder sound.
When setting T- and C- levels, the clinician uses a fixed pulse width and
increases the current amplitude using CLs from 1 – 255.
• T-level – Threshold Level – the lowest amount of stimulation in CL that
elicits a very soft, but consistent hearing sensation (the level at which a
recipient can just begin to hear sound).
T-level Assessment Procedures
Determine T-levels using an ascending approach because it gives a more
reliable measure of threshold. Starting at a low level (the software default is
80 CL, but you can decrease this if necessary), use your computer mouse to
increase CL by clicking on the up arrow next to the “set Ts” box in Custom
Sound. Alternatively, you can use the up arrow on your computer. By default,
the software increases the CL by 5 units; you may want a smaller step size
when you are near threshold. The software sends one stimulus at the specified
level, but you can increase the number of stimuli.
To confirm that recipients consistently hear at T-level, you may ask them to
count the number of sounds they hear. To do this, increase the number of
stimuli (by increasing the number next to the blue ball) and present the stimuli
at the specified CL by pressing the blue ball icon. The recipient should correctly
count the number of stimuli. This is called a “counted T-level”. Typically,
counted T-levels are slightly higher than standard T-levels because the sound
must be a little louder in order to count the stimuli reliably.
It is not necessary to measure the T-level on all active channels. As part of
Custom Sound, the streamlined programming method selects 5 channels
(including channels 1 and 22) spaced along the array for T-level measurement.
4
CLINICAL GUIDANCE | SECTION ONE
The remaining T-levels are automatically interpolated. If you wish to measure
other channels, simply double-click on the specific channel or click the “make
all channels measurable” button to access the entire array.
• C-level – Comfort Level – the maximum level of stimulation in CL that
does not produce uncomfortably loud sounds (the level that is as loud as a
recipient could listen to comfortably for long periods).
C-level Assessment Procedures
In Custom Sound, you can measure C-levels on all channels simultaneously
using speech (click the “go live” button and then use the increase and decrease
arrows in the “live Cs” section of the Streamlined Programming box) or
you can measure individual channels in psychophysics. Typically, live voice
assessment of C-levels provides a better indication of overall comfortable
loudness in the MAP because all the channels are being stimulated and any
loudness summation effects are taken into account. Alternatively, you can
measure individual channel C-levels by clicking on the “Set Ts and Cs” drop
down menu and choosing “C”. In this case, you measure C-levels using the
same psychophysical stimulus that you use for measuring T-levels. If you prefer
to measure C-levels in this way, it is not necessary to measure every active
channel. You may interpolate between measured C-levels.
• Electrical DR – electrical dynamic range – the difference between C- and
T-level on a given channel.
• Shift – a means of adjusting all T- and/or C-levels simultaneously by an
absolute amount (e.g. 5 CL) or a percentage of the dynamic range for
each channel.
• Sweep – a means of stimulating each active channel sequentially along
the electrode array. During a sweep, you may stimulate the channels at
T- level, C-level or within the DR. Choose from the options in the Sweep
drop-down menu. During the sweep, you can check for any channels
that are too loud or too soft at C-level or within the DR. You can also
observe the recipient for any non-auditory sensations, such as facial
nerve stimulation.
• Balance – a means of comparing loudness perception across the
stimulated channels. You can optimize sound processing for a recipient by
ensuring that sounds at C-level are equally loud across the array. An easy
way to do this is to sweep the active channels in small groups and ask the
person about the loudness of each channel. You can modify individual
C-levels to ensure equal loudness across the array. This activity is generally
only suitable for teenagers or adults.
5
SECTION ONE | CLINICAL GUIDANCE
1.1 STREAMLINED PROGRAMMING METHODS
Custom Sound includes three streamlined programming methods that
make programming simpler for the recipient and reduce programming
time without compromising outcomes (preliminary data collected at the
Cooperative Research Centre for Cochlear Implant and Hearing Aid Innovation
in Melbourne1 and in the US Streamlined Programming Study). Cochlear
recommends using one of these methods at the initial activation for recipients
who are using implant types that allow monopolar stimulation (i.e. have
extracochlear electrodes). After the recipient has some listening experience,
you can easily refine and modify MAPs based on the individual’s feedback. The
streamlined programming methods use behavioural responses (behavioural
method) or objective measures, (objective offset method or objective preset
method). The behavioural method is appropriate for adults and older children
who can easily make reliable behavioural responses to sound. The objective
methods may be more appropriate for young children and other individuals
who have difficulty responding reliably to sound.
During the initial activation, it is recommended that you select ACE™ /ACE
(RE) as the default sound processing strategy when recipients have at least
12 or more active channels available. Two independent studies by Skinner et
al2, 3 found that approximately two-thirds of adult recipients preferred and
performed better with ACE. Another 25% preferred SPEAK and only about 8%
preferred CIS. Plant et al3 recommend when recipients have less than 12 active
channels, to start with CIS since there may not be a sufficient number of active
channels available for good spectral processing.
Streamlined programming is not recommended for use with Nucleus 22
implant types or when using other implant types with a bipolar mode
of stimulation. This is because interpolation cannot be used with bipolar
stimulation modes, due to possible differences in stimulation requirements
along the array.
References
1. Plant, K., Whitford, L., Psarros, C. Strategy Comparison for Nucleus 24 recipients with
a limited number of available electrodes. (2000). Cochlear White Paper, N94317F
Iss1,Oct 2000.
2. Skinner, M.W., Arndt, P.L., Staller, S.J. Nucleus 24 advanced encoder conversion study:
Performance versus preference. (2002) Ear and Hearing 23 (suppl.), 2S-17S.
3. Skinner, M.S., Holden, L.K., Whitford, L.A., Plant, K.L., Psarros, C., Holden, T.A. Speech
recognition with the Nucleus 24 SPEAK, ACE, and CIS speech coding strategies in newly
implanted adults. (2002). Ear and Hearing 23, (3), 207-223.
6
CLINICAL GUIDANCE | SECTION ONE
1.1.1 Behavioural Procedures
1. Measure impedances by performing an implant test.
2. In the Open or Create MAP screen, create a new MAP by selecting the
required MAP parameters from the available drop-down menus and
clicking Create. Alternatively, you can select and open an existing MAP
that you can modify.
The default streamlined programming method is the behavioural one and
by default, channels 22, 16, 11, 6, and 1 are highlighted for measurement.
Any flagged channels are noted.
3. Click on the Streamlined Programming drop-down menu. Using the
“Set Ts” buttons, measure the T-level on each of the default channels
(indicated by wider bars) using an ascending method. By default, the
starting level is 80 CL. For more information, see Programming
Principles T-level Assessment Procedure. Custom Sound
automatically interpolates T-levels on the unmeasured channels
(indicated by the thinner bars).
4. At initial activation, use of streamlined programming methods is
recommended. However, if a large variability in the profile is observed,
additional measurements should be made in this area of the array, for
example on the basal electrodes (e.g. electrodes 4, 3 and 2) to improve
the accuracy of the interpolation and obtain optimum sound quality.
5. To set C-levels, click the “go live” button (the large green button) and
talk to the recipient as you gradually increase C-levels globally by
clicking the <up> arrow under “live Cs”. During live voice testing, the
microphone sensitivity is set to 12 by default for most processors (the
optimal sensitivity) and the volume control is set to maximum (this can
be reduced). Adjust C-levels so that ongoing conversational speech is
comfortably loud. It is recommended reading aloud to the recipient and
allowing the person to follow along with the text while tracking loudness
using the loudness-scaling chart. As the loudness level gets closer to
comfortably loud, reduce the step size from 5 CL to 2-3 CL. If necessary,
you can reduce the microphone sensitivity slightly.
6. Note: When going live to set C-levels, ADRO® is typically used, however it
can be turned off when setting C-levels using live voice if desired.
If you choose to use the traditional method of measuring individual C-levels
and then testing in live speech mode, it is recommended that you initially
reduce the microphone sensitivity or volume if it is at maximum because the
sound could be too loud. Gradually increase the sensitivity up to the default of
12 and check sound comfort at maximum volume.
7
SECTION ONE | CLINICAL GUIDANCE
1. Stop the stimulation and sweep all of the channels at 80% and then at
C-level to confirm that sounds are comfortably loud. (Open the Sweep
menu by clicking on the Sweep drop-down menu.) You can balance
loudness across the channels by sweeping a small set of channels (4 – 5
at a time) to confirm equal loudness. To adjust individual channel C-levels
that have not been measured, double-click the specific channel or click
the “make all channels measurable button” and then modify individual
C-levels as necessary.
2. Save the MAP.
3. Make additional MAPs as necessary.
4. Personalize the MAPs for the listening environment(s) or create
Progressive MAPs (where C-Levels are automatically adjusted to a
predetermined level for each programming location) prior to writing
them to the sound processor.
5. Predict new levels for a different stimulation rate using
streamlined programming.
1.1.2 NRT/Objective Offset Method
The NRT/objective offset method offsets the T-level profile from the objective
measurement profile, and enables a single offset channel to be measured using
psychophysics. C-levels are measured using live voice testing.
1. Measure impedances by performing an implant test.
2. Obtain objective measures (the default is Neural Response Telemetry)
in the operating room or during the programming session using the
AutoNRT ™ function in Custom Sound or using Custom Sound™ EP
software (AutoNRT available for Freedom and later model implants only).
To measure NRT in Custom Sound, select “Perform AutoNRT” under the
programming tasks. By default, the software automatically measures
T-NRT on channels 22, 16, 11, 6, and 1 using an ascending approach
and built-in detection algorithm. (You may select other channels.)
T-NRT values are saved automatically. Alternatively, you can use T-NRT
measurements from Custom Sound EP.
3. In the Select MAP screen, create a new MAP by selecting the required
MAP parameters from the available drop-down menus and clicking
Create. Alternatively, you can select and open an existing MAP that you
can modify.
8
CLINICAL GUIDANCE | SECTION ONE
4. The default streamlined programming channels 22, 16, 11, 6, and 1 are
highlighted. In the Method box, click the “Select NRT/Objective Levels”
button. Select the measurement type (e.g. NRT), the values you wish
to use from the “date of measurement” and click ok (more than one
set of measurements may be selected.). This brings the T-NRT values
(blue markers) on the measured channels into the Set Levels screen.
Alternatively, in the Set Levels screen you may click and drag the blue
T-NRT markers up to the T-NRT values.
5. Select “NRT/Objective Offset” in the Programming Method box. Custom
Sound highlights Channel 11 and interpolates the remaining T-levels
to keep the difference between T-NRT on each measured channel and
the starting T-level equal to the difference between T-NRT and starting
T-level difference on Channel 11. This has the effect of maintaining
the T-NRT profile. Measure the T-level on Channel 11. Custom Sound
automatically adjusts the overall T-level profile based on the measured
T-level on Channel 11. To measure additional T-levels, double click on the
specific channel.
6. To set C-levels, click the go live button and talk to the recipient as you
gradually increase C-levels globally by clicking the <up> arrow next
under “live Cs”. During live voice testing, the microphone sensitivity is
set to default of 12 (the optimal sensitivity). Watch the recipient for any
behavioural responses or indications that the sound may be too loud. It is
recommended that you initially set C-levels conservatively.
7. Stop the stimulation and sweep all of the channels at 80% and then at
C-level to confirm that sounds are comfortably loud. For adults or older
children who can complete the task, you can balance loudness across the
channels by sweeping a small set of channels (4 – 5 at a time) to confirm
equal loudness. To adjust individual channel C-levels that have not
been measured, double-click the specific channel or click the
“make all channels measurable button” and then modify individual
C-levels as necessary.
8. Save the MAP.
9. You may select to create progressive MAPs from the original MAP.
10.Personalize the MAPs for the listening environment(s) prior to writing
them to the sound processor.
9
SECTION ONE | CLINICAL GUIDANCE
1.1.3 NRT/Objective Preset Method
The NRT/objective preset method offsets the T- and C-level profiles from the
objective measurement profile. Additional MAPs are created with the C-levels
set progressively higher on each MAP. This method is appropriate for very
young children or others who may not give any reliable behavioural responses.
1. Measure impedances by performing an implant test.
2. Obtain objective measures (the default is Neural Response Telemetry)
in the operating room or during the programming session using the
AutoNRT function in Custom Sound or using Custom Sound EP software.
To measure NRT in Custom Sound, select “Perform AutoNRT” under the
programming tasks. By default, the software automatically measures
T-NRT on channels 22, 16, 11, 6, and 1 using an ascending approach and
built-in detection algorithm. (You may select other channels.) T-NRTs
are saved automatically. Alternatively, you can use T-NRT measurements
from Custom Sound EP.
3. In the Select MAP screen, create a new MAP by selecting the required
MAP parameters from the available drop-down menus and clicking
Create. Alternatively, you can select and open an existing MAP that you
can modify.
4. The default streamlined Programming channels 22, 16, 11, 6, and 1 are
highlighted. In the Method box, click the “Select NRT/objective Levels”
button. Select the measurement type (e.g. NRT), the values you wish
to use from the “date of measurement” and click Ok ( more than one
set of measurements may be selected.). This brings the T-NRT values
(blue markers) on the measured channels into the Set Levels screen.
Alternatively, in the Set Levels screen you may click and drag the blue
T-NRT markers up to the T-NRT values.
5. Select “NRT/Objective Preset Method” in the Programming method box.
6. The software automatically interpolates between T-NRT measurements
and creates the first NRT MAP with T-levels set 40 CL below T-NRT and
C-levels set 10 CL above T-level (i.e. C-level offset of 30 CLs). Custom
Sound automatically creates three additional MAPs with C-levels set
10 CLs higher in each MAP. Each MAP has T-levels set 40 CLs below
T-NRT and DRs of 10, 20, 30 and 40 CLs respectively. In other words, the
loudest MAP has C-levels set to T-NRT.
7. Data collected during the European and Melbourne System four studies
were analysed to determine the relationship between T-NRT and
behavioural C-level at the ACE/ACE(RE) stimulation rates. For each rate,
significant variability was observed across individuals with respect to
10
CLINICAL GUIDANCE | SECTION ONE
where T-NRT fell in relation to the behavioural dynamic range. As a
result of the large variability between recipients, offsets may need to be
changed depending on the stimulation rate being used for the MAP. The
current C-level offsets in Custom Sound may result in MAPs that are too
soft for some recipients when using the higher stimulation rates.
8. The current clinical recommendation is to combine the preset method
with any behavioural measures wherever possible, in order to determine
an offset for each individual. To change the preset defaults, go to Clinician
Preferences and the Progressive MAPs tab. To have an offset applied in
the negative direction, it is necessary to enter the value as a positive
number. To have the offset applied in the positive direction, enter the
value as a negative number. Then, create MAPs with progressively larger
dynamic ranges. Alternatively, drop the T/C-level profile to a minimum
value and increase the levels using live speech mode until a behavioural
response is observed. Initially, T-levels can be brought up to this point and
MAPs with progressively wider dynamic ranges made. Where behavioural
responses are not available to determine an offset for any individual, it is
recommended that clinicians proceed conservatively.
9. Sweep the C-levels to look for any sound awareness or behavioral
responses before going live with the first MAP. Go live with the MAP and
watch for any responses to sound. Note: this is a very conservative MAP.
Sweep C-levels of each progressive MAP prior to going live.
10.Save the MAPs.
11. Personalize the MAPs for the listening environment(s) prior to writing
them to the sound processor.
11
SECTION ONE | CLINICAL GUIDANCE
1.2 ADJUSTMENTS TO CHANNEL GAINS
In addition to the user-controlled microphone sensitivity that determines the
overall gain applied to the input signal, each channel in the MAP includes an
adjustable gain control. These individual channel gains are set in the MAP
when the clinician programs the sound processor. The default gain setting is 0
dB across all channels. Changing the channel gains is analogous to adjusting an
equalizer on a stereo system, which emphasizes or de-emphasizes pitches in a
particular channel. The gain is applied to each channel output and affects the
stimulation levels sent to the implant.
In the SPEAK and ACE strategies, the channel gains are applied before the
maxima are selected. Therefore, the gain settings can influence the channels
selected for stimulation. Reducing the gain on a given channel de-emphasizes
that channel’s output, making it less likely to be selected. Conversely,
increasing the gain emphasizes the output. In CIS strategies, all of the
activated channels are stimulated during each frame, regardless of channel
amplitude. Therefore, channel gains do not influence the channels selected for
stimulation. However, the gain settings increase or decrease stimulation levels.
The main clinical application of channel gains is to alter the perceived sound
quality of the MAP. You can adjust these gains during live-voice testing of the
MAP to improve the sound quality. The gains can be adjusted via the Gains
Toolbar shaping options. Alternatively, you can enter gain values into the data
grid, by clicking on the data grid with the right mouse button and selecting
‘Show Gains’. Alternatively, you can enter gain values into the data grid, by
clicking on the data grid with the right mouse button and selecting ‘Show Gains’.
It should be noted that if ADRO is applied to all preset channel gain adjustments
are voided. ADRO will adjust channel gains based on environment.
1.3 BASIC SOUND PROCESSOR INFORMATION
• Microphone Sensitivity Control – determines the minimum input signal
level required for stimulation. At higher sensitivity settings, less acoustic
energy, that is a lower SPL, is required to cause stimulation. At lower
sensitivity settings, greater acoustic energy, that is a higher SPL, is required
to cause stimulation.
• Volume Control – controls the maximum amount of stimulation. It
allows the implant recipient to change the loudness of sound. Maximum
volume equals C-level stimulation.
12
CLINICAL GUIDANCE | SECTION ONE
• Automatic Gain Control (AGC) – front-end amplifier that reduces the
gain of high amplitude inputs to avoid distortion/peak clipping. The AGC
threshold depends upon the microphone sensitivity setting.
• Autosensitivity – this algorithm automatically adjusts the microphone
sensitivity to lessen the effects of background noise.
1.3.1 Input Processing/SmartSound™ Options
• ADRO® – Adaptive Dynamic Range Optimization - a digital pre-processing
signal algorithm designed to improve audibility of low-level sounds and
reduce the gain on higher level sounds to keep the signal level at the
desired point below C-level. This is available for the SPrint™, Freedom™, and
CP810 Sound Processors.
• Whisper™ – a fast-acting compression circuit that makes soft sounds easier
to hear. This is available for the ESPrit™ 3G, Freedom, and CP810 Sound
Processors.
• Beam™ – a beamforming algorithm that uses spatial input processing and
intelligent noise cancelling to automatically adjust microphone directionality
depending on the presence and type of noise sources.
It improves the signal-to-noise ratio (SNR) by reducing the loudness of
sound that originates from behind and to the sides of the listener and makes
it easier to hear sounds originating from the front. It is adaptive, so if the
noise source is moving dynamically, so too does the direction of maximum
attenuation. This is available for the Freedom and CP810 Sound Processors.
• Zoom – uses an algorithm that has a fixed directional pattern, where the
pattern does not change as a function of changes in spatial separation
between speech and noise, keeping the soundscape relatively constant.
It gives optimal blocking of diffuse noise, or when noise comes from
many directions simultaneously and the signal of interest is in front of the
listener. This is available for the CP810 Sound Processor.
• Autosensitivity™ – automatically adjusts microphone sensitivity based on
the noise floor of the surrounding environment.
The Custom Sound clinical programming software provides combinations
of these input processing options.
13
SECTION ONE | CLINICAL GUIDANCE
1.3.2 Supported Combinations of Implant System Components
The supported combinations of implant system components and
programming systems for Custom Sound 3.2 approved for all regions, are
summarized in the following table.
Programming
Interface
14
Sound
Processor
Sound Coding Nucleus
Strategy
SmartSound
Implant Model
Programming CP810
Pod
ACE™/
ACE(RE)
Programming Freedom™
Pod
SPEAK
Autosensitivity
ACE/ACE (RE) ADRO
CIS/CIS (RE) Whisper
Beam
PPS
SPrint™
ESPrit™ 3G
SPEAK
CIS
ACE
Autosensitivity
ADRO (SPrint™
only with ACE
and SPEAK)
Whisper (ESPrit
3G)
PPS
ESPrit
SPEAK
ACE
Autosensitivity
PPS
ESPrit 3G
Spectra
ESPrit 22
SPEAK
Autosensitivity
Whisper (ESPrit
3G)
CI512
Freedom™ (CA)
Freedom (ST)
CI24M
CI24R (ST)
CI24R (CS)
CI24R (CA)
CI512
Freedom (CA)
Freedom (ST)
CI24M
CI24R (ST)
CI24R (CS)
CI24R (CA)
Nucleus 22 series
implants
CI24M
CI24R (ST)
CI24R (CS)
CI24R (CA)
ABI24M (SPrint)
Freedom (CA)
(ESPrit 3G)
Freedom (ST)
(ESPrit 3G)
CI24M
CI24R (ST)
CI24R (CS)
CI24R (CA)
Nucleus 22 series
implants
Autosensitivity™
ADRO™
Whisper™
Beam™
Zoom
CLINICAL GUIDANCE | SECTION ONE
1.4 ELECTRICAL STIMULATION AND MAP PARAMETERS
• Stimulation Mode – describes the location of the indifferent electrode
relative to the active electrode.
• Stimulation Rate – the frequency (Hz) of the biphasic current pulse
delivered to a channel. The clinician uses the software defaults or
alternatively selects a stimulation rate.
• Total Stimulation Rate (TSR) – the rate across the entire electrode array
for a stimulation cycle. It is the product of the per channel stimulation rate
and the number of maxima (SPEAK and ACE) or number of channels (CIS).
Example: 1,200 Hz stimulation rate x 12 maxima = 14, 400 Hz TSR.
• Sound Coding Strategies – a set of rules that define how the sound
processor analyses acoustic signals and codes them for delivery to the
cochlear implant. The default strategy for most processors is Advanced
Combination Encoder (ACE).
• Maxima – the frequency ranges in the audio signals that contain the
greatest amounts of energy. This is a parameter of the SPEAK and ACE
sound processing strategies.
• Frequency Allocation Tables (FATs) – define the frequency range
(frequency bandwidth) that is assigned to each active channel in the
MAP. Each channel covers a specific frequency range and a given channel
receives stimulation when its bandwidth has sufficient energy in it
to be selected as a maxima. The FAT used depends upon the sound
processing strategy and the number of channels in the MAP. The software
automatically assigns the default FAT but the clinician can modify this.
Changing the FAT may affect sound quality.
• Channel Gain – the amount of amplification applied to each channel
before output stimulation levels are sent to the implant.
• T-SPL – a MAP parameter that controls the minimum intensity input level
that results in electrical stimulation. Reducing the T-SPL results in softer
input signals being presented at the recipient’s T-level.
• C-SPL – a MAP parameter that controls the maximum intensity input
level that results in electrical stimulation at C-level (prior to the activation
of the AGC).
15
SECTION ONE | CLINICAL GUIDANCE
• IIDR (Instantaneous Input Dynamic Range) – is the selected range
of input signal at any instant in time that will be mapped between
T- and C-level, i.e. the audible range of sounds for a recipient. It is
a programmable value determined (in Freedom and CP810 sound
processors) by two MAP parameters, T-SPL and C-SPL. It is the dB
difference between the two. For example, at the default microphone
sensitivity of 12, for a T-SPL of 25 and C-SPL of 65, the IIDR is 65 - 25 =
40 dB.
• IDR (Input Dynamic Range) – is the entire operating range of the sound
processor including the AGC compression range. In contrast to the IIDR,
it is a fixed value. It can be up to 75 dB for the Freedom and CP810 sound
processors.
• Q-value – controls the steepness of the amplitude growth function and
determines the percentage of a recipient’s electrical output dynamic range
that is allocated to the top 10 dB of the sound processor’s input dynamic
range. A low Q-value makes the loudness growth function steeper and has
the effect of making soft sounds perceptually louder (see Figure 2 below).
Figure 2 : Loudness
growth functions:
Base Level = 4,
Q varies
16
CLINICAL GUIDANCE | SECTION ONE
1.5 STIMULATION MODES
Electrical stimulation produces current flow between an active (stimulated)
and indifferent (reference) electrode. A pair of electrodes forms a channel of
stimulation. For each channel, stimulation mode describes the location of the
indifferent electrode relative to the active electrode. The distance between
the two electrodes determines the spread of electrical current and the nerve
endings or spiral ganglia that are stimulated. There are two basic categories
of stimulation mode, monopolar and bipolar. The CI500 series implants,
Freedom™ implant as well as all Nucleus® 24 implant models can use both
types. (Note: to access bipolar modes on the CI500 Series implants, you need
to use the Freedom Sound Processor or install the regional option to activate
this).
1.5.1 Monopolar (MP) Stimulation
In MP stimulation, the active electrode is inside the cochlea and the indifferent
electrode(s) is outside the cochlea. There are three MP configurations:
• Monopolar 1 (MP1): Current flows between the active intracochlear
electrode and the ground ball electrode (Freedom and N24 series
implants). The CI500 series implants have a short pin-shaped electrode.
• Monopolar 2 (MP2): Current flows between the active intracochlear
electrode and the plate electrode on the body of the implant (Freedom
and N24 series implants). On the CI500 series implants the extracochlear
electrode is built into the receiver stimulator.
• Monopolar 1+2 (MP1+2): Current flows between the active intracochlear
electrode and both extracochlear electrodes.
The default stimulation mode is MP1+2. This mode produces the lowest
electrode impedances. MP modes also produce the lowest T- and C- levels.
This means that the implant uses less energy to produce stimulation and this
results in longer battery life. MP modes are necessary for higher stimulation
rates that are used in the Advanced Combination Encoder (ACE™/ACE(RE)) and
Continuous Interleaved Sampling Strategies (CIS/CIS(RE)).
17
SECTION ONE | CLINICAL GUIDANCE
1.5.2 Bipolar (BP) Stimulation
In BP stimulation, both the active and indifferent electrodes are inside
the cochlea. The separation between the two electrodes defines the BP
configuration and the spread of current within the cochlea (see Figure 3). The
smaller the distance between the active and indifferent electrodes, the more
current required to reach T- and C-levels, probably because a smaller amount
of neural tissue is stimulated.
• Bipolar (BP): Current flows between the active electrode and the electrode
next to it in the apical direction (e.g. E1 to E2).
• Bipolar + 1 (BP+1): Current flows between the active electrode and the
electrode that is two away from it (e.g. E1 to E3).
• Bipolar + x (BP+x): X refers to the number of electrodes between the active
and indifferent electrodes (e.g. E1 to E5 is called BP+3).
As the BP configuration becomes wider, the number of channels of stimulation
decreases, for example, in BP+3 there is a total of 18 possible channels. The
optimal BP mode provides comfortably loud hearing with the smallest distance
between the active and indifferent electrodes. Bipolar modes may be used
with the Spectral Peak (SPEAK) strategy.
Figure 3: Bipolar
stimulation
18
CLINICAL GUIDANCE | SECTION ONE
1.5.3 Variable and Pseudomonopolar (PSMP) Stimulation
Variable and pseudomonopolar stimulation modes combine different BP
modes in the same program or MAP. For example, in variable mode some
channels may be programmed in BP1 and others in BP2, BP3, or BPx. Variable
mode can be used to increase the number of active channels in situations
where there are a reduced number of electrodes available due to electrode
anomalies or non-auditory sensations. Variable mode can also be used to
create wider stimulation modes for channels that have too high C-levels in the
nominal mode.
Pseudomonopolar is a specific application of variable mode. Typically it is
used in cases of partial insertion of the electrode array where the monopolar
reference electrodes are not available, e.g. in the case of the Nucleus 22
System. In these cases, pseudomonopolar is used to maximize the number
of active channels. In pseudomonopolar, when each of the intracochlear
electrodes is designated active, the indifferent electrode is an electrode that
is just outside the cochlea. In pseudomonopolar the current flow is reversed
because the indifferent electrode is basal to the active electrode. For example,
if electrodes 10 – 22 are inside the cochlea, each of these electrodes could be
referenced to electrode 9 that would be at the cochleostomy. Then channel
22 would have the widest BP mode (BP-12) and channel 10 would have the
narrowest mode (BP).
1.5.4 Common Ground (CG) Stimulation
In CG stimulation, current flows between the active electrode and all the other
electrodes on the array, which are connected together electronically to form
a single indifferent or reference (see Figure 4). The extracochlear electrodes
(MP1 and MP2) are not used. CG is an important mode because it can detect
electrode anomalies. As each electrode on the array is activated, the remaining
electrodes form the reference. Impedance telemetry uses CG to detect
potential electrode problems on the intracochlear array.
Just like MP modes, CG allows all 22 electrodes to be used as active compared
to BP where the maximum number of channels is 21. Due to the wider spread
of current in CG, this mode has been considered somewhat analogous to MP or
a wide BP mode. However, T- and C-levels in CG are typically higher than in MP.
Although CG is a programming option with the SPEAK strategy, MP modes are
still the recommended first choice. CG should not be used as a programming
mode with implant recipients who have partial insertions of the electrode array.
Because current is flowing to all electrodes on the array, it will flow to any
electrodes outside the cochlea and this may produce non-auditory sensations.
19
SECTION ONE | CLINICAL GUIDANCE
Figure 4 : Common
Ground stimulation
Selecting the stimulation mode
The clinician sets the stimulation mode in the Custom Sound software on the
“Open or Create MAP” screen. The software lists the stimulation modes that
are available based on the implant type, sound processor and sound processing
strategy being used. The software defines the stimulation mode using the location
of the indifferent (reference) electrode relative to the active (stimulated) electrode.
In the Set Levels screen, the electrode selected by number is the active electrode.
Most Freedom and CI500 series implant recipients will be programmed using
MP1+2, but other modes can be selected if necessary. Using one of the MP modes
is recommended because the choice of mode determines which sound processing
strategies are available and MP modes provide the greatest flexibility. Whenever
the clinician chooses a different mode, T- and C- levels must be re-measured in
the new mode. This is because the amount of electrical current required for T- and
C- levels is different for each stimulation mode.
1.6 TELEMETRY MEASUREMENTS
• Telemetry – the bi-directional communication of data using a radio
frequency code. The system sends information to the implant and receives
information back from the implant about the device status.
• Impedance – a measure of the opposition to electrical current flow. An
impedance test identifies short- or open-circuit electrodes on the implant.
• Implant test – a test within the software that measures the impedance
for each electrode.
• Voltage Compliance – the ability of the implant to deliver sufficient
voltage to generate the requested current level.
20
CLINICAL GUIDANCE | SECTION ONE
• Out of Compliance – the condition where the maximum voltage
available from the implant is not sufficient to generate the desired current
level (CL) on a given channel. When this occurs, the implant recipient does
not perceive loudness growth when the CL is increased, i.e. there is
loudness saturation.
• NRT – Neural Response Telemetry - records neural activity within the
cochlea in response to electrical stimulation from the implant. It provides
a quick, non-invasive, objective measure of peripheral neural function.
1.7 VOLTAGE COMPLIANCE
1.7.1 CI500 series, Freedom™ and N24 series Cochlear
Implant Systems
‘Out of compliance’ refers to the condition where the maximum voltage
available from the implant is not sufficient to generate the desired current
level on a given electrode. When this occurs, the recipient does not perceive
loudness growth when the current level (CL) is increased, i.e. there is loudness
saturation. In addition, when the implant is ‘out of compliance’, ongoing
changes to electrode impedance may affect the amplitude of the biphasic
stimuli generated for a given CL. Such changes may cause the perceived
loudness to fluctuate in response to changes in electrode impedance.
Custom Sound™ is capable of detecting ‘out of compliance’ electrodes in the
CI500 series, Freedom™, and N24 series cochlear implant systems via the use
of compliance telemetry. Electrodes that are ‘out-of-compliance’ are flagged
in red by the software. During psychophysical testing, compliance telemetry
continuously monitors the output current sources of the electrodes and alerts
the clinician if the implant cannot provide sufficient voltage to generate the
requested amount of electrical current to the electrode pair. In cases where the
‘out of compliance’ flag is observed, it may be necessary to:
• widen the pulse width to reduce the C-levels, or
• decrease the per channel stimulation rate
• increase the Power Level (if supported by the battery type used)
Reducing the per channel stimulation rate or widening the pulse width is
possible when using the ACE™/ACE(RE) or CIS/CIS(RE) strategies in many
instances. The pulse width(s) that can be selected are dependent on the
total stimulation rate of the MAP (i.e. the stimulation rate per electrode x
the number of maxima). Custom Sound lists the pulse widths and number
of maxima that are valid for a given stimulation rate. For each rate there is a
default pulse width and number of maxima.
21
SECTION ONE | CLINICAL GUIDANCE
Increasing the pulse width may result in the number of maxima being reduced
automatically. The 3500 Hz per channel stimulation rate only allows a pulse
width of 9.6 µs.
It is important to optimize a recipient’s power level to ensure that all channels
are in compliance, to allow the widest range of MAP parameters to be used
for a given recipient, and to maximize sound processor battery life.The CP810/
Freedom sound processors (CI500 series, Nucleus Freedom, and Nucleus
24 implant types) and Custom Sound software can automatically optimize
the power level used by the processors to power the implant. Manual
adjustments of Power Level can also be made and affect compliance, therefore
it is recommended to remeasure compliance at the specified power level to
avoid ‘out of compliance’. Please refer to section 1.8 Power Optimization for
additional information.
Currently only limited clinical information is available regarding the possible
effects of ‘out of compliance’ channels on recipient performance. These effects
may include the recipient reporting the MAP to be too soft or fluctuating in
loudness, or that no loudness growth occurs when increasing C-levels on a
channel. The current recommendation is to keep all active channels/electrodes
used in the MAP within the voltage compliance limits for the battery type that
will be used. Thus, it is recommended that the MAP be modified to keep all
active electrodes in voltage compliance. Channels that remain out of voltage
compliance should be deactivated.
Note : It is known that electrode impedance, and therefore compliance,
may change over the first weeks of experience with the cochlear implant.
If some electrodes are ‘out of compliance’ at initial device activation, it
is recommended that the MAP be modified to bring these channels into
compliance or that the electrodes be deactivated. Electrode impedances
should be measured at every clinical visit.
1.7.2 Nucleus® 24 System
The SPrint™ processor provides the same Compliance Telemetry information
in psychophysics as the CP810 and Freedom™ sound processors. CI500 series
and Freedom implants have the added functionality for the user to request
compliance information. When using the ESPrit™ 3G sound processor, where
there is no telemetry functionality available, it is recommended that the
SPrint or Freedom processor be used at regular intervals for programming, i.e.
particularly when changes to T- and C-levels are observed. It is also important
to do a new impedance test at regular intervals. Converting the SPrint MAP to
the ESPrit 3G provides information about whether the ESPrit 3G MAP is within
compliance. The Custom Sound™ software provides guidance regarding any
22
CLINICAL GUIDANCE | SECTION ONE
required programming changes. Note: Nucleus 24 system implant recipients
may upgrade to the CP810 or Freedom processor regardless of their current
sound processor type.
1.7.3 Nucleus® 22 System
The Nucleus 22 System does not include a telemetry function. For recipients
using the CI22M implant (i.e. with the Spectra, ESPrit™ 22, ESPrit 3G for
Nucleus 22 or Freedom™ for Nucleus 22 sound processors) it is likely that the
Stimulus Level or ESPrit Stimulus Level (ESL) amplitude mapping scale is used.
This Stimulus Level and ESL scales use changes to both current amplitude
(Current Level) and pulse width to control loudness. First the pulse width
is held fixed and the current is increased, then the current is held constant
and the pulse width is increased to deliver increased charge. The range of
clinical programming units for Stimulus Level is 1 – 239. The range for ESL is
1 – 255. When using Stimulus Level or ESPrit Stimulus Level MAPping, it is not
possible to diagnose behaviourally that the implant is ‘out of compliance’. This
is because the charge per phase (or loudness) is increased by increasing the
pulse width rather than through increasing the current amplitude for a large
portion of the scale, i.e. for Stimulus Levels between 66 and 228, and for ESL
between 128 and 223. As a result the recipient will perceive loudness growth
as the Stimulus Level increases even though the implant is ‘out of compliance’.
To diagnose ‘out of compliance’ with a Stimulus Level or ESPrit Stimulus Level
MAP, it is necessary to change to Current Level MAPping, using a pulse width
that is narrow enough to allow presentation of Current Levels up to 190
Current Level. If the recipient reports that the loudness continues to grow up to
this level, the implant is not ‘out of compliance’.
1.8 POWER OPTIMIzATION
It is important to optimize a recipient’s power level to ensure that all channels
are in compliance, to allow the widest range of MAP parameters to be used
for a given recipient, and to maximize sound processor battery life.The CP810/
Freedom sound processors (CI500 series, Nucleus® Freedom™, and Nucleus 24
implant types) and Custom Sound software can automatically optimize the
power level used by the processors to power the implant. Power optimization
works by characterizing how much power is consumed by the implant in worst
case conditions. This assumes noise levels equivalent to a noisy room (> 65
dB SPL). It does this for each of the recipient’s MAPs. Then the power level for
each MAP is optimized to the minimum possible, such that the implant is in
compliance at all times.
23
SECTION ONE | CLINICAL GUIDANCE
The power level required is dependent on the type of MAP, its various
parameters, and the individual recipient. Power optimization selects the most
appropriate power level for the recipient and each MAP and this is shown
as a percentage (ranging from 0 - 100%). In general, a MAP with a higher
stimulation rate or higher current levels requires a higher power level (for
example, Custom Sound™ may specify a power level of 97% to effectively run
such a MAP). Similarly, a MAP with a lower rate or lower current levels requires
a lower power level (for example, Custom Sound may specify a power level of
52% to effectively power such a MAP). Custom Sound automatically optimizes
the power level when you click ‘Batteries’ in the Battery Suitability box or write
a program to the sound processor. It is done at this time, because a number of
implant operating characteristics must be measured using telemetry and these
can only be made after the MAP parameters have been chosen.
Some battery types support higher power levels than other types of batteries
as shown in the following table.
Sound processor
Battery Type
CP810 Standard
CP810 Compact
rechargeable
CP810 Standard
rechargeable
Freedom™ Bodyworn
Freedom BTE
Freedom BTE rechargeable
Freedom Mini BTE
2 zinc-air
Li Ion rechargeable
Manual Power Level
Limit
77%
100%
Li Ion rechargeable
100%
2xAAA
3 zinc-air
Li Ion rechargeable
2 zinc-air
100%
75%
91%
56%
Use the compliance and battery suitability section of the software to
determine the best battery option(s) for the individual. If a recipient has
a power level that exceeds the recommended power level for a certain
sound processor, Custom Sound will provide a message stating that sound
degradation may occur towards the end of battery life.
There is the option to use an ‘Auto’ or a ‘Manual’ method for setting the
Power level. The default is to use the Auto option which will automatically
calculate the optimal Power Level setting during the programming session. It
is recommended that Auto Power be used wherever possible. If the manual
option is selected, compliance should be remeasured at the specified power
level to avoid ‘out of compliance’. If the power level is increased manually
above the optimized power level, it is important to choose a battery type that
will support the increased power level.
24
CLINICAL GUIDANCE | SECTION ONE
If the coil is not on the implant when power optimization occurs, the power
level is set to the previously saved level (where available) or the default manual
level. Note: When the power level is optimized, a stimulation occurs which may
be heard by the recipient.
Optimize the power for a recipient’s sound processor when the recipient:
• is being fit with a new MAP,
• is being converted to a new sound processor,
• reports intermittencies,
• reports poor battery life,
• reports changes in sound quality,
• has not visited your clinic before,
• has not visited the clinic in six months,
• has lost or gained weight; or
• has significantly grown or cut their hair.
Optimizing CP810 and Freedom sound processors (Nucleus CI500 series,
Freedom implants and Nucleus 24 series implants)
At every programming session Custom Sound automatically performs the
following measurements that are required to estimate the power level and
compliance for the recipient.
• Impedances using the channel pulse width and stimulation mode of the MAP
at a current level of 80 CL.
• A short stimulation using the MAP pulse width, mode and rate at three
different current levels.
The recipient does not hear the stimulation.
When you write MAPs to either the CP810 or Freedom sound processors, the
measurements performed include stimulation at C-level on the channel with
the highest electrode voltage. The recipient may hear this stimulation. This
stimulation occurs for each MAP that you are writing to the sound processor
that has a different pulse width, rate or mode. If the coil is not on the head
when performing this measurement, you must initiate live voice again after realigning the coil to obtain compliance information. If compliance measurements
have not been obtained and the coil is on the recipient’s implant, Custom Sound
estimates the power level when writing the MAP to the sound processor. If the
coil is not on the implant, the power is set to the previously saved power level if
available or to the default (manual) level (of 75%).
25
SECTION ONE | CLINICAL GUIDANCE
Before sending the recipient home, it is recommended that you determine the
batteries that are best to use with the recipient’s MAPs.
Freedom sound processors (Nucleus 22 implants)
Custom Sound prompts you to measure the skin flap and optimize the
power level when you first Go live with a MAP, Click Batteries in the Battery
Suitability box or Write a program to the sound processor. The calculated
power level is used for all MAPs created or opened in the same programming
session.
ESPrit™ 3G and ESPrit 22 sound processors (Nucleus 22 implants)
Custom Sound prompts you to measure the skin flap and optimize the power
level when you first Go live with a MAP or write a program to the sound
processor. You cannot go live or Write programs to the sound processor until
the skin flap measurement is performed, or a manual power setting is selected.
ESPrit 3G sound processors (Nucleus 24 implants)
Custom Sound prompts you to perform an implant measurement when
you first Go live with a MAP or Write a program to the sound processor.
The implant measurement is saved for the recipient until such time as a
new measurement is taken. Custom Sound uses the measurement when
automatically calculating the optimized power level for each new MAP. You
cannot go live or write programs to the sound processor until the implant
measurement is performed, or a manual power setting is selected.
Note: The impedance measurements, compliance levels and voltage information
are saved to file. These two measurements are performed when you create a new
MAP, modify an existing MAP, the first time you go live with a MAP or when you
go live and compliance measurements have not been measured. Custom Sound
uses these measurements to estimate the maximum current level allowed for each
channel in order to provide compliance guidance when setting current levels using
live speech.
For progressive MAPs or MAPs based on an optimized MAP with modified
levels, Custom Sound can predict the power level by measuring the implant
supply voltage and impedances.
26
CLINICAL GUIDANCE | SECTION ONE
The recipient does not hear this stimulation. For MAPs that are personalized
for different listening environments, provided that the current levels, MAP
stimulation rate, channel pulse width and mode are the same as the first
optimized MAP, Custom Sound does not perform additional measurements.
The power level is set to the same level as the first MAP. However, if you are
writing MAPs to the sound processor and they have a different channel pulse
width, stimulation mode or MAP stimulation rate, Custom Sound remeasures
the impedances and stimulates on the channel with the highest electrode
voltage. The recipient may hear up to four beeps when writing four different
MAPs to the sound processor.
Manual Power Level Setting
It is recommended that Auto Power is used wherever possible, however, you
may need to use a manual power level for the following reasons:
• the recipient is not in the clinic to make the measurements and the MAP
should be set to the power level that was used during their last visit;
• the optimized power set is artificially high because of one or more channels
and you do not want to eliminate these channels from the MAP;
• you are a service centre and the recipient’s MAP should be sent to the
recipient with the power level that was set in their clinic;
• you do not want the recipient to hear the C-level beep when the power
level is optimized (for Nucleus CP810/Freedom processors).
To use the manual power level, select to use a manual power level in the
software. If you are a service centre, you may want to set your clinician
preference to not optimize the power level and use the power level set in the
MAP. This preference is only available for CP810/Freedom sound processors.
1.9 SOUND CODING STRATEGIES
Sound processing strategies represent a set of rules that define how the sound
processor analyzes acoustic signals and codes them for delivery to the cochlear
implant. Freedom™ and CP810 sound processors use sophisticated digital signal
processing and state-of-the-art pulsatile sound processing strategies. The
following sound processing strategies are available in Custom Sound™ (not all
processors or implant types support all of the strategies).
The following sound processing strategies are available in Custom Sound:
• ACE™/ACE(RE) (Advance Combination Encoder) strategy,
• SPEAK (Spectral Peak) strategy,
• CIS/CIS (RE) (Continuous Interleaved Sampling) strategy.
27
SECTION ONE | CLINICAL GUIDANCE
Table 1: The differences between SPEAK, CIS/CIS (RE) and ACE/ACE (RE)
Strategy
No. of
Stimulation rates
stimulation
per channel (Hz)
sites
No. of maxima / channels
stimulated per frame
SPEAK
20
250
6 to 10
CIS/CIS (RE)
4, 6, 8 or 12
900, 1200, 1800,
2400 or 3500
4, 6, 8 or 12 (up to 8 for
1800, 2400, 3500 Hz
ACE/ACE (RE)
22
250, 500, 720, 900,
1200, 1800, 2400
or 3500
up to 20 (depending upon
stimulation rate selected)
1.9.1 ACE™/ACE (RE)
ACE (Advanced Combination Encoder) combines the detailed spectral
representation of SPEAK and the high stimulation rates of CIS to produce a
very rich representation of sound. This strategy gives the clinician enormous
flexibility to optimize sound processing for each individual. Using ACE, the
clinician selects the number of stimulation channels (maximum = 22), the
number of maxima and the per channel stimulation rate. The TSR (number
of maxima multiplied by the per channel rate) depends upon the implant
type (e.g. Nucleus 24 implants vs Freedom vs CI500 series implants). Custom
Sound™ provides a list of available rates based upon the type of implant used
by the recipient. ACE (RE) is specific to the Freedom™ and CI500 series cochlear
implants. These implants provide higher stimulation rates with a maximum
TSR of 31,500 pps. The clinician may choose per channel rates of 1800, 2400,
and 3500 pps and number of maxima (maximum = 9 at 3500 pps, 8 at 1800
and 10 at 2400 pps). By default, the software chooses 8 maxima and 900 pps
for a TSR of 7200 pps. For more information, see Programming Principles
and Frequency-to-Channel Allocation.
The following electrodogram (Figure 5) shows how ACE represents the English
word ‘choice’. Notice the amount of spectral and temporal detail this strategy
provides and how well it represents the spectrogram in Figure 6.
28
CLINICAL GUIDANCE | SECTION ONE
Figure 5 :
Electrodogram of
the English word
“choice” using the
ACE strategy
1.9.2 SPEAK
SPEAK (Spectral Peak) focuses on the spectral (frequency) properties of
sound. It takes advantage of the 22 closely spaced intracochlear electrodes
and the place pitch selectivity of the cochlea. The sound processor examines
the ongoing acoustic signal and sends stimulation pulses to the appropriate
electrode sites or channels based on the signal’s spectral content. The places
of stimulation in the cochlea vary depending upon ongoing spectral analysis.
SPEAK needs a large number of intracochlear electrodes to take advantage of
the cochlea’s spectral selectivity. SPEAK continuously analyses the energy in
sound and determines the spectral maxima. These are the frequency regions in
the signal that have the largest amounts of energy.
SPEAK divides the acoustic bandwidth (188 – 7938 Hz) into 20 bands and
assigns each active channel to one of these frequency bands in a tonotopic
way (i.e. the most basal channel receives the highest frequencies and the most
apical channel the lowest frequencies). After SPEAK identifies the maxima, the
channels that correspond to the correct frequency bands receive stimulation
pulses. The amount of electrical current (between T- and C-level) sent to the
channels is directly proportional to the amount of energy in the frequency
bands. As the acoustic signal changes, the maxima and the stimulated
channels vary across the array. SPEAK uses a maximum of 20 bandwidths, so
20 of the 22 possible channels can be used as active sites. By default, for each
stimulation cycle SPEAK identifies eight maxima and delivers stimulation to the
selected channels. The channels that are selected vary as the sound changes.
The clinician can increase the number of maxima up to 10.
29
SECTION ONE | CLINICAL GUIDANCE
The selected channels receive sequential stimulation in tonotopic order from
high to low frequency. SPEAK uses a stimulation rate of 250 pulses per second
(pps). The total stimulation rate (TSR) across the array is 2,000 pps for eight
maxima and 2,500 pps for 10 maxima. SPEAK cannot currently be used with
the CP810 Sound Processor unless accessed as a regional option in the Custom
Sound™ software.
Figure 6 illustrates the spectrogram (i.e. spectral analysis) of the English word
‘choice’ and the corresponding electrodogram. The electrodogram represents
the electrical stimulation pattern for ‘choice’ through SPEAK. Each striation
in the electrodogram indicates stimulation of a channel. This 20-channel
electrodogram clearly shows how SPEAK provides frequency information that
corresponds to the frequency information in the spectrogram (see Figures 6
and 7).
Figure 6 :
Spectrogram of
the English word
“choice” using the
SPEAK strategy
Figure 7 :
Electrodogram of
the English word
‘choice’ using the
SPEAK strategy
30
CLINICAL GUIDANCE | SECTION ONE
1.9.3 CIS/CIS (RE)
CIS (Continuous Interleaved Sampling) focuses on the temporal (timing)
properties of sound. It uses a relatively small number of channels (4, 6, 8 or 12)
in comparison to SPEAK and stimulates them at a high per channel rate. Higher
stimulation rates better represent the rapid timing events in sound compared
to lower rates. By default, the software chooses a fixed set of 12 channels and
a 900 pps channel rate (TSR = 10800 pps). The clinician may choose other
rates (900, 1800, 2,400 or 3500 pps) and different numbers of channels (4,
6 or 8), with the stipulation that the maximum TSR not exceed 14, 400 pps
for Nucleus® 24 implants or 28,000 pps for Freedom implants. The TSR is
the per channel rate multiplied by the number of channels. Custom Sound™
provides a list of available rates and number of channels based upon the type
of implant used by the recipient. The CIS (RE) rate of 3500 pps is specific to
the Freedom™ cochlear implant. Although the software selects specific default
channel sets, the clinician can modify these. CIS stimulates the same fixed set
of channels during each stimulation cycle regardless of any changes in spectral
(frequency) information. CIS divides the acoustic bandwidth (188 – 7938 Hz)
by the number of channels (4 – 12) used. This determines the bandwidth for
each channel. The software automatically assigns a bandwidth to each fixed
channel in a tonotopic way (i.e., the most basal channel receives the highest
frequencies and the most apical channel the lowest frequencies). During each
stimulation cycle, CIS determines the amount of energy in each band and
delivers the appropriate electrical current. The amount of current (between
T- and C-level) sent to the channels is directly proportional to the amount
of energy in each band. CIS cannot currently be used with the CP810 Sound
Processor unless accessed as a regional option in the Custom Sound software.
Figure 8 :
Electrodogram of
the English word
‘choice’ using the
CIS strategy
31
SECTION ONE | CLINICAL GUIDANCE
Figure 8 illustrates the electrical stimulation pattern of the English word
‘choice’ using a 6-channel CIS strategy. In this example, density of the
striations represents the rapid temporal changes in the signal. Since CIS always
stimulates the same channels, it does not convey frequency changes that
occur in the signal.
1.10 FREQUENCY-TO-CHANNEL ALLOCATIONS
Frequency-to-Channel Allocations
A primary function of the MAP is to translate the spectral information in the
incoming acoustic signal into instructions for channel stimulation. The electrodes
on the implanted array are numbered sequentially starting at the round
window. Electrode 1 is the most basal electrode and Electrode 22 is the most
apical electrode. Stimulation of different channels at identical stimulation rates
typically results in pitch percepts that reflect the tonotopic organization of the
cochlea. Channel 22 produces the lowest pitch percept while Channel 1 produces
the highest pitch percept. The frequency-to-channel allocation depends on the
sound processing strategy, the sound processor to be used and the number
of channels available for stimulation. During programming, Custom Sound™
automatically assigns appropriate frequency-to-channel information.
The default table number for each sound processor (SPrint™, ESPrit™ 3G,
Freedom™, CP810), and for the ACE™, SPEAK and CIS strategies respectively,
is shown in the Custom Sound software. When converting between sound
processors, the default table is selected for the new sound processor. The table
numbering system for the CP810 and Freedom sound processors is that the
default table number is the same as the number of active channels in the MAP.
This differs from the SPrint and ESPrit 3G sound processors where a different
numbering system, not related to the number of channels, is used.
For the SPrint, Freedom and CP810 sound processors the default input frequency
range of 188-7938 Hz is maintained irrespective of the number of channels in
the MAP. However, if a non-default table number is chosen, the upper frequency
boundary reduces below 7938 Hz. In the case of 22 active channels, the available
non-defaults are Tables 1-5 for the SPrint and Tables 22 A-E for the
CP810/Freedom sound processors. In addition, when a CP810/Freedom
processor MAP contains less than 22 active channels, the higher numbered
tables are available and use of these tables progressively reduces the upper
frequency boundary. For example, when using the CP810/Freedom processor
with 20 active channels, the default is Table 20, however, Tables 21, 22, and 22A
- E are available. The default Table 20 provides the full input range of 188 - 7938
Hz, however, changing to Table 22 reduces the input range to 188 - 6063 Hz.
32
CLINICAL GUIDANCE | SECTION ONE
When programming a Nucleus® 24 implant and the SPrint processor with 20
active channels, the default is Table 8 (188 - 7938 Hz) and the available nondefaults are Table 1-7. Changing to Table 6 reduces the input range to 188 6063 Hz. For the ESPrit 3G the default input frequency range reduces as the
number of channels is reduced. However, other table numbers are available to
further modify the input frequency range. For example, for a 20-channel MAP,
the default is Table 7 (120 - 8658 Hz). Changing to Table 5 provides an input
frequency range of 100 - 7215 Hz. When converting between sound processors,
it may be necessary to change the table number for the CP810/Freedom
processor to match that used in the SPrint or ESPrit 3G, i.e. where the default
table was not used. The table number is changed via the Parameters screen of
Custom Sound. The options for changing the table number are listed in the pulldown menu. For example, when converting a 22-channel SPrint MAP that uses
Table 4 (188 - 6938 Hz), use CP810/Freedom Table 22-B. When converting from
an ESPrit 3G to the CP810/Freedom processor, it may not be possible to achieve
the same input frequency range. In this case, choose the Table that provides the
closest input frequency range to the ESPrit 3G.
User adjustable frequency boundaries
Custom Sound allows you to manually adjust the channel frequency
boundaries for the CP810 and Freedom processors to have more flexibility
when customizing recipient MAPS (e.g. MAPs for speciality devices), or to try
different frequency boundaries for different channels or groups of channels
to troubleshoot hearing problems. Typically, the user adjustable frequency
boundaries are used for the following applications: clinical research, Hybrid™,
partial insertions, Auditory Brainstem Implants (ABI), Double Array implants
and MAP conversions.
33
SECTION ONE | CLINICAL GUIDANCE
1.11 MICROPHONE SENSITIVITY AND VOLUME SETTING
1.11.1 Microphone Sensitivity
The setting of the microphone sensitivity control determines the minimum
input signal level required for stimulation. At higher sensitivity settings, less
acoustic energy, i.e. a lower SPL, is required to cause stimulation. At lower
sensitivity settings, greater acoustic energy, that is a higher SPL, is required to
cause stimulation (see Figure 9).
Figure 9: Acoustic
energy required to
cause stimulation
When the sensitivity is set optimally, the AGC circuit uses the most recent peak
value in the signal to determine the instantaneous gain. With the onset of a high
level signal, the AGC rapidly decreases the gain so that the peak value of the
signal is set to a fixed value. The AGC slowly increases the gain after the highlevel peak has passed. The sensitivity control range on the Freedom and CP810
sound processors is equivalent to that on the SPrint sound processor, i.e. ranging
from 0-20. The default setting is 12. With the default settings (T - SPL = 25,
C - SPL = 65), 25 dB SPL sound input stimulates at T-level and sounds at or above
65 dB SPL stimulate at C-level. Recipients should be counselled to use the default
sensitivity setting in a quiet environment. If the recipient consistently sets the
microphone sensitivity above or below the optimal setting, it means that overall
C-levels in the MAP are not set appropriately and general speech understanding
will be compromized. If the sensitivity is set too low, the gain applied to the
incoming signal is reduced. In this case, conversational speech levels cause
stimulation below C-level and softer sounds will not be heard. If the sensitivity
is set too high the gain applied to low-level inputs (such as background noise) is
increased. The AGC operates on higher-level input signals such as speech and the
result is a decrease in the perceived signal-to-noise ratio (SNR). This decreased
SNR makes it difficult for the listener to accurately discriminate and recognize
34
CLINICAL GUIDANCE | SECTION ONE
softer speech sounds. In both cases, C-levels should be re-assessed.
The Sensitivity Mode may be set to ‘Manual’ or ‘Fixed’. When set to the ‘Manual’
mode the recipient can manually adjust the sensitivity setting by pressing the
appropriate buttons on the Freedom™. This can also be done with the CP810
Sound Processor if the ‘Advanced (sensitivity)’ UI (user interface) is selected in
Custom Sound™ or the CR110 Remote Assistant can be used to make sensitivity
changes on the CP810 processor. When set to the ‘Fixed’ mode (or the ‘Simple’
UI is indicated for the CP810 processor), the sound processor buttons to adjust
sensitivity do not function. (The sensitivity can also be locked in the CR110
Remote Assistant used with the CP810 processor by choosing this option in
Custom Sound.) The fixed mode is sometimes the preferred mode for the
programming of young children, where it is preferable that the sensitivity is not
adjusted. In this case it is recommended to also choose an environment setting
that includes autosensitivity™ (ASC). The function of the autosensitivity control
(ASC) is to automatically adjust the microphone sensitivity based on the noise
floor of the incoming acoustic signal. If the noise floor is above a programmable
breakpoint, it is likely that the gain (sensitivity) is too high for that situation. In
this case the ASC gradually reduces the sensitivity. If the noise floor is below
the breakpoint the gain is gradually increased back to the manual setting. The
programmable breakpoint is referred to as the ‘Autosensitivity Breakpoint’ and
is by default set to 57 dB SPL for the CP810/Freedom processors. This means
that the autosensitivity function is activated (i.e. will start turning down the
sensitivity), once the background noise reaches 57 dB SPL.
ASC is available as a setting for all Cochlear sound processors.
1.11.2 Volume Setting
The CP810 and Freedom™ processors provide the option to adjust the volume
level in addition to the microphone sensitivity. For the CP810 processor,
the maximum volume setting display is 10 and the minimum setting is 1.
For Freedom, the maximum volume setting display for 9, and the minimum
setting is 0. The effect of adjusting the volume setting is to globally reduce
the C-levels by a certain percentage of the dynamic range. The overall range
of reduction is programmable. The default setting involves a 20% reduction in
C-levels between the maximum and minimum volume settings.The maximum
volume level results in stimulation at C-level. If the recipient requires the option
to increase the volume under certain listening situations, it is recommended
that a global increase in C-levels be applied to the MAP, and that the volume
setting be reduced to an intermediate setting to provide room to adjust the
volume in both directions.
35
SECTION ONE | CLINICAL GUIDANCE
With the CP810 Sound processor, the clinician can lock out the ability to
change both sensitivity and volume via the Remote Assistant. Using Custom
Sound software, the clinician can choose to allow the recipient to have access
to sensitivity only, volume only, both sensitivity and volume, or neither option
on their Remote Assistant.
Other processors have volume controls (SPrint and ESPrit series). On the
SPrint, use the Select button until the volume symbol appears on the LCD,
then press the up button to increase loudness and the down button to
decrease. On the ESPrit series, the rotary control can be programmed as either
a sensitivity control or a volume control.
1.12 NUCLEUS® SMARTSOUND™
1.12.1 ADRO®
ADRO® is a digital pre-processing algorithm designed to make soft sounds
more audible and to maintain comfort for loud sounds. It was developed by
researchers in Melbourne1, 2. ADRO varies the gain in each channel by statistical
analysis of three levels: the input level, the level of background noise, and the
level of the loudest sounds. ADRO estimates these long-term output levels
for each frequency band and compares these estimates to target values.
This information is used to determine whether the gain on the channel in
question should be increased or decreased. This means that ADRO continually
adjusts the frequency response according to the input frequency spectrum.
Figure 10: Schematic
representation
of ADRO
36
CLINICAL GUIDANCE | SECTION ONE
The channel gains adapt so as to optimize the loudness of the signal into the
recipient’s dynamic range. For low intensity sounds, the gain is increased while
for high intensity sounds, the gain is reduced to keep the signal level below the
C-level (see Figure 10). The channel gains are adaptively adjusted to maintain
the signal in each channel within the upper region of the dynamic range
of hearing. ADRO responds slowly and smoothly to changes in signal level.
Continual adjustment of channel gains using ADRO provides improved sound
quality and improved speech perception performance in quiet at soft levels,
without affecting performance in noise. ADRO will override manual gains to
channel gains.
Studies with ADRO in both adults and children1,2 have shown that ADRO
improves performance in quiet with no decrement in speech understanding in
noise.
ADRO is used alone and in combination with other input processing algorithms
for the SmartSound™ Everyday environment and also in combination for
the SmartSound Noise, Focus and Music environments. See section 1.13
SmartSound for more information.
References
1.James, C.J., Blamey, P.J., Martin, L., Swanson, B., Just, Y., Macfarlane, D. (2002). Adaptive
dynamic range optimization for cochlear implants: a preliminary study. Ear & Hearing.
23, 49S-58S.
2.Dawson, P.W., Decker, J.A., Psarros, C.E. (2004). Optimizing dynamic range in children
using the Nucleus cochlear implant. Ear & Hearing.25, 230-41.
1.12.2 Whisper™
Whisper™ provides recipients with greater access to soft signals, such as the
softer elements of some music. It was developed by Prof. Hugh McDermott at
the University of Melbourne1.
Whisper uses fast time constants operating at the front end of the automatic
gain control (AGC). Whisper compresses the more intense portions of the
input signal and processes softer parts of the signal that would typically not
be heard. This is very analogous to wide dynamic range compression. Using
Whisper, signals above the 52 dB SPL compressor knee-point are compressed
at a 2:1 ratio, while softer signals below the knee-point are not compressed and
maintain a 1:1 relationship between input and output (see Figure 11).
37
SECTION ONE | CLINICAL GUIDANCE
80
Whisper boosts soft
sounds but not
loud sounds
Figure 11 : Input/
output functions
of the standard
microphone setting
(dashed line) and
when Whisper is
enabled (solid line)
referenced to a 1
kHz sine wave.
Processed Signal (dB SPL)
70
AGC
operating
2:1
60
50
1:1
40
30
20
20
30
40
50
60
70
80
90
Input Signal (dB SPL)
Whisper may not provide significant benefit to all recipients in all environments.
Past studies2,3 with Whisper have found significant advantages when
listening to soft input levels. While Whisper has been proven to improve
performance when listening to low-level signals, it is not recommended in
noisy environments. For the studies above, with sentences in multi-talker
babble, scores were significantly lower when using Whisper. This result was
due to Whisper amplifying lower input signals, including noise. In more recent
studies with the Nucleus® Freedom™, 39 CI recipients participated in testing to
compare ADRO, Whisper and a MAP with no input processing4 (see Figure 12).
The SmartSound technologies of ADRO® and Whisper were compared to a
MAP with no input processing. Error bars represent one standard error from the
mean. Statistical significance is indicated by asterisk symbols. For CNC words
presented at a low level of 50 dB SPL, a statistically significant improvement
in performance was found for both ADRO and Whisper compared to the
standard program. There was no significant difference found between ADRO
and Whisper for this condition. As for previous studies, there was no significant
difference between performance with ADRO, Whisper, and the standard MAP
for listening to words at the higher level of 60 dB SPL.
38
CLINICAL GUIDANCE | SECTION ONE
Figure 12: Speech
perception scores
with Nucleus
Freedom.
Whisper is used alone and in combination for the SmartSound Everyday
environment and also in combination for the SmartSound Music environment.
See section 1.13 SmartSound for more information.
References
1. McDermott, H.J., Henshall, K.R., McKay, C.M. (2002). Benefits of syllabic input
compression for users of cochlear implants. J AmAcad Audiol. 13, 14-24.
2. Cochlear Limited. (2002). Nucleus ESPrit 3G Whisper setting, White paper. Cochlear Ltd.,
Sydney, Australia.
3. Dawson, P.W., Decker, J.A., Psarros, C.E. (2004). Optimizing dynamic range in children
using the Nucleus cochlear implant. Ear & Hearing 25, 230-41.
4. Cochlear Ltd. (2007). Nucleus Freedom for previous generation implants, Implantable
Hearing Solutions. 1, 7-11.
1.12.3 Focus (using Beam™)
The SmartSound™ Focus environment uses Beam, a state-of-the art adaptive
beamformer. Focus utilizes spatial input processing and an intelligent noise
cancelling algorithm to automatically adjust microphone directionality
depending on the presence and type of noise sources. Beam is designed to
attenuate the sensitivity in the direction of interfering noises to the sides
and behind the listener, while maintaining maximum sensitivity to the
front. Beam is adaptive, so if the noise source is moving dynamically, so
too does the direction of maximum attenuation. Beam is an adaptive twostage beamformer, developed by researchers under the direction of Prof Jan
Wouters at the KatholiekeUniversiteit of Leuven (KUL), Belgium1,2,3,4. Focus
is only available with the Freedom™ and CP810 sound processors. It is not
recommended for use in quiet or windy environments.
39
SECTION ONE | CLINICAL GUIDANCE
Focus with the Freedom Sound Processor
The Freedom sound processor implements the beam algorithm using one
dual port directional and one omni-directional microphone. The beamformer
output is formed by combining the signals from two microphones, the
directional microphone at the front of the sound processor and the
omnidirectional microphone at the rear of the processor.
There are two stages to the adaptive beamformer (see Figure 13). The* first
stage comprizes the beamformer operation while the second stage comprizes
an adaptive noise cancellation operation.
Figure 13 : A block
diagram of the
two-stage adaptive
beamformer.
The beamformer output is formed by combining the signals from two
microphones, the directional microphone at the front of the sound processor
and the omnidirectional microphone at the rear of the processor.
The beamformer has fixed directionality. It is optimized to have maximum
sensitivity at 0˚, and maximum suppression of signals arriving from 90˚ to 270˚
(see Figure 14).
40
CLINICAL GUIDANCE | SECTION ONE
Figure 14: Examples
of sensitivity plots
for Beam (light
blue line) and a
fixed directional
microphone (dark
blue line)
The polar plots in Figure 14 compare the directional sensitivity of Beam (light
blue line) and a fixed directional microphone (dark blue line) for noises coming
from different directions. On the plots, 0° corresponds to in front of the listener,
90° to the left, 180° behind and 270° to the right. In the first plot, a noise
source is placed at 90° (indicated by the large arrow) that corresponds to the
left side of the recipient. Unlike the fixed directional microphone pattern, Beam
significantly reduces the sensitivity of the processor, as indicated by the ‘notch’
shape of the pattern at 90° on the plot. The remaining plots similarly show how
Beam responds to noise sources at 120° and 180°. In each case, the standard
directional microphone plot is fixed, while the Beam pattern changes to reduce
the processor’s sensitivity in the direction of the noise source.
The second stage of the algorithm, the adaptive noise canceller, serves to
filter out the noise from the beamformed signal. Since it is an adaptive filter, it
adapts to the changing noise environment, producing an optimal beamformer
output. This adaptation only occurs if speech has not been detected in
the signal, thereby minimizing distortion on the speech component of the
beamformed signal. Since the adaptive noise canceller effectively moves the
nulls in the beamformer output toward the interfering noise signal, the overall
algorithm is called ‘adaptive beamformer’.
41
SECTION ONE | CLINICAL GUIDANCE
The effects of Beam were evaluated in a double-blind trial with five adult
Nucleus® CI users4. Subjects were tested with their standard program and
were then fitted with Beam. Testing with Beam was carried out after a twoweek trial period. Speech Reception Threshold (SRT) with sentences and the
percentage correct phoneme scores for Consonant-Vowel-Consonant (CVC)
words were measured in quiet and noise at different signal-to-noise ratios.
The results are shown in quiet (quiet), speech weighted noise at 90° (spw 90),
multi-talker babble at 90° (babble 90), speech weighted noise from three
directions 90°, 180° and 270° (spw 3n), and multi-talker babble from three
directions 90°, 180° and 270° (babble 3n). Beam showed significant benefits
for listening to speech in competing noise. As shown in Figure 15, the group
showed an average improvement of 5 – 16 dB in SRT in noise when wearing
Beam compared to their standard program. Percentage correct phoneme
scores improved from 10 – 41 percentage points.
Figure 15:
Improvement of
Speech Reception
Threshold (SRT) with
Beam in different
noise scenarios
Focus with the CP810 Sound Processor
The CP810 utilizes two programmable omni-directional microphones, with
long filters and individual customized calibration of up to 1 dB precision, as well
as proprietary DSP technology that combines them into selectable response
patterns. In addition to providing greater noise cancellation from the rear and
sides than the Freedom processor, CP810 Focus more reliably preserves sound
from in front.
A comparison of Focus with the Freedom sound processor and the CP810
sound processor was conducted as part of the Nucleus 5 validation5. Speechin-noise testing was conducted with 19 Australian subjects using a spatially
separated noise setup, in which four talker babble was delivered from speakers
positioned at left, right, and behind the subject (N 90, 180, 270). The signal-tonoise ratio was optimized for each participant to avoid floor and ceiling effects.
42
CLINICAL GUIDANCE | SECTION ONE
Group mean results for CUNY sentences at 65dB SPL are shown in Figure 16,
and indicate a statistically significant mean improvement of 12 percentage
points with CP810 (67%) over the Freedom sound processor (55%) when Focus
(using Beam) was enabled.
Nucleus Freedom vs Nucleus CP810
SmartSound 2 Focus Program (n=19)
100
80
60
Freedom
CP810
40
20
0
S1
S2
S3
S4
S5
S6
S7
S8
S9
S10
S11
S12
S13
S14
S15
S16
Individual subjects
S17
S18
S19
Figure 16 :
Improvement of
speech perception
scores with CP810
Focus compared
with Freedom
Focus in spatially
separated noise
Average
p<0.001
References
1.Van den Berghe, J., Wouters, J. An adaptive noise canceller for hearing aids using two
nearby microphones. (1998) Journal of the Acoustical Society of America 103,
3621-3626.
2.Wouters, J., Van den Berghe, J. Speech recognition in noise for cochlear implantees with a
two-microphone monaural adaptive noise reduction system. (2001). Ear and Hearing 22,
420-430.
3.Maj, J-B., Wouters, J., Moonen, M. Noise reduction results of an adaptive filtering
technique for dual-microphone behind-the-ear hearing aids. (2004) Ear and Hearing,
25 (3), 215-229.
4.Spriet, A., Duen, L.V., Eftaxiadis, K., Laneau, J., Moonen, M., Dijk, B.V., Wieringen, A.V.,
Wouters, J. (2007). Speech understanding in background noise with the two-microphone
adaptive beamformer Beam in the Nucleus Freedom cochlear implant system. Ear &
Hearing 28, 62-72.
5.CP810/CR110 Validation, Cochlear internal data Aug 2009.
1.12.4 Zoom
Zoom is only available with the CP810 sound processor, which has two omnidirectional microphones. Zoom has a directional pattern that is fixed. It
does not change over time. The directional pattern of zoom is optimized so
maximum attenuation is achieved if noise is present from all directions at the
same time. It is not possible to configure the algorithm to cancel all directions
43
SECTION ONE | CLINICAL GUIDANCE
equally, so a null position is selected to give the best overall result. With zoom,
this null direction is fixed (Figure 17). Zoom provides more moderate noise
cancelling compared to Beam and is recommended for generally noisy places
or for situations where the noise is stationary and the listener can move such
that the noise source is behind him. It is not recommended for use in quiet or
windy environments. Zoom+ASC+ADRO® is now the default Noise program in
the Custom Sound Programming software.
Head blocks sound a
little more on this side
due to the sound
processor being worn
on other ear
Figure 17: CP810
Zoom directional
sensitivity - on the
head. The blue
line is the CP810/
Freedom directional
microphone
sensitivity (no
zoom), and the
red line is the
CP810 with zoom
activated.
CP810 Zoom
Freedom Dir /
CP810 Standard
(without zoom)
Processor
Zoom functionality with the CP810 was evaluated as part of the Nucleus 5
validation1. Speech-in-noise testing was conducted with 15 Australian subjects
using a spatially separated noise setup, in which four talker babble was delivered
from speakers positioned at left, right, and behind the subject (N 90,180, 270,).
The signal-to-noise ratio was optimized for each participant to avoid floor and
ceiling effects. Three conditions were assessed : Freedom and CP810 using
standard microphone directionality (no zoom), and CP810 with zoom activated.
Group mean results for CUNY sentences at 65 dB SPL are shown in Figure 18. A
statistically significant mean improvement of 30 percentage points was shown
with zoom enabled on CP810 (74%) compared to when zoom was switched off
(44%). There was no difference in group mean scores between Freedom and
CP810 when standard directionality (no zoom) was used.
44
CLINICAL GUIDANCE | SECTION ONE
Testing in noise with zoom (n=15)
Freedom No Zoom
CP810 No Zoom
CP810 Zoom
Figure 18:
Improvement of
speech perception
scores in noise with
CP810 using Zoom
compared with
CP810 and Freedom
using standard
microphone
directionality (no
Zoom).
80
Percent correct
CUNY % 65 dB SPL - (S0, N90, 180, 270)
100
*
60
40
20
0
Average
References
Figure 2 Bars represent individual subject performance with each bar representing the average of eight lists measured over two sessions. The last three bars on the right
represent averages of all subjects’ performance, with error bars plotting the standard error of the mean. The asterisk indicates a statistically significant difference.
*p<0.001 1.CP810/CR110 Validation, Cochlear internal data Aug 2009.
1.12.5 Autosensitivity™ (ASC)
The function of the Autosensitivity control (ASC) is to automatically adjust the
microphone sensitivity based on the noise floor of the incoming acoustic signal.
If the noise floor is above a programmable breakpoint, it is likely that the gain
(sensitivity) is too high for that situation. In this case the ASC gradually reduces
the sensitivity. If the noise floor is below the breakpoint the gain is gradually
increased back to the manual setting. When using ASC, the microphone
sensitivity is automatically adjusted based on the noise floor of the surrounding
environment. The noise floor is the level to which sound decreases during breaks
in speech, also known as troughs. The ASC adjusts the microphone sensitivity
dynamically, and when the CP810/Freedom™ ASC is set to default, it begins
to reduce the sensitivity when the measured noise floor in the acoustic signal
reaches 57 dB SPL. The overall perceptual effect of the ASC is a reduction in the
loudness of background noise. The programmable breakpoint is referred to as the
‘Auto-sensitivity Breakpoint’ and is by default set to 57 dB SPL for the CP810/
Freedom. This means that the autosensitivity function is activated (i.e. will start
turning down the sensitivity, once the background noise reaches 57 dB SPL. The
time taken for the ASC to adapt is in the order of seconds.
100
80
*
60
40
Freedom No Zoom
CP810 No Zoom
CP810 Zoom
20
0
Average
*p<0.001
45
SECTION ONE | CLINICAL GUIDANCE
Recommendations for changing Autosensitivity (ASC) breakpoint
Increasing the Autosensitivity breakpoint will make it less aggressive / prevent
it from turning down the sensitivity so much. Decreasing the Autosensitivity
breakpoint will make it turn down the sensitivity more. It is not recommended
to change both the Autosensitivity breakpoint and the base level (for the
ESPrit 3G processor). If you change base level breakpoint or Autosensitivity
breakpoint parameters from the default, it will result in a complex interaction
between the two. If you change one, it is recommended to set the other to
the default.
Recommendations for changing Autosensitivity (ASC) breakpoint
Indication
Background noises
are too soft or all
sound is becoming
too soft
Background
noises are too
loud / becoming
troublesome
Recommendation
for a CP810 and
Freedom™ sound
processor
Increase the
Autosensitivity
breakpoint, for
example from
57 to 59
Decrease the
Autosensitivity
breakpoint, for
example from
57 to 55
Recommendation
for an ESPrit™ 3G Outcome
sound processor
Increase the
Autosensitivity
breakpoint, for
example from
-15 to -13
Decrease the
Autosensitivity
breakpoint, for
example from
-15 to -17
Autosensitivity will
be less aggressive
/ prevent from
turning down the
sensitivity too much
Autosensitivity
will turn down the
sensitivity more
Autosensitivity is used alone or in combination with other input processing
technologies for the SmartSound Everyday, Noise, Focus and Music programs.
See section 1.13 SmartSound for more information.
1.13 SMARTSOUND™ ENVIRONMENTS
A SmartSound™ Environment provides guidance as to which SmartSound
option is best suited to a particular listening environment. Each environment
has a default option and sub-options for differing recipient needs. For a
Freedom™ MAP, the following SmartSound environments are available. The
default option for an environment is highlighted in bold font.
46
CLINICAL GUIDANCE | SECTION ONE
Environment Options
Everyday
This environment is used in
typical listening situations.
A clinician will typically
program this in P1 and
instruct the recipient to
use this setting most of the
time. It can be modified
for recipients whose
listening environments are
particularly loud or soft.
• CP810 SOUND PROCESSOR OPTIONS
Autosensitivity™ + ADRO® – Autosensitivity minimizes the effects
of noise in the changing acoustic environment. ADRO dynamically
optimizes the level of sounds in each channel.
ADRO – ADRO is designed to make soft sounds more audible while
maintaining comfort for loud sounds. It helps the listener to process
information in different listening environments.
Whisper™ + ADRO – If the “Everyday” environment is typically
quieter, Whisper + ADRO boosts, compresses and then optimizes
the level of sounds in each channel.
Whisper™ – Whisper boosts and compresses the signal.
None – No SmartSound option enabled.
Note – Whisper is not recommended for noisy environments
• FREEDOM SOUND PROCESSOR OPTIONS
ADRO – ADRO is designed to make soft sounds more audible while
maintaining comfort for loud sounds. It helps the listener to process
information in different listening environments.
Autosensitivity + ADRO – If the “Everyday” environment is typically
noisy, Autosensitivity + ADRO optimizes sensitivity and then
optimizes the level of sounds in each channel.
Whisper + ADRO – If the “Everyday” environment is typically
quieter, Whisper + ADRO boosts, compresses and then optimizes
the level of sounds in each channel.
Whisper – Whisper boosts and compresses the signal.
Note – Whisper is not recommended for noisy environments.
Noise
This environment is used
when there is significant
ongoing background noise
coming from all sides of
the recipient. A clinician
will typically program
this in P2 and instruct the
recipient to use this setting
when listening to sounds
all around while in a noisy
place.
• CP810 SOUND PROCESSOR OPTIONS
Zoom + Autosensitivity + ADRO – Includes fixed directional
hearing. Then Autosensitivity minimizes the effects of noise in the
changing acoustic environment and ADRO dynamically optimizes
the level of sounds in each channel.
Zoom + Autosensitivity – Includes fixed directional hearing, then
minimizes the effects of noise in a changing acoustic environment.
Zoom + ADRO – Includes fixed directional hearing, then ADRO
dynamically optimizes the level of sounds in each channel.
Autosensitivity – minimizes the effects of noise in a changing
acoustic environment.
• FREEDOM SOUND PROCESSOR OPTIONS
Autosensitivity + ADRO – Autosensitivity minimizes the effects
of noise in the changing acoustic environment. ADRO dynamically
optimizes the level of sounds in each channel.
Autosensitivity – minimizes the effects of noise in a changing
acoustic environment.
ADRO – ADRO is an input processing algorithm designed to make
soft sounds more audible while maintaining comfort for loud sounds.
47
SECTION ONE | CLINICAL GUIDANCE
FOCUS
This environment is used
when there is significant
background noise, but the
focus is on hearing what
one person, or a small
group of people are saying.
A clinician will typically
program this in P3 and
instruct the recipient to
use this setting when
listening to sounds right in
front while in a noisy place.
• CP810 SOUND PROCESSOR OPTIONS
Beam™ + Autosensitivity + ADRO – This environment uses
adaptive directional hearing. Autosensitivity minimizes the effects
of noise for comfort and ADRO dynamically optimizes the level of
sounds in each channel.
Beam + Autosensitivity – Includes adaptive directional hearing and
then optimizes sensitivity setting.
Beam + ADRO – Reduces the background noise adaptively, then
optimizes the level of sounds in each channel.
Beam – In spatially separate noise (where noise is separate from
the target signal), Beam adaptively removes those noise sources
from the side and behind.
• FREEDOM SOUND PROCESSOR OPTIONS
Beam + Autosensitivity + ADRO – This environment uses
adaptive directional hearing. Autosensitivity minimizes the effects
of noise for comfort and ADRO dynamically optimizes the level of
sounds in each channel.
Beam + Autosensitivity – Includes adaptive directional hearing and
then optimizes sensitivity setting.
Beam + ADRO – Reduces the background noise adaptively, then
optimizes the level of sounds in each channel.
Beam – In spatially separate noise (where noise is separate from
the target signal), Beam adaptively removes those noise sources
from the side and behind.
MUSIC
The music environment is
designed to be beneficial
when listening to a variety
of music; either live or
via an audio source such
as an iPod®. A clinician
will typically program
this in P4 and may try all
the variations within the
environment over time.
• CP810 SOUND PROCESSOR OPTIONS
Whisper + ADRO – Whisper boosts the level of soft signals
without increasing loud sounds. The ADRO component then
dynamically optimizes the level of sounds in each channel. Whisper
+ ADRO boosts, compresses and then optimizes the level of sounds
in each channel.
Autosensitivity + ADRO
ADRO
• FREEDOM SOUND PROCESSOR OPTIONS
Whisper + ADRO – Whisper boosts the level of soft signals
without increasing loud sounds. The ADRO component then
dynamically optimizes the level of sounds in each channel. Whisper
+ ADRO boosts, compresses and then optimizes the level of sounds
in each channel.
Autosensitivity + ADRO
ADRO
The default environment for a new MAP is “Everyday”.
Telecoil Mixing and Telecoil Always On are extra options available with the
above SmartSound environments for the Freedom processor. For CP810, a
single button press on the processor or remote assistant will toggle telecoil on/
off. An Auto Telecoil option is also available with CP810 where the incoming
signal is analyzed and the processor switches on the telecoil automatically
if the signal is analyzed to be speech. This option must be enabled through
Custom Sound™ and then activated via the CR110 Remote Assistant.
48
CLINICAL GUIDANCE | SECTION ONE
When you convert a Freedom MAP to a Nucleus 24 MAP, input processing
options that are not supported on Nucleus 24 sound processors will not
be available. Similarly, when you convert a CP810 MAP to a Freedom or
Nucleus 24 MAP, input processing options (e.g. Noise with zoom) that are not
supported on Freedom or Nucleus 24 processors will not be available.
1.14 Objective Measurements
1.14.1 Electrically-evoked Auditory Brainstem Response (EABR)
EABR is an electrophysiological measurement technique that records the
response of the auditory brainstem to electrical stimulation from the implant.
Externally applied scalp electrodes are used to record the EABR. To perform an
EABR, you need an external evoked potential averaging machine with a trigger
input. The trigger input of your EABR machine is connected to the trigger
output of the Programming Pod. The trigger is a TTL compatible pulse.
When you perform an EABR with Custom Sound™ EP software, only the
thresholds are stored in your Custom Sound database. The actual EABR traces
should be stored on the external machine.
Electrode Placement: EABR recordings from the non-implanted side usually
have a smaller stimulus artifact. Therefore, the following electrode montage is
recommended: (+) on the forehead, (-) on the non-implanted mastoid and a
reference on the contralateral cheek (a position in the middle between (+) and
the (-) electrode is best).
Recommended Setting for the EABR Machine
The amplifier should have a fast response time. The high-pass filter cut-off
frequency should be set between 1 Hz and 150 Hz and the low-pass filter
cut off frequency at 5 kHz (or 3 kHz if needed). You need an analog to digital
converter (ADC) with at least 12 bits range and a sample frequency of 10 kHz.
The pre-amplifier gain should be between 60 and 100 dB.
Tips for Recording EABR
• To prevent interference from the RF that is sent from the coil to the
implant during recording, an RF free period can be set in the software that
prevents RF being sent after a stimulus. Make sure that the RF free period
covers the measuring window of your external EABR equipment.
• Bipolar stimulation modes produce less artefact than monopolar
stimulation modes.
• Apical electrodes usually produce less artefact than basal electrodes.
49
SECTION ONE | CLINICAL GUIDANCE
• Alternating stimulus polarity will effectively reduce the stimulus artefact.
However, there may be a disadvantage if the evoked brainstem responses
from negative and positive leading stimulus pulses have different
response latencies. This can be reduced by using narrow pulse widths, for
example, 25 μs.
(Absence of an EABR does not mean that the implant is not working or that
the individual will not stimulate postoperatively.)
1.14.2 Cortical Evoked Potentials (CEP)
Cortical Evoked potentials can be recorded in a similar manner as EABR.
Practically, the only difference between EABR and CEP is the time between the
stimulation pulse and the recording window. Typically, the EABR signal occurs
at 1 – 10 ms after the stimulus while the CEP signals can be recorded between
100 and 500 ms. Clinically, CEP is usually more associated with perception
(conscious), while EABR is merely a sign of detection (unconscious).
1.14.3 Electrical Stapedius Reflex Test (ESRT)
The acoustical stapedius reflex is a small movement of the stapedius muscle in
the middle ear that is elicited by loud (>80 dB SL) acoustical stimulation. The
ESRT can be tested with an implant recipient and is generally believed to have
a correlation with C-level. There are two ways to measure ESRT thresholds:
Method 1: Visual inspection ESRT
During surgery, after the electrode has been placed and with the skin flap still
open, the implant can be stimulated and the surgeon can look for a stapedius
reflex by visual inspection of the stapedius tendon or the middle ear ossicles.
Please keep in mind the following tips:
• Make sure the monopolar reference electrodes are covered to get a good
electrical connection. Preferably test the impedance first. If needed, use
saline to improve the electrical contact.
• Do not use a muscle-relaxing agent since this will suppress the ESRT.
Method 2: Impedance bridge testing of ESRT
When using this method, an electro acoustic immittance meter is connected
to either the contra- or the ipsilateral ear. By measuring the impedance change
during the electrical stimulation, a response can be observed. To use this
method, use your immittance meter in free running mode and observe for
changes in the impedance when stimulating. A trigger is also made available
by the system, should you use equipment that needs to be triggered for
measurements. This trigger functionality is similar to the description given for
EABR measurements.
50
CLINICAL GUIDANCE | SECTION ONE
Absence of ESRT does not mean the implant is not working or the recipient
is not hearing. There can be other causes for the absence of the response,
such as middle ear disease.
1.15 Guidance for FM Fittings
1.15.1 CP810 Sound Processors
FM systems are designed to improve a recipient’s signal to noise ratio (SNR)
to allow them to hear better in noise. They are useful when the signal comes
from a consistent source. For example, children may use an FM system in the
classroom to hear the teacher over other classroom sounds. Adults may use
an FM system in business meetings to hear the presenter over the sound of a
projector fan and other ambient noise. The Nucleus® CP810 sound processor
can incorporate FM signal inputs through the following devices :
• an FM ear-level receiver connected to the sound processor using the Euro
Accessory Adaptor
• a neckloop receiver and the sound processor’s telecoil, and
• an ESPrit™ FM cable connected to a bodyworn receiver
Ear-level FM receivers (using the Euro Accessory Adaptor): The microphone
of the FM transmitter picks up the speaker’s voice and sends it via a specific
radio frequency (RF) channel to the FM receiver. When the transmitter and the
receiver are turned on, the wireless connection is established between the two
devices, since most current devices will automatically synchronize to the same
channel (this can be done manually if required). The Euro Accessory Adaptor
connects an ear-level receiver to the CP810 sound processor via the accessory
socket.
Neckloop receivers: A neckloop is a necklace-size loop of covered wire that
functions as the FM receiver in an FM system. The sound processor’s telecoil
is used to pick up the electromagnetic field that the neckloop produces.The
microphone of the FM transmitter picks up the speaker’s voice and sends it via
a specific radio frequency (RF) channel to the FM receiver. The FM neckloop
receiver is worn around the neck of someone who has a sound processor with
a telecoil. When the transmitter and the receiver are turned on, the wireless
connection is established between the two devices, since most current devices
will automatically synchronize to the same channel (this can be done manually
if required). A neckloop receiver used with a telecoil is the interface of choice of
many CI users.
ESPrit FM cables: The ESPrit FM cable connects the CP810 Sound Processor
to a commercially available body-worn FM receiver using the Freedom
51
SECTION ONE | CLINICAL GUIDANCE
Accessory Adaptor. The Freedom Accessory Adaptor is needed to connect the
processor end of the ESPrit FM cable into the accessory socket of the CP810
Sound Processor. The body-worn FM receiver is used in combination with an
FM transmitter and microphone, which picks up the speaker’s voice.
The following Custom Sound software settings are recommended when fitting
FM systems for use with the CP810 sound processor :
Parameter
Mixing Ratio
Children
Mixing Ratio
Adults
52
Recommendation Rationale
Default 1:1
A mixing ratio of 1:1 in a classroom
environment provides a good compromize
between FM inputs (teacher) and the
sound processor microphone inputs (other
students in the room). Other mixing ratios
may be used as desired to reduce audibility
of sounds coming directly into the CP810
Sound Processor microphones, however 1:1
is strongly recommended for classroom use,
meetings, etc.
Note: Clinicians will need to set this as the
default for teenagers and adults in Custom
Sound if a 1:1 mixing ratio is required and
the Simple UI for the Remote Assistant is
being used by the adult recipient (i.e. the
mixing ratio cannot be changed with the
Simple UI on the Remote Assistant and 1:1 is
the default for pediatrics and not adults).
Default 2:1
A mixing ratio of 2:1 provides FM
precedence, reducing audibility of sounds
coming directly into the CP810 Sound
processor microphone.
CLINICAL GUIDANCE | SECTION ONE
Parameter
Auto Telecoil
Recommendation
Off. (Note: for
neckloop receivers,
please activate the
telecoil)
SmartSound
Environment
ASC+ADRO (use
default Everyday
Environment
setting and the
default sensitivity
setting of 12)
Rationale
Cochlear recommends deactivating Auto
Telecoil for children. This is especially true
with FM systems because the first sentence
spoken by the teacher after a long pause
may not be picked up by the FM (because
it can take a few seconds for the auto
telecoil to recognize the incoming speech);
and music is not likely to activate the auto
telecoil (because the auto telecoil signal
may drop out when non-speech signals are
present).
Note: Clinicians should not deactivate the
telecoil on the CP810 for recipients who
may use a neckloop receiver. Additionally,
clinicians may need to check if recipients
using a neckloop receiver hear a “buzzing”
sound when using a sensitvity setting of
12. If the “buzzing” sound is present, the
clinician should not deactivate sensitivity
on the Remote Assistant as this level may
need to be reduced to 8 to eliminate the
“buzzing” sound when using the neckloop
receiver with the CP810 Sound Processor.
ASC is designed to automatically reduce the
sound processor’s microphone sensitivity to
reduce the negative effects of background
noise and is proven to provide optimal
performance when using FM. ASC should
always be used with FM (1).
Reference
1. Wolfe J, Schafer E, Heldner B, Mulder H, Ward E, Vincent B. Evaluation of speech
recognition in noise with Cochlear implants and Dynamic FM. Journal of the American
Academy of Audiology. 2009; 20:409-421.
The following channels are recommended for use with FM systems, to ensure
optimal performance :
H band : H02, H06, H08, H12, H16, H20, H33
N band : N01, N12, N18, N52, N64
53
SECTION ONE | CLINICAL GUIDANCE
Many factors impact the battery life of a sound processor including the use
of some accessories. It is important to note that ear-level FM receivers that
require the use of the Euro Accessory Adaptor are active devices (i.e. they
draw power from the CP810 Sound Processor, unlike other accessories such
as the personal audio cable which is not an active device). Therefore use of
an ear-level FM receiver with the Euro Accessory Adaptor will reduce battery
life of the CP810 Sound Processors. This reduction can range from 10-40% of
battery life, depending upon various MAP parameters and whether a dynamic
FM system is used. (The most recent Build Standard of the CP810 Processor
(Build Standard C) is required in order to use a dynamic FM ear-level receiver.)
Recipients with high powered MAPs (the battery life estimate is <19 hours with
the standard battery module using two Zinc Air batteries) may experience
issues with FM use. In this scenario, the FM device exceeds the power
capability of the two Zinc Air batteries and the clinician may need to lower the
MAP stimulation rate or recommend use of the standard rechargeable battery
module. Custom Sound will provide information about whether a battery
module is suitable with using FM systems. This information can be accessed
when viewing the battery life estimates for the different battery types.
Towards the end of processor battery life, plugging in a coupled ear-level FM
receiver and Euro Accessory Adaptor may cause the sound processor to shut
down with the standard battery module (using two Zinc Air batteries). The
solution is to insert fresh batteries when using an ear-level FM receiver.
For additional FM information including troubleshooting tips and a list of
compatible FM receivers, please refer to the document ‘FM Solutions for the
CP810 Sound Processor’.
1.15.2 Freedom Sound Processors
The accessory mixing ratio determines the amount of attenuation of the
Freedom microphone compared to the FM transmitter microphone. The
mixing ratio is set for each program using Custom Sound. For children, the
default mixing ratio for accessories is 1:1. In a classroom environment this
provides a good compromize between FM inputs (teacher) and the sound
processor microphone inputs (other students in the room). For adults, the
default mixing ratio for accessories is 2:1 to provide automatic FM precedence
by reducing the audibility of sounds coming directly into the Freedom Sound
Processor microphone.
54
SECTION TWO | CLINICAL GUIDANCE
CLINICAL GUIDANCE | SECTION TWO
SECTION 2: PROGRAMMING
RECOMMENDATIONS FOR
SPECIALTY DEVICES
2.1 SPECIALTY DEVICES
2.1.1 ABI
The Nucleus® 24 ABI (Auditory Brainstem Implant) is functionally very similar
to the Nucleus 24 cochlear implant and uses the same receiver/stimulator
(Figure 1).
Figure 1 : The
Nucleus 24 ABI
implant
The ABI is supported by the following sound processors:
• Freedom™ (with Custom Sound™)
• SPrint™
The main differences between the ABI implant and the other cochlear
implants include:
• The electrode array comprizes 21 platinum disk electrodes, 0.7 mm
in diameter, mounted on a silicone carrier in three rows of seven. The
silicone carrier measures 8.5 mm x 3.0 mm x 0.6 mm. The 21 stimulating
electrodes correspond to E2-E22 in the programming – there is no E1
connection (Figure 2).
• A removable magnet is fitted in the centre of the implant’s receiver coil. A
surgeon may remove this and replace with a non-magnetic plug during a
Nucleus 24 ABI surgery.
55
SECTION TWO | CLINICAL GUIDANCE
Figure 2:
Descriptive
illustration of the
Nucleus 24 ABI
2.1.1.1 Setting Up the ABI Equipment
Before switch-on
• Since tuning the Nucleus 24 ABI is time-consuming, consider scheduling
the recipient for programming over two to three days. The underlying
medical condition might also mean individual sessions need to be short.
• Counsel the recipient about the tuning procedure and assess their
expectations.
• Since successful programming of the Nucleus 24 ABI relies upon good
recipient feedback, before each test session and each individual test, give
clear instructions to the recipient
• Take a CT scan and/or MRI to check the electrode array has not moved
from the lateral recess. You may take this scan any time between two
weeks after surgery and the morning of the switch-on.
Caution: Recipients who do not have the internal magnet removed from
their implant may be subject to additional regional restrictions with Magnetic
Resonance Imaging (MRI). If the magnet requires removal, see the Nucleus 24
ABI Surgeon’s Guide for more information.
Programming equipment
Use Custom Sound software and a Pod (for a Freedom sound processor) or a
Portable Programming System (PPS) (for a SPrint sound processor) to program
the Nucleus 24 ABI.
56
CLINICAL GUIDANCE | SECTION TWO
ECG monitoring equipment
Caution: During stimulation the recipient must be connected to ECG
monitoring equipment with a member of medical staff qualified in
resuscitation present.
Due to the proximity of the auditory brainstem implant electrodes to the tenth
nerve (vagus), there is a small risk that electrical stimulation could disturb
heart rhythm. A standard 3-lead ECG is sufficient to monitor heart activity.
The recipient may be seated or supine for programming, according to comfort.
You must always follow this procedure for the first fitting and for subsequent
programming if previously untested electrodes are being used, or if the
recipient has reported any side effects consistent with a heart rhythm change
(e.g. feeling unwell, light headed, palpitations, etc.).
2.1.1.2 Programming the ABI
Transmitter coil
If the internal magnet has been removed from the Nucleus 24 ABI implant,
ensure that the external transmitter coil is held in position by use of either
a lightly elasticated headband, or an adhesive retainer disk (available from
Cochlear). In each case, you must ascertain the orientation of the implant to be
able to correctly position the transmitter coil.
To position the transmitter coil:
1.Position the coil over the centre of the superior-posterior section of the
implant behind the pinna.
2.If using a retainer disk, expose an area of skin on the scalp directly over the
receiver coil of the implant.
3.Trim away a circular patch of hair (approx. 15 mm in diameter) a few
millimetres above the centre position of the coil.
4.Wipe clean the exposed skin with gauze moistened with 70% isopropyl
(rubbing) alcohol.
5.When the skin is dry, peel off the backing of the retainer disk and press the
disk firmly to the scalp.
6.Attach the retainer disk so it rests just above the centre of the receiver coil
of the implant, since the transmitter coil will not adhere directly to the
centre of the retainer disk (Figure 3).
57
SECTION TWO | CLINICAL GUIDANCE
Figure 3:
Positioning the
retainer disk
7.Position the transmitter coil so it is just below the retainer disk. The
transmitter coil will then be located directly over the receiver coil.
8.Re-apply retainer disks every one to three days as required.
Finding the receiver/stimulator
To find the receiver/stimulator:
1.Palpate the area or check for a tattoo, (if used).
2.Use Custom Sound software to connect to the receiver/stimulator.
3.Start testing with headband, then shave the scalp for the retainer disk.
Note: To place retainer disk, clean (i.e. with alcohol) and dry a quarter-sized
area and place disk slightly higher than you think is required. Do not perform
an impedance test until all electrode T- and C- levels have been checked.
Preparing the recipient for responses
When programming an ABI recipient, you may want to ask the recipient to
provide the following responses:
• Let you know as soon as the recipient hears or feels anything;
• Let you know when sound is comfortably loud;
• Let you know what it sounds like (i.e. bell, tone, buzz, etc.);
• How much the recipient notices the side effects;
• Give you a number for the pitch of the sound.
Rating Scales 58
Pitch magnitude
1 – 100
Non-auditory sensations
1–4
Loudness
1 – 10
CLINICAL GUIDANCE | SECTION TWO
Performing Psychophysics
Note: It is important that you perform psychophysics on an electrode-byelectrode basis. Interpolation or streamlined fitting is not appropriate for an
ABI due to variation in T- and C-levels from one electrode to the next, even
when using monopolar mode.
Default parameters
Cochlear recommends using the SPEAK strategy for the initial programming
session, as it allows the use of wider pulse widths and has a lower rate of
stimulation. Both of these factors may contribute to a reduction of side effects
that the recipient may experience. Monopolar (MP1+2) mode is recommended
for all routine programming. In the event of excessive side effects, you may use
bipolar mode. For more information, see Managing side effects.
Use the following default parameters for programming:
Strategy: SPEAK
Stimulation mode:
MP1+2
Pulse width:
100 µs
Number of maxima:
6
Pulse rate:
250 Hz
Telemetry
Caution: Do not perform an impedance telemetry sweep prior to an initial
psychophysics investigation. All electrodes are stimulated during this process
and could cause discomfort to the recipient if they have low side-effect
thresholds on any electrodes.
Finding T- and C- levels
Programming the Nucleus 24 ABI differs from other Cochlear Nucleus implants
because most recipients may experience non-auditory side effects on a
number of channels. Whether these side effects occur on a few channels rather
than most, or whether they occur around C-level rather than around T-level
determines the complexity of programming.
59
SECTION TWO | CLINICAL GUIDANCE
Scenario One
In the best case scenario, all channels would have both T-levels and C-levels
below any side-effect threshold (Figure 4).
Figure 4 : Best case
ABI programming
scenario
Scenario Two
In the worst case, it is impossible to find T-levels and C-levels since they are
above the threshold of a side effect on all channels (Figure 5). This implies
that the device may not be positioned optimally over the cochlear nucleus, or
the cochlear nucleus is not responsive to electrical stimulation (e.g. irradiation
damage).
Figure 5 : Worst case
ABI programming
scenario
60
CLINICAL GUIDANCE | SECTION TWO
Scenario Three
In a typical case, there is usually a group of channels which has only side
effects, another which has only auditory sensations, and a further group which
has a side effect which presents between T- and C-level (Figure 6).
Figure 6 : Typical
ABI programming
scenario
It is recommended that you investigate C-levels on all possible channels before
attempting to find accurate T-levels. It may also be helpful to investigate the
periphery of the electrode array to get a quick impression of auditory and nonauditory areas (see Figure 7).
Figure 7 :
Investigating the
periphery of the ABI
electrode array
Using this method:
1.Test the periphery and then systematically test all electrodes using nearby
levels and nearby side effects as an indication of the likely response.
2.For each electrode combination, commence stimulation at Current Level =
1 and increase slowly.
3.Watch the recipient for any non-auditory side effects that are not obvious
to the recipient (e.g. throat twitch). Check the heart monitor for any
significant rhythm change.
4.It may be useful for the recipient to see the stimulus light on the
programming system and to indicate sensations (auditory and nonauditory) on a loudness/sensation strength scale.
61
SECTION TWO | CLINICAL GUIDANCE
Table 1: Loudness/sensation strength scale
Auditory Sensation
Scale
Side Effect
Stop
10
Stop
Too loud
9
Uncomfortable sensation
Maximum comfortable level
8
Very loud
7
Loud
6
Medium loud
5
Medium
4
Quiet
3
Very quiet
2
Just hearing
1
Very slight sensation
No sound
0
No sensation
Strong sensation
Medium strong sensation
Mild sensation
Exceeding safe levels of stimulation
Caution: In Current Level modulation, when stimulus pulse widths exceed
200 µs it becomes possible, at high stimulus output, to create levels of charge
density on the electrodes which exceed established safety margins.
When wishing to increase the intensity of a stimulus beyond 255 units using
Current Level (CL) modulation, you can increase the stimulus pulse width,
either globally or locally, on selected channels. You need to perform this with
caution when using the Nucleus 24 ABI, since with wider pulse widths it could
create levels of charge density on the stimulating electrodes that exceed
recommended biological safety margins applicable to electrical stimulation
of the cortex. Exceeding such limits could lead to a gradual increase in a
recipient’s perceptual threshold over time. This could result in a decrease in
performance and either temporary or permanent damage to the cochlear
nucleus structure. Permanent damage could prevent long term benefit from
the implant.
The recommended values for the safe current level for a variety of pulse width
options (which are applicable regardless of the programming system and/or
software in use) are shown in the table below.
Note: there is an inverse relationship between pulse width and the limit for
safe current level, i.e. as the pulse width is increased, the upper limit of the safe
current decreases (when an ABI24M implant type is selected, an on-screen
visual warning will be given when these limits have been reached).
62
CLINICAL GUIDANCE | SECTION TWO
What to do if you reach the safe limit level
The levels listed in the table below are considered to be conservative values
of the stimulation safe limit, i.e. they are significantly below levels at which
damage has ever been observed in neural tissue. These boundaries should,
however, be treated with caution, and as suggested below.
Table 2: Programming recommendations when approaching safe limit levels
Situation
Action
Current Level reaches
the safe level and
recipient still hears no
sound
Current Level reaches
the safe level and
recipient hears only a
quiet sound
Do not stimulate at a higher level on this channel
Current Level reaches
the safe level and the
recipient already hears
a loud sound
Do not increase the level further unless all channels
exhibit the same phenomenon and the recipient would
not get functional benefit from their sound processor
without increased amplitude. Consider either decreasing
or increasing pulse width to see whether you can achieve a
louder sensation compared to the new safe level.
Do not increase the level further even if this channel is not
as loud as adjacent channels
Note: If the safe Current Level has been exceeded, inform the recipient of the
potential consequences as detailed above. It is only with a recipient’s consent
that you may set the levels above the recommended limits.
63
SECTION TWO | CLINICAL GUIDANCE
Table 3: Maximum safe current and corresponding current levels for various
stimulus pulse widths for the Nucleus ABIM implant
Pulse width
(µs)
Maximum safe
Current Level (CL)
25
50
100
150
200
250
300
350
400
>255
>255
>255
>255
255
244
235
227
221
The above table shows that up to pulse widths of 200 µs, the full stimulator
output (255 units) may be safely used. Beyond this, the inverse proportional
relationship between pulse width and maximum safe current imposes Current
Level values progressively less than 255 with increasing Pulse Widths. To ensure
that you remain within established safety limits, please refer to Table 2 above.
Scenario Four
In rare circumstances it may be possible to obtain T-levels on several channels,
yet not achieve C-level on any channel before a side effect occurs, as shown in
Figure 8.
Figure 8 : T-levels
found with C-levels
not achieved before
a side effect occurs
In this case, see Managing side effects. If this does not improve the situation, it
will probably be ineffective to balance these channels to an overall significantly
reduced C-level. This may potentially limit the detection of temporal
information in speech.
64
CLINICAL GUIDANCE | SECTION TWO
For supplementary programming guidelines for the Nucleus Freedom Processor
for Nucleus 24 ABI (ABI24M) using Custom Sound 2.0 or Custom Sound 3.0,
please contact your Cochlear representative.
2.1.1.3 Managing Side Effects
• Investigate narrower bipolar combinations, which either use or traverse
electrodes giving auditory sensations in monopolar mode (if any),
especially where these sensations have the largest dynamic range.
Investigate bipolar combinations which represent different physical
orientations.
• If there were no auditory sensations in monopolar mode, concentrate on
areas where non-auditory sensations start at the highest levels. Avoid, as
far as possible, areas with strong or uncomfortable side effects.
• Avoid using (either as an active or indifferent) electrodes which have a
low threshold of non-auditory sensation, especially if that sensation is
uncomfortable.
• If T-levels and/or C-levels approach the maximum safe stimulation levels
(or cannot be obtained at all), switch to wider bipolar combinations.
• Aim to have a logical arrangement of electrodes, rather than a mesh or
‘cobweb’ of overlapping currents, unless electrode combinations are very
limited, and unless all selected combinations give different pitch sensations.
• Avoid creating more channels than are functionally beneficial, or using the
same electrode many times as an active electrode.
The aim of this process is to narrow the area giving the best auditory
sensations. This is largely dependent upon what the recipient reports, but
in general, try to obtain the narrowest stimulation modes with the largest
dynamic range.
65
SECTION TWO | CLINICAL GUIDANCE
2.1.1.4 Fine Tuning the ABI
Balancing/sweeping
Before carrying out any pitch perception test, it is important to balance the
loudness of all functional channels. To achieve this, first balance at C-level, and
then at 50% of the dynamic range.
• Balancing at C-level – Use the Sweep option to stimulate pairs/groups
of channels at C-level, making adjustments as appropriate. Always use one
balanced channel as a reference for the next one. Do not balance channels
with reduced loudness due to a side effect but, instead, balance other
electrodes and then consider omitting this electrode from the final MAP.
This is particularly relevant if, after pitch ranking, this electrode falls into
the more useful frequency range, below 4 kHz.
• Balancing at 50% of dynamic range – Carry out loudness balancing
at 50% of the T-C range and then adjust the T-level to compensate, e.g.
reduce the T-level for any channel that sounds louder than its neighbour.
Pitch-ranking
Unlike the cochlear implant electrode array, it cannot be assumed that there is a
definite tonotopicity across the auditory brainstem implant electrode array. This
makes it essential to pitch rank all functional channels before creating a MAP.
Pitch ranking is generally quite difficult for Nucleus 24 ABI recipient because:
• most recipients report a mixed or complex pitch percept on each
channel in response to stimulation and these are difficult to compare
with one another
• many channels may sound quite similar in overall pitch
• changing the stimulus intensity may change the pitch percept on
an individual channel
Use the Nucleus 24 ABI Pitch Ranking Worksheet (Figure 9) to compare
successive electrode pairs.
Tip: Use the Set Levels screen to present stimuli. Deactivate all channels except
the two that require comparing and then use the sweep or balance option.
66
N33595F ISS3 FEB10
CLINICAL GUIDANCE | SECTION TWO
Give clear instructions to the recipient before conducting the pitch-ranking
procedure to ensure they understand the task is to rank pitch and not loudness.
1.(Optional) Sweep across all active channels to find two channels that are
clearly distinct by pitch (e.g. approximate lowest and highest) as this can
make the pitch ranking task easier.
2.Select the two channels you wish to compare by clicking on the channel
number until it changes to yellow.
3.In the sweep toolbar, select C-levels and Selected channels.
4.Ask the recipient to tell you which of the following two sounds is higher.
5.Sweep these two channels by using the sweep left or right icon, or by using
the L or R keys - remember the order you swept.
6.Based upon the recipient feedback, drag the lower pitch channel to the far
left channel position (i.e. channel 22), and the higher pitch channel to the
next channel position (i.e. channel 21).
7.Unselect the channel numbers.
8.To remind yourself which channels you have tested and ordered, consider
either a) using the NRT marker channel as a ‘flag’, or b) ensuring there
is always at least one deactivated channel separating the ordered from
unordered channels.
9.Select any other channel in the unordered list, then perform comparisons
with the lowest pitch channel in the ordered list. If the new channel is lower
than the lowest ordered channel, drag it to the new lowest position. If not,
compare the new channel to the highest ordered channel and if higher drag
it to the new highest position. If the new channel is between the two, drag
it to the position between the existing lowest and highest channels.
10.Repeat the above procedure for each new channel, comparing first with
the lowest and then the highest channel. Then compare it with channels in
between. Note that as the list of ordered channels increases, the number of
comparisons needed will also increase. It is generally suggested that after
comparing the new channel with the highest and lowest channels, to next
select a channel approximately half-way between and gradually iterate
to the correct channel position. This procedure works well provided no
channel becomes placed out of order.
67
SECTION TWO | CLINICAL GUIDANCE
11.It is strongly advised that after every few channels have been added to
the ordered list, to sweep all the ordered channels to check no channel is
incorrectly positioned.
12.In practice, recipients will usually find some channels that are so close
in pitch to another channel that they cannot easily be distinguished. It is
recommended to keep a note of any groups of electrodes (not channels, as
these may change throughout this procedure) which sound the same and
then never attempt to compare a new channel with more than one channel
from that group of electrodes.
Figure 9 : Nucleus
ABI 24M pitch
ranking worksheet
Creating and testing a Nucleus 24 ABI MAP
To create and test a Nucleus 24 ABI MAP:
1.Deactivate any channels that should not be used. If the number of channels
is below 6 and you select the SPEAK sound processing strategy, consider
‘doubling up’ each channel number on the Set Levels screen to obtain a
better frequency allocation table assignment.
2.Test the live MAP in the sound processor.
3.Globally adjust C-levels and/or T-levels according to the recipient response.
To improve sound quality, you could modify frequency allocation tables,
individual channel gains, number of maxima, deactivate ‘redundant’
channels (i.e. those with very similar pitch percepts), or reorder electrodes.
In all cases, recipient preference should be the main criteria for selection. Test
the recipient’s reaction to simple discrimination tasks. It is often helpful to
read a passage of text (following with your finger) to help the recipient make
68
CLINICAL GUIDANCE | SECTION TWO
a better subjective impression between MAPs. Once you select a favourable
MAP, encourage the recipient to use the processor as much as possible. It
is not recommended to give the recipient many different MAPs at a first
programming session.
2.1.1.5 Follow up Programming
Optimal sound processor tuning for Nucleus 24 ABI recipients is a complex
process and will involve many return visits to the clinic. Arrange these visits
regularly to start with to check the stability of T- and C-levels, and the
thresholds of any non-auditory side effects. Carefully monitor and compensate
any small fluctuations, particularly to T- and C-levels. You should record any
increase in side effects. Return visits may be a convenient opportunity to
investigate further parameters such as frequency allocation, sound processing
strategies, mode combinations and other processor settings. Try to make
only minor MAP changes and allow the recipient sufficient time to become
accustomed to a new MAP.
Note: Any adverse side effects, sudden changes to the recipient’s physical
condition, or loss of stimulation during processor use should be reported to
Cochlear within 24 hours.
2.1.1.6 Rehabilitation
It is encouraged to conduct a formal rehabilitation program for Nucleus 24 ABI
recipients, including evaluation of performance at appropriate test intervals. If
the use of the device is discontinued, it must be reported to Cochlear.
69
SECTION TWO | CLINICAL GUIDANCE
2.1.1.7 ABI Worksheets
Figure 10 : Nucleus®
24 ABI MAPping
worksheet
Figure 11 : MAPping
an ABI 24 recipient
70
CLINICAL GUIDANCE | SECTION TWO
Note: It is recommended to maximize perceptual abilities wherever possible.
This is because ABI performance is generally low at first.
To MAP an ABI recipient:
1. To find the receiver / stimulator, palpate the area or check for a tattoo
(if used).
2. Use Custom Sound to connect to the receiver / stimulator.
3. If the recipient has no internal magnet, start testing with a headband, and
then shave the scalp for the retainer disk.
4. Perform an impedance test when all T- and C- levels have been checked.
5. Review the possible outcomes with the ABI recipient.*
*Typical ABI outcomes: Auditory sensations only (5%), Auditory plus non-auditory sensations
(86%), Non-auditory sensations only (9%)
6. Start in the middle of the array (i.e. MP1+2) and measure T- and C- levels.
7. Attempt to use only channels with no side effects.
8. Perform a loudness balance.
9. Assess electrode specific pitch.
10. Remove electrodes that do not sound distinct in pitch
11. Double-up channels, if required to create a sufficiently wide
frequency allocation
12. Use a psychophysical summary sheet to track the following:
• electrodes tested;
• stimulation mode;
• type (and quality) of sensations (i.e auditory / non-auditory);
• magnitude (i.e. pitch / non-auditory sensations).
Note: Deactivate problem electrodes on screen.
Common MAPping outcomes
The following are common MAPping outcomes for ABI recipients:
• The number of useable electrodes is typically between 11 – 14;
• Side effects are more often found on medial (deeply inserted / higher
numbered) electrodes;
• Wide pulse widths are often required;
• There are approximately 6 – 11 distinctive pitches;
• Most channels are in mid-pitch range.
71
SECTION TWO | CLINICAL GUIDANCE
2.1.2 The Nucleus® 24 Double Array
The Nucleus® 24 Double Array (CI 11+11+2M) cochlear implant is based on the
Nucleus 24 (CI24M) cochlear implant. The receiver/stimulator and reference
electrodes are identical to those of the Nucleus 24.
The electrode array is split in two parts, a basal array for insertion into the basal
turn of the scala tympani and an apical array for insertion into the apical turn of
the scala tympani. The basal array has 11 active electrodes (numbered from 1 to
11) and 10 stiffening rings. The apical array carries 11 active electrodes (numbered
from 12 to 22) and 9 stiffening rings. It can be identified by a large gap between
the last two stiffening rings. The apical array exits the receiver/stimulator in the
middle between the other two arrays (Figure 12). The basal array (electrodes 1
to 11) is inserted into the basal turn of the scala tympani and the apical array
(electrodes 12 to 22) is inserted into the second turn of the scala tympani, thus
providing the same electrode order (1 to 22) as the Nucleus 24 cochlear implant.
An x-ray may be used to confirm the insertion orientation by identifying the
large gap between the last two stiffening rings of the apical array.
Figure 12 : The
Nucleus 24 Double
Array
The active electrodes are numbered from 1 to 11 (basal array) and 12 to 22
(apical array). The arrow shows the distinction mark on the apical array. If the
electrode arrays are interchanged or if a different surgical approach has been
used, programming the speech processor will be more difficult as the tonotopic
order of channels will no longer follow the order of the standard Nucleus 24
cochlear implant. Without correction this will lead to a wrong electrode-tochannel allocation in the speech processor’s MAP. This is particularly important
when programming children who cannot give reliable responses. Note: With
a standard insertion, the basal electrode array will be in the basal turn of the
cochlea and the apical array will be in the apical turn of the cochlea.
72
CLINICAL GUIDANCE | SECTION TWO
Prior to programming, check with the surgery report to confirm which
electrode array is in which turn of the cochlea and whether the orientation is
standard or retrograde, as this will affect electrode-to-channel allocation.
2.1.2.1 Programming the Double Array
The Nucleus 24 Double Array can be programmed in the same modes as the
Nucleus 24 (CI24M) except for common ground. However, it is recommended
to use MP1+2 where possible as this will result in lower T- and C-levels. In
monopolar mode (MP1, MP2, MP1+2), channels 1 to 11 on the basal array
and 12 to 22 on the apical array can be used in the MAP. In bipolar mode, the
arrangement of the electrode arrays within the cochlea and the stimulation
mode (BP+1, BP+2, etc.) will determine which electrodes can be used in the
MAP. Measure T- and C- levels in the routine way. In bipolar mode, the surgical
approach determines the arrangement of the electrode arrays within the
cochlea and thus which channels can be used. After setting the T- and C-levels,
equalize the recipient’s perception of loudness for each channel.
Determining Appropriate ‘Electrode-to-Channel’ Allocation
If the electrode arrays have been inserted in the standard way (basal array
into the basal turn and apical array into the second turn of the cochlea), the
implant can be programmed like a standard Nucleus 24. If the electrode arrays
have been interchanged or if another surgical approach has been carried out,
one or both of the electrode arrays will need to be given a different ‘electrodeto-channel’ order to maintain tonotopicity. Electrode array location (base or
apex) and direction (standard or retrograde) may be ascertained by performing
an x-ray. Alternatively, the Sweep command may be used whilst asking the
recipient to report on the subjective pitch order. A significant pitch difference
should exist between the apical and basal array, and between the ends of each
individual array. Note that pitch differences between electrodes in the apex of
the cochlea are generally less than those in the base.
To ascertain electrode direction (standard or retrograde):
1.Sweep across all electrodes in the apex. In a standard insertion, electrode
pitch should decrease from electrode 12 to electrode 22. A retrograde
insertion will have the opposite pitch order.
2.Sweep across all electrodes in the base. In a standard insertion, electrode
pitch should decrease from electrode 1 to electrode 11. A retrograde
insertion will have the opposite pitch order.
73
SECTION TWO | CLINICAL GUIDANCE
To ascertain electrode location (base or apex):
1.Select one active electrode mid-way along each array (e.g. 6 and 17 with
a full insertion of both arrays) using the channel check tick boxes. Use
the ‘Balance’ function to stimulate the two electrodes and deactivate all
remaining electrodes. If the electrode array is inserted as recommended,
pitch should decrease with increasing electrode number. Electrode arrays
that have been switched (i.e. basal array in the apex) will have the opposite
pitch order.
2.Repeat this test on different electrode pairs in the base and apex to confirm
tonotopicity. If results are not repeatable, an x-ray should be performed.
Test the MAP in live-voice mode and make any necessary adjustments.
For more detailed information on the various surgical approaches and how
these will affect programming the implant, please refer to the Programming
Guide for the Nucleus 24 Double Array provided by Cochlear.
74
CLINICAL GUIDANCE | NOTES
75
As the global leader in hearing solutions, Cochlear is dedicated to bringing
the gift of sound to people all over the world. With our hearing solutions,
Cochlear has reconnected over 200,000 people to their families, friends and
communities in more than 100 countries.
Along with the industry’s largest investment in research and development,
we continue to partner with leading international researchers and hearing
professionals, ensuring that we are at the forefront in the science of hearing.
For the hearing impaired receiving any one of Cochlear’s hearing solutions, our
commitment is that for the rest of their life they will Hear now. And always
Cochlear, the elliptical logo, Custom Sound, Freedom, ACE, AutoNRT, Whisper, Beam,
Autosensitivity (ASC), SmartSound, SPrint and ESPrit are trademarks of Cochlear Limited.
Nucleus is a registered trademark of Cochlear Limited.
ADRO is a registered trademark of Dynamic Hearing Pty Ltd.
Copyright Cochlear Limited 2010.
231495 ISS3 DEC10