1
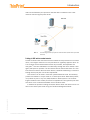
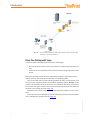
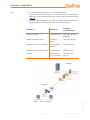
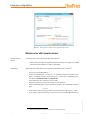
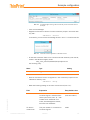
ThinPrint Connection Service
Printing via DMZ and into masked networks
(version 6.2.1)
Manual
ThinPrint GmbH
Alt-Moabit 91 a
10559 Berlin
Germany / Alemania
Cortado, Inc.
7600 Grandview Avenue
Suite 200
Denver, Colorado 80002
USA / EEUU
Cortado Pty. Ltd.
Level 20, The Zenith Centre,
Tower A
821 Pacific Highway
Chatswood, NSW 2067
Australia
E-Mail: [email protected]
Web: www.thinprint.com
Issued: February 27, 2015 (v67)
Notes
© Copyright
This document is the intellectual property of ThinPrint GmbH. This document may be copied in whole or
in part, provided this Copyright notice is included in every copy.
® Registered trade marks
All hardware and software names mentioned in this document are the registered trademarks of their
respective companies or should be regarded as such.
Safety warning
All ThinPrint products are pure software solutions. Please note the safety warnings in the technical documentation from your hardware vendor and from the manufacturer of each device and component.
Before beginning installation, we recommend closing all windows and applications and deactivating any
virus scanner.
© ThinPrint GmbH 2015
2
Manual
Contents
Introduction
................................................................................................................ 4
Connection Service scenarios ........................................................................................... 4
Standard ThinPrint scenario ........................................................................................ 4
Printing via DMZ and into masked networks ................................................................. 5
Driver Free Printing and V-Layer ....................................................................................... 6
Licensing ...................................................................................................................... 7
Example configuration ............................................................................................ 7
Basic installation ............................................................................................................ 9
Basic configuration .................................................................................................... 9
Workstation ................................................................................................................. 10
Central print server under Windows ................................................................................ 12
Windows server with Connection Service ......................................................................... 14
Creating printers on the central print server ................................................................. 16
Application server/host system ....................................................................................... 17
Example ................................................................................................................. 17
Print test ..................................................................................................................... 18
Further configuration options
............................................................................ 18
Configuration of the Connection Service .......................................................................... 18
Session manager ..................................................................................................... 18
Connections ............................................................................................................ 19
Client IDs .................................................................................................................... 20
Database ................................................................................................................ 20
Appendix .................................................................................................................... 21
Customer service and technical support .......................................................................... 21
© ThinPrint GmbH 2015
Relevant registry keys ................................................................................................... 21
Registry keys of ThinPrint Client (Service) Windows for Connection Service .................... 21
Registry keys of ThinPrint Engine for Connection Service Ports ...................................... 22
Registry keys of Connection Service ........................................................................... 22
Additional resources ..................................................................................................... 24
Abbreviations and acronyms .......................................................................................... 24
Manual
3
Introduction
Introduction
The change from expensive leased or dedicated lines to inexpensive VPN connections
– usually based on the economical DSL norm – is today a must for every IT manager.
Printing across VPN connections, however, creates quite a few challenges for administrators. Aborted print data transfer at even the slightest instability in the VPN
connection, inadequate addressability for printers in masked networks1, or the need
for central provision of printer drivers for remote offices are just a few of the difficulties that face administrators. Moreover, the very high data volume involved in printing
can quickly skyrocket the charges for VPN connections with by-volume tariffs.
ThinPrint Connection Service is the optimal solution for all of these issues. It stabilizes transmission for print data, even in case the connection is broken for up to 90
seconds. In contrast to the otherwise normal direction of communication, connections can be established from remote locations to a central server, thereby making it
possible to address network printers via TCP/IP even in masked networks or with
firewalls.
Furthermore the Connection Service is the perfect DMZ component for printing.
TCP ports must only be opened towards the Connection Service (Illus. 2), and no
data is stored or spooled locally.
Adaptive compression for Citrix or Microsoft terminal servers reduces print data
90% and more. What’s more, the patented Driver Free Printing technology makes
central administration of printer drivers unnecessary. For all other application servers
and host systems, the standard compression of ThinPrint is available.
Connection Service as a supplemental component to the ThinPrint Engine is therefore an ideal solution for easy, fast, and inexpensive connection of remote offices.
The example illustrates a test installation of the Connection Service (Page 7). Once
you are convinced of the software's functionality, the installation can be adapted to
your requirements.
Connection Service scenarios
Standard ThinPrint scenario
In a normal scenario, ThinPrint Engine is installed on a terminal server, a other application server, or a central (dedicated) print server. When a user initiates a print job,
ThinPrint Engine compresses and encrypts the print data and streams it (in packets
of some KB) across a preset amount of bandwidth to the ThinPrint Client (Illus. 1).
ThinPrint Client decompresses and decrypts the print data and forwards it to the correct print interface. If ThinPrint Output Gateway (Driver Free Printing) is used on the
server instead of and original printer driver, ThinPrint Client Windows feeds the print
4
© ThinPrint GmbH 2015
1
Network with network address translation (NAT)
Manual
Connection Service.fm
Introduction
data into the Windows print process so that the data is rendered on the client
machine with the original printer driver.
Illus. 1
Illus. 1
ThinPrint Engine sends print jobs to ThinPrint Clients (arrows show print data
direction)
Printing via DMZ and into masked networks
© ThinPrint GmbH 2015
So that ThinPrint Client does not have to be installed on every end device in a remote
office, it is enough to install it on a local print server or a gateway appliance (Illus. 2).
The ThinPrint Client installed there receives all print data, decompresses and
decrypts it 2 and then distributes it conventionally through the office network. Here
again, NAT poses no problem. The Connection Service resolves that issue: The ThinPrint Client connects to the Connection Service, therefore establishing a connection
through which print jobs can be sent despite NAT.
This scenario can be used in more than just the Windows world. All necessary
printers are installed in V-Layer mode on a central print server. With these printers,
it is possible to print in any Unix, SAP, AS/400 or iSeries system. The ThinPrint
Engine installed on the central print server compresses and encrypts the print data
and sends it over controlled bandwidth to the ThinPrint Client.
In addition the printers including Connection Service Ports and drivers can be created on the central print server using the ThinPrint Management Center.
2
Connection Service.fm
Under Windows, it can also render the data.
Manual
5
Introduction
Illus. 2
Illus. 2
ThinPrint Engine sends print jobs using Connection Services (arrows show
directions of TCP communication)
Driver Free Printing and V-Layer
ThinPrint’s Driver Free Printing offers two main advantages:
• No (native) printer drivers have to be installed on the Windows application servers.
• Print jobs can be compressed much more than when printing with native printer
drivers.
Driver Free Printing requires that all participating computers (application servers,
central and local print servers) have Windows as operating system.
Only on the client side can other operating systems be used: for print servers, print
server devices, or appliances with non-Windows operating systems, V-Layer can be
avoided. All necessary native printer drivers are installed on the central print server.
Driver Free Printing and V-Layer can be used simultaneously: mixed environments are
therefore not a problem (see also Page 10).
Examples of print server devices and appliances that are suitable for use as ThinPrint.
Connection Service is supported by ThinPrint Gateway TPG-25/65 and the Spool
Server ISD300/4x0 by SEH (see also Page 24).
© ThinPrint GmbH 2015
6
Manual
Connection Service.fm
Licensing
Licensing
1. You need the ThinPrint Engine Premium type license (ThinPrint version 10).
You enter this on the (to be installed) Cortado license server. The license server
can be installed on any computer in the domain, e.g. the print server. This is
not described in depth here, but details can be found in the License server
manual (Page 24).
2. For Connection Service, you can also apply in Enterprise Portal3 for a for a
THCG-0498-5 type license, free of charge. The figure in the third block (here:
5) shows the number of client devices with client ID (Page 20). Supply them
with a THCG license on the server that Connection Service is running on. If it's
running on the same server as the license server, give them a Premium license
there as well.
All license keys are valid for 30 days after they have been entered. They must be
activated within this time to continue printing. Demo license keys cannot be activated. A license key’s expiration date can be found in License Manager under VALID
UNTIL (Illus. 12).
Once you have successfully tested ThinPrint, you can purchase a full license. You
will receive new license keys, which are then entered in the License Manager. To activate the license keys upload them together with their registration keys to the Cortado
Enterprise Portal. For further information about the activation procedure see the
Licensing manual (Page 24).
Example configuration
This example of configuration should show how to configure an application server
and a central print server for printing with the Connection Service under Windows.
As example on the client side, a workstation running Windows is described (alternatively, a local print server could be used); information on using other operating systems and devices is found in the ThinPrint Client Linux or ThinPrint Client Mac user
manual as well as in the documents SEH TPG60/120 as a Client Gateway and SEH
ISD300/400 as a Client Gateway (see Page 24).
The components required for this example (Illus. 3) are:
1 application server (e.g. a Citrix XenApp server)
1 central Windows print server incl. ThinPrint Engine
1 Windows server incl. Connection Service
1 Cortado License Server (can be installed on any server)
1 NAT router
1 Windows compatible PC as a local print server – to be configured to support
Connection Service (incl. ThinPrint Client Service Windows)
• 1 client PC (Windows)
• 1 network printer with an internal or external print server
without embedded ThinPrint Client
© ThinPrint GmbH 2015
•
•
•
•
•
•
3
Connection Service.fm
https://enterpriseportal.cortado.com
Manual
7
Example configuration
Tips
1. The ThinPrint Connection Service only works with TCP/IP.
– Installation of the ThinPrint Engine on a central print server is not described in
depth here. For the installation procedure, please consult the relevant manual
(Page 24).
2. For this example configuration, you need the licenses referred to under Licensing (see above), of which 30 day demo versions are available.
IP address
(computer name)
Installed on ...
Component
Central print server
ThinPrint Engine
192.168.149.158
(ps0025)
Additional Windows server
Connection
Service
192.168.149.156
Application server (e. g. XenApp)
Terminal Server
Extension
192.168.149.5
Workstation (or local print server)
ThinPrint Client
192.168.1.16
Client PC
Desktop Extension, if necessary
192.168.1.51
(tp_01)
Illus. 3
8
© ThinPrint GmbH 2015
Illus. 3
Example configuration
Manual
Connection Service.fm
Example configuration
Basic installation
Application
server
– Provide an application server; e.g., a Citrix XenApp server or a Microsoft
Remote Desktop Session host (or terminal server).
Central
print server
– Install ThinPrint Engine on a central print server. Please consult the ThinPrint
Engine on print servers manual (Page 24).
Workstation
– Install a ThinPrint Client on a Windows Workstation (or on a local Windows
print server). See the appropriate manual ThinPrint Client Windows (Page 24).
Cortado License
Server
– Install the Cortado License Server on any Windows server. Enable at least one
user for ThinPrint. See the appropriate manual License server (Page 24).
Basic configuration
– Assign all computers and devices involved IP addresses in the headquarters’
subnet (192.168.149.0/24) and in the local, masked subnet
(192.168.1.0/24); for example:
• For
• For
• For
• For
• For
• For
the application server:
192.168.149.5
the central print server:
192.168.149.158
the server with Connection Service: 192.168.149.156
the local print server:
192.168.1.16
the client PC:
192.168.1.51
the network printer:
192.168.1.50
– If you are running non-Windows servers as host systems (application servers)
but the central print server is nevertheless a Windows server, please activat the
server role LPD SERVICE on the central print server (SERVER ROLES→ PRINT AND
DOCUMENT SERVICES→ LPD SERVICE, Illus. 4).
© ThinPrint GmbH 2015
Illus. 4
Connection Service.fm
Manual
9
Example configuration
Illus. 4
activat server role LPD SERVICE for UNIX
Workstation
On the workstations4 you can use Windows or a non Windows operation system. The
only requirement is that the ThinPrint Client to be installed supports the Connection
Service; the following are appropriate:
•
•
•
•
•
ThinPrint Client Windows
ThinPrint Client Service Windows
ThinPrint Client Linux
ThinPrint Client Mac
All print server devices and appliances with embedded ThinPrint Client
If you want to use Driver Free Printing for sending print data from the central print
server to the workstations, you must use a Windows machine for all participating
computers – application servers, central print servers, workstations. If only the application servers and the central print server run Windows as operating system, you can
then use V-Layer (see Page 6).
The following shows an example of how a Windows computer can be configured
with the ThinPrint Client Service Windows as local print server. For information on
Linux or refer to the ThinPrint Client Linux or ThinPrint Client Mac manual; for print
server devices and appliances see the SEH TPG120 as a ThinPrint Client Gateway
and SEH ISD400 as a ThinPrint Client Gateway documentation (Page 24).
Creating printers
ThinPrint Client
Service Windows
– Create two printers (printer objects) on the workstation for:
• the network printer HP Color LaserJet 3600 (Illus. 5)
• the network printer with an internal print server (network card)
Lexmark T644
– To do so, create new “Standard TCP/IP Ports”.
Install ThinPrint Client as described in the ThinPrint Client Windows manual
(Page 24).
– Start the ThinPrint Client Manager (via START menu).
– Find the printer IDs for the HP Color LaserJet 3600 and the Lexmark T644
under ASSIGNMENT – here, 1 and 2, respectively (Illus. 5).
10
© ThinPrint GmbH 2015
4
The client can also be installed on a local print server.
Manual
Connection Service.fm
Example configuration
Illus. 5
Illus. 5
ThinPrint Client Manager: printer IDs 1 and 2
– Enable USE CONNECTION SERVICE on the ADVANCED tab (Illus. 6).
Illus. 6
Illus. 6
Enable Connection Service
– In the CONNECTION SERVICE tab, enter the following (Illus. 7):
• Connection server address:
• TCP port:
• Client ID:
• Authentication key:
• Connection retry interval (s):
• Keep alive interval:
192.168.149.156
4001
99
111
300
60
(Page 9)
(Page 15)
(here as example)
(here as example)
(here as example)
(if displayed)
© ThinPrint GmbH 2015
– Close ThinPrint Client Manager with OK.
– Restart the THINPRINT CLIENT in the Windows Services folder.
Connection Service.fm
Manual
11
Example configuration
Illus. 7
Illus. 7
Entering the IP address of the server where Connection Service is running and
a client ID (see also Illus. 20)
Central print server under Windows
Creating printer
ports (ThinPrint
Engine)
– Open the ThinPrint Engine port configuration.
– Create a new printer port with the type “ThinPrint Connection Service port”
(arrow in Illus. 8).
Illus. 8
Illus. 8
Creating a new ThinPrint port for the Connection Service
– In the next window, enter a port name (Illus. 9).
Illus. 9
Illus. 9
Entering a port name (example)
12
Manual
Connection Service.fm
© ThinPrint GmbH 2015
– Open the properties (in context menu) of the new printer port (Illus. 10) and
enter the following:
• CONNECTION SERVER IP ADDRESS:
192.168.149.156
Example configuration
Illus. 10
Illus. 10
Entering Connection Service’s IP address
For print jobs to travel from the Connection Service to the workstation and from there
to the correct printer, the address information needs to be entered into the printer
names. This can be done manually or with ThinPrint Management Center.
The resulting printers then have the following syntax:
printer_name#client_ID:printer_ID
with hash mark (#) between the printer name and client ID
and with a colon (:) between client ID and printer ID
© ThinPrint GmbH 2015
– Select the appropriate name convention in the properties of the new ThinPrint
port (arrow in Illus. 11). Confirm with OK.
Connection Service.fm
Manual
13
Example configuration
Illus. 11
Illus. 11
Setting name convention of the Connection Service Port
Windows server with Connection Service
System requirements
The following are the operating system requirements:
• Windows Server 2003 or 2003 R2 with Service Pack 2 or higher (only x86),
Windows Server 2008 (only x64) or 2008 R2
Installation
Install the Connection Service on a separate Windows server as follows 5:
– Unzip file TP10x64Bundle.zip.
– Under TP10X64BUNDLE→ CORTADO→ 2-THINPRINT ENGINE 10 PREMIUM SOFTWARE→ THINPRINT CONNECTED GATEWAY 6.2.1→ SOFTWARE→ ENGLISH you can
find the files TPConnect.exe and Licman.exe.
– Copy these files into a directory of the server.
– Open the command prompt and change to that directory.
– Start License Manager from the command prompt in the installation directory
with:
Licman
– Enter a license key of the type THCG-xxxx-xxxxxxx-xxxx with LICENSE¡ NEW.
– If you need a demo license key, you can find it in the TP10x64Bundle.zip file.
14
Alternative installation: Connection Service on the central print server
Manual
Connection Service.fm
© ThinPrint GmbH 2015
5
Example configuration
Illus. 12
Illus. 12
License Manager: entering a demo license key for the Connection Service
(example)
– Close License Manager.
– Register the Connection Service from the command prompt in the same directory with:
TPConnect -install
If successful, you will receive the message shown in Illus. 13. Confirm with OK.
Illus. 13
Illus. 13
Connection Service registered as a Windows service
– So that the Connection Service can communicate with stationary end devices,
create in the Windows registry under:
hkey_local_machine\software\thinprint\tpconnect
the following entry:
Name
Type
Setting
Standalone
reg_dword
1
– Start the Connection Service configuration in the command prompt from the
installation directory with:
TPConnect -setup
© ThinPrint GmbH 2015
– Make the following settings in GATEWAY CONFIGURATION (Illus. 14):
Field
Explanation
Entry/default value
ADD IP
IP address of the server on which the
ThinPrint Engine is installed (here:
central print server, Illus. 3) – with
clusters the IP addresses of all
nodes; with Management Center,
also with their addresses.
192.168.149.158
(with ADD button)
TP SERVER
TCP port number for connection to
ThinPrint Engines
4000
CONNECTIONS
Connection Service.fm
Manual
15
Example configuration
Field
Explanation
Entry/default value
CLIENT
TCP port number for connection to
ThinPrint Clients
4001
CONNECTIONS
– Close the configuration panel with OK.
Illus. 14
Illus. 14
Configuring
a client ID
Connection Service: configuring the IP address of the central print server
– Open the command prompt and change to the Connection Service installation
directory.
– Set up the Client ID that you previously set up in ThinPrint Client Manager.
For the example in Illus. 7, enter the following command line:
TPConnect -add 99:111
– Lastly, restart the TP CONNECTION SERVICE in the Windows SERVICES folder.
Creating printers on the central print server
You can use Management Center, which is also a part of the ThinPrint Engine Premium license, for automatic printer creation (Page 24) It simplifies the creation of
printers and allows the transfer of finishing options to the created printers.
16
Manual
Connection Service.fm
© ThinPrint GmbH 2015
If no Management Center is available create the printers as follows:
1. Create printers with the following syntax, as for example:
HP Color LaserJet 3600#99:1
Lexmark T 644#99:2,
here, “99” represents the client ID (see Illus. 7), and “1” is the printer ID in
ThinPrint Client Manager (see Illus. 5). Note the syntax with hash key (#) and
colon (:).
Example configuration
2. Connect the printers with a Connection Service Port (here: CS_1, as an
example) you created before (Page 12).
The result is shown here:
Illus. 15
Illus. 15
Connection Service: created printers on the central print server
Application server/host system
The application servers send their print jobs to the printers installed on a central print
server. To print to these shares in a pure Windows environment, the terminal servers
(or desktops) only need to establish a connection to these shares. In contrast, for all
constellations in which non-windows servers are in use, you use the LPR/LPD print
protocol.
Example
AutoConnect can automate the creation of printers when opening a session with a
Windows machine. AutoConnect automatically creates printer connections (Illus. 17)
to the printers on the central print server (Illus. 15) for the duration of the session.
To do so, AutoConnect must be installed on each participating machine, as for
example on terminal servers. Use ThinPrint Terminal Server Extension for the installation of AutoConnect on Remote Desktop Session Hosts. This Extension is an option
in the Engine installation wizard. For desktops, use Desktop Extension.
Then enter the share from the central print server (here: HP Color LaserJet 3600
and Lexmark T644) into the AutoConnect configuration on the terminal server under
MAP ADDITIONAL PRINTERS (Illus. 16).
© ThinPrint GmbH 2015
Illus. 16
Illus. 16
Connection Service.fm
ThinPrint AutoConnect: Entering shares from the central print server
Manual
17
Further configuration options
Illus. 17
Illus. 17
Printers created on a Windows terminal server by AutoConnect - printing to
Windows workstation (TP Output Gateway)
The two printers in Illus. 17 can now be used for the duration of a terminal server
session.
Print test
Now test the Connection Service installation. Print using the newly created printers
(Illus. 17) on both network printers. The user who is printing must be enabled for
ThinPrint on the license server (Page 24).
Further configuration options
In addition to the configuration of the Connection Service on Page 14, the Connection
Service functions are described in more detail below.
Configuration of the Connection Service
– Start the configuration program of Connection Service in the command prompt
(from its installation directory) with:
TPConnect -setup
This opens the window shown in Illus. 18.
Session manager
There is only one value 6 that can be configured on the SESSION MANAGER tab:
MAX. CLIENT RECONNECT TIME
6
18
The other two values are used for configuring dynamic mode, which is not used here.
Manual
Connection Service.fm
© ThinPrint GmbH 2015
This value specifies the timeout for printing in case the Connection Service receives
a print job but the ThinPrint Client for which the print job is intended is no longer
connected with the Connection Service. If ThinPrint Client returns within the given
time, the print job will be sent to it; otherwise, the print job will be deleted.
The value is set in seconds (default: 80 s). See also “ReconnectTO”, Page 23.
Further configuration options
Illus. 18
Illus. 18
Setting timeout
Connections
The CONNECTIONS tab (Illus. 18) offers the following settings:
Field
Explanation
Default
Registry key
ADD IP
IP address(es) of the server(s)
on which ThinPrint Engine or
Management Center is installed (with clusters, the cluster
nodes addresses)
—
IPAccess
Page 23
THINPRINT
ENGINE CONNEC-
TCP port number for receiving
print data from ThinPrint Engines
4000
ServerPort
Page 23
TCP port number for forwarding print data to the ThinPrint Clients
4001
ClientPort
Page 23
TIONS
THINPRINT CLIENT CONNECTIONS
© ThinPrint GmbH 2015
– To add the IP address of a server on which ThinPrint Engine is installed, enter
the IP address under ADD IP and then click ADD. The IP address appears in the
table above.
– To change an IP address, mark it in the table and then click CHANGE or DELETE.
Connection Service.fm
Manual
19
Further configuration options
Illus. 19
Illus. 19
Configuring IP addresses and TCP ports
– Close the configuration program by clicking OK.
– Lastly, restart the TP CONNECTION SERVICE in the Windows Services folder.
Client IDs
A client ID including authentication key must be stored in the Connection Service
access database for every end device that is allowed to use the ThinPrint Connection
Service (see below). These two values must also be set up in each ThinPrint Client
(Illus. 7). Note also that a ThinPrint license is required for each client ID7.
Database
Set up client IDs as follows:
– Open the command prompt and change to the Connection Service installation
directory (Page 14).
– Set up the client ID that you previously set up in ThinPrint Client Manager.
For the example in Illus. 7, enter the following command line:
TPConnect -add 99:111
To get an overview of used licenses and to delete entries from the database, proceed
as follows:
7
20
ThinPrint License Manager can be started from the command prompt with Licman.exe.
Manual
Connection Service.fm
© ThinPrint GmbH 2015
– Pause the Windows TP CONNECTION SERVICE service.
– In the Connection Service installation directory, open TPConnect.mdb with
Microsoft Access.
– Then click on ACTIVESESSIONS (Illus. 20, arrow).
– Here, you could delete a line, if necessary.
Appendix
– Close TPConnect.mdb.
– Restart the TP CONNECTION SERVICE in the Windows Services folder.
Illus. 20
Illus. 20
Connection Service’s database with client ID 99 and authentication key 111
(see also Illus. 7)
Appendix
Customer service and technical support
www.thinprint.com/ → RESOURCES & SUPPORT
www.thinprint.com/en-us/resourcessupport/supportrequest.aspx
Relevant registry keys
Registry keys of ThinPrint Client (Service) Windows for Connection Service
hkey_local_machine\software\thinprint\client:
ThinPrint Client
Manager
Description
Type
Default
value
ConnAuthKey
AUTHENTICATION KEY
(Illus. 7)
Value is used for authentication –
like a password.
reg_dword
0
ConnKeepAlive
KEEP ALIVE INTERVAL
(v6.2 only)
Interval for refreshing the connection; has to be lower or equal
than Connection Service’s “KeepAliveTO”; Page 23 (in seconds)
reg_dword
60
ConnMode
USE CONNECTION
SERVICE (Illus. 6)
0 = Listen mode
3 = Static mode
1=0+3
reg_dword
0
ConnPort
TCP PORT (Illus. 7)
TCP port for communication with
the Connection Service; be sure:
same TCP port number as
Connection Service’s “ClientPort”;
Page 23
reg_dword
4001
© ThinPrint GmbH 2015
Name
Connection Service.fm
Manual
21
Appendix
Name
ThinPrint Client
Manager
Port
Description
Type
Default
value
TCP PORT (Illus. 6)
TCP port for communication with
the ThinPrint Engine; be sure:
same TCP port number as ThinPrint Engine’s “Port” in case of a
normal ThinPrint Port
reg_dword
4000
ConnServer
CONNECTION SERVER
ADDRESS (Illus. 7)
IP address of the computer on
which Connection Service is running
reg_sz
127.0.0.1
ConnUID
CLIENT ID (Illus. 7)
Client ID for the static mode – an
unambiguous ID must be assigned for all clients (TPUID)
reg_dword
0
ConnWait
CONNECTION RETRY
INTERVAL (Illus. 7)
Wait time for connection retries if
Connection Service is not reachable (in seconds)
reg_dword
300
Registry keys of ThinPrint Engine for Connection Service Ports
hkey_local_machine\system\CurrentControlSet\Control\Print\Monitors\ThinPrint Port
\<port name>:
MMC of
ThinPrint Engine
Description
Type
Default
value
Host
CONNECTION SERVER
IP ADDRESS
(Illus. 10)
IP address of the computer on
which Connection Service is running
reg_sz
—
IsCSvcPort
NEW THINPRINT
CONNECTION SERVICE PORT /NEW
THINPRINT PORT
0 = ThinPrint Engine prints directly to ThinPrint Clients or LPD
devices
1 = ThinPrint Engine prints to the
Connection Service
reg_dword
—
Port
TCP PORT (Illus. 10)
TCP port for communication with
the Connection Service; be sure:
same TCP port number as
Connection Service’s
“ServerPort”; Page 23
reg_dword
4000
Name
© ThinPrint GmbH 2015
Registry keys of Connection Service
hkey_local_machine\software\thinprint\tpconnect:
22
Manual
Connection Service.fm
Appendix
Name
Connection Service
GUI
Description
Type
Default
value
ClientPort
CLIENT CONNECTIONS
(Illus. 19)
TCP port for communication with
the ThinPrint Clients; be sure:
same TCP port number as ThinPrint Clients “ConnPort”; Page 21
reg_dword
4001
FirstSessionTO
MAX. TIME TO FIRST
Max. time to first client connect
(in seconds); not relevant here
reg_dword
600
Allowed IP addresses of ThinPrint Engines or Management
Center
reg_multi_sz
—
Interval for refreshing the connection; has to be higher or equal
than ThinPrint Client’s “ConnKeepAlive”; Page 21 (in seconds)
reg_dword
70
Max. client reconnect time
(in seconds)
reg_dword
80
CLIENT CONNECT
(Illus. 18)
IPAccess
PRINT SERVER IPS
(Illus. 19)
KeepAliveTO
ReconnectTO
—
MAX. CLIENT
RECONNECT TIME
(Illus. 18)
TP SERVER CONNECTIONS (Illus. 19)
TCP port for communication with
the ThinPrint Engine; be sure:
same TCP port number as ThinPrint Engine’s “Port” in case of a
ThinPrint Connection Service
Port; Page 22
reg_dword
4000
SessionTO
MAX. SESSION INACTIVITY TIME (Illus. 18)
Max. session inactivity time
(in seconds); not relevant here
reg_dword
600
Standalone
—
Key has to be exist and set to “1”
0 = Dynamic mode
1 = Static mode
reg_dword
—
© ThinPrint GmbH 2015
ServerPort
Connection Service.fm
Manual
23
Appendix
Additional resources
Manuals and
technical information
The following documents (amongst others) are available at
www.thinprint.com
•
•
•
•
•
•
•
•
•
•
•
•
•
Print servers and
Appliances
ThinPrint Engine on print servers
ThinPrint Engine on terminal servers
License Server
Licensing
ThinPrint Client user manuals
ThinPrint Management Center
ThinPrint Ports
Tips for configuring ThinPrint
ThinPrint addressing
Unattended installation of ThinPrint server components
Preconfiguration and unattended installation of ThinPrint Client Windows
SEH TPG60 as a Client Gateway
SEH ISD300/4x0 as a Client Gateway
The TPG-25, TPG60 and TPG-65 ThinPrint Gateways are available at www.seh.de,
as well as the ISD300 and ISD400 spool server. They support the Connection Service.
Abbreviations and acronyms
ID
Identification (number)
IP
Internet Protocol (see also TCP/IP)
LPD
Line Printer Daemon
LPR
Line Printer Remote
MMC
Microsoft Management Console
NAT
Network Address Translation (also known as: IP masking)
s
Second(s)
TCP/IP
Transmission Control Protocol over Internet Protocol
TP
ThinPrint
© ThinPrint GmbH 2015
24
Manual
Connection Service.fm