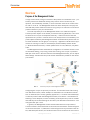
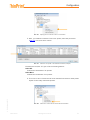
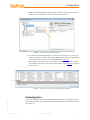
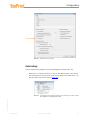
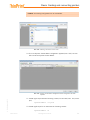
1
ThinPrint Management Center Version 2.2 Manual ThinPrint GmbH Alt-Moabit 91 a 10559 Berlin Germany / Alemania Cortado, Inc. 7600 Grandview Avenue Suite 200 Denver, Colorado 80002 USA / EEUU Cortado Pty. Ltd. Level 20, The Zenith Centre, Tower A 821 Pacific Highway Chatswood, NSW 2067 Australia E-mail: [email protected] Web: www.thinprint.com Issued: November 20, 2015 (v200) Notes © Copyright This document is the intellectual property of ThinPrint GmbH. This document may be copied in whole or in part, provided this Copyright notice is included in every copy. ® Registered trade marks All hardware and software names mentioned in this document are the registered trademarks of their respective companies or should be regarded as such. Safety warning All ThinPrint products are pure software solutions. Please note the safety warnings in the technical documentation from your hardware vendor and from the manufacturer of each device and component. Before beginning installation, we recommend closing all windows and applications and deactivating any virus scanner. © ThinPrint GmbH 2015 2 Management Center Manual Contents Overview ...................................................................................................................... 6 Purpose of the Management Center .................................................................................. 6 Functional principle ........................................................................................................ 7 Management Center ................................................................................................... 7 AutoConnect ............................................................................................................. 8 Printing .................................................................................................................... 8 How it works – the configuration in brief ........................................................................... 9 What is required? ......................................................................................................... 10 How does the licensing work? ........................................................................................ 11 Installation ................................................................................................................ 11 System requirements .................................................................................................... 11 Client computers and devices .................................................................................... Central print servers ................................................................................................. Management Center machine .................................................................................... SQL server .............................................................................................................. Active Directory (domain) ......................................................................................... Template Server and Driver Pool ................................................................................ 11 11 12 12 12 12 Preparing the installation ............................................................................................... 12 Installing the Management Center for the first time ........................................................... 14 Updating an existing Management Center installation ....................................................... 15 Updating Output Gateway to the current ThinPrint version ............................................ 15 © ThinPrint GmbH 2015 Updating Print Tickets .................................................................................................. 16 Manual Management Center 3 Contents Configuration ............................................................................................................ 16 Printer drivers and Template Server ................................................................................ 17 Overview ................................................................................................................ Setting up the Driver Pool ......................................................................................... Printer drivers ......................................................................................................... Setting up the Template Server .................................................................................. Deleting and recreating a template ............................................................................. Which printer property is preset where? ...................................................................... Device settings with universal printer drivers ............................................................... Device settings with KPDL drivers .............................................................................. 17 17 19 24 26 27 28 31 Driver Free Printing vs. V-Layer vs. Native Printing ........................................................... 32 Select the print mode ............................................................................................... 32 Preset the print mode ............................................................................................... 34 TCP/IP vs. Connection Service vs. ICA or RDP ................................................................. 35 Non-created printers (Unmapped Location Printers) ......................................................... 36 Adding computers and devices with ThinPrint Clients ....................................................... 37 Printer port information of the ThinPrint Client computers ................................................. 38 Remote configuration of ThinPrint Client Windows ........................................................... 39 Adding a central print server .......................................................................................... 41 Relocating to another central print server ........................................................................ 41 Groups of Central Print Servers ...................................................................................... 43 Adding a Connection ..................................................................................................... 46 Deleting a Connection .............................................................................................. 48 Adding Printers ............................................................................................................ 49 Workstation or local print server ................................................................................ 49 ThinPrint gateway appliance ..................................................................................... 52 Deselecting printers ...................................................................................................... 53 Connection Service ....................................................................................................... 54 Overview ................................................................................................................ 54 Procedure ............................................................................................................... 54 Encryption of print data ................................................................................................. 56 Overview ................................................................................................................ 56 Procedure ............................................................................................................... 56 License Manager .......................................................................................................... 59 4 Management Center Manual © ThinPrint GmbH 2015 Global settings ............................................................................................................. 57 Contents Praxis: Creating and connecting printers ...................................................... 61 Running applications on Remote Desktop Session Hosts or virtual desktops ........................ 61 Network printers ...................................................................................................... 61 Printers connected locally to workstations or Thin Clients ............................................. 71 Local printers for mobile or home users ...................................................................... 76 Running applications on workstations ............................................................................. 83 Network printers ...................................................................................................... 83 Printers attached locally on workstations .................................................................... 84 Appendix .................................................................................................................... 86 Customer service and technical support .......................................................................... 86 Additional sources ........................................................................................................ 86 Troubleshooting ........................................................................................................... 86 Message history ....................................................................................................... 86 Logging .................................................................................................................. 87 Solving issues ......................................................................................................... 88 Icons .................................................................................................................... 102 © ThinPrint GmbH 2015 Abbreviations and acronyms ........................................................................................ 102 Manual Management Center 5 Overview Overview Purpose of the Management Center In large environments, losing an overview of the printers can sometimes occur – particularly if these are distributed among many branch offices. Printers may be replaced, not immediately available, or such information reaches the central office too late or not at all. The Management Center has been developed to simplify and automate this process. With one mouse click, it gives you an overview of all ThinPrint printers installed in your print environment. The most important job of the Management Center is to create the required ThinPrint printer objects on the central print servers (running Windows). This could be laborious and only be accomplished manually – aside from the fact that the replacement of a printer in a remote office is not always known of immediately. The printer objects created by the Management Center are automatically shared and can be made available to all user groups in a company – regardless of whether their applications are running on virtual or real desktops, Remote Desktop Session Hosts (= Windows terminal servers), or other systems such as Linux, SAP-R/3, or System i hosts. The Management Center automates the configuration of ThinPrint functions such as bandwidth setting, port pooling, Driver Free Printing, and V-Layer in particular. With just a few clicks in the user interface of the Management Center, you can adjust these settings. Printers with their ports are then automatically created on the central print servers. Illus. 1 Illus. 1 functional principle of the Management Center 6 Management Center Manual.fm © ThinPrint GmbH 2015 Configuring the V-Layer is especially convenient. This enables Driver Free Printing from RD Session Hosts, virtual desktops or workstations to non-Windows devices such as terminals (thin clients), gateway appliances (= ThinPrint Client Gateways) or network printers. With the Management Center, all it takes is a checkmark and selecting a driver template, and the necessary printer objects and ports are created automatically. Driver Free Printing can be used in pure Windows environments – also configured with just a click. In general, the Management Center communicates with two components of ThinPrint: with the ThinPrint Clients on the client side and with the ThinPrint Engines on the server side (Illus. 1). While the ThinPrint Engines are only installed on the central, dedicated print servers, the ThinPrint Clients can be located on the one hand on Overview local print servers or gateway devices or appliances and on the other hand also on workstations, thin clients, or network printers. Thus, when planning your print environment, you have to decide which pathway your print jobs will take. You can print from a central print server via the pathways below: • via the TCP/IP protocol to a local print server, to a gateway appliance or directly to network printers with an internal or external ThinPrint Client (see ThinPrint Clients in Illus. 1, 85 and 133) • via the TCP/IP protocol to the client computer or thin client that initiated the print job (see Illus. 108 and 135) • via the ICA, RDP or PCoIP protocol to the client computer or thin client that initiated the print job, whereby the central print server sends the print jobs via a RD Session Host or a virtual or real desktop to the client computer or thin client (see Illus. 117) If the target computers or printers cannot be reached over their IP addresses due to masked networks 1 or firewall settings, alternatively to the RDP or ICA protocol the print jobs can also be sent using the Connection Service (see the section Virtual Channel Gateway in the ThinPrint Engine on print servers manual and the Connection Service manual, Page 86). As needed, the Management Center automatically downloads all required printer drivers from a file server – the Driver Pool (Illus. 1) – to install them on the central print servers. It also creates a template for each driver on a separate server for pre-setting driver properties. Thus, the necessary printer drivers are managed centrally and can be provided for the central print servers. Management Center also offers an export function for AutoConnect – the mapping component of ThinPrint Engine. This can help to simplify the somewhat complex editing of Dynamic Printer Matrix or Map Additional Printers table drastically. Functional principle Illus. 2 demonstrates the functional principle of the Management Center, central print server, and RD Session Host (or virtual desktops) with the example of the Helsinki branch: Management Center © ThinPrint GmbH 2015 1. After the printers have been set up on the ThinPrint gateway (box--01), the Management Center retrieves them with GET CONFIGURATION and writes them to its SQL database. 2. With APPLY CONFIGURATION, the Management Center creates the required printers and printer ports on the central print server (printserver--02), shares them and also installs any printer drivers needed. (It creates two printer objects per real printer = V-Layer.) 3. A user starts a remote desktop session (on ts--01) from the thin client (helsinki--01). 1 Manual.fm Networks with Network Address Translation (NAT) Management Center 7 Overview Illus. 2 Illus. 2 data traffic of printer information (1), (2), remote desktop session (3), (4) and print jobs (5), (6) AutoConnect AutoConnect has two tables available for printer mapping: • Dynamic Printer Matrix • Map Additional Printers In the Map Additional Printers table all printer shares are listed in the column TARGET. If all the other columns are marked with a star (*), then all the printers are mapped in a session – regardless of the presence, or not, of a ThinPrint Client. By default, included in the mapping for the table Dynamic Printer Matrix, is the ThinPrint Client of the workstation from which the session is established. During this procedure, AutoConnect scans the print server for one share for each client printer: 4. The AutoConnect installed on the RD Session Host (ts--01) asks the ThinPrint Client (on helsinki--01) about the printers to be mapped and then automatically establishes all connections intended for this workstation to printer shares on the central print server (see the following sections). Thus the printers appear in the session. Printing 8 Management Center Manual.fm © ThinPrint GmbH 2015 5. If a user decides to print from an application, the data to be printed are transmitted to the central print server by means of the Output Gateway installed on the RD Session Host (in the printer driver-independent EMF format). 6. There, the ThinPrint Engine renders the print job and sends it (in RAW format) to the ThinPrint gateway (box--01) with limited bandwidth, compressed, and encrypted if needed. The ThinPrint Client (on box--01) decompresses (and decrypts) the print data and sends them to the printer selected in the remote desktop session. Overview How it works – the configuration in brief 1. All locations that will be printed to are entered as Location – in the example in Illus. 3 and Illus. 4: Oslo, Stockholm and Helsinki. (Also when printing to mobile or home users via RDP or ICA, a – in this case, virtual – location will be set up). Illus. 3 Illus. 3 treeview of Management Center console © ThinPrint GmbH 2015 2. All ThinPrint Clients that will distribute print jobs are entered as ThinPrint Client Devices and assigned to a Location. Afterwards, all printer information can be automatically imported with Get Configuration. (Also when printing to mobile or home users via RDP or ICA, a ThinPrint client device will be set up, whereby the printers without a printer ID specification are listed manually). 3. All central print servers are set up under Central Print Servers, this also applies to all print spooler instances of a Microsoft Failover Cluster (or Server Cluster). 4. If multiple central print servers are to be configured identically (and share the bandwidth of one connection), then they are incorporated in Groups of Central Print Servers. 5. Each connection between headquarters and a branch office requires its own bandwidth settings and definitions of the printer drivers and ports to be used. These are set up under Connections (Page 65). 6. Under Central Print Server Drivers, all printer drivers (of the Driver Pool) required on the print servers are identified. 7. The Management Center immediately saves all settings in an SQL database. With the Apply Configuration function, the information is automatically transmitted from the database to the print servers. In the process, printers with their drivers and ports are installed, bandwidth settings, the V-Layer, and any encryption set up. Manual.fm Management Center 9 Overview Illus. 4 Illus. 4 possible scenario with two branch offices and a mobile or home user What is required? Compare with Illus. 4. You need: 2 10 Output Gateway, AutoConnect and Virtual Channel Gateway are installed on servers using the ThinPrint Engine installer – on desktops using the Desktop Extension installer Management Center Manual.fm © ThinPrint GmbH 2015 • The Management Center on a separate Windows 7 computer at the data center; the driver pool and the template server can be set up here too. The Management Center can also be installed on the central print server if it isn’t installed as a Microsoft Failover Cluster (Windows 2008 x86 and 2008 R2 only). • An SQL Server; the Management Center installer only creates a new database on an existing SQL server. • A ThinPrint Engine on each central print server or cluster node • At least one ThinPrint Client in every branch office (TCP/IP type) • ThinPrint Clients on workstations of mobile or home users with local attached printers (RDP or ICA type) • The TP Output Gateway printer driver on all Windows computers that will use the central print servers with Driver Free Printing or V-Layer – for example, on RD Session Hosts, virtual desktops, or workstations 2 • all (native) printer drivers – regardless of the desired configuration – either on the central print servers or on the workstations and/or local print servers running Windows (except for non-Windows hosts); see also the section Printer drivers and Template Server (Page 17) • optional AutoConnect on all Windows computers that will automatically map the printer shares from the central print servers (which are created and shared using the Management Center) – for example, on RD Session Hosts, virtual desktops, or workstations 2 • Optional Virtual Channel Gateway on RD Session Hosts or virtual desktops, if print jobs are to be delivered to mobile or home users via RDP or ICA2 Installation How does the licensing work? You need ThinPrint licenses for both the ThinPrint Engines (and the Connection Service, if applicable) and – additionally – the Management Center. During the installation of Management Center, you can select if you want to enter a productive license key you’ve already purchased, or allow a demo license to be installed automatically. Starting with ThinPrint version 10, Management Center is a part of the ThinPrint Engine Premium license – with separate Management Center license keys. In case License Server and Management Center are installed on different machines, the license keys of ThinPrint Engine Premium (TLUS or TPUS) are to be installed on the License Server but the one of the Management Center (TPMC) on the Management Center machine. All license keys are valid for 30 days after they have been entered. They must be activated within this time to continue printing. Demo license keys cannot be activated. A license key’s expiration date can be found in License Manager under VALID UNTIL. Once you have successfully tested the ThinPrint Engine, you can purchase a productive license. You will receive new license keys, which are then entered in the License Manager. To activate the license keys upload them together with their registration keys to the Enterprise Portal (enterpriseportal.cortado.com→ CUSTOMER VIEW). For further information about license activation see the Licensing manual (Page 86). Installation System requirements Client computers and devices • PCs or local print servers on which a ThinPrint Client that supports AutoConnect can be installed (Windows, Linux, Mac OS X, Java) • Devices or appliances with an integrated ThinPrint Client (= ThinPrint Client Gateways or ThinPrint gateways), preferable with AutoConnect, for example: • IAPS ThinPrint from Intermate or • TPG-25/65 and ISD300/4x0 from SEH • Internal or external print server devices from SEH A list of supported devices can be found at www.thinprint.com. Central print servers © ThinPrint GmbH 2015 • Windows Server 2003 with SP2 or later, 2008 3, 2008 R2 SP1, 2012 or 2012 R2 • Architecture: x86 or x64 • Microsoft Failover Clusters and Server Cores are supported • .NET Framework Version 2.0 or higher • ThinPrint Engine 8.0 or later installed on each print server or cluster node Manual.fm Management Center 11 Installation Management Center machine • • • • • • • Windows Server 2012 R2 Update1 or 2012 Windows 2008 R2 SP1 with Microsoft hotfix KB2493115 4 installed or Windows Server 2008 x86 SP2 or Windows 8.1 or 8 or Windows 7 SP1 with Microsoft hotfix KB2493115 installed Microsoft .NET Framework 3.5 has to be enabled or installed Except failover clusters and core servers SQL server • Microsoft SQL Server 2005 (Express) or higher Active Directory (domain) • All servers have to be members of the same domain (Active Directory). • In DNS a Reverse Lookup Zone has to be set up, in which all computers, devices and appliances are registered. Template Server and Driver Pool • see computers with Management Center or central print servers (except failover clusters) Note! Management Center, Template Server, Driver Pool, SQL server, and Connection Service can be set up on the same computer. Preparing the installation 12 3 with SP2 or Microsoft hotfixes KB958741 (Print Job Owner) and KB958656 (Client Side Rendering) 4 also for all terminal servers (with Windows Server 2008 R2) and desktops (with Windows 7) which use the central print server(s) Management Center Manual.fm © ThinPrint GmbH 2015 • Local Administrator permissions are required for all installation and configuration steps. The Management Center must also run with an account that has administrative permissions on both the print servers and the Template Server. • Although the Management Center remotely can install and update the required printer drivers on the central print servers it is recommended that you pre-install these on the print servers (because not every printer driver can be installed remotely). • Make sure that on all central print servers, on the computer that the Management Center is to be installed on, and on the Template Server at least one printer is permanently shared. So printers can be created per RPC remotely. Installation • Make sure that a ThinPrint Engine with version 8.0 or later is installed on all central print servers. Note! The ThinPrint Port THINPORT: which is created by the ThinPrint Engine installer must not be removed. • Firewall settings: • TCP ports for remote configuration of central print servers and template servers via WMI and RPC: msdn.microsoft.com/en-us/library/aa389286.aspx support.microsoft.com/kb/178517 • TCP ports for sending print jobs from non-Windows hosts (e.g. SAP servers) to the central print servers via LPR/LPD, if applicable: 515, 721–731. • TCP ports for sending print jobs from a ThinPrint Engine to a ThinPrint Client or (if applicable) to the Connection Service: 4000 (default) as well as for communication from a ThinPrint Client to the Connection Service, if applicable: 4001 (default) • Check whether an SQL server can be reached. If applicable, install the Microsoft SQL 3Server 2005 Express or higher before the Management Center (maybe that after installation the Windows service SQL Server Browser must be started manually). © ThinPrint GmbH 2015 Preparing an SQL server for Windows authentication. With Management Center installation you can choose between SQL server authentication and Windows authentication. For Windows authentication assign the privileges for creating a database to the account used for installation before. To do so, assign the roles DBCREATOR, SECURITYADMIN, SERVERADMIN and SYSADMIN to this account (Illus. 5) as well as MASTER with USER MAPPING including the role memberships DB_DATAREADER, DB_DATAWRITER and DB_SECURITYADMIN (Illus. 6). Manual.fm Management Center 13 Installation Illus. 5 Illus. 5 SQL server: server roles for the installation account Illus. 6 SQL server: database role memberships for the installation account Illus. 6 – Follow the instructions of the Management Center quick installation guide. 14 Management Center Manual.fm © ThinPrint GmbH 2015 Installing the Management Center for the first time Installation Updating an existing Management Center installation To update an earlier Management Center version, proceed as follows: 1. Open the console of the old Management Center (e.g. version 2.1.3, build version 2.2.434). 2. With this Management Center version, select APPLY CONFIGURATION for all central print servers (Illus. 52) or for all Connections. 3. On the SQL server, perform a backup of the Management Center database. To find the database information, select EXTRA→ APPLICATION SETTINGS in the old Management Center (Illus. 76). 4. Install the new Management Center version – best on a new server (not necessarily). To do so, follow the instructions of the Management Center quick installation guide. 5. Open the console of the new Management Center. Specify the database information in EXTRA→ APPLICATION SETTINGS. The Management Center performs an – irreversible – database update automatically. Updating Output Gateway to the current ThinPrint version After sharing printers the printer driver TP Output Gateway can be delivered automatically using Point and Print to terminal servers, virtual desktops and workstations. But with the printer driver update maybe the print processor isn’t updated automatically by Windows if an older version already exists. In this case it’s possible to print but ThinShare doesn’t work – in other words: The print data won’t be compressed on the way to the central print server. To make sure to update ThinPrint’s print processor (tpwinprn) there are two alternatives: • Either you update the printer driver directly on the target machine using its driver package. This can be found on the central print server in the directory C:\Program Files\Common Files\ThinPrint\Virtual Printer\TPOG3 • Or you enable the group policy POINT AND PRINT RESTRICTIONS (Illus. 7) in the domain for all target machines including the option DO NOT SHOW WARNING OR EVALUATION PROMPT (Illus. 8). © ThinPrint GmbH 2015 Illus. 7 Illus. 7 Manual.fm GPO Point and Print Restrictions Management Center 15 Configuration Illus. 8 Illus. 8 enabling the GPO Point and Print Restrictions Updating Print Tickets Additionally it’s recommended to update the TPPrintTicket.dll – which provides finishing options of specific native printer drivers in the Output Gateway GUI. This file is located in C:\Program Files\Common Files\ThinPrint on both the central print server and the Management Center machine and – additionally – in the Management Center program folder. The current version of Print Ticket Extension can be downloaded at our website. Configuration For all installation steps, as well as basic configuration, see the quick installation guide for Management Center. The following functions are already explained there: 16 Management Center Manual.fm © ThinPrint GmbH 2015 • Creating printer objects on a central print server • Direct printing via TCP/IP; target printer: • two network printers – installed on a local print server • a printer locally attached to a workstation • Driver Free Printing (using TP Output Gateway) • Printer mapping on a workstation using AutoConnect’s Dynamic Printer Matrix as a Group Policy Object (GPO) Configuration Printer drivers and Template Server Overview The (native) printer drivers required for your print environment may come from various sources. We distinguish between: • Printer drivers provided by the printer manufacturers (for which an own .inf file is available) • Printer drivers provided by the operating system (drivers shipped with Windows) For your print environment, you must decide whether you want to centralize or decentralize the installation and management of the printer drivers. Decentralized would mean that the printer drivers are installed on the local print servers and also on the workstations, if applicable. Centralized would mean that all printer drivers are installed on the central print server(s) – but not on Windows RD Session Hosts, workstations or virtual desktops. You can use the methods below for centrally providing printer drivers: • So that the Management Center does not also have to transmit and install the printer drivers when printers and printer ports are created remotely, manually install all printer drivers on the central print servers. (Option INSTALL DRIVER deactivated in the Driver Pool) • So that the Management Center can (remotely) install the drivers when printers are created, set a Driver Pool and copy all printer drivers to it; file format: .inf, (not .exe, .zip or similar; option INSTALL DRIVER activated) • In addition to the Driver Pool you can specify a Template Server on which the Management Center pre-installs all printer drivers. Presettings and user permissions of the template printers5 installed on the Template Server will be assigned to the printers installed (with their installation) on the central print servers by the Management Center. For the print mode Driver Free Printing (Page 32) additional presettings of the printers installed on the client machines are assigned to the printers on the central print server. Presettings include for example paper formats, trays or duplex. • Best practice: Use the Template Server for test installation of printer drivers instead of the – possibly productive – central print servers. Setting up the Driver Pool © ThinPrint GmbH 2015 1. Create a directory for the driver pool (recommended: on the local host) and copy to there all printer drivers with their .inf files. 5 Manual.fm e.g., printer options like duplex unit, additional paper trays, or the default paper tray Management Center 17 Configuration 2. Start the Management Center console (Illus. 9). Illus. 9 Illus. 9 open the Management Center console 1. Select SET PATH TO DRIVER POOL in the context menu of the node CENTRAL PRINT SERVER DRIVERS (Illus. 10). Illus. 10 Illus. 10 specify the path to the Driver Pool 2. In the following window, you can either enter the UNC path to the Driver Pool manually or search for it using the BROWSE function (Illus. 11). Click OK to confirm. Illus. 11 18 © ThinPrint GmbH 2015 Illus. 11 enter the path to the Driver Pool or use the BROWSE button Management Center Manual.fm Configuration 3. Select ENABLE TEMPLATE SERVER in the EXTRA→ VIEW menu (Illus. 12). Illus. 12 Illus. 12 enable Template Server Printer drivers In the Driver Pool, set up every printer driver which Management Center is to install remotely or for which you need a template. That way, the driver information to be managed is written into the SQL database. There are two options available to do this, as listed in the section Printer drivers and Template Server on Page 17 (drivers with an .inf file or drivers shipped with Windows). Option 1: Drivers with an .inf file 1. Select ADD A DRIVER USING .INF FILE in the context menu of the node CENTRAL PRINT SERVER DRIVERS (Illus. 10). Alternatively, you can select BROWSE FOR NEW DRIVERS. Here you name a computer, on which the required drivers are already being used, click on GET NEW DRIVERS, and then select the preferred driver with ADD (Illus. 13). © ThinPrint GmbH 2015 Illus. 13 Illus. 13 Manual.fm nominate a computer, click on GET NEW DRIVERS and select with ADD Management Center 19 Configuration 2. A window opens, as shown in Illus. 14. Click here on ADD. Illus. 14 Illus. 14 click ADD to add the driver 3. Select the .inf file of the preferred driver in the Driver Pool (Illus. 11). Confirm by clicking on OPEN. Illus. 15 Illus. 15 Driver Pool: Select the .inf-file of the preferred driver © ThinPrint GmbH 2015 20 Management Center Manual.fm Configuration 4. Select the driver, and click OK to confirm (Illus. 16). Illus. 16 Illus. 16 select driver and click OK to confirm 5. The HP driver shown here supports both architectures: 32 bit (= x86) and 64 bit (= amd64 or x64) – see bottom right in Illus. 16. However, many drivers support only one of the two architectures. If you still want to use both architectures' versions of these drivers, then you have to add both drivers individually with ADD (Illus. 17). Illus. 17 Illus. 17 two .inf-files selected: one for x64 and one for x86 © ThinPrint GmbH 2015 6. If you also want to ensure that Management Center remotely installs and updates the drivers, then, additionally enable the option INSTALL DRIVER or UPDATE DRIVER (below in Illus. 17). Click on OK to confirm. Illus. 18 shows the example result; two drivers for each of two architectures have been added: • 32- and 64- bit version of HP Universal Printing PCL 6 • 32- and 64- bit version of Xerox Global Print Driver PCL6 Manual.fm Management Center 21 Configuration Illus. 18 Illus. 18 printer manufacturers' drivers set up for different architectures 7. No .inf file was specified for TP Output Gateway, because it is generally already available as a component of ThinPrint Engine on all print servers which are to be configured. If you also want to achieve an update management at his point, then enter an .inf file here (with EDIT in the context menu, Illus. 19) and enable the option UPDATE DRIVER (Illus. 17). After ThinPrint Engine installation you will find the Output Gateway driver files on the print server in the directory. C:\Program Files\Common Files\ThinPrint\Virtual Printer\TPOG3. Copy the directory TPOG3 into your Driver Pool (Illus. 11). Illus. 19 Illus. 19 Option 2: Drivers shipped with Windows add driver information for TP Output Gateway As an alternative to option 1, you can use those drivers shipped with the operating system (recommended). Windows 7 is shipped with around 2000 printer drivers. © ThinPrint GmbH 2015 22 Management Center Manual.fm Configuration Running a Windows update in Print Server Properties (PRINT SERVER PROPERTIES, Illus. 20) of the local host increases that number, to a current total of about 5000. Illus. 20 Illus. 20 Windows Update for printer drivers 1. Following the update and the driver installation, go to Management Center’s configuration console and select ADD A DRIVER SHIPPED WITH WINDOWS from the context menu of the CENTRAL PRINT SERVER DRIVERS node (Illus. 10). The window in Illus. 21 opens. Select a printer manufacturer, and confirm by clicking on FILTER. Illus. 21 select a printer manufacturer, here: Hewlett-Packard (HP) © ThinPrint GmbH 2015 Illus. 21 Manual.fm Management Center 23 Configuration 2. Select the driver, and click OK to confirm (Illus. 22). The added driver will appear in the overview CENTRAL PRINT SERVER DRIVERS (Illus. 23). Illus. 22 Illus. 22 select printer model, here: HP LaserJet 5 Illus. 23 Windows internal driver set, here: HP LaserJet 5 Illus. 23 Setting up the Template Server Requirement: The Template Server should already be enabled (Illus. 12 on Page 19). After setting up the Driver Pool (see above), the template printers to be installed appear in the TEMPLATE SERVER node, although still with grayed out icons (on the right in Illus. 24). If the column CENTRAL PRINT SERV DRIVER is empty yet, the templates were written into the database, but not yet installed on the template server. 24 Management Center Manual.fm © ThinPrint GmbH 2015 1. If you want to install several templates for specific printer drivers (because, for example, you have several printers running with the same driver, but with different hardware configurations), then firstly select NEW in the context menu of the TEMPLATE SERVER node (upper arrow in Illus. 24). Configuration Illus. 24 Illus. 24 Template Server node’s context menu 2. The Menu in Illus. 25 will appear. Select the name of the additional template, and click on CREATE. Illus. 25 Illus. 25 choosing another templates for the same driver © ThinPrint GmbH 2015 3. To install the templates, you now select APPLY CONFIGURATION TO TEMPLATE SERVER (lower arrow in Illus. 24). Following successful completion of this operation (it may take a few minutes), you will receive the notification “The operation has been successfully completed”. Otherwise (if not successful), a red icon will appear in the bottom right of the configuration console (arrow in Illus. 26). Manual.fm Management Center 25 Configuration Illus. 26 Illus. 26 template installation possibly failed 4. With a double click on the red icon (Illus. 26), you can open the message history, which presents you error messages (see section Troubleshooting on Page 86). 5. Occasionally a printer driver can not be installed remotely. In this case, simply install the driver manually in the printers folder or in the print management on the target computer. Then repeat APPLY CONFIGURATION TO TEMPLATE SERVER (see above). 6. Now you can implement those default settings that should be used for creating the target printers on the central print servers. To do so, select the PROPERTIES of each template individually in Template Server’s printers folder or print management (Illus. 27). Illus. 27 Illus. 27 putting the default settings on the templates – Mark the relevant template(s) and select REMOVE in its context menu. – Select APPLY CONFIGURATION TO TEMPLATE SERVER. – Disable the template server (EXTRA→ VIEW→ ENABLE TEMPLATE SERVER) and enable it again. – Select APPLY CONFIGURATION TO TEMPLATE SERVER (Illus. 24). 26 Management Center Manual.fm © ThinPrint GmbH 2015 Deleting and recreating a template Configuration Which printer property is preset where? Basically there are two types of templates which can be used for presetting printer properties: • templates with Output Gateway driver • templates with native drivers Furthermore, with Driver Free Printing mode the presettings are performed at the printer objects on the client computers (e.g. local print servers). The following table shows which driver setting is configured where (Illus. 28) – with the print modes; on this, see the section Driver Free Printing vs. V-Layer vs. Native Printing (Page 32). Illus. 28 Illus. 28 driver settings using the example of an Output Gateway template Driver Free Printing V-Layer Native Printing Location ThinPrint Client machine native template native template Comment ThinPrint Client machine native template native template GENERAL tab © ThinPrint GmbH 2015 ADVANCED→ PRINTING DEFAULTS tab (left in Illus. 28) Paper size + Paper source ThinPrint Client machine native template native template Color + Print quality ThinPrint Client machine native template native template Orientation + Print on both sides ThinPrint Client machine native template native template Number of copies Output Gateway template native template native template Manual.fm Management Center 27 Configuration Driver Free Printing V-Layer Native Printing Open my printing preferences + Print preview Output Gateway template — — Scale to fit + Adjust margins Output Gateway template Output Gateway template — Finishing options ThinPrint Client machine native template native template Compression level Output Gateway template — — Output Gateway template native template native template SECURITY tab Permissions DEVICE SETUP tab (right in Illus. 28) Compression range Output Gateway template — — SpeedCache + ThinShare Output Gateway template Output Gateway template — Black and white only + Always use duplex Output Gateway template Output Gateway template — The abovementioned ThinShare configuration applies only to workstations and virtual desktops. For terminal servers see the ThinPrint Engine on print servers manual. Device settings with universal printer drivers Universal drivers from printer manufacturers need – at least once – a connection to a physical printer to be able to retrieve device settings. In this case, choose a typical printer from your network on which as many as possible device options are installed.6 Proceed as follows: 1. Create an own Standard TCP/IP Port for the relevant template and connect the template to this new printer port. 2. Enter the physical printer’s (IP) address in the Standard TCP/IP Port settings (Illus. 29). 28 Depending on device settings, it could be useful to use multiple templates per driver (Page 24). Management Center Manual.fm © ThinPrint GmbH 2015 6 Configuration Illus. 29 Illus. 29 port configuration: Entering the IP address of a physical printer 3. Retrieve the device settings from the physical printer. To do so, mark the relevant template in the Windows Print Management (Illus. 30) and execute one of the following functions: • PROPERTIES→ DEVICE SETTINGS→ AUTOMATIC CONFIGURATION→ UPDATE NOW (e.g. with HP Universal Printing PCL 6, Illus. 31) • PROPERTIES→ EXTENDED SETTINGS→ SET UP (e.g. with Kyocera Classic Universaldriver PCL6, Illus. 32) • PROPERTIES (e.g. with Konica Minolta Universal PCL, Ricoh PCL6 Driver for Universal Print and Samsung Universal Print Driver) • PROPERTIES→ ADVANCED→ PRINTING DEFAULTS (e.g. with Brother Universal Printer and Epson Universal Laser P6) • PROPERTIES→ DEVICE SETTINGS→ GET DEVICE STATUS (e.g. with Canon Generic PCL6 Driver) • PROPERTIES→ DEVICE OPTIONS→ GET PRINTER SETTINGS (e.g. with OKI Universal PCL 5) • PROPERTIES→ INSTALL OPTIONS→ ASK PRINTER (e.g. with Lexmark Universal) • PROPERTIES→ ADMINISTRATION→ XEROX UPDATE (e.g. with Xerox Global Print Driver PCL6) © ThinPrint GmbH 2015 Note! Because of the performance, make sure that the properties of the relevant printers are retrieved only manually but not automatically. The settings received here will be transmitted by the Management Center when installing printer objects in the modes V-Layer and Native Printing (for this, see the following chapter). Before creating printers with the Management Center it may be necessary to perform a print job using the respective template-for instance with the Manual.fm Management Center 29 Configuration Oki C5510 driver because it doesn't completely send its printer properties until the first print job is received. Illus. 30 Illus. 30 opening the properties of a template (example for Brother) Illus. 31 retrieving device settings from an HP printer Illus. 31 © ThinPrint GmbH 2015 30 Management Center Manual.fm Configuration Illus. 32 Illus. 32 retrieving device settings from a Kyocera printer Device settings with KPDL drivers – With the Kyocera Printer Driver Language (KPDL) sometimes there are be problems with printing PDF documents. If a print job – for example – hangs in the printer queue and then vanishes or the printout is inaccurate you can change from KPDL to another printer driver language in the driver settings (Illus. 33). – Alternatively you can set the EMF spooling option (Illus. 34). © ThinPrint GmbH 2015 Illus. 33 Illus. 33 Manual.fm selecting a printer driver language with a Kyocera driver (example) Management Center 31 Configuration Illus. 34 Illus. 34 enabling EMF spooling with a Kyocera driver (example) Driver Free Printing vs. V-Layer vs. Native Printing Select the print mode Driver Free Printing With Driver Free Printing, the print jobs are rendered with the printer drivers installed on the local print servers (or workstations); thus, no (native) printer drivers, except the TP Output Gateway, have to be installed on either the computers initiating the printing (for example, RD Session Hosts or virtual desktops) or on the central print servers. In regard to the pathway of the print data, Driver Free Printing is limited to pure Windows environments; orange line or steps (5) and (6) in Illus. 2. This does not apply to the terminals or workstation computers whose ThinPrint Clients exclusively control printer mapping; green line or step (3) in Illus. 2. – To activate Driver Free Printing in the EDIT PRINTERS menu of a Connection (Illus. 66 on Page 51): • Select the printer by activating its DEPLOY checkbox (Illus. 35). • Select NORMAL as PRINTER TYPE. • Select TP Output Gateway as DRIVER and an Output Gateway template as NORMAL TEMPLATE (e.g., _Template_TP Output Gateway). • Click OK to confirm. © ThinPrint GmbH 2015 32 Management Center Manual.fm Configuration Illus. 35 Illus. 35 V-Layer activating Driver Free Printing If the target printers in the branch offices are not installed on a Windows computer or the printer driver are to be centralized, the V-Layer can be used instead of Driver Free Printing. Here, two printer objects per target will be installed (Illus. 99). The Management Center remotely performs both the creation of printers and their ports and the connection of the pair of printer objects (with native drivers and TP Output Gateway). – To activate the V-Layer in the EDIT PRINTERS menu of a Connection (Illus. 66 on Page 51): • Select the printer by activating its DEPLOY checkbox (Illus. 36). • Enable the V-LAYER option as PRINTER TYPE. • Select a native driver as DRIVER and – if necessary – a native template as NORMAL TEMPLATE (e.g., _Template_Kyocera FS-C8100DN) • Select an Output Gateway template as V-LAYER TEMPLATE – if necessary. • Click OK to confirm. Illus. 36 © ThinPrint GmbH 2015 Illus. 36 activating V-Layer Please note with V-Layer and Native Printing: If the INSTALL DRIVER option is deactivated in the Driver Pool (see the section Printer drivers on Page 19), then the Management Center does not install any drivers on a central print server during printer installation; these must already be installed there. If the function is activated, then it installs the required drivers together with the printers if they are not already installed. For finishing options, see the section Updating Print Tickets on Page 16. Native Printing Manual.fm If only native printer drivers are used, we are talking about Native Printing. The Management Center installs the printers with native drivers remotely on central print servers if necessary. Printer preferences are set up at the templates. Management Center 33 Configuration If, instead, the print jobs are initiated from non-Windows servers (for example, Unix, SAP R/3, or System i), it makes no difference which drivers you install on the central print servers since the print jobs arrive there already rendered. Note! For Native Printing you should install all relevant printer drivers on RD Session Hosts or virtual desktops manually. Otherwise Windows tries to draw the printer drivers not yet installed to the RD Session Hosts or virtual desktops automatically during printer mapping. This fails if users have not the necessary permissions. If printer drivers are incompatible with one another, this can lead to problems when printing – problems as serious as system instabilities. Therefore, use only drivers which have been signed by Microsoft. – To activate Native Printing in the EDIT PRINTERS menu of a Connection (Illus. 66 on Page 51): • Select the printer by activating its DEPLOY checkbox (Illus. 37). • Select NORMAL as PRINTER TYPE. • Select a native driver as DRIVER and – if necessary – a native template as NORMAL TEMPLATE (e.g., _Template_HP Color LaserJet 4700). • Click OK to confirm. Illus. 37 Illus. 37 activating Native Printing Preset the print mode For each printer driver the Management Center saves the selected print mode (see above) in its SQL database. By default, the Management Center applies this information to all newly identified printers with the same driver name automatically (option ASSIGN BEST PRINTER DRIVER AUTOMATICALLY in Illus. 38). This presetting can be changed. Select the option PREFER TP OUTPUT GATEWAY (if you want to use Driver Free Printing) or the option ENABLE V-LAYER as the default print mode for newly identified printers (see also Illus. 67). © ThinPrint GmbH 2015 34 Management Center Manual.fm Configuration Illus. 38 Illus. 38 default printer configuration TCP/IP vs. Connection Service vs. ICA or RDP All printers that are created by Management Center on central print servers, send their print jobs (with the help of ThinPrint Engine) to devices on which a ThinPrint Client is installed. For the addressing of the ThinPrint Clients you can choose from three protocols: © ThinPrint GmbH 2015 • TCP/IP if ThinPrint Clients are accessed via their IP address • Connection Service if ThinPrint Clients on ThinPrint Gateways or local print servers cannot be accessed directly via their IP addresses or if firewall settings require a reversal in the direction of communication (additional licensing is necessary, see the ThinPrint Connection Service manual) • ICA or RDP if ThinPrint Clients on workstations or Thin Clients cannot be accessed directly via their IP addresses (with VMware also PCoIP instead of RDP) In the Management Center configuration console you have to configure the selected print protocol in several places: Manual.fm Management Center 35 Configuration • Protocol settings in the LOCATIONS menu: • for TCP/IP and Connection Service see Illus. 87 • for ICA or RDP see Illus. 119 • Protocol settings in a ThinPrint Client’s PRINTERS menu: • for ICA or RDP see Illus. 122 • Protocol settings in the Connections menu (Page 47): • for TCP/IP and Connection Service see Illus. 95 • for ICA or RDP see Illus. 126 You also need to consider the required print protocol in the Dynamic Printer Matrix of AutoConnect: • Protocol settings in the Dynamic Printer Matrix of AutoConnect: • for TCP/IP and Connection Service see Illus. 115 • for ICA or RDP see Illus. 131 If ThinPrint Client is not already integrated into the firmware of a device, then install – if possible – the compatible ThinPrint Client (TCP/IP type, ICA type or RDP type). Or select another, appropriate device, on which a ThinPrint Client can be installed. For example, you can use a local print server or a Gateway Appliance, if you don’t want to install ThinPrint Client on every workstation. Non-created printers (Unmapped Location Printers) The UNMAPPED LOCATION PRINTERS node (Illus. 39) should solely serve to provide you with information. Here, all printers are displayed that have been transmitted by the ThinPrint Clients, but not – or not yet – installed on the central print servers. This is the case when you have either not yet (or not successfully) run the APPLY CONFIGURATION function or not selected some printers in the EDIT PRINTERS menu of a Connection (Illus. 66 on Page 51). Illus. 39 Illus. 39 printers retrieved from ThinPrint Clients, but not created on the central print servers © ThinPrint GmbH 2015 36 Management Center Manual.fm Configuration Adding computers and devices with ThinPrint Clients You have two options for adding computers or devices to which the ThinPrint print jobs are to be sent: 1. Call up the SEARCH FOR THINPRINT CLIENT DEVICES function in the context menu of the LOCATIONS node or the ALL THINPRINT CLIENT DEVICES node (bottom arrow in Illus. 40). Here, you should use the comment column because search and addressing are carried out exclusively via IP addresses (Illus. 42). If not all IP addresses of ThinPrint Client devices are displayed, limit the IP address space, e.g., .../24 instead of .../22 (see Illus. 42). If a ThinPrint Client uses the Connection Service (Page 54) enter a range of Client IDs instead of the IP address range. Examples: 1-100, 11–45. For IP addresses, the following syntax applies: IP address/significant bits. Example: 125.128.40.128/24 IP address/subnet mask. Example: 192.168.40.128/255.255.255.240 2. For a faster approach, use the NEW function in the context menu of the ALL THINPRINT CLIENT DEVICES node (Illus. 41). Illus. 40 Illus. 40 add computers or devices in the LOCATIONS node Illus. 41 add computers or devices in the ALL THINPRINT CLIENT DEVICES node © ThinPrint GmbH 2015 Illus. 41 Manual.fm Management Center 37 Configuration Illus. 42 Illus. 42 click SEARCH to automatically search for ThinPrint Clients on the network Printer port information of the ThinPrint Client computers If workstations, local print servers or appliances are running Windows (and if these devices can be accessed via TCP/IP), the Management Center can display information about the printer ports connected to the network printers; this is displayed in the properties of the ThinPrint Client devices. 1. Select EDIT for a node under ALL THINPRINT CLIENT DEVICES (Illus. 43). Illus. 43 Illus. 43 set up display of information about client-side printer ports 2. Activate the option GET PORT INFORMATION VIA WMI (Illus. 44) and specify, if necessary, an account of the pertinent Windows computer. © ThinPrint GmbH 2015 38 Management Center Manual.fm Configuration Illus. 44 Illus. 44 select GET PORT INFORMATION VIA WMI 3. Select GET CONFIGURATION for this ThinPrint Client (Illus. 43). For Windows computers, you receive additional information on the PORT and the PORT TYPE; Illus. 45. Illus. 45 Illus. 45 columns PORT and PORT TYPE Caution! To avoid database errors do not change the Location of an existing ThinPrint Client Device (Illus. 89). On this, see Page 91. Remote configuration of ThinPrint Client Windows © ThinPrint GmbH 2015 Remote configuration is possible for ThinPrint Client Windows printing with TCP/IP protocol. The entry RMTCONF is needed in the Windows registry of all client machines you want to configure (see Illus. 46). 1. Open the Windows registry of the client machine you want to configure. Add the entry RMTCONF (reg_mulit_sz) under hkey_local_machine\software\thinprint\client. Enter the IP addresses of all those machines from which the client should be configured (Illus. 46). Manual.fm Management Center 39 Configuration Illus. 46 Illus. 46 ThinPrint Client machine: Registry entry RMTCONF added for remote configuration of ThinPrint Client 2. Restart ThinPrint Client. 3. Go to the Management Center and select CONFIGURE CLIENT for the respective ThinPrint Client (Illus. 47). Illus. 47 Illus. 47 Management Center: Select CONFIGURE CLIENT – Now, the selected ThinPrint Client is ready for remote configuration (Illus. 48). © ThinPrint GmbH 2015 40 Management Center Manual.fm Configuration Illus. 48 Illus. 48 Management Center: Remote configuration of a ThinPrint Client Adding a central print server To add a central print server, proceed as follows: 1. Install the ThinPrint Engine on the new central print server. 2. If needed, install the necessary printer drivers on this server. 3. Incorporate the print server into the Management Center (Illus. 93). 4. Create new Connections for it (Illus. 94), or assign the print server to a group of central print servers (see below). 5. Select APPLY CONFIGURATION for this Connection or for the respective print server (Illus. 98). Relocating to another central print server Management Center allows you to move from a print server to a new one. All printers that were previously created on the old print server are added to the new print server. We recommend running a backup of the SQL database beforehand. Proceed then as follows: © ThinPrint GmbH 2015 Illus. 49 Illus. 49 Manual.fm backup existing configuration Management Center 41 Configuration Requirements: The previous print server must be present in the Management Center (lower arrow in Illus. 49, here: vmee-n0ps), the new print server has not yet been added. – Click in the menu bar of the Management Center on FILE→ SAVE CONFIGURATION (upper arrow in Illus. 49). An .xml file is created, save this to a suitable location. Illus. 50 Illus. 50 replace the previous print server with the name of the new one. – Then open the .xml file which was just created in a WordPad (or Notepad). Search in the file for the name of the previous print server and replace it with the name of the new one (Illus. 50). Backup the file by saving it under a new name. Illus. 51 Illus. 51 discard the existing configuration – Then click in the menu bar of the Management Center on FILE→ DISCARD CONFIGURATION, to discard the existing configuration (Illus. 51). Beforehand, you can save a backup copy of the configuration (.xml file). – Click then on FILE→ OPEN CONFIGURATION and select the modified file with the new print server name. © ThinPrint GmbH 2015 42 Management Center Manual.fm Configuration Illus. 52 Illus. 52 click on APPLY CONFIGURATION to create printer objects – Select at CENTRAL PRINT SERVERS, the new print server and then click oN APPLY CONFIGURATION to create the printer objects. Groups of Central Print Servers With EXTRA→ VIEW→ ENABLE CENTRAL PRINT SERVER GROUPS, you can show another node in the tree view of the Management Center console (Illus. 53 and 54). This allows you to create groups of central print servers that: • should be configured identically and • should share the bandwidth of one connection This can pertain – for example – to all print servers that are node computers of the same NLB cluster or of a Windows Server 2012 cluster. Please note: A print spooler instance of a Microsoft Failover Cluster (up to Windows Server 2008 R2) is not set up as a group but as a simple print server – unlike an NLB cluster. Note! First, setup the central print server, then the central print server groups, and finally the corresponding Connections. An existing Connection cannot be retrospectively assigned to another print server or group. © ThinPrint GmbH 2015 Illus. 53 Illus. 53 Manual.fm show groups of central print servers Management Center 43 Configuration Illus. 54 Illus. 54 groups of central print servers shown Above is described how to add two print servers to a common group. In its initial condition, every print server has its own group (Illus. 54). 1. Select NEW in the context menu of the GROUPS OF CENTRAL PRINT SERVERS (Illus. 55). Illus. 55 Illus. 55 assign print servers to a group: Select NEW 2. Assign a name to the new print server group – for example, ps – and move the print servers cps04 and vmee-n0ps to this group using the arrow buttons (Illus. 56). Illus. 56 44 assigning a name to the print server group (here: ps) and add both print servers to it Management Center Manual.fm © ThinPrint GmbH 2015 Illus. 56 Configuration 3. Provided that Connections have still not been set up for this central print server, you can delete the nodes of the groups no longer needed (here: cps04 and vmee-n0ps) from the branch of the print server groups (Illus. 57). 4. If you get a message that the print server can’t be removed because it’s in use, remove the relevant Connection(s) before (Page 48). Illus. 57 Illus. 57 delete print server groups which aren’t needed anymore 5. Now, you can create a new Connection for the new print server group. To do so, open the context menu of the node CONNECTIONS with NEW (Illus. 58) and assign the Connection to the new PS group (Illus. 59). (For setting up a Connection, see Page 65 in the section Praxis: Creating and connecting printers.) Illus. 58 create new Connection © ThinPrint GmbH 2015 Illus. 58 Manual.fm Management Center 45 Configuration Illus. 59 Illus. 59 assign the new group PS to the HLSNK Connection if necessary Adding a Connection In a Connection, the settings of the ThinPrint ports to be created on the print server will be defined. For setting up a Connection, see Page 65 in the section Praxis: Creating and connecting printers. Caution! To avoid database errors with creating a new Connection please note the following: • Do not use the underscore character (_) in the Connection name. • Avoid entering the same Connection name twice. On this, see Page 97. You can make the following settings for a Connection (Illus. 60): 46 Management Center Manual.fm © ThinPrint GmbH 2015 Control Bandwidth. Enter a maximum value for the bandwidth (recommended value: 50% of the available bandwidth of the connection to the branch office involved.) Also select the number of ThinPrint Ports, with which the printer objects to be created (those that send print data via ThinPrint Engine) are to be connected; this option is called Port Pooling, the number of ThinPrint Ports is equal to the number of print jobs that can be processed simultaneously. Configuration Note! With NUMBER OF THINPRINT PORTS PER CENTRAL PRINT SERVER don’t specify more than 20 to 25 Ports because each printer of this Connection must be assigned to all ports and the printer creation would be time consuming. Additionally, the general rule is: (length of Connection name + 4) number of ports 200 To perform more print jobs simultaneously we recommend the ONE PORT PER PRINTER option or splitting the respective Connection into multiple Connections. One port per printer. As an alternative to Port Pooling (see above), you can also allow a separate printer ThinPrint Port to be created for each printer object. Use encryption. See the section Encryption of print data (Page 56). Default printer configuration. See section Preset the print mode (Page 34). Share native V-Layer printer objects. V-Layer pairs usually consist of a shared Output Gateway printer object, and a non-shared native printer object. With this option, you can also share the native printer object. Publish shared printers in AD. You can specify here whether the printer objects should also be listed in the directory – that’s equivalent to the Windows option LIST IN DIRECTORY (AD). Client connection settings. Here you can define how, and with which protocol, the print data should be sent to the ThinPrint Client (Page 35). © ThinPrint GmbH 2015 • directly to the ThinPrint Client’s IP address (CONNECT TO THINPRINT CLIENT DIRECTLY) • to Connection Service’s IP address, from where the ThinPrint Client retrieves it’s print orders (CONNECT TO THINPRINT CLIENT VIA CONNECTION SERVICE) • to the IP address of Virtual Channel Gateway (that is running on a RD Session Host or virtual desktop) and from there, via ICA or RDP, to the ThinPrint Client (CONNECT TO VIRTUAL CHANNEL GATEWAY) Manual.fm Management Center 47 Configuration Illus. 60 Illus. 60 settings of a Connection Deleting a Connection – To delete a Connection, firstly remove all printers of this Connection and secondly select REMOVE in the Connection’s context menu (Illus. 61). Thirdly select APPLY CONFIGURATION to delete it (lower arrow in Illus. 62). – Repeat APPLY CONFIGURATION if it didn’t work with the first attempt. It’s also possible to select FORCE REMOVE after the first attempt (upper arrow in Illus. 62). – FORCE REMOVE can also be used if the printers weren’t be removed before. However, in this case the printers won’t be removed from the print server. © ThinPrint GmbH 2015 48 Management Center Manual.fm Configuration Illus. 61 Illus. 61 removing a Connection Illus. 62 select APPLY CONFIGURATION to delete the Connection Illus. 62 Adding Printers Workstation or local print server © ThinPrint GmbH 2015 What needs to be done, if a new printer has been connected to a workstation or to a local print server? The workstation or the local print server may be running on various operating systems – e.g. Windows, Mac OS or Linux. 1. Create the new printer on the computer. Enable the printer in ThinPrint Client; the up-to-date version of ThinPrint Client Windows does this automatically (Illus. 63). Manual.fm Management Center 49 Configuration Illus. 63 Illus. 63 new printer has been created on a workstation (example for Windows) 2. Select GET CONFIGURATION from the context menu of the relevant ThinPrint Client node (Illus. 64). Illus. 64 Illus. 64 import ThinPrint Clients printer list 3. Select EDIT (Illus. 64) to edit the printer list. If printers appear which aren’t needed oder don’t exist any longer you can delete them here. To do so, mark the respective printers (Illus. 65) and then press the DEL key. Illus. 65 removing a printer which isn’t needed or doesn’t exist any longer 4. Select EDIT PRINTERS for the relevant Connection (Illus. 67). 50 Management Center Manual.fm © ThinPrint GmbH 2015 Illus. 65 Configuration Illus. 66 Illus. 66 Opening the EDIT PRINTERS menu of a Connection 5. Here, you enable the checkbox for the new printer, select the print mode (Page 32), and click OK to confirm. Illus. 67 Illus. 67 select the new printer in the relevant Connection (example) Furthermore here (Illus. 67) you’ll find the following buttons: Select All: Enables the checkmarks of all printers Select None: Disables the checkmarks of all printers 6. Then click on APPLY CONFIGURATION for the relevant Connection to create printer objects for the newly discovered printers. © ThinPrint GmbH 2015 Illus. 68 Illus. 68 Manual.fm select APPLY CONFIGURATION for the relevant Connection Management Center 51 Configuration ThinPrint gateway appliance What needs to be done, if a new network printer has been installed in a branch office in which a gateway appliance is being used? 1. Create the newly installed printer in the web console of ThinPrint Gateway (Illus. 69). Illus. 69 Illus. 69 new printer on ThinPrint Gateway (example for ISD400 from SEH) © ThinPrint GmbH 2015 52 Management Center Manual.fm Configuration 2. Switch to the Management Center console. Select GET CONFIGURATION in the context menu of the relevant ThinPrint Client node (Illus. 64). Illus. 70 Illus. 70 re-import ThinPrint Client’s printer list 3. For printing to ThinPrint Gateways, use the V-Layer print mode. To do so, you need the native driver for the new printer. Check whether this is already present in the Driver Pool and set up on the template server (Page 17). 4. Open the EDIT PRINTERS menu for the relevant Connection (Illus. 66). Enable the checkbox of the new printer here, select the print mode (Page 32), and click OK to confirm. Illus. 71 Illus. 71 select the new printer in the relevant Connection (example) Deselecting printers © ThinPrint GmbH 2015 If you want to disable a printer for the Management Center (e.g., to reduce the number of used licenses), only disable it in the PRINTERS menu of the respective Connection (Illus. 71). Manual.fm Management Center 53 Configuration Connection Service Overview With the Management Center, you can remotely create the following types of ThinPrint Ports on the central print servers: • ThinPrint Ports of TCP/IP type • ThinPrint Ports of Connection Service type • ThinPrint Ports of Use Virtual Channel Gateway type The information, which protocol will be used when sending print jobs, will be located on the central print servers in the properties of the ThinPrint Ports. Procedure To create Connection Service Ports with the Management Center, open the properties of a location in the LOCATIONS node (Illus. 72). – Select – per Location – CONNECT TO THINPRINT CLIENT VIA CONNECTION SERVICE and specify a TCP port (for communication between the ThinPrint Engine and Connection Service; default: 4000) and the address of the computer that the Connection Service is installed on. Click CREATE or OK to confirm. – You set its default values with EXTRA→ CONNECTION DEFAULTS (Illus. 76). – Select – per Connection – also CONNECT TO THINPRINT CLIENT VIA CONNECTION SERVICE (Illus. 73). Enter here also the TCP port and IP address of the computer where the Connection Service is installed. Illus. 72 Illus. 72 Setting up Connection Service per Location (example for Stockholm) © ThinPrint GmbH 2015 54 Management Center Manual.fm Configuration Illus. 73 Illus. 73 Connection Service per Connection (example for STCKH) Note! To get printer information from ThinPrint Client connected via Connection Service, you have to enter the IP address of the machine on which the Management Center is running in the Connection Service configuration (Illus. 74). See also the ThinPrint Connection Service manual. © ThinPrint GmbH 2015 Illus. 74 Illus. 74 Manual.fm Connection Service: setting the Management Center’s IP address Management Center 55 Configuration Encryption of print data Overview You can use the options below for encryption of your print data: • VPN connections from headquarters to the branches • Encryption of print data through the ThinPrint Engine and decryption through a ThinPrint Client The ThinPrint Clients and devices with integrated ThinPrint Client are capable of decrypting ThinPrint print jobs: • ThinPrint Clients installed on the local print servers (Windows, Linux, Java) • ThinPrint gateway TPG-25/65 or TPG60/120 and print server appliance ISD300/4x0 from SEH • Multifunction printers from Ricoh and Oki • Network printers from HP, Kyocera, and Citizen For communication between the ThinPrint Engine (on central print servers) and the ThinPrint Clients (on local print servers, appliances, or network printers), you can determine per Connection whether printing should be done with or without SSL/TLS encryption. This information is located on the central print servers in the properties of the ThinPrint Ports. Procedure To activate encryption, you only need to open the properties of a Connection in the CONNECTIONS node (Illus. 75). 1. Select – per Connection – USE ENCRYPTION and click CREATE or OK to confirm. 2. Store all the required SSL certificates in the certificate storages of the central print servers and all local print servers, appliances, or network printers involved. See also the manual of the respective ThinPrint Client. © ThinPrint GmbH 2015 56 Management Center Manual.fm Configuration Illus. 75 Illus. 75 Select SSL/TLS encryption Global settings You can adjust some settings for the entire Management Center (Illus. 76). • With EXTRA→ CONNECTION DEFAULTS you set the default values of the TCP/IP and the Connection Service protocols for new locations to be created (Illus. 77). See the section Connection Service (Page 54). Illus. 76 pre-settings for the connection protocol when printing, the V-Layer, and the SQL database of the Management Center © ThinPrint GmbH 2015 Illus. 76 Manual.fm Management Center 57 Configuration Illus. 77 Illus. 77 connection defaults • With EXTRA→ APPLICATION SETTINGS you can enter/change the SQL server and the SQL database (Illus. 78). You can also select/change the type of authentication here and provide an account for it. • In the APPLICATION START tab, you can determine whether GET CONFIGURATION will be run immediately upon starting the application for all central print servers and/or for all locations (Illus. 79). • Click OK to confirm. Illus. 78 Illus. 78 select SQL server and database Illus. 79 retrieve configuration at start-up of the Management Center? Illus. 79 © ThinPrint GmbH 2015 58 Management Center Manual.fm Configuration License Manager Please also see the section How does the licensing work? (Page 11). 1. Open the License Manager with START(→ THINPRINT MANAGEMENT CENTER)→ THINPRINT LICENSE MANAGER (Illus. 80). Illus. 80 Illus. 80 Open License Manager The console of the License Manager opens (Illus. 81). Illus. 81 License Manager with one activated productive license key (green) and one outdated demo license key (red) for the Management Center © ThinPrint GmbH 2015 Illus. 81 Manual.fm Management Center 59 Configuration 2. With ADD LICENSE KEY in the context menu of the server node, you can add license keys – e.g. of productive licenses – (Illus. 82). (If you did not receive any license keys, please contact your vendor.) The following types of license keys are currently available for the Management Center: Number of printers supported License key (example) Demo license 10 TPMC-0572-10-TESTxx-xxxx Productive license 150, 700 or 2500 (>2500 on request) TPMC-0572-700-xxxxxx-xxxx License type Illus. 82 Illus. 82 adding a license key Note! After entering a license key, it is valid for 30 days without activation. Demo keys can’t be activated. 3. You also have the option to remotely manage the license keys of the central print servers. Select ADD COMPUTER in the THINPRINT LICENSE MANAGER node (Illus. 83). After adding the central print servers, the License Manager appears as shown in Illus. 84. Illus. 83 60 © ThinPrint GmbH 2015 Illus. 83 displaying license keys of remote computers Management Center Manual.fm Praxis: Creating and connecting printers Illus. 84 Illus. 84 license keys of the Management Center and of central print servers More information about licensing, especially activating license keys, can be found in the manuals License Server and Licensing. If you also want to remotely configure other ThinPrint components then, additionally, install the administration tools; they are offered as a part of the ThinPrint Engine installation routine. Praxis: Creating and connecting printers In the following we present typical scenarios to show how, on the one hand, with the help of Management Center, the required printers are created on the central print servers and, on the other, how those printers, with the help of AutoConnect, can be connected (= mapped) to users in their sessions. Running applications on Remote Desktop Session Hosts or virtual desktops For the installation of single components, see the Quick Installation guides of Management Center and ThinPrint Engine on print servers. Network printers © ThinPrint GmbH 2015 Preconditions (see Illus. 85) Manual.fm • Installed on RD Session Hosts or virtual desktops are: • the virtual printer driver TP Output Gateway (v8.0 or later) • the ThinPrint mapping component AutoConnect (v8.0 or later) • The ThinPrint Engine (v8.0 or later) is installed on the central print server. • Installed on the local print server are: • printers • ThinPrint Client (TCP/IP type) Alternatively, devices with integrated ThinPrint Client can be used (e. g. TPG-65 or ISD400 from SEH). • Management Center is installed on a separate computer or on the central print server (not shown in Illus. 85). Management Center 61 Praxis: Creating and connecting printers Illus. 85 Illus. 85 Procedure path of the print data: Desktop→ central print server→ local print server→ printers 1. In Management Center’s configuration console set up an object for the ThinPrint Clients of a branch. To do so, select LOCATIONS→ NEW (Illus. 86). Enter the name of the branch (here: Helsinki), and click CREATE and CLOSE to confirm (Illus. 87). Illus. 86 Illus. 86 setting up a Location Illus. 87 entering the name of the branch Illus. 87 Management Center © ThinPrint GmbH 2015 62 Manual.fm Praxis: Creating and connecting printers 2. Set up the local print server. To do so, select ALL THINPRINT CLIENT DEVICES→ NEW (Illus. 88). Enter the hostname of the local print server (here: lps-8), choose the location (here: Helsinki), and click CREATE and CLOSE to confirm (Illus. 89). Illus. 88 Illus. 88 adding ThinPrint Client Illus. 89 entering host name (or IP address) of the local print server Illus. 89 3. Request the printer list of the ThinPrint Client that runs on lps-8, using the command GET CONFIGURATION (Illus. 90). Click OK to confirm the subsequent notification. The printer list will be displayed (Illus. 91). © ThinPrint GmbH 2015 Illus. 90 Illus. 90 Manual.fm importing ThinPrint Client’s printer list with GET CONFIGURATION Management Center 63 Praxis: Creating and connecting printers Illus. 91 Illus. 91 printers of lps-8 are displayed 4. Set up the central print server. To do so, select CENTRAL PRINT SERVERS→ NEW (upper arrow in Illus. 92). Enter the host name of the central print server (here: vmee-n0ps) – for failover clusters, enter the name of a print spooler instance. Click CREATE and CLOSE to confirm (Illus. 93). Note! After adding a new print server, always click immediately on GET CONFIGURATION (lower arrow in Illus. 92), to determine if the print server is reachable. Illus. 92 Illus. 92 adding a central print server Illus. 93 entering host name or IP address of the central print server Illus. 93 Management Center © ThinPrint GmbH 2015 64 Manual.fm Praxis: Creating and connecting printers 5. Set up an object for the Connection settings (which will be stored in the configuration of the ThinPrint Ports). To do so, select CONNECTIONS→ NEW (Illus. 94). Enter the name of the Connection – e.g. that of the branch – (here: HLSNK), select the central print server and the location, and click CREATE or OK to confirm and CLOSE (Illus. 95). Illus. 94 Illus. 94 adding Connection settings (CONNECTION) Caution! To avoid database errors with creating a new Connection please note the following: • Do not use the underscore character (_) in the Connection name. • Avoid entering the same Connection name twice. © ThinPrint GmbH 2015 Illus. 95 Illus. 95 Manual.fm NEW CONNECTION with connection settings Management Center 65 Praxis: Creating and connecting printers 6. Now set up the printer objects. To do so, select EDIT PRINTERS in the Connection’s context menu (here: HLSNK, Illus. 96). Enable the selected printers (all with SELECT ALL), and for each one, enable V-LAYER7 (PRINTER TYPE column). Assign to each printer a native driver and a template 8 (NORMAL TEMPLATE column) as well as an Output Gateway template (V-LAYER TEMPLATE column). Click OK to confirm (Illus. 97). Illus. 96 Illus. 96 selecting EDIT PRINTERS for this Connection Illus. 97 SELECT ALL and V-LAYER and then the templates of the native drivers (NORMAL TEMPLATE) and of Output Gateway (V-LAYER TEMPLATE) Illus. 97 Create printers on the central print server 7. To create the printer objects, select APPLY CONFIGURATION for the central print server (Illus. 98) or for the relevant Connection. Click YES and OK to confirm the subsequent notifications. The result appears in the printers folder of the central print server (Illus. 99). In the session, both Output Gateway objects of the V-Layer pairs can be connected at the same time, here: Lexmark T630_lps-8 and HP Color LaserJet 4700_lps-8. 7 Recommended for the transmission of print data to non Windows clients, as well as to centralize all printer drivers on the central print server 8 For printer driver and Templates management see Page 17. Management Center Manual.fm © ThinPrint GmbH 2015 66 The newly selected printers are then automatically set on the central print server: Praxis: Creating and connecting printers Illus. 98 Illus. 98 selecting APPLY CONFIGURATION for the central print server Illus. 99 result: Three V-Layer printer pairs have been applied to the central print server (here: one Lexmark and two HPs) Illus. 99 Configuring AutoConnect The ThinPrint component AutoConnect connects the above applied printers into a session on an RD Session Host or a virtual desktop (= printer mapping). AutoConnect has two tables to set up the mapping rules: • Dynamic Printer Matrix and • Map Additional Printers © ThinPrint GmbH 2015 Dynamic Printer Matrix is the more comfortable operated of the two tables. It assumes that the required information for processing the mapping rules can be requested. Consequently, AutoConnect attempts to create in a session, exactly one printer object for each printer for which it received a report from ThinPrint Client. In contrast, when using the table Map Additional Printers, all printers that are in the table and for which a rule applies, are created in the session, regardless of the presence of a ThinPrint Client. Manual.fm Management Center 67 Praxis: Creating and connecting printers Alternative 1 • Dynamic Printer Matrix. Advantages • Printer names don’t have to be entered • Rules can be imported from Management Center Disadvantage requires ThinPrint Client You don’t have to completely enter the contents of Dynamic Printer Matrix all over again. You can export it from Management Center, import it into Dynamic Printer Matrix and then just edit it there, if required. Do this by the following method: 8. In the CENTRAL PRINT SERVERS node of the Management Center’s configuration console select the menu item EXPORT TO CSV (Illus. 100). Enter a file name, and click SAVE to confirm (Illus. 101). Illus. 100 Illus. 100 CENTRAL PRINT SERVERS→ selecting EXPORT TO CSV Illus. 101 9. Switch to Dynamic Printer Matrix on the Active Directory server. Select IMPORT CONFIGURATION there (upper arrow in Illus. 102) and then select the newly exported .csv file. Click on OPEN (lower arrow). 68 Management Center Manual.fm © ThinPrint GmbH 2015 Illus. 101 assigning a file name and click SAVE Praxis: Creating and connecting printers Caution! An existing configuration will be overwritten. Illus. 102 Illus. 102 selecting .csv file and click on OPEN 10. The new Dynamic Printer Matrix configuration appears (Illus. 103). Click on OK to close the Dynamic Printer Matrix. Illus. 103 Illus. 103 Dynamic Printer Matrix: Management Centers configuration has been imported © ThinPrint GmbH 2015 11. Create logon scripts with the following content, for the users (Illus. 104, example): tpautoconnect -a lps-8 12. Create logoff script for all users with the following content: tpautoconnect -d Manual.fm Management Center 69 Praxis: Creating and connecting printers Illus. 104 Illus. 104 connecting printers with AutoConnect (here: on the command line) 13. Perform an update of the group policy for the RD Session Hosts and/or virtual desktops. 14. Start a session on the RD Session Host or virtual desktop and perform test prints on the automatically mapped printers (Illus. 105). Illus. 105 Illus. 105 printers mapped in a session by AutoConnect Alternative 2 • Map Additional Printers. Advantage ThinPrint Clients are not required Disadvantage A rule has to be entered for every printer. © ThinPrint GmbH 2015 70 Management Center Manual.fm Praxis: Creating and connecting printers 15. Switch to Map Additional Printers table on the Active Directory server. Enable the table with ENABLED (above right in Illus. 106), and create a rule for each printer to be connected. Click on OK to close. Illus. 106 Illus. 106 Map Additional Printers: enabling and entering rules 16. Perform an update of the group policy for the RD Session Hosts and/or virtual desktops. 17. Start a session on the RD Session Host or virtual desktop and perform a test prints to the printers automatically mapped by AutoConnect (Illus. 107). Illus. 107 Illus. 107 two printers mapped in a session by AutoConnect Printers connected locally to workstations or Thin Clients © ThinPrint GmbH 2015 Requirements (see Illus. 108) Manual.fm • Installed on RD Session Hosts or virtual desktops are: • The virtual printer driver TP Output Gateway (v8.0 or later) • The ThinPrint mapping component AutoConnect (v8.0 or later) • ThinPrint Engine is installed on the central print server (v8.0 or later). • Installed on the workstation or the Thin Client are: • Printers • ThinPrint Client (TCP/IP type) • Management Center is installed on a separate computer or on the central print server (not shown in Illus. 108). Management Center 71 Praxis: Creating and connecting printers Illus. 108 Illus. 108 path of the print data: Desktop→ central print server→ workstation→ printer Procedure 1. If you have not already done so, set up a branch as LOCATION (here: Helsinki, Illus. 86 and 87, Page 62). 2. Set up the workstation. To do so, select ALL THINPRINT CLIENT DEVICES→ NEW. Enter the host name of the workstation (here: ws-87), select the location (here: Helsinki), and click CREATE and CLOSE to confirm (Illus. 109). Illus. 109 Illus. 109 entering the workstation’s host name (or IP address) 3. With the command GET CONFIGURATION, request the printers list of the ThinPrint Client, which runs on ws-87 (Illus. 110). Click OK to confirm the subsequent notification. The printer list will be shown (Illus. 111). Illus. 110 72 Management Center Manual.fm © ThinPrint GmbH 2015 Illus. 110 retrieving ThinPrint Client’s printer list with GET CONFIGURATION Praxis: Creating and connecting printers Illus. 111 Illus. 111 printer from ws-87 will be shown 4. If you have not already done so, set up the central print server (Illus. 92 and 93, Page 64). 5. If you have not already done so, set up an object for the Connection settings (here: HLSNK, Illus. 94, Page 65). Caution! To avoid database errors with creating a new Connection please note the following: • Do not use the underscore character (_) in the Connection name. • Avoid entering the same Connection name twice. 6. Now set up the printer object. To do so, select EDIT PRINTERS in the Connections context menu (here: HLSNK, Illus. 112). Enable the required printer (here: Kyocera), enable V-LAYER 9 (PRINTER TYPE column), and assign to the printer one template with a native driver (NORMAL TEMPLATE column) and one template with TP Output Gateway (V-LAYER TEMPLATE column). Click OK to confirm (Illus. 113). Illus. 112 © ThinPrint GmbH 2015 Illus. 112 selecting EDIT PRINTERS for the Connection 9 Manual.fm recommended for sending print data to non-Windows clients, as well as for centralizing all the printer drivers on the central print server Management Center 73 Praxis: Creating and connecting printers Illus. 113 Illus. 113 SELECT ALL and V-LAYER (PRINTER TYPE) and the native drivers (NORMAL TEMPLATE) and Output Gateway templates (V-LAYER TEMPLATE) Create printers on the central print server Thereby you will automatically create the printer you have just selected on the central print server: 7. Select APPLY CONFIGURATION to create printer objects for the central print server or for the corresponding Connection. Click YES and OK to confirm the subsequent messages. Illus. 114 shows the result displayed in the printers folder of the central print server. The Output Gateway objects of the V-Layer pairs will be connected into the session, here: Kyocera FS-C8100DN, Lexmark T630, HP Color LaserJet CP2020 and HP Color LaserJet 4700 Illus. 114 Illus. 114 result: A new V-Layer printer pair has been created on the central print server (here: Kyocera) Configuring AutoConnect Because, in this scenario, ThinPrint Engine sends the print output to printers installed locally on workstations or on Thin Clients (Illus. 108), that’s where the ThinPrint Client is installed. Therefore, the printer mapping is carried out here with AutoConnect’s Dynamic Printer Matrix. You don’t have to completely enter all the contents of Dynamic Printer Matrix again. You can export it from Management Center, import it into the Dynamic Printer Matrix and edit it there if required. To do so, proceed as follows: 74 Management Center Manual.fm © ThinPrint GmbH 2015 8. In the CENTRAL PRINT SERVERS node, select the menu item EXPORT TO CSV from the Management Center configuration console (Illus. 100, Page 68). Enter a file name, and click SAVE to confirm (Illus. 101). Praxis: Creating and connecting printers 9. Switch to Dynamic Printer Matrix on the Active Directory server. Select IMPORT CONFIGURATION there (upper arrow in Illus. 102) and then the newly exported .csv file. Click on OPEN (lower arrow). Caution! An existing configuration will be overwritten. 10. The new Dynamic Printer Matrix configuration is displayed (Illus. 115). Click on OK to close Dynamic Printer Matrix. Illus. 115 Illus. 115 new Dynamic Printer Matrix configuration 11. Perform an update of the group policies for the RD Session Hosts and/or virtual desktops. 12. Start a session on the RD Session Host or virtual desktop and perform test prints on the printer automatically mapped by AutoConnect (Illus. 116). © ThinPrint GmbH 2015 Illus. 116 Illus. 116 printer mapped in a session by AutoConnect Manual.fm Management Center 75 Praxis: Creating and connecting printers Local printers for mobile or home users Preconditions (see. Illus. 117) • Installed on RD Session Hosts or virtual desktops are: • the virtual printer driver TP Output Gateway (v8.0 or later) • the ThinPrint mapping component AutoConnect (v8.0 or later) • Virtual Channel Gateway (v8.0 or later) to deliver the print output via ICA, RDP or PCoIP • ThinPrint Engine is installed on the central print server (v8.0 or later). • Installed on the workstation or ThinPrint Client are: • printers • ThinPrint Client (RDP type) or ThinPrint Client (ICA type) • Management Center is installed on a separate computer or on the central print server (not shown in Illus. 117). Illus. 117 Illus. 117 path of the print data: Desktop→ central print server→ desktop→ workstation→ printer Procedure 1. Set up an object for the ThinPrint Clients of mobile or home users on the Management Center’s configuration console. To do so, select LOCATIONS→ NEW (Illus. 118). Enter a nominal branch name (here: Mobile or Home Users), and click CREATE and CLOSE to confirm (Illus. 119). Illus. 118 Illus. 118 entering nominal Location for mobile or home user © ThinPrint GmbH 2015 76 Management Center Manual.fm Praxis: Creating and connecting printers Illus. 119 Illus. 119 entering the nominal branch name 2. Set up a (nominal) ThinPrint Client device. To do so, select ALL THINPRINT CLIENT DEVICES→ NEW (Illus. 120). Illus. 120 Illus. 120 adding ThinPrint Client 3. Specify a nominal host name (here: VCG), select the location (here: Mobile or Home Users) (Illus. 121). © ThinPrint GmbH 2015 Illus. 121 Illus. 121 entering nominal host name and printer name Manual.fm Management Center 77 Praxis: Creating and connecting printers When putting in the printer (right arrow in Illus. 121), it is important to distinguish between three different cases: • Case 1: Windows workstations are used, and the print jobs will only be sent to the standard local printer. • Case 2: Windows workstations are used. If multiple printers are connected, they need to be able to be specifically selected in a session (Prerequisite: ThinPrint Engine version 8.6 or later). • Case 3: Non-Windows clients are used. Here, the native driver must be assigned. (Prerequisite: ThinPrint Engine version 8.6 or later). 4. Case 1: Enter a printer name in the column PRINTER NAME with which users in a session are to print to their local default printer (here: mobile or home). Select TP Output Gateway as the driver (if it’s not already displayed in the DRIVER list add it, using ADD NEW DRIVER10). Don’t enter a printer ID11 (Illus. 122); this is not necessary here because the print data will be sent to the workstation’s default printer (the ThinPrint Client’s Current Printer respectively). Illus. 122 Illus. 122 case 1: defining only one Output Gateway printer 11 If -1 is given as printer ID, please do not delete this. 78 Management Center Manual.fm © ThinPrint GmbH 2015 10 See in the Troubleshooting section in case the ADD NEW DRIVER option does not work. Praxis: Creating and connecting printers 5. Case 2: Enter a name in the column PRINTER NAME for each printer model installed on the Windows clients (the spelling must match that on the Windows clients). In each case, select TP Output Gateway as the driver. Don’t enter a printer ID11 (Illus. 123); this will be automatically determined later, by AutoConnect. Illus. 123 Illus. 123 case 2: defining an Output Gateway printer for each printer model 6. Case 3: Enter a printer name in the column PRINTER NAME for each printer model installed on non-Windows clients (the spelling must match that on the clients’ devices). In each case, select that driver with which the print jobs are to be rendered (if these are not already displayed in the DRIVER list add them, using ADD NEW DRIVER10). Don’t enter a printer ID11 (Illus. 124); this will be automatically determined later, by AutoConnect. © ThinPrint GmbH 2015 Illus. 124 Illus. 124 Case 3: defining a printer and allocate a native driver for each printer model 7. Click CREATE and CLOSE to close the New ThinPrint Client device menu (Illus. 121). Manual.fm Management Center 79 Praxis: Creating and connecting printers 8. If you have not done so already, set up the central print server (Illus. 92 and 93, Page 64). 9. Set up an object for the Connection settings (which are stored in the ThinPrint Ports). To do so, select CONNECTIONS→ NEW (Illus. 125). Enter a name for the Connection (here: VCG), select the central print server and the location, and click CREATE or OK to confirm and CLOSE (Illus. 126). Illus. 125 Illus. 125 adding Connection settings (CONNECTION) Caution! To avoid database errors with creating a new Connection please note the following: • Do not use the underscore character (_) in the Connection name. • Avoid entering the same Connection name twice. Illus. 126 © ThinPrint GmbH 2015 Illus. 126 NEW CONNECTION with Connection settings 80 Management Center Manual.fm Praxis: Creating and connecting printers 10. Now set up the printer objects. To do so, select EDIT PRINTERS in context menu of the Connection (here: VCG, Illus. 127). Enable the desired printers (all with SELECT ALL). Cases 1 and 2: In each case, select TP Output Gateway as NORMAL TEMPLATE (Illus. 128). Case 3: In each case, enable V-LAYER 12, and assign to each printer one template with a native driver (NORMAL TEMPLATE column) and one with TP Output Gateway (V-LAYER TEMPLATE column). Click OK to confirm (Illus. 128). Illus. 127 Illus. 127 selecting EDIT PRINTERS for the Connection Illus. 128 Illus. 128 selecting printers and print mode and assign drivers (example for case 2) Create printers on central print server The newly selected printers are then created automatically on the central print server: © ThinPrint GmbH 2015 11. To create the printer objects, select APPLY CONFIGURATION either for the central print server (Illus. 129) or for the respective Connection. Click YES and OK to confirm the subsequent notification. The result in the central print server’s printers folder is shown in Illus. 130. 12 recommended for the sending of print data to non-Windows clients as well as for centralizing all printer drivers on the central print server Manual.fm Management Center 81 Praxis: Creating and connecting printers Illus. 129 Illus. 129 selecting APPLY CONFIGURATION for the central print server Illus. 130 Illus. 130 printer has been created on the central print server (example for case 2) Configuring AutoConnect Because, in this scenario, ThinPrint Engine sends the print jobs to printers installed locally on the workstations or on Thin Clients, (Illus. 117), that’s where the ThinPrint Client is installed. Therefore, printer mapping is carried out here by the Dynamic Printer Matrix of AutoConnect. You don’t have to completely enter all the contents of Dynamic Printer Matrix again. You can export it from Management Center, import it into the Dynamic Printer Matrix and edit it there, if required. See Illus. 100 to 102 (Page 68). © ThinPrint GmbH 2015 82 Management Center Manual.fm Praxis: Creating and connecting printers 12. After that, the Dynamic Printer Matrix configuration for mobile and home users is shown, Illus. 131. Click on OK to close Dynamic Printer Matrix. Illus. 131 Illus. 131 Dynamic Printer Matrix: Management Center configuration has been imported 13. Perform an update of the group policies for RD Session Hosts and/or virtual desktops. 14. Start a session on the RD Session Host or virtual desktop and perform a test print on the automatically created printer (Illus. 132). Illus. 132 Illus. 132 printer mapped in a session by AutoConnect (example) Running applications on workstations © ThinPrint GmbH 2015 Network printers Preconditions (see Illus. 133) Manual.fm • ThinPrint Engine is installed on the central print server (v8.0 or later). • Installed on the local print server are: • Printers • ThinPrint Client (TCP/IP type) Management Center 83 Praxis: Creating and connecting printers • Installed on the Windows workstations: • Printer • ThinPrint Desktop Extension (v8.0 or later) • Management Center is installed on a separate computer or on the central print server (not shown in Illus. 133). Illus. 133 Illus. 133 path of the print data: Workstation→ central print server→ local print server→ printer Procedure The installation procedure is the same as for network printers in the section Running applications on Remote Desktop Session Hosts or virtual desktops (Page 61). Except that in this case, the group policies don’t relate to the RD Session Hosts or virtual desktops, but to the workstations. And finally, AutoConnect will be started with the same script when logging on to the workstation. – Log on locally to a workstation, and perform test prints on the automatically created printers (Illus. 134). Illus. 134 Illus. 134 printers mapped on workstation by AutoConnect Preconditions (see Illus. 135) 84 • ThinPrint Engine is installed on the central print server (v8.0 or later) • Installed on the Windows workstation are (Note the sequence!): • Printers • ThinPrint Desktop Extension (v8.0 or later)13 • ThinPrint Client (TCP/IP type) Management Center Manual.fm © ThinPrint GmbH 2015 Printers attached locally on workstations Praxis: Creating and connecting printers • Management Center is installed on a separate computer (not shown in Illus. 135). Illus. 135 Illus. 135 path of the print data: Workstation→ central print server→ workstation→ printer Procedure The installation procedure is the same as for Printers connected locally to workstations or Thin Clients in the section Running applications on Remote Desktop Session Hosts or virtual desktops (Page 71). Except that AutoConnect needs to be started script-controlled on the workstation, that is, as follows (Illus. 136): 1. Create logon scripts for all users – with the following content: tpautoconnect -d tpautoconnect -a %computername% -q Illus. 136 Illus. 136 connecting printers with AutoConnect (here: on the command line) 2. Perform an update of the group policy for the workstation. 3. Log on locally on the workstation, and perform test prints on the automatically created printer (Illus. 137). © ThinPrint GmbH 2015 Illus. 137 13 The Windows service TP VC Gateway has to be disabled after installation. Manual.fm Management Center 85 Appendix Illus. 137 printer on the workstation connected by AutoConnect Appendix Customer service and technical support www.thinprint.com/—>RESOURCES & SUPPORT www.thinprint.com/en-us/resourcessupport/supportrequest.aspx Additional sources Further information about ThinPrint can be downloaded from our website. Here you will find also demo downloads of our software and a list of Thin Clients or print server devices with embedded ThinPrint Client. Manuals and other descriptions The following manuals and technical information are available at www.thinprint.com/manuals: • • • • • • • • • • • ThinPrint Management Center quick installation guide ThinPrint Engine on print servers ThinPrint Engine on print servers quick installation guide ThinPrint Connection Service Microsoft Failover Clusters and ThinPrint Licensing License Server Creating SSL certificates for printing with ThinPrint SEH ISD as a ThinPrint Client Gateway SEH TPG as a ThinPrint Client Gateway and various ThinPrint Clients manuals Troubleshooting Message history 14 Maximum 100000 messages are charged with; first in, first out. 86 Management Center Manual.fm © ThinPrint GmbH 2015 When working with the Management Center, message windows occasionally pop up (Illus. 138). If such a message appears, check whether an exclamation mark in a red circle appears in the lower right corner of the console. In this case, you receive more information if you select the SHOW MESSAGES option (right mouse button or double-click). Illus. 139 shows an example of this type of message. Using the COPY TO DATA CLIPBOARD button you can copy all messages to the clipboard. CLEAR (MESSAGES) or restarting the Management Center deletes all messages.14 Appendix Illus. 138 Illus. 138 confirming message and opening the description with SHOW MESSAGES Illus. 139 Illus. 139 reading the description and copying, if needed (example) Logging To get more detailed information what happened exactly the first way is to have a look at the Message History (see above). In case this information isn’t sufficiently you can enable logging temporarily. © ThinPrint GmbH 2015 – Only copy the file NLog.config into Management Center’s program directory. Then the Management Center creates the log file Printermanager.log in the same directory automatically. Manual.fm Management Center 87 Appendix – Copy the following lines into a text file to create the file NLog.config yourselves: <?xml version="1.0" encoding="utf-8" ?> <nlog xmlns="http://www.nlog-project.org/schemas/NLog.xsd" xmlns:xsi="http://www.w3.org/2001/XMLSchema-instance"> <targets> <target name="DebugLevel" xsi:type="File" fileName="${basedir}/Printermanager.log" layout="${longdate} ${level} ${threadid} ${message} ${stacktrace}" /> </targets> <rules> <logger name="*" minlevel="Debug" writeTo="DebugLevel" /> </rules> </nlog> Solving issues The table below lists some messages and gives suggestions for solving the problem. Suggested solution “Your operating system must be at least Windows 7 SP1 or Windows Server 2008 R2 to continue the installation.” • Install the Management Center on a machine with one of the operation systems Windows 7 SP1 x86 or x64 or Windows Server 2008 R2 on which the Microsoft hotfix KB2493115 is installed too. • The Management Center installer doesn’t (yet) support Windows 8 and Windows Server 2012. However, the Management Center can manage central print servers running Windows Server 2012 or 2012 R2 remotely. “ThinPrint License Manager is required to install this product but can not be found.” • The installer has been started on an OS which is not supported (see Page 11). • Whether no ThinPrint component is installed (anymore) delete the following Registry keys: hkey_local_machine\software\ThinPrint hkey_local_machine\software\wow6432node\ThinPrint “The application is not yet configured.” You have started the Management Center the first time. Begin the Management Center setup (see Page 17). The Management Centers console’s start takes to long (e.g. more than two minutes). Check whether a antivirus software slows the process down. 88 Management Center Manual.fm © ThinPrint GmbH 2015 Message/Problem © ThinPrint GmbH 2015 Appendix Message/Problem Suggested solution “The operation has not been successfully completed” Select SHOW MESSAGES to get a more detailed description (see above). V-Layer: Timeout with transmitting print jobs of all users (also of admins) from the Output Gateway object to the native printer object • Check whether the name resolution by the DNS works properly (both lookup and reverse lookup) – in particular for the Management Center machine and the central print server – and translates the names into IPv4 addresses. If the DNS returns an IPv6 address, disable IPv6. • Delete the V-Layer printer pair and then re-create it using the Management Center. V-Layer: Print jobs of normal users disappear while the Output Gateway printer object is paused (by way of trial). • Up to ThinPrint 9.0: Check whether the option RENDER PRINT JOBS ON CLIENT COMPUTERS is disabled in the printer (object) properties. • Windows Server 2008 SP1 (x86 and x64): Install the Microsoft hotfixes KB958741 (Print Job Owner) and KB958656 (Client Side Rendering) or SP2 both on RD Session Hosts and central print servers. • Check whether the Output Gateway driver version on source and target machine match. V-Layer: Print jobs from normal users disappear on the way from the Output Gateway printer object to the (test paused) native printer object. • Check whether valid and sufficient license keys are installed on the print server. • Assign the permission MANAGE PRINTERS to the EVERYONE group of the respective native printer driver’s template (particularly in case of the print spooler event ID 372). • Enable the option SHARE NATIVE V-LAYER PRINTER OBJECTS in the settings of the respective CONNECTION. • Share the respective native printer (object) manually (up to ThinPrint 9.0: option RENDER PRINT JOBS ON CLIENT COMPUTERS disabled). • Check whether the Output Gateway driver version on source and target machine match. V-Layer: Bitmaps won’t be printed. • Check on the template server if the respective Output Gateway template is set to NO IMAGES in ADVANCED→ PRINTING DEFAULTS. • On this Output Gateway template, change any option in ADVANCED→ PRINTING DEFAULTS and save it using APPLY or OK. Then delete the V-Layer and recreate it. Can I abort APPLY CONFIGURATION when the first error occurs? Yes. Select EXTRA→ ERROR HANDLING→ HALT ON ERROR (see Page 57). The information in parentheses after the designations of nodes is missing. Select EXTRA→ VIEW→ SHOW COMMENTS IN TREEVIEW (see Page 57). “The import is not available” See the System requirements on Page 11. Manual.fm Management Center 89 Appendix Message/Problem Suggested solution “The software you are installing (for this hardware – Printers –) has not passed Windows logo testing ...” A printer driver is not signed by Microsoft. Don’t use unsigned drivers. No SQL server appears under EXTRA→ APPLICATION SETTINGS. The SQL server cannot be reached or is not running, or the Windows service SQL Server Browser is not running. “The password for access to database is invalid.” • Check the SQL database password • Database could not be found or is not accessible. Error 27502. Could not connect to Microsoft SQL Server 'MGMTCENTER03\SQLEXPRESS'. Login failed for user 'NT AUTHORITY\ANONYMUS LOGON'. (18456) The remote SQL server can be reached but the used account has not the permissions to create a new database. “Invalid operation. The connection is closed.” The SQL server connection is lost. Select EXTRA→ APPLICATION SETTINGS then OK. Or restart the Management Center to reconnect to the SQL database. “Failed to restrict the database against inappropriate usage. Timeout expired. The timeout period elapsed prior to completion of the operation or the server is not responding.” A new Management Center version had tried to update an older database. But this database is blocked by another user access. Disconnect all connections to the database and repeat the update (e.g., by restarting the Management Center). “The connection to the database could not be established. Following error(s) occured: The database is already used by the Management Center or does not exist.” • The database is blocked by another user access. Disconnect all connections to the database and repeat the action. • After an update, the database is blocked by the update script. Simply repeat the action. “An error occurred while attempting to query '192.168.201.7'. The received answer was not valid.“ Check whether the ThinPrint Client or Connection Service is accessible from the Management Center machine via the TCP port which is configured in LOCATIONS (e.g., using telnet 192.168.201.7 4000). © ThinPrint GmbH 2015 90 Management Center Manual.fm © ThinPrint GmbH 2015 Appendix Message/Problem Suggested solution “Object reference not set to an instance of an object“ Maybe the respective ThinPrint Client Device was moved to another Location after creating printers (on the central print server). To solve this problem perform the following steps: • Remove the respective Connection using REMOVE and then FORCE REMOVE (instead of APPLY CONFIGURATION). • Restart the Management Center console. Should the problem still exists perform the following after removing the respective Connection additionally: • Remove the respective ThinPrint Client Device. • Remove the respective Location. • Recreate all removed objects (Location, ThinPrint Client Device and Connection). An Output Gateway printer object has not been created and the message “SrvPrinter. Object reference not set to an instance of an object. System.NullReferenceException” appeared. Make sure that both the forward and the reverse name resolution by the DNS works properly with all involved computers – in particular with the License Server. Does the DNS translate the names into IPv4 addresses? If the DNS returns an IPv6 address, disable IPv6. “An error occured while attempting to query '172.20.224.23'. The requested name is valid, but no data of the requested type was found. (0x00002afc)” • Maybe that the used IP address is from another domain. Use its FQDN instead. • Check to make sure that driver pool and template server can be reached. “The address of ThinPrint Client device 172.20.224.23 has no valid TPUID format” Use the client ID of the ThinPrint client (Illus. 69) as an address in the properties of the ThinPrint client devices (Illus. 89). “The printer 'Canon iR5570/iR6570 PCL#36:6' is invalid. The share is not valid.” Remove the slash in the share name (in the column SHARE, Illus. 37). “Input string was not in a correct format.” • Check whether the ThinPrint Client Windows version is at least 8.0. • Use the V-Layer print mode for this ThinPrint Client. • In ThinPrint Client Windows, disable the option ENABLE SENDING PROPERTIES. In the PORT column of THINPRINT CLIENT DEVICES the WMI information is displayed. But the PORT TYPE column appears empty (Illus. 45). Check to make sure the respective computer is a domain member. “Skip retrieving port information from ThinPrint Client '55'. The connection mode does not support the feature.” Deactivate GET PORT INFORMATION VIA WMI in the ThinPrint Client Device’s settings (because of the Connection Service doesn’t support WMI). Manual.fm Management Center 91 Appendix Message/Problem Suggested solution <ADD NEW DRIVER> does not work in the EDIT THINPRINT CLIENT DEVICE menu. With closing the window maybe the following message appears: “Failed to save the changes to the Client Printer Drivers. Cannot insert explicit value for identity column in table ‘SOURCEDRIVER’ when IDENTITY_INSERT is set to OFF.” Add the needed driver name manually. On this, proceed as follows: • Save the configuration with FILE→ SAVE CONFIGURATION and create a backup copy of the XML file. • Open the XML file using an editor and search for a string as the following: <SOURCEDRIVER> <SOURCEDRIVER_ID>13</SOURCEDRIVER_ID> <NAME>HP 2500C Series PS3</NAME> </SOURCEDRIVER> • Add a new string below this current one – e.g.: <SOURCEDRIVER> <SOURCEDRIVER_ID>99</SOURCEDRIVER_ID> <NAME>new driver name</NAME> </SOURCEDRIVER> • Note that the new SOURCEDRIVER_ID must not exist beforehand (here: 99). • Save the XML file and import it to the Management Center using FILE→ OPEN CONFIGURATION. Then, the new driver name will appear in the EDIT THINPRINT CLIENT DEVICE menu. “A transport-level error has occurred when sending the request to the server. (provider: TCP provider, error: 0 - An existing connection was forcibly closed by the remote host.)” Problems with SQL database access. • Simply repeat the last action. • Open the SQL server connection settings (EXTRA→ APPLICATION SETTINGS) and click OK to confirm. The SQL database will be re-connected. With a Group of Central Print Servers some ThinPrint Ports are listed more than once. Select EXTRA→ APPLICATION SETTINGS then OK. Or restart the Management Center to refresh the display of SQL server data. “File must be placed in driver pool.” Copy all required (original) drivers from the printer manufacturers to the Driver Pool directory or a subdirectory of it (see Page 17). “Some printer drivers could not be removed because they are still in use.” In the CENTRAL PRINT SERVER DRIVERS node, those drivers cannot be deleted for which a template exists or which have been checked in the EDIT PRINTERS menu of a Connection. The Management Center cannot delete a printer with the icon. • Check whether a print job is to be printed by this printer. • Runtime problem: Simply repeat the last action. • Restart the Management Center and repeat the last action. © ThinPrint GmbH 2015 92 Management Center Manual.fm Appendix Suggested solution “EnumPrinterDriver failed on printserver--01. The RPC server is unavailable. (No. 1722)” • Check to make sure the entered addresses of template server and central print servers can be reached. • Check to make sure at least one printer is shared on the target computer – with failover clusters on the print spooler instance. • Check to make sure the print spoolers are running on both servers (ThinPrint Engine and Management Center). • Check the domain membership of both servers. • Check whether the name resolution by the DNS works properly (both lookup and reverse lookup) and translates the names into IPv4 addresses. If the DNS returns an IPv6 address, disable IPv6. “Installation of printer Lexmark T630#tpw2307:4 on ps failed. Index was outside the bounds of the array.” Connection settings: Choose a lower value for MAXIMUM CONNECTION BANDWIDTH (BIT/S). “Failed to set the Port for Printer "HPColorLaserJet4700" on Connection "CS". Please deploy Connections with the "One Port per Printer" Feature one by one.“ Connection settings: If you enabled the option ONE PORT PER PRINTER select APPLY for each of these Connections individually – thus not for all Connections at the same time and not per print server. “Creating printer ... on printserver--02 failed. The RPC server is unavailable. (No. 1722)” Check to make sure the Print Spoolers are running on the respective print server(s). “Creating printer ... on printserver--02 failed. The remote procedure call failed. (No. 1726)” • Check to make sure the Print Spoolers are running on the respective print server(s). • Probably the printer uses a driver which cannot be installed remotely. Install the respective printer driver (provided by the printer manufacturer) manually on the print server, or use a driver provided by the operating system. “... port ... on printserver--02 could not be created. The printer name is invalid. (No. 1801)” • The printer port for a V-Layer printer could not be created. Possibly the Print Spooler doesn’t run. • If error 1726 occurred at the same time, see there. “Creating printer ... on printserver--02 failed because of missing V-Layer port.” • A printer could not be created because the printer port to which it should be connected doesn’t exist. • If error 1726 or 1801 occurred at the same time, see there. © ThinPrint GmbH 2015 Message/Problem Manual.fm Management Center 93 Appendix Message/Problem Suggested solution “EnumPrinterDriver failed on localhost. The parameter is incorrect. (No. 87)” • The target server cannot be reached. • Check to make sure the entered addresses of template server and central print servers can be reached. • Don’t use Alias names in your DNS. • If the print server is a failover cluster use the address of a print spooler instance as the print server address instead of the address of the cluster instance or a cluster node. Check to make sure the cluster instance is online. See also the Microsoft Failover Clusters and ThinPrint. “Driver TP Output Gateway is missing on Central Print Server ps1.” With failover clusters the TP Output Gateway driver has to be installed not only on each cluster node but also on the print spooler instance (here: ps1). See also the Microsoft Failover Clusters and ThinPrint manual. “Port on ps1 could not be created. Marshaling packet signature is invalid.” With failover clusters at least one ThinPrint Port has to be installed (manually) on the print spooler instance (here: ps1). See also the message The RPC server is unavailable as well as the Microsoft Failover Clusters and ThinPrint. The message: “Querying port ‘BLN_1:’ on ‘vmee-n0ps’ failed.” appears in the Management Center’s Message History. Or in the print server’s ThinPrint Port Manager appears the message: “Error occurred. Could not get port information. (0x8007000d)” On a 2008 R2 failover cluster running ThinPrint Engine 8.0: • Create only ThinPrint Ports with maximum 8 characters. • Install the Thinmon.dll hotfix (v8.0.876.2 or later) • Update the ThinPrint Engine to version 8.6 or later. ThinPrint Port couldn’t be deleted. • There are printers which are connected to this port. • Runtime problem: Simply repeat the last action. “The driver installation for Windows Version 6 and higher failed. Step 1: Driver Upload Driver ... The system cannot find the path specified.” • To be able to install the printer driver a Windows update is necessary again on the Management Center machine (Illus. 20). • Install the respective driver manually on the target server (in the PRINT SERVER PROPERTIES menu). • With uninstallation of drivers shipped with Windows never select the option REMOVE DRIVER AND DRIVER PACKAGE but always REMOVE DRIVER ONLY. © ThinPrint GmbH 2015 94 Management Center Manual.fm Appendix Suggested solution “The driver installation for Windows Version 6 and higher failed. Step 1: Driver Upload Driver: TP Output Gateway, Architecture: Windows x64, Machine: printserver1 An attempt was made to acquire a mutant such that its maximum count would have been exceeded. (Exception from HRESULT: 0x8007024B)“ Maybe that the ThinPrint Engine version of the target systems is lower than the version of Output Gateway on the Management Center machine which is to be installed per driver update (e.g. 9.0 instead of 10 or 9.2 instead of 9.4). • If applicable, update the ThinPrint Engine on the target system. “The printer Lexmark T630_n_#tpw2307:4 could not be modified. Information level 2. The print processor is unknown.” The printer driver versions on the Management Center machine and on the target server use different print processors. Choose a printer driver with the same print processor on both systems – advantageously the one shipped with Windows (WinPrint). “The printer Lexmark T630#PS01:10 could not be modified. Information level 2. The parameter is incorrect. (0x00000057)“ Check whether the ThinPrint Port THINPORT: still exists on the central print server. This printer port was created by the ThinPrint Engine installer and must not be removed. “Querying printer OKI C5510_n_#ws-87:5 on vmee-n0ps failed. Access is denied. (0x00000005)” Check whether a printer driver uses an own spooler-dependent Windows service (e. g. OKI OPHF DCS Loader). Assign another printer driver instead and restart the Management Center afterwards.” “Skip installation of template ... because of missing printer driver.” • Install the respective printer driver manually on the Template Server, enter the path to the relevant .inf file (see Page 19), and/or enable the option INSTALL DRIVER in the Driver Pool (see Page 17). • Remove the respective printer driver from the template server and reinstall it. “Installing template _Template_OKI C5510 on 127.0.0.1 failed. The printer driver is unknown. (0x00000705)” After creating a template, maybe this template and its driver was removed manually from the template server. • Disable the template server (EXTRA→ VIEW→ ENABLE TEMPLATE SERVER) and enable it again. • Restart the Management Center. “TemplatePrinter. Installing template _Template_TP Output Gateway on 127.0.0.1 failed. The printer driver is unknown. (0x00000705)” The Output Gateway template cannot be installed because its driver isn’t installed on the target machine (here: template server on 127.0.0.1). • Copy the Output Gateway driver from the central print server (C:\Program Files\Common Files\ThinPrint\Virtual Printer\TPOG3) to the template server (here: Management Center machine) and install it there. © ThinPrint GmbH 2015 Message/Problem Manual.fm Management Center 95 Appendix Suggested solution “The driver installation for Windows Version 6 and higher failed. ... The installation routine requested a file that could not be found. This usually indicates that the driver is not fully compatible with the target operating system.” • Install the respective printer driver manually on the central print server. • Check whether there is a more recent version available for the driver in question. • Remove the respective printer driver from the print server and reinstall it. “Driver ... is missing on Central Print Server printserver--02.” • Install the respective printer driver manually on the central print server. Or enable the option INSTALL DRIVER in the Driver Pool (see Page 17) and enter the path to the relevant .inf file (see Page 19). • Remove the respective printer driver from the print server and reinstall it. “Installation of driver ... on ... failed. The system cannot find the path specified. (No. 3)” Check whether you have specified the right path to the relevant .inf file on the computer on which the Driver Pool has been set up. “[printserver--03] No suitable Printserver Driver for Source Driver 'Alps MD-2010 (MS)' found.” Assign Driver Free Printing, V-Layer, or Native Printing in the relevant Connection properties. Enable the checkbox of the printer and click OK to confirm (see Page 32). Repeat the procedure which caused this message. Port on printserver--02 could not be created. Generic failure Check whether a ThinPrint Engine is installed on the target machine. “Removing port VCG_1: from cps51 failed. Generic failure” • There are printers still connected to this port. • Runtime problem. Repeat the last action. Printer creation takes long, i.e., Management Center works too slow (normally 10 to 30 Output Gateway objects per minute can be created). • Check your Management-Center-Version. Often Version 2.2 is considerably faster than 2.1. • With NUMBER OF THINPRINT PORTS PER CENTRAL PRINT SERVER don’t specify more than 20 to 25 Ports because each printer of this Connection must be connected to all ports. Use the option ONE PORT PER PRINTER instead or split the respective Connection into multiple Connections. • Additionally, the general rule is: (length of Connection name + 4) number of pooled ports 200 • Which print mode is used? Driver Free Printing or V-Layer? Driver Free Printing could be slow if a ThinPrint Client can’t be reached. • Are the printer drivers to be installed remotely? • Check whether the name resolution by the DNS works properly (both lookup and reverse lookup) and translates the names into IPv4 addresses. If the DNS returns an IPv6 address, disable IPv6. • Does the target machine have performance problems, e.g. RAM insufficient or hard disk almost full? 96 Management Center Manual.fm © ThinPrint GmbH 2015 Message/Problem Appendix Suggested solution “Value cannot be nul. Parameter name: collection” • Maybe that a database error occured with creating a Connection: • Check whether a Connection name contains an underscore (_) followed by an alphabetic character. • Check whether two Connections use the same denomination. If so, remove the affected Connections, restart the Management Center console and recreate the Connections. “Subquery returned more than 1 value. This is not permitted when the subquery follows =, !=, <, <= , >, >= or when the subquery is used as an expression.The statement has been terminated.” See above “Value cannot be nul. Parameter name: collection”. Some printer properties missing with printers installed by the Management Center. Configure the printer driver pre-settings on the Template Server (V-Layer and Native Printing) or on the client machines (Driver Free Printing). (see Page 17) Printer settings on the Template Server or on client machines do not affect the printers already installed on the central print servers. • Select APPLY CONFIGURATION again for the respective Connection. • Deactivate the appropriate printers in the relevant Connection properties and select APPLY CONFIGURATION for this Connection. The appropriate printer objects will be uninstalled on the central print servers. • Activate the appropriate printers in the relevant Connection properties again and select APPLY CONFIGURATION for this Connection. The appropriate printer objects will be installed on the central print servers and then the settings will be copied from the Template Server (V-Layer and Native Printing) or from the client machines (Driver Free Printing). • See also the following message. Printer list of ThinPrint Client Service Windows is empty after starting Windows Restart the TP Client Service Windows manually. If the printer list appears change the start type to a delayed start – either using the start type AUTOMATIC (DELAYED START) or per script (start type: MANUAL): ping 127.0.0.1 -n 30 >NUL net start Thn32svc © ThinPrint GmbH 2015 Message/Problem Manual.fm Management Center 97 Appendix Suggested solution “Client printer properties for printer 'Kyocera FS-1700+#helsinki--01:2' on 'printserver' are not available, switch to default.” During printer creation with Driver Free Printing mode a ThinPrint Client cannot be reached or the printer driver in question doesn’t send its properties. • Check the device is switched on and the ThinPrint Client is running (see Pages 17 and 32). • Delete the printer in question from the Connection and then run APPLY CONFIGURATION. Afterwards re-create this printer. • On the client-side, select another driver for the printer in question. • Change the print mode from Driver Free Printing to V-Layer for the printer in question. “An error occurred while attempting to query 'ws-88.clus.vm'. Unknown protocol version. The client needs to be updated.” • The target machine is not accessible. • No connection to the ThinPrint Client. Check the Firewall settings. • Is the ThinPrint Client running? “Error while connecting to 'vmee-n0ps'. The filename, directory name, or volume label syntax is incorrect.” Server or print spooler instance is not accessible. • Check whether the server is running or the failover cluster’s print spooler instance is online. “Error while connecting to 'vmee-dc'. Access is denied. (Exception from HRESULT: 0x80070005 (E_ACCESSDENIED))” Check whether the respective machine can be accessed (here: vmee-dc). “... No such host is known. (No. 11001)” Or: “The address of the ThinPrint Client Device is missing.” No connection to the computer, appliance or network printer. • Check whether the device is switched on, a connection exists and the host name or IP address is correct. • Add the device to your domain or to the hosts file of the computer the Management Center is installed on. “Error while connecting to 'printserver--03'. A connection attempt failed ... (No. 10060)” No connection to the computer or appliance. • Check whether the device is switched on, a connection exists and the host name or IP address is correct. • Check also the domain membership. • Check whether the name resolution by the DNS works properly (both lookup and reverse lookup) and translates the names into IPv4 addresses. If the DNS returns an IPv6 address, disable IPv6. “Error while connecting to '192.168.128.67'. No connection could be made because the target machine actively refused it. (No. 10061)” ThinPrint Client or Connection Service is not running on the respective machine (or appliance). Check whether the ThinPrint Client or Connection Service is enabled and/or started. With central print servers: Map any printer share once from the central print server to the computer the Management Center is running on. 98 Management Center Manual.fm © ThinPrint GmbH 2015 Message/Problem Appendix Suggested solution “An error occured while attempting to query 'lps-8'. No connection could be made because the target machine actively refused it. (0x0000274d)” • Check whether the respective machine can be reached per PING • Check whether the name resolution by the DNS works properly (both lookup and reverse lookup) and translates the names into IPv4 addresses. If the DNS returns an IPv6 address, disable IPv6. “Transmission failed. No data was received.” • Check the name resolution by the DNS (forward and reverse) of the central print server and the Connection Service machine. Does the DNS translate the names into IPv4 addresses? If the DNS returns an IPv6 address, disable IPv6. • Restart the Management Center machine if can’t retrieve data from a ThinPrint Client via the Connection Service. “Error while connecting to '192.168.129.201': The ThinPrint Client Device does not support the command. Unspecified error (No. -2147467259)” Connection Service or one of its ThinPrint Clients cannot be accessed. • Check whether the IP address of the server (the Management Center is running on) has been set up in the Connection Service (Illus. 74). • Check whether the ThinPrint Clients are connected to the Connection Service. Error while connecting to '192.168.129.201'. An established connection was aborted by the software in your host machine. (No. 10053) Connection Service or one of its ThinPrint Clients cannot be accessed. • Check whether the IP address of the server (the Management Center is running on) has been set up in the Connection Service (Illus. 74). • Check whether the ThinPrint Clients are connected to the Connection Service. • Make sure that Management Center and Connection Service run on different machines. An empty windows (GUI) appears with remote configuration of ThinPrint Client. • Check whether the value RmtConf has been set properly in the ThinPrint Client’s Windows registry (Illus. 46). • Please note that only TCP/IP type of ThinPrint Client Windows can be configured remotely. © ThinPrint GmbH 2015 Message/Problem Manual.fm Management Center 99 Appendix Message/Problem Suggested solution “Error while connecting to '192.168.129.201'. An existing connection was forcibly closed by the remote host. (No. 10054)” Connection Service or one of its ThinPrint Clients cannot be accessed. • Check whether the IP address of the server (the Management Center is running on) has been set up in the Connection Service (Illus. 74). • Check the domain membership of both servers the Management Center and the Connection Service are installed on. • Check whether the name resolution by the DNS works properly (both lookup and reverse lookup) and translates the names into IPv4 addresses. If the DNS returns an IPv6 address, disable IPv6. • Check whether the ThinPrint Clients are connected to the Connection Service. “Error while connecting to '192.168.129.201'. No such interface supported. (No. -2147467262)” • Check the domain membership of both servers the Management Center and the Connection Service are installed on. • Check whether the name resolution by the DNS works properly (both lookup and reverse lookup) and translates the names into IPv4 addresses. If the DNS returns an IPv6 address, disable IPv6. • Check whether the ThinPrint Clients are connected to the Connection Service. “[printserver--03] Access is denied ...” Check the user accounts of the target computer and of the computer that the Management Center was installed on. Make sure that all servers are members of the same domain (the same Active Directory). “No license found!” Check the validity of the license key for the Management Center (see the columns VALID UNTIL and ACTIVATED in Illus. 81). “Invalid license!” Check the validity of the ThinPrint license keys on the central print servers and on the computer that the Management Center was installed on (see the columns VALID UNTIL and ACTIVATED in Illus. 84). To avoid issues with Management Center licenses disable the Windows explorer option “Automatically search for network folders and printers” per Policy for all PCs and/or users. © ThinPrint GmbH 2015 100 Management Center Manual.fm © ThinPrint GmbH 2015 Appendix Message/Problem Suggested solution “An error occurred while attempting to query '192.168.129.202'. A connection attempt failed because the connected party did not properly respond after a period of time, or established connection failed because connected host has failed to respond. (0x0000274c)” • The target computer cannot be reached (e.g. to retrieve the properties of native printer drivers). • Check the TCP port number for connecting the target computer (e.g. in the properties of the relevant Location). • With using the Connection Service, maybe that the relevant ThinPrint Client isn’t connected to the Connection Service. • Check the validity of the ThinPrint license keys on the central print server or on the license server. • Make sure that the properties of the relevant printer are retrieved only manually but not automatically (see Page 29). • For the relevant printer, select the V-Layer print mode (with EDIT PRINTERS on the relevant Connection) instead of Driver Free Printing (see Page 32), or install another driver on the client machine. “Client accepted request but an error occurred while processing the command.” • The ThinPrint Client gets no or not all properties from a native driver. • You can ignore this message if important driver properties aren’t missing on the central print server. • Otherwise, select the V-Layer print mode for the relevant printer (with EDIT PRINTERS on the relevant Connection) instead of Driver Free Printing (see Page 32), or install another driver on the client machine. “No port information on ps1 available” • Check whether a ThinPrint Engine with version 8.0 or later is installed on the target server. • For ThinPrint Engine 9.0 and 10 the Management Center must have at least version 2.1.3 (= build version 2.2.434). On this, see also the quick installation guide. • Check the validity of the ThinPrint license keys on the target server. • Does at least one ThinPrint Port exist on the target server? If no, recreate THINPORT:. • Is the print spooler running on the target server? “Installing printer ... on printserver--02 failed. The parameter is incorrect. (No. 87) ...” Check the validity of the ThinPrint license keys on the central print servers (see the columns VALID UNTIL and ACTIVATED in Illus. 84). To avoid issues with Management Center licenses disable the Windows explorer option “Automatically search for network folders and printers” per Policy for all PCs and/or users. “Configuration could not be stored because of license restrictions.” Reduce the number of printers (see Page 53) or install a ThinPrint license key which supports more printers. Manual.fm Management Center 101 Appendix Icons Icons in treeview: A green checkmark on an icon (see below) indicates that the respective object has been tested successfully. Icon Meaning Object status not yet tested (example) Object status tested successfully (example) Icons for displaying ThinPrint Ports and printers in tables of Central Print Servers, Groups of Central Print Servers, Connections and Template Server: Icon Object Status ThinPrint Port – icon with green checkmark ThinPrint Port created on the target server ThinPrint Port – icon without green checkmark ThinPrint Port in the database but not yet created on the server ThinPrint Port – crossed icon ThinPrint Port to be deleted Printer – icon with green checkmark Printer object created on the target server Printer – icon without green checkmark Printer object in the database but not yet created on the server Printer – crossed icon Printer object to be deleted Abbreviations and acronyms Active Directory CSV Comma-Separated Values DNS Domain Name System DOS Disk Operation System (Microsoft) FQDN Fully Qualified Domain Name 102 Management Center © ThinPrint GmbH 2015 AD Manual.fm © ThinPrint GmbH 2015 Appendix GPO Group Policy Object GUI Graphical User Interface HF Hotfix IAPS Intermate Advanced Print Server (Intermate) ICA Independent Computing Architecture (Citrix’ RD Session Host and virtual desktop protocol) IP see TCP/IP ISD Intelligent Spooling Device (SEH) LPD Line Printer Daemon LPR Line Printer Remote Mac MacIntosh (Apple) MS Microsoft NAT Network Address Translation NLB Network Load Balancing (Microsoft) OEM Original Equipment Manufacturer OS Operating System PCoIP PC-over-IP (VMware’s virtual desktop protocol) PC Personal Computer RAM Random Access Memory (main memory) RDP Remote Desktop Protocol (Microsoft’s RD Session Host and virtual desktop protocol) RD Session Host Remote Desktop Session Host (Microsoft), formerly: Windows terminal server RPC Remote Procedure Call (Microsoft) SP Service Pack SQL Structured Query Language SSL Secure Sockets Layer System i formerly: AS/400 (IBM) TCP/IP Transmission Control Protocol/Internet Protocol TLS Transport Layer Security TP ThinPrint TPG ThinPrint gateway (SEH) TPOG ThinPrint Output Gateway TPUID Client ID of Connection Service V-Layer Printer Virtualization Layer (ThinPrint) WMI Windows Management Instrumentation (Microsoft) XenApp Citrix terminal server, formerly: Presentation Server Manual.fm Management Center 103