1
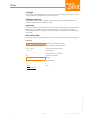
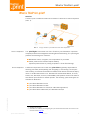
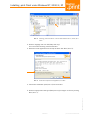
.print Client Windows
for ICA, RDP, and TCP/IP
(.print version 7.0)
Manual
ThinPrint GmbH
Alt-Moabit 91 a/b
10559 Berlin
Germany / Alemania
ThinPrint Pty. Ltd.
L 10, 275 Alfred Street
North Sydney / NSW / 2060
Australia
ThinPrint, Inc.
20525 Center Ridge Rd, Suite 630
Cleveland, Ohio 44116
USA / EEUU
ThinPrint, Inc.
8703 Yates Drive, Suite 200
Westminster, Colorado 80031
USA / EEUU
E-mail: [email protected]
Web: www.thinprint.com
Issued: July 8, 2008 (v21)
Notes
© Copyright
This document is the intellectual property of ThinPrint GmbH. This document may be copied in whole or
in part, provided this Copyright notice is included in every copy.
® Registered trade marks
All hardware and software names mentioned in this document are the registered trademarks of their
respective companies or should be regarded as such.
Safety warning
All ThinPrint products are pure software solutions. Please note the safety warnings in the technical documentation from your hardware vendor and from the manufacturer of each device and component.
Before beginning installation, we recommend closing all windows and applications and deactivating any
virus scanner.
How to use this manual
The following conventions are used throughout this manual to represent recurring actions and text types.
Conventions
Note!
Important tip, explanation, exception
SMALL CAPS
Menu, command, dialog panel, option
Italic “Name”
Proper name, emphasis, variable
Courier
Keyboard input
¡
Consecutive menu or command
■
Enumeration, head note
Example
Example
–
1.
2.
Procedural steps
Page 5
www.cortado.com
Links
© ThinPrint GmbH 2008
2
Manual
.print Client Windows
Contents
What is ThinPrint .print? ....................................................................................... 5
Overview .................................................................................................................. 5
ThinPrint Output Gateway .......................................................................................... 6
Installing .print Client under Windows NT, 2000/3, XP
......................... 7
Administrator permissions ............................................................................................... 7
Installation .................................................................................................................... 7
Currently available .print Client Windows types .................................................................. 9
Installing .print Client under Windows Vista
.............................................. 11
Administrator permissions ............................................................................................. 11
Installation .................................................................................................................. 11
Installing .print Client under Windows 9x/ME ........................................... 13
.print Client context menu
.................................................................................. 14
Configuration with .print Client Manager
..................................................... 15
Setup tab .................................................................................................................... 16
Assignment tab ............................................................................................................ 16
Plug-and-play client installation ................................................................................. 17
.print AutoConnect ................................................................................................... 17
Advanced tab ............................................................................................................... 19
Connection Svc tab ....................................................................................................... 20
SSL encryption ............................................................................................................. 21
Importing SSL certificates ......................................................................................... 22
Registry entry CertName ........................................................................................... 23
Remote client configuration ........................................................................................... 24
© ThinPrint GmbH 2008
.print Client Gateways and .print Connected Gateways ...................................................... 26
Appendix .................................................................................................................... 28
Customer service and technical support .......................................................................... 28
Additional sources ........................................................................................................ 28
License agreement ........................................................................................................ 28
.print Client Windows
Manual
3
Contents
Distributing .print Client ................................................................................................ 31
Installing additional .print Client Windows types .............................................................. 31
Repairing .print Client Windows ..................................................................................... 32
Updating .print Client Windows ..................................................................................... 32
Uninstalling .print Client Windows .................................................................................. 32
Relevant entries in Windows Registry ............................................................................. 34
Registry entries of .print Client Windows .................................................................... 34
Additional Registry entries of .print Client Windows ..................................................... 36
.print Clients and supported features ............................................................. 38
© ThinPrint GmbH 2008
4
Manual
.print Client Windows
What is ThinPrint .print?
What is ThinPrint .print?
Overview
ThinPrint .print is a software solution and consists of a server and a client component
(Illus. 1).
Illus. 1
Illus. 1
Server component
Using of ThinPrint .print with server and client components
The .print Engine is the actual core of the ThinPrint .print framework. It provides
complete printer driver management including Driver Free Printing. The .print Engine
performs the following main functions:
■ Bandwidth control, encryption, and compression for print data
■ Virtual printer driver ThinPrint Output Gateway
(replaces printer drivers on printing computers = Driver Free Printing).
Client component
A software component on the client side, print Client is generally responsible for
receiving print data, decompressing and decrypting it, and sending it to the print
device. Many .print Clients are available for different end devices and areas of deployment: for all Windows versions incl. Windows CE and Windows Mobile, for Linux,
Solaris, Dos, Win OS/2, and Java, for BlackBerry and Symbian as well as for internal
and external print servers for network printers. The following .print Client types are
available for Windows 1:
© ThinPrint GmbH 2008
■
■
■
■
1
2
.print Client Windows
.print
.print
.print
.print
Client Windows for ICA
Client Windows for RDP
Client Windows for TCP/IP (as a Windows application)
Client Service Windows (as a Windows service) 2
Windows 95 and later
Information on installing and configuring the .print Client Service Windows can be found in the
relevant manual (Page 28).
Manual
5
What is ThinPrint .print?
ThinPrint Output Gateway
Output Gateway is a virtual printer driver which enables print jobs to be rendered only
on clients with Windows as the operating system; an optional print preview is also
available on the client.
Note! When printing over Output Gateway, the fonts used in the document
must also be installed on the client.
Page setup
Client-side printer properties such as paper sizes and sources, print resolution, color,
and duplex will be displayed in Output Gateway’s user interface (Illus. 2, left).
Illus. 2
Illus. 2
Display of native printer driver’s paper sources on a client (left) and of ThinPrint
Output Gateway in a terminal session (right)
© ThinPrint GmbH 2008
6
Manual
.print Client Windows
Installing .print Client under Windows NT, 2000/3, XP
Installing .print Client under Windows NT, 2000/3, XP
Administrator permissions
Administrator permissions are required for all installation and configuration procedures. It is therefore best to log on under Windows always with the same account –
e.g. as ADMINISTRATOR.
Installation
Note! Under Windows NT 4.0, the installation routine for .print Client
Windows 5.0 SR-2 (5.2) and later requires Service Pack 6.
■ Please note: Particular installation programs are provided for Windows Vista as
well as for RDP printing to .print Clients running under Windows XP x64 or
2003 x64 (see Page 11), and the installation under Windows 9x/ME (see
Page 11) differs a little from that under Windows NT 4.0/2000/XP/2003.
■ Download of .print Client at: www.thinprint.com/?s=4316&lc=61
in particular: Setup.exe, TPTCPen.msi, TPICAen.msi, TPRDPen.msi
■ Please first delete any previously installed .print Client Windows (see Page 32).
© ThinPrint GmbH 2008
.print Client
Windows
installation
1. Under Windows NT 4.0, 2000, XP, or 2003 start the installation program
Setup.exe (Illus. 3) or the relevant .msi file (Illus. 4) 3. The abbreviations in the
.msi file names have the following meanings:
• ICA = for printing via the Citrix ICA protocol
• RDP = for printing via the Microsoft RDP protocol
• TCP or SRV = for session-independent printing via TCP/IP
(TCP = installation as an application; SRV = installation as a Windows service)
• en or de = English or German
Illus. 3
Illus. 3
3
.print Client Windows
Installing .print Client with Setup.exe
For the unattended installation see the Preconfiguration and unattended installation of .print
Client Windows white paper.
Manual
7
Installing .print Client under Windows NT, 2000/3, XP
Illus. 4
Illus. 4
Installing .print Client with an .msi file under Windows NT 4.0, 2000, XP, or
2003
2. Select a language and click OK (Setup.exe only)
and confirm the following window with NEXT.
3. Read the license agreement and accept its terms with NEXT (Illus. 5).
Illus. 5
Illus. 5
Read and accept the license agreement; click NEXT
4. Choose the installation path (Illus. 6) and click NEXT.
Illus. 6
5. Select an appropriate client type (Setup.exe only) and again confirm by clicking
NEXT (Illus. 7).
© ThinPrint GmbH 2008
8
Manual
.print Client Windows
Installing .print Client under Windows NT, 2000/3, XP
Illus. 7
Illus. 6
Changing installation path if necessary
Illus. 7
.print Client Windows type selection (Setup.exe only)
Note! Please note the check list in the “.print Server Engine” or “.print Application Server Engine” manual (Page 28).
Currently available .print Client Windows types
© ThinPrint GmbH 2008
.print Client
Windows for TCP/IP
A TCP/IP connection must exist between server and client machines. To run .print
Client Windows for TCP/IP. It must also be possible to access the client machine’s
TCP port from the server. Connections with Network Address Translation (NAT) or
with asynchronous connections require the .print Client Windows for ICA or RDP
(below). In case of NAT .print Connection Service 4 can also be used.
The .print Client is started by a shortcut that is automatically created in the
Windows STARTUP folder during setup.
4
.print Client Windows
Additional licensing required (.print Connected Gateway)
Manual
9
Installing .print Client under Windows NT, 2000/3, XP
– Click NEXT and continue with step 6., Page 10.
.print Client
Service Windows
See the “.print Client Service Windows” user manual (Page 28).
.print Client
Windows for ICA
This .print Client can be run as long as there is an ICA connection to a Citrix server
(the ICA client version must be 4.20.715 or higher).
The .print Client starts automatically when an ICA session is opened.
– Click NEXT and continue with step 6., Page 10.
Note! To successfully complete .print Client installation, the correct path to
the Citrix ICA client must be entered at the prompt (is usually automatically
detected – Illus. 8).
Illus. 8
Illus. 8
.print Client
Windows for RDP
Completing
installation
Path to the Citrix ICA client
This .print Client can be run as long as there is an RDP connection to a Microsoft
terminal server (the Terminal Services client 5 version must be 5.00.x or higher; the
terminal server must be running Windows 2000/XP/2003).
The .print Client starts automatically when an RDP session is opened.
Illus. 9
5
10
.print Client Windows icon in the task bar
Other Microsoft denominations are: Remote Desktop Client and Remote Desktop Connection
Manual
.print Client Windows
© ThinPrint GmbH 2008
6. Confirm the remaining prompts with OK, YES, NEXT, or FINISH. An icon is displayed in the task bar when .print Client Windows is running (Illus. 9).
Illus. 9
Installing .print Client under Windows Vista
Installing .print Client under Windows Vista
Administrator permissions
Administrator permissions are required for all installation and configuration procedures. It is therefore best to log on under Windows always with the same account –
e.g. as ADMINISTRATOR.
Installation
■ Please note: For other Windows versions than Vista as well as for RDP printing
to .print Clients running under 32-bit Windows particular installation programs
are provided (see Pages 7 and 13).
■ If you want to print via ICA under Windows Vista you need a Citrix ICA client
version 10.0 or later (as well as the following .print Client Installer:
TPIcaVen.msi; upper arrow in Illus. 10).
■ Download of .print Client at: www.thinprint.com/?s=4316&lc=61
in particular: TPTcpVen.msi, TPTcpVenx64.msi, TPIcaVen.msi,
TPRdpVen.msi, TPRdpVenx64.msi
© ThinPrint GmbH 2008
.print Client
Windows
installation
1. Under Windows Vista start the relevant .msi file (Illus. 10) 6. The abbreviations
in the .msi file names have the following meanings:
• TP = ThinPrint
• Ica = for printing via the Citrix ICA protocol
• Rdp = for printing via the Microsoft RDP protocol
• Tcp or Srv = for (session-independent) printing via TCP/IP
(Tcp = installation as an application; Srv = installation as a Windows
service 7)
• en or de = English or German
• V = .print Client for Windows Vista
(and .print Client RDP type for Windows XP x64/2003 x64)
• x64 = .print Client for Windows Vista x64 as well as for RDP printing to .print
Clients running under Windows XP x64 or 2003 x64
6
7
.print Client Windows
For the unattended installation see the Preconfiguration and unattended installation of .print
Client Windows white paper.
See the .print Client Service Windows manual.
Manual
11
Installing .print Client under Windows Vista
Note! There are .print Client versions both for 32-bit Windows as well as for
Windows x64.
• For printing via ICA to .print Clients running under Windows Vista x64,
XP x64, or 2003 x64 you can only use the 32-bit version of .print Client,
because there are only 32-bit versions of Citrix ICA client.
• For printing via RDP to .print Clients running under Windows Vista x64,
XP x64, or 2003 x64 you can only use the x64 version of .print Client,
because Microsoft delivers only a 64-bit version of its RDP client together
with Windows.
• For printing via TCP/IP to .print Clients running under Windows Vista x64,
XP x64, or 2003 x64 you can use both the 32-bit or the x64 version of
.print Client.
Example 1: You intend to install the .print Client on a PC and print via ICA.
On the PC runs the 32-bit version of Windows Vista or Windows Vista x64.
Select in both cases the file: TPIcaVen.msi (upper arrow in Illus. 10).
Example 2: You intend to install the .print Client on a PC and print via RDP.
On the PC runs the 32-bit version of Windows Vista. Therefor select the file:
TPRdpVen.msi (middle arrow in Illus. 10).
Example 3: You intend to install the .print Client on a PC and print via RDP
On the PC runs Windows XP x64. Therefor select the file:
TPRdpVenx64.msi (lower arrow in Illus. 10).
2. Continue with step 2 on Page 8.
© ThinPrint GmbH 2008
12
Manual
.print Client Windows
Installing .print Client under Windows 9x/ME
Illus. 10
Illus. 10 Installing .print Client under Windows Vista
Installing .print Client under Windows 9x/ME
© ThinPrint GmbH 2008
Installation of .print Client Windows for the Windows versions 9x / ME only differs
from that for Windows NT / 2000 / XP/2003 (see Page 7) in the choice of available
.print Client types (Illus. 11). For Windows versions 9x / ME, the .print Client
Windows is not available as Windows service.
Illus. 11
Illus. 11 .print Client Windows type selection under Windows 9x/ME (Setup.exe only)
.print Client Windows
Manual
13
.print Client context menu
.print Client context menu
.print Client version 6.2 and later has a context menu, which can be opened by clicking the .print icon in the task bar, that offers quick access to important functions.
– Right click the .print icon in the task bar. The context menu shown in Illus. 12
opens.
Illus. 12
Illus. 12 .print Client context menu
The following options are available in context menu:
■ CONFIGURE: Clicking CONFIGURE opens .print Client Manager (see also “Configuration with .print Client Manager”, Page 15).
■ RELOAD PRINTERS: To read newly installed printers into the .print Client
Windows printer list or remove deleted printers from the .print Client Windows
printer list without closing and restarting the .print Client, use the RELOAD
PRINTERS option. Selecting this option synchronizes the .print Client’s printer list
with the system’s printer list.
If the relevant value in the Windows Registry has been set (see “Select all existing printers for AutoConnect” in “.print AutoConnect”, Page 17), these detected
printers will also all be selected for .print AutoConnect.
■ ABOUT: This option displays version information on the installed .print Client
(Illus. 13).
Illus. 13
Illus. 13 Information about .print Client
■ CLOSE: Click CLOSE to close .print Client. This option is only available in TCP/IP
versions (and not in the ICA and RDP version as well as in the .print Client Service Windows).
How to restart the .print Client? See the following chapter.
© ThinPrint GmbH 2008
14
Manual
.print Client Windows
Configuration with .print Client Manager
Configuration with .print Client Manager
Remember, several changes only take effect after restarting the .print Client
Windows. Please follow the steps described below to do so.
■ Close .print Client Windows (TCP/IP version only; see above and Page 20).
■ Restart .print Client Windows:
• TCP / IP: Select START¡ PROGRAMS¡ .PRINT CLIENT WINDOWS¡ START
CLIENT (Illus. 14).
• ICA /RDP: Disconnect and reconnect each terminal session.
Illus. 14
Illus. 14 Start .print Client Windows for TCP/IP
Starting .print
Client Manager
.print Client Windows is configured with .print Client Manager:
– Open .print Client Manager
• either by double clicking its icon in the task bar (see illustration left)
• or with START¡ PROGRAMS¡ .PRINT CLIENT WINDOWS¡ CONFIGURE
(Illus. 14)
• or by opening the context menu using the right mouse-button and selecting
the CONFIGURE option.
Illus. 15
Illus. 15 .print Client Windows
context menu
© ThinPrint GmbH 2008
– This opens the panel in Illus. 16.
.print Client Windows
Manual
15
Configuration with .print Client Manager
Illus. 16
Illus. 16 .print Client Manager: CURRENT
PRINTER
(Lexmark printer as example)
Setup tab
Current printer
Select CURRENT PRINTER here (Illus. 16). Print jobs are printed from the current printer
if the printer ID can't be determined (e.g., no printer ID is given in the printer name
at the server).
Should you want to specify that the current printer of ThinPrint .print is the same
as the local Windows default printer, simply leave the default setting INHERIT CLIENT’S
DEFAULT PRINTER. Or select the current printer manually with USE THIS PRINTER; in this
case, the current printer can be different than the local Windows default printer.
Furthermore, the current printer can be set as default printer in a session for .print
AutoConnect (see Illus. 16).
Assignment tab
Printers
and their IDs
ASSIGNMENT lists available printers with their IDs and their classes (Illus. 17).
Illus. 17
The ASSIGNMENT panel displays information about available printers. This is also
where you find printer IDs, which are automatically assigned by the .print Client
16
Manual
.print Client Windows
© ThinPrint GmbH 2008
Illus. 17 Printers with assigned IDs and selection for .print AutoConnect
Configuration with .print Client Manager
Windows and are necessary for manually assigned printer names on the .print Engine
(without AutoConnect; for more information, see the .print Engine manual; Page 28).
Note! If .print Client Windows recognizes a printer as new – e.g., after renaming a printer – it might assign the printer a new ID; in this case, .print Engine
may need to be reconfigured.
Enable sending
properties
If this option is enabled and .print AutoConnect is used, the client printer’s paper
trays as well as duplex settings, paper formats, and print resolution will be applied
to the printer created on the server. Please also observe the server side option APPLY
CLIENT PRINTER PROPERTIES of the .print AutoConnect configuration (see manual of the
respective .print Engine; Page 28). Default: enabled.
Plug-and-play client installation
Since .print version 5.3, the .print Client Windows is pre-configured at installation so
that user input is no longer necessary. This, too, decisively simplifies administration.
The following especially noteworthy settings are default properties:
■ The “current printer” in .print Client Windows is selected for .print AutoConnect
(and/or roaming service).
■ The “current printer” in .print Client Windows is selected as default printer for
the session (when running .print AutoConnect).
■ “Sending properties“ is enabled.
Please note that previous settings are still valid when updating or installing .print
Client on a machine where it was installed before.
.print AutoConnect
It's also possible to select different printers by checking the box next to them. .print
AutoConnect will automatically map all selected printers on a server and connect
them with a ThinPrint Port – provided templates exist and .print AutoConnect is running on the server (= auto-created printers). When starting a terminal session all
marked printers are created automatically in the session. For more information please
refer to the .print AutoConnect chapter in the .print Engine manual (Page 28).
Select all existing
printers for
AutoConnect
By starting .print Client from the COMMAND PROMPT, you can enter a parameter for
selecting all existing printers as well as all printers to be created in the future for AutoConnect. This option is only available in the .print Client for TCP/IP.
– Start .print Client Windows from the command prompt from its directory with
© ThinPrint GmbH 2008
Thnclnt32 -e1
All printers listed on the ASSIGNMENT tab are now selected for AutoConnect.
.print Client Windows
Manual
17
Configuration with .print Client Manager
Should you no longer wish to have all printers automatically selected for
AutoConnect, you can disable this function by starting the .print Client Windows with
the parameter -e0:
– Start .print Client Windows from the command prompt from its directory with
Thnclnt32 -e0
Printer class
Double clicking a printer name opens an input box for specifying the printer class for
.print AutoConnect (Illus. 18). The result is shown in Illus. 19.
Illus. 18
Illus. 18 Enter class name (see .print AutoConnect in the .print Engine manual; Page 28)
Note! Unlike printer names, class names may not be longer than 7 characters
and may not included blank spaces.
Illus. 19
Illus. 19 Printers with ID and class
© ThinPrint GmbH 2008
18
Manual
.print Client Windows
Configuration with .print Client Manager
Advanced tab
The ADVANCED panel (Illus. 20) offers the following settings:
Bandwidth
– Check this box and enter a bandwidth value. Note: If the value is larger or if
CLIENT CONTROL is disabled at the server, server settings (see .print Engine manual; Page 28) are applied.
TCP Port
– Enter here the port number where .print Client Windows should receive incoming connections. Be sure: Same TCP port number for both .print Client Windows
and .print Engine printer port to which the client printer is connected.8 Otherwise, communication between the two .print components is impossible.
The TCP port number is of course only relevant for printing over TCP/IP. Default
port number is 4000.
Use Connection
Service
– If you want to use the .print Connection Service, enable its check box. Once it
has been activated, the additional tab card called CONNECTION SVC will be
added. This tab offers settings for using the Connection Service (see “Connection Svc tab” below). Default: disabled
Illus. 20
Illus. 20 .print Client Manager for Windows: advanced options
Print-to-Screen
This function of .print Client Windows 7.0 is a component of ThinPrint’s Cortado Corporate Server 9; see “Cortado Corporate“ user manual (Page 28).
Administrators only
Checking this box prevents users from making changes to .print Client Windows settings.
© ThinPrint GmbH 2008
OK
CANCEL
Changes are applied without quitting .print Client Windows – changes could, however, first be functional after restarting .print Clients or the terminal session
(Page 15).
Previous settings remain intact, all changes are ignored.
8
9
.print Client Windows
see also .print Engine manual (Page 28)
formerly Content Beamer
Manual
19
Configuration with .print Client Manager
Quits .print Client Windows for TCP/IP. The .print Client icon disappears from the
task bar. The .print Client Windows must be restarted before .print printing resumes
(Page 15).
Restart could change printer IDs – if printers were deleted along with their Registry
entries; in this case, the .print Engine may require reconfiguration.
CLOSE
Tip! The CLOSE button is only active for .print Client Windows for TCP/IP.
The .print Clients for ICA and RDP automatically close when the session ends.
The .print Client Service Windows is closed in the SERVICES folder.
The info line displays the version numbers of the .print Client Windows files.
Info line
Connection Svc tab
The CONNECTION SVC tab (Illus. 21) offers settings for using the .print Connection
Service. Please also note the information about installing and configuring the .print
Connection Service in your .print Engine manual and in the “.print Connected Gateway” manual (Page 28).
Illus. 21
Illus. 21 .print Client Manager started; CONNECTION SVC tab
Connection server
address
TCP port
Authentication key
20
– Enter the number of the TCP port via which the .print Client connects to the
Connection Service. Default port number is 4001.
– Enter the .print Client’s authentication key for the Connection Service.
– Here is where the client ID is entered. The Connection Service uses the client
ID to forward print jobs to a client. Depending on the mode of communication,
the client ID is given by the Connection Service (dynamic mode) or must be
given by the client (static mode). In the latter case, the client ID must be saved
in this box.
Manual
.print Client Windows
© ThinPrint GmbH 2008
Client ID
– Enter the IP address of the server on which the .print Connection Service has
been installed.
Configuration with .print Client Manager
Connection retry
interval (s)
– Enter the wait time (in seconds) after which a new attempt should be made to
establish a connection if the .print Connection Service is not reachable.
Default: 0.
Status line
After successful connection to the Connection Service, the status line will display the
server IP address as well as the TCP port number, client ID, and authentication key.
If no connection could be established to the Connection Service, the status line shows
the message “Not connected” (see Illus. 21).
SSL encryption
© ThinPrint GmbH 2008
If you want a secure SSL connection between .print Engine and .print Client, you can
encrypt print data (version 6.2 and later) with the SSL based TLS 10 norm. To do so,
Windows 2000 or higher is required as operating system on the client machine.
This print data encryption is based on client authentication. When using SSL
encryption, two certificates are installed on the server where .print Engine is running,
and a certificate signed by the server is installed on the client. More information is
found in the .print Server Engine manual.
We recommend creating certificates with an individual certificate server or
requesting them from an official source 11. Please note that the certificate must be a
x.509 certificate (file format *.cer or *.p12). See the Creating SSL certificates for
printing with .print white paper.
10 TLS = Transport Layer Security; SSL = Secure Socket Layer
11 e. g., www.verisign.com or www.trust-center.de
.print Client Windows
Manual
21
Configuration with .print Client Manager
Importing SSL certificates
If the USE ENCRYPTION option is enabled in the ThinPrint Port configuration 12 on the
server, a relevant SSL certificate, which has been signed by the server, must be
imported to the machines on which a .print Client is running.
Note! Client certificates have to be imported in the client machine’s certificate
store. Either you import the certificates individually for each user (at MY USER
ACCOUNT) or one time per machine (at COMPUTER ACCOUNT). Did you choose
the Computer Account you have to assign permissions to the certificate afterwards, if the computer user(s) are not members of the Administrators group
(to do so see the Creating SSL certificates for printing with .print white paper).
1. To install a client certificate, open the Microsoft Management Console (MMC)
with mmc.exe from the COMMAND PROMPT.
2. Select either the following in MMC on the client PC per user:
FILE¡ ADD/REMOVE SNAP-IN¡ ADD¡ CERTIFICATES¡ ADD¡ MY USER
ACCOUNT¡ FINISH¡ CLOSE¡ OK
Or select for the machine:
FILE¡ ADD/REMOVE SNAP-IN¡ ADD¡ CERTIFICATES¡ ADD¡ COMPUTER
ACCOUNT¡ FINISH¡ CLOSE¡ OK
3. Now import the certificate by selecting ALL TASKS¡ IMPORT in the context menu
(Illus. 22) and then
NEXT¡ BROWSE¡ OPEN¡ NEXT¡ PASSWORD¡ NEXT¡ PLACE ALL
CERTIFICATES IN THE FOLLOWING STORE¡ NEXT¡ FINISH¡ OK
Illus. 22
Illus. 22 Starting import of an SSL certificate
(example for MY USER ACCOUNT or CURRENT USER)
Illus. 23 and 24 show the results of import.
© ThinPrint GmbH 2008
12 see .print Engine manual (Page 28)
22
Manual
.print Client Windows
Configuration with .print Client Manager
Illus. 23
Illus. 23 SSL certificate imported to a client machine
(example for MY USER ACCOUNT or CURRENT USER)
Illus. 24
Illus. 24 SSL certificate imported to a client machine
(example for COMPUTER ACCOUNT or LOCAL COMPUTER)
Registry entry CertName
Before sending encrypted print data, the server checks whether the name of the
imported certificate is included in the CertName entry in the client machine’s Registry and whether the stored certificate is present on the client. The CertName entry
in the Registry can be entered with the Custom Installation Wizard 13 or manually as
follows:
1. After the certificate has been imported, create the following Registry entry on
the client machines with REGEDIT (Illus. 25; data type: reg_sz):
© ThinPrint GmbH 2008
hkey_local_machine\software\thinprint\client\CertName
13 See the Preconfiguration and unattended installation of .print Client Windows white paper.
.print Client Windows
Manual
23
Configuration with .print Client Manager
Illus. 25
Illus. 25 Registry entry for SSL encryption on Windows clients
(example for tpclient certificate)
2. Enter as value the name of the imported certificate as displayed in the column
ISSUED TO of the MMC’s certificate overview (tpclient as example in illus. 23
and 25).
3. Restart .print Client Windows (Page 15).
The CertName Registry entry is only needed for encrypting print data; receipt of
unencrypted print data is still possible.
Remote client configuration
Remote configuration is possible for .print Client Windows printing with TCP/IP protocol. The entry RmtConf is needed in the Windows registry of all client machines
you want to configure. This can be done manually (Illus. 26 or Page 36) or by using
the Custom Installation Wizard 7.0 or 7.0 V (see the Preconfiguration and unattended installation of .print Client Windows white paper).
24
Manual
.print Client Windows
© ThinPrint GmbH 2008
– Open the Windows registry of the client machine you want to configure. Add
the entry RmtConf (reg_mulit_sz) under hkey_local_machine\software\thinprint\client. Enter the IP addresses of all those machines from which the client
should be configured (Illus. 26).
– Restart .print Client.
– Go to the machine on which .print Engine is installed. Open the MMC, select
.print Client snap-in and enter the address of the client machine to configure
(Illus. 27).
– Now, the selected machine is ready for remote configuration (Illus. 28).
Configuration with .print Client Manager
Illus. 26
Illus. 26 .print Client machine:
Registry entry RMTCONF added for remote configuration of .print Client
Illus. 27
© ThinPrint GmbH 2008
Illus. 27 .print Engine machine: Open the MMC, select .print Client snap-in and enter
the address of the client machine to configure
.print Client Windows
Manual
25
Configuration with .print Client Manager
Illus. 28
Illus. 28 .print Engine machine: Remote configuration of a .print Client
.print Client Gateways and .print Connected Gateways
The .print Client Gateway can greatly simplify the introduction of ThinPrint .print
because it can receive .print print jobs for an entire group of clients and printers,
decompress and decrypt them, and then distribute them conventionally in a local network – like a local print server (Illus. 29). Then the .print Client is only necessary on
the Client Gateway for this remote LAN. Otherwise, the .print client must be installed
on each end device: rich clients, printers, print servers, thin clients, PDAs, etc. This
could mean that with thin clients, for example, a BIOS update is necessary. Even
mixed environments pose no problem: The .print client is installed onto all devices
where simple installation is possible, and all others are served by a Client gateway.
More information can be found in the Windows computer as a .print Client Gateway white paper.
Illus. 29
The .print Connected Gateway is a variation of the .print Client Gateway. The .print
Client installed on the Client Gateway can connect to the .print Connection Service
installed on the server. Print jobs can then be sent via TCP/IP, even where the Client
Gateways are found in a masked network (e.g., behind a router with Network
Address Translation; Illus. 30).
26
Manual
.print Client Windows
© ThinPrint GmbH 2008
Illus. 29 Windows computer as a .print Client Gateway (example)
Configuration with .print Client Manager
More information can be found in the .print Connected Gateway manual and in the
SEH TPG60/120 as a .print Client Gateway white paper.
Illus. 30
© ThinPrint GmbH 2008
Illus. 30 Windows machine and SEH TPG60 as .print Connected Gateways (example)
.print Client Windows
Manual
27
Appendix
Appendix
Customer service and technical support
www.thinprint.com/?s=8&lc=61
[email protected]
Customer Service
Additional sources
Further information about ThinPrint .print can be downloaded from our website.
The following manuals are available at www.thinprint.com/¡ FIND PRODUCT
¡ <product name>¡ MANUAL(S):
Manuals
■
■
■
■
■
■
■
■
■
■
■
■
■
■
■
White papers
.print Client Service Windows
.print Application Server Engine
Cortado Corporate
.print RDP Engine
.print Virtual Desktop Engine
.print Desktop Blade Engine
.print Tracking Service
Remote Desktop Suite Standard
Remote Desktop Suite Premium
.print Server Engine
.print Engine Unix
.print Engine AS/400
.print RDP Engine XP
.print Queue Manager
.print Connected Gateway
The following white papers can be downloaded at www.thinprint.com/¡ FIND PRO<product name>¡ WHITE PAPERs or www.thinprint.com/¡ SUPPORT &
SERVICES¡ WHITE PAPER DOWNLOAD:
DUCT¡
Preconfiguration and unattended installation of .print Client Windows
Creating SSL certificates for printing with .print
Tips for configuring ThinPrint .print
.print addressing
.print AutoConnect and .print Virtual Channel Gateway
Windows computer as a .print Client Gateway
Intermate IAPS ThinPrint as a .print Client Gateway
SEH ISD200/300 as a .print Client Gateway
SEH TPG60/120 as a .print Client Gateway
Intermate 10x as a .print Client Gateway
License agreement
ThinPrint End User License Agreement (EULA)
28
Manual
.print Client Windows
© ThinPrint GmbH 2008
■
■
■
■
■
■
■
■
■
■
Appendix
© ThinPrint GmbH 2008
”.print Client Windows”
Important!
Please read the following ThinPrint End User License Agreement (hereinafter referred to as “EULA”) carefully before installation and/or use of the Software “.print Client Windows”, its possibly integrated add-on
programs and any media, material, online or electronic documentation (hereinafter jointly referred to as
“Software”) as specified in section 4 of the EULA.
Upon installation, copying or any other use of the Software you are entering into a binding agreement to
accept the conditions of the EULA and agree to adhere to them. If you install this Software as administrator
or other member of staff of a company entitled to installation and/or if you make it available for use to
Third Parties or persons afterwards, you also accept the conditions stipulated in the EULA and agree to
adhere to them.
If you, however, do not agree with the conditions of the EULA, you are not entitled to install, make available and/or use the Software.
0. General terms
The EULA is agreed upon between ThinPrint GmbH, Alt-Moabit 91a/b, 10559 Berlin (hereinafter referred
to as “ThinPrint”) and a legal or natural person who themselves or their staff install and use the Software
(hereinafter referred to as “End User”). It is a valid contract between the named parties finally defining all
rights and duties of the End User and ThinPrint in regard to the Software.
1. Rights of use
1.1 Within the limits of the EULA, End User has – subject to the conditions of the EULA – the non-transferable, revocable, regionally limited and non-exclusive right to install and use the Software and its possibly integrated add-on programs. The Software may be used and installed on a computer, server or a server
farm in accordance with the number of licenses included with the Software. End User is entitled to make
a copy of this Software in accordance with the EULA after the installation or – instead of the copy – to
create an image of the computer or server on which the Software has been installed. The copy or image
may only be used and stored for archiving and reinstallation purposes of the Software on the same computer, server or server farm. All trademarks and copyrights and any other legal notes relating to the rights
of ThinPrint must be included and remain in such copy or image.
1.2 End User is not entitled to make additional partial or complete copies or images of the Software and
its add-on programs other than mentioned in 1.1, to copy in any way, to translate or to dismantle parts
of the Software, to change the arrangement or to make any other changes and/or amendments or to make
copies of such changes. End User is not allowed other than in the legally permitted boundaries to reverse
engineer, to decompile or to disassemble the Software. End User is not entitled to distort the contents of
the Software, to change its color, pattern and fonts or to split or in any other way alter the elements of the
logo, copyright and trademark details.
1.3 End User is not entitled to surrender, sublicense, sell or in any other way pass on the rights and duties
granted to him under the EULA.
1.4 If End User receives the Software on more than one storage system, End User is only entitled to install
and use the Software contained on one of the mediums only. It is generally prohibited to install and use
the Software contained on the second medium on another computer, server or server farm. The Restrictions in 1.2 and 1.3 also apply.
1.5 If the Software is an update version of a previous product (“original product”) and End User has bought
the update version as part of an update service, End User is only entitled to install and use the Software,
if End User is in possession of a valid license for an original product marked available for upgrade by
ThinPrint. End User must be aware that the update version replaces the original product and/or its supplements and may deactivate it.
1.6 If the Software is marked “School Version”, End User is only entitled to the use described in 1.1–1.3,
if End User uses the Software as “Entitled User in an Approved Educational Establishment“. To obtain the
entitlement mentioned in sentence 1, End User has to apply in writing to ThinPrint GmbH, Alt-Moabit
91a/b, 10599 Berlin, Germany.
1.7 If the Software has been marked “NFR” (Not For Resale), the use of the Software is limited to demo,
test or evaluation purposes only. Any further use is prohibited. End User is especially not entitled to resell
the Software or pass it on in any other way to a Third Party.
1.8 Any other rights of ThinPrint not explicitly asserted above remain unaffected.
2. Transmission of the Software onto 2nd Computer, Disclosure to Third Parties
2.1 The Software itself may at no time be sold, loaned, rented or passed on in any other way to Third
Parties.
2.2 End User is only entitled to install the Software on a second computer, server or server farm, if the
Software, after its transmission onto the second computer, server or server farm has been completely and
permanently removed and/or cancelled from the first computer, server or server farm. Upon installation of
the Software onto the second computer, server or server farm, all other parts of the Software, including
but not limited to its add-on programs, descriptions, media and other printed materials, also must be
transferred. All persons having access to the second computer, server or server farm and therefore to the
Software must be sufficiently informed of the contents and the individual conditions of the EULA.
3. Licensing
It is not necessary to activate any license key in order to use the Software.
4. Software-components of the ".print Client Windows"
The “.print Client Windows” is an additional software component of the “.print”-product line that provides
services and functions on a computer.
5. Intellectual Properties, Trademarks and Copyrights of the Software
.print Client Windows
Manual
29
Appendix
30
Manual
.print Client Windows
© ThinPrint GmbH 2008
The Software, its entire contents (including but not limited to pictures, photos, animations, video, audio,
music, text and “Applets”), any contents accessible through the Software, and copies thereof are protected
by any and all available national and international copyrights, commercial protection rights, especially
patent rights, utility patent, design patent and trade rights and all other existing protection rights of the
Software, its improvements, bug fixes and extensions or any other modifications to the Software, regardless of their origin. By accepting the EULA, End User is obliged to use and observe all of the aforementioned rights of the Software product which are entitled to ThinPrint or Third Parties only as stipulated and
defined in the EULA and not to infringe or violate such rights including in particular that no content must
be copied or in any other way multiplied, stored, sold or passed on in any way, nor – apart from the Software itself – be used. End User is entitled to print a documentation of the Software, if the documentation
is only provided in electronic form. End User may multiple copies of all printed materials accompanying
the Software for internal use.
6. Warranty
6.1 The Software only has to perform those functions mentioned and described in the manual without
error.
6.2 Otherwise, the General Terms and Conditions of Business of ThinPrint governing the purchase of Software apply.
7. Liability
7.1 ThinPrint tests the Software and validates its general suitability. If damages occur to End User during
the installation or use of the Software, ThinPrint is liable completely and to twice the value of the purchase
price of said Software not exceeding in any case a total sum of EUR 50,000, if said damages are directly
caused by improper and/or incomplete testing or improper or incomplete test of suitability. Liability for
negligence and gross negligence of ThinPrint is limited to damages that have been foreseeable or should
have been foreseeable. ThinPrint assumes no liability for indirect or atypical damages (consequential or
otherwise) or for any financial losses such as loss of profits or savings.
7.2 If End User does not make any adequate (at least daily), reasonable and common to the current stateof-the-art backup of his data in the interest of data security, or – in case of suspected Software error – fails
to take reasonable and adequate security measures, End User has to accept contributory negligence
regarding resulting damages.
7.3 ThinPrint is only liable for damages arising to End User within the context of or due to the Software
download process from the ThinPrint website or during the installation process. ThinPrint specifically does
not guarantee freedom from computer viruses, so that ThinPrint can not be held liable for any damage
arising from computer viruses. In fact, End User is specifically obliged to use sufficient and always up-todate protection against computer viruses and to actively prevent infiltration by computer viruses, in particular before End User starts downloading the Software.
7.4 ThinPrint assumes no liability for the information and the Software “.print Client Windows” regarding
defects of quality or title, particularly for the accuracy, correctness, freedom of third-party trademark rights
and copyrights, completeness and/or usability, except for cases of gross negligence or malice traceable to
ThinPrint. In case of proven gross negligence or intent of ThinPrint, ThinPrint is liable to a maximum sum
of EUR 50,000.
7.5 The product liability of ThinPrint remains unaffected.
8. Forfeiture
If End User or his employees and/or representatives violate any rights and/or obligations arising from the
EULA, especially rights of use, ThinPrint is entitled to request End User to immediately abandon the use
of the Software and its copies and to delete or return the Software and its copies to ThinPrint. ThinPrint
reserves any rights to claim for damages.
9. Transfer of Rights
Neither party may assign or transfer the EULA and the rights and obligations arising hereof to a Third Party
without previous written permission of the respective other party, unless the Transferring Party and the
Third Party are in a state of dependence as defined in § 17 of the German Stock Companies Act (AktG) or
the Third Party takes over all or almost all assets of the transferring party by written contract. The permission as defined in sentence 1 may be denied given significant causes. Significant cause is particularly
given, if the fulfillment of rights and obligations under the EULA are endangered due to such transfer.
10. Scope of the EULA
The EULA ultimately stipulates all rights of use of the Software as well as any other right and/or obligation
of End User and ThinPrint, as long as deviant written agreements and conditions individually agreed
between the Parties do not exist. The EULA supersedes any and all previous oral or written agreements,
information or offers concerning the Software.
11. Place of Jurisdiction/Applicable Law
The EULA and its implementation shall be construed and interpreted in accordance with German Law and
be subject to the exclusive jurisdiction of the Courts of Berlin, Germany. Any terms of the CISG (United
Nations Convention on Contracts for the International Sale of Goods) are applicable, if and insofar as they
include mandatory law.
12. Severability Clause
If any one or more of the provisions contained in the EULA shall, for any reason, be held invalid, illegal or
unenforceable in any respect, such invalidity, illegality or unenforceability shall not affect the remaining
provisions of the EULA, but the EULA shall be construed as if such invalid, illegal or unenforceable provision had never been contained herein, unless the deletion of such provision or provisions would result in
such a material change so as to cause completion of the transactions completed herein to be unreason-
Appendix
able. In lieu of such invalid, illegal or unenforceable provision shall be added a provision similar in terms
to such provision as may be valid, legal and enforceable and suiting the Parties contractual interests best.
ThinPrint GmbH, 10559 Berlin
November 2007/v2.2
Distributing .print Client
The program “Custom Installation Wizard” can be used together with the Preconfiguration and unattended installation of .print Client Windows white paper for presetting .msi-versions of .print Client Windows.
The CUSTOM INSTALLATION WIZARD FOR .PRINT CLIENT WINDOWS .MSI FILES can be
downloaded from: www.thinprint.com/¡ SUPPORT & SERVICES¡ SOFTWARE DOWNLOAD¡ CONTINUE¡ .PRINT CLIENT WINDOWS .MSI FILES.
Custom Installation
Wizard
Installing additional .print Client Windows types
It is possible to install several types of .print Client Windows on a single client
machine. Thus you get a .print Client, that supports multiple protocols simultaneously (TCP/IP, ICA, and/or RDP).
1. Therefor run the .print Client installation program Setup.exe (not over CONTROL
PANEL→ADD / REMOVE PROGRAMS). The menu in Illus. 31 appears. Or run the
relevant .msi file (Pages 8 and 13).
Illus. 31
© ThinPrint GmbH 2008
Illus. 31 Modify or repair the .print Client Windows
2. If you run the Setup.exe select MODIFY afterwards. The menu in Illus. 32
appears.
.print Client Windows
Manual
31
Appendix
3. Select additional .print Client Windows types for installation.
Note! It is not possible to install both TCP/IP clients (.print Client Windows
and .print Client Service Windows) on the same computer. Removing the
checkmark (Illus. 32) will uninstall the .print Clients.
Illus. 32
Illus. 32 Installing additional (or uninstalling) .print Client Windows types (example)
Repairing .print Client Windows
Should .print Client Windows ever quit functioning, you don't have to reinstall it – you
can repair it. .print Client Windows are repaired exactly as described above, except
that REPAIR is selected instead of MODIFY (Illus. 31).
Updating .print Client Windows
Please note that previous settings are still valid when updating or installing .print
Client on a machine where it was installed before.
1. Uninstall the present .print Client (see next chapter).
2. Install the new one (Page 7 or 13).
1. Select CONTROL PANEL→ADD OR REMOVE PROGRAMS, select .PRINT CLIENT
WINDOWS 14, and click REMOVE (Illus. 33).
14 formerly ThinPrint Client
32
Manual
.print Client Windows
© ThinPrint GmbH 2008
Uninstalling .print Client Windows
Appendix
Illus. 33
Illus. 33 Removing .print Client Windows (Example for Windows XP)
2. Did you use the Setup.exe for installation the menu in Illus. 34 appears. Select
REMOVE and then NEXT.
3. Confirm the following windows with REMOVE and FINISH.
Illus. 34
© ThinPrint GmbH 2008
Illus. 34 Deleting .print Client(s) Windows
.print Client Windows
Manual
33
Appendix
Relevant entries in Windows Registry
Registry entries of .print Client Windows
The .print Client creates the following Registry entries under:
hkey_local_machine\software\thinprint\client
Name
Menu item
(.print Client
Manager)
AdminOnly
ADMINISTRATORS
Description
Type
Default
value
Restricts client configuration to administrators only
reg_dword
0
BANDWIDTH
Client-side bandwidth setting (bit/s or
bps)
reg_dword
none
AUTHENTICATION
Value can be defined by the admin on
the connection server; otherwise it’s
irrelevant for the first logon, but may
not be changed thereafter
reg_dword
0
ONLY
Bandwidth
ConnAuthKey
KEY
ConnKeepAlive
—
Interval for refreshing the connection;
has to be lower or equal than .print
Connection Service’s “KeepAliveTO”
(server side); (in seconds)
reg_dword
60
ConnMode
USE CONNECTION
SERVICE
0 = Receiving print jobs without .print
Connection Service (Listen Mode)
3 = Using .print Connection Service
Static Mode
1 = both modes at the same time
(0 + 3)
reg_dword
0
ConnPort
TCP PORT
(CONNECTION
SVC)
TCP port for communication with the
.print Connection Service; be sure:
same TCP port number as .print Connection Service’s “ClientPort”
reg_dword
4001
CONNECTION
IP address of the computer on which
.print Connection Service is running
reg_sz
127.0.
0.1
ConnServer
SERVER ADDRESS
CLIENT ID
Client ID for the static mode – an unambiguous ID must be assigned for all clients (TPUID)
reg_dword
0
ConnWait
CONNECTION
Wait time for connection retries if .print
Connection Service is not reachable (in
seconds)
reg_dword
300
AutoConnect defines current printer as
default printer at server; Page 16
reg_dword
1
RETRY INTERVAL
DefaultState
DEFAULT AT
SERVER
34
Manual
.print Client Windows
© ThinPrint GmbH 2008
ConnUID
Appendix
Menu item
(.print Client
Manager)
Description
Type
Default
value
PName_n
PRINTER
(ASSIGNMENT)
Name(s) of client printer(s) as read from
the system settings
reg_sz
none
Port
TCP PORT
(ADVANCED)
TCP-Port for communication with the
.print Engine; must be the same as
.print Engine “port” with a normal
ThinPrint port
reg_dword
4000
PrinterClasses
CHOOSE CLASS
Names of the created printer classes
reg_sz
PCL5,
PS,
TXT
Name
NAME
PTSPort
PRINT-TO-SCREEN
Print-to-Screen interface
(e.g. COM2, RIM_USB); not .print
Client Windows 7.0 V
reg_sz
none
PType_n
CLASS
(ASSIGNMENT)
Assigned printer class (n corresponds to
n from PName_n) plus printer driver
name
reg_sz
none
SelectedPrinter
CURRENT PRINTER
.print Client’s default printer
reg_sz
UseWD
efault
SendProperties
ENABLE SENDING
AutoConnect option for sending printer
properties
reg_dword
1
UseWDefault
INHERIT CLIENT’S
Set to use local Windows default printer
as CURRENT PRINTER
reg_dword
1
PROPERTIES
© ThinPrint GmbH 2008
DEFAULT PRINTER
.print Client Windows
Manual
35
Appendix
Additional Registry entries of .print Client Windows
The following Registry entries can be created by the Custom Installation Wizard or
have to be created manually under:
hkey_local_machine\software\thinprint\client
Menu item
(Custom Installation Wizard)
Description
Type
Default
value
CertName
(Windows
2000 and
later)
SSL ENCRYPTION
¡ CERTIFICATE
Name of the imported SSL/TLS certificate; Page 23
reg_sz
none
CERTSTORE
(.print Client
Windows 7.0
V and later)
CERTIFICATE
0 = use the user’s certificate store
1 = use the computer’s certificate store
Note: Permissions has to be assigned to
the certificate (see the Creating SSL certificates for printing with .print white
paper).
reg_dword
0
DefPrintState
PRINTER SELEC-
Value for the automatic selection of all
newly installed printers for AutoConnect; 1 = enabled
reg_dword
none
1= .print Client configuration is user
specific saved under:
hkey_current_user\software\thinprint\client
reg_dword
0
Name
NAME
STORE
TION
HKCU
PRIORITY FOR SAVING SETTINGS
NewID
ASSIGN PRINTER
ID
Specifies the starting value for printer ID
assignment
reg_dword
none
PreviewPrinter
PREVIEW PRINTER
FOR OUTPUT
GATEWAY
Specifies whether a preview should be
displayed on the client computer when
using ThinPrint Output Gateway,
reg_dword
none
RmtConf
REMOTE CONFIGU-
IP address of the administration
machine from which the .print Client
remote configuration is allowed (it is
possible to enter more than one
address); Page 24
reg_multi_sz
none
RATION
© ThinPrint GmbH 2008
36
Manual
.print Client Windows
Appendix
Name
Menu item
(Custom Installation Wizard)
SetIDList
MODIFYING THE
PRINTER LIST
Description
Type
Default
value
Specifies whether changes in the .print
Client (new printers, classes, etc.)
should be applied when client is
restarted
1 = changes are applied (printer list is
updated)
0 = changes are reset
Note: The „Reload printers“ function
(see Page 14) has a higher priority than
these settings.
reg_dword
none
StartDelay
START DELAY
Specifies whether and how long (in seconds) .print Client startup should be
delayed after user login (applies only to
.print Client Windows TCP/IP)
reg_dword
none
WATCHPRINT-
PRINTER LIST
0
UPDATE
1 = .print Client updates its printer list
automatically (as soon as a printer is
added to or deleted from the machine)
0 = .print Client updates its printer list
only if it is restarted or its “Reload Printers” option is executed
reg_dword
ERS
Description
Type
Default
value
(.print Client
Windows 7.0
V and later)
hkey_local_machine\software\thinprint\tpviewture
Name
Menu item
(Custom Installation Wizard)
Move
POSITION
Specifies whether the position of the
screen is to be moved to the printable
area of the client printer (for use with
ThinPrint Output Gateway only)
reg_dword
none
Resize
SIZE
Specifies whether the position of the
screen is to be scaled to the printable
area of the client printer (for use with
ThinPrint Output Gateway only)
reg_dword
none
© ThinPrint GmbH 2008
Further information on the single entries can be found in the respective chapters of
this manual and of the Preconfiguration and unattended installation of .print Client
Windows white paper.
.print Client Windows
Manual
37
.print Clients and supported features
.print Clients and supported features
+ possible
– not possible
ICA
TCP/IP
RDP
.print
AutoConnect
Compression
and streaming
Bandwidth control
SSL/TLS encryption
Output Gateway
.print Viewture
Virtual Channel
Gateway
Connection Service
Network
protocol
Windows (TCP/IP) a
–
+
–
+
+
+
+
+
+
–
+
Windows (ICA)
+
–
–
+
+
+
+
+
+
+
–
.print Client
Windows (RDP) b
–
–
+
+
+
+
+
+
+
+
–
Service Windows (TCP/IP)
a
–
+
–
+
+
+
+
+
–
–
+
ActiveX Windows (TCP/IP)
a
–
+
–
+
+
+
+
+
+
–
+
–
+
–
+
+
+
+
–
–
–
+
–
–
+
+
+
+
+
–
–
+
–
–
+
–
+
+
+
+
–
–
–
+
Java as an applet (ICA)
+
–
–
+
+
+
+
–
–
+
–
(TCP/IP) a
–
+
–
+
+
+
–
–
–
–
–
Win OS/2 (TCP/IP)
–
+
–
+
+
+
–
–
–
–
–
(TCP/IP) a
–
+
–
+
+
+
–
–
–
–
–
–
+
–
+
+
+
–
–
–
–
–
Windows CE (ICA)
+
–
–
+
+
+
–
–
–
+
–
Windows CE (RDP)
–
–
+
+
+
+
–
–
–
+
–
–
+
–
+
+
+
–
–
–
–
–
Windows Mobile (ICA)
+
–
–
+
+
+
–
–
–
–
–
Windows Mobile (RDP)
–
–
+
+
+
+
–
–
–
–
–
ActiveX Windows Mobile (TCP/IP) a
–
+
–
+
+
+
–
–
–
–
+
LPD device
–
+
–
–
+c
+
–
–
–
–
–
Linux (TCP/IP)
a
Linux (RDP)
Java (TCP/IP)
Win16
MS-DOS
Windows CE
a
(TCP/IP) a
Windows Mobile
a
b
c
(TCP/IP) a
Also usable for ICA / RDP sessions, provided a TCP/IP connection exists between server and client
RDP 5.0 required
If a decompression filter can be installed
© ThinPrint GmbH 2008
38
.print Clients