1
Black Box® QuickStart Guide
for the SmartPath AP (LWN602HA)
a
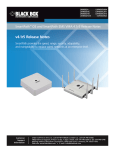
Different Subnets (Use of DHCP
options or DNS resolution)
Eth0
To do the following:
Check the status of both wired and
wireless interfaces
show interface mgt0
See the network settings (IP address,
netmask, default gateway) and VLAN ID
of the mgt0 interface
no interface mgt0 dhcp client
Disable the DHCP client
interface mgt0 ip <ip_addr>
<netmask>
Set the IP address and netmask of the
mgt0 interface
interface mgt0 native-vlan <id>
Set the native (untagged) VLAN that the
switch infrastructure in the surrounding
wired and wireless network uses
Connect a standard
Ethernet cable with
RJ-45 connectors from
ETH0 on the SmartPath
(LWN602HA) to a switch.
2
Ethernet
Cable
show capwap client
See CAPWAP client settings and status
capwap client server name
<string>
Set the IP address or domain name of
the CAPWAP server (SmartPath EMS
Appliance)
capwap client vhm-name <string>
Set the VHM (virtual SmartPath EMS
Appliance) to which the client belongs
As explained in the previous section, after connecting a SmartPath AP to the network and
powering it on, it acts as a DHCP client and tries to get its network settings automatically from
a DHCP server in VLAN 1. However, if there is no DHCP server in that VLAN, if the native VLAN
for the network segment is not 1, or if you just want to assign it a static IP address, then you
need to access the Command Line Interface (CLI) and define the network settings yourself.
show cluster
See the cluster name
show cluster <string> neighbor
Check for any nearby cluster members
clusters <string> ...
Create a cluster and set its parameters
One approach is to use a console cable, which is available from Black Box as an accessory.
Another is to use the virtual access console. This is a way of accessing the CLI on a SmartPath
wirelessly through a special SSID that the SmartPath, by default, automatically activates for
administrative access when it has no configuration and cannot reach its default gateway.
show ssid
See a list of all SSID names
ssid <string> ...
Configure an SSID
interface { wifi0 | wifi1 } ssid
<string>
Bind an SSID to a wireless interface in
access mode
Internet
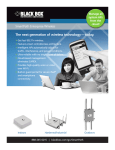
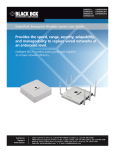
Same Subnet (Automatic Discovery)
Broadcast
Firewall
SmartPath EMS
CAPWAP Server
SmartPath AP
CAPWAP Client
The SmartPath AP broadcasts CAPWAP
Discovery Request messages until it
receives a response from SmartPath
EMS, which is a CAPWAP server, in the
same subnet. Then they negotiate a
secure CAPWAP connection with each
other.
Some other network devices. (They
might all be incorporated in the same
device, such as a router or firewall.)
If the switch does not
provide PoE, use the
AC/DC power adaptor
(optional) to connect
the SmartPath to a
100-240 AC power
source.
Connecting to SmartPath EMS
3
b
Switch
If the switch provides
PoE (Power over
Ethernet), cabling the
SmartPath AP to the
switch will cause the
SmartPath AP to power
on in a few seconds.
Unicast
Router
DHCP
Server
Cable the SmartPath AP to an Ethernet network—a SmartPath AP connected directly to the
network like this is called a portal—or place it within radio range of a portal so that it forms
a wireless link through the portal to the wired network. This kind of SmartPath AP is called
a mesh point. By default, a SmartPath AP acts as a DHCP client and gets its network settings
automatically from a DHCP server. (You can also configure the SmartPath AP with static
network settings through the CLI. See the next section, “Using the Virtual Access Console,”
for information about making a wireless—or “virtual”—console connection to the CLI on the
SmartPath AP.)
Using the Virtual Access Console
The default virtual access console SSID name is “<SmartPath-hostname>”. The default host
name of a SmartPath consists of "BB-" plus the last six digits of its MAC address; for example,
BB-123456. In this case, the name of the default virtual access console SSID would be “BB123456.” By default, this SSID uses blackbox as the PSK (preshared key) for authenticating user
access. To access the virtual access console, do the following:
4
A mesh point initially forms a cluster with its portal using the default cluster cluster0.
Through this link, the mesh point can reach the network and get its network settings
through a DHCP server. Then it can form a CAPWAP connection with the SmartPath EMS. (To
add a mesh point after changing the cluster name, first connect it to the wired network.
Next, push a configuration with the new cluster name to it from the SmartPath EMS. Finally,
deploy it as a mesh point.
CAPWAP (Control and Provisioning of Wireless Access Points) is a protocol that access points
use to contact a management device and communicate with it. After getting its network
settings through DHCP, the SmartPath AP then acts as a CAPWAP client and tries to reach
a CAPWAP server, which in this case is a SmartPath EMS Appliance. If the SmartPath AP
is configured with the SmartPath EMS IP address or domain name or if it receives DHCP
attributes specifying either a SmartPath EMS IP address or domain name, it uses those
settings to contact it.
If the SmartPath AP is not configured with SmartPath EMS settings and does not receive them
through DHCP, it then checks if it can do a DNS lookup to resolve “SmartPathEMS.<local_
domain>” to an IP address (“<local_domain>” is the domain that the DHCP server assigned to
the SmartPath AP).
Finally, if none of the previous efforts enables the SmartPath AP to contact the SmartPath
EMS, the SmartPath AP broadcasts CAPWAP Discovery messages on its subnet. If the
SmartPath EMS is in the same broadcast domain, it responds, and the two devices negotiate
a secure CAPWAP connection.
If SmartPath EMS is in the same subnet as the SmartPath AP, the SmartPath AP finds and
connects to it automatically. However, if SmartPath EMS is in a different subnet from the
SmartPath AP, you must configure settings on the SmartPath AP, the DHCP server, or DNS
server so that one of the other SmartPath EMS discovery methods can succeed:
(1) Manually configure the SmartPath AP with the SmartPath EMS IP address or domain name.
(2) Configure a DHCP server to return the SmartPath EMS IP address or domain name in one
of the DHCP options.
(3) Configure the local authoritative DNS server with an A-record or a host record that
resolves “SmartPath EMS” to the SmartPath EMS IP address.
When the SmartPath AP has a specific IP address for the SmartPath EMS, it can then
send unicast CAPWAP Discovery Request messages to it at that address.
After logging in to the virtual access console, you can view the status of various
functions and make configuration changes. Here are some commonly used commands.
show interface
DHCP or
DNS Server
Attach the shorter antennas
to the 5-GHz connectors...
1
6
Use these commands:
This QuickStart guide explains how to set up a SmartPath access point (AP) (LWN602HA) so it can
make a network connection to a switch, and how to mount it on a ceiling or wall.
and the longer ones to
the 2.4-GHz connectors
on the Eth0 port side.
When SmartPath EMS is in a different
subnet, do one of the following: (1) set the
SmartPath EMS IP address or domain name
on the SmartPath AP; or (2) configure a
DHCP server to return the SmartPath EMS
IP address or domain name; or (3) add an
A-record or a host record that resolves
“smartpath.<domain_name>” to the
SmartPath EMS IP address on a DNS server
that is authoritative for that domain.
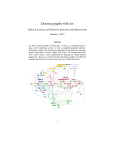
Using your wireless client,
scan for wireless networks.
If you are within range, an
SSID such as “BB-123456”
appears.
Select it, and when
prompted to enter a network
key, type blackbox and then
click Connect.
Status LEDs
The five status LEDs on the top of the SmartPath AP (LWN602HA) indicate various states
of activity through their color (dark, green, amber, and red) and illumination patterns
(steady glow or pulsing). The meanings of the various color and illumination patterns
for each LED are explained below:
Beacons
5
Check the IP address of
the default gateway that
the DHCP server on the
SmartPath AP assigned to
Beacons
your client. Then
make an SSH or a
Telnet connection to the
SmartPath AP at that IP
address. When prompted to
enter your credentials, enter
the default Black Box login name
(admin) and password (blackbox).
Wireless
Client
C:\>ipconfig
Windows IP Configuration
Ethernet adapter Wireless
Network Connection:
Connection-specific DNS Suffix . :
IP Address. . . . . . : 1.1.1.2
Subnet Mask . . . . . : 255.255.255.0
Default Gateway . . . : 1.1.1.1
C:\>telnet 1.1.1.1
To see a list of commands, and their accompanying CLI Help, type a question mark ( ? ).
For example, to see all the show commands, enter show ?
If you want to find a command that uses a particular character or string of characters,
you can do a search using the following command: show cmds | include
<string>, where <string> is the word or string of characters you want to find.
Device- and platform-specific CLI reference guides are available on-line. (To learn how
to access them, see "Where to go for more information" elsewhere in this document.)
Power
• Dark: No power
• Steady green: Powered on and the firmware is running normally
• Pulsing green: Firmware is booting up
• Steady amber: Firmware is being updated
• Pulsing amber: Alarm indicating a firmware issue has occurred
• Steady red: Alarm indicating a hardware issue has occurred
ETH0 and ETH1
• Dark: Ethernet link is down or disabled
• Steady green: 1000-Mbps Ethernet link is up but inactive
• Pulsing green: 1000-Mbps Ethernet link is up and active
• Steady amber: 10-/100-Mbps Ethernet link is up but inactive
• Pulsing amber: 10-/100-Mbps Ethernet link is up and active
WIFI0 and WIFI1
• Dark: Wireless interface is disabled
• Steady green: Wireless interface is in access mode but inactive
• Pulsing green: Wireless interface is in access mode and active
• Steady amber: Wireless interface is in backhaul mode but inactive
• Pulsing amber: Wireless interface is in backhaul mode and is connected with other
cluster members
• Alternating green and amber: Wireless interface is in backhaul mode and is
searching for other cluster members
Mounting the SmartPath AP (LWN602HA)
Using the mounting plate and track clips, you can mount the SmartPath AP to the tracks of a
dropped ceiling grid. Using just the mounting plate, you can mount the SmartPath to any flat
surface that can support its weight (3.3 lb., 1.5 kg). Both mounting options are explained below.
Note: In addition to these methods, you can also mount the SmartPath AP on a table using the
set of four rubber feet that ship with the product. Simply peel the rubber feet off the
adhesive sheet and press them against the underside of the SmartPath AP in its four
corners.
Surface Mount
You can use the mounting plate to attach the SmartPath AP (LWN602HA) to any surface that
supports its weight, and to which you can screw or nail the plate. First, mount the plate to the
surface. Then, through the large opening in the lower part of the plate, make a hole in the wall
so that you can pass the cables through to the SmartPath AP.
Finally, attach the device to the plate, and connect the cables.
Mount the SmartPath (LWN602HA) on a wall as explained below.
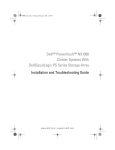
Ceiling Mount
To mount the SmartPath AP LWN602HA to a standard 1" (2.54 cm) wide track in a dropped ceiling,
you need the mounting plate, two track clips, and two Keps® nuts that ship with the SmartPath
(LWN602HA). You also need a drill, a wrench, and—most likely—a ladder. For narrower tracks
1/2" to 9/16" (1.27 - 1.43 cm) wide, contact Black Box Technical Support at 724-746-5500
or [email protected].
2
3
Worm’s eye view with ceiling tiles removed for clarity
Press the track clips against the
ceiling track and swivel them until
they snap into place, gripping the
edges of the track. If necessary,
slide one or both of the clips
along the track to position them
at the proper distance (2 1/4" or 7
cm) to fit through the holes in the
mounting plate.
Insert the mounting plate over the
screws attached to the track clips,
and use the Keps nuts to fasten
the plate firmly to the threaded
studs on the clips. Use a wrench to
tighten the nuts firmly to the bolts
and secure the plate to the track.
2 1/4" (7 cm)
Drill a hole in the ceiling tile
and feed cables through here.
Cut or drill a hole through one of the
openings in the mounting plate to pass
the cables through to the SmartPath
(LWN602HA).
3
Insert the tabs on the mounting plate
into the slots on the underside of the
SmartPath (LWN602HA). Then push the
SmartPath (LWN602HA) downward to
lock it in place.
Mounting Plate
SmartPath
(LWN602HA)
Wall
Attach the antennas and connect the
cables to the SmartPath (LWN602HA).
Where to Go for More Information
Technical Documentation
Black Box provides various technical documents for its products. For information about CLI
commands, see the CLI reference guides available in HTML format. For information about
SmartPath EMS Appliance and SmartPath AP hardware and software topics, see the SmartPath
Deployment Guide (PDF). The deployment guide contains information about SmartPath APs
and SmartPath EMS appliances, WLAN deployment considerations, and detailed configuration
instructions for commonly used features.
Depending on the deployment, you might
connect one or two Ethernet cables and
a power cable.
Note: There are a variety of holes through which you
can screw or nail the plate in place. Choose
the two or three that best suit the object to
which you are attaching it.
SmartPath EMS Appliance Help System
The SmartPath EMS Appliance Help System contains a wealth of information about all the
features you can configure through SmartPath EMS Appliance. To access it, click the Help icon
in the upper right corner of the GUI. A Help topic that pertains to the currently active GUI
page appears. To see other Help topics, use the table of contents to browse the system or the
search tool to find information about a specific subject.
SmartPath AP (shown transparent for clarity)
Support Site
Access technical support services, documentation, and software at ftp://ftp.blackbox.com.
You can contact Black Box Tech Support for assistance through the Web site at
www.blackbox.com, by e-mail at [email protected], or by phone at 724-746-5500.
Tab
Tab
inside
slot
Tab
locked in
place
With the SmartPath AP (LWN602HA) upside down, align its port side with the
bottom end of the plate. Push the SmartPath upward, inserting the four tabs
on the plate into the four slots on the SmartPath. Slide the SmartPath toward
the bottom end of the plate, locking the tabs in the slots.
Ceiling
Mounting Plate
SmartPath
Locking the SmartPath AP LWN602HA
To lock the SmartPath AP (LWN602HA) to the mounting plate, use either a Kensington lock or the
lock adapter that is included with the mounting kit and a small padlock (not included). To use
a Kensington lock, loop the cable attached to the lock around a secure object, insert the T-bar
component of the lock into the device lock slot on the SmartPath AP, and then turn the key to
engage the lock mechanism. To use the lock adapter, follow the steps below:
1
Insert the security screw through
the hole in the SmartPath AP and
begin to thread it into the hole
in the mounting plate.
Cables pass through holes in
mounting plate and ceiling
5
Mounting
Plate
SmartPath AP
(LWN602HA)
4
Slot
4
2
Ceiling Track
Attach the SmartPath AP (LWN602HA) to the mounting plate and connect the cables. (Note: You
can tie the cables to the tie points [small arched strips] on the mounting plate to prevent them
from being pulled out of their connections accidentally.)
Side view
With the two wings at the sides of the
plate extending away from the surface,
attach the mounting plate to a secure
object such as a wall or beam. Use #8
screws for the oblong holes, and #10
for the larger round ones.
Track Clips
Through the oblong opening in the
plate, drill a hole in the ceiling tile
(not shown). Then pass one or both
Ethernet cables through the hole,
and if you plan to supply power
from an AC power source rather
than through PoE, pass the power
cable through as well.
Mounting Plate
1
Side view
Nudge the ceiling tiles slightly away from the track to clear some space. Attach the track clips to
the ceiling track, and then fasten the mounting plate to the clips. When you have the mounting
plate in the correct location, cut or drill a hole in the ceiling through which you can then pass the
Ethernet and power cables.
1
Deployment and Configuration Tips
Attach the antennas and connect the cables to complete the installation.
When done, adjust the ceiling tiles back into their former position.
The following are some tips and suggestions to help you troubleshoot a few common problems
that might arise when setting up the SmartPath (LWN602HA):
• Make sure that you connect the larger antennas to the 2.4-GHz connectors and the
smaller ones to the 5-GHz connectors.
• If you manage the SmartPath AP through SmartPath EMS Online and it does not show up
on the Monitor > Access Points > SmartPath APs page, do the following:
- Check connectivity to SmartPath EMS Online: ping smartpath.blackbox.com
- Make sure that any intervening firewalls allow one of the following sets of services from
the SmartPath AP to SmartPath EMS Online:
CAPWAP (UDP 12222), SSH (TCP 22), and HTTPS (TCP 443)
or
HTTP (TCP 80) and HTTPS (TCP 443)
• If a client cannot form an association, check that the client is within range and that it is
configured to use the same authentication method as the SSID. For example, if the client
is configured to use Open or WEP authentication but the SSID is set for WPA or WPA2, the
client will not be able to associate with the SmartPath AP. To see the security settings an
SSID, click WLAN > Configure WLAN/SSID, and look at the key management, encryption
and authentication methods, and SSID type listed at the bottom of the page.
• If a client associates and authenticates itself, but the SmartPath AP cannot forward
traffic, check that the SmartPath AP is assigning the correct user profile and, if so, that it
is also assigning the correct VLAN. To see the user profile and VLAN that a SmartPath AP
assigns a client, enter show ssid <string> station, and check the UPID (user profile
ID) and VLAN columns. If those are correct, then check that the client has received its
network settings through DHCP. To check connectivity to the DHCP server, make a console
or an SSH connection to the SmartPath AP, send a probe, and see if it elicits a response:
interface mgt0 dhcp-probe-vlan-range <vlan1> <vlan2>. Also check that the
VLAN configuration for the port on the connecting switch is correct.
To remove all settings and return to factory default settings, enter the reset config
command or use a pin to press the Reset button on the chassis and hold it down for five
seconds.
Insert a lock
through the opening.
5 GHz (C )
2
With the insert bit in a screwdriver,
tighten the screw into place, securing
the SmartPath AP to the mounting plate.
Rotate the lock
adapter5 GHz
clockwise.
(B )
5 GHz (A )
SmartPath
(LWN602HA)
Mounting Plate
© Copyright 2010. Black Box Corporation. All rights reserved.
Black Box and the Double Diamond logo are registered trademarks
of BB Technologies, Inc. Keps is a registered trademark of ITW Shakeproof.
Any other trademarks mentioned in this manual are acknowledged to be
the property of the trademark owners.
LWN602HA QSG, rev. 1