1
.
maxView Storage
Manager User's Guide
CDP-00278-02-A Rev. A
Issue: December 4, 2012
maxView Storage Manager User's Guide
Copyright © PMC-Sierra, Inc. All rights reserved.
The information in this document is proprietary and confidential to
PMC-Sierra, Inc. In any event, no part of this document may be reproduced
or redistributed in any form without the express written consent of
PMC-Sierra, Inc.
CDP-00278-02-A Rev. A, IssueNumber
None of the information contained in this document constitutes an express
or implied warranty by PMC-Sierra, Inc. as to the sufficiency, fitness or
suitability for a particular purpose of any such information or the fitness, or
suitability for a particular purpose, merchantability, performance, compatibility
with other parts or systems, of any of the products of PMC-Sierra, Inc., or any
portion thereof, referred to in this document. PMC-Sierra, Inc. expressly
disclaims all representations and warranties of any kind regarding the contents
or use of the information, including, but not limited to, express and implied
warranties of accuracy, completeness, merchantability, fitness for a particular
use, or non-infringement.
In no event will PMC-Sierra, Inc. be liable for any direct, indirect, special,
incidental or consequential damages, including, but not limited to, lost profits,
lost business or lost data resulting from any use of or reliance upon the
information, whether or not PMC-Sierra, Inc. has been advised of the
possibility of such damage.
For a complete list of PMC-Sierra’s trademarks and registered trademarks,
visit: http://www.pmc-sierra.com/legal/.
Other product and company names mentioned herein may be the trademarks
of their respective owners.
Proprietary and Confidential to PMC-Sierra, Inc.
Document No.: CDP-00278-02-A Rev. A, Issue:
2
maxView Storage Manager User's Guide
Revision History
Issue
Issue Date
Details of Change
1.1
December 4,
2012
Adaptec maxView Storage Manager Version 1.1
Proprietary and Confidential to PMC-Sierra, Inc.
Document No.: CDP-00278-02-A Rev. A, Issue:
3
maxView Storage Manager User's Guide
Contents
Adaptec by PMC Product Support..............................................................................................................................8
Software License Agreement....................................................................................................................................10
1 About this Guide...................................................................................................................................................13
What You Need to Know Before You Begin..................................................................................................13
Terminology Used in this Guide...................................................................................................................13
How to Find More Information....................................................................................................................14
2 Introduction to maxView Storage Manager..........................................................................................................15
Getting Started.............................................................................................................................................15
About maxView Storage Manager ...............................................................................................................15
About the maxView Storage Manager Agent .................................................................................16
About the maxView Storage Manager Web Server.........................................................................16
About the maxView Storage Manager CIM Server..........................................................................16
System Requirements..................................................................................................................................17
Browser Support..........................................................................................................................................17
Typical Storage Space Configurations...........................................................................................................18
A Simple Storage Space...................................................................................................................18
An Advanced Storage Space............................................................................................................18
Continuing to Grow Your Storage Space..........................................................................................19
3 Installing maxView Storage Manager....................................................................................................................20
Before You Begin the Installation.................................................................................................................20
Installing on Windows..................................................................................................................................20
Installing on Red Hat, Cent OS, SuSE, or Fedora Linux.................................................................................21
Installing on Debian or Ubuntu Linux...........................................................................................................22
Installing on Solaris......................................................................................................................................22
Installing on VMware ESX 4.1.......................................................................................................................23
Installing on VMware ESXi 5.x......................................................................................................................24
Installing on a VMware Guest OS.................................................................................................................25
Running maxView Storage Manager from the DVD.....................................................................................25
Uninstalling maxView Storage Manager......................................................................................................26
Uninstalling from Windows.............................................................................................................26
Uninstalling from Red Hat, Cent OS, SuSE, or Fedora Linux.............................................................26
Uninstalling from Debian or Ubuntu Linux......................................................................................26
Uninstalling from Solaris..................................................................................................................26
Uninstalling from VMware ESX 4.1..................................................................................................27
Uninstalling from VMware ESXi 5.x.................................................................................................27
4 Exploring maxView Storage Manager...................................................................................................................28
Starting maxView Storage Manager and Logging In ....................................................................................28
Working in maxView Storage Manager........................................................................................................28
Overview of the Main Window....................................................................................................................28
The Enterprise View ........................................................................................................................29
What do the Enterprise View Icons Mean? ......................................................................30
The Ribbon ......................................................................................................................................31
The Storage Dashboard...................................................................................................................31
Checking System Status from the Main Window.........................................................................................32
Revealing More Device Information ............................................................................................................33
Getting Help.................................................................................................................................................34
Logging Out of maxView Storage Manager..................................................................................................34
5 Building Your Storage Space.................................................................................................................................35
Overview......................................................................................................................................................35
Choosing a Management System.................................................................................................................35
‘Local’ or ‘Remote’?.........................................................................................................................35
Proprietary and Confidential to PMC-Sierra, Inc.
Document No.: CDP-00278-02-A Rev. A, Issue:
4
maxView Storage Manager User's Guide
Logging in on the Local System .......................................................................................................36
Starting maxView Storage Manager on Remote Systems............................................................................36
Starting the Agent Only ..................................................................................................................36
Windows.............................................................................................................................37
Linux or VMware.................................................................................................................37
Solaris..................................................................................................................................37
Logging into Remote Systems from the Local System..................................................................................38
Creating Logical Drives.................................................................................................................................39
Express Configuration .....................................................................................................................39
Custom Configuration......................................................................................................................41
Partitioning and Formatting Your Logical Drives..............................................................................44
Creating Logical Drives on Other Systems in Your Storage Space....................................................44
6 Protecting Your Data.............................................................................................................................................45
Creating and Managing Hot Spares..............................................................................................................45
Hot Spare Limitations......................................................................................................................45
Dedicated Spare or Global Spare?...................................................................................................45
Designating a Global Hot Spare.......................................................................................................45
Assigning a Dedicated Hot Spare or Pool Hot Spare........................................................................46
Deleting a Global Hot Spare ............................................................................................................47
Removing or Deleting a Dedicated Hot Spare.................................................................................48
Enabling Copyback.......................................................................................................................................49
Enabling Automatic Failover........................................................................................................................50
7 Modifying Your Storage Space..............................................................................................................................52
Understanding Logical Drives.......................................................................................................................52
Creating and Modifying Logical Drives.........................................................................................................52
Including Different-sized Disk Drives in a Logical Drive...................................................................53
Creating a Logical Drive Using Available Segments.........................................................................54
Creating a Hybrid RAID Logical Drive ..............................................................................................54
Fine-tuning Logical Drives............................................................................................................................55
Renaming a Logical Drive.................................................................................................................55
Changing the Read Cache Setting....................................................................................................56
Changing the Write Cache Setting...................................................................................................56
Changing the Stripe Size .................................................................................................................57
Changing the Initialize Method .......................................................................................................57
Optimizing Logical Drive Performance.........................................................................................................57
Verifying Logical Drives................................................................................................................................58
Verifying and Fixing a Logical Drive.................................................................................................59
Enabling/Disabling Background Consistency Check........................................................................59
Increasing the Capacity of a Logical Drive....................................................................................................60
Changing the RAID Level of a Logical Drive..................................................................................................61
Erasing a Logical Drive..................................................................................................................................62
Deleting a Logical Drive................................................................................................................................62
Adding maxCache SSD Caching to Your Storage Space ...............................................................................62
Creating a maxCache Container.......................................................................................................63
Setting the maxCache Flush and Fetch Rate ...................................................................................64
Verifying and Fixing the maxCache Container.................................................................................64
Deleting the maxCache Container...................................................................................................65
Changing the maxCache Settings for a Logical Drive.......................................................................65
Changing the maxCache Settings for a Controller...........................................................................66
Using maxCache with Adaptec Series 6 Controllers........................................................................66
Maintaining an Energy-Efficient Storage Space............................................................................................67
Setting Power Management Options for a Logical Drive.................................................................68
Setting Power Management Options for a Controller.....................................................................69
Disabling Power Management for a Logical Drive...........................................................................70
8 Working with Scheduled Tasks..............................................................................................................................71
Scheduling a Task.........................................................................................................................................71
Monitoring Tasks .........................................................................................................................................72
What if a Task Misses its Start Time?...............................................................................................73
Proprietary and Confidential to PMC-Sierra, Inc.
Document No.: CDP-00278-02-A Rev. A, Issue:
5
maxView Storage Manager User's Guide
Modifying a Task ..........................................................................................................................................73
Deleting a Task ............................................................................................................................................74
9 Maintaining Physical Devices................................................................................................................................75
Viewing Device Properties ..........................................................................................................................75
Locating Drives in Your Storage Space..........................................................................................................75
Locating a Disk Drive........................................................................................................................76
Locating Physical Disks in a Logical Drive.........................................................................................76
Locating SSDs in the maxCache Container.......................................................................................77
Working with Failed or Failing Disk Drives...................................................................................................78
Replacing Disk Drives in a Logical Drive...........................................................................................78
Setting a Disk Drive to ‘Failed’.........................................................................................................78
Initializing and Erasing Disk Drives...............................................................................................................79
Initializing Disk Drives......................................................................................................................79
Erasing Disk Drives...........................................................................................................................79
Verifying and Fixing a Disk Drive..................................................................................................................80
Changing a Disk Drive's Write Cache Setting................................................................................................80
Working with Controllers.............................................................................................................................81
Silencing a Controller Alarm............................................................................................................81
Disabling a Controller Alarm............................................................................................................81
Rescanning a Controller...................................................................................................................82
Setting a Controller's Default Task Priority......................................................................................82
Enabling Native Command Queuing on a Controller.......................................................................82
Working with System Alarms.......................................................................................................................83
Updating Controller and Disk Drive Firmware.............................................................................................84
Before You Begin..............................................................................................................................84
Updating the Controller Firmware ..................................................................................................84
Updating the Disk Drive Firmware ..................................................................................................87
10 Monitoring Status and Activity...........................................................................................................................88
Monitoring Options......................................................................................................................................88
Checking Status from the Main Window .....................................................................................................88
Viewing Activity Status in the Event Log..........................................................................................89
What Do the Event Status Icons Mean?..............................................................................89
Viewing Task Status in the Task Log.................................................................................................90
Viewing Component Status in the Storage Dashboard....................................................................90
Monitoring Enclosure Status...............................................................................................92
Viewing SMART Statistics....................................................................................................92
Viewing Storage Space Usage in Chart View...................................................................................93
Notifying Users by Email About Status and Activity ....................................................................................93
Setting Up Email Notifications.........................................................................................................93
Sending a Test Message...................................................................................................................96
Modifying Recipient Information or Removing a Recipient.............................................................97
Modifying Email Server Settings......................................................................................................98
Creating an Email Notification Template.........................................................................................98
Broadcasting Alerts About Status and Activity ............................................................................................99
Monitoring Advanced Statistics about Activity in Your Storage Space.........................................................99
Setting up Statistics Logging............................................................................................................99
Viewing Advanced Statistics..........................................................................................................100
Resetting the Statistics Counters...................................................................................................101
Changing an Operating System's Event Log Setting...................................................................................102
11 Managing Your Storage Space..........................................................................................................................103
Deploying Servers ......................................................................................................................................103
Creating a Server Template File.....................................................................................................103
Duplicating the Server Template....................................................................................................103
Managing Remote Systems........................................................................................................................105
Adding Remote Systems with the Wizard......................................................................................105
Manually Adding a Remote System...............................................................................................105
Removing a Remote System..........................................................................................................106
Changing the Auto-Discovery Settings...........................................................................................107
Proprietary and Confidential to PMC-Sierra, Inc.
Document No.: CDP-00278-02-A Rev. A, Issue:
6
maxView Storage Manager User's Guide
Clearing the Controller Configuration........................................................................................................108
Changing the Agent Base Port Setting........................................................................................................109
12 Solving Problems...............................................................................................................................................110
General Troubleshooting Tips....................................................................................................................110
Identifying a Failed or Failing Component..................................................................................................110
Recovering from a Disk Drive Failure.........................................................................................................111
Failed Disk Drive Protected by a Hot Spare...................................................................................111
Failed Disk Drive Not Protected by a Hot Spare.............................................................................111
Failure in Multiple Logical Drives Simultaneously.........................................................................111
Disk Drive Failure in a RAID 0 Logical Drive...................................................................................112
Multiple Disk Drive Failures in the Same Logical Drive .................................................................112
Rebuilding Logical Drives............................................................................................................................113
Creating a Support Archive File..................................................................................................................113
Appendix A Selecting the Best RAID Level.............................................................................................................114
Comparing RAID Levels..............................................................................................................................115
Understanding Drive Segments..................................................................................................................115
Non-redundant Logical Drives (RAID 0)......................................................................................................116
RAID 1 Logical Drives .................................................................................................................................116
RAID 1 Enhanced Logical Drives.................................................................................................................117
RAID 10 Logical Drives................................................................................................................................118
RAID 5 Logical Drives..................................................................................................................................119
RAID 5EE Logical Drives..............................................................................................................................120
RAID 50 Logical Drive.................................................................................................................................121
RAID 6 Logical Drives..................................................................................................................................122
RAID 60 Logical Drives................................................................................................................................122
Appendix B Icons At-a-Glance................................................................................................................................123
Proprietary and Confidential to PMC-Sierra, Inc.
Document No.: CDP-00278-02-A Rev. A, Issue:
7
maxView Storage Manager User's Guide
Adaptec by PMC Product Support
If you have questions about installing or using your Adaptec by PMC product, check this document
first—you will find answers to most of your questions. If you need further assistance, use the support
options listed below. To expedite your service, have your computer in front of you.
Note: The phone numbers below are subject to change. Please visit the Support
section of www.adaptec.com for the most up to date contact information.
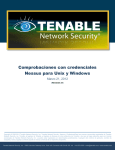
Technical Support Identification (TSID) Number
• Before contacting Technical Support, you need your product unique TSID number. The TSID number
identifies your product and support status.
• The TSID number is included on a white, bar-coded label, like this example:
• It's recommended that you register your product so that you have easy access to your TSID when
contacting product support.
Self Help and Support in English
• Visit our Web site at www.adaptec.com.
• Search the Adaptec Support Knowledgebase (ASK) at ask.adaptec.com for articles, troubleshooting
tips, and frequently asked questions for your product.
• For support via e-mail, submit your question at ask.adaptec.com.
• To speak with a Technical Support Specialist, call +1 408 934 7274 or +49 89 4366 5544 or +44 845
266 8773.
Technische Informationen und Support in Deutsch
• Besuchen Sie unsere Webseite www.adaptec.com/de-de
• Suchen Sie in der Adaptec Support Knowledgebase (ASK) unter ask-de.adaptec.com nach Artikeln,
Tipps zur Fehlerbehebung und häufig gestellten Fragen zu Ihrem Produkt.
• Support per Email erhalten Sie unter ask-de.adaptec.com.
• Für telefonischen Support wählen Sie +49 89 4366 5522.
Техническая поддержка и информация на русском языке
• Посещаете наш сайт www.adaptec.com/ru-ru/.
• База знаний Adaptec (ASK) на сайте ask-ru.adaptec.com ask-ru.adaptec.com – статьи, советы по
устранению неисправностей и часто задаваемые вопросы о Вашем продукте.
• Для поддержки по электронной почте отправьте Ваш запрос на сайте ask-ru.adaptec.com
• Чтобы обратиться к специалисту технической поддержки по телефону, звоните на +7 499 918
7200 или +49 89 4366 5555.
日本語での技術情報とサポート
• 弊社のウェブサイト、www.adaptec.com/ja-jp をご覧ください。
• ask.adaptec.co.jp のAdaptec Support Knowledgebase (ASK)で、お使いの製品の情報 トラブル
シューティングのヒント、よくある質問を検索してください。
• Eメールでのサポートには ask.adaptec.co.jp から質問を送ってください。
Proprietary and Confidential to PMC-Sierra, Inc.
Document No.: CDP-00278-02-A Rev. A, Issue:
8
maxView Storage Manager User's Guide
Information Technique et d'assistance en Français
• Visitez notre site Web à l'adresse www.adaptec.com/fr-fr.
• Rechercher dans le base de connaissances Adaptec (ASK) ask-fr.adaptec.com pour des articles,
conseils de dépannage et les questions fréquemment posées pour votre produit.
Proprietary and Confidential to PMC-Sierra, Inc.
Document No.: CDP-00278-02-A Rev. A, Issue:
9
maxView Storage Manager User's Guide
Software License Agreement
PLEASE READ CAREFULLY: THE USE OF THIS SOFTWARE IS SUBJECT TO THE SOFTWARE LICENSE TERMS
OF PMC-SIERRA, INC. AND OTHER LICENSORS WHOSE SOFTWARE MAY BE BUNDLED WITH THIS PRODUCT.
BY YOUR USE OF THE SOFTWARE INCLUDED WITH THIS PRODUCT YOU AGREE TO THE LICENSE TERMS
REQUIRED BY THE LICENSOR OF THAT SOFTWARE, AS SET FORTH DURING THE INSTALLATION PROCESS.
IF YOU DO NOT AGREE TO THE LICENSE TERMS APPLICABLE TO THE SOFTWARE, YOU MAY RETURN THE
ENTIRE UNUSED PRODUCT FOR A FULL REFUND.
In return for acquiring a license to use the PMC-Sierra software, which may include software from third
party licensors and patches made available by PMC-Sierra (“Software”), and the related documentation,
you agree to the following terms and conditions:
1. License. This Agreement grants you, the Licensee, a license to:
a. Use the Software on a single computer system, which is not intended for use by more than five
(5) users; and:
b. Make one copy of the Software in machine readable form solely for back-up purposes, provided
you reproduce PMC-Sierra's copyright proprietary legends. Notwithstanding the foregoing, the
Software may be used on the home, laptop or other secondary computer of the principal user
of the Software, and an additional copy of the Software may be made to support such use. As
used in this license, the Software is “in use” when it is either loaded into RAM or installed on a
hard disk or other permanent memory device. The Software may be “in use” on only one computer
at any given time. (Different license terms and fees are applicable for networked or multiple user
applications.) As a specific condition of this license, you agree to use the Software in compliance
with all applicable laws, including copyright laws, and that you will not copy, transmit, perform
or distribute any audio or other content using the Software without obtaining all necessary
licenses or permissions from the owner of the content.
2. Restrictions. You may not distribute copies of the Software to others or electronically transfer the
Software from one computer to another over a network. You may not post or otherwise make
available the Software, or any portion thereof, in any form, on the Internet. You may not use the
Software in a computer service business, including in time sharing applications. The Software contains
trade secrets and, in order to protect them, you may not decompile, reverse engineer, disassemble,
or otherwise reduce the Software to a human-perceivable form. YOU MAY NOT MODIFY, ADAPT,
TRANSLATE, RENT, LEASE, LOAN, RESELL FOR PROFIT, DISTRIBUTE, NETWORK OR CREATE DERIVATIVE
WORKS BASED UPON THE SOFTWARE OR ANY PART THEREOF.
3. Ownership of Software. As Licensee, you own the media upon which the software is recorded or
fixed, but PMC-Sierra and its licensors retain title and ownership of the Software recorded on the
original media and all subsequent copies of the Software, regardless of the form or media in which
or on which the original and other copies may exist. This license is not a sale of the Software or any
copy.
4. Confidentiality. You agree to maintain the Software in confidence and that you will not disclose the
Software to any third party without the express written consent of PMC-Sierra. You further agree
to take all reasonable precautions to preclude access of unauthorized persons to the Software.
5. Term. This license is effective until January 1, 2045, unless terminated earlier. You may terminate
the license at any time by destroying the Software (including the related documentation) together
with all copies or modifications in any form. PMC-Sierra will have the right to terminate our license
immediately if you fail to comply with any term or condition of this Agreement. Upon any termination,
including termination by you, you must destroy the Software (including the related documentation),
together with all copies or modifications in any form.
6. Special Terms Applicable to Databases. Where a database is included with the Software, you
acknowledge that it is licensed only in connection with the use of the Software to perform disc
creation, and that the database and all data derived therefrom must be maintained in confidence
in accordance with the provisions of Section 4. This license does not grant you any rights to distribute
or disclose such database or data.
Proprietary and Confidential to PMC-Sierra, Inc.
Document No.: CDP-00278-02-A Rev. A, Issue:
10
maxView Storage Manager User's Guide
7. Limited Warranty. PMC-Sierra and its Licensor warrant only that the media upon which the Software
is furnished will be free from defects in material or workmanship under normal use and service for
a period of thirty (30) days from the date of delivery to you. PMC-SIERRA AND ITS LICENSORS DO
NOT AND CANNOT WARRANT THE PERFORMANCE OR RESULTS YOU MAY OBTAIN BY USING THE
SOFTWARE OR DOCUMENTATION. THE FOREGOING STATES THE SOLE AND EXCLUSIVE REMEDIES
PMC-SIERRA AND ITS LICENSORS WILL PROVIDE FOR BREACH OF WARRANTY. EXCEPT FOR THE
FOREGOING LIMITED WARRANTY, PMC-SIERRA AND ITS LICENSORS MAKE NO WARRANTIES,
EXPRESSED OR IMPLIED, INCLUDING, BUT NOT LIMITED, AS TO NON-INFRINGEMENT OF THIRD PARTY
RIGHTS, MERCHANTABILITY OR FITNESS FOR A PARTICULAR PURPOSE. Some states do not allow the
exclusion of implied warranties or limitations on how long an implied warranty may last, so the
above limitations may not apply to you. This warranty gives you specific legal rights and you may
also have other rights which vary from state to state.
8. The entire liability of PMC-Sierra and its licensors, and your exclusive remedy for a breach of this
warranty, shall be:
a. The replacement of any media not meeting the above limited warranty which is returned to
PMC-Sierra; or:
b. if PMC-Sierra or its distributor is unable to deliver replacement media which is free from defects
in materials or workmanship, you may terminate this Agreement by returning the Software and
your money will be refunded.
9. Limitation of Liability. IN NO EVENT WILL PMC-SIERRA OR ITS LICENSORS BE LIABLE TO YOU FOR ANY
INCIDENTAL, CONSEQUENTIAL OR INDIRECT DAMAGES, INCLUDING ANY LOST PROFITS, LOST SAVINGS,
OR LOSS OF DATA, EVEN IF PMC-SIERRA OR A LICENSOR HAS BEEN ADVISED OF THE POSSIBILITY OF
SUCH DAMAGES, OR FOR ANY CLAIM BY ANY OTHER PARTY. Some states do not allow the exclusion
or limitation of special, incidental, or consequential damages, so the above limitation or exclusion
may not apply to you.
10. Export. You acknowledge that the laws and regulations of the United States and other countries
may restrict the export and re-export of the Software. You agree that you will not export or re-export
the Software or documentation in any form in violation of applicable United States and foreign law.
11. Government Restricted Rights. The Software is subject to restricted rights as follows. If the Software
is acquired under the terms of a GSA contract: use, reproduction or disclosure is subject to the
restrictions set forth in the applicable ADP Schedule contract. If the Software is acquired under the
terms of a DoD or civilian agency contract, use, duplication or disclosure by the Government is subject
to the restrictions of this Agreement in accordance with 48 C.F.R. 12.212 of the Federal Acquisition
Regulations and its successors and 49 C.F.R. 227.7202-1 of the DoD FAR Supplement and its successors.
12. General. You acknowledge that you have read this Agreement, understand it, and that by using the
Software you agree to be bound by its terms and conditions. You further agree that it is the complete
and exclusive statement of the agreement between PMC-Sierra and you, and supersedes any proposal
or prior agreement, oral or written, and any other communication between PMC-Sierra and you
relating to the subject matter of this Agreement. No additional or any different terms will be
enforceable against PMC-Sierra unless PMC-Sierra gives its express consent, including an express
waiver of the terms of this Agreement, in writing signed by an officer of PMC-Sierra. You assume
full responsibility for the use of the Software and agree to use the Software legally and responsibly.
This Agreement shall be governed by California law, except as to copyright matters, which are covered
by Federal law. This Agreement is deemed entered into at Sunnyvale, California by both parties.
Should any provision of this Agreement be declared unenforceable in any jurisdiction, then such
provision shall be deemed severable from this Agreement and shall not affect the remainder hereof.
All rights in the Software not specifically granted in this Agreement are reserved by PMC-Sierra.
Should you have any questions concerning this license, contact:
PMC-Sierra, Inc.
Legal Department
1380 Bordeaux Drive
Proprietary and Confidential to PMC-Sierra, Inc.
Document No.: CDP-00278-02-A Rev. A, Issue:
11
maxView Storage Manager User's Guide
Sunnyvale, CA 94089
(408) 239-8000
Proprietary and Confidential to PMC-Sierra, Inc.
Document No.: CDP-00278-02-A Rev. A, Issue:
12
maxView Storage Manager User's Guide
1
About this Guide
Adaptec maxView Storage Manager™ is a browser-based software application that helps you build a
storage space using Adaptec RAID controllers, disk drives, and enclosures, and then manage your stored
data, whether you have a single RAID controller installed in a server or multiple RAID controllers, servers,
and enclosures.
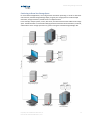
This guide describes how to install and use Adaptec maxView Storage Manager (called simply maxView
Storage Manager in the remainder of this guide) to build and manage direct attached storage—a RAID
controller and disk drives which reside inside, or are directly attached to, the computer accessing them,
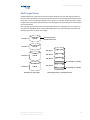
similar to the basic configurations shown in the figures below:
Server with Adaptec RAID
controller and disk drives
System running maxView
Storage Manager
Network
Connection
Server with Adaptec RAID
controller and disk drives
System running maxView
Storage Manager
Server with Adaptec RAID controller
running maxView Storage Manager
Storage enclosures with
disk drives installed
What You Need to Know Before You Begin
This guide is written for data storage and IT professionals who want to create a storage space for their
online data. You should be familiar with computer hardware, operating system administration, and
Redundant Array of Independent Disks (RAID) technology.
If you are using maxView Storage Manager as part of a complex storage system, with multiple servers,
enclosures and RAID controllers, you should be familiar with network administration, have knowledge
of Local Area Networks (knowledge of storage area networks (SANs) is not required), and be familiar
with the input/output (I/O) technology of the storage devices on your network, such as Serial ATA (SATA)
or Serial Attached SCSI (SAS).
Note: Because this guide covers multiple Adaptec RAID products, some of the features
and functions described may not be available for your controller or enclosure.
Terminology Used in this Guide
Because this guide provides information that can be used to manage multiple Adaptec RAID products
in a variety of configurations, the generic term “storage space” is used to refer to the controller(s), disk
drives, and systems being managed with maxView Storage Manager.
For efficiency, the term “component” or “components” is used when referring generically to the physical
and virtual parts of your storage space, such as systems, disk drives, controllers, and logical drives.
Proprietary and Confidential to PMC-Sierra, Inc.
Document No.: CDP-00278-02-A Rev. A, Issue:
13
maxView Storage Manager User's Guide
Many of the terms and concepts referred to in this guide are known to computer users by multiple
names. In this guide, this terminology is used:
• Controller (also known as adapter, board, or I/O card)
• Disk drive (also known as hard disk, hard drive, or hard disk drive)
• Solid State Drive (also known as SSD or non-rotating storage media)
• Logical drive (also known as logical device or array)
• System (also known as a server, workstation, or computer)
• Enclosure (also known as a storage enclosure or disk enclosure)
How to Find More Information
You can find more information about your Adaptec RAID controller, management software, and utilities
by referring to these documents, located on the Adaptec Installation DVD:
• Readme.txt—Includes product information and known issues.
• Adaptec RAID Controllers Installation and User's Guide—Provides complete information on how to
install and configure your Adaptec RAID controller and attach devices.
• Adaptec RAID Controllers Command Line Utility User's Guide—Describes how to use ARCCONF, the
Adaptec RAID Controller Configuration command line utility, to perform basic storage management
tasks.
Proprietary and Confidential to PMC-Sierra, Inc.
Document No.: CDP-00278-02-A Rev. A, Issue:
14
maxView Storage Manager User's Guide
2
Introduction to maxView Storage Manager
This section introduces the maxView Storage Manager software, explains the concept of a “storage
space,” and provides a checklist of getting-started tasks.
Getting Started
The first part of this guide provides the information you need to install, start, and begin to use maxView
Storage Manager. Follow these general steps:
Step 1: Familiarize yourself with the software components of maxView Storage Manager, review the
system requirements, and study the configuration examples that illustrate how to build and grow your
storage space (described in the remainder of this chapter).
Step 2: Install maxView Storage Manager on every system that will be part of your storage space (see
Installing maxView Storage Manager on page 20).
Step 3: Start maxView Storage Manager and explore its graphical user interface (see Exploring maxView
Storage Manager on page 28).
Step 4: Build your storage space (see Building Your Storage Space on page 35).
About maxView Storage Manager
maxView Storage Manager is a browser-based software application that helps you build a storage space
for your data, using Adaptec RAID controllers, disk drives, Solid State Drives (SSDs), and enclosures.
With maxView Storage Manager, you can group disk drives into logical drives and build in redundancy
to protect your data and improve system performance. You can also use maxView Storage Manager to
monitor and maintain all the controllers, enclosures, and disk drives in your storage space from a single
location.
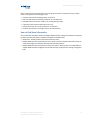
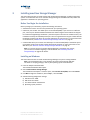
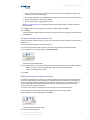
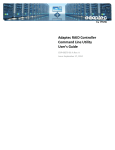
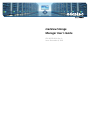
The maxView Storage Manager GUI (or graphical user interface) runs on most contemporary Web
browsers (for a list of supported browsers, see Browser Support on page 17). A software stack comprising
a Web server, Agent, and CIMOM server allows maxView Storage Manager to communicate with your
RAID controller and coordinate activity in your storage space.
Browser
maxView Storage
Manager Client
HTTPS
Web Server
Apache Tomcat
maxView Servlet
RMI
maxView Storage
Manager Agent
SMI-S
CIMOM
Driver
Adaptec
Controller
Proprietary and Confidential to PMC-Sierra, Inc.
Document No.: CDP-00278-02-A Rev. A, Issue:
15
maxView Storage Manager User's Guide
About the maxView Storage Manager Agent
When maxView Storage Manager is installed on a system, the maxView Storage Manager Agent is also
installed automatically. The Agent is designed to run in the background, without user intervention. Its
job is to monitor system health, manage event notifications, task schedules, and other on-going processes
on a system. It sends notices when tasks are completed successfully, and notifies you when errors or
failures occur on that system.
If your storage space includes systems that won't be connected to monitors (and therefore won't require
the graphical user interface), you can choose to run the Agent only on those systems instead of the full
application.
You can manage and monitor systems running the Agent only by logging into them as remote systems
(see Starting maxView Storage Manager on Remote Systems on page 36).
About the maxView Storage Manager Web Server
The maxView Storage Manager Web Server is an instance of the open-source Apache Tomcat servlet
container. It runs the maxView Storage Manager Web application, and serves static and dynamic content
to the maxView Storage Manager GUI. The maxView Web Server is installed automatically with maxView
Storage Manager and the maxView Storage Manager Agent.
About the maxView Storage Manager CIM Server
The maxView Storage Manager CIM Server is an instance of the open-source Pegasus CIM Object
Manager, or CIMOM. In maxView Storage Manager, the CIM Server manages the SMI-S hardware
provider and notification provider, which monitor the RAID controllers in your system and notify the
maxView Storage Manager Agent. The standards-based SMI-S provider enables your Adaptec RAID
controller to be managed with any standard CIM client. (For more information, contact your Adaptec
support representative.) The maxView Storage Manager CIM Server is installed automatically with
maxView Storage Manager and the maxView Storage Manager Agent.
Proprietary and Confidential to PMC-Sierra, Inc.
Document No.: CDP-00278-02-A Rev. A, Issue:
16
maxView Storage Manager User's Guide
System Requirements
To install maxView Storage Manager, each system in your storage space must meet these requirements:
• PC-compatible computer with Intel Pentium processor, or equivalent
• At least 2 GB of RAM
• 350 MB of free disk drive space
• 256-color video mode
• DVD-ROM drive
• One of these operating systems:
∘ Microsoft® Windows® Server 2012 (32-bit and 64-bit), Windows Server 2008 (32-bit and 64-bit),
Windows Server 2008 R2 (64-bit), Windows SBS 2011, Windows Storage Server 2008 R2, Windows
Storage Server 2011, Windows 7 and Windows 8 (32-bit and 64-bit)
∘ Red Hat® Enterprise Linux 6.2, 5.8 (32-bit and 64-bit)
∘ SuSE Linux Enterprise Server 11, 10 (32-bit and 64-bit)
∘ Debian Linux 6 (32-bit and 64-bit)
∘ Ubuntu Linux 12, 11, 10 (32-bit and 64-bit)
∘ Fedora Linux 16, 15, 14 (32-bit and 64-bit)
∘ CentOS 6.2, 5.8
∘ Solaris 10, Solaris 11 Express
∘ VMware ESXi 5.1, VMware ESX 4.1 Classic
For the latest on operating system version support check the readme on your Adaptec Installation DVD
or visit the Support area of the Adaptec Web Site at www.adaptec.com
Note: maxView Storage Manager can also be used before an operating system is
installed. See Running maxView Storage Manager from the DVD on page 25 for more
information.
Browser Support
To run the maxView Storage Manager GUI, each system in your storage space must be running one of
these Web browsers:
• Microsoft® Internet Explorer® 8, 9, or newer
• Google® Chrome™ 15.0, or newer
• Mozilla Firefox® 8, 9, 10, or newer
• Apple® Safari® 4, 5, or newer
Proprietary and Confidential to PMC-Sierra, Inc.
Document No.: CDP-00278-02-A Rev. A, Issue:
17
maxView Storage Manager User's Guide
Typical Storage Space Configurations
The following examples show typical storage spaces that you can build with maxView Storage Manager.
You can grow your storage space as your requirements change by adding more systems, controllers,
disk drives, and enclosures, and by adding redundant logical drives for protection against data loss.
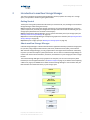
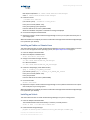
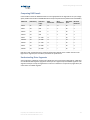
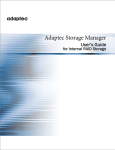
A Simple Storage Space
This example shows a simple storage space that might be appropriate for a small business. This storage
space includes one RAID controller and three disk drives installed in a server. For data protection, the
disk drives have been used to build a RAID 5 logical drive.
Business and
Customer Data
Server with Adaptec RAID
controller and 3 disk drives
System running
maxView Storage Manager
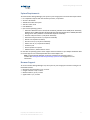
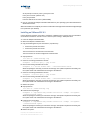
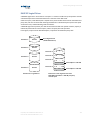
An Advanced Storage Space
This example shows how you can grow your storage space as the requirements of your application
change. On the first server, segments from each disk drive have been used to build two RAID 5 logical
drives. A second server connected to two 12-disk enclosures has been added. The additional storage
space has been used to create two RAID 50 logical drives. The Administrator of this storage space can
create and modify logical drives and monitor both controllers, disk drives, and enclosures from a single
system running the maxView Storage Manager GUI.
Business Data
RAID 5
RAID 5
Server with Adaptec RAID
controllers and disk drives
Local system running
maxView Storage Manager
Network
connection
Customer Data
RAID 50
RAID 50
Server with Adaptec RAID controller running
maxView Storage Manager Agent
Proprietary and Confidential to PMC-Sierra, Inc.
Document No.: CDP-00278-02-A Rev. A, Issue:
Storage enclosure with
disk drives installed
18
maxView Storage Manager User's Guide
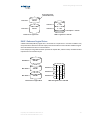
Continuing to Grow Your Storage Space
For more advanced applications, such as high-volume transaction processing in "cloud" or data center
environments, maxView Storage Manager helps you grow your storage space to include multiple
controllers, storage enclosures, and disk drives in multiple locations.
In this example, multiple systems, servers, disk drives, and enclosures have been added to the storage
space. The Administrator can create and modify logical drives and monitor all the controllers, enclosures,
and disk drives in the storage space from any system running the maxView Storage Manager GUI.
RAID 50
Server running maxView
Storage Manager Agent
Storage enclosures with
disk drives installed
RAID 5
Network Connection
RAID 5
Server with RAID controller
and disk drives installed
System running maxView
Storage Manager
RAID 60
Server running maxView
Storage Manager Agent
RAID 6
RAID 6
System running maxView
Storage Manager
Server running maxView
Storage Manager Agent
Proprietary and Confidential to PMC-Sierra, Inc.
Document No.: CDP-00278-02-A Rev. A, Issue:
RAID 6
Storage enclosures with
disk drives installed
19
maxView Storage Manager User's Guide
3
Installing maxView Storage Manager
This section describes how to install and uninstall maxView Storage Manager on different operating
systems. It also describes how to run maxView Storage Manager in bootable DVD mode, before the
application is installed on an operating system.
Before You Begin the Installation
Before you begin your installation, prepare the following information:
• Administrator account user name and password for your operating system.
• CIM Server port number. The default port is recommended (5988). If you want to use a different
port, select any one between 65500 and 65535 and it will be assigned as the CIM Server http port
for maxView Storage Manager installation. (The selected port must be free at installation time.) The
installation will verify the availability of this port. There is no guarantee that any port number besides
the default will work in the future as any other application can claim this port. For more information
on the CIM Server, seeAbout the maxView Storage Manager CIM Server on page 16.
• maxView Web Server port number. The default port is recommended (8443). If the default port is
not available, another port number will be automatically assigned. For more information on the
Web Server, see About the maxView Storage Manager Web Server on page 16.
Note: If a previous version of maxView Storage Manager is installed on your system,
you must remove it before beginning a new installation. See Uninstalling maxView
Storage Manager on page 26 for details.
Installing on Windows
This section describes how to install maxView Storage Manager on systems running Windows.
Note: You need administrator or root privileges to install maxView Storage Manager.
For details on verifying privileges, refer to your operating system documentation.
1. Insert the Adaptec Installation DVD.
The Installation DVD Main Menu opens.
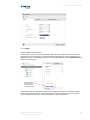
2. Select Install maxView Storage Manager.
The Installation wizard opens. If it doesn't open, select Browse the CD/DVD, then click Autorun.
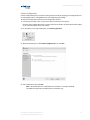
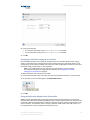
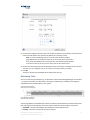
3. Click Next to begin the installation, click I accept..., then click Next.
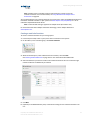
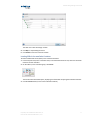
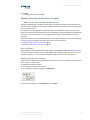
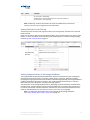
4. Add the following configuration settings:
a) CIM Server Port: 5988.
b) Web Server Port: 8443.
c) User Name default: Administrator
d) Operating system password.
Proprietary and Confidential to PMC-Sierra, Inc.
Document No.: CDP-00278-02-A Rev. A, Issue:
20
maxView Storage Manager User's Guide
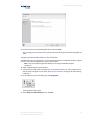
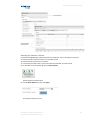
5. Click OK on the password verification window and on the CIM Server and Web Server port number
verification window.
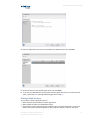
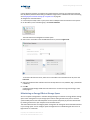
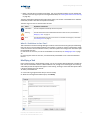
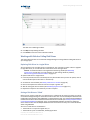
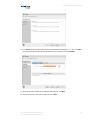
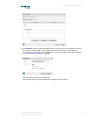
6. Ensure that GUI and Agent is selected. Optionally, select CLI Tools. Then click Next.
7. Click Install to begin the installation.
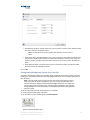
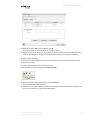
8. Repeat these steps to install maxView Storage Manager on every Windows system that will be part
of your storage space.
When the installation is complete you receive a confirmation message and the maxView Storage Manager
icon is placed on your desktop.
Installing on Red Hat, Cent OS, SuSE, or Fedora Linux
This section describes how to install maxView Storage Manager on systems running Red Hat Linux, Cent
OS, SuSE Linux, or Fedora Linux. For information about installing maxView Storage Manager on Debian
and Ubuntu Linux, see the next section. For a list of supported Linux operating systems, see System
Requirements on page 17.
Note: The installation includes a 32-bit and 64-bit installation package.
1. Insert the Adaptec Installation DVD.
The Installation DVD mounts automatically. If it doesn't, manually mount it.
2. Change to the manager directory.
Proprietary and Confidential to PMC-Sierra, Inc.
Document No.: CDP-00278-02-A Rev. A, Issue:
21
maxView Storage Manager User's Guide
Red Hat/Cent OS/Fedora: cd /media/cdrom/maxview/linux/manager
SuSE: cd /media/cdrom/maxview/linux manager
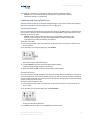
3. Install the .bin file:
./StorMan-9.00.i386.bin
(For a 64-bit system) ./StorMan-9.00.x86_64.bin
Enter your username [default: root].
Enter your operating system password.
Enter the CIM Server HTTP Port: [default:5988].
When the installation completes a confirmation message is displayed.
4. Unmount the Adaptec Installation DVD.
5. Repeat these steps to install maxView Storage Manager on every Linux system that will be part of
your storage space.
When the installation is complete you receive a confirmation message and the maxView Storage Manager
icon is placed on your desktop.
Installing on Debian or Ubuntu Linux
This section describes how to install maxView Storage Manager on systems running Debian or Ubuntu
Linux. For a list of supported Linux operating systems, see System Requirements on page 17.
1. Insert the Adaptec Installation DVD.
2. Mount the Adaptec Installation DVD:
mount /dev/cdrom /mnt/cdrom
3. Change to the Debian manager directory:
cd /mnt/cdrom/maxview/debian_x86/manager
for a 64-bit installation:
cd /mnt/cdrom/maxview/debian_x86_64/manager
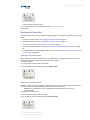
4. Install the .deb package. (xxxxx=build number)
dpkg -i StorMan_9.00_XXXXX_i386.deb
(For a 64-bit system) dpkg -i StorMan_9.00_XXXXX_x86_64.deb
Enter your username [default: root].
Enter your password.
Enter the CIM Server HTTP Port: [default:5988].
5. Unmount the DVD:
umount /mnt/cdrom
6. Repeat these steps to install maxView Storage Manager on every Debian and Ubuntu Linux system
that will be part of your storage space.
When the installation is complete you receive a confirmation message and the maxView Storage Manager
icon is placed on your desktop.
Installing on Solaris
This section describes how to install maxView Storage Manager on systems running Solaris.
1. Insert the Adaptec Installation DVD.
The Installation DVD mounts automatically. If it doesn't, manually mount it.
mount -F hsfs -o ro/dev/dsk/c1t0d0s2/mnt
2. Install maxView Storage Manager.
pkgadd -d/<mount point>/maxview/solaris_x86/manager/StorMan.pkg
Proprietary and Confidential to PMC-Sierra, Inc.
Document No.: CDP-00278-02-A Rev. A, Issue:
22
maxView Storage Manager User's Guide
At the prompt to continue, select y, then press Enter.
Enter your username: [default: root]
Enter your password.
Enter the CIM Server HTTP Port: [default:5988]
3. Eject or unmount the Adaptec Installation DVD. Refer to your operating system documentation for
detailed instructions.
When the installation is complete you receive a confirmation message and the maxView Storage Manager
icon is placed on your desktop.
Installing on VMware ESX 4.1
Use the following procedure to install the .vib files for a VMware ESX 4.1 system only. The installation
can be done on an ESX 4.1 console or from a remote system running a Telnet/SSH client.
1. Insert the Adaptec Installation DVD.
2. Mount the Adaptec Installation DVD.
3. Copy the following files to your local ESX 4.1 /tmp directory:
• vmware-esx-provider-arcconf.vib
• vmware-esx-provider-arcsmis.vib
The arcconf.vib is for command line communication.
The arcsmis.vib is for remote management communication.
4. Stop operations.
/etc/init.d/./sfcbd-watchdog stop
5. Check for an existing installation of arcconf.
esxupdate --vib-view query | grep arcconf
6. Remove the existing installation of arcconf.
esxupdate -b < arcconf module name > --maintenancemode remove
When the package is removed, you receive the message "The update completed successfully, but
the system needs to be rebooted for the changes to be effective".
7. Check for an existing installation of arcsmis.
esxupdate --vib-view query | grep arcsmis
8. Remove the existing installation of arcsmis.
esxupdate -b < arcsmis module name > --maintenancemode remove
When the package is removed, you receive the message "The update completed successfully, but
the system needs to be rebooted for the changes to be effective."
9. Reboot the system.
10. Stop operations.
/etc/init.d/./sfcbd-watchdog stop
11. Install the arcconf package.
esxupdate -b /tmp/vmware-esx-provider-arcconf.vib --nodeps --nosigcheck
--maintenancemode update
When the package is installed, you receive the message "The update completed successfully, but
the system needs to be rebooted for the changes to be effective."
12. Install the arcsmis package.
esxupdate -b /tmp/vmware-esx-provider-arcsmis.vib --nodeps --nosigcheck
--maintenancemode update
When the package is installed, you receive the message "The update completed successfully, but
the system needs to be rebooted for the changes to be effective."
13. Reboot the system.
Proprietary and Confidential to PMC-Sierra, Inc.
Document No.: CDP-00278-02-A Rev. A, Issue:
23
maxView Storage Manager User's Guide
14. Continue with Installing on a VMware Guest OS on page 25.
Installing on VMware ESXi 5.x
Use the following procedure to install the .vib files for a VMware ESXi 5.x system only. The installation
must be done from a remote system running a Telnet/SSH client. Use a terminal emulator to access the
ESXi 5.x server remotely.
1. Insert the Adaptec Installation DVD.
2. Mount the Adaptec Installation DVD.
3. Copy the following files to your local ESXi 5.x /tmp directory:
• vmware-esx-provider-arcconf.vib
• vmware-esx-provider-arcsmis.vib
The arcconf.vib is for command line communication.
The arcsmis.vib is for remote management communication.
4. Stop operations.
/etc/init.d/./sfcbd-watchdog stop
5. Check for existing installation of arcconf.
esxcli software vib list | grep arcconf
6. Remove the existing arcconf package.
esxcli software vib remove -n arcconf
When the package is removed, you receive the message "Reboot Required: false."
7. Check for an existing installation of arcsmis.
esxcli software vib list | grep arcsmis
8. Remove the existing arcsmis package.
esxcli software vib remove -n arcsmis
When the package is removed, you receive the message "Reboot Required: false."
9. Set the acceptance level if this is the first installation of arcconf and arcsmis:
esxcli software acceptance set –-level=CommunitySupported
10. Install the arcconf package.
esxcli software vib install --maintenance-mode --no-sig-check -v
/tmp/vmware-esx-provider-arcconf.vib
When the package is installed, you receive the message "Reboot Required: false."
11. Install the arcsmis package.
esxcli software vib install --maintenance-mode --no-sig-check -v
/tmp/vmware-esx-provider-arcsmis.vib
When the package is installed, you receive the message "Reboot Required: false."
12. Reboot the system.
13. Continue with Installing on a VMware Guest OS on page 25.
Proprietary and Confidential to PMC-Sierra, Inc.
Document No.: CDP-00278-02-A Rev. A, Issue:
24
maxView Storage Manager User's Guide
Installing on a VMware Guest OS
This section describes how to install maxView Storage Manager on a VMware guest operating system.
1. Insert the Adaptec Installation DVD.
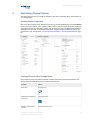
2. Go to the ASM-MANAGER-GOS directory for the remote operating system you want to install.
3. Type one of the following commands, depending on the operating system:
Options
Description
Linux
./StorMan-9.00-19098.esx86_64.bin
Windows
setup_asm_esx_x64.exe
Running maxView Storage Manager from the DVD
When you run maxView Storage Manager from the DVD, you are using bootable-DVD mode. Bootable-DVD
mode lets you configure the controller before you install your operating system. After you configure
the controller and install the operating system, you can install and run maxView Storage Manager as
an installed software application, as described earlier in this chapter.
Running maxView Storage Manager in bootable-DVD mode is not a substitute for running it as an installed
software application. Most of the features and functions described in this guide are not available when
you run maxView Storage Manager from the DVD. Use bootable-DVD mode only for configuring your
controller before you install an operating system.
To run maxView Storage Manager in bootable-DVD mode:
Note: Before you begin, ensure that your system is set up to boot from a DVD or CD
drive. Check the system BIOS to see if the CD drive is listed first in the boot order. For
more information, see your system's documentation.
1. Insert the Adaptec Installation DVD into your DVD drive, then restart your system.
2. When prompted, select the language you want, then press Enter.
3. Review the license information, then press Enter.
The main DVD menu opens.
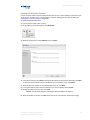
4. Click Launch Configuration Utility.
maxView Storage Manager opens.
5. On the ribbon, in the Logical Disk group, click Create Logical Drive.
The logical drive configuration wizard opens.
Proprietary and Confidential to PMC-Sierra, Inc.
Document No.: CDP-00278-02-A Rev. A, Issue:
25
maxView Storage Manager User's Guide
6. Continue with Creating Logical Drives on page 39.
Uninstalling maxView Storage Manager
To uninstall maxView Storage Manager, follow the instructions for your operating system.
Note: If a previous version of maxView Storage Manager is installed on your system,
you must remove it before beginning a new installation.
Uninstalling from Windows
To uninstall maxView Storage Manager from a Windows system, use the Add or Remove Programs tool
in the Control Panel. All maxView Storage Manager components are uninstalled.
When the uninstall process is complete, you receive a confirmation message and the maxView icon is
removed from your desktop.
Uninstalling from Red Hat, Cent OS, SuSE, or Fedora Linux
This section describes how to uninstall maxView Storage Manager from systems running Red Hat, Cent
OS, SuSE, or Fedora Linux.
Type the command rpm -e StorMan
When the uninstall process is complete, you receive a confirmation message and the maxView icon is
removed from your desktop.
Uninstalling from Debian or Ubuntu Linux
This section describes how to uninstall maxView Storage Manager from systems running Debian or
Ubuntu Linux.
Type the command dpkg -r StorMan
When the uninstall process is complete, you receive a confirmation message and the maxView icon is
removed from your desktop.
Uninstalling from Solaris
This section describes how to uninstall maxView Storage Manager from systems running Solaris.
1. Type the command pkgrm StorMan
Proprietary and Confidential to PMC-Sierra, Inc.
Document No.: CDP-00278-02-A Rev. A, Issue:
26
maxView Storage Manager User's Guide
2. At the prompt to remove the package select y, then press Enter.
3. At the confirmation prompt select y, then press Enter.
When the uninstall process is complete, you receive a confirmation message and the maxView icon is
removed from your desktop.
Uninstalling from VMware ESX 4.1
Use the following procedure to remove maxView Storage Manager from a VMware ESX 4.1 system.
1. Log in with the user name: root
2. List the installed packages:
esxupdate -–vib-view query | grep arcconf
esxupdate –-vib-view query | grep arcsmis
3. Stop operations:
/etc/init.d/./sfcbd-watchdog stop
4. Remove the arcconf package:
esxcli software vib remove -n arcconf
5. Remove the arcsmis package:
esxcli software vib remove -n arcsmis
6. Restart operations:
/etc/init.d/./sfcbd-watchdog start
To verify that maxView Storage Manager was uninstalled, repeat step 2. If no results are shown, the
software was uninstalled.
Uninstalling from VMware ESXi 5.x
Use the following procedure to remove maxView Storage Manager from a VMware ESXi 5.x system.
1. Log in with the user name: root
2. List the installed packages:
esxcli software vib list | grep arcconf
esxcli software vib list | grep arcsmis
3. Stop operations:
/etc/init.d/./sfcbd-watchdog stop
4. Remove the arcconf package:
esxcli software vib remove -n arcconf
5. Remove the arcsmis package:
esxcli software vib remove -n arcsmis
6. Restart operations:
/etc/init.d/./sfcbd-watchdog start
To verify that maxView Storage Manager was uninstalled, repeat step 2. If no results are shown, the
software was uninstalled.
Proprietary and Confidential to PMC-Sierra, Inc.
Document No.: CDP-00278-02-A Rev. A, Issue:
27
maxView Storage Manager User's Guide
4
Exploring maxView Storage Manager
This section describes how to start and log into maxView Storage Manager, and familiarizes you with
the main features of the graphical user interface. It also explains how to get help and log out of maxView
Storage Manager when you are finished working with the application.
Starting maxView Storage Manager and Logging In
The procedure for starting and logging in to maxView Storage Manager is the same for all operating
systems with a graphical desktop.
Note: You need Administrator or root privileges to run the maxView Storage Manager
application.
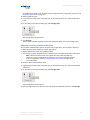
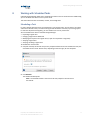
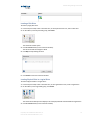
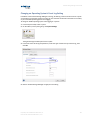
1. On the desktop, double-click the maxView Storage Manager desktop icon.
The login window opens in the default browser.
Note: If you do not have an icon for maxView Storage Manager on your desktop,
open a browser window, type this URL in the address bar:
https://127.0.0.1:8443/maxview/manager/login.xhtml, then press Return.
2. Enter Administrator account username and password from your operating system, then click Login.
The maxView Storage Manager main window opens.
Working in maxView Storage Manager
Most options in maxView Storage Manager are available by:
• Selecting components in the Enterprise View
• Clicking icons on the ribbon, at the top of the main window
• Working with information in the Storage Dashboard and Chart View
• Checking status in the Event Log and Task Log
The following sections describe how to work with these features in the main window of maxView Storage
Manager.
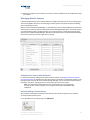
Overview of the Main Window
The main window of maxView Storage Manager has three main panels—left, right, and bottom—plus
the ribbon, at the top of the window.
The left panel shows always the Enterprise View. The bottom panel shows the Event Log and Task Log.
The right panel shows the Storage Dashboard and Chart View. Different information appears in the right
panel depending on which component is selected in the Enterprise View.
Proprietary and Confidential to PMC-Sierra, Inc.
Document No.: CDP-00278-02-A Rev. A, Issue:
28
maxView Storage Manager User's Guide
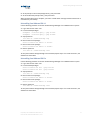
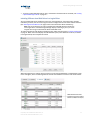
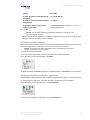
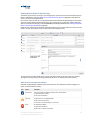
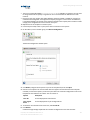
In example below, a controller is selected in the Enterprise View, and the right panel displays the Storage
Dashboard for the controller, with a chart view of its storage space.
Ribbon
Enterprise
View
Storage
Dashboard
Event Log
Task Log
You can resize the panels and scroll horizontally or vertically as needed, to view more or less information.
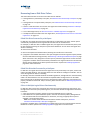
The Enterprise View
The Enterprise View is an expandable “tree” that shows the physical and logical components of your
storage space. The Enterprise View lists the local system (the system you're working on) and any remote
systems that you have logged in to from the local system. (See ‘Local’ or ‘Remote’? on page 35 for more
information.)
Local system
Remote system
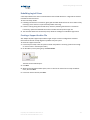
Expand a system in the Enterprise View to the see its controllers, logical drives (“devices”), physical
drives, enclosures and maxCache Container (see Adding maxCache SSD Caching to Your Storage Space
on page 62 for more on maxCache).
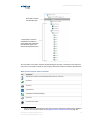
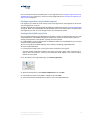
In the figure below, a controller is expanded in the Enterprise View, revealing the physical and logical
devices associated with that controller.
Proprietary and Confidential to PMC-Sierra, Inc.
Document No.: CDP-00278-02-A Rev. A, Issue:
29
maxView Storage Manager User's Guide
By selecting a controller
in the Enterprise View...
...the disk drives or enclosures
and disk drives connected to it
and the logical drives created with
those disk drives appear in the
Physical and Logical Devices trees.
You can perform most tasks in maxView Storage Manager by selecting a component in the Enterprise
View, such as a controller or disk drive, then using the related commands on the ribbon, described next.
What do the Enterprise View Icons Mean?
Icon
Description
System with controller and directly attached disk drives or enclosures
Controller
Enclosure
Logical device
maxCache Container (healthy)1
Hard drive
Solid State Drive (SSD)
1
A green checkmark in the Enterprise View means that the component is healthy with no problems
or issues. For more information, see Identifying a Failed or Failing Component on page 110.
Proprietary and Confidential to PMC-Sierra, Inc.
Document No.: CDP-00278-02-A Rev. A, Issue:
30
maxView Storage Manager User's Guide
Icon
Description
Connector or other physical device
The Ribbon
Most tasks in maxView Storage Manager are available from the ribbon, at the top of the main window.
The ribbon replaces toolbars and menus in maxView Storage Manager to help you quickly find the
commands you need to complete a task.
The ribbon is organized into groups, with related tasks for Systems, Controllers, Logical Disks, Physical
Disks, and maxCache; the Home group (on the left) provides commands for working with remote systems
(see Managing Remote Systems on page 105). Options available on the ribbon vary, depending on which
type of component is selected in the Enterprise View. For instance, if you select a controller in the
Enterprise View, the Create Logical Drive option is highlighted in the Logical Disk group, in addition to
options in the Controller group. If you select a disk drive or SSD in the Enterprise View, options in the
Physical Disk group are highlighted; and so on.
For a description of the icons on the ribbon, see Icons At-a-Glance on page 123.
The Storage Dashboard
When you select a component in the Enterprise View, maxView Storage Manager displays detailed
information about that component on the Storage Dashboard. Occupying the largest portion of the
main window in maxView Storage Manager, the Storage Dashboard provides status information, physical
and logical device properties, resources, usage statistics, and reliability indicators for hard drives and
SSDs. It also provides a chart view of free and used space in your system.
Tabs provide quick access
to component information
Chart view of free
and used space in
your system
Proprietary and Confidential to PMC-Sierra, Inc.
Document No.: CDP-00278-02-A Rev. A, Issue:
31
maxView Storage Manager User's Guide
For more information about the types of information provided on the Storage Dashboard for each
component in your storage space, see Viewing Component Status in the Storage Dashboard on page
90; also see Revealing More Device Information on page 33.
Checking System Status from the Main Window
maxView Storage Manager includes an Event Log and Task Log for at-a-glance status and activity
information for all managed systems. The Event Log provides status information and messages about
activity (or events) occurring in your storage space. The Task Log provides information about current or
recurring processes in your storage space, such as the creation of a logical drive. Single-click any event
or task to see more information in an easier-to-read format. For more information about the Event
Log and Task Log, see Viewing Activity Status in the Event Log on page 89 and Working with Scheduled
Tasks on page 71.
Click this tab to open
the Event Log
Click this tab to
open the Task Log
Warning- and Error-level icons appear next to components in the Enterprise View affected by a failure
or error, creating a trail, or rapid fault isolation, that helps you identify the source of a problem when
it occurs. See Identifying a Failed or Failing Component on page 110 for more information.
If your storage space includes a drive enclosure with a temperature sensor, temperature, fan, and power
module status is displayed on the Storage Dashboard (see Monitoring Enclosure Status on page 92).
For more information about checking status from the main window, see Monitoring Status and Activity
on page 88.
Proprietary and Confidential to PMC-Sierra, Inc.
Document No.: CDP-00278-02-A Rev. A, Issue:
32
maxView Storage Manager User's Guide
Revealing More Device Information
You can reveal more information about disk drive usage in your storage space with the Resources view
on the Storage Dashboard.
To reveal disk drive usage by logical drive (and vice-versa), select a controller in the Enterprise View,
then open the Resources tab on the Storage Dashboard. As shown in the figures below, you can click a
logical drive (including the maxCache Container) to see its member disk drives or SSDs; similarly, you
can click a physical disk to see which (if any) logical drive it belongs to.
Two disk drives plus a
hot spare comprise
the selected logical drive
The maxCache Container is
comprised of three SSDs
Proprietary and Confidential to PMC-Sierra, Inc.
Document No.: CDP-00278-02-A Rev. A, Issue:
33
maxView Storage Manager User's Guide
Getting Help
maxView Storage Manager provides online help that includes conceptual information, glossary definitions,
and descriptions of on-screen items and dialog boxes, in addition to step-by-step instructions for
completing tasks.
To open the online help, click the Help button at the upper-right corner of the main window:
Click here to open
the Help window
For help with a dialog box or wizard, click the question-mark icon, in the lower corner of the dialog box,
for help with that specific procedure:
Click here for help
with this procedure
Logging Out of maxView Storage Manager
To log out of maxView Storage Manager:
1. In the Enterprise View, click on the local system.
2. Click the Logout button at the upper-right corner of the main window:
Click here to
log out
You are logged out of maxView Storage Manager and the main window is closed.
Proprietary and Confidential to PMC-Sierra, Inc.
Document No.: CDP-00278-02-A Rev. A, Issue:
34
maxView Storage Manager User's Guide
5
Building Your Storage Space
Follow the instructions in this section to choose a management system, log in to each system in your
storage space, and create logical drives. (For more information, see Understanding Logical Drives on
page 52.)
Note: Before beginning the tasks in this chapter, ensure that maxView Storage
Manager is installed on every system that will be part of your storage space.
Overview
To build your storage space, complete these steps:
1. Choose at least one management system (see Choosing a Management System on page 35).
2. Start and log in to maxView Storage Manager on the management system (see Starting maxView
Storage Manager and Logging In on page 28).
3. Start maxView Storage Manager or the Agent on all other systems (see Starting maxView Storage
Manager on Remote Systems on page 36).
4. Log in to all other systems from the management system (see Logging into Remote Systems from
the Local System on page 38).
5. Create logical drives for all systems in your storage space (see Creating Logical Drives on page 39).
As your storage requirements change, you can add systems, controllers, and disk drives, then modify
the logical drives in your storage space by following the instructions in Modifying Your Storage Space
on page 52.
Choosing a Management System
You must designate at least one system as a management system, a system from which you will manage
the storage on all systems in your storage space.
The management system can be any system on your network that has a video monitor and can run the
full maxView Storage Manager application.
‘Local’ or ‘Remote’?
Whenever you're working in maxView Storage Manager, the system that you're working on is the local
system. All other systems in your storage space are remote systems. ‘Local’ and ‘remote’ are relative
terms, as shown in the following figure—when you are working on system A (local system), system B is
a remote system; when you are working on system B (local system), system A is a remote system.
For the purposes of this guide, the ‘local system’ is the management system.
Proprietary and Confidential to PMC-Sierra, Inc.
Document No.: CDP-00278-02-A Rev. A, Issue:
35
maxView Storage Manager User's Guide
A
B
Local logged
in to remote
maxView Storage Manager
or Agent
maxView Storage
Manager
A
B
Local logged
in to remote
maxView Storage Manager
or Agent
maxView Storage
Manager
Logging in on the Local System
To log in on the local system, see Starting maxView Storage Manager and Logging In on page 28.
Starting maxView Storage Manager on Remote Systems
You can run the maxView Storage Manager application on the remote systems in your storage space
(making those systems usable as 'management systems'). Alternatively, if your storage space includes
systems that aren't connected to monitors or that you don't anticipate using as management systems
(and therefore won't require the GUI, or graphical user interface), you can run the Agent only on those
systems. (For more information, see About the maxView Storage Manager Agent on page 16.)
• To start the full maxView Storage Manager application on a remote system, follow the instructions
in Starting maxView Storage Manager and Logging In on page 28.
• To start the Agent only on a remote system, follow the instructions in Starting the Agent Only on
page 36.
Starting the Agent Only
To start the maxView Storage Manager Agent only on a remote system, follow the instructions for your
operating system, as described in the sections below.
In an Agent Only configuration, you must ensure that the maxView Storage Manager CIM server and
Web server are running on the remote system, and that you start the services in the proper order:
1. CIM server
2. Agent
3. Web server
In general, maxView Storage Manager services start automatically when the system is powered on. Use
the procedures in this section to manually start and stop the services, as needed. For more information
about the maxView Storage Manager Agent, CIM server, and Web server, see About maxView Storage
Manager on page 15.
Proprietary and Confidential to PMC-Sierra, Inc.
Document No.: CDP-00278-02-A Rev. A, Issue:
36
maxView Storage Manager User's Guide
Windows
On Windows systems, the Agent and other maxView Storage Manager services start automatically when
the system is powered on.
To verify that the Agent is running:
1. Open the Windows Control Panel.
2. Double-click Administrative Tools, then double-click Services.
3. In the list of services, check that the maxView Storage Manager Agent is installed and running. Then
verify that the maxView CIM server and maxView Web server are running. If not, you can choose to
restart the services. Be sure to observe the proper startup order: CIM server, Agent, Web server.
Linux or VMware
On Linux systems and VMware Guest OSs, the Agent and other maxView Storage Manager services start
automatically when the system is started. To manually start (or stop) the Agent on Linux, enter these
commands:
1. Start the CIM server:
Options
Description
Start service
service stor_cimserver start
Stop service
service stor_cimserver stop
Check status
service stor_cimserver status
To start operations from the VMware console, use these commands:
Options
Description
Start service
Sfcbd-watchdog start
Stop service
Sfcbd-watchdog stop
2. Start the Agent:
Options
Description
Start service
service stor_agent start
Stop service
service stor_agent stop
3. Start the Web server:
Options
Description
Start service
service stor_tomcat start
Stop service
service stor_tomcat stop
Solaris
To start (or stop) the Agent on Solaris, enter these commands:
1. Start the CIM server:
Options
Description
Start service
svcadm enable stor_cimserver
Stop service
svcadm disable stor_cimserver
Check status
svcs -l stor_cimserver
2. Start the Agent:
Proprietary and Confidential to PMC-Sierra, Inc.
Document No.: CDP-00278-02-A Rev. A, Issue:
37
maxView Storage Manager User's Guide
Options
Description
Start service
svcadm enable ADPTstor_agent
Stop service
svcadm disable ADPTstor_agent
3. Start the Web server:
Options
Description
Start service
svcadm enable stor_tomcat
Stop service
svcadm disable stor_tomcat
Logging into Remote Systems from the Local System
Once maxView Storage Manager or the maxView Storage Manager Agent (see About the maxView
Storage Manager Agent on page 16) is running on all systems in your storage space, you can log into
the remote systems from the local system.
Once you have logged in to a remote system, it automatically appears in the Enterprise View each time
you start maxView Storage Manager on the local system. You can work with a remote system's controllers,
disk drives, and logical drives as if they were part of your local system.
To log in to a remote system:
1. On the ribbon, in the Home group, click Add System.
The Add System window opens, showing a list of "discovered" systems; that is, systems on your
network that are running the maxView Storage Manager Agent.
2. Select the systems you want to add to the Enterprise View, then enter the systems' login credentials
(username/password) in the space provided.
Proprietary and Confidential to PMC-Sierra, Inc.
Document No.: CDP-00278-02-A Rev. A, Issue:
38
maxView Storage Manager User's Guide
Note: You can add a system manually if you don't see the system in the list. For
more information, see Manually Adding a Remote System on page 105.
3. Click Add.
maxView Storage Manager connects to the remote system(s) and adds them to the list of managed
systems in the Enterprise View.
For more information about working with remote systems, see Managing Remote Systems on page 105.
Creating Logical Drives
maxView Storage Manager has a wizard to help you create, or configure, the logical drives in your storage
space. You can choose from two configuration methods, depending on your needs:
• Express configuration—Automatically creates logical drives by grouping together same-sized physical
drives, and assigns RAID levels based on the number of physical disk drives in the logical drive.
Use the express method when you want to use all available disk drives in the most efficient manner.
For instructions, see Express Configuration on page 39.
• Custom configuration—Helps you group disk drives, set RAID levels, determine logical drive size,
and configure advanced settings manually.
Use the custom method when you want to create specific logical drives with any or all available disk
drives and SSDs (Solid State Drives). For instructions, see Custom Configuration on page 41
Note: We recommend that you do not combine SAS and SATA disk drives within the
same logical drive. maxView Storage Manager displays a warning if you try to create
a logical drive using a combination of SAS and SATA disk drives.
Express Configuration
When you use Express configuration, maxView Storage Manager automatically creates logical drives by
grouping together same-sized physical drives, and assigns RAID levels based on the number of physical
drives in a logical drive:
• A logical drive with three or more physical drives is assigned RAID 5.
• A logical drive with two physical drives is assigned RAID 1.
• A logical drive with only a single physical drive becomes a simple volume, which does not offer
redundancy.
To create a logical drive with any other RAID level, you must use the custom method, as described on
Custom Configuration on page 41. See Selecting the Best RAID Level on page 114 for more information
about RAID levels.
With Express configuration, maxView Storage Manager uses all available disk drive space to maximize
the capacity of the logical drives.
To build your storage space with the Express method:
1. In the Enterprise View, select a system, then select a controller on that system.
2. On the ribbon, in the Logical Disk group, click Create Logical Drive.
3. When the wizard opens, ensure that Express Configuration is selected, then click Next.
Proprietary and Confidential to PMC-Sierra, Inc.
Document No.: CDP-00278-02-A Rev. A, Issue:
39
maxView Storage Manager User's Guide
4. Review the logical drive configuration summary.
5. Click Finish.
maxView Storage Manager builds the logical drive(s). Use the Event Log and Task Log to track build
progress.
6. Repeat Steps 2-5 for each controller in your storage space.
7. Partition and format your logical drives. See Partitioning and Formatting Your Logical Drives on page
44.
Proprietary and Confidential to PMC-Sierra, Inc.
Document No.: CDP-00278-02-A Rev. A, Issue:
40
maxView Storage Manager User's Guide
Custom Configuration
Custom configuration helps you build your storage space manually by stepping you through the process
of creating logical drives, setting RAID levels, and configuring other settings.
To build your storage space with the Custom configuration method:
1. In the Enterprise View, select a system, then select a controller on that system.
Note how many available disk drives are connected to the controller; this information will be helpful
as you create the logical drives in the wizard.
2. On the ribbon, in the Logical Disk group, click Create Logical Drive.
3. When the wizard opens, select Custom Configuration, then click Next.
4. Select a RAID level, then click Next.
Note: Not all RAID levels are supported by all controllers. For example, RAID 5EE
and JBODs are supported on Adaptec Series 6 controllers only.
Proprietary and Confidential to PMC-Sierra, Inc.
Document No.: CDP-00278-02-A Rev. A, Issue:
41
maxView Storage Manager User's Guide
See Selecting the Best RAID Level on page 114 for more information about RAID levels.
5. Select the disk drives and SSDs (Solid State Drives) that you want to include in the logical drive. Be
sure to select the right number of drives for the RAID level you selected.
Note: maxView Storage Manager allows you to create hybrid RAID drives that
maximize performance in logical drives that include SSDs. For more information
about hybrid RAID, see Creating a Hybrid RAID Logical Drive on page 54.
6. Click Next.
7. (Optional) In the RAID Attributes panel, customize the logical drive settings. You can:
• Enter a name for the logical drive. Names can include any combination of letters and numbers,
but cannot include spaces.
• Set a smaller logical drive size (by default, a new logical drive uses all available disk space).
Proprietary and Confidential to PMC-Sierra, Inc.
Document No.: CDP-00278-02-A Rev. A, Issue:
42
maxView Storage Manager User's Guide
• Change the stripe size—the amount of data written per disk in the logical drive. (The default
stripe size usually provides the best performance.)
• Set the build method to Build, Clear, or Quick. The build method determines how a logical drive
is initialized (prepared for reading and writing), and how long initialization will take.
• Set the build priority to: High, Medium, or Low.
Note: By default, maxCache read and write caching is enabled for a logical drive.
Be sure to disable maxCache if you have not created a maxCache Container. (You
can enable maxCache later, after you create the container.) For more information,
see Adding maxCache SSD Caching to Your Storage Space on page 62.
Disable maxCache if you
have not created a maxCache
Container
See Fine-tuning Logical Drives on page 55 for details about customizing the settings in the RAID
Attributes panel.
8. Click Next, then review the logical drive settings.
This example shows a RAID 5 logical drive ready to be created.
To make changes, click Back.
9. Click Finish.
maxView Storage Manager builds the logical drive. Use the Event Log and Task Log to track build
progress.
10. If you have other disk drives or available disk space and want to create additional logical drives,
repeat Steps 2 to 9 for each logical drive that you want to create on the controller.
11. Repeat Steps 1 to 10 for each controller in your storage space, as needed.
12. Partition and format your logical drives. See Partitioning and Formatting Your Logical Drives on page
44 for more information.
Proprietary and Confidential to PMC-Sierra, Inc.
Document No.: CDP-00278-02-A Rev. A, Issue:
43
maxView Storage Manager User's Guide
Partitioning and Formatting Your Logical Drives
The logical drives you create appear as physical disk drives on your operating system. You must partition
and format these logical drives before you can use them to store data.
Note: Logical drives that have not been partitioned and formatted cannot be used
to store data.
Refer to your operating system documentation for more information.
Creating Logical Drives on Other Systems in Your Storage Space
If you installed maxView Storage Manager and Adaptec RAID controllers on more than one system,
continue building your storage space as follows:
• From each individual system, log in to maxView Storage Manager and repeat the steps to perform
an Express Configuration or Custom Configuration, or
• From your local system (the system you're working on), log in to all other systems in your storage
space as remote systems (see Logging into Remote Systems from the Local System on page 38),
then repeat the steps to perform an Express Configuration or Custom Configuration, or
• From your local system, create a server template file and deploy the configuration to the remote
systems in your storage space (see Deploying Servers on page 103).
Proprietary and Confidential to PMC-Sierra, Inc.
Document No.: CDP-00278-02-A Rev. A, Issue:
44
maxView Storage Manager User's Guide
6
Protecting Your Data
In addition to the standard (RAID 0, RAID 1, RAID 5, RAID 10, RAID 50) and enhanced (RAID 1E, RAID 6,
RAID 60) RAID levels, controllers with the Adaptec Advanced Data Protection Suite include additional
methods of protecting the data on your storage space.
This section describes how to use hot spares, failover, and copyback to protect your data.
Creating and Managing Hot Spares
A hot spare is a disk drive or SSD (Solid State Drive) that automatically replaces any failed drive in a
logical drive, and can subsequently be used to rebuild that logical drive. (For more information, see
Recovering from a Disk Drive Failure on page 111.)
Hot Spare Limitations
• You cannot protect a RAID 0 logical drive or simple volume with a hot spare; hot spares protect only
redundant logical drives.
• You cannot create a hot spare from a disk drive that is already part of a logical drive.
• You should select a disk drive that is at least as big as the largest disk drive it might replace.
• We recommend that you do not designate a SAS hot spare for a logical drive comprising SATA disk
drives, or a SATA hot spare for a logical drive comprising SAS disk drives.
Dedicated Spare or Global Spare?
A global hot spare is not assigned to a specific logical drive; it will protect any redundant logical drive
on the controller. (RAID 0 logical drives and simple volumes are non-redundant and are not protected
by hot spares.) You can designate a global hot spare before or after you build logical drives on a controller.
To designate a global hot spare, see Designating a Global Hot Spare on page 45.
A dedicated hot spare is assigned to one or more specific logical drives and will only protect those logical
drives. (A dedicated hot spare that is assigned to protect more than one logical drive is called a pool
spare.) You must create the logical drive before you can assign a dedicated hot spare to protect it. To
assign a dedicated hot spare or pool hot spare, see Assigning a Dedicated Hot Spare or Pool Hot Spare
on page 46.
Designating a Global Hot Spare
To designate a global hot spare before or after you build a logical drive:
1. In the Enterprise View, select a controller then, in the Physical Devices tree, select the disk drive or
SSD that you want to designate as a hot spare. (See Hot Spare Limitations on page 45 for help
selecting a disk drive.)
2. On the ribbon, in the Physical Disk group, click Assign Spare.
The Assign Spare wizard opens.
3. Select Assign as Global Spare, then click Next.
Proprietary and Confidential to PMC-Sierra, Inc.
Document No.: CDP-00278-02-A Rev. A, Issue:
45
maxView Storage Manager User's Guide
4. Review the summary of protected logical drives, then click Finish.
Any other logical drives created on the controller will automatically be protected by that global hot
spare.
Assigning a Dedicated Hot Spare or Pool Hot Spare
A dedicated hot spare is assigned to one or more specific logical drives. A dedicated hot spare assigned
to protect more than one logical drive is called a pool hot spare.
Note: You must create the logical drive before you can assign a dedicated hot spare
to protect it.
To assign a dedicated spare or pool hot spare:
1. In the Enterprise View, select a controller then, in the Physical Devices tree, select the disk drive or
SSD you want to designate as a hot spare. (See Hot Spare Limitations on page 45 for help selecting
a disk drive.)
2. On the ribbon, in the Physical Disk group, click Assign Spare.
The Assign Spare wizard opens.
3. Select Assign as a Dedicated Spare, then click Next.
Proprietary and Confidential to PMC-Sierra, Inc.
Document No.: CDP-00278-02-A Rev. A, Issue:
46
maxView Storage Manager User's Guide
4. Select the logical drive that you want protected by the dedicated spare, then click Next.
5. Review the summary of protected logical drives, then click Finish.
6. To use the same dedicated hot spare to protect another logical drive (that is, to create a pool hot
spare), repeat Steps 2-5, selecting a different logical drive in Step 4.
Deleting a Global Hot Spare
You may want to delete a global hot spare to:
• Make disk drive space available for another logical drive.
• Make a global hot spare into a dedicated hot spare.
• Remove the ‘hot spare’ designation from a disk drive that is no longer being used as a hot spare.
(When a hot spare is built into a logical drive after a disk drive failure, it retains its ‘hot spare’
Proprietary and Confidential to PMC-Sierra, Inc.
Document No.: CDP-00278-02-A Rev. A, Issue:
47
maxView Storage Manager User's Guide
designation even though it can no longer protect the logical drives it's assigned to. See Recovering
from a Disk Drive Failure on page 111.
To delete a global hot spare:
1. In the Enterprise View, select a controller then, in the Physical Devices tree, select the hot spare
itself.
2. On the ribbon, in the Physical Disk group, click Unassign Spare.
The Unassign Spare window opens.
3. Click Unassign.
The hot spare is deleted and the drive becomes available for other uses in your storage space.
Removing or Deleting a Dedicated Hot Spare
You can delete a dedicated hot spare or remove it from a logical drive. You may want to do this to:
• Make disk drive space available for another logical drive.
• Make a dedicated hot spare into a global hot spare.
• Remove the ‘hot spare’ designation from a disk drive that is no longer being used as a hot spare.
Note: When a hot spare is built into a logical drive after a disk drive failure, it
retains its ‘hot spare’ designation even though it can no longer protect the logical
drives it's assigned to. See Recovering from a Disk Drive Failure on page 111 for
more information.
To remove or delete a dedicated hot spare:
1. In the Enterprise View, select a controller then, in the Physical Devices tree, select the dedicated
spare itself.
2. On the ribbon, in the Physical Disk group, click Unassign Spare.
The Unassign Spare window opens.
3. Select the logical drive from which to remove or delete the dedicated spare, then click Unassign.
Proprietary and Confidential to PMC-Sierra, Inc.
Document No.: CDP-00278-02-A Rev. A, Issue:
48
maxView Storage Manager User's Guide
If the spare protects only one logical drive, it is deleted and the drive becomes available for other
uses in your storage space. If the spare protects more than one logical drive (a pool spare), it is
removed from the logical drive but continues to protect the other logical drives to which is it assigned.
4. Repeat Step 2 and Step 3 to remove the dedicated spare from other logical drives, as needed.
Enabling Copyback
When a logical drive is rebuilt using a hot spare (see Failed Disk Drive Protected by a Hot Spare on page
111), data from the failed drive is transferred to the hot spare. When copyback is enabled, data is moved
back to its original location once the controller detects that the failed drive has been replaced. Once
the data is copied back, the hot spare becomes available again.
To enable or disable copyback:
1. In the Enterprise View, select a controller.
2. On the ribbon, in the Controller group, click Set Properties.
The Set Properties window opens.
3. Click the Data Protect tab.
4. In the Copyback drop-down list, select Enabled or Disabled , then click Apply.
Proprietary and Confidential to PMC-Sierra, Inc.
Document No.: CDP-00278-02-A Rev. A, Issue:
49
maxView Storage Manager User's Guide
Enabling Automatic Failover
This function controls the rebuilding of a logical drive when a failed drive is replaced. When failover is
enabled, the controller automatically rebuilds a logical drive when a failed disk drive is replaced. When
failover is disabled, the logical drive must be rebuilt manually (for more information, see Rebuilding
Logical Drives on page 113). Failover applies to redundant logical drives only (see Selecting the Best RAID
Level on page 114).
To enable or disable failover:
1. In the Enterprise View, select a controller.
2. On the ribbon, in the Controller group, click Set Properties.
The Set Properties window opens.
3. Click the Data Protect tab.
4. In the Failover drop-down list, select Enabled or Disabled , then click Apply.
Proprietary and Confidential to PMC-Sierra, Inc.
Document No.: CDP-00278-02-A Rev. A, Issue:
50
maxView Storage Manager User's Guide
Proprietary and Confidential to PMC-Sierra, Inc.
Document No.: CDP-00278-02-A Rev. A, Issue:
51
maxView Storage Manager User's Guide
7
Modifying Your Storage Space
This section provides additional scenarios for creating and modifying logical drives. It explains how to
create hybrid RAID drives; optimize logical drive performance; use maxView Storage Manager's power
management features; and how to use Adaptec maxCache™ to leverage the performance capabilities
of the Solid State Drives (SSDs) in your system.
Understanding Logical Drives
A logical drive is a group of physical disk drives that appears to your operating system as a single drive
that can be used for storing data.
A logical drive can comprise one or more disk drives or SSDs, and can use part or all of each disk drive's
capacity.
You can include the same disk drive in two different logical drives by using just a portion of the space
on the disk drive in each, as shown in the following figure.
Three Disk Drives
(500 MB Each)
One RAID 1
Logical Drive
One RAID 5
Logical Drive
250 MB
250 MB
250 MB
250 MB
Available
Space
250 MB
250 MB
250 MB
250 MB
Appears to Operating System
as one 250 MB disk drive
250 MB
250 MB
Appears to Operating System
as one 500 MB disk drive
Disk drive space that has been assigned to a logical drive is called a segment. A segment can include all
or just a portion of a disk drive's space. A disk drive with one segment is part of one logical drive, a disk
drive with two segments is part of two logical drives, and so on. When a logical drive is deleted, the
segments that comprised it revert to available space (or free segments).
A logical drive can include redundancy, depending on its RAID level. (See Selecting the Best RAID Level
on page 114 for more information.)
Once a logical drive has been created, you can change its RAID level or increase its capacity to meet
changing requirements. You can also protect your logical drives by assigning one or more hot spares to
them. (See Creating and Managing Hot Spares on page 45 for more information.)
Creating and Modifying Logical Drives
For basic instructions for creating logical drives, see Building Your Storage Space on page 35.
This section describes three additional scenarios for creating logical drives:
• To create a logical drive from different-sized disk drives, see Including Different-sized Disk Drives in
a Logical Drive on page 53.
• To create a logical drive using available segments of disk drives, see Creating a Logical Drive Using
Available Segments on page 54.
Proprietary and Confidential to PMC-Sierra, Inc.
Document No.: CDP-00278-02-A Rev. A, Issue:
52
maxView Storage Manager User's Guide
• To create a hybrid RAID logical drive using a combination of hard disk drives and SSDs, see Creating
a Hybrid RAID Logical Drive on page 54.
Including Different-sized Disk Drives in a Logical Drive
You can combine disk drives of different sizes in the same logical drive. If the logical drive includes
redundancy, however, the size of each segment can be no larger than the size of the smallest disk drive.
(See Selecting the Best RAID Level on page 114 for more information about redundancy.)
Note: We recommend that you do not combine SAS and SATA disk drives within the
same logical drive. maxView Storage Manager displays a warning if you try to create
a logical drive using a combination of SAS and SATA disk drives.
To create a logical drive with disk drives of different sizes, follow the instructions in Custom Configuration
on page 41. When the wizard displays the RAID Members panel, select different size drives, as shown
in the figure below, then complete the wizard.
When the logical drive is created, check its resources on the Storage Dashboard: it should appear similar
to the next figure, where a RAID 5 logical drive includes two disk drives of one size and one of another.
RAID5 with different size disks.
No segment is larger than smallest
disk drive (111GB, in this example).
Proprietary and Confidential to PMC-Sierra, Inc.
Document No.: CDP-00278-02-A Rev. A, Issue:
53
maxView Storage Manager User's Guide
You can include a disk drive's available space in a new logical drive (see Creating a Logical Drive Using
Available Segments on page 54), or add it to an existing logical drive (see Increasing the Capacity of a
Logical Drive on page 60).
Creating a Logical Drive Using Available Segments
Free segments on a disk drive can be used to create a new logical drive. (Each segment can be used in
only one logical drive at a time.)
To create a logical drive using free segments on disk drives, follow the instructions in Custom Configuration
on page 41. When the wizard displays the RAID Members panel, select the disk drives and/or free disk
drive segments you want to use in the logical drive, then complete the wizard.
Creating a Hybrid RAID Logical Drive
You can combine hard drives and Solid State Drives (SSDs) in a RAID 1 or RAID 10 logical drive to create
a hybrid RAID drive. Hybrid RAID leverages the performance benefits of the SSDs in your system by
sending read operations to the SSD first; typically, the fastest I/O path.
For a hybrid RAID 1, you must select exactly one HDD and one SSD. For a hybrid RAID 10 you must select
an equal number of SSDs and HDDs.
You can use any SSD (or available segment) when creating or modifying a hybrid RAID drive.
To create a hybrid RAID drive:
1. In the Enterprise View, select a system, then select a controller on that system.
Note the number and location of SSDs in your system; for instance, SSD 1 in Slot 1 on Enclosure 1,
SSD 2 in Slot 3 on Enclosure 1, and so on. This information will be helpful as you create the hybrid
RAID drive in the wizard.
2. On the ribbon, in the Logical Disk group, click Create Logical Drive.
3. When the wizard opens, select Custom Configuration, then click Next.
4. In the RAID Level panel, select RAID 1 or RAID 10, then click Next.
5. Select the hard drives and SSDs that you want to use in the hybrid RAID drive.
Proprietary and Confidential to PMC-Sierra, Inc.
Document No.: CDP-00278-02-A Rev. A, Issue:
54
maxView Storage Manager User's Guide
For a RAID 10, be sure to select an even number of SSDs and HDDs!
6. Click Next, then customize the RAID Attributes, as needed. See Fine-tuning Logical Drives on page
55 for more information.
7. Click Next, review the logical drive settings, then click Finish.
maxView Storage Manager begins to build the hybrid RAID drive. Use the Event Log and Task Log to
track build progress.
Fine-tuning Logical Drives
You can fine-tune a new or existing logical drive to meet your needs by changing its name or adjusting
the property settings described in this section.
Renaming a Logical Drive
To change the name of a logical drive:
1. In the Enterprise View, select a controller, then select the logical drive you want to rename.
2. On the ribbon, in the Logical Disk group, click Set Properties.
The Set Properties window opens.
3. In the Logical Device Name field, type the new name, then click OK.
maxView Storage Manager updates the logical drive name and displays the new name in the Enterprise
View.
Proprietary and Confidential to PMC-Sierra, Inc.
Document No.: CDP-00278-02-A Rev. A, Issue:
55
maxView Storage Manager User's Guide
Changing the Read Cache Setting
When read caching is enabled, the controller monitors read access to a logical drive and, if it sees a
pattern, pre-loads the cache with data that seems most likely to be read next, thereby improving
performance. You can set the Read Cache to:
• Enabled—The controller transfers data from the logical drive to its local cache in portions equal to
the stripe size. Use this setting for the best performance when workloads are steady and sequential.
Enabled is the default setting.
• Disabled—The controller transfers data from the logical drive to its local cache in portions equal to
the system I/O request size. Use this setting for the best performance when workloads are random
or the system I/O requests are smaller than the stripe size.
Note: For additional performance gains in read-intensive applications, you can also
use maxCache read caching. For more information, see Changing the maxCache
Settings for a Logical Drive on page 65.
To quickly change the read cache setting:
1. In the Enterprise View, select a controller, then select a logical drive on that controller.
2. On the ribbon, in the Logical Disk group, click Set Properties.
The Set Properties window opens.
3. In the Read Cache drop-down list, select Enabled or Disabled, as needed.
4. Click OK.
Changing the Write Cache Setting
The write cache setting determines when data is stored on a disk drive and when the controller
communicates with the operating system. You can set the Write Cache to:
• Disabled (write-through)—The controller sends (or writes) the data to a disk drive, then sends
confirmation to the operating system that the data was received. Use this setting when performance
is less important than data protection.
• Enabled (write-back)—The controller sends confirmation to the operating system that the data was
received, then writes the data to a disk drive. Use this setting when performance is more important
than data protection and you aren't using a battery-backup cache or zero-maintenance cache
protection module. Enabled is the default setting.
• Enabled (write-back) when protected by battery/ZMM—Similar to Enabled (write-back), but used
when the controller is protected by a zero-maintenance cache protection module. For more
information about zero-maintenance cache protection, see the Adaptec RAID Controller Installation
and User's Guide.
Note: (RAID 10, 50, and 60 only) All logical drives comprising a RAID 10/50/60 logical
device must have the same write cache setting—either all write-through or all
write-back.
To quickly change the write cache setting:
1. In the Enterprise View, select a controller, then select a logical drive on that controller.
2. On the ribbon, in the Logical Disk group, click Set Properties.
Proprietary and Confidential to PMC-Sierra, Inc.
Document No.: CDP-00278-02-A Rev. A, Issue:
56
maxView Storage Manager User's Guide
The Set Properties window opens.
3. In the Write Cache drop-down list, select Enabled, Enabled when protected by battery/ZMM,
or Disabled, as needed.
4. Click OK.
Changing the Stripe Size
The stripe size is the amount of data (in KB) written to one disk drive, before moving to the next disk
drive in the logical device. Stripe size options vary, depending on your controller and RAID level. For
example, in a RAID 6 or RAID 60 logical drive, the more disk drives included in the logical drive, the fewer
stripe size options are available. Normally, the default stripe size provides the best performance.
You can change the stripe size of an existing logical drive when you expand or migrate the logical drive.
For more information, see Increasing the Capacity of a Logical Drive on page 60 and Changing the RAID
Level of a Logical Drive on page 61.
Changing the Initialize Method
The initialize, or build, method determines how a logical drive is prepared for reading and writing and
how long initialization will take.
You can choose one of the initialization methods below when you create a new logical drive with the
Custom Configuration wizard. (The methods are presented in order of slowest to fastest.) You can change
the initialization method of an existing logical drive only when you expand the logical drive (see Increasing
the Capacity of a Logical Drive on page 60).
• Build—(slowest) For RAID 1 logical drives, data is copied from the primary drive to the mirror drive;
for RAID 5 logical drives, parity is computed and written. maxView Storage Manager performs Build
initializations in the background; you can use the logical drive immediately. Build is the default setting
for most logical drives
• Clear—Every block in the logical drive is overwritten with zeros, removing all existing data. You
cannot use the logical drive until the initialization is complete.
• Quick—(fastest) The logical drive is made available immediately. Quick is the default setting for RAID
1, RAID 1EE, and RAID 10 logical drives. It is recommended for use only with new drives.
• Skip Initialization—Reconstructs the logical drive meta-data without modifying or destroying other
data on the disks. Useful for recovering data when multiple drives fail in the same logical drive. For
more information, see Multiple Disk Drive Failures in the Same Logical Drive on page 112.
Optimizing Logical Drive Performance
To ensure optimal performance of the logical drives in your storage space, you can select an
application-specific performance mode to improve I/O throughput based on the needs of your application.
The following performance modes are supported by maxView Storage Manager.
Performance Mode
Performance Criteria
Dynamic (default)
Automatically adjusts
—
criteria based on controller
usage, RAID level, and disk
drive type
Online Transaction Process
(OLTP)/Database—a system
that facilitates and manages
transaction-oriented
applications, such as data
entry or retrieval applications.
100% Random
60%--80% Read
20%--40% Write
8Kb Blocks
Proprietary and Confidential to PMC-Sierra, Inc.
Document No.: CDP-00278-02-A Rev. A, Issue:
Best Performance
SAS:
R0 Sequential writes (all request sizes)
R0 File server and Web server
R5 Sequential writes (all request sizes)
R5 Web server
R6 Web server
R10 Sequential writes
R10 Web server
SATA:
R0 Sequential reads (all request sizes)
57
maxView Storage Manager User's Guide
Performance Mode
Performance Criteria
Best Performance
R0 Sequential writes (all request sizes)
R0 File/print server
R5 Sequential writes (256Kb request size)
R5 Random writes
R6 Sequential writes (all request sizes)
R10 Sequential writes (all request sizes)
R10 Workstation
To select a performance mode for the logical drives on a controller:
1. In the Enterprise View, select a controller, then select a logical drive on that controller.
2. On the ribbon, in the Logical Disk group, click Set Properties.
The Set Properties window opens.
3. In the Performance Mode drop-down list, select the application type: Dynamic or OLTP.
4. Click OK.
5. Shutdown maxView Storage Manager and reboot the system.
Note: You must reboot the system for the performance mode setting to take
effect.
Verifying Logical Drives
To ensure that there are no data problems on your logical drives, it is important to verify them. When
you verify a logical drive, maxView Storage Manager checks it for inconsistent or bad data and then
fixes any problems. (You can also choose to verify a logical drive without fixing it.)
Logical drives without redundancy (for instance, RAID 0 logical drives) do not need to be verified.
In maxView Storage Manager, logical drive verification can occur in different ways, depending on your
controller:
• Automatic verification—If your controller supports Build initialization, maxView Storage Manager
automatically verifies all new redundant logical drives. No manual verification is required.
To see if your controller supports Build initialization, select the controller in the Enterprise View
then, on the Storage Dashboard, click Properties.
• Manual verification—If your controller doesn't support Build initialization, a Warning-level event
notice appears in the event log prompting you to verify a logical drive before you begin to use it. To
verify a logical drive manually, see Verifying and Fixing a Logical Drive on page 59.
• Background verification—If your controller supports background consistency check, maxView Storage
Manager continually and automatically checks your logical drives once they're in use.
To see if your controller supports background consistency check, select the controller in the Enterprise
View then, on the Storage Dashboard, click Properties. To enable or disable background consistency
check or to set the checking period, see Enabling/Disabling Background Consistency Check on page 59.
If your controller doesn't support background consistency check, we highly recommend that you verify
your logical drives weekly, following the instructions in Verifying and Fixing a Logical Drive on page 59.
Proprietary and Confidential to PMC-Sierra, Inc.
Document No.: CDP-00278-02-A Rev. A, Issue:
58
maxView Storage Manager User's Guide
Verifying and Fixing a Logical Drive
While maxView Storage Manager verifies and fixes a logical drive, you can't complete any other tasks
on the controller. Because the verification can take a long time to complete, you may want to schedule
it as a task to be completed overnight or on a weekend.
Note: You can also choose to verify the logical drive without fixing inconsistent or
bad data.
To verify and fix a logical drive:
1. Ensure that no activity is taking place on the controller for the logical drive.
2. In the Enterprise View, select the logical drive.
3. On the ribbon, in the Logical Disk group, click Verify.
The Verify LD window opens.
4. To repair inconsistent or bad data during verification, click Verify with fix. To verify the logical drive
without fixing bad data, leave the checkbox blank.
5. To verify the logical drive now (immediately), click Verify.
To verify the logical drive later, click Schedule, then set the time and date to perform the verification.
You can also set up the verification as a recurring task. (For more information, see Working with
Scheduled Tasks on page 71.)
Caution: Do not power off the system while the verification is in progress. If you
do, the verification will stop.
When the verification is complete, an event notice is generated in the local system's event log, at
which time you can continue working with the controller.
Enabling/Disabling Background Consistency Check
If your controller supports background consistency check, maxView Storage Manager continually and
automatically checks your logical drives for bad or inconsistent data once they're in use. (To see if your
controller supports background consistency check, select the controller in the Enterprise View then, on
the Storage Dashboard, click Properties.)
To enable or disable background consistency check:
1. In the Enterprise View, select a controller.
2. On the ribbon, in the Controller group, click Set Properties.
Proprietary and Confidential to PMC-Sierra, Inc.
Document No.: CDP-00278-02-A Rev. A, Issue:
59
maxView Storage Manager User's Guide
The Set Properties window opens.
3.
4.
5.
6.
Click the Data Protect tab.
In Consistency Check drop-down list, select Enabled or Disabled.
Enter the Consistency Check Period period, in days.
Click Apply.
Increasing the Capacity of a Logical Drive
You can add more disk drive space, or expand, a logical drive, to increase its capacity .
Note: Some operating systems have size limitations for logical drives. Refer to your
operating system documentation to see if size limits apply.
The expanded logical drive must have a capacity that is greater than or equal to the original logical drive.
To increase the capacity of a logical drive:
1. In the Enterprise View, select a controller, then select the logical drive you want to expand.
2. On the ribbon, in the Logical Disk group, click Expand/Migrate.
A wizard opens to help you modify the logical drive.
3. Click Next.
4. Select the disk drive(s), drive segments, or SSDs you want to add to the logical drive.
If you want to remove a specific disk drive or segment and replace it with another one (for instance,
to replace a smaller disk drive with a larger one), deselect the disk drive you want to remove, then
select another disk drive of greater or equal capacity to replace it.
Note: We recommend that you do not combine SAS and SATA disk drives within
the same logical drive. maxView Storage Manager displays a warning message if
you try to create a logical drive using a combination of SAS and SATA disk drives.
5. Click Next.
6. Enter the size of the logical drive in the space provided (in gigabytes). It must be greater than or
equal to the current size.
7. Select a new stripe size from the drop-down list, if required.
Note: The default stripe size usually provides the best performance.
8. Click Next.
9. Review the logical drive settings. To make changes, click Back.
10. Click Finish.
The logical drive is expanded and its capacity increased to the new size.
Proprietary and Confidential to PMC-Sierra, Inc.
Document No.: CDP-00278-02-A Rev. A, Issue:
60
maxView Storage Manager User's Guide
Changing the RAID Level of a Logical Drive
If your storage needs or application requirements change, you can change, or migrate, the RAID level
of your logical drives to another, more suitable, RAID level. You may want to change the RAID level to
add redundancy, further protect your data, or to improve data availability for speedier access. See
Selecting the Best RAID Level on page 114 for more information.
Changing the RAID level normally requires one or more disk drives to be added to or removed from the
logical drive. maxView Storage Manager will not let you change the RAID level unless the right number
of drives are available.
The following RAID level migrations are supported:
• RAID 1 to RAID 5
• RAID 5 to RAID 10
• RAID 10 to RAID 5
• RAID 5 to RAID 6
To change the RAID level of a logical drive:
1. In the Enterprise View, select a controller, then select the logical drive that you want to migrate.
2. On the ribbon, in the Logical Disk group, click Expand/Migrate.
A wizard opens to help you modify the logical drive.
3. Select a new RAID level, then click Next. Only valid RAID level options are offered.
4. In the RAID Members panel, select the disk drive(s), drive segments, or SSDs that you want to add
to the logical drive.
If you want to remove a specific disk drive or segment and replace it with another one (for instance,
to replace a smaller disk drive with a larger one), deselect the disk drive you want to remove, then
select another disk drive of greater or equal size to replace it.
Note: We recommend that you do not combine SAS and SATA disk drives within
the same logical drive. maxView Storage Manager displays a warning message if
you try to create a logical drive using a combination of SAS and SATA disk drives.
5. Enter the size of the logical drive in the space provided (in gigabytes). It must be greater than or
equal to the current size.
Note: Some operating systems have size limitations for logical drives. Before you
save the configuration, verify that the logical drive size is supported by your
operating system.
6. Select a new stripe size from the drop-down list, if required.
Note: The default stripe size usually provides the best performance.
7. Click Next.
8. Review the logical drive settings. To make changes, click Back.
9. Click Finish.
The logical drive is reconfigured with the selected disks and migrates to the new RAID level.
Proprietary and Confidential to PMC-Sierra, Inc.
Document No.: CDP-00278-02-A Rev. A, Issue:
61
maxView Storage Manager User's Guide
Erasing a Logical Drive
You can use maxView Storage Manager to erase the data on any logical drives that are in the Optimal
state. The logical drive remains in the Enterprise View and ready to store new data.
Caution: When you erase a logical drive, you lose all data on that drive.
To erase a logical drive:
1. In the Enterprise View, select a controller, then select the logical drive you want to erase.
2. On the ribbon, in the Logical Disk group, click Erase.
The Erase VD window opens.
3. Click Erase to erase the logical drive; click Cancel to cancel the action.
Deleting a Logical Drive
When you delete a logical drive, it is removed from the Enterprise View and the disk drives or segments
in the logical drive become available to use in a new logical drive (see Creating a Logical Drive Using
Available Segments on page 54), or to expand an existing logical drive (see Increasing the Capacity of
a Logical Drive on page 60).
Caution: When you delete a logical drive, you lose all data stored on that logical drive.
Be sure that you no longer need the data on the logical drive before you delete it.
To delete a logical drive:
1. In the Enterprise View, select a controller, then select the logical drive you want to delete.
2. On the ribbon, in the Logical Disk group, click Delete.
3. When prompted, click Delete to delete the logical drive; click Cancel to cancel the action.
Adding maxCache SSD Caching to Your Storage Space
maxView Storage Manager supports an advanced SSD caching technology called maxCache. maxCache
uses the Solid State Drives (SSDs) in your storage space as fast cache memory, providing performance
benefits for both read and write operations in I/O-intensive applications with mixed workloads.
maxCache read and write caching can be applied independently on a per controller or per logical drive
basis. With maxCache read caching enabled, the system analyzes I/O traffic and copies frequently read
"hot" data to the maxCache Container—a reserved logical drive comprised of SSDs only—for faster
retrieval.
With maxCache write caching enabled, the system populates the maxCache Container with certain "hot"
blocks from the logical drives in your storage space. All writes to those hot data blocks go directly to
the maxCache Container. The data remains on the maxCache Container until it is full or some other
"hotter" data replaces it. The data is then flushed from the cache and written back to the logical drives
in your storage space.
Proprietary and Confidential to PMC-Sierra, Inc.
Document No.: CDP-00278-02-A Rev. A, Issue:
62
maxView Storage Manager User's Guide
Note: Adaptec Series 6 controllers support read caching only, and do not use the
maxCache Container. For more information, see Using maxCache with Adaptec Series
6 Controllers on page 66.
You can add maxCache to your storage space only if you have one or more compatible Solid State Drives
installed on the RAID controllers in your system. See www.adaptec.com/compatibility for a list of
maxCache-compatible Solid State Drives.
Note: maxCache SSD caching is supported on Adaptec Series Q controllers only.
For more information about Adaptec maxCache technology, visit the Adaptec Web site at
www.adpatec.com.
Creating a maxCache Container
To create a maxCache Container for your storage space:
1. In the Enterprise View, select a system, then select a controller on that system.
2. On the ribbon, in the maxCache group, click Create maxCache.
3. When the wizard opens, select a RAID level for the container, then click Next.
See Selecting the Best RAID Level on page 114 for more information about RAID levels.
4. Select the SSDs that you want to include in the maxCache Container. Be sure to select the right
number of SSDs for the RAID level you selected.
5. Click Next.
6. (Optional) In the RAID Attributes panel, customize the settings for the maxCache Container. You
can:
Proprietary and Confidential to PMC-Sierra, Inc.
Document No.: CDP-00278-02-A Rev. A, Issue:
63
maxView Storage Manager User's Guide
• Enter a name for the maxCache Container. Names can include any combination of letters and
numbers, but cannot include spaces.
• Set a smaller logical drive size. (By default, the maxCache Container uses all available drive space.)
• Set the build method to: Build, Clear, or Quick.
• Set the build priority to: High, Medium, or Low.
See Fine-tuning Logical Drives on page 55 for details about customizing the settings in the RAID
Attributes panel.
7. Click Next, then review the logical drive settings. To make changes, click Back.
8. Click Finish.
maxView Storage Manager builds the maxCache Container. Use the Event Log and Task Log to track
build progress.
Setting the maxCache Flush and Fetch Rate
Once the maxCache Container is built, you can set its Flush and Fetch rate to optimize the read cache
performance.
To set the maxCache Container Flush and Fetch rate:
1. In the Enterprise View, select a controller, then select the associated maxCache Container.
2. On the ribbon, in the maxCache group, click Set Properties.
The Set Properties window opens.
3. In the drop-down list, set the Flush and Fetch rate to: Slow, Medium, or High. The default is Medium.
Note: The lower the rate, the longer data is kept on the maxCache Container
before it's flushed from the cache.
4. Click OK.
Verifying and Fixing the maxCache Container
If maxCache is enabled for a controller, you cannot complete any other tasks on that controller while
maxView Storage Manager verifies and fixes the maxCache Container. Optionally, you can choose to
verify the maxCache Container without fixing inconsistent or bad data, or run a coherency check to
compare valid pages of the maxCache Container with their corresponding logical drive storage.
To verify and fix the maxCache Container:
1. Ensure that no activity is taking place on the controller for the maxCache Container.
2. In the Enterprise View, select the maxCache Container you want to verify and fix.
3. On the ribbon, in the maxCache group, click Verify.
The Verify maxCache window opens.
4. Choose a verification option:
Proprietary and Confidential to PMC-Sierra, Inc.
Document No.: CDP-00278-02-A Rev. A, Issue:
64
maxView Storage Manager User's Guide
Options
Description
To repair inconsistent or bad data during
verification
...click Verify with fix.
To verify the maxCache Container without ...click Verify.
fixing bad data
To perform a coherency check on the
maxCache meta-data
...click Coherency Check, then select Once or Always
from the drop-down list.
5. Click OK.
Caution: Do not power off the system while the verification is in progress. If you
do, the verification will stop.
When the verification is complete, an event notice is generated in the system's event log, at which
time you can continue working with the controller.
Deleting the maxCache Container
When you delete the maxCache Container, the component SSDs become available and can be used to
create a new logical drive, as hot spares, or to create a new maxCache Container.
Caution: Ensure that no activity is taking place on the controller for the maxCache
Container; otherwise you may lose data.
To delete the maxCache Container:
1. In the Enterprise View, select a controller, then select the maxCache Container.
2. On the ribbon, in the maxCache group, click Delete.
3. When prompted, click Delete to delete the maxCache Container; click Cancel to cancel the action.
Changing the maxCache Settings for a Logical Drive
You can enable or disable maxCache read and write caching for each logical drive in your storage space:
1. In the Enterprise View, select a controller, then select a logical drive on that controller.
2. On the ribbon, in the Logical Disk group, click Set Properties.
3. When the Set Properties window opens, click the maxCache tab.
Proprietary and Confidential to PMC-Sierra, Inc.
Document No.: CDP-00278-02-A Rev. A, Issue:
65
maxView Storage Manager User's Guide
4. In the drop-down lists:
• For maxCache Read Cache, select Enabled or Disabled, as needed.
• For maxCache Write Cache, select Enabled or Disabled, as needed.
5. Click OK.
Changing the maxCache Settings for a Controller
You can disable maxCache write caching for all logical drives on a controller. Because write caching
sends in-coming data to the maxCache Container first, before moving it to the logical devices in your
storage space, you may want to disable write caching to reduce the possibility of data loss in the event
of a power outage, system failure, or dirty shutdown.
Note: To re-enable maxCache write caching in your storage space, you must change
the maxCache settings for each logical drive individually; see Changing the maxCache
Settings for a Logical Drive on page 65.
To disable maxCache write caching for a controller:
1. In the Enterprise View, select a controller, then select the maxCache Container on that controller.
2. On the ribbon, in the maxCache group, click Disable Write Cache.
3. Click OK.
Using maxCache with Adaptec Series 6 Controllers
Adaptec Series 6 (and other legacy) controllers support maxCache read caching only. On a Series 6
controller with maxCache read caching enabled, the system copies frequently read "hot" data to an SSD
cache pool, called the maxCache device. Unlike the maxCache Container, used for Adaptec Series 7 and
newer controllers, the maxCache device is simply a collection of SSDs used as fast read memory; it is
not a logical device and is not displayed in the Enterprise view.
Proprietary and Confidential to PMC-Sierra, Inc.
Document No.: CDP-00278-02-A Rev. A, Issue:
66
maxView Storage Manager User's Guide
Use the following procedure to configure the maxCache device and to set the cache Flush and Fetch
Rate. By default, maxCache read caching is enabled for a logical drive. To disable maxCache read caching,
see Changing the maxCache Settings for a Logical Drive on page 65.
To configure the maxCache device:
1. In the Enterprise View, select a system, then select an Adaptec Series 6 controller on that system.
2. On the ribbon, in the maxCache group, click Create maxCache.
The maxCache Device Configuration window opens.
3. Select one or more SSDs in the Available SSD Drives list, then click right arrow.
To remove a SSD from the cache, select one or more SSDs in the maxCache Device list, then click
left arrow.
4. Select the maxCache flush and fetch rate from the drop-down list: Low, Medium, High. (The default
is Medium.)
5. Click OK.
maxView Storage Manager builds the maxCache Device. Use the Event Log and Task Log to track
build progress.
Maintaining an Energy-Efficient Storage Space
You can use power management in maxView Storage Manager to maintain an energy-efficient storage
space. Power management of your storage space reduces cooling and electricity costs. It increases
system stability due to lower heat dissipation. And it improves the quality of your work environment
by reducing noise levels in your computer rooms and data centers.
This section describes how to configure power management for the logical drives and RAID controllers
in your storage space. You can configure power management for an individual logical drive or for all
logical drives on a controller.
Proprietary and Confidential to PMC-Sierra, Inc.
Document No.: CDP-00278-02-A Rev. A, Issue:
67
maxView Storage Manager User's Guide
• To configure power management for a logical drive, see Setting Power Management Options for a
Logical Drive on page 68.
• To configure power management for a controller, see Setting Power Management Options for a
Controller on page 69.
• To disable power management on a logical drive, see Disabling Power Management for a Logical
Drive on page 70.
Note: To see if your controller supports power management, select the controller in
the Enterprise View then, on the Storage Dashboard, click the Properties tab. If the
Key Features section includes 'Intelligent Power Management', the controller supports
the power management features. You can check for power management support on
the Storage Dashboard for controllers, logical drives, and physical drives.
Setting Power Management Options for a Logical Drive
This section describes how to set the power management options for an existing logical drive. You can
also set the power management options when you create a logical drive in the wizard (see Custom
Configuration on page 41).
For each logical drive in your storage space, you can a set a timer to reduce the disk drive spin rate
(RPM), turn disk drives off, and verify the health of inactive drives.
Note: We do not recommend enabling power management for logical drives with
shared physical drives; that is, logical drives that include segments of the same physical
drives. Placing logical drives with these characteristics under power management may
limit the power savings benefit in your storage space.
To set the power management options for a logical drive:
1. In the Enterprise View, select a controller, then select a logical drive.
2. On the ribbon, in the Logical Disk group, click Set Properties.
The Set Properties window opens.
3. Click the Power tab.
4. In the Power Settings drop-down list, select Enabled.
5. Select a value for each timer from the drop-down lists:
Proprietary and Confidential to PMC-Sierra, Inc.
Document No.: CDP-00278-02-A Rev. A, Issue:
68
maxView Storage Manager User's Guide
• Slow Down Drives After—Period of inactivity, from 3 minutes to 3 hours, after which the drives’
spin rate is lowered. The default is Never.
Note: For disk drives that do not support slow operation, set this timer to
Never.
• Verify Drives After—Period of inactivity, from 1 hour to 24 hours, after which an inactive drive
(a drive that's already powered down) is restarted and checked to verify its health. Once the
check is complete, the drive is powered down and returns to an inactive state. The default is
Never.
• Power Off Drives After—Period of inactivity, from 3 minutes to 3 hours, after which the disk
drives are turned off. The default is Never.
6. Click OK.
Setting Power Management Options for a Controller
The power management options for a controller affect all logical drives on that controller. The main
setting is the “stay awake” period: the time during which disk drives on the controller always spin at
their peak rate.
Note: The stay awake period is relative to your local system time and time zone. To
set the time zone for power management, you must use the controller BIOS utility.
The time zone does not adjust automatically for daylight savings time. To compensate,
you must adjust the stay awake period manually, either in the BIOS or with maxView
Storage Manager. For more information, see the Adaptec RAID Controller Installation
and User's Guide.
To set the stay awake period for the disk drives on a controller:
1. In the Enterprise View, select a controller.
2. On the ribbon, in the Controller group, click Set Properties.
The Set Properties window opens.
Proprietary and Confidential to PMC-Sierra, Inc.
Document No.: CDP-00278-02-A Rev. A, Issue:
69
maxView Storage Manager User's Guide
3. Click the Power Management tab.
4. In the Stay Awake Period drop-down list, select Enabled.
Note: This field is set to Enabled and grayed out if you enabled power management
when you created the logical drive.
5. Enter the stay awake period start time and end time in 24-hour, hhmm, format; for example, 0900
for 9AM, 1400 for 2PM, and so on.
6. Select the days of the week to enforce the stay awake period. On days that you do not select, the
stay awake period is disabled and the spin rate is controlled by the logical drive's power timer settings
(see Setting Power Management Options for a Logical Drive on page 68).
7. Click Apply.
Disabling Power Management for a Logical Drive
You can disable power management for a logical drive. You may choose to disable power management
for the drives on a high-volume server or a logical drive that needs to be highly available.
To disable power management for a logical drive:
1. In the Enterprise View, select a controller, then select a logical drive on that controller.
2. On the ribbon, in the Logical Disk group, click Set Properties.
The Set Properties window opens.
3. Click the Power tab.
4. In the Power Settings drop-down list, select Disabled.
5. Click OK.
Proprietary and Confidential to PMC-Sierra, Inc.
Document No.: CDP-00278-02-A Rev. A, Issue:
70
maxView Storage Manager User's Guide
8
Working with Scheduled Tasks
maxView Storage Manager allows you to schedule some tasks to start at convenient times. Additionally,
you can schedule some tasks to recur at preset times.
This section describes how to schedule, monitor, and manage tasks.
Scheduling a Task
If a task is lengthy and limits access to components in your storage space, you may want to set a date
and time for the task to start, instead of running the task while there is activity in your storage space.
If a task must be performed regularly, you can schedule it to recur at preset times.
You can schedule these tasks in maxView Storage Manager:
• Expanding a logical drive
• Changing a logical drive's RAID level
• Modifying the stripe size of a logical drive (as part of an expansion or migration)
• Verifying a logical drive
• Verifying and fixing a logical drive
To schedule one of these tasks:
1. Complete each step of the task until you are prompted to finish the task or schedule the task. (The
actual label on the "finish" button varies, depending on the task type.) Do not click finish!
2. Click Schedule.
The schedule window opens.
Note: The schedule window is the same for all tasks, except for the title text on
the title bar.
Proprietary and Confidential to PMC-Sierra, Inc.
Document No.: CDP-00278-02-A Rev. A, Issue:
71
maxView Storage Manager User's Guide
3. Set the time and date for the task to start. You can pick the date from the calendar or use the controls
in the Start Date field to enter it directly. By default, the task starts "today".
Note: If you are scheduling a task on a remote system located in another
geographical area, remember that the time you set for the task is that system's
time, which may be different from the local time. You will be prompted to select
a new time if the one you've set occurs in the past on the remote system.
4. Set the recurrence frequency from the drop-down menu, if the option is available for this task and
you want it to occur regularly. You can set a task to recur daily, weekly, or monthly.
5. Click OK.
The task is saved and the scheduled task is added to the Task Log.
Monitoring Tasks
You can use the Task Log and Event Log—at the bottom of the maxView Storage Manager main window
—to monitor your tasks. The information in each log is complementary, and helps you manage the
scheduled and non-scheduled tasks in your system.
Use the Event Log for information
about running or non-recurring tasks
Use the Task Log for general task
information, status, and progress
The Task Log displays all scheduled tasks in order of creation, and includes basic information about each
task, and progress of running tasks. The Status column shows the current condition of each task:
• Scheduled—The task is scheduled to be completed at a future date and time.
• Running—The task is running and currently in progress.
Proprietary and Confidential to PMC-Sierra, Inc.
Document No.: CDP-00278-02-A Rev. A, Issue:
72
maxView Storage Manager User's Guide
• Error—The task did not complete successfully. (For more information about an error, double-click
the task in the Task Log to open the Task Log Detail window; see Viewing Task Status in the Task Log
on page 90.)
The Event Log displays additional information about tasks, such as when a scheduled task is modified
or deleted, or when a task did not complete successfully.
The Event Log uses icons to show the status of tasks:
Icon
Status
Explanation and Solution
Information
The task completed successfully. No action required.
Warning
The task missed its start time. Reschedule the task to clear the error, as described in
Modifying a Task on page 73.
Error
The task failed. Delete the task to clear the error. Schedule the task again, as described
in Scheduling a Task on page 71.
What if a Task Misses its Start Time?
Tasks scheduled in maxView Storage Manager include an automatic 30-minute grace period following
their start time, to accommodate temporary interruptions. For instance, if there's a brief power outage
a task will run once normal conditions resume, if the interruption lasts no longer than 30 minutes past
the scheduled start time.
If a task misses its start time, it must be rescheduled. For instructions, see Modifying a Task on page
73.
If a recurring task misses its start time, it is automatically rescheduled to run at the next scheduled
interval.
Modifying a Task
If the requirements for a scheduled task change, you can use maxView Storage Manager to modify the
task. You can reschedule a task for a different date or time; change it from recurring to non-recurring;
and modify the task description that appears in the Task Log. Creating a custom task description makes
it easier to find the task in the task list.
To modify a scheduled task:
1. In the Task Log, single-click the task you want to modify.
2. When the Task Log Detail window opens, click Modify.
Proprietary and Confidential to PMC-Sierra, Inc.
Document No.: CDP-00278-02-A Rev. A, Issue:
73
maxView Storage Manager User's Guide
3. When the Modify Task window opens, make the required changes, then click OK.
The task changes are saved and its entry in the Task Log is updated.
Deleting a Task
If a scheduled task is no longer needed, you can delete it from the system.
To delete a task:
1. In the Task Log, single-click the task you want to delete.
2. When the Task Log Detail window opens, click Delete.
3. Click Yes to confirm the deletion.
The task is deleted and its entry is removed from the Task Log.
Proprietary and Confidential to PMC-Sierra, Inc.
Document No.: CDP-00278-02-A Rev. A, Issue:
74
maxView Storage Manager User's Guide
9
Maintaining Physical Devices
This section describes how to manage the controllers, disk drives, solid state drives, and enclosures in
your storage space.
Viewing Device Properties
Click on any physical device in the Enterprise View then, on the Storage Dashboard, click the Properties
tab to view version numbers, status, model numbers, features, and other information about the device.
The properties listed vary, depending on which type of device you select. The figure below shows the
properties for a controller. For more information about using the Storage Dashboard to monitor the
components in your storage space, see Viewing Component Status in the Storage Dashboard on page
90.
Locating Drives in Your Storage Space
You can blink the LEDs on disk drives and SSDs to identify where they are physically located in your
storage space. This table describes how to locate specific devices.
To Locate...
Select...
A disk drive
Disk Drive icon:
All disk drives included in a
logical drive
Logical Drive icon:
All SSDs in the maxCache
Container
maxCache Container icon:
Proprietary and Confidential to PMC-Sierra, Inc.
Document No.: CDP-00278-02-A Rev. A, Issue:
75
maxView Storage Manager User's Guide
To Locate...
Select...
Locating a Disk Drive
To locate a (single) disk drive:
1. In the Enterprise View, select a controller then, in the Physical Devices tree, select a disk drive.
2. On the ribbon, in the Physical Disk group, click Locate.
The Locate PD window opens.
3. Click the Locate button (on the Locate PD window).
The LED on the disk drive begins to blink.
4. Click Stop to stop blinking the drive.
5. Click Cancel to close the Locate PD window.
Locating Physical Disks in a Logical Drive
To locate all physical disks in a logical drive:
1. In the Enterprise View, select a controller then, in the Logical Devices tree, select a logical drive.
2. On the ribbon, in the Logical Disk group, click Locate.
The Locate LD window opens and displays a list of the physical disks associated with the logical drive.
3. Click the Locate button (on the Locate LD window).
Proprietary and Confidential to PMC-Sierra, Inc.
Document No.: CDP-00278-02-A Rev. A, Issue:
76
maxView Storage Manager User's Guide
The LEDs on the disk drives begin to flash.
4. Click Stop to stop blinking the drives.
5. Click Cancel to close the Locate LD window.
Locating SSDs in the maxCache Container
To locate all Solid State Drives (SSDs) in the maxCache Container:
1. In the Enterprise View, select a controller then, in the maxCache Container tree, select the maxCache
Container on that controller.
2. On the ribbon, in the maxCache group, click Locate.
The Locate maxCache window opens, displaying a list of the SSDs comprising the maxCache Container.
3. Click the Locate button (on the Locate maxCache window).
Proprietary and Confidential to PMC-Sierra, Inc.
Document No.: CDP-00278-02-A Rev. A, Issue:
77
maxView Storage Manager User's Guide
The LEDs on the SSDs begin to flash.
4. Click Stop to stop blinking the SSDs.
5. Click Cancel to close the Locate maxCache window.
Working with Failed or Failing Disk Drives
This section describes how to use maxView Storage Manager to manage failed or failing disk drives in
your storage space.
Replacing Disk Drives in a Logical Drive
You can replace one or more disk drives in a logical drive. You may want to replace a drive to upgrade
to larger disk drives, or to make disk drive size uniform across the logical drive.
Caution: If another disk drive in the logical drive fails during rebuild (see Rebuilding
Logical Drives on page 113), you may lose data. For help solving disk drive problems,
see Recovering from a Disk Drive Failure on page 111.
To replace a disk drive in a logical drive:
1. In the Physical Devices tree in the Enterprise View, find the disk drive you want to replace; note its
size and location (for instance Slot 1 in Enclosure 0).
2. Set the drive state to failed. (See Setting a Disk Drive to ‘Failed’ on page 78.)
3. Remove and replace the disk drive with one of equal or greater size.
4. Wait for the logical drive to rebuild. (See Rebuilding Logical Drives on page 113.)
5. Repeat these steps for each disk drive you want to replace.
Setting a Disk Drive to ‘Failed’
Before you can remove a disk drive, you should set it to a failed state to protect your data. You cannot
use maxView Storage Manager to set the drive state to Failed. You must use the Adaptec RAID Controller
Configuration command line utility (ARCCONF), to change the drive state. First, use the Storage Dashboard
to determine the drive's device ID and channel number on the controller (see Viewing Component Status
in the Storage Dashboard on page 90). Then, use the ARCCONF SETSTATE command to change the
drive's state to Failed. See the Adaptec RAID Controllers Command Line Utility User's Guide for details
about using ARCCONF.
You can set a disk drive to a failed state if:
• The disk drive is not part of a logical drive, or
• The disk drive is part of a redundant, healthy logical drive
Proprietary and Confidential to PMC-Sierra, Inc.
Document No.: CDP-00278-02-A Rev. A, Issue:
78
maxView Storage Manager User's Guide
You cannot set a disk drive to a failed state if doing so will take a logical drive offline.
Caution: You may lose data or damage your disk drive if you remove a disk drive
without first setting it to a failed state.
Initializing and Erasing Disk Drives
This section describes how to use maxView Storage Manager to erase data and meta-data (including
logical drive information) from the disk drives in your storage space.
Initializing Disk Drives
You can use maxView Storage Manager to initialize any disk drives (or SSDs) that are in the Ready state.
You may want to do this to erase all existing data and meta-data before using the disk drive in a new
logical device or as a hot spare.
Caution: Do not initialize a disk drive that is part of a logical drive. Initializing a disk
drive that's part of a logical drive may make the logical drive unusable. Be sure to back
up all data from your disk drive before you initialize it.
To initialize a disk drive:
1. In the Enterprise View, select a controller then, in Physical Devices tree, select the disk drive you
want to initialize.
2. On the ribbon, in the Physical Disk group, click Initialize.
The Initialize Physical Disk window opens.
3. Click the Initialize button (on the Initialize Physical Disk window).
maxView Storage Manager begins the initialization.
4. When prompted, click OK to close the Initialize Physical Disk window.
Erasing Disk Drives
You can use maxView Storage Manager to securely erase existing data on any disk drives or SSDs that
are in the Ready state. Secure erase completely destroys the data on the drive; the data is completely
and irretrievably eradicated. Secure erase performs three distinct writing passes to the disk drive being
erased—it does not just write zeros.
To securely erase a disk drive or SSD:
1. In the Enterprise View, select a controller then, in the Physical Devices tree, select the drive you
want to erase.
2. On the ribbon, in the Physical Disk group, click Secure Erase.
The Secure Erase PD window opens.
3. Click Erase to erase the disk drive; click Cancel to cancel the action.
Proprietary and Confidential to PMC-Sierra, Inc.
Document No.: CDP-00278-02-A Rev. A, Issue:
79
maxView Storage Manager User's Guide
Verifying and Fixing a Disk Drive
When you verify a physical drive (HDD or SSD), maxView Storage Manager checks it for inconsistent or
bad data and then fixes any problems it finds. (You can also choose to verify a physical drive without
fixing it.) While maxView Storage Manager verifies and fixes a physical drive, you can't complete any
other tasks on that drive. You can verify any drive in the Ready state.
To verify and fix a physical drive:
1. In the Enterprise View, select a controller, then select a physical drive on that controller.
2. On the ribbon, in the Physical Disk group, click Verify.
The Verify PD window opens.
3. To repair inconsistent or bad data during verification, click Verify with fix. To verify the physical
drive without fixing bad data, leave the checkbox blank.
4. Click Verify.
Caution: Do not power off the system while the verification is in progress. If you
do, the verification will stop.
When the verification is complete, an event notice is generated in the event log, at which time you
can continue working with the drive.
Changing a Disk Drive's Write Cache Setting
Note: This task is for advanced users only.
By default, disk drive write caching is disabled in maxView Storage Manager. You can enable write
caching on a disk drive to improve performance. However, if the system experiences a power, device,
or system failure, or cannot be shut down properly, there is a possibility of data loss or file-system
corruption.
Caution: With disk drive write caching enabled, you may lose data if a power outage
or other system failure occurs.
1. In the Enterprise View, select a controller then, in the Physical Devices tree, select a disk drive.
2. On the ribbon, in the Physical Disk group, click Set Properties.
Proprietary and Confidential to PMC-Sierra, Inc.
Document No.: CDP-00278-02-A Rev. A, Issue:
80
maxView Storage Manager User's Guide
The Set Properties window opens.
3. In the Write-back Cache drop-down list, select Enabled or Disabled.
4. Click OK.
Working with Controllers
This section describes how to use maxView Storage Manager to manage the controllers in your storage
space:
• To silence a controller alarm, see Silencing a Controller Alarm on page 81.
• To disable a controller alarm, see Disabling a Controller Alarm on page 81.
• To re-scan a controller, see Rescanning a Controller on page 82.
• To set the controller's default task priority, see Setting a Controller's Default Task Priority on page
82.
• To enable Native Command Queuing (NCQ) on a controller, see Enabling Native Command Queuing
on a Controller on page 82.
Silencing a Controller Alarm
When a Warning- or Error-level event occurs, an audible alarm is triggered on the controller. You can
silence the alarm on your local system while you fix the problem.
To silence the alarm:
1. In the Enterprise View, select the controller.
2. On the ribbon, in the Controller group, click Silence Alarm.
Disabling a Controller Alarm
Warning- or Error-level events trigger an audible alarm on a controller, which sounds until the event is
resolved. The alarm is enabled by default, but can be disabled, if required.
Caution: If you disable the alarm, no audible signal will sound when an error occurs
on the controller.
To disable a controller's alarm:
1. In the Enterprise View, select a controller.
2. On the ribbon, in the Controller group, click Set Properties.
Proprietary and Confidential to PMC-Sierra, Inc.
Document No.: CDP-00278-02-A Rev. A, Issue:
81
maxView Storage Manager User's Guide
The Set Properties window opens.
3. In the Alarm drop-down list, select Disabled.
Note: To enable a disabled alarm, select Enabled from the drop-down list.
4. Click Apply.
The alarm is disabled for that system.
Rescanning a Controller
After you connect a disk drive or remove a Ready (non-failed) disk drive from a controller, maxView
Storage Manager may not recognize the change until it rescans the controller.
To rescan a controller:
1. In the Enterprise View, select the controller.
2. On the ribbon, in the Controller group, click Rescan.
The Rescan window opens.
3. Click the Rescan button (on the Rescan window).
maxView Storage Manager scans all the channels or ports on the controller you selected.
4. When the scan is complete, click Cancel to close the Rescan window.
Setting a Controller's Default Task Priority
Note: This setting applies to new tasks. It does not affect currently running tasks.
To set the default priority for all tasks running on the controller:
1. In the Enterprise View, select a controller.
2. On the ribbon, in the Controller group, click Set Properties.
The Set Properties window opens.
3. On the General Settings tab, in the Task Priority drop-down list, select High, Medium, or Low.
4. Click Apply.
Enabling Native Command Queuing on a Controller
Native Command Queuing, or NCQ, lets SATA disk drives arrange commands into the most efficient
order for optimum performance.
To enable or disable NCQ for the drives on a controller:
1. In the Enterprise View, select a controller.
2. On the ribbon, in the Controller group, click Set Properties.
Proprietary and Confidential to PMC-Sierra, Inc.
Document No.: CDP-00278-02-A Rev. A, Issue:
82
maxView Storage Manager User's Guide
The Set Properties window opens.
3. On the General Settings tab, in the NCQ drop-down list, select Enabled or Disabled.
4. Click Apply.
Working with System Alarms
Warning- or Error-level events on a system trigger an audible alarm, a series of beeps which sound every
five minutes (or 300 seconds) until the event is resolved.
The alarm is enabled by default, but can be disabled on any system, if required. You can also change
the frequency and duration of the alarm.
Note: A system alarm is not the same as a controller alarm. For controller alarm
information, see Working with Controllers on page 81.
To change alarm settings on a system:
1. In the Enterprise View, select a system.
2. On the ribbon, in the System group, click System Settings.
The maxView Storage Manager Agent Settings window opens. The alarm settings are circled in the
next figure.
3. Edit the alarm settings, as needed.
You can disable the system alarm by deselecting Sound Alarm.
Proprietary and Confidential to PMC-Sierra, Inc.
Document No.: CDP-00278-02-A Rev. A, Issue:
83
maxView Storage Manager User's Guide
4. Click OK.
The changes take effect immediately.
Updating Controller and Disk Drive Firmware
Note: This task is recommended for advanced users only.
maxView Storage Manager includes a wizard to help you update the firmware on the controllers and
disk drives in your storage space. The wizard updates the firmware for devices of the same type on the
local or a remote system.
For example, if your storage space includes disk drives from two different manufactures, you must
update the firmware for each manufacturer's drives separately by running the wizard twice. Additionally,
if you have more than one system in your storage space, you must run the wizard for each system
separately.
To update the firmware on the controllers and disk drives in your storage space, review the prerequisites
in Before You Begin on page 84, then follow one of these sets of instructions:
• Updating the Controller Firmware on page 84
• Updating the Disk Drive Firmware on page 87
Before You Begin
Before you begin, download the latest firmware images from the Adaptec Web site at www.adaptec.com,
or from your vendor's support site on the World Wide Web. Controller images come in sets of one or
more files and have a .ufi file extension. Disk drive image file names vary by manufacturer.
Updating the Controller Firmware
Use the Firmware Update wizard to update the firmware for one or more controllers of the same type
on the local or a remote system.
To update the controller firmware:
1. In the Enterprise View, select a system.
2. On the ribbon, in the System group, click FW Update.
3. When the wizard opens, select Controller, then click Next.
Proprietary and Confidential to PMC-Sierra, Inc.
Document No.: CDP-00278-02-A Rev. A, Issue:
84
maxView Storage Manager User's Guide
4. Click Choose, browse the file system for the firmware update file (typically, a .ufi file), click Open
to select the file (the button label may be different on your browser), then click Upload.
5. When the file name appears in the Uploaded F/W File(s) list, click Next.
6. Select the controllers you want to update, then click Next.
Proprietary and Confidential to PMC-Sierra, Inc.
Document No.: CDP-00278-02-A Rev. A, Issue:
85
maxView Storage Manager User's Guide
7. Review the update summary, then click Finish.
Caution: Do not power down the controller(s) while the update is in progress!
8. When the update is complete, click OK. Restart the server to activate the new firmware image.
Proprietary and Confidential to PMC-Sierra, Inc.
Document No.: CDP-00278-02-A Rev. A, Issue:
86
maxView Storage Manager User's Guide
Updating the Disk Drive Firmware
Use the Firmware Update wizard to update the firmware for one or more disk drives of the same type
on the local or a remote system. The procedure is similar to updating the controller firmware (see
Updating the Controller Firmware on page 84).
To update the disk drive firmware:
1. In the Enterprise View, select a system.
2. On the ribbon, in the System group, click FW Update.
3. When the wizard opens, select Disk Drive, then click Next.
4. In the Select Files panel, click Choose, browse the file system for the firmware update file, click Open
to select the file (the button label may be different on your browser), then click Upload.
5. When the file name appears in the Uploaded F/W File(s) list, click Next.
6. In the Select Devices panel, select the disk drives you want to update, then click Next.
7. Review the update summary, then click Finish.
Caution: Do not power down the controller(s) while the update is in progress!
8. When the update is complete, click OK. Restart the server to activate the new firmware image.
Proprietary and Confidential to PMC-Sierra, Inc.
Document No.: CDP-00278-02-A Rev. A, Issue:
87
maxView Storage Manager User's Guide
10
Monitoring Status and Activity
This section describes how maxView Storage Manager helps you monitor status and activity in your
storage space.
Monitoring Options
maxView Storage Manager provides many ways to monitor the status of your storage space:
• Event Log—The main window of maxView Storage Manager features an event log that provides
at-a-glance status information about activity (or events) occurring in your storage space. All Warningand Error-level events are also recorded in your operating system's event log.
See Viewing Activity Status in the Event Log on page 89 and Changing an Operating System's Event
Log Setting on page 102.
• Task Log—The main window also features a task log that provides status information about the
progress of current or recurring tasks in your storage space, such as the creation or verification of
a logical drive.
See Viewing Task Status in the Task Log on page 90.
• Storage Dashboard—Occupying the largest portion of the main window in maxView Storage Manager,
the Storage Dashboard provides complete, at-a-glance, information about the components of your
storage space, including status information, physical and logical device properties, resources, and
reliability indicators for hard drives and SSDs.
See Viewing Component Status in the Storage Dashboard on page 90.
• Chart View—Provides a visual representation of free and used space for a system, controller, or
your entire storage space.
See Viewing Storage Space Usage in Chart View on page 93.
• Notifications—You can set maxView Storage Manager to email or broadcast status notifications in
your choice of format to help you monitor activities in your storage space, such as:
∘ Changes in the status of physical devices, such as disk drive failures.
∘ Changes on local or remote systems, such as the expansion of a logical drive or the creation of
a hot spare.
∘ Changes in temperature in storage enclosures, or that fans or power supplies within an enclosure
have failed.
See pages Notifying Users by Email About Status and Activity on page 93 and Broadcasting Alerts
About Status and Activity on page 99.
• Advanced Statistics—You can set maxView Storage Manager to log advanced I/O and usage statistics
for the RAID controllers in your system.
See Monitoring Advanced Statistics about Activity in Your Storage Space on page 99.
• Audible Alarm—A series of beeps sounds whenever a serious event occurs on your storage space.
See Working with System Alarms on page 83.
Checking Status from the Main Window
You can view status information and messages about the activity occurring in your storage space by
looking at the event log, status icons, and task log in the main window of maxView Storage Manager.
(You can also view all events for a system in its operating system event log; see Changing an Operating
System's Event Log Setting on page 102.) Using the Storage Dashboard and Chart View, you can also
monitor the physical and logical components of your storage space from the main window, including
summary information and status, physical and logical device properties and resources, and usage and
I/O statistics.
Proprietary and Confidential to PMC-Sierra, Inc.
Document No.: CDP-00278-02-A Rev. A, Issue:
88
maxView Storage Manager User's Guide
Viewing Activity Status in the Event Log
The Event Log lists activity occurring in your storage space, with the most recent event listed at the top.
Status is indicated by icons (see What Do the Event Status Icons Mean? on page 89) in the left-hand
column, as shown in the figure below.
You can view events as they occur in the bottom panel of the maxView Storage Manager main window.
The main window displays the last 100 events in your storage space. To view more events, filtered by
device (a controller, for example), open the Event tab on the Storage Dashboard (see Viewing Component
Status in the Storage Dashboard on page 90).
Single-click any event to open the Event Log Detail window to see more information in an easier-to-read
format. Use the up and down arrows to view previous or following events.
Single-click to view
event details.
To make it easier to find a specific event, click on the column heads to sort the events. For example,
sorting the events by Severity can help you find specific Error- or Warning-level events quickly.
What Do the Event Status Icons Mean?
maxView Storage Manager indicates event status with icons. This table lists the three categories, or
types, of events based on severity.
Icon
Status
Examples
Information
The local system successfully connected to a remote system.
A logical drive was created.
A hot spare was deleted.
Warning
A logical drive is in a degraded state.
A disk drive is being rebuilt.
A controller is not responding to an enclosure.
Error
A controller has failed.
A logical drive has failed.
A disk drive or hot spare has failed.
Proprietary and Confidential to PMC-Sierra, Inc.
Document No.: CDP-00278-02-A Rev. A, Issue:
89
maxView Storage Manager User's Guide
Icon
Status
Examples
An enclosure is overheating.
Multiple fans or power supplies within an enclosure have failed.
An enclosure is not responding.
Note: All Warning- and Error-level events also cause the audible alarm to sound. See
Working with Controllers on page 81 for more information.
Viewing Task Status in the Task Log
The Task Log shows the status and progress of tasks in your storage space, with the most recent task
listed at the top.
Single-click any task to open the Task Log Detail window to see more information in an easier-to-read
format. For more information about monitoring and scheduling tasks in maxView Storage Manager,
see Working with Scheduled Tasks on page 71.
Single-click to view
task details
Viewing Component Status in the Storage Dashboard
The Storage Dashboard provides detailed information about the components of your storage space,
including local and remote systems, controllers, logical devices, enclosures, disk drives and SSDs.
Occupying the largest portion of the main window in maxView Storage Manager, the Storage Dashboard
organizes component information by category, with a tabs providing one-click access to summary
information and status, properties, resources, and usage statistics.
The information on the Storage Dashboard varies, depending on which component is selected in the
Enterprise View. The figure below shows the Storage Dashboard for a controller. Tabs provide access
to summary information, controller properties, and resources. The Events tab shows filtered events
about the selected device (see Viewing Activity Status in the Event Log on page 89).
Note: For information about Chart View, on the right side of the Storage Dashboard,
see Viewing Storage Space Usage in Chart View on page 93.
Proprietary and Confidential to PMC-Sierra, Inc.
Document No.: CDP-00278-02-A Rev. A, Issue:
90
maxView Storage Manager User's Guide
This table lists the categories and types of information provided on the Storage Dashboard for each
component in your storage space.
Component
Categories
Examples
System
Summary
System name and IP address
Operating system
Number and type of controllers
Alarm status (see Working with System Alarms on page 83)
Controller
Summary
Properties
Resources
Model, key features, and status
Number of physical drives, logical drives and status
Performance mode, settings, and power management features
maxCache status
Health and activity of flash backup module, if present ("Green backup" status)
Physical drive assignments by logical device (see Revealing More Device
Information on page 33)
Logical
drives and
maxCache
devices
Summary
Resources
Raid level, size, and status
Member drives and locations
Cache settings
Hot spare protection
Power management status
Drive segment allocation
Enclosure
Summary
Enclosure type, vendor, model and status
Fan, power supply, and temperature status (see Monitoring Enclosure Status
on page 92)
Slot allocation and usage
Hard drives
and SSDs
Summary
Resources
SMART Statistics
Drive type (hard drive, SSD), vendor, and model
Drive state (Ready, Optimal, Hot Spare)
Channel number and device ID
Cache settings, power management status, and transfer speed
Drive segment allocation
SMART statistics (see Viewing SMART Statistics on page 92)
Proprietary and Confidential to PMC-Sierra, Inc.
Document No.: CDP-00278-02-A Rev. A, Issue:
91
maxView Storage Manager User's Guide
Monitoring Enclosure Status
If your storage space includes an enclosure with an enclosure management device, such as a SCSI
Accessed Fault-Tolerant Enclosure (SAF-TE) processor, maxView Storage Manager displays temperature,
fan, and power module status on the Storage Dashboard, as shown in the figure below.
Viewing SMART Statistics
You can use the Storage Dashboard to view various indicators of reliability for the SATA hard drives and
SSDs in your storage space. maxView Storage Manager displays SMART statistics for the drives using
Self-Monitoring, Analysis and Reporting Technology available on most contemporary hard drives and
non-spinning storage devices. You can use this information to verify the health of your hard drives and
SSDs and to predict drive failures.
To view the SMART statistics for a hard drive or SSD, select the drive in the Enterprise View, then click
the SMART tab on the Storage Dashboard. For SSDs, the statistics include wear-level and longevity
indicators, as shown in next figure. Refer to your drive vendor's data sheet for a description of individual
report items.
SSD wear-level and
longevity indicators
Proprietary and Confidential to PMC-Sierra, Inc.
Document No.: CDP-00278-02-A Rev. A, Issue:
92
maxView Storage Manager User's Guide
Viewing Storage Space Usage in Chart View
Chart View provides a visual representation of the free and used space for a system, controller, or your
entire storage space (all systems and controllers). Located on the right side of the Storage Dashboard
in the maxView main window, Chart View displays a pie chart of storage space usage.
To view storage space usage in Chart View, simply select the component in the Enterprise View (a
system, for instance); the chart view is updated immediately. To view more details about the use of
storage space on that component, move your mouse over any colored section of the pie chart; hover
text reveals the amount of space represented by that section, as shown in the figure below.
Hover text reveals
storage space usage
details
Notifying Users by Email About Status and Activity
You can set up maxView Storage Manager to send email messages (or notifications) to one or more
email addresses when an event occurs on a system, such as the creation of a logical drive or the failure
of a disk drive. Email notifications can help you monitor activity on your entire storage space from any
location, and are especially useful in storage spaces that include multiple systems running the maxView
Storage Manager Agent only. Email notifications can also help ensure that urgent issues receive immediate
attention from the right people.
Follow the instructions in this section to:
• Set up email notifications (see Setting Up Email Notifications on page 93).
• Send a test email (see Sending a Test Message on page 96).
• Modify or remove an email recipient (see Modifying Recipient Information or Removing a Recipient
on page 97).
• Modify email server settings (see Modifying Email Server Settings on page 98).
• Create an email notification template (see Creating an Email Notification Template on page 98).
Setting Up Email Notifications
This section describes how to set up email notifications for one system. If you want to monitor multiple
systems by email, you must complete the tasks in this section for each one separately.
Before you begin, note this information:
• The address of your Simple Mail Transfer Protocol (SMTP) server (host name and domain, or TCP/IP
address)
Proprietary and Confidential to PMC-Sierra, Inc.
Document No.: CDP-00278-02-A Rev. A, Issue:
93
maxView Storage Manager User's Guide
• The email address of each person who will receive email notifications
To set up email notifications:
1. In the Enterprise View, select a system.
2. On the ribbon, in the System group, click System Settings.
3. When the System Settings window opens, click the SMTP tab.
4. Enter the IP address of your SMTP server and the server's port number (or use the default port).
Then, enter the “From” address that you want to appear in your email notifications. If an email
recipient will be replying to email notifications, be sure that the “From” address belongs to a system
that is actively monitored.
5. If authentication is enabled on your SMTP server (that is, the server requires authentication details
before it will send messages to users), select Use Secure Mail Server, then enter the SMTP server's
login credentials (username/password) in the space provided.
6. On the System Settings window, click the Email tab.
The Email Notifications Manager opens.
Proprietary and Confidential to PMC-Sierra, Inc.
Document No.: CDP-00278-02-A Rev. A, Issue:
94
maxView Storage Manager User's Guide
7. Click Add Email. When the Add Email window opens, enter the recipient's email address, select the
level of events that will trigger an email notification for that recipient (Error, Error/Warning,
Error/Warning/Informational), then click Add. (For more information about event levels, see What
Do the Event Status Icons Mean? on page 89.)
Repeat this step to add more email recipients.
Each recipient appears in the Email Notifications Manager, as shown below:
Proprietary and Confidential to PMC-Sierra, Inc.
Document No.: CDP-00278-02-A Rev. A, Issue:
95
maxView Storage Manager User's Guide
8. When you're done adding email recipients, click OK.
The email recipients and your SMTP server settings are saved.
9. Repeat the steps in this section for each system you want to monitor with email notifications, then
continue by sending test messages to all recipients (see Sending a Test Message on page 96).
Sending a Test Message
To ensure that an email recipient is receiving event notifications, you can send them a test message.
To send a test message:
1. In the Enterprise View, select the system you want.
2. On the ribbon, in the System group, click System Settings.
3. When the System Settings window opens, click the Email tab.
The Email Notifications Manager opens.
4. Select one or more email addresses to send a test message to. To select all addresses, click the check
box at the top of the list, as shown in the figure below.
Proprietary and Confidential to PMC-Sierra, Inc.
Document No.: CDP-00278-02-A Rev. A, Issue:
96
maxView Storage Manager User's Guide
5. Click Send Test Email.
If the test is successful, the email recipient(s) receive the test message. If the test fails:
• Ensure that the recipient's email address is correct. (See Modifying Recipient Information or
Removing a Recipient on page 97.)
• Ensure that your SMTP server address is correct. (See Modifying Email Server Settings on page
98.)
• Try sending the test message again.
Modifying Recipient Information or Removing a Recipient
To modify a recipient's email address or change the types of event notifications the recipient receives,
you have to delete and recreate the recipient record in the Email Notifications Manager.
To modify a recipient's information or to stop sending email notifications to a recipient:
1. In the Enterprise View, select a system.
2. On the ribbon, in the System group, click System Settings.
3. When the System Settings window opens, click the Email tab.
The Email Notifications Manager opens.
4. Select the email recipient you want to modify or remove, then click Delete Email.
If you simply want to stop sending email notifications to the recipient, click OK to close the Email
Notifications Manager; otherwise, continue with the next step.
5. To modify the recipient's email address or to change the types of event notifications the recipient
receives, click Add Email. When the Add Email window opens, change the information as required,
then click OK.
The modified information appears in Email Notifications Manager.
6. Click OK to close the Email Notifications Manager and save the changes.
Proprietary and Confidential to PMC-Sierra, Inc.
Document No.: CDP-00278-02-A Rev. A, Issue:
97
maxView Storage Manager User's Guide
Modifying Email Server Settings
You can modify these email server settings, if required:
• Address and port of your SMTP server
• ‘From’ address that will appear in email notifications
• Secure server login credentials
To modify email server settings:
1. In the Enterprise View, select a system.
2. On the ribbon, in the System group, click System Settings.
3. When the System Settings window opens, click the SMTP tab.
4. Edit the SMTP server settings as required, then click OK to save your changes.
Creating an Email Notification Template
You can create an email notification template with a custom subject line and notification preamble. The
notification preamble precedes the system-generated event message (created by maxView Storage
Manager), which includes (but is not limited to) the following information:
• System on which the event occurred
• Timestamp
• Severity level (Error, Warning, Information)
• Event details
To create an email notification template:
1. In the Enterprise View, select a system.
2. On the ribbon, in the System group, click System Settings.
3. When the System Settings window opens, click the Email tab.
The Email Notifications Manager opens.
4. In the Event Email Template section, enter a subject line for the email notification, then enter a
notification message.
5. Click OK to save the template.
Proprietary and Confidential to PMC-Sierra, Inc.
Document No.: CDP-00278-02-A Rev. A, Issue:
98
maxView Storage Manager User's Guide
Broadcasting Alerts About Status and Activity
You can set maxView Storage Manager to send status alerts about a specified system to all users who
are logged into your storage space. You might want to do this if your storage space isn't managed by a
dedicated person, or if that particular system is off-site or not connected to a monitor. Event alerts
signal everyone working on the storage space that a system requires technical assistance.
When you set maxView Storage Manager to broadcast event alerts, all logged-in users receive messages
about all types of events. In Windows, these alerts appear as pop-up messages; in all other operating
systems, these alerts appear as console messages.
Note: Event alerts are independent of email notifications (see Notifying Users by
Email About Status and Activity on page 93).
To enable event alerts:
1. In the Enterprise View, select a system.
2. On the ribbon, in the System group, click System Settings.
The Agent Settings window for that system opens.
3. Click Broadcast Events to Logged-In Users, then click OK.
4. Restart maxView Storage Manager to apply the change.
Monitoring Advanced Statistics about Activity in Your Storage Space
You can set maxView Storage Manager to log advanced I/O and usage statistics about the RAID controllers,
hard drives, SSDs, and logical drives in your storage space, including maxCache caching statistics.
Follow the instructions in this section to:
• Enable statistics logging on a controller (see Setting up Statistics Logging on page 99).
• View the advanced statistics for a controller, hard drive, SSD, or logical drive (see Viewing Advanced
Statistics on page 100).
• Reset the statistics counters (see Resetting the Statistics Counters on page 101).
Setting up Statistics Logging
To set up statistics logging for the controllers in your storage space:
1. In the Enterprise View, select a system, then select a controller.
2. On the ribbon, in the Controller group, click Set Properties.
The Set Properties window opens.
3. In the Advanced Statistics drop-down list, select Enabled.
Proprietary and Confidential to PMC-Sierra, Inc.
Document No.: CDP-00278-02-A Rev. A, Issue:
99
maxView Storage Manager User's Guide
4. Click Apply.
Viewing Advanced Statistics
Use the Statistics Viewer to view the advanced statistics for the controllers, hard drives, SSDs, and
logical drives in your storage space, including maxCache caching statistics. To view the statistics for a
component, select it in the Enterprise View then, on the Storage Dashboard, click the Advanced Statistics
link, on the Summary tab.
Select a component in
the Enterprise View,
then click this link on
the Storage Dashboard.
The statistics listed vary, depending on which type of component you select. The following example
shows the advanced statistics for a controller (on the left) and the maxCache statistics for a logical
drive, including cache hits and misses and a histogram of cache hit distribution.
Proprietary and Confidential to PMC-Sierra, Inc.
Document No.: CDP-00278-02-A Rev. A, Issue:
100
maxView Storage Manager User's Guide
Controller Statistics
maxCache Statistics
for a Logical Drive
Resetting the Statistics Counters
In maxView Storage Manager, advanced statistics are cumulative. That is, the statistics continue to
accumulate until you reset the counters for a controller to zero.
To reset the statistics counters for a controller:
1. In the Enterprise View, select a system, then select the controller you want to reset.
2. On the ribbon, in the Controller group, click Set Properties.
The Set Properties window opens.
3. Click the Reset Now button, then click Apply.
The statistics counters are reset.
Proprietary and Confidential to PMC-Sierra, Inc.
Document No.: CDP-00278-02-A Rev. A, Issue:
101
maxView Storage Manager User's Guide
Changing an Operating System's Event Log Setting
In addition to the maxView Storage Manager event log, all Warning- and Error-level events on a system
are recorded in its operating system event log. You can customize the level of events that are recorded,
or you can disable operating system event logging.
To change or disable operating system event logging on a system:
1. In the Enterprise View, select a system.
2. On the ribbon, in the System group, click System Settings.
The Agent Settings window opens for that system.
3. In the Save Events to OS Log drop-down list, select the type of events that you want to log, then
click OK.
4. Restart maxView Storage Manager to apply the new setting.
Proprietary and Confidential to PMC-Sierra, Inc.
Document No.: CDP-00278-02-A Rev. A, Issue:
102
maxView Storage Manager User's Guide
11
Managing Your Storage Space
This section describes the advanced features in maxView Storage Manager that help you manage your
storage space. You can:
• Deploy servers with a server template file
• Manage remote systems and auto-discovery tasks with the Remote System wizard
• Clear a controller configuration
• Use a custom base port for the maxView Storage Manager Agent
Deploying Servers
maxView Storage Manager helps you deploy servers in your storage space without configuring each
server manually. You can select an optimally configured server in your storage space, save the controller
configuration to a sever template file, then duplicate the configuration on servers throughout your
network.
The basic procedure works like this:
1. Choose the system you want to use as the model for other servers in your storage space.
2. Save the configuration to a server template file for each controller on that system.
3. Log in to each remote system in your storage space and restore the controller(s) from the server
template file(s).
The following sections provide details on each of these steps.
Creating a Server Template File
This procedure saves the configuration of a controller that you want to use as a model for other servers
in your storage space. It creates a server template file in XML format, which defines the controller type,
operational settings, physical drive size, logical drive size, RAID level, and more. The default name of
the server template file is ControllerConf.xml.
To create a server template file:
1. In the Enterprise View, select a system, then select a controller on that system.
2. On the ribbon, in the Controller group, click Save Configuration.
The Save Configuration window opens.
3. Click Save to continue.
4. When the File Download window opens, click Save, enter a name for the server template file or
accept the default name, then click Save again.
5. When the download is complete, click Close.
6. Continue with Duplicating the Server Template on page 103 to deploy the same controller configuration
on multiple systems in your storage space.
Duplicating the Server Template
When you are ready to duplicate the server template on other systems in your storage space, you can
restore the controller(s) on those systems from the server template file.
Keep in mind that:
Proprietary and Confidential to PMC-Sierra, Inc.
Document No.: CDP-00278-02-A Rev. A, Issue:
103
maxView Storage Manager User's Guide
• The server template file (default, ControllerConf.xml) is editable. For example, you may need
to change the disk drive capacity or logical drive size to accommodate the differences on each
machine.
• Drives from the same vendor with slightly different capacities (147GB vs 150GB, for instance) are
considered interchangeable. If the logical drive capacity changes as a result of the size difference,
it is scaled accordingly. For example, if the new drives have 4% more capacity due to vendor or model
changes, then all logical drives are increased in size by 4%.
To duplicate the server template on another system:
1. In the Enterprise View, select a system, then select a controller on that system.
2. On the ribbon, in the Controller group, click Restore Configuration.
The Restore Configuration window opens.
3. Click Browse, navigate the file system to your server template file, then click Open.
4. Choose a Force option if the new controller does not support all of the features of the template
controller, or if the drive capacity on the new system does not match the configuration in the server
template file. The default is Force None. You can choose to:
Options
Description
Force All
To force deployment of all features
Force Logical
Drives
To force deployment of just the logical drives
5. To retain the slot information for enclosures, click Use Slot ID.
6. Click Restore.
maxView Storage Manager duplicates the controller configuration on the new controller.
Proprietary and Confidential to PMC-Sierra, Inc.
Document No.: CDP-00278-02-A Rev. A, Issue:
104
maxView Storage Manager User's Guide
7. Repeat these steps for each controller on the server. Choose a different server template file in Step
3, as needed.
Managing Remote Systems
maxView Storage Manager has a wizard to help you manage the remote systems in your storage space.
The wizard simplifies the process of connecting to remote systems from the local system and adding
them to the Enterprise View.
When you start maxView Storage Manager, an “auto-discovery” task runs in the background, continuously
searching your network for systems running the maxView Storage Manager Agent. The wizard presents
a list of discovered systems (see figure below). You can select systems to add to the Enterprise View
when you start maxView Storage Manager; add systems manually if they are not discovered automatically;
and remove systems that you no longer want to manage.
Adding Remote Systems with the Wizard
For basic instructions for adding remote systems with the wizard, see Logging into Remote Systems
from the Local System on page 38. Once you add a system in the wizard, it automatically appears in the
Enterprise View each time you start maxView Storage Manager. You can work with a remote system's
controllers, disk drives, and logical drives as if they were part of your local system.
Note: The wizard adds all selected systems to the Enterprise view even if login fails
on some systems. For those systems, try running the wizard again with different login
credentials.
Manually Adding a Remote System
You can add a remote system manually if auto-discovery fails to find the system on your network.
To manually add a remote system:
1. On the ribbon, in the Home group, click Add System.
Proprietary and Confidential to PMC-Sierra, Inc.
Document No.: CDP-00278-02-A Rev. A, Issue:
105
maxView Storage Manager User's Guide
2. When the Add System window opens, click System Not Present.
The Add System Manually window opens.
3. Enter the system name and login credentials in the space provided, then click Add.
The window closes and the system appears in the discovered systems list in the Add System window.
4. Select the system, then click Add.
maxView Storage Manager connects to the remote system and adds it to the Enterprise View.
Removing a Remote System
If you no longer want to manage a remote system, you can remove it from the Enterprise View.
Note: Removing a remote system from the Enterprise View does not take it off-line.
To remove a remote system:
1. On the ribbon, in the Home group, click Delete System.
The Delete System window opens.
2. Select the system(s) you want to remove. To select all systems in the list, click the checkbox at the
top of the window.
Proprietary and Confidential to PMC-Sierra, Inc.
Document No.: CDP-00278-02-A Rev. A, Issue:
106
maxView Storage Manager User's Guide
3. Click Delete.
maxView Storage Manager removes the remote system(s) from the Enterprise View.
Changing the Auto-Discovery Settings
Auto-discovery, in maxView Storage Manager, is enabled by default. The auto-discovery task runs in
the background each time maxView Storage Manager is started. You can disable auto-discovery if
desired, and configure the auto-discovery settings described below.
To change the auto-discovery settings on a system:
1. In the Enterprise View, select a system.
2. On the ribbon, in the System group, click System Settings.
The maxView Storage Manager Agent Settings window opens for that system. The auto-discovery
settings appear at the bottom:
Proprietary and Confidential to PMC-Sierra, Inc.
Document No.: CDP-00278-02-A Rev. A, Issue:
107
maxView Storage Manager User's Guide
3. To enable/disable auto-discovery, select Enable Auto Discovery. (This option toggles between
enabled and disabled.)
4. Update the auto-discovery settings, as needed:
• In the Auto Discovery Base Port field, enter the port number for the auto-discovery task. You
can use any available port for auto-discovery. The default port is 34570. If you change the port,
you must restart the maxView Storage Manager Agent for the change to take effect.
• In the Auto Discovery Interval field, enter the number of seconds between each auto-discovery
check. This number determines how often maxView Storage Manager checks for changes in
remote system resources. The default is 360 seconds.
5. Click OK to save the changes.
Clearing the Controller Configuration
You can clear the configuration of a controller, if needed, to accommodate changes in your storage
space. For example, you may want to clear a controller if you upgraded your hardware or if you plan to
move the controller to another machine. Clearing the configuration destroys the controller meta-data,
including logical device information, partition information, maxCache information, and so on. Once you
clear the controller configuration, your online data is no longer accessible.
Caution: When you clear a controller configuration, you lose all data stored on that
controller. Be sure you no longer need the data on the controller before proceeding.
To clear the controller configuration:
1. In the Enterprise View, select a system, then select a controller on that system.
2. On the ribbon, in the Controller group, click Clear Configuration.
A message window opens, warning that this operation destroys your data.
Proprietary and Confidential to PMC-Sierra, Inc.
Document No.: CDP-00278-02-A Rev. A, Issue:
108
maxView Storage Manager User's Guide
3. Click OK to clear the configuration; click Cancel to close the window without clearing the configuration.
Changing the Agent Base Port Setting
You can change the base port setting for the maxView Storage Manager Agent, if needed, to
accommodate changes in your network or IT requirements. The Agent can use any open port for
communication. The default port is 34571. If you change the port, you must restart the maxView Storage
Manager Agent for the change to take effect.
To change the Agent base port setting:
1. In the Enterprise View, select a system.
2. On the ribbon, in the System group, click System Settings.
The Agent Settings window opens. In the figure below, the base port setting is circled in blue.
3. Enter the new base port, then click OK.
4. Restart the Agent.
Proprietary and Confidential to PMC-Sierra, Inc.
Document No.: CDP-00278-02-A Rev. A, Issue:
109
maxView Storage Manager User's Guide
12
Solving Problems
This section describes how to troubleshoot the components in your storage space.
General Troubleshooting Tips
If you experience problems installing or using maxView Storage Manager, try these troubleshooting tips
first:
• Ensure that all managed systems are powered on and that you are logged in to any remote systems
that you want to manage. (See Logging into Remote Systems from the Local System on page 38 for
more information.)
• Check all cable connections.
• Try uninstalling and reinstalling maxView Storage Manager.
• Check the Readme on the installation DVD for compatibility issues and known problems.
Identifying a Failed or Failing Component
When you receive notice of a Warning- or Error-level event, use maxView Storage Manager's rapid fault
isolation feature to quickly identify the source of the problem.
For instance, in this example, a disk drive has failed. To find the failed disk drive, expand the tree in the
Enterprise View, look for the orange and red warning and error icons, and continue tracing the problem
to its source.
Error is on local system...
...on Controller 1
...affecting two Logical Drives
...and a physical device in Slot 2 in Enclosure 0.
Click Slot 2 to check the device status on the Storage
Dashboard and continue tracing the fault to its source...
...a disk drive failure.
Proprietary and Confidential to PMC-Sierra, Inc.
Document No.: CDP-00278-02-A Rev. A, Issue:
110
maxView Storage Manager User's Guide
Recovering from a Disk Drive Failure
This section describes how to recover when a disk drive or SSD fails:
• If the logical drive is protected by a hot spare, see Failed Disk Drive Protected by a Hot Spare on page
111.
• If the logical drive is not protected by a hot spare, see Failed Disk Drive Not Protected by a Hot Spare
on page 111.
• If there is a disk drive failure in more than one logical drive simultaneously, see Failure in Multiple
Logical Drives Simultaneously on page 111.
• If it is a RAID 0 logical drive, see Disk Drive Failure in a RAID 0 Logical Drive on page 112.
• If multiple disk drives fail within the same logical drive, see Multiple Disk Drive Failures in the Same
Logical Drive on page 112.
Failed Disk Drive Protected by a Hot Spare
If a disk drive in a logical drive fails and that logical drive is protected by a hot spare, the hot spare is
automatically incorporated into the logical drive and takes over for the failed drive.
For example, if a disk drive fails in a RAID 5 logical drive, the logical drive is automatically rebuilt, with
its data reconstructed using the hot spare in place of the failed drive. You can access the logical drive
while it's rebuilding.
To recover from the failure:
1. Remove and replace the failed disk drive, following the manufacturer's instructions.
2. If copyback is not enabled—Remove the ‘hot spare’ designation from the original hot spare (the disk
drive that was built into the logical drive). See Removing or Deleting a Dedicated Hot Spare on page
48 for instructions. Then, designate a new hot spare to protect the logical drives on that controller.
If copyback is enabled—Data is automatically moved back to its original location once the controller
detects that the failed drive has been replaced. No action is required. See Enabling Copyback on
page 49 for more information.
Failed Disk Drive Not Protected by a Hot Spare
If a disk drive in a logical drive fails when the logical drive is not protected by a hot spare, remove and
replace the failed disk drive. The controller detects the new disk drive and begins to rebuild it. You can
access the logical drive while it's rebuilding.
For example, when one of the disk drives fails in a RAID 1 logical drive, the logical drive is not automatically
rebuilt. The failed disk drive must be removed and replaced before the logical drive can be rebuilt.
If the controller fails to rebuild the logical drive, check that the cables, disk drives, and controllers are
properly installed and connected. Then, if necessary, follow the instructions in Rebuilding Logical Drives
on page 113.
Failure in Multiple Logical Drives Simultaneously
If a disk drive fails in more than one logical drive at the same time (one failure per logical drive), and
the logical drives have hot spares protecting them, the controller rebuilds the logical drives with these
limitations:
• A hot spare must be of equal or greater size than the failed disk drive it's replacing.
• Failed disk drives are replaced with hot spares in the order in which they failed. (The logical drive
that includes the disk drive that failed first is rebuilt first, assuming an appropriate hot spare is
available—see the previous bullet.)
Note: If the number of disk drive failures exceeds the number of hot spares, see Failed
Disk Drive Not Protected by a Hot Spare on page 111.
If copyback is enabled, data is moved back to its original location once the controller detects that the
failed drive has been replaced. See Enabling Copyback on page 49 for more information.
Proprietary and Confidential to PMC-Sierra, Inc.
Document No.: CDP-00278-02-A Rev. A, Issue:
111
maxView Storage Manager User's Guide
Disk Drive Failure in a RAID 0 Logical Drive
Because RAID 0 volumes do not include redundancy, if a disk drive fails in a RAID 0 logical drive, the
data cannot be recovered.
Correct the cause of the failure or replace the failed disk drives. Then, restore your data from backup,
if available.
Multiple Disk Drive Failures in the Same Logical Drive
If multiple disk drives fail in the same logical drive, you may be able to recover the data by recreating
the logical drive in the wizard without the initialization step. Omitting the initialization step reconstructs
the logical drive meta-data without modifying or destroying any other data on the disks.
Note: RAID 6 and RAID 60 logical drives support two simultaneous disk drive failures.
In some instances, RAID 10 and RAID 50 logical drives may survive multiple disk drive
failures, depending on which disk drives fail. See Selecting the Best RAID Level on page
114 for more information.
Caution: This procedure is not guaranteed to successfully recover your logical drive.
The surest way to recover your data is to restore the failed logical drive from backup.
To recreate the logical drive after multiple drive failures:
1.
2.
3.
4.
Start the logical drive creation wizard, select Custom Configuration, then click Next.
Choose the same RAID level as the original logical drive, then click Next.
Select the same set of disk drives as the original logical drive, then click Next.
Ensure that all RAID Attributes are the same as the original logical drive, click Skip Initialization, then
click Next.
5. Click Finish.
maxView Storage Manager builds the logical drive.
6. Check the logical drive for data and file system integrity. If you still cannot access the data, initialize
the physical drives (to erase the meta-data), then rebuild the logical drive again without initialization,
selecting the disk drives in a different order in Step 3. You may need to try several different disk
drive orders (called the “stripe order”) before you can recover the data..
Note: On the Summary panel, uninitialized logical drives have an “Impacted” status.
Proprietary and Confidential to PMC-Sierra, Inc.
Document No.: CDP-00278-02-A Rev. A, Issue:
112
maxView Storage Manager User's Guide
Rebuilding Logical Drives
A hot-swap rebuild occurs when a controller detects that a failed disk drive in a logical drive has been
removed and then reinserted.
To start a hot-swap rebuild:
1. Following manufacturer's instructions, gently pull the failed disk drive from the server without fully
removing it, then wait for it to spin down fully before continuing.
2. If there is nothing wrong with the disk drive, reinstall it, following manufacturer's instructions.
If necessary, replace the failed disk drive with a new disk drive of equal or larger size.
3. The controller detects the reinserted (or new) disk drive and begins to rebuild the logical drive.
Creating a Support Archive File
Your Adaptec by PMC support representative might ask you to create a configuration and status
information archive file to help diagnose a problem with your system.
To create the support archive file:
1. In the Enterprise View, select the system on which the problem is occurring. (Look for the orange
or red error icons in the Enterprise View.)
2. On the ribbon, in the System group, click Save Archive.
The Save Archive window opens.
3. Click Save.
4. When the File Download window opens, enter a name for the archive file or accept the default
name, then click Save.
5. In the Save Archive window, click Close.
Proprietary and Confidential to PMC-Sierra, Inc.
Document No.: CDP-00278-02-A Rev. A, Issue:
113
maxView Storage Manager User's Guide
A
Selecting the Best RAID Level
When you create logical drives in maxView Storage Manager, you can assign a RAID level to protect
your data.
Each RAID level offers a unique combination of performance and redundancy. RAID levels also vary by
the number of disk drives they support.
This section provides a comparison of all the RAID levels supported by maxView Storage Manager, and
provides a basic overview of each to help you select the best level of protection for your storage system.
Proprietary and Confidential to PMC-Sierra, Inc.
Document No.: CDP-00278-02-A Rev. A, Issue:
114
maxView Storage Manager User's Guide
Comparing RAID Levels
Use this table to select the RAID levels that are most appropriate for the logical drives on your storage
space, based on the number of available disk drives and your requirements for performance and reliability.
RAID Level
Redundancy
Disk Drive
Usage
Read
Performance
Write
Performance
Built-in Hot
Spare
Minimum
Disk Drives
RAID 0
No
100%
***
***
No
2
RAID 1
Yes
50%
**
**
No
2
RAID 1E
Yes
50%
**
**
No
3
RAID 10
Yes
50%
**
**
No
4
RAID 5
Yes
67 – 94%
***
*
No
3
RAID 5EE
Yes
50 – 88%
***
*
Yes
4
RAID 50
Yes
67 – 94%
***
*
No
6
RAID 6
Yes
50 – 88%
**
*
No
4
RAID 60
Yes
50 – 88%
**
*
No
8
Disk drive usage, read performance, and write performance depend on the number of drives in the
logical drive. In general, the more drives, the better the performance.
Understanding Drive Segments
A drive segment is a disk drive or portion of a disk drive that is used to create a logical drive. A disk drive
can include both RAID segments (segments that are part of a logical drive) and available segments. Each
segment can be part of only one logical drive at a time. If a disk drive is not part of any logical drive, the
entire disk is an available segment.
Proprietary and Confidential to PMC-Sierra, Inc.
Document No.: CDP-00278-02-A Rev. A, Issue:
115
maxView Storage Manager User's Guide
Non-redundant Logical Drives (RAID 0)
A logical drive with RAID 0 includes two or more disk drives and provides data striping, where data is
distributed evenly across the disk drives in equal-sized sections. However, RAID 0 logical drives do not
maintain redundant data, so they offer no data protection.
Compared to an equal-sized group of independent disks, a RAID 0 logical drives provides improved I/O
performance.
Drive segment size is limited to the size of the smallest disk drive in the logical drive. For instance, an
array with two 250 GB disk drives and two 400 GB disk drives can create a RAID 0 drive segment of 250
GB, for a total of 1000 GB for the volume, as shown in this figure.
Disk Drive 1
250 GB
Disk Drive 2
250 GB
Disk Drive 3
400 GB
Drive Segment Size
(Smallest Disk Drive)
Disk Drive 1
1 5 . . . 997
Disk Drive 2
2 6 . . . 998
Disk Drive 3
3 7 . . . 999
Unused Space = 150 GB
Disk Drive 4
Disk Drive 4
400 GB
Disk Drives in Logical Drive
4 8 . . . 1000
Unused Space = 150 GB
RAID 0 Logical Drive = 1000 GB
RAID 1 Logical Drives
A RAID 1 logical drive is built from two disk drives, where one disk drive is a mirror of the other (the
same data is stored on each disk drive). Compared to independent disk drives, RAID 1 logical drives
provide improved performance, with twice the read rate and an equal write rate of single disks. However,
capacity is only 50 percent of independent disk drives.
If the RAID 1 logical drive is built from different- sized disk drives, the free space, drive segment size is
the size of the smaller disk drive, as shown in this figure.
Proprietary and Confidential to PMC-Sierra, Inc.
Document No.: CDP-00278-02-A Rev. A, Issue:
116
maxView Storage Manager User's Guide
Drive Segment Size
(Smallest Disk Drive)
Disk Drive 1
Disk Drive 2
250 GB
400 GB
Disk Drive 1
1 – 250
Disk Drive 2
1 – 250
Unused Space = 150 GB
RAID 1 Logical Drive = 250 GB
Disk Drives in Logical Drive
RAID 1 Enhanced Logical Drives
A RAID 1 Enhanced (RAID 1E) logical drive—also known as a striped mirror—is similar to a RAID 1 array
except that data is both mirrored and striped, and more disk drives can be included. A RAID 1E logical
drive can be built from three or more disk drives.
In this example, the large bold numbers represent the striped data, and the smaller, non-bold numbers
represent the mirrored data stripes.
Disk Drive 1
400 GB
Disk Drive 2
400 GB
Disk Drive 3
400 GB
Disk Drives in Logical Drive
Proprietary and Confidential to PMC-Sierra, Inc.
Document No.: CDP-00278-02-A Rev. A, Issue:
Disk Drive 1
3
6
Disk Drive 2
1
4
Disk Drive 3
2
5
RAID 1E Logical Drive = 600 GB
117
maxView Storage Manager User's Guide
RAID 10 Logical Drives
A RAID 10 logical drive is built from two or more equal-sized RAID 1 logical drives. Data in a RAID 10
logical drive is both striped and mirrored. Mirroring provides data protection, and striping improves
performance.
Drive segment size is limited to the size of the smallest disk drive in the logical drive. For instance, an
array with two 250 GB disk drives and two 400 GB disk drives can create two mirrored drive segments
of 250 GB, for a total of 500 GB for the logical drive, as shown in this figure.
Disk Drive 1
250 GB
Disk Drive 2
250 GB
Disk Drive 3
400 GB
Drive Segment Size
(Smallest Disk Drive)
Disk Drive 1
1 3
. . . 499
Disk Drive 2
2 4
. . . 500
Disk Drive 3
1 3
. . . 499
Unused Space = 150 GB
Disk Drive 4
Disk Drive 4
400 GB
Disk Drives in Logical Drive
Proprietary and Confidential to PMC-Sierra, Inc.
Document No.: CDP-00278-02-A Rev. A, Issue:
2 4
. . . 500
Unused Space = 150 GB
RAID 10 Logical Drive = 500 GB
118
maxView Storage Manager User's Guide
RAID 5 Logical Drives
A RAID 5 logical drive is built from a minimum of three disk drives, and uses data striping and parity
data to provide redundancy. Parity data provides data protection, and striping improves performance.
Parity data is an error-correcting redundancy that's used to re-create data if a disk drive fails. In RAID
5 logical drives, parity data (represented by Ps in the next figure) is striped evenly across the disk drives
with the stored data.
Drive segment size is limited to the size of the smallest disk drive in the logical drive. For instance, an
array with two 250 GB disk drives and two 400 GB disk drives can contain 750 GB of stored data and
250 GB of parity data, as shown in this figure.
Disk Drive 1
250 GB
Disk Drive 2
250 GB
Disk Drive 3
400 GB
Drive Segment Size
(Smallest Disk Drive)
Disk Drive 1
1 4
.. .
P
Disk Drive 2
2 5
. . . 748
Disk Drive 3
3 P
. . . 749
Unused Space = 150 GB
Disk Drive 4
Disk Drive 4
400 GB
Disk Drives in Logical Drive
Proprietary and Confidential to PMC-Sierra, Inc.
Document No.: CDP-00278-02-A Rev. A, Issue:
P 6
. . . 750
Unused Space = 150 GB
RAID 5 Logical Drive = 750 GB plus Parity
119
maxView Storage Manager User's Guide
RAID 5EE Logical Drives
A RAID 5EE logical drive—also known as a hot space—is similar to a RAID 5 array except that it includes
a distributed spare drive and must be built from a minimum of four disk drives.
Unlike a hot spare, a distributed spare is striped evenly across the disk drives with the stored data and
parity data, and can't be shared with other logical disk drives. A distributed spare improves the speed
at which the array is rebuilt following a disk drive failure.
A RAID 5EE logical drive protects your data and increases read and write speeds. However, capacity is
reduced by two disk drives’ worth of space, which is for parity data and spare data.
In this figure, S represents the distributed spare, P represents the distributed parity data.
Disk Drive 1
250 GB
Disk Drive 2
250 GB
Disk Drive 3
Drive Segment Size
(Smallest Disk Drive)
400 GB
Disk Drive 1
1 S
.. .
P
Disk Drive 2
2 P
. . . 449
Disk Drive 3
S 3
.. .
S
Unused Space = 150 GB
Disk Drive 4
Disk Drive 4
400 GB
Disk Drives in Logical Drive
Proprietary and Confidential to PMC-Sierra, Inc.
Document No.: CDP-00278-02-A Rev. A, Issue:
P 4
. . . 500
Unused Space = 150 GB
Based on the drive segment sizes used:
RAID 5EE Logical Drive = 500 GB plus parity
and hot spare
120
maxView Storage Manager User's Guide
RAID 50 Logical Drive
A RAID 50 logical drive is built from six to forty-eight disk drives configured as two or more RAID 5 arrays,
and stripes stored data and parity data across all disk drives in both RAID 5 logical drives. (For more
information, see RAID 5 Logical Drives on page 119.)
The parity data provides data protection, and striping improves performance. RAID 50 logical drives
also provide high data transfer speeds.
Drive segment size is limited to the size of the smallest disk drive in the logical drive. For example, three
250 GB disk drives and three 400 GB disk drives comprise two equal-sized RAID 5 logical drives with 500
GB of stored data and 250 GB of parity data. The RAID 50 logical drive can therefore contain 1000 GB
(2 x 500 GB) of stored data and 500 GB of parity data.
In this figure, P represents the distributed parity data.
RAID 50
Logical Drive
=
1000 GB
plus Parity
RAID 5
A
Each RAID 5 Logical Drive has
500 GB Data Storage
250 GB Parity Data
1, 5, P
3, P, 9
P, 7, 11
Drive 1
250 GB
Drive 2
250 GB
Drive 3
250 GB
Proprietary and Confidential to PMC-Sierra, Inc.
Document No.: CDP-00278-02-A Rev. A, Issue:
RAID 5
B
2, 6, P
4, P, 10
P, 8, 12
Drive 4
400 GB
Drive 5
400 GB
Drive 6
400 GB
Total Unused
Space = 150 GB
121
maxView Storage Manager User's Guide
RAID 6 Logical Drives
A RAID 6 logical drive—also known as dual drive failure protection—is similar to a RAID 5 logical drive
because it uses data striping and parity data to provide redundancy. However, RAID 6 logical drives
include two independent sets of parity data instead of one. Both sets of parity data are striped separately
across all disk drives in the logical drive.
RAID 6 logical drives provide extra protection for your data because they can recover from two
simultaneous disk drive failures. However, the extra parity calculation slows performance (compared
to RAID 5 logical drives).
RAID 6 logical drives must be built from at least four disk drives. Maximum stripe size depends on the
number of disk drives in the logical drive.
Disk Drive 1
250 GB
Disk Drive 2
250 GB
Disk Drive 3
400 GB
Drive Segment Size
(Smallest Disk Drive)
Disk Drive 1
1 P1 . . . P2
Disk Drive 2
2 P2 . . . 449
Disk Drive 3
P1 3 . . . P1
Unused Space = 150 GB
Disk Drive 4
Disk Drive 4
400 GB
Disk Drives in Logical Drive
P2 4 . . . 500
Unused Space = 150 GB
Based on the drive segment sizes used:
RAID 6 Logical Drive = 500 GB plus parity
(P1 & P2)
RAID 60 Logical Drives
Similar to a RAID 50 logical drive (see RAID 50 Logical Drive on page 121), a RAID 60 logical drive—also
known as dual drive failure protection—is built from eight disk drives configured as two or more RAID
6 logical drives, and stripes stored data and two sets of parity data across all disk drives in both RAID 6
logical drives.
Two sets of parity data provide enhanced data protection, and striping improves performance. RAID 60
logical drives also provide high data transfer speeds.
Proprietary and Confidential to PMC-Sierra, Inc.
Document No.: CDP-00278-02-A Rev. A, Issue:
122
maxView Storage Manager User's Guide
B
Icons At-a-Glance
The following is a complete list of icons used in maxView Storage Manager. It contains the icons on the
ribbon, in the Enterprise View and on tabs and dialog boxes.
See Overview of the Main Window on page 28 for more information.
Ribbon Home Icons
Icon
Description
Remote system add
Remote system delete
Ribbon System Icons
Icon
Description
System settings
Firmware update
Save archive file
Ribbon Controller Icons
Icon
Description
Controller settings
Save configuration
Restore configuration
Controller rescan
Silence alarm
Clear configuration
Ribbon Logical Disk Icons
Icon
Description
Logical disk with gear
Logical disk create
Logical disk expand
Logical disk verify
Logical disk locate
Proprietary and Confidential to PMC-Sierra, Inc.
Document No.: CDP-00278-02-A Rev. A, Issue:
123
maxView Storage Manager User's Guide
Icon
Description
Logical disk delete
Logical disk erase
Ribbon Physical Disk Icons
Icon
Description
Physical disk set
Assign physical disk as spare
Unassign physical disk as spare
Physical disk initialization
Physical disk verify
Physical disk erase
Physical disk locate
Ribbon MaxCache Icons
Icon
Description
maxCache container create
maxCache set properties
maxCache locate
maxCache container verify
maxCache container delete
maxCache container disable
Enterprise View Icons
Icon
Description
Enterprise View
Local or remote system
Controller
Enclosure
Logical disk
Proprietary and Confidential to PMC-Sierra, Inc.
Document No.: CDP-00278-02-A Rev. A, Issue:
124
maxView Storage Manager User's Guide
Icon
Description
Logical disks
Physical disk
Hard disk drive
Solid State drive
Physical disks
Enclosure
Connector or other physical device
Enterprise View Status Icons
Icon
Description
Enterprise OK
Enterprise error
Enterprise no access
Enterprise warning
Enterprise View System Icons
Icon
Description
System OK
System error
System missing
System no access
System warning
Enterprise View Connector Icons
Icon
Description
Connector OK
Connector failed
Connector missing
Proprietary and Confidential to PMC-Sierra, Inc.
Document No.: CDP-00278-02-A Rev. A, Issue:
125
maxView Storage Manager User's Guide
Icon
Description
Connector warning
Enterprise View Controller Icons
Icon
Description
Controller OK
Controller failed
Controller missing
Controller warning
Enterprise View Enclosure Icons
Icon
Description
Enclosure Management OK
Enclosure Management failed
Enclosure missing
Enclosure Management warning
Enterprise View Physical Disk Icons
Icon
Description
Physical disk OK
Physical disks OK
Physical disks failure
Physical disks missing
Physical disks warning
Enterprise View MaxCache Container Icons
Icon
Description
maxCache container error
maxCache container missing
maxCache container OK
Proprietary and Confidential to PMC-Sierra, Inc.
Document No.: CDP-00278-02-A Rev. A, Issue:
126
maxView Storage Manager User's Guide
Icon
Description
maxCache container warning
Tab Icons
Icon
Description
Summary
Properties
Resources
Events
Task
Dialog Box Icons
Icon
Description
E-mail notification
Chart
Proprietary and Confidential to PMC-Sierra, Inc.
Document No.: CDP-00278-02-A Rev. A, Issue:
127
maxView Storage Manager User's Guide
Index
A
activity in storage space 32
event log 32
task log 32
activity on storage space, See monitoring
adapters, See controllers
Add System wizard 105
adding maxCache SSD caching 63, 66
Series 6 controllers 63, 66
advanced settings 43, 64
Agent 16, 36, 37, 38
introduction 16, 36, 38
starting 37
Linux 37
Solaris 37
Windows 37
startup order 36
alarm 81
controllers 81
disabling 81
disabling 81
controller-level 81
systems 81
silencing 81
ARCCONF command line utility 14, 78
SETSTATE command 78
archive file 113
auto-discovery 105
automatic verification 58
B
background consistency check 58, 59
background verification 58
boards, See controllers
Bootable DVD mode 17, 25
broadcasting event alerts 88, 99
build method 43, 57, 111, 112
Build 43, 57
Clear 43, 57
Quick 43, 57
Skip Initialization 57, 111, 112
building storage space 15, 35, 39, 41, 52, 53, 54, 63,
66, 68
adding maxCache SSD caching 63, 66
custom configuration 39, 41, 53, 54, 68
express configuration 39
C
cards, See controllers
CIM server 16, 20
Proprietary and Confidential to PMC-Sierra, Inc.
Document No.: CDP-00278-02-A Rev. A, Issue:
command line utility 14, 78
ARCCONF 14, 78
components 13, 75
defined 13
viewing properties 75
Configuration Event Detail window 89
configuring 39
See also building storage space
controller 32, 33, 91, 108
clearing configuration 108
controllers 75, 81, 82, 84, 87
disabling alarm 81
properties 75
rescanning 81, 82
updating firmware 84, 87
copyback 49, 111
custom configuration 39, 41, 53, 54, 68
D
dedicated hot spares 45, 46, 48, 111
creating 45, 46
deleting 48, 111
removing 48, 111
deleting logical drives 62
deleting tasks 74
direct attached storage 13
defined 13
disk drive 84, 87
updating firmware 84, 87
disk drive segments 115
disk drives 42, 49, 52, 53, 54, 57, 62, 75, 78, 79, 84,
111, 112
conceptual graphic 52
different sizes in same logical drive 52, 53
failed state 78
failure recovery 49, 57, 111, 112
multiple disk drives 57, 111, 112
multiple logical drives 111
RAID 0 logical drives 111, 112
with hot spare 49, 111
without hot spare 111
identifying 75
initializing 79
locating 75
properties 75
replacing in logical drives 78
segments in logical drives 52, 54, 62
updating firmware 84
within logical drives 42
drives 75
identifying 75
locating 75
128
maxView Storage Manager User's Guide
E
H
email notifications 88, 93, 94, 96, 97, 98, 99
"from" address 94
changing "from" address 93, 97, 98
changing SMTP server 93, 97, 98
failed test emails 97
modifying recipient information 93, 97
recipient addresses 93
removing recipients 93, 97
setup 93
SMTP server settings 94
template 93, 98
test emails 93, 96
Email Notifications Manager 88, 93, 96, 99
opening 93
test emails 93, 96
enclosures 32, 75, 91, 92
fan status 32, 91, 92
identifying 75
locating 75
monitoring 32, 91, 92
power status 32, 91, 92
status 32
temperature status 32, 91, 92
Enterprise View 29, 30
icons 30
Error (task status) 73
event alerts 88, 99
event log 32, 88
event log (operating system) 102
events 32
See also monitoring
expanding logical drives 54, 57, 60, 62
express configuration 39
RAID levels 39
hard disk 14
hard disk drive 14
hard drive, See disk drive
help 34
hot spares 45, 46, 48, 52, 111
creating 45
creating dedicated 45, 46
creating pool spare 45, 46
dedicated 45
defined 45
deleting 48, 111
global 45
defined 45
limitations 45, 46
removing 48, 111
hybrid RAID 42, 53, 54
F
failed disk drives 57, 111, 112
multiple disk drives 57, 111, 112
multiple logical drives 111
RAID 0 logical drives 111, 112
without hot spare 111
failover 50
firmware 84, 87
Firmware Update wizard 84
formatting logical drives 40, 43, 44
G
global hot spares 45, 47
deleting 47
Green Backup status 91
Proprietary and Confidential to PMC-Sierra, Inc.
Document No.: CDP-00278-02-A Rev. A, Issue:
I
icons 30, 89, 95
Enterprise View 30
event status icons 89, 95
identifying components 75
initialize method 57
initializing disk drives 79, 112
skipping 112
L
Linux 37
starting the Agent 37
local systems 35
locating drives 75
logging in 28, 35, 36
logging into remote systems 38
logging out 34
logical drives 35, 39, 40, 41, 42, 43, 44, 50, 52, 53, 54,
55, 56, 57, 58, 59, 60, 61, 62, 64, 68, 78, 111,
113, 115, 116, 117, 118, 119, 120, 121, 122
advanced settings 43, 64
automatic verification 58
background consistency check 58
background verification 58
build method 43, 57
building 39
basic 39
changing RAID levels 57, 61
custom configuration 39, 41, 53, 54, 68
defined 52
deleting 62
different-sized disk drives 52, 53
disabling background consistency check 58, 59
disk drive segments 52, 54, 62, 115
enabling background consistency check 58, 59
expanding 54, 57, 60, 62
fine-tuning 43, 55, 64
formatting 40, 43, 44
129
maxView Storage Manager User's Guide
logical drives (continued)
hybrid RAID 42, 53, 54
increasing capacity 54, 57, 60, 62
initialize methods 57
manual verification 58
maximum size 60
non-redundant 116
options for creating 39
partitioning 40, 43, 44
RAID 1 116
RAID 10 118
RAID 1E 117
RAID 5 119, 121
RAID 50 121, 122
RAID 5EE 120
RAID 6 122
RAID 60 122
RAID segments 115
read cache 56
rebuilding 50, 78, 111, 113
remove disk drive or segment 60, 61
renaming 55
replace disk drive or segment 60, 61
replacing disk drives 78
selecting disk drives 42
selecting RAID levels 41
stripe size 57
verifying 58
verifying and fixing 58, 59
write cache setting 56
M
main window 28, 32, 34, 75, 78, 88, 89, 90, 95, 123
event details 89
event log 88
Logout button 34
monitoring activity and status 88
notification types 88, 89, 95
event log 88
event status icons 89, 95
overview 28, 123
status icons 89, 95
Storage Dashboard 32, 75, 78, 88, 89, 90
task details 90
manual verification 58
maxCache 29, 43, 62, 63, 66, 100
cache hits and misses 100
configuring 29, 43, 62
read caching 62
with Series 6 controllers 63, 66
write caching 62
maxCache container 63
creating 63
maxCache Container 63, 64, 65
coherency check 64, 65
deleting 65
Flush and Fetch rate 64
selecting a RAID level 63
Proprietary and Confidential to PMC-Sierra, Inc.
Document No.: CDP-00278-02-A Rev. A, Issue:
maxCache Container (continued)
selecting SSDs 63
verifying and fixing 64
maxCache device 63, 66
creating 63, 66
maxCache statistics 100
maxView Storage Manager 15, 16, 17, 21, 22, 28, 29,
30, 31, 36, 38, 88, 123
Agent 16, 36, 38
beginning steps 15
Enterprise View 29
event log 88
icons 30
introduction 15, 36
logging into remote systems 38
main window overview 28, 123
ribbon 31
Ribbon 29
system requirements 17, 21, 22
modifying tasks 73
monitoring 32, 72, 75, 78, 88, 89, 90, 93, 94, 95, 96,
97, 98, 99
device properties 75
email notifications 88, 93, 94, 96, 97, 98, 99
"from" address 94
changing "from" address 93, 97, 98
changing SMTP server 93, 97, 98
failed test emails 97
modifying recipient information 93, 97
recipient addresses 93
removing recipients 93, 97
setup 93
SMTP server settings 94
test emails 93, 96
Email Notifications Manager 88, 93, 99
event details 89
event log 32, 88
options 88
status icons 89, 95
Storage Dashboard 32, 75, 78, 88, 89, 90
task details 90
task log 32
tasks 72
monitoring tasks 72
N
Native Command Queuing 82
NCQ 82
non-redundant logical drives 116
notification types 88, 93, 99
email notifications 88, 93, 99
notifications 88, 99
event alerts 88, 99
O
online help 34
operating system event log 102
130
maxView Storage Manager User's Guide
operating systems 17
P
partitioning logical drives 40, 43, 44
physical drives 80
verifying and fixing 80
pool hot spares 45, 46
power management 68, 69, 70
disabling 70
stay awake period 69
timers 68
Properties tab 75
R
RAID 57, 116, 117, 118, 119, 120, 121, 122
non-redundant logical drives 116
RAID 0 116
RAID 1 116
RAID 10 118
RAID 1E 117
RAID 5 119, 121
RAID 50 121, 122
RAID 5EE 120
RAID 6 57, 122
stripe size 57
RAID 60 57, 122
stripe size 57
RAID levels 39, 41, 57, 61
changing 57, 61
custom configuration 41
express configuration 39
selecting 41
RAID segments 115
read cache 56
rebuilding (defined) 111
rebuilding logical drives 50, 78, 111, 113
recurring tasks 71
remote systems 35, 39, 105, 106
adding manually 39, 105
removing 106
renaming logical drives 55
rescanning controllers 81, 82
Resources View 32, 33, 91
ribbon 31, 38, 55, 56, 60, 61, 80, 82, 113
Add system 38
Change logical device name 55
Configure disk drive cache 80
Configure read cache 56
Expand or change logical device 60, 61
overview 31
Rescan 82
Save support archive 113
Ribbon 29
S
Scheduled (task status) 72
Proprietary and Confidential to PMC-Sierra, Inc.
Document No.: CDP-00278-02-A Rev. A, Issue:
scheduling tasks 59, 71, 73
rescheduling 73
supported tasks 59
verifying with fix 59
tasks you can schedule 71, 73
Secure erase 79
segments 52, 115
Selectable performance modes 57
Self-Monitoring Analysis and Reporting Technology
(SMART) 92
Server Template File 44, 103
silencing alarm 81
system-level 81
Skip Initialization method 112
SMART statistics 92
SMI-S provider 16, 20
SMTP server 93, 97, 98
Solaris 37
starting the Agent 37
spares, See hot spares
statistics counters 101
resetting 101
statistics logging 99, 100, 101
counters 101
enabling 99
viewing 100
Statistics Viewer 100
status 32
See also monitoring
enclosures 32
event log 32
task log 32
See also monitoring
status icons 89, 95
main window 89, 95
Storage Dashboard 32, 75, 78, 88, 89, 90
storage space 13, 18
examples 18
stripe size 57
changing 57
support archive file 113
system requirements 17, 21, 22
systems 35, 75
local systems 35
properties 75
remote systems 35
T
task log 32
tasks 71, 72, 73, 74
deleting 74
missed start times 73
modifying 73
monitoring 72
recurring 71
scheduling 71, 73
temperature status 32, 91, 92
terminology 13
131
maxView Storage Manager User's Guide
U
verifying logical drives (continued)
manual verification 58
updating firmware 84, 87
V
verifying and fixing logical drives 58, 59
verifying and fixing physical drives 80
verifying logical drives 58
automatic verification 58
background verification 58
Proprietary and Confidential to PMC-Sierra, Inc.
Document No.: CDP-00278-02-A Rev. A, Issue:
W
Windows 37
starting the Agent 37
write cache 56
write-back 56
write-through 56
132
PMC-Sierra, Inc.
1380 Bordeaux Drive
Sunnyvale, CA 94089 USA
© Copyright PMC-Sierra, Inc. 2012
All rights reserved. Adaptec and the Adaptec by PMC logo
are trademarks of PMC-Sierra, Inc.
Part Number: CDP-00278-02-A Rev A
JPB 03/11