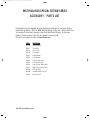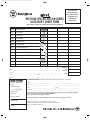
1
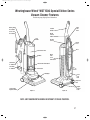
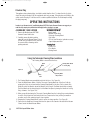
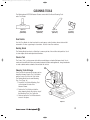
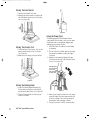
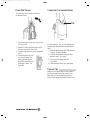
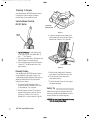
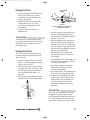
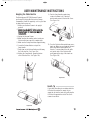
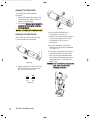
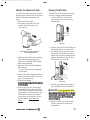
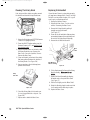
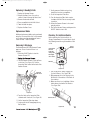
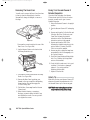
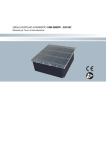
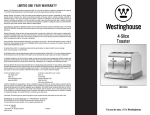
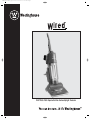
WST1500-1509_IB_12-6-03 6/12/03 9:17 PM Page 1
WST1500-1509 Special Edition Series Upright Vacuum
WST1500-1509_IB_12-6-03 6/12/03 9:17 PM Page 2
IMPORTANT SAFETY INSTRUCTIONS
This electrical appliance must always be used according to the following safety instructions:
READ ALL INSTRUCTIONS CAREFULLY BEFORE USING THIS APPLIANCE
WARNING: To reduce the risk of fire, electric shock or injury:
1. Always turn the appliance off before unplugging it.
2. Always unplug the appliance before cleaning or servicing it. Do not unplug by pulling the cord; to
unplug, grasp the plug, not the cord.
3. Do not leave the appliance plugged in or running while unattended.
4. Do not pull or carry the appliance by the cord. Do not run the appliance over the cord, close a
door on the cord, or pull the cord around sharp edges or corners. Keep the cord away from
heated surfaces.
5. Do not use the appliance if the cord or plug is damaged.
6. Avoid the use of extension cords.
7. Do not handle the plug or appliance with wet hands.
8. Do not use appliance outdoors, or on wet surfaces.
9. Do not use appliance to vacuum up water or damp materials such as mud, tile grout, plaster filler,
or caulking.
10. Do not use appliance to vacuum up flammable or combustible liquids, such as gasoline. Do not use
in areas where these liquids may be present.
11. Do not use this appliance to vacuum up burning or smoking materials, such as cigarettes, matches
or hot ashes.
12. Keep hair, loose clothing, and all parts of the body, especially fingers, away from openings and
moving parts.
13. Do not put any objects into appliance openings, or use with any openings blocked or plugged.
14. Do not use this appliance to pick up hard or sharp objects or other large surface litter. Pick these
up by hand before vacuuming.
15. Do not operate without the Collection Bin properly in place.
16. Always vacuum stairs with the appliance below you.
17. Do not allow the appliance to be used as a toy. Do not use or leave appliance plugged in near small
children or infants.
18. Always use the Cleaning Wand / Hose (and attachments) to clean upholstery.
19. Use the appliance only for normal household use, as described in this Use and Care Guide. Use
only with manufacturer's recommended attachments and accessories.
20. Turn appliance off before removing or replacing the Collection Bin or Filter Cartridges.
21. Unplug appliance before cleaning or maintenance, such as cleaning the Rotating Brush, removing a
blockage, or replacing a light bulb.
22. This appliance is protected from overheating by an automatic reset thermal limiter. If the appliance
shuts itself off, unplug it and check for blockages. Allow it to cool for 30 minutes before restarting.
23. If the appliance is not working as it should, or if it has been dropped, damaged, left outdoors or
dropped into water, return it to an authorized Service Center for inspection or repair. Do not repair
the appliance yourself, as this will invalidate your warranty. Contact Consumer Service for return
authorization, examination, repair or adjustment.
SAVE THESE INSTRUCTIONS
1
FOR HOUSEHOLD USE ONLY
WST1500-1509_IB_12-6-03 6/12/03 9:17 PM Page 3
Westinghouse Wired™ WST1500 Special Edition Series
Vacuum Cleaner Features
Product may vary slightly from illustrations
Dusting Brush
(P/N 40023)
Crevice Tool
(P/N 40015)
Upper
Cord
Hook
Vacuum
Handle
Wand
Release
Button
Carry
Handle
ON/OFF
Switch
Power
Cord
Hose
Electrostatic Filter
HEPA
Filter
Cover
(P/N 40027)
Bin Web
Floor Nozzle
(P/N 40022V)
Tool Holder
(P/N 40021)
Collection Bin (P/N 40024)
Dirt Arrestor
Headlight
Lower
Cord
Hook
Inspection
Plate
Carpet Height
Adjustment Dial
Figure 1a
Upright
Release
Pedal
Figure 1b
NOTE: UNIT SHOWN WITH HANDLE IN UPRIGHT STORAGE POSITION.
2
WST1500-1509_IB_12-6-03 6/12/03 9:17 PM Page 4
Polarized Plug
This appliance has a polarized plug (one blade is wider than the other.) To reduce the risk of electric
shock, this plug is intended to fit into a polarized outlet only one way. If the plug does not fit fully in the
outlet, reverse the plug. If it still does not fit, contact a qualified electrician. Do not attempt to modify
the plug in any way.
OPERATING INSTRUCTIONS
In order to get the most out of your Westinghouse WST1500 Series Vacuum Cleaner, we suggest you
read the easy step-by-step instructions thoroughly before starting to vacuum.
ACCESSORY / PARTS LIST
ASSEMBLING YOUR VACUUM
• Upper Handle
1. Remove the Westinghouse WST1500
• Vacuum Cleaner Body
Vacuum Cleaner from its box.
• Telescopic Cleaning Wand
2. Carefully remove all plastic packing
• Tool Holder
materials from the Vacuum Cleaner. Check
• 10 Foot Hose Extension (optional accessory)
to make sure you remove all the Tools and
• Spare Replacement Belt
Accessories before throwing out the
Cleaning Tools
packing materials.
• Crevice Tool
• Floor Nozzle
• Dusting Brush
Using the Telescopic Cleaning Wand and Hose
The Cleaning Wand is stored inside the Hose.
Wand
Rim
Cleaning Wand Handle
w/ Locking Ring
Figure 2a
Hose
Collar
Cleaning Wand
fully extended
1. The Cleaning Wand comes assembled inside into the Hose. (See Figure 2a.)
2. Press the Wand Release Button. Slide the Telescopic Cleaning Wand out of the Hose Collar by
gripping the Collar in one hand and the Cleaning Wand Handle in the other. Pull to extend, then
grasp the end of the Wand to extend the Wand to its full length. The Wand should slide out easily.
Once the Wand is at the desired length, lock the Wand into place by turning the Handle w/ Locking
Ring clockwise. (See Figure 10b.)
3. When you are finished using the Telescopic Cleaning Wand, turn the Locking Ring counterclockwise
to unlock. Slide it back into itself and into the Hose. Compress the Hose just like you would an
accordion so all of the retaining rings fit close together.
4. Grasping the Cleaning Wand Handle, guide it up into its storage position. (See Figure 1b.)
5. Push up on the Handle until it snaps and locks into place in the channel at the back of the Vacuum
Cleaner, under the Wand Release Button.
3
WST1500 Special Edition Series
WST1500-1509_IB_12-6-03 6/12/03 9:17 PM Page 5
CLEANING TOOLS
The Westinghouse WST1500 Vacuum Cleaner comes with 3 On-Board Cleaning Tools
and a Tool Holder.
Figure 3a
Floor Nozzle
(P/N 40022V)
Figure 3b
Dusting Brush
(P/N 40023)
Figure 3d
Tool Holder
(P/N 40021)
Figure 3c
Crevice Tool
(P/N 40015)
Floor Nozzle
Use the Floor Nozzle to clean low, hard-to-reach spaces, under furniture, where dust and dirt
accumulate. It's also a great way to clean stairs. Good for bare floor surfaces.
Dusting Brush
The Dusting Brush has short, soft bristles to remove pet hair, lint and fine dust particles. Use it
to clean drapes, blinds and upholstered furniture.
Crevice Tool
The Crevice Tool is a long narrow tool with a rounded larger end and a flat tapered end. Use to
reach and clean difficult nooks and crannies between furniture and appliances, along baseboards
or under cabinets where cobwebs, lint and dust like to hide.
Cleaning Tools Storage
Each Tool has its own special storage spot on
board the Vacuum Cleaner. The Floor Nozzle
and the Crevice Tool fit in the Tool Holder.
The Dusting Brush has its own Mounting
Peg. (See Figure 1a.)
1. Locate the Tool Holder Mounting Post
on the bottom left side of the
Vacuum Cleaner.
2. Position the Tool Holder so that the
dome-shaped cylinder fits right on top of
the Mounting Post. (See Figure 4a.)
3. Slide and press the Tool Holder down to
secure it into place.
Tool
Holder
Mounting
Post
Figure 4a
4
WST1500-1509_IB_12-6-03 6/12/03 9:17 PM Page 6
Storing The Floor Nozzle
1. Turn the Floor Nozzle on its side.
2. Grasping the round extension, slide the flat
end of the Nozzle front into the Tool Holder
Cup. (See Figure 4b.)
Figure 4d
Using the Power Cord
Figure 4b
Storing The Crevice Tool
1. Fit the wide end of the Crevice Tool onto the
dome-headed cylinder of the Tool Holder.
(See Figure 4c.)
2. Make sure it fits snugly so it won't fall off.
The Westinghouse WST1500 Vacuum Cleaner
comes with a 25 foot Power Cord so you can move
easily from room to room without plugging and
unplugging your Vacuum Cleaner.
1. Uncoil the Power Cord which is coiled tightly
for shipping.
2. The top of the Hose Handle splits as you rotate
the top portion upwards, creating the Upper
Cord Hook.
3. Wind the Cord around the Upper and Lower
Cord Hooks on the side of the Vacuum Cleaner
to store. (See Figure 5a.)
Turn Upper Hook
to the up position
to store cord.
Turn Lever down
to release cord.
Figure 4c
Storing the Dusting Brush
1. Locate the Dusting Brush Mounting Peg.
It's the small crossed post on the top left
side of the Vacuum Cleaner. (See Figure 4d.)
2. Slide the Dusting Brush onto the Peg and
secure it into place.
5
WST1500 Special Edition Series
Figure 5a
4. When you are ready to release the cord, simply
rotate the Upper Cord Hook down over the top
of the Hose Handle. The cord slips easily off
the machine, with no tangles or twists.
5. Plug the Cord into a 120V AC electrical outlet.
WST1500-1509_IB_12-6-03 6/12/03 9:17 PM Page 7
Power Cord Storage
Transporting Your Vacuum Cleaner
The Power Cord stores easily on the side of
the Vacuum Cleaner.
Carry
Handle
Figure 7
Figure 6a
1. Position the Upper Cord Hook so it points up.
(See Figure 6a.)
2. Wind the Cord first around the Upper Hook
and, then, around the Lower Hook.
3. Continue to wind until the cord is completely
coiled.
4. Secure the plug to the cord
so it doesn't unravel. The
rubber grip built onto the
plug will fit around the cord
and keep it in place. (See
Figure 6b.)
Figure 6b
Use the convenient, easy-to-grip Carry Handle to
transport your Vacuum Cleaner up and down the
stairs.
1. Return the Westinghouse WST1500 Vacuum
Cleaner to its upright position.
2. Locate the Carry Handle on the top of the
Vacuum Cleaner. (See Figure 7.)
3. Secure your hand firmly under the
Carry Handle.
4. Lift the Vacuum Cleaner up or down stairs.
Tools and Tips
Always use the Upper Handle or Carry Handle to
pull your Vacuum Cleaner from room to room.
Never pull your Vacuum Cleaner by the Hose.
Doing so may damage the Vacuum Cleaner Hose.
6
WST1500-1509_IB_12-6-03 6/12/03 9:17 PM Page 8
Preparing To Vacuum
Your Westinghouse WST1500 Vacuum Cleaner
is designed to clean a variety of surfaces:
Carpets, Bare Floors and Above Floors.
Vacuum Cleaner Controls:
ON/OFF Button
Carpet Height
Adjustment Slide
Figure 9a
ON/OFF
Switch
4. Locate the Upright Release Pedal on the
bottom back side of your Vacuum Cleaner
between the 2 wheels. (See Figure 9b.)
Figure 8
1. The ON/OFF Button is located at the base
of the Upper Handle. It is marked with “O”
and “ — ”. (See Figure 8.)
2. To turn the Vacuum Cleaner ON, depress the
ON/OFF Button to its down position.
3. Press the Button again to turn the Vacuum
Cleaner OFF. The Button will raise to the
upper position.
Cleaning Carpets
Your Westinghouse WST1500 Vacuum Cleaner
can be adjusted to any height of carpet. The
3-Way Carpet-Height Adjustment Slide lets you
adjust the Rotary Brush to the proper brush
height for your carpets.
1. The Carpet Height Adjustment Slide is
located on the top of the Base Cover, next
to the Headlight. (See Figure 9a.)
2. With the Vacuum Cleaner OFF and in the
upright locked position, push the Slide to
the top for Low Pile, to the center for
Medium Pile or to the bottom for High Pile.
Upright Release Pedal
Figure 9b
5. Grip the Upper Handle with 1 hand and
press down on the Pedal with either foot.
6. Tilt the Vacuum Cleaner back into a
comfortable position.
7. Push the Vacuum Cleaner onto the carpet
and begin vacuuming.
Safety Tip
Make sure you turn your Vacuum Cleaner OFF
whenever you make any adjustments or lift the
Vacuum Cleaner up or remove any part.
CAUTION: Be sure to keep fingers and toes away
from the moving Rotary Brush.
7
WST1500 Special Edition Series
WST1500-1509_IB_12-6-03 6/12/03 9:17 PM Page 9
Cleaning Wand
Handle
Cleaning Bare Floors
1. Steer the Westinghouse WST1500 Vacuum
Cleaner onto the bare floor you want to
clean. Return your Vacuum Cleaner to its
upright, locked position.
2. Attach the Floor Nozzle to the Telescopic
Cleaning Wand or Hose. (See “Using
Your Telescopic Cleaning Wand” section
of this manual.
3. Use the Floor Nozzle to clean tiles or
hardwood floors.
Tools and Tips
The Westinghouse WST1500 Vacuum Cleaner
Hose is made with reinforced steel. Its coils will
stay flexible and in good shape for the life of
your Vacuum Cleaner.
Cleaning Above Floors
The 10 Foot Telescopic Cleaning Wand, gives
you makes easy work to vacuum hard-to-reach,
above-floor areas.
1. Return your Vacuum Cleaner to its upright
position. (You may assemble while Vacuum
Cleaner is either ON or OFF.)
2. Rotate the Upper Cord Hook down so that it
fits snugly on top of the Hose Handle. Grab
the Hose Handle and press down firmly on
the colored Wand Release Button. (See
Figure 10a.)
3. The Telescopic Cleaning Wand will release
easily from the back of the Vacuum Cleaner.
Figure 10b
Lock the Wand into place by turning the
Locking Ring clockwise.
4. Slide the Telescopic Cleaning Wand out of
the Hose Collar by gripping the Collar in
one hand and the Cleaning Wand Handle in
the other. Pull to extend.
5. Grasp the Wand Rim in one hand, and use
your other hand to extend the Wand to its
full length. (See Figure 10b.) Keep pulling
it until it reaches the length you want. With
the Hose and Cleaning Wand fully extended,
there are 10 feet to work with.
6. If the Wand won't pull out easily, twist
the Locking Ring counter-clockwise and
loosen slightly.
7. Once the Wand is at the desired length, lock
the Wand into place by turning the Handle
w/ Locking Ring clockwise.
8. Notice that the airflow is automatically
redirected from the Power Head to the
Telescopic Cleaning Wand.
9. All On-Board Cleaning Tools will attach onto
the end of the Telescopic Cleaning Wand.
10. To return the Cleaning Wand to its locked
position inside the Hose, grasp the Hose
handle to place it into the channel at the
back of the Vacuum. Push the Handle
upwards until the Wand locks into place
with a click.
Tools and Tips
Figure 10a
When using the Cleaning Wand, do not leave
the appliance in one place for an extended
period of time as the Rotary Brush continues to
turn. Tilt the Vacuum Cleaner back using the
Upper Handle to protect more delicate surfaces.
.
8
WST1500-1509_IB_12-6-03 6/12/03 9:17 PM Page 10
Attaching Cleaning Tools
To The Wand
1. Select the appropriate Cleaning Tool for the
vacuuming job.
2. Release the Cleaning Wand.
3. Slide the Tool into the top of the Cleaning
Wand.
4. Firmly press the Tool in place. It should
fit snugly.
Attaching Cleaning Tools
To The Hose
You can also attach your Cleaning Tools directly
onto the Hose. This will give you the flexibility
to clean delicate china or fine collectibles that
must be dusted carefully.
1. Remove the Wand from the Hose. Extend
the Cleaning Wand as far as it will reach out
of the Hose.
2. Hold the Hose Collar in one hand and, using
your thumb and forefinger, press in both of
the Hose Collar Latches. (See Figure 11a.)
Hose Collar Latch
Figure 11a
3. With your other hand, pull the Wand all of
the way out of the Hose Collar. (See Figure
11a.)
4. Insert any Attachment directly into the Hose
Collar. (See Figure 11b.)
Figure 11b
9
WST1500 Special Edition Series
Tools and Tips
If you're having difficulty removing the Cleaning Wand
from the Hose Collar, rotate the Wand as you pull it
out. With continued use, the rubber Hose Collar will
soften and the Cleaning Wand will pull out more
easily.
Using the Hose Extension
(Optional Accessory)
If you have extra high ceilings or staircases, you may
want to purchase a Hose Extension. It will give you
additional cleaning reach. To purchase a Hose
Extension or any of the other cleaning accessories,
turn to the “Accessory/Parts List” in this manual.
Using The Hose Extension
1. Remove the Cleaning Wand from the Hose
following the instructions outlined in the
“Attaching Cleaning Tools to the Hose” section of
this manual.
2. Push the Tabs around the rim of the
Hose Collar.
3. At the same time, twist the Nozzle of the
Optional Hose Extension into the Hose Collar.
Make sure it slides in all the way.
4. If extra reach is needed, insert the Cleaning Wand
into the Hose Extension Collar.
5. Select the appropriate Cleaning Tool and attach to
either the Wand or directly to the Hose Extension.
6. Vacuum as usual.
Removing The Hose Extension
Always remove the Optional Hose Extension after
you've finished your cleaning task.
1. Push in the Tabs of the Extension Hose Collar.
This will release the Wand from
the Collar.
2. Pull out the Cleaning Wand.
3. Remove the Optional Extension Hose by pushing
in the Tabs of the Vacuum Cleaner Hose Collar and
pulling out the Hose Extension Nozzle.
4. Slide the Cleaning Wand back into the
Hose Collar.
Proper cleaning and maintenance will ensure the
highest operating performance of your Westinghouse
WST1500 Vacuum Cleaner.
WST1500-1509_IB_12-6-03 6/12/03 9:17 PM Page 11
USER MAINTENANCE INSTRUCTIONS
Emptying the Collection Bin
The Westinghouse WST1500 Vacuum Cleaner's
see-through Collection Bin fits inside a Storage
Compartment. It will fill up quickly, so it's a good idea
to empty it after every use.
1. Return your Vacuum Cleaner to its upright
position.
2. Always press the ON/OFF Button to turn the
Vacuum Cleaner OFF before you empty the
Collection Bin.
3. Unplug the Vacuum Cleaner.
4. Make sure that the swirling action inside your
Collection Bin has come to a complete stop.
5. Make sure the Rotary Brush has stopped moving.
6. Locate the Release Button on top of the
Carry Handle.
7. Press down on the Release Button and tilt away
the Collection Bin. (See Figure 12a.)
8. Holding the Carry Handle, grasp the bottom
of the Collection Bin. (See Figure 12b.)
9. Turn the Carry Handle a quarter turn
counter-clockwise to its "unlocked"
position and remove Collection Bin Cover.
(See Figure 13c.)
Figure 12c
10. Turn the Collection Bin upside down over a
trash can. Make sure you empty all dirt and
debris from above and below the Dirt
Arrestor. To ensure that all the dirt spills
out, tap the side of the Collection Bin
gently against the edge of the trash can.
(See Figure 12d.)
Figure 12d
Figure 12a
Health Tip
If you suffer from allergies or asthma, take the
Collection Bin outdoors to empty. As you
empty the dirt into the trash can, gently tap the
Collection Bin against the side of the can to
remove loose debris.
Figure 12b
10
WST1500-1509_IB_12-6-03 6/12/03 9:17 PM Page 12
Cleaning The Collection Bin
The Collection Bin should be washed
periodically.
1. Wash the Bin in warm water using a mild
soap. Avoid harsh or abrasive cleaners or
sponges. Rinse thoroughly.
2. Let it air dry. Make sure the Collection Bin is
completely dry before putting it back into
the Vacuum Cleaner.
WARNING: THIS BIN IS NOT DISHWASHER SAFE.
Replacing The Collection Bin
After cleaning, the Collection Bin Cover and
Collection Bin must be reassembled.
Figure 13a
1. Align the arrow on the Collection Bin Cover
with the UNLOCK icon on the Collection
Bin. (See Figures 13a and 13b.)
LOCK
Icon
Figure 13c
2. Insert the Inner Tube back into the
Collection Bin. (See Figure 13c.)
3. Rotate the Collection Bin Handle clockwise
so that you line up the arrow on the Bin
Cover with the LOCK icon on the
Collection Bin.
4. Insert the reassembled Collection Bin
bottom-first into the Storage Compartment.
(See Figure 13d.)
5. Line up the recessed area on the bottom of
Collection Bin with the Bin Mount at the
base of the Storage Compartment. Make
sure the Bin Catch snaps back into place on
the Vacuum Cleaner. You should hear an
audible "click."
WARNING: If the Collection Bin is not secured in
place, a loss of suction while
vacuuming could result.
UNLOCK
Icon
Figure 13b
Figure 13d
11
WST1500 Special Edition Series
WST1500-1509_IB_12-6-03 6/12/03 9:17 PM Page 13
Cleaning The Collection Bin Filter
Cleaning The HEPA Filter
To get the best possible performance from your
Vacuum Cleaner you should clean the Collection
Bin Filter after every use and wash once a
month.
1. Remove the Collection Bin.
2. Pull out the Collection Bin Filter from
its nest in the Collection Bin Cover.
(See Figure 14.)
The HEPA Filter will need cleaning once every
3 months to maintain optimal performance.
1. Locate the HEPA Filter. It's inside the
long, narrow Housing on the side of the
Vacuum Cleaner.
Figure 15a
Figure 14
The Foam Filter is nested in the bottom
of the Collection Bin Filter.
3. Remove the Foam Filter from the underside
of the Filter Assembly by grasping the
Plastic Post in the middle. Rinse in warm
water and dry completely.
4. Wash the Collection Bin Filter with warm
water and soap.
*For best results, immerse in soapy water
for 30 minutes.
5. Hold the Filter under running tap water until
water running out the bottom is clean and
there is no remaining soap.
6. Shake out excess water.
7. Air-dry the Collection Bin Filter thoroughly for
at least 24 hours.
8. Place the dry Foam Filter, with the larger
round end of the Foam Filter’s Plastic Post
into the bottom (the smaller end of the Post
remains visible) of the Collection Bin Filter.
Then insert the Collection Bin Filter back
into its storage nest inside the Collection
Bin Cover with the Foam Filter on the
bottom.
2. Slide the Louvered Cover of the Housing up
and off its Guide Rails. (See Figure 15a.)
3. The HEPA Filter fits snugly into the Filter
Housing. Pull the tabs at the top and the
bottom of the Filter to pull it away from the
machine. Gently pull the Filter out of the
Filter Housing. (See Figure 15b.)
Figure 15b
4. Tap Filter gently against trash container to
free and eliminate excess dirt and debris.
IMPORTANT! (DO NOT WASH HEPA FILTER)
We recommend that the HEPA Filter be checked
every 3 months to maintain performance. Under
normal circumstances, this Filter will seldom
need to be replaced.
5. Replace the HEPA Filter into its Housing.
Slide the Louvered Cover down into its
locked position.
12
WST1500-1509_IB_12-6-03 6/12/03 9:17 PM Page 14
Cleaning The Rotary Brush
Replacing A Broken Belt
Hair, string and other debris can gather around
the bristles and slow the Rotary Brush down.
If your Vacuum Cleaner is not working properly,
you may have a damaged Belt. Check to see that
the Belt is not stretched or broken. If it is, you'll
need to put on a Replacement Belt.
1. Unplug the Vacuum Cleaner.
2. Remove the Base Cover. (See the section
entitled: Removing the Base Cover.)
3. Remove the Rotary Brush by pulling it
straight up using both hands.
(See Figure 17.)
4. Clean out the dirt and debris that may have
accumulated between the metal plates and
the ends of the Rotary Brush Assembly.
5. Remove the old Belt and discard it.
Figure 16a
1. Return the Westinghouse WST1500 Vacuum
Cleaner to its upright position.
2. Press the ON/OFF Button making sure the
Vacuum Cleaner is OFF, and unplug it from
the electrical outlet.
3. Lay the Vacuum Cleaner on its back so that
the Rotary Brush faces up. Remove the
Base Cover. See section entitled: “How to
Remove the Base Cover.”
4. Clean out threads, pet hair and other debris
that have gathered between the bristles of
the Rotary Brush. (See Figure 16a.)
5. Remove any large objects that may have
jammed in the Brush.
Rotary
Valve Inlet
Figure 16b
6. Check the Rotary Valve Inlet to make sure
it is not clogged with dirt or objects. (See
Figure 16b.)
7. Replace and re-attach the Base Cover.
13
WST1500 Special Edition Series
Motor
Shaft
Belt
Align Metal End
Plates As Shown
Figure 17
6. Fit the Replacement Belt around the Rotary
Brush Assembly. Make sure it is not
twisted.
7. Replace the Brush Assembly by aligning
the metal ends so the points face down.
(See Figure 17.)
8. Pull the Belt tightly over the Motor Shaft.
9. Rotate the Brush by hand to make sure that
it rolls easily and the Belt stays in place.
10. Replace the Base Cover.
WST1500-1509_IB_12-6-03 6/12/03 9:17 PM Page 15
Replacing A Headlight Bulb
1. Unplug the Vacuum Cleaner.
2. Remove the Base Cover. See section
entitled: “How to Remove the Base Cover.”
3. Remove the burned out Bulb.
4. Press a new Bulb into the Bulb Socket.
5. Twist the Bulb into place.
6. Replace the Base Cover.
7. Gently remove all debris using a long,
straight tool such as a screwdriver.
8. Close the Inspection Plate Door.
9. Turn the Inspection Plate Latch counterclockwise until the Plate is securely locked
in position.
10. Return the Vacuum Cleaner to its normal
upright position.
11. Plug in the Vacuum Cleaner and depress the
ON/OFF Switch to turn it ON.
Replacement Bulbs
Additional replacement bulbs can be purchased
using the “Accessory/Parts List” in this manual
or by calling your nearest authorized Service
Center toll free: 1-800-616-8689.
Removing A Blockage
The Westinghouse WST1500 Vacuum Cleaner
may incur a loss of suction if there is a
blockage.
1. Press the ON/OFF Button to turn the
Vacuum Cleaner OFF.
2. U n p l u g t h e V a c u u m C l e a n e r .
3. Turn the Vacuum Cleaner to rest the Base
on its front. (See Figure 18.) Find the
Inspection Plate located at the back of the
Vacuum Cleaner.
Checking for Additional Debris
Before returning the Collection Bin to its
Storage Compartment, it's a good idea to check
the following areas for any accumulation of dirt
or lint.
Cyclone
Entrance
Collection Bin
Filter and
Foam Filter
Storage Nest.
Pull straight
out to remove.
Bin Web
Figure 19a
Inspection
Plate Latch
1. Pull out any lint or debris clogging the
Cyclone Entrance. (See Figure 19a.)
2. Wipe away any dirt or lint clinging to the
Bin Web or to the surface of the inside of
the container.
3. Make sure there is not a buildup of dirt or
debris above or below the Dirt Arrestor.
(See Figure 19b.)
Figure 18
4. Turn the Latch on the Inspection Plate
clockwise until it unlocks. (See Figure 18.)
5. Let the Inspection Plate drop down.
6. Look up into the Air Passageway for any
fluff or debris.
Dirt Arrestor
Figure 19b
14
WST1500-1509_IB_12-6-03 6/12/03 9:17 PM Page 16
Removing The Base Cover
You will need to remove the Base Cover from time
to time to clean the Rotary Brush, check the
Vacuum Belt, change a Headlight, or remove a
blockage.
Cover
Screws
Figure 20a
1. Unscrew the screws located on the rear of the
Base Cover. (See Figure 20a.)
2. Lay the Vacuum Cleaner on its back so that
the Rotary Brush faces up.
Cover
Screws
Figure 20b
3. Unscrew the screws located under the Rotary
Brush. (See Figure 20b.)
4. Remove the Base Cover by placing your
thumbs in the rear screw holes and pushing
forward and up. This will disengage the
3 Cover Locking Tabs.
5. Pull the Base Cover away from the Vacuum
Cleaner head.
6. When finished cleaning or removing a
blockage, you must replace the Base Cover
and refasten the screws. Be sure you don't
over-tighten the screws.
15
WST1500 Special Edition Series
Giving Your Vacuum Cleaner A
Detailed Inspection
If you don't find a blockage, the Vacuum
Cleaner shuts itself off or a loss of suction
persists, you will need to give it a more
detailed inspection.
1. Return the Vacuum Cleaner to its upright
position.
2. Turn the Vacuum Cleaner OFF and unplug
it.
3. Remove and clean the Collection Bin and
Collection Bin Filter, Dirt Arrestor, and
Foam Filter following the detailed
instructions in the User Maintenance
Instructions section in this manual.
5. Remove and clean the HEPA Filter
following the detailed instructions in the
section entitled: “Cleaning The HEPA
Filter” section in this manual.
4. Remove any dirt or debris that may have
accumulated in the Air Passageway or in
the Cyclone Entrance.
5. Check the Rotary Brush and Rotary Valve
Inlet. (See “Cleaning the Rotary Brush”
section of this manual.)
6. Check the Belt to make sure it is in good
condition. If it is broken or damaged,
replace it. (See section entitled:
Replacing a Broken Belt.)
7. Replace Collection Bin.
Safety Tip
Make sure you turn your Vacuum Cleaner OFF
whenever you make any adjustments or lift
the Vacuum Cleaner up or remove any part.
CAUTION: Be sure to keep fingers and toes
away from the moving Rotary Brush.
WST1500-1509_IB_12-6-03 6/12/03 9:17 PM Page 17
TIP NO. 1 - MOVING THE HEIGHT ADJUSTMENT
You may find it difficult to adjust the carpet height button when the machine is resting on the floor.
A simple method is to raise the head off the floor as shown below and slide the button to your preferred
carpet height position.
TIP NO. 2 – BUMPER GUARD
If the bumper guard is pulled away from the base during use it may result in a loss of suction
performance. To place the bumper back in position, remove the base cover (hood) and lock the bumper
on the base in the slots provided. Then replace the base cover (hood) to resume cleaning. (see page 15
of the owner’s manual for base cover removal and replacement steps)
16
WST1500-1509_IB_12-6-03 6/12/03 9:17 PM Page 18
Overload Protection
Tools and Tips
Your Westinghouse WST1500 Vacuum Cleaner
has an Overload Protection System that
automatically monitors the machine's
temperature at all times and may shut off the
Vacuum Cleaner to protect the motor from
overheating. Here's what to do when this
happens:
1. Turn your Vacuum OFF and unplug it.
2. Let the Vacuum sit for 30 minutes before
turning it back ON.
3. Follow the detailed instructions in the
section entitled: “Removing A Blockage” in
this manual.
4. The Self-Resetting Overload Protector will
automatically correct itself.
5. After 30 minutes, turn the Vacuum Cleaner
back on.
If the Vacuum Cleaner still does not start, or if
you are experiencing a sudden loss of suction
power, phone toll free: 1-800-616-8689 for
assistance.
Tools and Tips
If you are vacuuming in a very hot room, the
cooling time could take longer.
QUESTIONS AND ANSWERS
The Westinghouse WST1500 Vacuum Cleaner is
easy to use. Even so, you may have some
questions about how it works. Here are answers
to some of the most common questions. If you
still have a a question and can't find the answer
here, please call Consumer Service toll free at:
1-800-616-8689 or e-mail Salton, Inc. at:
[email protected].
Can I use the Westinghouse WST1500
Vacuum Cleaner outside?
No. The Westinghouse WST1500 Vacuum
Cleaner is designed for indoor use only. Do not
use the Vacuum Cleaner outdoors, or on wet
indoor surfaces.
17
WST1550 Special Edition Series
Are there any types of materials that should not
be vacuumed up with the Westinghouse
WST1500?
Yes. Do not vacuum up damp materials such as
mud, tile grout, plaster-filler or caulking since
these materials could harden inside the Vacuum
Cleaner and cause damage. Also, do not pick up
large surface litter, cellophane, twine or solid
objects such as coins, paper clips, safety pins,
etc. These types of objects can easily lodge in
the rotating brush and will decrease suction and
cleaning ability.
Will the Westinghouse WST1500 Vacuum
Cleaner's wheels get stuck in my high
pile carpets?
No. The Westinghouse WST1500 Vacuum
Cleaner has extra wide wheels so you can push
it easily over high pile carpets, uneven tile or
wood floors.
WST1500-1509_IB_12-6-03 6/12/03 9:17 PM Page 19
How difficult is it to empty the Collection Bin?
We've designed the Westinghouse WST1500
Vacuum Cleaner's Collection Bin so that it's
easy to handle and carry. The Lid firmly locks
into place until it's time to empty the Bin. It's
easy to see when the Bin is full because it's
made of clear plastic that reveals all the dirt
you've collected. What's more, you can easily
find objects that you've accidentally vacuumed
up without having to tear open a dirty bag.
What should I do if the suction in my Vacuum
Cleaner starts to decrease or shut off
altogether?
Check the Dirt Arrestor. Before doing so,
remember to turn OFF and unplug the Vacuum
Cleaner. The Dirt Arrestor is located below the
main dirt collection area in the Collection Bin.
Look to see that this area is not full. Tip the
Collection Bin upside down over a trash can.
The two hinged doors of the Dirt Arrestor
compartment will swing open and allow any
accumulated particles to empty.
What if there is still no suction when I turn on
my Vacuum Cleaner?
Once you have fully examined your Dirt Arrestor,
check the Cyclone Entrance Hole, and the Inner
Tube and wipe away any dirt or lint clinging to
the surface. Then open the Inspection Plate and
remove any debris that may be plugging up the
Air Passageway.
How often will I need to replace the belt?
Not often at all. The Westinghouse WST1500
Vacuum Cleaner uses a special break-free belt.
It rarely breaks or needs replacing.
How can I order a Hose Extension or other
accessories for my Westinghouse WST1500
Vacuum Cleaner?
Just call our toll free number:
1-800-616-8689 and refer to the
“Accessory/Parts List” in this manual.
What are some of the other accessories
I can order for my Westinghouse WST1500
Vacuum Cleaner?
There is a wide range of replacement
accessories available. Simply refer to the
“Accessory/Parts List” at the back of this manual
for a complete list and ordering instructions.
CALL US AT:
1-800-616-8689
or email us at: [email protected]
18
WST1500-1509_IB_12-6-03 6/12/03 9:17 PM Page 20
WST1500-1509 SPECIAL EDITION SERIES
ACCESSORY / PARTS LIST
Replacement parts are available, and may be purchased through our Consumer Service
Department by calling 1-800-616-8689, Monday through Friday, 9am - 5pm Central Time,
You can pay for these parts by using either Visa, Mastercard, Discover, or American
Express. Please be ready to give the part number(s) when you call.
Or log into our website to order at: www.eSalton.com
PART #
DESCRIPTION
40018V
40021
40015
40022V
40023
40024
40032
40025
40026
40027
40028
40029V
40030
Hose Extension
Tool Holder
Crevice Tool
Floor Nozzle
Dusting Brush
Collection Bin
Collection Bin Cover
Collection Bin Filter
Foam Filter w/ Plastic Post
HEPA Filter Housing Cover
HEPA Air Filter
Headlight Bulbs (Set of 2)
Belts (Set of 2)
WST1550 Special Edition Series
WST1500-1509_IB_12-6-03 6/12/03 9:18 PM Page 21
To use as a selfmailer, please fold
order form as shown
on backside, seal
with tape and
add postage.
WST1500 SPECIAL EDITION SERIES
ACCESSORY ORDER FORM
Please contact us tollfree at: 1-800-616-8689 for All Pricing Information.
PART #
DESCRIPTION
QUANTITY
40018V
Hose Extension
40021
Tool Holder
40015
Crevice Tool
40022V
Floor Nozzle
40023
Dusting Brush
40024
Collection Bin
40032
Collection Bin Cover
40025
Collection Bin Filter
40026
Foam Filter w/ Plastic Post
40027
Louvered Cover to HEPA Filter Housing
40028
HEPA Air Filter
40029V
Headlight Bulbs (Set of 2)
40030
Belts (Set of 2)
AMOUNT ($)
PRICE EACH
MAILING LABEL: Please Print
SUBTOTAL
Name ____________________________________________________________________________________________
TAX
(if applicable)
Street: ____________________________________________________________________________________________
TOTAL
City: _______________________________________________ State: ________________________________________
Zip Code ___________________________________________Tel: (
METHOD OF PAYMENT:
❏ Check / Money Order
❏ Visa
❏ American Express
C.I.D.# ❏❏❏❏❏
❏ Master Card
❏ Discover
Credit Card Number:
) _____________________________________
CARDHOLDER ADDRESS (If different from mailing address indicated above): Please Print
Name ____________________________________________________________________________________________
Street: ____________________________________________________________________________________________
City: _______________________________________________ State: ________________________________________
Zip Code ___________________________________________Tel: (
) _____________________________________
Satisfaction guaranteed or full refund price of Accessory within 30 days from date of receipt (less shipping and handling).
Please contact us at: 1-800-616-8689 for RETURN AUTHORIZATION.
Enclose Check or Money Order payable to: Salton, Inc.
*Accessories described are subject to availability. Please allow 2 to 4 weeks for processing and delivery.
Expiration Date:
™ and “You can be sure...if it's Westinghouse” are trademarks
of Westinghouse Electric Corporation and used under license by Salton, Inc.
Wired™ is a trademark of Salton, Inc.
Signature:
WST1500-1509_IB_12-6-03 6/12/03 9:18 PM Page 22
PLACE
STAMP
HERE
Salton, Inc.
1801 North Stadium Blvd.
Columbia, MO 65202
ATTN: WESTINGHOUSE VACUUMS
ORDER PROCESSING DEPARTMENT
WST1500-1509_IB_12-6-03 6/12/03 9:18 PM Page 23
LIMITED WARRANTY
One Year Vacuum Cleaner Warranty: This Westinghouse Vacuum Cleaner is warranted to be free from defects in
materials and workmanship for a period of (1) year from the original purchase date.
Seven Year Filter Warranty: The HEPA filter in your Westinghouse Vacuum Cleaner is warranted not to become so clogged
that it starts to significantly retard air flow for a period of seven (7) years from the original purchase date.
Original Purchaser: This warranty covers only the original consumer purchaser for as long as he or she owns the
Westinghouse Vacuum Cleaner.
Warranty Coverage: This warranty is valid only if the purchaser uses the Vacuum Cleaner in accordance with Salton’s
Operating Instructions. This warranty is void if the Westinghouse Vacuum Cleaner is used for commercial or rental use. This
warranty does not apply (i) to normal wear parts that require replacement under normal use. Including but not limited to: rubber
parts, hoses, slip belts, bulbs, bumpers and attachments; (ii) to ordinary wear and tear and blockages which occur during use; (iii) if
the machine is used to vacuum excessive amounts of plaster dust, sawdust, or fireplace ash; (iv) to Vacuum Cleaners which have
been subject to abuse, misuse, negligence or accident; or (v) to damage or defects which were caused by unauthorized or improper
use, modification, alteration, service or repair.
This warranty is effective only if the Westinghouse Vacuum Cleaner is purchased and operated in the USA, and does not extend to
any units which have been altered or modified
Implied Warranties: ANY IMPLIED WARRANTIES WHICH THE PURCHASER MAY HAVE WITH RESPECT TO THE Westinghouse
Vacuum CLEANER ARE LIMITED IN DURATION TO ONE (1) YEAR FROM THE ORIGINAL PURCHASE DATE. ANY IMPLIED WARRANTIES
WHICH THE PURCHASER MAY HAVE WITH RESPECT TO THE HEPA FILTER ARE LIMITED IN DURATION TO SEVEN (7) YEARS FROM
THE ORIGINAL PURCHASE DATE. Some states do not allow limitations on how long an implied warranty lasts, so the above
limitation may not apply to you.
Vacuum Cleaner Warranty Performance: If the Westinghouse Vacuum Cleaner is found to be defective during the warranty
period, Salton will, at its option, either repair or replace the Vacuum Cleaner with a reconditioned comparable model, without
charge, or refund the purchase price. To get warranty service:
1. Call Salton Consumer Service, toll-free at: 1-800-616-8689 to report the problem.
2. You will be given the name of an Authorized Salton Service Center.
3. Take the Vacuum Cleaner and proof-of-purchase to the designated Authorized Salton Service Center for warranty repairs
deemed appropriate by the designated Service Center.
4. If there is no local Authorized Service Center, you may be requested to ship your Vacuum Cleaner (postage prepaid) to a
designated Authorized Salton Service Center for warranty repairs. Care must be exercised when the Vacuum Cleaner is
shipped, as Salton will not be responsible for warranty repairs to products damaged during transit.
HEPA Filter Warranty Service: If the HEPA Filter becomes so clogged during the warranty period that is starts to
significantly retard air flow while you still own the Vacuum Cleaner in which it was installed, Salton will send you a replacement
HEPA Filter at no cost. To get warranty service, send the defective Filter postage pre-paid to the Repair Center listed below together
with a proof-of-purchase.
Risk During Shipment: We cannot assume responsibility for loss or damage for products shipped for warranty repair. For
your protection, carefully package the product for shipment and insure it with the carrier. Be sure to enclose the following items
with your appliance: any accessories related to your problem, your full return address and daytime phone number, a note describing
the problem you experienced, a copy of your sales receipt or other proof-of-purchase to determine warranty status. C.O.D.
shipments cannot be accepted.
To return the product, ship to:
ATTN: Repair Center
Salton, Inc.
708 South Missouri Street
Macon, MO 63552
To contact us, please write to, call, or email:
Consumer Relations Dept.
Salton, Inc.
1801 North Stadium Blvd.
Columbia, MO 65202
1-800-616-8689
E-mail: [email protected]
Limitation of Remedies: No representative or other person is authorized to assume for Salton any other liability in
connection with the sale of our products. There shall be no claims for defects or failure of performance or product failure under any
theory of tort, contract or commercial law including, but not limited to negligence, gross negligence, strict liability, breach of
warranty and breach of contract. Repair, replacement or refund shall be the sole remedy of the purchaser under this warranty, and in
no event shall Salton be liable for any incidental or consequential damages, losses or expenses. Some states do not allow the
exclusion or limitation of incidental or consequential damages, so the above limitation or exclusion may not apply to you.
Legal Rights: This warranty gives you specific legal rights, and you may also have other rights which vary from state to state.
™ and “You Can Be Sure...If It's Westinghouse" are trademarks
of Westinghouse Electric Corporation and used under license by Salton, Inc.
Wired™ is a trademark of Salton, Inc.
For more information on Salton products: visit our website: www.eSalton.com
©2003 Salton, Inc. All rights reserved.
Made in China
P/N 61226
2/03