1
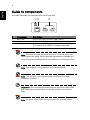
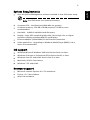
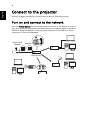
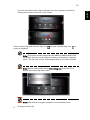
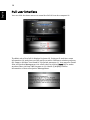
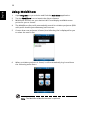
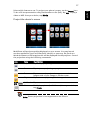
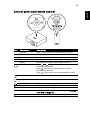
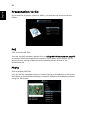
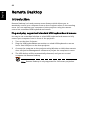
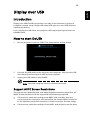
1
Introduction
The Acer Projector Gateway (APG) is a smart, integrated system that enhances
presentations via your Acer projector. The APG provides versatile source
connectivity, the latest eProjection Management tools, support for video
playback via the built-in decoder and more.
APG features:
•
High-performance wireless projection via a built-in access point featuring a
lossless CODEC or an RJ-45 port for wired connections.
•
Playback of any audio content through the projector's built-in speakers for
added effect.
•
Visitors can easily launch Acer eProjection Management automatically by
inserting the Acer Plug-and-Show token (using the Windows autorun
function) into the source’s USB port, or by installing the software via an
Internet browser. A driver disc is not required.
•
Presents a user-friendly graphic interface for simple setup and operation.
•
Allows presenters to connect to the Internet or corporate Intranet to
retrieve interactive content during presentations.
•
Supports up to four presentations at the same time under split-screen
projection mode.
•
Supports remote control functions for projector operation.
•
Makes wireless or wired connections via 802.11b/g, 802.11b/g/n or an
Ethernet 10/100-based network.
•
Acer Projector Gateway Web Management enables a web-based control of
Acer projector for both Windows and Mac OS.
•
Wireless network security (WEP, WPA-PSK, WPA2-PSK).
•
MobiShow technology allows wireless projection from a Wi-Fi-enabled
smartphone.
•
Acer Multiple Projector Control Center is a PC utility which allows one PC
to control all projectors that are connected to a LAN.
•
Crestron compliance.
•
Media playback via a USB port.
English
Acer Projector Gateway
English
2
Guide to components
This table discusses the hardware features of the APG:
1 2
3
#
Component
Description
1
Mini USB
Project PC screen via mini USB (USB B).
2
LAN port
Connects to an Ethernet 10/100-based network.
3
USB Type A
Connects to USB IODVKGULYH for multimedia playback.
2UFRQQHFWVWRD86%:L)LGRQJOHRSWLRQDO
Note: The APG provides advanced projector functions when you
enter supervisor mode. Set a supervisor password and enable full
control of system settings with the convenience of remote control.
Note: The antenna is only required for wireless models.
Note: The antenna is not required when a USB Wi-Fi dongle
(optional) installed.
Important: Acer recommends setting up the projector name (SSID)
and supervisor password when using the projector for the first
time.
Note: Projector name (SSID) is only required for wireless models.
3
•
Acer eProjection Management software installed or Acer PnS token ready.
Note: Acer PnS token is an optional accessory.
•
Computer CPU - Intel Pentium III-800 MHz (or greater).
•
Computer memory - 256 MB of RAM required, 512 MB or more
recommended.
•
Hard disk - 10 MB of available hard disk space.
•
Display - Super VGA supporting 800 x 600, 16-bit high color or higherresolution display recommended (PC and display).
•
Ethernet adapter (10/100 Mb/s) for an Ethernet connection.
•
Video application - Upgrading to Windows Media Player (WMP) v.10 or
above is recommended.
OS support
•
Windows Microsoft Windows 2000 with Service Pack 4 or later.
•
Windows XP Home or Professional 32-bit Service Pack 3 or later.
•
Windows Vista 32- and 64-bit Service Pack 2 or later.
•
Macintosh OS V10.5 and above.
•
Windows 7 32- and 64-bit.
Browser support
•
Microsoft Internet Explorer 6.0 / 7.0 and above.
•
Firefox 1.5 / 2.0 and above.
•
Safari 4.0 and above.
English
System Requirements
Connect to the projector
Before you begin projecting, you will need to do the following things:
Turn on and connect to the network
Press the Power button on the bundled remote control or the device to turn on
your Acer projector and enable the WLAN (only for wireless models or models a
USB Wi-Fi dongle installed). Connecting the projector to the LAN for a wired
connection is also recommended.
LAMP
Cable / ADSL
Modem
TEMP
MENU
SOURCE
RESYNC
English
4
Internet
APG / AP
DHCP Server
USB B
RESET
USB A1
POWER
USB A2
5
Take note of the important information on the splash screen. The splash screen
displays the following items: Projector ID (a), Acer logo (b), network
information (c) and instructions (d).
Projector ID (displayed only when available)
This 4-digit number will not be displayed on the top left of the splash screen
until this option is enabled by the supervisor in the Configure tab under Acer
eProjection Management. The four digits are given randomly for projector
identification. For more information, please see General Settings on page 27.
Projector Name (SSID)
The Projector Name and initial Service Set ID (SSID) can be added by the
supervisor on the Configure tab of Acer eProjection Management. For more
information, please see Network Settings on page 28.
Server IP
The Server IP indicates the IP address your projector uses to connect to a wired
or wireless network. It will be 192.168.100.10 for general wireless and wired
connections. The Server IP will be assigned by the wired network with DHCP
enabled. For more information, please see Network Settings on page 28.
Security: (None, WEP, WPA-PSK, WPA2-PSK)
Wired Equivalent Privacy or Wireless Encryption Protocol (WEP) is a scheme to
secure wireless networks. It is part of the IEEE 802.11 wireless networking
English
Check the information on the splash screen
English
6
standard. WPA-PSK (Wi-Fi Protected Access - pre-shared key) and WPA2-PSK are
other individual encryption methods with higher level security. The option is
enabled by the supervisor in the Configure tab under Acer eProjection
Management. For more information, please see Security Settings on page 29.
Note: Projector name (SSID) and security are only required for
wireless models.
Note: When turning the LAN or Wi-Fi on via the projector OSD,
please remember to change the projector source to "LAN/WiFi".
Use the keypad or remote control to change the projector source.
Follow the instructions on the splash screen to
connect and project
1
Make a note of the Projector ID, Projector Name (SSID), Server IP and
Security option on the splash screen. A secure key needs to be used when
Security is enabled.
7
Enable your WLAN and select the access point labeled AcerProjector or
AcerProjectorXXXX to connect wirelessly. Connect the projector to your
LAN for a wired connection.
Internet
3
Open the Internet browser (see note). Click Download Acer eProjection
Management on the welcome page, and then click Run to launch the
Welcome to the Acer Projector Gateway Setup Wizard. The installation will
proceed automatically. Make sure the installation is complete.
Note: If you do not see the welcome page or cannot connect to
the wired network, please enter the Server IP address (the second
English
2
English
8
item listed under the Acer logo on the splash screen) into your
browser’s address bar.
Note: Ensure that you have administrator-level permission on your
computer so that you can install the software.
Note: If you receive any security warnings, click OK to proceed
with the installation procedure.
Note: The Acer eProjection Management shortcut will be created
in desktop when the installation is complete.
Note: Visitors can also insert the optional Acer PnS token using the
Windows autorun function into a USB port of your system.
Note: If your PC cannot perform the autorun function of the PnS
token, please execute AcerProjectorGatewayW5.exe from the PnS
token manually.
e le ss
Wi r
Ga te wa y
Proje ct or
9
4
Acer eProjection Management will execute automatically and search for
your Acer projector.
Note: Make sure your personal firewall does not block the Acer
eProjection Management application.
5
When the search is complete, a login dialog box will open to ask you to
enter the User name and Projector ID (if needed) to log in to your Acer
Projector.
6
The UI will look as it does below when your source successfully connects
and begins projecting in 1024 x 768 mode.
English
Note: You can make a PnS token by yourself by clicking the Make
PnS Token button from the CD welcome page. The Acer PnS
Token is a standard accessory on some projector models.
English
10
Note: For the best projection performance, Acer recommends
adjusting your resolution to 1024 x 768.
11
Acer eProjection Management helps you connect to, and control Acer
projectors with the integrated APG. By allowing the transmission of highquality audio and video signals, the APG offers added flexibility and
convenience, allowing you to use an Acer projector in almost any room or
setting.
For first time installation
The utility can be downloaded directly from the projector using a wireless or
wired network connection.
The software will be set up on any PC in just a few minutes, without needing
any discs.
Security
Acer eProjection Management supports PIN code security, protecting the Acer
projector from unauthorized access and use.
Wireless communication between the Acer projector and PC are protected using
unique, image-based encryption to prevent eavesdropping or modification of
the video signal.
Simple GUI for one-click projection
The easy-to-use GUI enables one-click usability in finding and connecting to the
wireless projector, changing display settings, and controlling the projector.
It also supports up to four simultaneous presentations.
Onscreen remote
An onscreen remote utility gives any user the ability to control functions of the
projector without the owner worrying about the loss of or damage to the
projector's remote handset, or worn-out batteries.
English
Acer eProjection Management
English
12
Compact user interface
The compact user interface (UI) provides a solid look and feel.
•
Allows you to change the projection resolution (a).
To change the projection resolution, click Resolution to reveal a list of
choices.
•
Project using split-screen or full-screen (b).
To project from multiple sources, move the cursor over the split screen icon
and click to display the content in the location indicated on the split
screen.
•
Start or stop projecting (c)
•
Switch to video (d).
13
Select a video clip, and click the Play icon
stop the playback.
to load, and the Stop icon
English
You can also select video clips to display from the compact window by
clicking the arrow on the left of the screen.
to
Note: The video formats supported are MPEG2, MPEG4 and H.264
(optional). Connect via the LAN for better performance if playing
video. The full rate will be 30 fps depending on the video format.
Note: Please install audio driver VAC_Setup.exe from the CD to
display the video clip with audio.
Note: APG does not support projection to extended screen.
•
Change to full UI (e).
English
14
Full user interface
You can click the down arrow to reveal the full UI from the compact UI.
The Main tab of the full UI displays Projector ID, Projector IP and User name
information (a), and gives you the option to select a different wireless projector
(b). Swap to another connected PC via Switch presenter (c). You may also install
Acer eProjection Management via a PnS token by clicking Install (d) or make
another token via Save P&P Program to (e). About (f) displays version
information of Acer eProjection Management.
15
MobiShow allows content projection from a Wi-Fi-enabled smartphone or PDA
running Windows Mobile 5 and higher. Any type of screen content or a
PowerPoint slideshow (requires conversion with the included utility) can be
projected.
Installing MobiShow
For devices running Windows Mobile, the installation CD contains a MobiShow
installation file.
1
Click Install MobiShow to download the software installer (in CAB format)
to your mobile device.
2
Open your device’s file explorer and locate the CAB file.
3
Double-click the CAB file to start installation.
4
Follow the onscreen instructions to finish installation.
Note: Please make sure your device has at least 10 MB of available
space.
Connect to a wireless projector
Enable Wi-Fi on your mobile device and connect to the wireless projector in the
same way as you would from a PC. Please refer to Connect to the projector on
page 4. Refer to the IP address shown on the projected screen and the SSID
displayed onscreen (default SSID is AcerProjectorGateway).
Note: MobiShow only supports wireless projectors. You may also
use a USB Wi-Fi dongle plugged into a USB type A host on the
projector.
Other support
Mobishow also supports iPhone, please download the MobiShow installer from
App Store.
Note: The support of Android smartphone will be available when
it’s released to Android Market.
English
Projecting with MobiShow
English
16
Using MobiShow
1
Open Programs on your device and find the MobiShow application.
2
Tap the MobiShow icon to launch the client software.
3
MobiShow will turn on your device’s Wi-Fi and display available access
points for you to choose.
4
The MobiShow client will automatically search for wireless projectors (SSID
with prefix AcerProjectorGateway) and connect.
5
If more than one projector is found, the following list is displayed for you
to select the one to use.
6
When a wireless projector is found, it will automatically log in and show
the following main menu.
Note: The MobiShow Media function is optional.
17
Project the device’s screen
MobiShow will project anything displayed on your screen. You may launch
another application (such as PowerPoint Viewer) or open any file (such as a
Word document or JPG image) and it will be displayed via the projector. Control
the projection using the following commands:
Icon
/
Item
Description
Stop
Tap to stop projecting.
Pause
Tap to pause projecting; tap again to resume.
Zoom
Tap to zoom the projected screen to extend the
longest side of your image to fill the screen.
Play
Tap to restart projecting if it is stopped.
OK/Back
Tap to return to main menu.
Photo
To display a photo (in JPG format) from your device,
tap Photo.
Note: Screen projection is not supported on the iPhone.
English
Select which feature to use. To project your phone’s screen, tap the Screen icon.
To do a PC-less presentation using Presentation-to-Go (PtG), tap PtG. To play a
video or MP3 from your device, tap Media.
English
18
Wireless PtG
Install the PtG converter from the installation CD on your PC; this will enable
you to convert PowerPoint files to PtG format.
When you select PtG, the MobiShow client will automatically open Explorer for
you to select a PtG file. Select the file to open for your presentation. When the
file is open, the PtG slides will be projected while you will be shown controls on
your device screen. The slides are projected fullscreen with all the effects of the
original PowerPoint slides preserved.
Icon
Item
Description
Prev / Next
Tap to go to the previous or next item on the slide.
PgUp / PgDn Tap to go to previous or next slide.
Stop
Tap to stop projecting the file. The icon will become
Play if the file is not being played. Tap Play to
restart the presentation.
Home
Tap to go to the first slide.
Jump
Tap and MobiShow client will show thumbnails of
every slide in the PtG file. You can select any page
to go to.
Open
Tap to select another PtG file.
Note: PtG supports 800 x 600 and 1024 x 768 resolutions.
19
When you select the Photo function, MobiShow will automatically open
Explorer for you to select a photo folder. Open a file (JPG format) and controls
show on your device's screen.
Icon
Item
Description
Prev / Next Tap to go to the previous or next photo.
Play
Tap to restart projecting.
Open
Tap to select another file.
English
Photo reviewer
English
20
Media
When you select the Media function, MobiShow will automatically open
Explorer for you to select a media file. Select a file (videos in mpeg2, mpeg4 or
H.264 format, or MP3 music files) to play. When the file is open, the media will
be projected and controls shown on your device’s screen.
Icon
Item
Description
Rewind /
Tap to seek backward or forward.
Fast Forward
Vol- / Vol+
Tap to adjust playback volume.
Stop
Tap to stop playing the file. The icon will become
Play if the file is not playing. Tap Play to restart
playback.
Mute
Tap to mute the audio. Tap Mute again to restore
the volume.
Open
Tap to select another media file.
When you are in the main menu, tap OK or Back to close the application.
Note: The Media function is optional.
Note: Media projection is not supported on the iPhone.
21
Tap Menu to select Help to find MobiShow information.
Using the PtG converter
To use the Presentation-to-Go feature, you need to install the PtG Converter on
your PC from the CD. Put the CD into your CD-ROM and follow the onscreen
instructions to install the PtG Converter.
Open Programs > PtG Utility > PtG Converter from the Start menu. The
following control panel is displayed on your desktop.
Click Convert to select a PowerPoint file and start conversion. PtG Converter will
open the PowerPoint file and convert it to PtG format. You can see the
conversion process on your desktop.
Click Preview to expand or collapse the preview pane. Click Play to play back the
selected PtG file or click Open to select a different PtG file.
English
Help
English
22
Acer Projector Gateway Web
Management
Open the Internet browser, you will be redirected to the Acer Projector
Gateway Web Management main page. If you aren’t redirected, you can enter
the Server IP address. Please refer to Connect to the projector on page 4.
The default IP address is 192.168.100.10 for general wireless connections.
Download the client software
You can download and install the program for different platforms.
1
Acer eProjection Management application for Windows.
1
MobiShow for mobile devices running Windows Mobile v5.0.
1
Mac Utility Client for Mac OS.
1
Crestron RoomView.
After the program is installed a shortcut will be placed on the desktop.
Note: You also can install from the installation CD.
23
Conference projecting
You can initiate conference projecting from the Web Management webpage.
Clicking on Initiate Conference gives you control over who is projecting at any
time, and prevents the current presenter from being disconnected
inadvertently.
Once a conference has been initiated, all the persons connected to the projector
are displayed in a list. The active user is indicated by a check mark next to the
English
Note: If you are using Internet Explorer 8, please disable the
SmartScreen Filter before downloading.
English
24
user icon
and a triangular icon
. Inactive users are indicated by a square
icon. To activate a user, click on the play this user icon next to the user’s name.
Click End Conference to end the conference.
Note: Please remember to log out if you want to end the
conference.
Note: Up to 32 users in the same conference room may connect.
25
The default login for the advanced settings page is admin with the password
123456.
Console
The Console page gives you access to a variety of status and control features to
adjust the projection settings. From this page, you can view projection status;
English
Advanced settings
English
26
adjust brightness, contrast and aspect ratio; change the source; and adjust some
advanced settings. You can also turn off the projector directly from this page.
27
The Configure page allows you to change a variety of settings.
General Settings
You can check Enter the projector ID to start projecting to ensure that only
people in the room are able to access the projector. You can also select who can
connect to the Internet via the projector’s WLAN router - either all the meeting
attendees, or only the person currently projecting.
Note: The APG needs to reboot to apply changes made in
Configure mode. Please connect to the projector again if you
want to continue to use it.
English
Configure
English
28
Network Settings
Click Network settings to adjust other network settings.
Note: The default Projector Name (SSID) is AcerProjector. This
leaves 11 characters available for you to customize the name.
Note: Projector name (SSID) is only required for wireless models.
29
If you are projecting sensitive information, you may want to set up a WEP or
WPA-PSK key by clicking Security Settings.
The WEP key can support from 64- up to 128-bit encryption for wireless
connections. This feature can be set and enabled by the supervisor. You must
enter 5 or 13 ASCII characters, or 10 or 26 hexadecimal characters. The WPAPSK/WPA2-PSK encryption key should be entered as 8 to 63 ASCII characters.
This feature can be set and enabled by the supervisor.
Note: ASCII (American Standard Code for Information
Interchange) is a code for representing characters as “0-9, a-z, A-Z,
!, @, #, $, %, &, *, -, _, +,=, /, ?“are allowed. Hexadecimal digits
consist of the numbers 0-9 and the letters A-F/a-f.
Note: If you are using Windows XP, you need to apply the WPA2PSK hotfix from Microsoft.
Note: Enabling WPA-PSK/WPA2-PSK increases the computing load,
which may affect projection performance.
Note: Security is only required for wireless models.
English
Security Settings
English
30
Admin Password Setup
Change the password to log in to the Advance page by clicking Admin Password
Setup. The default supervisor password is 123456.
Firmware Upgrade
Ensure the projector is connected to the LAN and the Internet, then click on
Firmware upgrade and click the Upgrade… button. The projector will access the
Internet to automatically download and install any available upgrades.
31
Logout
Click Logout to return to the download page.
English
Alert Setting
English
32
Note: If you are using Internet Explorer 8, please adjust the
Compatibility view settings to make ensure correct display.
33
When you open your Internet browser, you will find a Crestron link on the Acer
Projector Gateway Web Management main page. Tap the link to open an
interactive Flash-based webpage.
Main page
You can control the projector from the easy-to-use interface, adjusting the
volume; changing the source; and projector settings. For more information,
please visit www.crestron.com and www.crestron.com/getroomview.
English
Crestron control tool
English
34
Tools
You can view projector IP information here, modify networking settings and set
up a password if desired.
Info
You can find projector information easily on this page and add information to
help you manage each projector.
35
1 You can project a Mac screen via WPS-Pro.
2 Obtain the installation program from the CD or download from the main
webpage. Please refer to page 7.
3 Make sure your personal firewall allows the WPS-Pro software to pass
through. A WPS-Pro shortcut will be created on your desktop.
English
Mac Utility for Mac OS
English
36
4 Enter the login code from the splash screen, please refer to Check the
information on the splash screen on page 5, if required and click OK to start
projecting.
5 The UI shown below will appear when you have connected to the projector
and are projecting at 1024 x 768 resolution.
37
Presentation mode
Icon
Description
Project desktop screen to full-screen or split-screen.
Full-screen projection.
Project to Split #1.
Project to Split #2.
Project to Split #3.
Project to Split #4.
Pause projecting.
Stop projecting.
Zoom.
Projector login code.
While projecting, this icon blinks.
Video mode
Icon
Description
Start playing video.
English
Compact and full user interface
English
38
Stop playing video.
Open video file.
Adjust volume.
Volume level indicator.
Video time bar.
While playing video, this icon blinks.
About
Icon
Description
Click
to open the function menu and select Web Admin to open
the management web page. Please refer to Acer Projector Gateway
Web Management on page 22.
Minimize the program
Exit the program
39
If you encounter any problems, you can use this message window in the upperright corner of the page to communicate in real time with the Helpdesk.
English
Contact IT help
English
40
Multimedia
Introduction
The Acer multimedia support offers easier projection without a PC or
multimedia player connected. Through USB type A slot, you can easily access
PtG (please refer to PtG on page 42) and JPG photo files. This function is
supported through the projector source USB A. Use the keypad or remote
control to select the source.
Multimedia Features
•
Fancy and stylish user interface for better experience.
•
Supports USB memory stick via USB type A slot.
•
Supports PowerPoint slideshow by PtG files and high resolution JPG photos
playback.
Connecting a multimedia device to the projector
1
2
#
Component
Description
1
Mini USB
Project PC screen via mini USB (USB B).
2
USB Type A
Connects to DUSB IODVKGULYH for multimedia playback.
Note:
a. USB flash drive needs to be formatted using FAT32.
b. The USB flash drive may only have one logical partition.
41
Icon
Component
Description
RESYNC
Back or stop function in multimedia controls.
SOURCE
Enter or play under certain control conditions.
Back
Up one data folder level.
Enter
Confirms item selection.
MENU
Goes back or stops in multimedia controls.
Direction Keys
Press
or
to select items or control volume
while playing media.
Press
for Enter or play function in most
multimedia controls.
Press
to go back in most multimedia controls.
Pre./Rewind
Goes to previous index or page in file list view.
Next/Fast forward
Goes to next index or page in file list view.
Play/Pause
Plays or pauses media playback.
Stop
Stops playing media file.
SD/USB A
Changes source to USB A (no SD function).
USB B
Changes source to USB B (please refer to Display
over USB on page 45).
Empowering Key
Enter or play under certain control conditions.
English
Control panel and remote control
English
42
Presentation to Go
If you sent the projector source to USB A, you will see the screen as shown
below.
PtG
Click to access PtG files.
You can use PtG converter (please refer to Using the PtG converter on page 21)
to convert files from PowerPoint format to PtG format, which allows you to
project from a variety of devices while retaining all the effects of the
PowerPoint file.
Photo
Click to display JPG files.
You can use the navigation keys to choose files from thumbnails or file listing.
Press Enter or the Empowering Key to create a slideshow that displays photos
using the full screen.
43
Setup
Adjust display settings.
English
Note: The photo file size must be smaller than 10 MB, and the
resolution under 8192 x 6144 pixels. Supports playback of JPG
images with EXIF information.
English
44
Remote Desktop
Introduction
Remote Desktop is a handy remote access feature which allows you to
seamlessly control your computer from an Acer Projector when in the meeting
room. You can operate your computer via the projector using the remote
control via a standard USB keyboard and mouse.
Plug-and-play, supports all standard USB keyboards and mouses
It's easy to use a standard wireless or wired USB keyboard and mouse to fully
control your computer from in front of the projector.
1
Turn on the Acer Projector.
2
Plug the USB keyboard/mouse receiver or wired USB keyboard or mouse
into a free USB port on the Acer projector.
3
Connect the computer to the projector using Wireless or LAN, then execute
Acer eProjection Management software to project the computer’s screen.
4
The USB devices will be automatically detected, and you can control
computer via Remote Desktop.
Note: Remote Desktop is only supported for full-screen projection.
45
Introduction
Display over USB (DoUSB) projection is an easy-to-use function to project a
computer’s screen using a single USB cable (USB type A to mini USB) without
needing any drivers.
If you unplug the USB cable, the projector will stop projecting and revert to
standby status.
How to start DoUSB
1
Set the projector source to USB B. The screen below will be shown.
2
Connect the USB cable to the projector and computer: Plug the mini USB
into the projector and type A USB into the computer.
3
Unplug the USB cable to stop DoUSB.
Note: Only one computer can be connected at a time.
Support All PC Screen Resolutions
Through an auto-detecting and auto-adjusting/auto-stretching algorithm, all
NB/PC screen resolutions can be supported and wirelessly projected.
•
If the current resolution setting at the NB/PC side is smaller than the
current projector resolution, APG will adjust the current NB/PC resolution
to the optimum projection resolution in order to project the best image.
•
If the current resolution settings of the NB/PC and projector are the same,
English
Display over USB
English
46
the same optimum projection resolution will be implemented.
•
If the current resolution setting of the NB/PC is larger than the current
projector resolution, APG will change the PC's resolution to match the
projector for better performance.
Operating system compatibility
The DoUSB function is compatible with Microsoft Windows XP with Service Pack
2 and above, Windows Vista 32- and 64-bit, and Windows 7 32- and 64-bit.
47
Model name
English
Feature table
S5201M/S5201B/S5301WM/
S5301WB
WiFi
LAN/WiFi
I/O
U5200/U5300W
--
RJ45 Ethernet Jack
V
V
Audio Out (Mini Jack)
--
--
USB Type A
X2
X2
USB Type B
X1
X1
SD Card Slot
--
--
Reset Button
--
--
Status LED
--
--
Antenna Jack
--
--
V
V
Yes (By USB WiFi dongle)
Yes (By USB WiFi dongle)
V
V
Application (Network, PC & Mac)
(1) DoLAN : Ethernet
projection
(2) DoWiFi : WiFi
projection
(3) Quad-View (4-split
screen)
Features
(4) HD video playback
--
--
(5) SD video playback
--
--
(6) PtG converter & viewer
V
V
(7) Wireless security (WEP/
WPA/WPA2)
Yes (By USB WiFi dongle)
Yes (By USB WiFi dongle)
(8) Remote desktop
V
V
(9) CD-less installation
V
V
(10) PnS Token
--
--
(11) Make PnS Token via
CD
V
V
(12) Vista OS compliant
(Upto Vista SP1 and above)
V
V
(13) MAC OS (10.4/10.5 and
above)
V
V
(14) Windows 7 compliant
V
V
Web-based Management Page (Network)
(1) Download page
V
V
(2) Conference Control
V
V
(3) Console (projector
control & monitor)
V
V
(4) Network setting
V
V
(5) Crestron Flash link
V
V
48
English
MobiShow (Network)
(1) Win Mobile V5 & above
supported
Yes (By USB WiFi dongle)
Yes (By USB WiFi dongle)
(2) Screen projection
Yes (By USB WiFi dongle)
Yes (By USB WiFi dongle)
(3) Quad-View (4-split
screen)
Yes (By USB WiFi dongle)
Yes (By USB WiFi dongle)
(4) PtG function
Yes (By USB WiFi dongle)
Yes (By USB WiFi dongle)
(5) Media sender
--
--
(6) Photo viewer
V
V
(7) iPhone supported
Yes (By USB WiFi dongle)
Yes (By USB WiFi dongle)
(8) Android supported
V
V
(1) RoomView (App.)
Control & Interactive
messaging & Text
broadcasting
V
V
(2) Flash GUI (Web) Control
& Interactive
V
V
(1) DoUSB : projecting by
USB type B
V
V
(2) Remote Desktop(KB/
Mouse) by USB type A
V
V
Crestron (Network)
Features
USB functionality
Accessory
(3) HD video playback
--
--
(4) JPEG Viewer
V
V
V
(5) Presentation -to-go
V
Remote Controller
V
V
Wireless CD
V
V
Wireless QG
V
V
Detachable Antenna
--
--
Wireless PnS(Plug and
Show) Token
--
--
49
If you experience a problem with your Acer projector, refer to the following
troubleshooting guide. If the problem persists, please contact your local reseller
or service center.
Problems and Solution
#
Problem
Solution
1
The projector stops
responding to all
controls
If possible, turn off the projector, then unplug
the power cord and wait at least 30 seconds
before reconnecting power.
2
Lamp burns out or
makes a popping
sound
When the lamp reaches the end of its useful life,
it will burn out and may make a loud popping
sound. If this happens, the projector will not turn
on until the lamp module has been replaced. To
replace the lamp, follow the procedures in the
Replacing the Lamp section of your projector’s
manual.
3
Image or projector
problems
Please refer to the troubleshooting section in
your projector’s manual.
4
Unable to read the
USB device
Please make sure the USB device is in good
condition and properly inserted.
Remember that the projectors do not support
file formats other than FAT16/32.
5
USB drive fail
USB port does not support USB hub function and
which power consumption is over 500mA.
6
Media file not
found or can’t be
opened from the
file list
Files that require a CODEC that is not supported
won’t be shown in the file list. Please check the
list of media formats supported.
English
Troubleshooting
English
50
Frequently asked questions
•
How do I configure the network?
Auto-Configuration Network Setup: The default setting of the APG is as a
DHCP client. When the APG is connected to a LAN that already has a DHCP
server present, the APG takes the IP address assigned to it by the server.
When the APG is connected to a LAN that does not have a DHCP server, the
APG becomes the DHCP server in the network.
•
Why doesn't my device obtain an IP address automatically?
The device will ask for an IP address from your enterprise DHCP server
while booting up, however, sometimes it might fail to obtain an IP address
in complex network environments. The system will obtain the IP address
again once there is another DHCP server detected or you can configure
your device IP address via Network Setup from the web admin page.
•
How do I reset the APG to the factory setting?
Press the reset button and press the power button for 20 seconds to reset
to factory settings.
•
What do I do if I'm not redirected to the APG's web page automatically?
1. Make sure you have connected to the APG.
2. Make sure your IP address is configured to Obtain an IP address
automatically or you have entered the proper IP address.
3. Turn off the your Internet browser’s proxy settings.
•
What do I do if I can't enter the APG web page?
1. Make sure you have connected to the APG.
2. Make sure your IP address is configured as to Obtain an IP address
automatically or you have entered the proper IP address.
3. Turn off the your Internet browser’s proxy settings.
4. Open your browser again and you will be redirected to the APG's web
page automatically, or you can enter the device IP manually.
•
What can I do if I can't download the APG application?
1. Make sure you have connected to the APG.
2. Make sure your IP address is configured to Obtain an IP address
automatically or you have entered the proper IP address.
3. Turn off the your Internet browser’s proxy settings.
4. Open your browser again and you will be redirected to the APG's web
automatically, or you can enter the device IP manually.
5. Download the application as required.
•
Should I install the application again after upgrading the firmware?
Yes. Download and install the application again.
•
What should I check for if I can't find the APG?
Is the PC connected to the APG?
51
Due to your network or firewall settings, the client application may not be
able to connect to the projector server. Please make sure the settings allow
the application to be able to communicate with the server.
To enable wireless projection, your personal firewall needs to allow the
APG application to pass through.
Due to your firewall settings, the client application may not be able to
establish a connection for video streaming. Please make sure the firewall
settings allow the application to communicate with the server (inbound
TCP port: 1041).
•
What are the possible connection combinations?
APG
connection
System
Projector Internet Remark
WLAN
WLAN
V
X
192.168.100.10
WLAN
WLAN +
Wired
V
V
192.168.100.10
Please execute the application
first if you need to access the
Internet.
WLAN +
Wired
WLAN
V
V
By LAN DHCP address
WLAN +
Wired
WLAN +
Wired
V
Wired
Wired
V
Please enter the IP address on
the welcome screen.
V
By LAN DHCP address
Please enter the IP address on
the welcome screen.
V
By LAN DHCP address
Please enter the IP address on
the welcome screen.
Wired
•
Other access
point
V
V
By LAN DHCP address
Please enter the IP address on
the welcome screen.
How do I register the APG on the firewall exceptions list for Windows XP
SP2?
1. Click Start > Control Panel.
2. Click Security Center > Windows Firewall when the Control Panel
window opens.
3. Click the Exceptions tab and then Add Program… when the Windows
Firewall window opens.
4. Click Acer Projector Gateway to allow connection with external devices
under Programs when the Add a Program window opens.
•
What is the Gatekeeper?
The Gatekeeper is designed to ensure enterprise network security for the
APG.
All Block blocks guest users from wireless access to the office LAN.
English
Are there any personal firewalls enabled?
English
52
All Allow allows guest users to access the wireless office LAN.
Internet Only allows guest users to use the Internet wirelessly, while
restricting access to the Intranet.
•
Can I use wireless and wired connections simultaneously?
If you have a wired Internet connection connected to the APG, it will
obtain an IP address automatically and allow wireless connectivity
simultaneously.
You have to configure the Gatekeeper setting to All Pass or Internet Only.
•
Why is the wireless transfer rate slow?
The transfer rate may be slower in some operating environments
(depending on factors such as the location, distance or radio signals).
•
Does the APG support audio projection while presenting?
No, APG can only project your PC’s screen without audio.
•
What should I do if the display isn't smooth?
Try setting the resolution to 1024 x 768 for improved performance.
•
Why is my presentation sluggish while presenting with the projector?
If your PC screen resolution is different to the device resolution, stretching
the screen data will require additional computing power which might
cause your PC to seem a little sluggish.
•
Which video formats are supported?
MPEG1; MPEG2; MPEG4; WMV9; AVI; DivX 3.11, 4x, 5x; XviD; ASF; VOB
(without encryption)
•
Video playback is not smooth.
The wireless transfer rate may be too slow or the video resolution may be
too high. Typically, the APG can support QCIF, CIF, 480P, 576P, 720P and
1080i resolution with full speed under optimum wireless environments.
•
I get the error message Cannot play this file. This file may be damaged.
This error message appears when the file cannot be played due to possible
data corruption.
•
Why doesn’t WPA2 work even after I enter the right password?
Check your operating system. Windows Vista supports WPA2, but Windows
XP doesn’t support WPA2. You can solve this problem by installing the
hotfix available from support.microsoft.com/kb/893357/en-us/, or by
upgrading to Windows XP SP3 (Service pack 3).