1
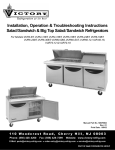
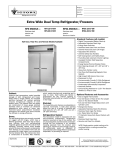
VICTORY REFRIGERATION INC
110 WOODCREST ROAD
CHERRY HILL, NJ 08003-3648
TEL: (856) 428-4200
FAX: (856) 428-7299
WEB: www.victory-refrig.com
Refrigeration at its best
Deep Well Horizontal Bottle Coolers
For Models: VDW-24 - 4, VDW-37-12, VDW-50 -18, VDW- 65 -24 & VDW- 95 -38
Thank you for purchasing a Victory Refrigeration Deep
Well Horizontal Bottle Cooler! This unit has passed our
strict Quality Control Inspection and meets the high
standards set by Victory Refrigeration. You have made a
quality investment that with proper maintenance will give
you years of service.
Please read the following installation and maintenance
instructions before installing or using your unit. If you have
any questions, please call our Customer Service
Department at (856) 428- 4200.
Receiving Shipment
All units are performance tested and thoroughly inspected
prior to shipment. Upon receipt, examine the exterior of
the shipment packaging for any signs of rough handling. If
the cabinet is damaged, it should be noted on the delivery
slip or bill of lading and signed. A claim must be filed
immediately against the carrier indicating the extent and
estimated cost of damage incurred.
Cleaning
Prior to setting up and operating your
new cooler, it is advisable that the
interior be washed thoroughly with a
mild, non-abrasive detergent and a
chlorine free water solution. Rinse with
clear water and a sanitizing solution.
Dry with a soft absorbent towel.
Coolers with the vinyl-coated and stainless steel exterior
require only mild soap and water to maintain the finish.
Caution: Before cleaning, servicing or removing
dividers, unplug the cooler to disconnect power!
Use non-abrasive cleaners that do
not contain chlorine and a soft cloth
or sponge. Do not use steel wool,
scrapers, wire brushes or other harsh
items to clean your cooler. Following
are some examples.
Locating Your New Cooler
Consider the following when selecting a cooler location:
1. Clearance - Coolers are to have a minimum clearance
space of 2”(inches) from walls and/or low ceilings.
2. Leveling - Coolers must be leveled when installed.
Although the cooler is plumbing free, failure to level
your cooler may result in condensate water not draining
appropriately.
3. Floor Load - The floor on which the cooler will rest
must be free of vibration and suitably strong enough to
support the combined weights of the cabinet plus the
maximum product load.
4. Ventilation - The air cooled, self-contained refrigeration
system requires a sufficient amount of cool, clean air.
Avoid placing the cooler near heat generating
equipment such as ovens, ranges, heaters, fryers,
steam kettles, etc., and out of direct sunlight. Avoid
locating the self-contained cooler in an unheated room,
or where the room temperature may be below 65°F.
Electric Supply
The electrical supply should always be performed by a
qualified electrician in accordance with local electrical
codes. A properly wired cooler will assure
proper operation. Electrical supply
requirements are on the cabinet
serial/data plate located on the upper left
wall inside the cabinet. It is recommended
that a direct, properly protected line of
the proper size wire be installed from the
main supply to your cooler. All coolers
electrical systems are internally grounded.
PART OF AGA FOODSERVICE GROUP
●
●
Baking Soda - Used for die-hard type stains. Mix in
one tablespoon of baking soda per one pint of water for
recommended solution.
Club Soda - Used to remove streaks.
Daily Exterior Cleaning
1. Clean surface with a sponge and cleaning solution.
2. Polish with a soft cloth for stainless steel, wiping
with the grain of the metal.
3. Once a week wipe with a film cutting agent to
maintain shine and stainless steel finish.
Weekly Interior Cleaning
1. Discontinue power to refrigeration system by
removing plug from receptacle.
2. Remove beverages.
3. Remove all dividers.
4. Remove loose substances from interior.
5. Scrub all interior surfaces with warm detergent
solution 100°F -120°F (38°C - 39°C) and a nylon
bristled brush.
6. Rinse with clear water and dry with soft absorbent
towel.
7. Reinstall dividers.
8. Restore power to refrigeration system by placing
plug into receptacle.
9. Return beverages when cooler has reached
working temperature.
Part No. 80250601
Rev: 00
Print Date: 3/25/04
IMPORTANT! CONDENSER MAINTENANCE
To keep your cooler running efficiently and trouble free,
clean the condenser coil and condensate drain pan at
least once every three months or more often. The
condensate drain pan should be emptied after all interior
cleanings and beverage spills.
Divider Installation
1. Discontinue power to the cooler! (*note: fans must not
be operating during divider installation)
2. Place spring on the middle rod of divider bar that will be
placed at the rear of cooler.
1. Remove beverages and close lid(s). Pull cooler forward
and remove power cord from receptacle.
3. Put divider in cooler and mount the middle rod with
spring in desired mounting hole at the rear of cabinet.
2. For condenser coil access, remove two screws from
front grill. Use both hands to carefully pull grill forward
and out from cabinet. “See pictures below”
4. Place top and bottom divider rods without springs straight
across into the front mounting holes.
3. Remove condensate drain pan by pulling the silver tab.
Clean pan and reinstall. “See pictures below”
6. Restore power to cabinet after all dividers are placed.
4. To properly clean the condenser coil, compressor-motor
and related parts:
a) Use a vacuum cleaner with proper brush attachments.
b) Use compressed air.
-orc) Use a soft bristled brush in a “rolling motion” to get
dirt and grime on the brush. Do not push dirt and
grime into the coil ,and do not flatten coil fins.
5. Repeat the procedure for additional dividers.
Divider
Mounting Hole
Spring
Grill
“Front Grill Removal”
Coil
Drain
Pan
“Condenser Coil Cleaning”
6. After cleaning, reassemble cooler and properly restore
power.
7. Return beverages when cooler has reached working
temperature.
Temperature Control
Cooler temperature controls are adjusted at the factory
before shipping to maintain an average temperature of
36°F (2.2°C) and should not need adjustment.
The temperature control is located inside the cooler at the
upper right hand side. A flat head screwdriver can be used
to make adjustments, if needed.
“Temp Control Location”
“Adjusting Temperature”
Fan Motor
Technical Service & Replacement Parts
Victory Refrigeration strives to provide excellent customer
service along with quality equipment. To help us better
assist you, a serial number and/or model
number must be provided when contacting
the technical service or parts department.
The data plate is located inside the cooler
on the upper left wall. All serial numbers are
recorded and kept indefinitely.
Refer to the guide on the next page of this document prior
to calling for technical assistance.
Technical information and replacement parts support can
also be obtained via website. Just go to www.victoryrefrig.com and click on the customer service link.
Common Replacement Parts
(1) 10830401- Grill Assembly, Front or Rear
(2) 10831501- Lid Assembly, VDW-24 (Complete)
(3) 10831601- Lid Assembly, VDW-36 (Complete)
(4) 10831701- Lid Assembly, VDW-50 (Complete)
(5) 10831801- Lid Assembly, VDW-65 (Complete)
(6) 10831901- Lid Assembly, VDW-95 (Complete)
(7) 10833201- Bottle Opener Assembly (Complete)
(8) 50893701- Cover, Bottle Opener
(9) 50893801- Base, Bottle Opener
(10) 50894001- Bottle Opener
(11) 50894901- Spring, 3” Retainer Divider (VDW-36,50,65 & 95)
(12) 50894902- Spring, 1.5” Retainer Divider (VDW-24)
(13) 50894701- Divider,VDW-36,50,65&95
(14) 50894801- Divider,VDW-36,50,65&95 (*mounts to fan)
(15) 50895001- Divider,VDW-24
(16) 50895101- Divider,VDW-24 (*mounts to fan)
Before Calling Service Guide for Common Problems
Caution: Disconnect Power Supply Prior to Attempting Any Service!
Problem
Cooler not running.
Condensing unit on cooler
runs for prolonged period or
continuously.
Cooler temperature too high.
Cooler is noisy.
Cooler is freezing product.
Cooler compressor will not
start-hums and trips on
overload protector.
Lid will not close.
Possible Cause
Fuse blown or circuit breaker tripped.
Power cord unplugged.
Thermostat in “OFF” position.
Improper voltage supplied to cooler.
(voltage does not match data plate)
Thermostat set too high.
Excessive amount of warm product.
Prolonged lid openings or (lids) ajar.
Dirty condenser coil.
Improper air flow around condensing
unit.
Remedy
Replace fuse or reset circuit breaker.
Plug in cord.
Turn thermostat clockwise and set temperature.
Correct supply voltage. (remove extension cords or other
equipment on circuit, etc.)
Set thermostat to lower temperature.
Allow adequate time for product to cool down.
Make sure lid is closed. Avoid prolonged lid openings.
Clean the condenser coil.
Insure adequate air space, relocate away from heat
generating equipment, direct sunlight, or direct path of air
conditioning or heating ducts.
Evaporator coil blocked with ice.
Turn unit off and allow coil to defrost. Make sure thermostat
is not set too cold and that lid(s) seal properly.
Thermostat set too high.
Set thermostat to lower temperature.
Poor circulation in cooler.
Re-arrange product to allow proper air circulation.
Excessive amount of warm product. Allow adequate time for product to cool down.
Prolonged lid openings or (lids) ajar. Make sure lid is closed. Avoid prolonged lid openings.
Dirty condenser coil.
Clean the condenser coil.
Insufficient clearance around cooler Insure adequate air space, relocate away from heat generating
or excessively high ambient temperature. equipment (ovens, fryers, etc.) and out of direct sunlight.
Evaporator coil blocked with ice.
Turn unit off and allow coil to defrost. Make sure thermostat
is not set too cold and that lid(s) sealed properly.
Part(s) loose.
Locate and tighten loose part(s).
Tubing vibrating.
Insure tubing is free from contact with other tubing or components.
Thermostat is set too low.
Set thermostat to higher temperature.
Cooler overloaded with product.
Remove or rearrange product.
Dirty condenser coil.
Clean the condenser coil.
Excessive heat generated from
Relocate cooler, or adjacent heat generating equipment.
equipment nearby.
Voltage to cooler too high or too low. Check and correct supply voltage.
Tracks guiding lid(s) not clean.
Clean tracks.
VDW WIRING DIAGRAM
115V/60Hz/1Ph
Warranty
(Continental USA Only)
The Seller warrants to the original purchaser, equipment manufactured by Seller to be free from defects in material and
workmanship for which it is responsible. The Seller's obligation under this warranty shall be limited to replacing or
repairing at Seller's option, without charge, F.O.B. Sellers factory, any part found to be defective and any labor and
material expense incurred by Seller in repairing or replacing such part, such warranty to be limited to a period of one
year from date of purchase or thirteen months from date of shipment from Seller's factory, whichever is earlier, provided
terms of payment have been fully met. All labor shall be performed during regular working hours. Overtime premium
charges will be at Buyer's expense.
Proof of purchase must be supplied to Seller to validate warranty. This warranty is valid only if equipment is properly
installed, started-up and inspected by the dealer or authorized Victory Service agent.
Removal or alteration of the serial/data plate from any equipment shall be deemed to release Seller from all warranty
obligations or any other obligations, expressed or implied.
This warranty does not cover Thermostat or Defrost Timer calibration and/or adjustment, freight damage, normal
maintenance items outlined in Owner's Manual, adjustment of door mechanisms or replacement of light bulbs, fuses
or batteries.
Any repairs or replacement of defective parts shall be performed by Seller's authorized service personnel. Seller shall
not be responsible for any costs incurred if the work is performed by other than Seller's authorized service personnel.
Reimbursement claims for part(s) or labor service costs must be made in writing. Model, cabinet serial numbers and
installation location must be shown on the claim. A receipted bill from the servicing agency must accompany the claim,
together with full details of the service problems, diagnosis and work performed. Victory reserves sole discretion
whether further documentation on a claim is to be submitted.
Seller shall not be liable for consequential damages of any kind which occur during the course of installation of
equipment, or which result from the use or misuse by Buyer, its employees or others of the equipment supplied
hereunder, and Buyer's sole and exclusive remedy against Seller for any breach of the foregoing warranty or otherwise
shall be for the repair or replacement of the equipment or parts thereof affected by such breach.
The foregoing warranty shall be valid and binding upon Seller if and only if Buyer loads, operates and maintains the
equipment supplied hereunder in accordance with the instruction manual provided to Buyer. Seller does not guarantee
the process of manufacture by Buyer or the quality of product to be produced by the equipment supplied hereunder
and Seller shall not be liable for any prospective or lost product or profits of Buyer.
THE FOREGOING WARRANTY IS EXCLUSIVE AND IN LIEU OF ALL OTHER EXPRESS AND IMPLIED
WARRANTIES WHATSOEVER. SPECIFICALLY THERE ARE NO IMPLIED WARRANTIES OF MERCHANTABILITY
OR OF FITNESS FOR A PARTICULAR PURPOSE.
The foregoing shall be Seller's sole and exclusive obligation and Buyer's sole and exclusive remedy for any action,
whether in breach of contract or negligence. In no event shall Seller be liable for a sum in excess of the purchase price
of the item.
You may register online at www.victory-refrig.com, fax this completed page to (856) 428-7299, or copy and mail form below to Victory.
*NOTE: The following mail-in form or online registration must be filled out and forwarded to Victory by the installer or customer within 10 days
after start-up. Failure to do this will invalidate the warranties. Retain this information for your records.
Refrigeration at its best
110 WOODCREST ROAD
CHERRY HILL, NJ 08003-3648
TEL: (856) 428-4200 ● FAX: (856) 428-7299
WARRANTIES NOT VALID UNLESS REGISTERED AT
FACTORY WITHIN 10 DAYS AFTER START-UP DATE.
Cabinet Model No.______________________
Cabinet Serial No._________________
(Data plate information located inside cooler on
the upper left wall)
ORIGINAL DATE OF INSTALLATION __________________________________________________________________
INSTALLATION COMPANY NAME ____________________________________________________________________
STREET _______________________________ CITY _____________________ STATE ______ ZIP CODE___________
DISTRIBUTOR’S NAME_____________________________________________________________________________
STREET _______________________________ CITY _____________________ STATE ______ ZIP CODE___________