1
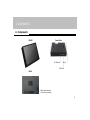
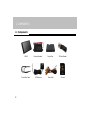
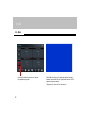
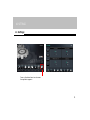
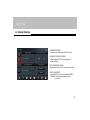
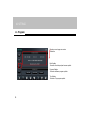
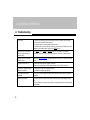
OEM-integrated Navigation System
UNAVI X1,X2
Owner’s Manual
Published by E-sense Technology inc.
Copyright ©2011 by E-sense Technology inc.
All rights reserved.
Contents
Thank you for using UNAVI!
Please read through these operating instructions so you will know how to operate your model properly.
After you have finished reading this instruction, keep this manual in a safe place for future reference.
NOTICE
1.
2.
3.
4.
5.
6.
7.
8.
9.
10.
11.
12.
2
UNAVI has a built-in user manual in an E-book format. Select “Owner’s Manual” icon.
INTRO
COMPONENTS
NAVIGATION
CLOCK
MUSIC
IMAGE
VIDEO
TRIP (see also “Bluetooth Phone Pairing”)
AUX
SETTINGS
UPDATE
ADDITIONAL INFORMATION
- Specification
- Troubleshooting
- Problems during operation
WARNING
Do not attempt to install or service your display by
yourself. Installation or servicing of the display by
persons without training and experience in electronic
equipment, car audio and automotive accessories may
be dangerous and could expose you to the risk of
electric shock or other hazards.
CAUTION
The user of this product is solely responsible for
observing safe driving practices. Do not
operate your UNAVI system while driving. Park the
vehicle first. Do not use the navigation system or
entertainment features if it presents a risk to you or any
other person or if it is a distraction.
3
1. INTRO
<< Disclaimer
>> For your safety, please do not operate this unit while driving. Be sure the vehicle is at a complete
stop and parked in a legal manner when the driver is operating this unit.
>> This navigation system should not be used in place of the driver`s own judgment.
Any route suggested made by this navigation system does not take into account, traffic conditions,
speed limits, road conditions, constructions, and etc. Disregard route suggestions made by the
navigation system if it suggests any illegal maneuvers or would place your vehicle and hazardous
situations.
>> All hardware and software belong to and are the property of E-Sense Technology, Inc. Duplication
and/or distribution or duplications of any copyrighted materials are illegal and may result to criminal
penalties and civil lawsuits. Any unauthorized attempts to access, upload or change any information
to defeat or circumvent security features may be subject to criminal penalties and civil lawsuits.
Utilization of this system for any other use than its intended purpose if progibited and may be subject to criminal penalties and civil lawsuits.
>> The advice provided by the navigation system is to be regarded only as a suggestion(s). There
may be situations where the navigation system displays the vehicle’s location incorrectly, fails to
suggest the shortest course, and/or fails to direct you to your desired destination. In such situations,
rely on your own driving judgment, taking into account current driving conditions.
4
1. INTRO
<< Disclaimer
>> Do not use the navigation system to route you to emergency services. The database does not
contain a complete listing of locations of emergency service providers such as police, fire stations,
hospitals and clinics. Please use your judgment and your ability to ask for directions in these
situations.
>> As a driver you are solely responsible for your road safety.
>> In order to avoid a traffic accident or traffic offense, remember that actual road conditions and
traffic regulations take precedence over the information contained in the navigation system.
>> Accordingly, the software may contain inaccurate or incomplete information due to the passage of
time, changing circumstances, and due to the nature of the sources used. Please observe the actual
traffic circumstances and regulations at all times while driving.
>> The navigation system does not provide, or account for in any way; information regarding traffic
and road laws; vehicle specifications including weight, height, width, load, and/or speed restrictions;
road conditions including road slope, grade, and/or surface conditions; obstruction information
including bridge and tunnel height and width, and/or other prevailing driving and/or road conditions.
Always rely on your own driving judgment, taking into account current driving conditions.
5
1. INTRO
<< Disclaimer
>> Minimize the amount of time spent viewing the screen while driving.
>> Do not cover up product with a towel or cloth-like material (Increased internal temperature may
cause product malfunction or lead to fire hazard).
>> Storing this product in a humid or dusty location may result in product malfunction or failure.
>> Normal operating temperature is between 32 degrees Fand 113 degrees F. Operating this
system outside of the operating tempserature can cause the system to malfunction.
>> This product must be used only with manufacturer’s approved parts and accessories. If not,
any warranty claims can be denied.
>> Ideal operating voltage of this system is 12 volts.
>> The touch screen responds best to a light touch from the pad of your finger. Using excessive
force or placing any metallic objects near the touch screen may damage the tempered glass surface
and will void your warranty.
6
1. INTRO
<< Disclaimer
>> During installation, please make sure the vent holes are not obstructed as it may lead to product
malfunction.
>> The MUTE function will only work with the system’s built-in speaker. It can take up to 3 seconds
for the sound to reappear after MUTE is turned off.
>> If your unit is trying to acquire satellites for the first time, it may take longer than normal to
establish an initial position. If the unit is powered on and outdoors with a clear view of the sky
this should not take more than 5-10 minutes.
>> If the vehicle is left non-operational for more an extended period of time, the GPS memory data
have been drained and will require at least 15 minutes of warming up to function properly.
>> Atmospheric conditions such as rain and fog can cause the GPS signal to fail. Driving inside tunnels,
in between tall buildings, and highly populated areas can also interfere with and diminish GPS signal
reception. If your vehicle has a protective UV coating on its windshield and has any electronic
devices that require satellite signals, it may prevent your GPS to operate properly.
>> Photos are non-binding. The manufacturer and importer do not take responsibility for any printing
errors.
7
1. INTRO
<< Disclaimer
>> Windows CE Logo is a registered trademark of Microsoft Corporation in the United States and/or
other countries.
>> iPhone, iPod and iTunes are trademarks of Apple Inc., registered in the U.S. and other countries.
>> The trademark and the Bluetooth® logo* are owned by the Bluetooth®* SIG, Inc. and any utilization
of these trademarks by Clarion is carried out under license. The other trademarks and commercial
names are the property of their respective owners.
>> DivX®, DivX® Certified, and associated logos are trademarks of DivX Inc. and are used under
license.
>> Any other trademarksand commercial names belong to and are the property of their respective
owners.
>> UNAVI and any of its distributors are not responsivle for any accidents pertaining to the misuse of
this product during inappropriate times.
>> The trademark and the UNAVI® logo are owned by the E-sense technology Inc.
8
2. COMPONENTS
<< Components
Control Box
FRONT
SD Card slot
Reset
USB host
BACK
②
①
① Main cable connector
② Control box connector
9
2. COMPONENTS
<< Components
UNAVI
Control Box Cable
10
External Speaker
GPS Antenna
Control Box
Main Cable
SD Card Reader
SD card
3. NAVIGATION
<< Using The Navigation
Under the Main Menu, please click on the NAVIGATION icon (For detailed navigation
usage instructions, please refer to the navigation user manual)
[Steps] Navigation menu > Select Destination
11
4. CLOCK
<< Clock
Press on the desired menu icon to access
the application program
12
Tap screen to return to the main menu.
5. MUSIC
<< Music
Press on the desired menu icon to access
the application program
13
5. MUSIC
<< Music
MUTE : Mutes and unmutes the
built-in speaker only.
EXIT : Exits user from the current
application.
DELETE ALL : Removes all files from
the playlist.(Actual file does not
get deleted)
DELETE FILE : Removes selected file(s)
from the playlist.(Actual file does
not get deleted)
ADD FILE : Add file(s) to the palylist
(See “Creating a file List” section)
Quick Menu Bar
14
5. MUSIC
<< Music
Default
Repeat Once
Shuffle
Shuffle Repeat
Forward
/Next
Play/Pause
Repeat All
Stop
Backward
/Previous
15
5. MUSIC
<< Creating A File List
1. Click ADD
16
2. Double click on any discovered storage devices.
5. MUSIC
<< Creating A File List
3. Double click the folder to display the files you
wish to play.
4. Select the file(s) you wish to add to the File List.
17
5. MUSIC
<< Creating A File List
5. Click ADD LIST to generate previously
selected files.
18
6. Click EXIT.
5. MUSIC
<< Creating A File List
1. SELECT ALL
-Selects all files in the list.
2. SELECT CANCEL
-Deselects file(s).
3. SELECT RRVERSE
-Unselected file(s) are selected.
4. ADD LIST
-Adds selected file(s) to the playlist.
19
5. MUSIC
<< Creating A File List
ROOT/
-Redirects user to the root directory.
FOLDER
-Redirects user to the upper directory
/folder
0/0
File Number - Displays the current number
of selected files out of the total number
of files in the list.
20
6. IMAGE
<< Image
Press on the desired menu icon to access
the application program
21
6. IMAGE
<< Image
SLIDE ON : Turns the slideshow feature
On and OFF.
SLIDE START : Begins slideshow.
EXIT : Exits user form the current application.
DELETE ALL : Removes all files from the
playlist.(Actual file does not get deleted)
DELETE FILE : Removes selected file(s)
from the playlist.(Actual file does not
get deleted)
ADD FILE : Add file(s) to the palylist
(See “Creating a File list” section)
Quick Menu Bar
22
7. VIDEO
<< Video
Press on the desired menu icon to access
the application program
Some video files cannot be played due to codec compativility
issues and may cause system error.
Movie player will not work with Navigation due to safety
concerns and to maintatin operating system stability.
Supports D1 Video Quality (720 X 480 resolution)
23
7. VIDEO
<< Video
MUTE : Mutes and unmutes the
built-in speaker only.
EXIT : Exits user form the current
application.
DELETE ALL : Removes all files from
the playlist(Actual file does not get
deleted)
DELETE FILE : Removes selected
file(s) from the playlist(Actual file
does not get deleted)
ADD FILE : Add file(s) to the palylist
(See “Creating a File list” section)
Quick Menu Bar
24
7. VIDEO
<< Video
Default
Repeat Once
Shuffle
Shuffle Repeat
Forward
/Next
Play/Pause
Repeat All
Stop
Backward
/Previous
25
8. TRIP
<< Trip
Press on the desired menu icon to access
the application program
26
Trip program(also referred to as the Radio screen)
8. TRIP
<< Trip
SONATA 1CDP audio
SONATA 6CDC audio
Tap screen to return
to the main menu
Tap screen to return
to the main menu
Radio screen timer control
(3,5,7 seconds or Always)
Radio screen timer control
(3,5,7 seconds or Always)
ELANTRA
TUCSON
Tap screen to return
to the main menu
Radio screen timer control
(3,5,7 seconds or Always)
Tap screen to return
to the main menu
Radio screen timer control
(3,5,7 seconds or Always)
27
8. TRIP
<< Trip
AZERA
OPTIMA
Radio screen timer control
(3,5,7 seconds or Always)
Tap screen to return
to the main menu
SPORTAGE
Tap screen to return
to the main menu
Radio screen timer control
(3,5,7 seconds or Always)
28
Radio screen timer control
(3,5,7 seconds or Always)
Tap screen to return
to the main menu
8. TRIP
<< Bluetooth Phone Pairing
WARNING
Vehicle must be parked to complete the phone pairing process. Not all mobile phones are
compatible with the car manufacturer`s Bluetooth system. Please visit the car manufacturer`s website
for a list of compatible phones tested to work with their Bluetooth system.
1.
2.
3.
4.
5.
6.
7.
Enable Bluetooth on your phone.
Push the SETUP button.
Select “PHONE” using the TUNE button, then press ENTER to Select.
Select “PAIR PHONE” using the TUNE button, then press ENTER to select.
Say the name of your phone when prompted(Use any name to uniquely describe your phone).
After Bluetooth system repeats the name you stated, say “Yes” to confirm.
The passkey ”0000” will display on the audio screen.
Select(’NAME OF CAR’)on the Bluetooth device list on your mobile phone and input passkey.
Continue pairing.
8. After pairing if completed, your phone may transfer phone/contact list to the audio system.(This process may
take a few minutes depending on the phone model and number of entries in the phone.contact list.)
29
9. AUX
<< Aux
Press on the desired menu icon to access
the application program
30
This Mode will allow you to view/play external sources
that are connected to the A/V input cable such as a DVD
player and game consoles.
(Tap screen to return to the main menu)
10. SETTINGS
<< Settings
Press on the desired menu icon to access
the application program
31
10. SETTINGS
<< Start Option
TRIP AUTORUN
-When turned ON, the system will automatically
execute the Trip program.
BUILT-IN SPEAKER
-When turnde ON, the system will enable sound
output through the built-in speakers.
PARKING ASSIST LINE
-When turned ON, rear-parking assist line will
display with the rearview camera activated.
START MENU
-Choose the default program menu to
launch on system startup.
32
10. SETTINGS
<< Screen/Volume
SCREEN BRIGHTNESS
-Adjusts overall brightness of the LCD screen.
DAY/NIGHT MODE AUTO CHAGE
-When turned ON, LCD will auto-adjust the
display settings.
BUILT-IN SPEAKER VOLUME
-Adjusts volume level of the system sound output.
TOUCH ADJUSTMENT
-Backlight OFF: Press to turn backlight ON/OFF
-Calibrate: Press to calibrate touch screen
sensitivity.
33
10. SETTINGS
<< Program
Displays current program version
infomation
Boot Update
-Executes the startup splash screen update.
Program Update
-Executes software program update.
Trip Update
-Executes Trip program update.
34
10. SETTINGS
<< Customizing The Splash Screen
To change the boot image(or splash screen logo)
at startup, select and prepare an image file with
the following format:
Image Size : 800x480
Image Format : 24-bit BMP
Filename & Extension: “intro.bmp”
35
10. SETTINGS
<< Customizing The Splash Screen
Drag and drop the selected image(BMP) file
to the main directory of the SD_CARD.
36
10. SETTINGS
<< How To Change The Intro Image
Insert the SD card into the SD card reader and start
up the system.
From the main menu, go to “SETTING” >
Press “PROGRAM” > Press “Boot Update”.
Upon completion of the update, system will reboot
automatically and will chage the boot image.
37
11. UPDATE
<< Update & Warranty
Firmware Update Procedure
1) Remove SD Card from the control box (usually located inside the glove compartment).
2) Visit www.unavi-usa.com to download and decompress the designated update file.
3) Once the update file has been decompressed and extracted, an UPDATE folder and UpdateProgram.exe
file will appear. Copy these files directly into the SD Card’s root directory.
4) Insert the SD Card back into the control box.
5) From the Main Menu, press: SETTINGS > PROGRAM > Program Update.
6) System will automatically restart if the update is successful.
7) Check if “X1_SD_FLASH” or “X2_SD_FLASH” text appears on the upper left corner of the boot-up screen
to ensure normal booting.
Map Update Procedure
Please visit www.unavi-usa.com for detailed information.
Warranty Period Extension
Please visit www.unavi-usa.com to purchase your extended warranty period desired.
38
12. ADDITIONAL INFORMATION
<< Specification
General
Rated power source : DC 12V
Storage temperature range : -20℃ to 60℃
Display
Screen size : 7.0 inch wide (UNAVI X1)
8.0 inch wide (UNAVI X2)
Resolution : 800 x 480 pixels
GPS
Signal : L1 Frequency(1575.42MHz)
Channels : 20 Parellel channels
Location determination range : under 25M (without SA)
S/W
OS : WinCE
Decoding Format
Movie : AVI
Music : MP3
Image : JPG, BMP
39
12. ADDITIONAL INFORMATION
<< Troubleshooting
40
To set time
1. There is no need to set up the clock manually as UNAVI is linked to the GPS signal.
2. Check to see there is GPS signal reception
3. Re-install program to resolve possible program errors
4. Otherwise, some vehicle models may require the user to manually configure the clock
displayed on the audio screen by going into the SETUP menu.
Bluetooth setup (instructions
may vary depending on the
vehicle model)
Press SETUP > Select PHONE or Bluetooth using the TUNE buttons (for complete
instructions, please refer to the factory Owner’s Manual or the built-in eBook manual.
System does not go past the
boot-up screen
Please visit www.unavi-usa.com to download the NK.bin file from our “Service & Support”
section
System does not boot up
1. Check that power cables are properly connected
2. Reboot the system using the Reset button located on the SD Card control box
Critical error message displays
and fails to initialize
1. Check to see the SD Card is properly inserted
2. Re-install the program and map files
MS Windows OS screen is
displayed
This is a result of the program files being deleted from memory and require program reinstallation
Broken image display
1. Broken images in the map screen indicate corrupt map files. Please update the map
files.
2. Broken images in non-map screens indicate corrupt program files and require program
re-installation.
12. ADDITIONAL INFORMATION
<< Troubleshooting
GPS abruptly stops
1. This may be due to surrounding obstructions to the GPS signal, such as bridges, tunnels,
underground parking structures, and buildings.
2. Check to see that there are no electronic devices near the GPS antenna.
3. Check to see that the GPS antenna is mounted in non-obstructive locations and
properly connected to the UNAVI unit.
Touch screen is non-responsive
Please check to see the LCD is not being pressed on by the housing cover
There is no sound
1. Check proper audio output set up under the menu option.
2. Check to see the mute key is not selected.
Route selection fails or takes
too long
1. Double check and select point of departure, waypoint, destination, and search options.
2. Confirm that waypoint and destination addresses are valid.
3. Not all areas may have been covered and updated by the GPS map provider.
Navigation instructions differ
from current road conditions
1. This may be due to changes in road conditions or during lane changes.
2. Download the latest map update as the existing map data may be outdated.
If the above measures do not resolve your trouble shooting questions, please contact your local UNAVI
distributor or visit us on the web at www.unavi-usa.com.
41
12. ADDITIONAL INFORMATION
<< Problems During Operation
-GPS signal reception is too slow
If the vehicle has been inoperative for an extended period of time, the GPS memory data may have been
drained and will require at least 15 minutes of “getting a fix” to acquire satellite signal. GPS positioning is
limited by weather (bad cloud cover, rain, fog) and usage location (tall buildings, tunnels, underpasses, trees,
bridges).
-USB memory device not recognized
In many cases, the reason why the USB flash drive doesn't work is because it is in a manufacturer-based
format that is not compatible with the UNAVI system. If possible, it is recommended to use a commonly
known brand USB flash drive with at least 16 GB of memory.
-Navigation system is not working
Check if the SD Card is inserted properly in the control box. It can also be affected by a missing or corrupted
data file in the SD Card. After diagnosing the problem, please reload the map update files (“SpeedNavi”
folder) by obtaining it from a proper source.
-Backup camera does not appear on screen or displays static noise
Typically caused by a faulty wiring or the backup camera device itself. If the problem arose during the initial
installation, we recommend testing different camera products as incompatibility issue may be apparent.
42
43
E-SENSE TECHNOLOGY INC.
265-28, YANGJAE-DONG, SEOCHO-GU, SEOUL, 137-130, KOREA
UNAVI USA INC.
21136 S. WILMINGTON AVE #200, CARSON, CA 90810, U.S.A
www.unavi-usa.com