1
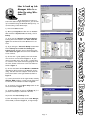
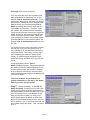
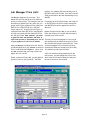
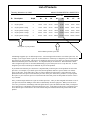
Lab Manager
Fast-Fax
Collection
Answers to Commonly Asked Questions
LSG
Page: 1
Page
Adding a Logo to Lab Manager ..........................................................................
Backing Up with Windows 95 .............................................................................
Backing Up with Windows 98 .............................................................................
Backing Up to a Zip Drive ...................................................................................
Case Completion Screen ....................................................................................
Cases to be Shipped Screen ..............................................................................
Clinic Doctors (How to add to an account) ..........................................................
Discounts or Credits ...........................................................................................
DLL problems. Lab Manager won’t start up .......................................................
Dot Matrix Printer Setup in Windows 98 ..............................................................
Dot Matrix Printer Setup in Windows XP ............................................................
End of Year Processing ......................................................................................
End of Month Processing ....................................................................................
Exporting from DOS Lab Manager ......................................................................
Flightags Reporting .............................................................................................
Forgot to close the month? .................................................................................
Getting Started for the first time ..........................................................................
Lab Manager Form Margins ...............................................................................
Print Labels with Microsoft Word ........................................................................
Payments. How to enter payments .....................................................................
Price Lists ...........................................................................................................
Printing the User Manual ....................................................................................
Quality Control Sheets ........................................................................................
Quick Books Interface .........................................................................................
Quickly Accessing Archived Data .......................................................................
Scheduling with Lab Manager ............................................................................
Unlocking Lab Manager Features .......................................................................
Upgrading Lab Manager Data ............................................................................
Quality Control ....................................................................................................
Weights and Measures Conversion Table ..........................................................
Windows XP Speed Problem Fix ........................................................................
Year End Processing ..........................................................................................
Page: 2
3
4
5
6
7
8
9
10
11
12
13
14
15
17
19
20
21
23
24
25
26
29
30
31
32
33
35
36
37
39
40
41
Adding Your
Logo to
LABORATORY
SYSTE MS GROUP
LM97/99/2000
Have you ever wished you could have Lab
Manager print your company logo on your
invoices and statements? Well, it can! To
place your company logo into Lab Manager
you will first have to draw or scan you
company logo into the computer.
To draw the logo you will need to use a
paint program, such as the one that comes
with Windows, or any other paint or draw
program. If you have such a tool and know
how to use it, the process is as simple as
“Selecting you master piece” using the
paint program’s “Select Object” or “Copy”
function to select the portion of the
drawing you want and copy it into Windows
copy and paste buffer.
If you don’t have access to a scanner,
LSG can scan your logo for a small fee.
Call (800) 677-1120 for mor e
information.
1) Select and copy artwork
2) Paste artwork
Next, start up Lab Manager and proceed
to the Main Menu.
There, click on
Maintenance Menu. At the Maintenance
Menu, click on Company & System
Information. At the Company & System
Information screen, click once on the
Logo screen to select that field. Finally,
press CTRL and the letter “V” to paste
your logo into the logo window.
3) Select options
Now to print the logo on all of your
invoices, place a check in the “Print logo on
invoice” box and to print the logo on all of
your statements, place a check in the “Print
logo on statement” box.
If you have a scanner and want to place a
scanned image of your logo into Lab
Manager, simply scan the image using the
scanning software that came with the
scanner and select the image and copy it
into the Windows copy and paste buffer,
start up Lab Manager and paste the image
into the logo field as described earlier.
Page: 3
How to back up Lab
Manager data to a
diskette using Windows 95
LABORATORY
SYSTE MS GROUP
If you don’t have a Zip drive or
some other mass storage backup device, you can back
up to a diskette using the Windows Backup utility. To
use that utility, follow these steps;
1) Click on the Start button
Figure 1
2) Move up to Programs and then over to Accessories and then to System Tools and finally, click on
Backup.
3) If you get the “Welcome to Microsoft Backup”
screen, place a check mark in the “Don’t show this
again” box and then click on the OK button to continue.
4) If you then get a “Microsoft Backup” window that
states “Backup has created the following full
backup file set for you”, place a check mark in the
“Don’t show this again” box and click on the OK button to continue.
5) Click on the “+” (plus symbol) in the left window
next to the C: drive as shown in Figure 1. If your
data is in another drive, click on the “+” symbol next
to it instead. This causes the backup program to list
all of the folders in that drive in the left window as
shown in Figure 2.
Figure 2
6) Click on the folder labeled LMWIN or LMWIN32
depending on which version of Lab Manager you are
using. This will cause the computer to list all of the
files in that folder in the right window as shown in
Figure 2.
7) Locate your data file in the right window, normally
LMDATA.MDB, and place a check into the empty box
to the left of the filename as shown in Figure 2.
8) To continue, click on the Next Step button to see
the screen shown in Figure 3.
Figure 3
9) As shown in Figure 3, click on “3½ Floppy (A:)” if
you want to back up to a diskette in drive A:.
10) Click on the Start Backup button.
11) Give the backup set a name, such as Lab Manager,
and click OK, as shown in Figure 4, to begin backup.
Figure 4
Page: 4
LABORATORY
S YSTEMS GROUP
How to back up Lab
Manager data to a
diskette using Windows 98
If you don’t have a Zip drive or some other mass
storage backup device, you can back up to a diskette using the Windows Backup utility. To use
that utility, follow these steps;
1) Click on the Start button on the task bar
from the Windows desktop screen.
Figure 1
2) Move up to Programs and then over to Accessories and then to System Tools and finally,
click on Backup.
3) If you get the “Welcome to Microsoft
Backup” screen, make sure that there is a dot
next to the “Create a new backup job” as shown
in Figure 1 and then click on the OK button to
continue.
4) In the next screen, shown in Figure 2, place
the dot next to “Back up selected files…” and
then click on the Next button.
5) As shown in Figure 3, click on the “+” (plus
symbol) in the left window next to the C: drive.
If your data is in another drive, click on the “+”
symbol next to it instead. This causes the
backup program to list all of the folders in that
drive in the left window.
Figure 2
6) Click on the folder labeled LMWIN or
LMWIN32 depending on which version of Lab
Manager you are using. This will cause the computer to list all of the files in that folder in the
right window as shown in Figure 3.
7) Locate your data file in the right window,
normally LMDATA.MDB, and place a check in the
empty box to the left of the filename as shown
in Figure 3.
8) To continue, click on the Next Step button
to see the screen shown in Figure 4 (on the next
page).
Figure 3
Page: 5
LABORATORY
SYSTE MS GROUP
There are
several
methods to
backup Lab
Manager’s
data.
1 Window’s backup utility.
2 Your tape backup program (if
you have a tape drive).
3 The DOS backup utility.
4 Lab Manager’s Utility program
The following discusses the
fourth selection shown above using the Lab Manager 99 Utility
Program. The Utility Program can
be configured to launch the
backup utility of your choice, but
in this article we will show you
how to configure it to backup your
data to a Zip disk.
To find Lab Manager 99’s utility
program, exit Lab Manager 99 and
return to Windows. It is
important that Lab Manager 99
be closed before attempting to
back up it’s data.
• Click on the Start button.
• Click on Programs.
• Click on the Lab Manager
Group.
Then click on the Lab Manager
Utility (LM Util 97 or LM Util
99). A window will appear showing
three options; Database
Maintenance, Format Backup
Restore, and Exit.
Click on the Format Backup
Restore button. Another window
will appear showing four more
options; Format a Diskette,
Backup Data, Restore Data, and
Exit.
Customizing the Backup
Data command
The default setting looks something like;
Xcopy c:\lmwin32\lmdata.mdb a:
This default command is set to
backup your data to a diskette in
drive a: (the floppy drive). To
change the backup command to
backup to your zip drive, simply
change the “a:” at the end of the
command to “e:” (without the
quotes). If your zip drive is not
drive e:, then substitute the appropriate drive letter for drive a:.
The command will now look something like;
Xcopy c:\lmwin32\lmdata.mdb e:
Click on the Backup Data button
to backup your data to the Zip
drive.
Customizing the Restore
Data command
The Restore command can be used
to restore data on a Zip disk back
to the computer. This process is
the opposite of the backup process. Please note that this
process will erase any Lab
Manager data currently in your
computer as it replaces it with
the data on the Zip disk.
The default Restore command
looks something like;
Xcopy a:\lmdata.mdb c:\lmwin32\*.*
This command is set up to restore the data from a diskette
but can be modified to restore
the data from most anywhere.
To change it to restore data
from the Zip disk, change the
“a:” after the xcopy command to
the drive letter of your Zip
drive. For example, if your Zip
drive is drive e: then the command should like this;
Xcopy e:\lmdata.mdb c:\lmwin32\*.*
Now, the next time you need to
restore your data, all you have
to do is click on the “Restore
Data” button.
Page: 6
Case Completion
The case completion screen can be used to tell
Lab Manager which technician completed a particular production step and when for the purpose
of reporting on technician production. The screen
is designed to be used with a mouse or a touch
monitor. Typically, this screen is displayed on a
touch monitor out in the laboratory where the
technicians have easy access to it. When a technician completes a step, he or she simply comes
to the touch monitor, touches his or her name and
then the “Select” button as shown in Figure 1
The black triangle to the far left of the screen indicates which technician the computer will select
when the “Select” button is pressed.. The First,
Previous, Next, and Last buttons can also be used
to choose the desired technician. Once the triangle is pointing at the desired technician, press the
“Select” button to proceed to the next screen.
Once the technician has been selected, a list of
cases will be displayed as shown in Figure 2. The
technician simply chooses the case they just
worked on using the same method described in
choosing the technician name. Choose the case
and then press the “Select” button to proceed to
the next screen.
The final screen, as shown in Figure 3, is used to
select the step just finished. Usually it will be the
top step, but if not, choose the correct step using
the same methods discussed above and then press
the “Select” button.
That completes the process for that step and the
computer will return to the display shown in Figure 1 for the next technician to use. Each time a
technician assigns his or her name to a step in this
way, that step will not appear again unless the
case is re-scheduled.
Once one or more of the steps have been completed in this way, the production information
will appear on the technician production report
the next time it is printed. To print the
“Technician Production” report, proceed to the
Report Menu and click on the “Production” tab
and then on the “Technicians” button. There you
can choose between the Summary and Detail reports.
Page: 7
Cases to be shipped
The cases to be shipped screen is designed to be used on the shipping department computer, networked to the
main server, to notify the shipping person what cases need to be shipped. As cases are billed out at other work
stations, those cases will automatically appear in the “Cases to be shipped” list shown above.
To use, simple use the mouse or touch monitor to select a case by clicking or touching the line the case is on or
click on or touch the First, Previous, Next, or Last buttons to move the black triangle, on the far left, to point at
the desired case. Finally, click on or touch the “Mark Shipped” button. This places today’s date in the
“Delivered” date field associated with that case to indicate that it has been shipped or delivered.
This screen will refresh it’s self automatically every few minutes. After the screen is refreshed, new cases
might appear and those cases you marked shipped will disappear. At the end of the day, if all of the cases were
marked shipped what were suppose to be shipped, the “Cases to be Shipped” screen will be empty.
Page: 8
LABORATORY
SYSTE MS GROUP
Adding Clinic
doctors to an
account.
Clinic doctors are doctors that do not work
alone but instead share an office with other
doctors. Clinic doctors do not get their own
statement, instead, the statement is sent to
the main office (or Account) with the details
of each doctor in the office on the one statement.
Figure 1
If you wish to send a doctor his own statement, then that doctor should be set up as an
account not a clinic doctor.
To set up a clinic doctor, start by setting up
the account information for the office. This is
accomplished by going to the Maintenance
Menu (as shown in figure 1) and click on
“Accounts, Payments, and Preferences.”
Define Account Information
Set up an account with the name, address,
telephone number, and starting balances as
shown in figure 2. Once the account is set up,
make a note of the account number or name
because you will need to know it when you define the clinic doctors that work at that office.
Figure 2
Define Clinic Doctors
Once the Account (or office) is set up, then
the clinic doctors can be defined. To do that,
return to the Maintenance Menu and click on
Clinic Doctors. Click on the New button if necessary to create a new record and then select
the Account (or office) by typing in the account number of the office or use the dropdown list button to select the account you set
up in figure 2. Next, type in the name of the
clinic doctor in the Doctor’s name field. If
more doctors are to be added to the same office, repeat the above process by clicking on
New, select the same office and then type in
the next doctors name in the name field.
Figure 3
Page: 9
Entering a Discount
or Credit.
LABORATORY
SYSTE MS GROUP
There are several methods available in Lab Manager to give discounts. If the discount
or credit is for an invoice from a past month then you
can issue it from the payment screen just like entering a payment except that you change the “Type” of
entry from “Payment” to “Discount” using the dropdown list box as shown in Figure 1. This discount will
clearly show up on the statement and will reduce the
accounts balance.
Figure 1
To show a discount on an invoice, create a special
product called “Discount”, “Special Discount”, “Remake
Credit”, or whatever name you want to give it, by going
to the Maintenance Menu and clicking on Products as
shown in Figure 2. Create an new product by clicking
on the “Add New” button and then fill in the blue
fields as show in Figure 3. Make sure to define the
selling price as a -1.00 (minus one dollar). Lab Manager will change the –1.00 to ($1.00) to indicate that
it is a negative number.
Figure 2
To use this new “Discount” product, proceed to the
Case Entry Screen and after defining the account and
patient names, click on the Products Tab to add the
applicable products. Add any and all products as usual
and then add the new “Discount” product as shown in
Figure 4. Use the “Qty” field to tell Lab Manager how
much of a discount you want to give. For example, to
issue a discount for $76.71, type it into the “Qty”
field. When you press the ENTER key, Lab Manager
will multiply the quantity of 76.71 times the minus one
dollar value and display a ($76.71) in the Total field.
Figure 3
When the invoice is printed, the discount will appear
with the other products and materials. The discount
amount will be subtracted from the invoice total. This
process will also deduct tax automatically if the
“Discount” product is “Taxable.” Refer to the
“Taxable” check box shown in Figure 3.
Figure 4
Page: 10
What to do if Lab Manager won’t start
Lab Manager 2000 DLL List
Deletion Order
3
3
1
3
3
3
3
3
3
3
1
3
3
2
1
2
2
2
2
3
2
3
3
3
3
3
3
1
1
2
Name
CONV32
CTL3D32
DAO3032
GRINTL
MFCANS32
MFCUIA32
MSACCCAH
MSACNV30
MSADTUSA
MSAEXP30
MSAIN300
MSAORN95
MSARNREG
MSJINT32
MSJT3032
MSJTER32
MSO5ENU
MSOTHUNK
MSRD2X32
MSSETUP
MSVCRT20
MSWNG300
OPENENU
SCP
SDM
SOA300
TWII32
VAEN232
VBA232
VBAJET32
Type
DLL
DLL
DLL
DLL
DLL
DLL
DLL
DLL
DLL
DLL
DLL
DLL
DLL
DLL
DLL
DLL
DLL
DLL
DLL
DLL
DLL
DLL
DLL
DLL
DLL
DLL
DLL
DLL
DLL
DLL
Size
69,632
27,136
456,464
123,184
133,904
24,576
67,584
236,800
189,952
172,032
1,155,072
937,472
62,976
35,088
950,272
98,356
92,160
11,264
245,520
249,344
274,432
309,520
53,760
9,904
102,032
102,400
40,960
10,240
1,048,848
30,992
Date
4/16/99
12/5/95
3/19/96
3/19/96
3/19/96
4/23/99
12/5/95
3/19/96
12/5/95
3/1/00
3/1/00
3/19/96
12/5/95
3/19/96
4/23/99
3/19/96
3/19/96
3/19/96
3/19/96
12/5/95
4/23/99
3/19/96
3/19/96
3/19/96
3/19/96
3/1/00
4/26/01
3/19/96
3/8/96
4/23/99
Time
9:52a
11:00p
11:00p
11:00p
11:00p
9:22p
11:00p
11:00p
11:00p
8:00a
8:00a
11:00p
11:00p
11:00p
9:22p
11:00p
11:00p
11:00p
11:00p
11:00p
9:22p
11:00p
11:00p
11:00p
11:00p
8:00a
2:54a
11:00p
2:11p
9:22p
IMPORTANT: If you are a Lab Manager user, make sure that you have your data
backed up before proceeding because un-installing Lab Manager will delete
your data.
If Lab Manager won't start after installing Office or some other program, start by deleting all of the
#1 DLL's listed above and then un-install Lab Manager and then re-install it. If you are a Lab
Manager user, restore your data and use the Change Company button in the Utility Menu to reattach to your data.
If Lab Manager still won't work, delete all of the #2 DLL's and then un-install Lab Manager and then
re-install it.
The easiest way to delete the above files is to search for each using the Windows Search feature.
Search for each file one at a time and then delete the file right there in the search screen.
Page: 11
How to Set Up Your Dot Matrix Printer to Use the Small Forms
Programs designed to operate in Windows rely on the Windows operating system to
handle all printing needs. Because of this, if you want to print work tickets, invoices,
or statements on our small 6” x 7” form, it is necessary to set up a Windows printer
with those form parameters. If you plan to use Lab Manager 97/99 with our small
form and a dot matrix printer, follow these steps in Windows 95;
LABORATORY
SYSTE MS GROUP
♦
♦
♦
♦
♦
♦
♦
♦
♦
♦
♦
♦
Click on the Start button
Click on Settings
Click on Printers
If your dot matrix printer is not shown in the
Printers windows then double click on the Add
Printer icon and follow the steps in the Add
Printer Wizard to select the dot matrix printer
you are using. When the Add Printer Wizard is
finished, a printer Icon will be added to the
Printers window.
A second printer icon for your dot matrix
printer is needed; one for the small invoice
forms and the other for the full size sheets of
paper used for printing reports. If you only
have one printer icon, repeat the above step to
create another.
Change the name of one of the printer icons to
Invoice Printer by clicking once on the icon, wait
for a moment, then click on the description
below the icon. The description will become
highlighted. You can now change the description
to Invoice Printer. Use this same process to
change the description of the other printer icon
to Report Printer.
Right Click on the Invoice printer icon and then left click on Properties.
Click on the Paper Tab
Scroll to the far right of the Paper size window to Custom and then double click on it.
Change the Width and Length parameters to a Width of 600 and a Length of 700 as shown in the
box below.
When finished, click on the OK button.
In the Printer Properties window, click on the
Apply button then click on the OK button.
From now on, set the Invoice Printer as the default
windows printer when ever you want to print on the
6” x 7” form and select the Report Printer when
ever you want to print a report.
To change the default printer; click on the Start
button, click on Settings, click on Printers. In the Printers window, right click on the printer icon you
wish to set as the default printer, then left click on Set As Default. This printer will remain the
default printer until you change it again.
Page: 12
This paper describes how to
set up a dot matrix printer
in Windows XP.
LABORATORY
SYSTE MS GROUP
From the desktop, click on the
Start button and then click on Printers and
Faxes as shown in figure 1.
In the Print Server Properties window, place a
check in the box labeled Create a new form as
shown in figure 3.
Define the Width and Height. If you want to
use our 2 part invoice form, use a width of 6.5
Figure 3
and a height of 7.
Figure 1
In the Printers and Faxes window, click on File
in the upper left corner and then on Server
Properties as shown in figure 2.
Give the form a name as shown in figure 4 and
then click on the Save Form button. Now the
form can be selected in the printer driver.
Figure 2
Figure 4
Page: 13
LABORATORY
SYSTE MS GROUP
The end of the year is nearly upon us and that means
it will soon be time to reset year to date totals to
zero.
The time to perform this function is in January (after you have closed December but before closing January).
The following information describes how:
DOS Users:
Start at the Main Menu and select 3 for System Maintenance Menu. Next, select 3 to “Reset year to
date totals to zero.” Finally, answer “Y” to reset the YTD totals to zero.
Lab Manager 97, 99, and 2000 Users:
There are actually two types of Year End Processing.
Update Calendar: The first has to do with updating the calendar to make sure that the “Days you are
closed” are correct. This is done by going to the Maintenance Menu and clicking on “Scheduling Calendar.”
This calendar is used for more than just scheduling. It is also used on the Lab Status Report to computer
the number of working days in the month and also the projected sales. Check over the calendar events
and make sure they are all correct.
Reset YTD Totals: Start at the Main Menu and click on “Utility Menu.” At the Utility Menu, click on
“Year End.” Finally, click on “Reset Year to Date Totals.” Do not perform this task until you have printed
statements and closed the last month of your fiscal year. This can be performed anytime during the
FIRST month of your fiscal year.
If you forget to perform this function during the first month of your fiscal year, then you can update the
YTD totals manually by going to the Maintenance Menu and clicking on “Accounts, Payments, and Preferences.” Next, go through each account and manually correct the amount found in the “YTD” field on the
right side of the screen. That total should reflect the sum of all of the current invoices (for that account) for all months up to but not including the current month since the beginning of your fiscal year. In
other words, if you are doing this in March and your fiscal year started in January, the YTD field should
contain the total of all of this accounts invoices for January and February.
Page: 14
Here are 7
easy-to-follow
steps for perfect Statements and End-of-Month
processing.
print them.
LABORATORY
SYSTE MS GROUP
At the end of each month, you will want to
send each of your doctors a statement of
all activity for that month. The exact day
you print statements and close the month
is not important. Most people close the
month within a day or two of the actual end
of the month, however, you can close on any
day.
Step 1: Print all invoices you want to ap-
pear on the statements. Print the YTD Invoice Register to verify (See Figure 1). If
the invoice is not on the report, it won't be
on the statement.
Step 2: Enter all payments (checks) de-
posited in the bank this month. This is
done in the Account entry screen. Remember, you want Lab Manager’s total monthly
cash receipts (checks and cash deposited in
the bank) to match your bank statement.
Print the MTD Cash Receipts Journal (See
Figure 1) to verify all payments have been
entered correctly.
Step 3: Print the Aged Trial Balance Re-
port. (See Figure 1). This is the most important report you can print each month.
This monthly summary shows you each doctor's beginning balance, his current sales
(invoices), his total monthly payments (cash
receipts) received, past due balances in the
30, 60, 90 day fields, any service charges
and his total amount due as of that moment. It is a quick picture of what your
statements will say before you actually
Figure 1
This is the time to catch any incorrect balances, before you print your
statements. If you find an error on any of
these reports, correct the error and reprint your reports.
Step 4: Print any other desired account-
ing and production related reports so that
you have a record of' what was sold, produced, and owed (See Figure 1). Check the
reports and if a problem is found, correct
it and reprint all reports affected by the
change. Make sure all data on the reports
is correct before proceeding.
Step 5: Do your monthly backup. If you
are unsure how to do a backup, see BACK
UP" procedure covered elsewhere in this
manual.
Step 6: Print statements for all ac-
counts (See Figure 1). Check over the
statements before answering the question
"Did the statements print OK." If you
find a problem answer NO, correct the
problem, reprint any related reports, and
reprint statements. If all of the statements printed correctly, answer YES and
Lab Manager will proceed to End Of Month
Page: 15
Processing which closes the month.
It is very important that ALL statements get
mark statemented by answering “Yes” to the
question “Did all statements print OK.” If you
answer “No” then none of the cases are marked
statemented. Cases that are not marked statemented will not get processed during End of
Month processing and that will cause your account balances to be wrong. Therefor, if you
are in doubt and you have printed statements
for all accounts and you have not yet closed the
month, proceed to the statement menu (Figure
2) and click on the Preview button. When the
first statement is visible in the preview window,
press the ESC key to exit and then answer the
question “Did all statements print OK” by clicking “Yes.”
Figure 2
If a problem is found after the month is closed,
the only way to correct the problem is to restore a BACK UP of the data made just before
closing the month. This is why it is very important to backup your data each month before
closing. If something goes wrong during the
month end closing, the BACK UP is your only salvation.
A few words before we do "End of
Month" (EOM) processing. This process updates
the material inventory, applies payments to the
account balances, ages the accounts, computes
service charges, archives the cases that have
been statemented and prepares Lab Manager 99
for the next month.
This function MUST be performed after
printing statements at the end of the month
before you start the next month.
Step 7: Closing the month. At the End Of
Month Processing screen (Figure 3), select the
month you are closing using the drop down list
box labeled Month to Close and then click on the
Start Processing button. Lab Manager 99 will
keep you informed of what it is doing in the
status window above the Month to Close field.
When the status window tells you that the process is complete, click on the Exit button and you
are finished closing the month. That's all there
is to it.
Page: 16
Figure 3
LABORATORY
SYSTEMS GROUP
These instructions describe
how to transfer data from
Lab Manager version 16.05
(the DOS version) to Lab
Manager , the Windows version.
The function is used ONLY ONCE to transfer data
from the DOS version to the Windows version. Be
sure to BACKUP your data before proceeding. .
Important Notes: If you have blank, missing, or
skipped accounts within your account file, then the
Windows version of Lab Manager will re-number
your accounts to fill in the blanks. This also applies to products, materials, vendors, technicians,
etc., but does not apply to cases. If this presents
an inconvenience, then simply fill in the blank records with the word “Blank” so that the record is
no longer empty prior to exporting.
Next, run a System Check. From the Main Menu
enter “2” (Reports Menu), then “6” (Invoice Register), then “6” (Check cases and accounts for problems), then “1” (Do System Check). Run this twice.
The first time, browse the report. Once it appears
on your screen, close it and then return to the
MAIN MENU. Run the report again and print. Review the report and correct any problems identified.
Export procedure
Both Lab Manager for DOS and Lab Manager must
be installed on the computer that will contain your
new Lab Manager for Windows. Install both the
diskette (DOS version) and the CD (Windows) into
the this computer .
C:>XCOPY C:\LM\*.* E:\LM\*.* /S
When completed, power down the computer and
disconnect the zip drive. Install the Zip drive to
the new computer. Open MY COMPUTER and notate the zip drive letter assigned in THIS computer. Often, the drive letters will be different.
Keep in mind that the example command may have
a different drive letter. Insert the Zip diskette
containing the copied data into the Zip drive and
restore the data using the following command;
XCOPY E:\LM\*.* C:\LM\*.* /S
Once you have both the DOS and Windows versions of Lab Manager on the same computer and
have confirmed the data is restored, proceed
with the following steps.
1
2
3
4
5
6
You will need to transfer the DOS data to the new
computer. An external Zip drive makes the transfer of data simple and will be necessary for making
backups in Lab Manager .
Install the Zip drive to the computer containing
the DOS data according to the directions. Open
the MY COMPUTER icon on your Windows Desktop
and notate the drive letter assigned to the Zip
Drive. Go to the DOS prompt. Type the following
command;
Note:(The following example has used “E” as
the drive letter of the Zip Drive. Change “E” to
the appropriate letter determined by your computer.)
7
Start up the DOS version (16.05) of Lab Manager as you normally do.
At the Main Program Menu, type “E” for export and press ENTER.
At the Export Menu, select "1" to begin the
export process and press ENTER.
Lab Manager (DOS version) will ask which
drive the Windows version was installed into.
The default answer is "C." Press ENTER, otherwise, type the appropriate drive letter and
press ENTER.
Lab Manager (DOS) will display the PATH
where it was found. If this is the correct
PATH (it should be), then press ENTER. The
PATH should be C:\LMWin32\.
A list of data files will be displayed. We recommend that you only export current year
files. If you ever need files prior to that, simply open your DOS program to access the records. Use the arrow keys to pass the files
you wish to export and F5 to eliminate the
older files from the list. Include the c:\LM
file., but F5 C:\LMBkup file. If you have two
or more companies call Technical Support for
assistance. Important Note: After removing
any directories that you don't want to export,
press ENTER. This process does not actually
delete any data, it simply removes items from
a list of things to be exported.
Lab Manager (DOS version) will again display
the small window at the right, this time showing only the directories to be exported. If this
is wrong, go back to the MAIN MENU and
start again. If the list is correct, press ENTER to begin the export process. The process
is very quick and should only take a minute or
two.
Page: 17
8
After the data has been exported successfully,
exit the DOS version of Lab Manager.
Exporting data from the DOS version does not delete
or modify the DOS data at all. After exporting, your
DOS version of Lab Manager will continue to operate
as usual. If you do need to export your data again, you
should contact our technical support department at
602-264-5913.
Return to Windows, and start Lab Manager . Go to
the Utility Menu, Change Company and click on the
small black arrow that the large red arrow is pointing
to. Select CURRENT MONTH. When it disappears,
close the Change Company screen.
Important Note
Once you have completed the Export/Import process,
you cannot return to your DOS program for data input. If this is done, the new information input in DOS
will need to be typed into the Windows program also.
you have a second company to transfer, exit Lab
Manager for Windows and follow the directions below.
Importing a Second Company
Once you have completed the entire procedure for
Company “A”, you can begin the setup for importing
Exit Lab Manager completely. Click on Start, Program Company “B”.
Files, Lab Manager, Lab Manager Utilities. Go to Database Maintenance. Click on Compact Data. When
While still in Lab Manager for Windows, go to the
it’s done, exit the Utilities Program and return to Lab Utility Menu.
Manager .
Go to Change Company , Click on Edit Database Connection., Create New Company. Type in the name of
If the Setup Wizard should appear, click on EXIT.
the 2nd company. It will appear on the list. Close the
At the Main Menu, click on Utility Menu.
screen and in the Change Company select the new
name, when it disappears, close Change Company.
Import procedure
In the Utility Menu, click on UPGRADE DATA.
Click on: UPGRADE FROM LAB MANAGER DOS VERSION.
Click on: START and follow the prompts. Make sure
that no one disturbs the program during the import
process.
Key Number
When importing is complete, call Lab Manager at 1800-677-1120 for your key number.
Figure 1
Configuring Lab Manager
Once you have received the key number, go to the
Maintenance Menu, Company & System Information
and type in your company name and address. While
in this screen, review the fields and configure Lab
Manager’s features. Click on the Interface Tab to
set the report forms for Invoices, Statements and
Work Tickets. This is also where you define any
statement and invoice messages.
Figure 2
Page: 18
Flightags Report
For all of you who use the Flightags
program, this report can be used to
automatically calculate the number
of Flightags each account has
earned and print them on an easy to
read report. If you don’t know
what a Flightag is, refer to the following section describing the
Flightag program offered by
Flightags Inc.
Figure 1
Printing the Flightags Report
Starting at the Main Menu, click on Report Menu. At the Report Menu, click on Flightags Report. At the next
screen (see Figure 1), you have the option of defining a “Cut-off” date. The default date is always the 10th of
the month but you can change this date if you wish. If the date is correct, simply click on the Print or Preview
button to print the report.
The Flightags® Marketing Program
Established in 1972, Flightags is the premier marketing program for dental labs and suppliers. The Flightags
Program is designed to help your company acheive specific business objectives, including increasing cash flow
through early and full payment, building customer loyalty, improving customer retention and acquiring new
accounts.
How the Program Works
The Flightags Marketing Program is built around the proven incentive of individual travel awards. Flightags
Travel Awards are rewarded to your customers based on their monthly purchases, when their account is current
and paid in full by a specific qualifying date. It's that simple.
The travel awards can be redeemed at local travel agencies for credit towards the cost of any agency service,
including airfares, auto rentals, hotel accommodations, vacation packages, cruises and more! Flightags Travel
Awards may be redeemed at any time and there are never any restrictions on dates of travel or destinations.
Travel Incentives..A Proven Motivator
Your customers, and their spouses, love to travel. In fact, your customers are probably already planning their
next vacation. Because the average dentist spends thousands of dollars each year for commercial lab work,
equipment and supplies, offering Flightags Travel Awards will help you earn more of their business, ensure
prompt payment and provide value-added service.
To learn more about how Flightags can benefit your business, please call (800) 521-3287 or (515) 244-2100.
The folks at Flightags, Inc. will be happy to provide you with additional information.
Flightags, Inc.
2733 6th Avenue
Des Moines, IA 50313-4124
Phone: 515-244-2100 or 800-521-3287
Fax: 515-280-7600
® TM Flightags, Inc., Des Moines, IA, USA © 1999
Page: 19
LABORATORY
SYSTE MS GROUP
The following describes what
to do when you discover that
you have two or more
months of data mixed together in the current month.
It’s the middle of the month and you have just
printed an Aged Trial Balance report or an Invoice Register and you discover that the totals are wrong. Taking a closer look at the Invoice Register reveals that there are two
months of cases on the report. Apparently,
last month was not closed properly and now
you have a mess on your hands.
3)
If this ever happens to you, simply follow
these steps to correct the problem.
Small Problem: If you simply forgot to close
last month and you have caught the problem
early, follow these steps, otherwise skip to
the next section titled Big Problem.
1) Change the status of all of the Current
invoiced cases to “Closed”, delete any
Current Payments and then close the
month as usual.
2) After closing, proceed to the Report
Menu and click on Invoices and then click
on Preview. When the first invoice appears in the preview window, press the
ESC key on the keyboard and answer the
question “Did they print OK” by clicking
on Yes. Everything should now be back to
normal and there is nothing else to do.
4)
5)
Big Problem: If you don’t know what you
have or you have a big mess, follow these
steps;
1) Print Reports: Print the Invoice Register
and Cash Receipts Journal for the month.
Do not change the starting or ending
dates on the Invoice Register launch
screen. Look over these reports.
2) Review the Cash Receipts Journal: If
you see payments that do not belong on
the Cash Receipts Journal this month,
they need to be marked Archived. Do this
by going to the Report Menu and click on
Payment Search. In the Search screen,
6)
click on the Search button to the far
right. You should now see all of the
“current” payments in the table below.
Place a check in the Archived box in the
table at the bottom of the screen next
to each payment that does not belong in
the current month.
Review the Invoice Register: If you
see invoiced or statemented cases that
do not belong, they need to be marked
“Statemented” and “Archived.” To do
this, go to the Report Menu and click on
the Case Related tab and then click on
Case Search. Click on the Search button to the far right to see a complete
list of all the current cases. Place a
check in the Archived check box next
to each case that does not belong and
change it’s status to “Statemented.”
Repeat steps 1 thru 3 until you see only
current cases and payments. Once all of
your invoices and payments are correct,
proceed to the next step.
Starting Balances: The next step involves correcting each doctor’s starting
balance. To do this, go to the Maintenance Menu and click on Accounts, Payments, and Preferences. Start with
your first account. You will need to
know what this account’s Ending Balance
was for last month. You can get this
from last months statements or Aged
Trial Balance report. If you have a good
copy of last month’s statement for each
account, get the amount at the bottom
of the statement (next to Please Pay
This Amount), the grand total and place
that amount into Lab Manager in the
Last Month field and also into the Last
Stmt field. Set the Late 60 and Late
90 days fields to 0.00. Repeat this
step for each account.
After you have completed the steps
above, all of your invoices, payments,
and starting balances should be correct
and you can now print all of your reports, verify that they are correct,
backup your data, and you will be ready
to print statements for the current
month with the time comes.
Page: 20
You have installed your
Lab Manager 97/99/
2000 and the Setup
Wizard has guided you
hrough the set-up
process defining all
your accounts, products and materials
and now you are ready to invoice
cases.....
LABORATORY
SYSTE MS GROUP
Entering Cases
1 At the Main Menu, click on the Case
Entry & Update button.
2 At the case entry screen, click on the
New Case button.
3 If this case is to be invoiced immediately, change the Status to Closed.
4 Select an account by number or by
name using one of the List Boxes next
to the Account field. Once an account
has been selected, you will see the accounts address and phone number appear on the screen.
5 Press ENTER twice to get to Patient
and enter the patient's name. It is
best to enter the name last name
first followed by the first name.
6 All of the other fields on this screen
such as Dr's date, Ship by date, Pan#,
and Shade are optional. Dates can by
typed in or you can select a date using
the handy calendar button next to
each date field to select the date.
7 To add products to the case, click on
the Products tab.
Entering Products
1 Add products by clicking on the List
Box in the Product ID or Description
column.
2 Select product from List Box.
3 Press ENTER to get to the Qty column. Enter the desired quantity if not
one.
4 Move cursor to the next line down if
you want to enter another product.
Figure 2
Entering Materials
1 Materials can be entered now or later
when the case is finished by clicking
on the Materials tab and selecting materials just as the products were selected.
2 Tooth numbers can be defined by typing the tooth#s into the tooth# field
(Figures 2 & 3) or by clicking on the
Tooth#s tab shown in Figure 1.
3 Move the cursor to the next line if you
want to enter another material.
4 Click on the Main tab to return to the
main case screen where you can review
the case $ totals.
Figure 3
Printing Work Tickets
Figure 1
To print a work ticket, exit the Case Entry screen and return to the Main Menu
then click on the Report Menu button.
Click on the Production tab found in the
Report menu (Figure 4) and then on
Work Tickets and finally on Print.
Page: 21
of the invoices for the month.
If you simply click on the Print or Preview button, the computer will print the default monthto-date report.
This report should be printed at the end of
the month just before printing statements.
Figure 4
Printing Invoices
Cash Receipts Journal
There is only one way to correctly print invoices.
The Cash Receipts Journal (Figure 5) shows all
You must exit the case screen, click on Reports
of the payments, credits, discounts, and adjustMenu and then click on Invoices (Figure 5). Fiments for the month or for a given day.
nally click on the Print button.
After printing the invoices, it is important to
This report should be printed at the end of
answer YES to the question, "Did all invoices
the month just before printing statements.
print correctly." If you don't, the cases will not
register as invoiced.
Aged Trial Balance
The Aged Trial Balance report (Figure 5) summarizes, for each account, the starting balance,
current charges, past due charges, payments,
and the total amount due. These balances match
those that will be found on the statement and
therefor makes this report ideal for checking
for errors before printing statements at the
end of the month.
Figure 5
This report should be printed at the end of
the month just before printing statements.
Invoice Register
The invoice register (Figure 5) is usually printed
on a daily and monthly basis. The daily report
shows all of the invoices for that day and the
month-to-date report shows in report format all
Page: 22
Work Tickets
1PF
1PF (FAST)
DBLSR
DOT MATRIX
LSR
LSR/QC
Invoices
1PF
1PF (FAST)
CUSTOM 1
CUSTOM 2
DBLSR
DOT MATRIX
DRAFT
LSR
LSR MEXICO
LSR/QC
LSR/QC/2
LSR/QC/3
LSR/QC/L
LSR/QC/L2
LSR/QC/L3
LSR/QC/L4
PLAIN PAPER1
PLAIN PAPER2
Statements
1PF
1PF (FAST)
CUSTOM 2
DBLSR
DOT MATRIX
DRAFT
LSR
LSR/QC
JRS LSR
Top
Bottom
Left
Right
.5
0
.5
0
1
.5
0
0
.5
0
1
.5
.5
0
.75
.25
1
.25
0
0
.25
0
.25
.25
.5
.5
.5
0
.25
0
0
.5
.5
.5
.5
.5
.5
.5
.5
.5
.5
0
0
.5
0
.25
0
0
.5
.5
.25
.25
.25
.25
.25
.25
.25
.5
.5
.5
.5
0
.5
.25
0
1
1
.5
.5
.5
.5
.5
.5
.5
1
0
0
.25
0
.25
0
0
.25
.25
.25
.25
.25
.25
.25
.25
.25
.25
.5
.5
.75
.25
.5
.5
0
.25
0
0
.5
.5
.5
0
0
0
.25
0
0
.5
.5
.5
.5
.5
0
.7
0
0
1
.5
.5
0
0
0
.25
0
0
.25
.25
.25
Page: 23
LABORATORY
SYSTE MS GROUP
1.
2.
3.
4.
5.
6.
7.
8.
9.
10.
11.
12.
13.
14.
15.
16.
17.
18.
19.
20.
21.
22.
23.
The following describes how to use Microsoft Word to
print custom mailing labels using Lab Manager’s data.
Start MS Word
At the top of the screen, click on “Tools” and then on “Mail Merge”
At the next screen, click on “Create” and then click on “Mailing Labels”
Click on “Active Windows”
Click on “Get Data”
Click on “Open data source”
At the bottom of the next screen, change the contents of the “Files of type” field to “MS Access databases” using the drop down list button there.
Now, using the upper portion of this same file dialogue box, locate your data file (usually LMData.mdb
in the C:\LMWin32 folder) click on it and then click on the Open button.
In the “Tables” window, click on “Doctor” and then click on OK.
In the “Mail Merge Helper” window, click on the “Set up Main Document” button.
In the “Label Options” window, select the label size or type you want to use and then click on OK.
In the “Create Label” window, select the fields you want printed on the label and place them where
you want them to appear. Start by clicking on the “Insert Merge Field” and choose the first field.
Usually, that will be “AccountName”. This will place “AccountName” onto the design window. Press
the Enter key to move the cursor to the next line down.
Click on “Insert Merge Field” and then click on “Address” and then press Enter to move down 1 line.
Click on “Insert Merge Field” and then click on “Address2” and then press Enter to move down 1 line.
Click on “Insert Merge Field” and then click on “City” and press the Space Bar once.
Click on “Insert Merge Field” and then click on “State” and press the Space Bar twice.
Click on “Insert Merge Field” and then click on “Zip” and click OK.
Back in the “Mail Merge Helper” next to Step 3, click on “Merge” if you want to merge ALL of your
doctors.
To merge one some of your accounts, click on “Query Options” and select the field(s) you want to
search and then type your search criteria in the “Compare to” field. For example, to merge all of the
account with a certain code in Lab Manager’s “Code” field, select the “Code” field and then place the
code you want it to search for in the “Compare to” field.
To sort the data into a special order such in zip code order, click on the “Sort Records” tab and select the field you with to sort by.
Click on OK to return to the “Mail Merge Helper”
Click on “Merge” and then on the next screen, click on “Merge”.
Back at the main Word screen you will see the doctor names merged into the labels. To print them,
click on File (at the top of the screen) and then click on Print and finally on OK.
Page: 24
Here are 6
easy-to-follow,
steps to enter
payments, discounts, and credits.
LABORATORY
SYSTE MS GROUP
Payments, credits, discounts, adjustments, and refunded tax can be entered
into Lab Manager very easily and usually
on a daily or weekly basis. At the very
least, payments should be entered at
the end of the month before closing.
Payments can be in the form of cash,
check, or credit card, and all are used
to reduce the account’s balance.
Step 1:
From the Main Menu, click on
the “Maintenance Menu” button, then
click on the “Accounts, Payments, and
Preferences” button. This will display
your first doctor account.
Step 2: Locate the account for whom
the payment, credit, discount, or adjustment is to be applied. This can be
done by using one of the “Go To” fields
at the top of the screen.
Step 3: Once the account is on the
screen, click on the Payments tab as
shown in Figure 1. This will then show
the payment window as shown in Figure
2.
Step 4: Begin by typing in the
amount of the payment, credit, discount, or adjustment in the amount column. If other payments already exist,
use the mouse or down arrow key to
move to the first unused payment line
and enter the amount then press ENTER
to move to the Ref# field. This field
can be left blank but is usually used to
define the check number.
Step 5: Press the ENTER to key
again to move to the Date field. The
Date field will default to today’s date
but can be changed to any date.
Step 6:
Finally, move to the Type
column and select the type of the entry.
Payment types include, Adjustment,
Credit, Discount, Payment (the default),
Refunded Tax, and Credit Card.
Repeat these steps until all payments
are entered.
Figure 1
Figure 2
Page: 25
Lab Manager Price Lists
Lab Manager supports 12 price lists. This
means that you can charge up to 12 different
prices for each product. For example, lets say
that when you opened your lab, years ago, you
priced each of your products at the going rate
($57.95 for a PFM, $75.95 for a full gold
crown, and so on). At that time, all of your accounts paid the same $57.95 for the PFM and
all of your accounts paid the same $75.95 for
the full gold crown. Now, however, you want
to generate some new business and want to
offer new accounts a discounted price for all
of your products for the first 6 months.
product, for example, will have the old price of
$57.95 in the Price #1 field. Into the Price #2
field you will define the new discounted price of
$49.95.
Proceeding to the Full Gold Crown, the old price
of $75.95 will be in the Price #1 field and the
new $65.95 price will be typed into the Price
#2 field.
Repeat this process for ALL of your products.
Place the old price in Price #1 and the new discounted price into Price #2.
This way, all doctors assigned to Price List #1
will automatically be billed the first price (Price
#1) for whatever product you bill him for. New
Using Lab Manager’s multiple price list feature,
accounts assigned to Price List #2, will autoyou would assign all of your current accounts to
matically be billed the second price (Price #2)
Price List #1 as shown in Figure 1. Next, all of
for whatever product you bill them.
the new accounts that you bring in will be assigned to Price List #2.
After six months of doing business with the
new account, you will change him to Price List
Finally, as shown in Figure #2, you will define 2
#1 so that he will then be billed the old price
prices for each of your products. The PFM
like all of the other old accounts.
Figure #1
Page: 26
When you assign an account to Price List #1, that account will ALWAYS be billed the price #1
price for the product you are billing him for. When you assign an account to Price List #2, that
account will ALWAYS be billed the price #2 price for the product you are billing him for, and so
on.
It doesn’t matter how many accounts you have, 50 accounts or 50,000 accounts, all of your accounts have to be assign to one of the 12 price lists.
Figure #2
Page: 27
List of Products
Thursday, November 14, 20002
MAGIC CROWN DENTAL LABORATORY
Price Lists
ID
Description
87
Acid etch
11
Dept#
#1
#2
#3
#4
#5
#6
#7
#8
3
25.00
25.00
25.00
25.00
25.00
25.00
25.00
25.00
Acrylic partial
2
70.00
75.00
85.00
85.00
85.00
85.00
85.00
85.00
12
Acrylic partial+1 clasp
2
75.00
80.00
85.00
90.00
90.00
90.00
90.00
90.00
16
Acrylic partial+2 clasps
2
75.00
80.00
85.00
90.00
95.00
95.00
95.00
95.00
14
Acrylic partial+3 clasps
2
80.00
85.00
90.00
95.00
100.00 100.00
100.00 100.00
15
Acrylic partial+4 clasps
2
85.00
90.00
95.00 100.00
105.00 105.00
105.00 105.00
Description of your products
Each column represents a price list.
Lab Manager supports up to 12 different price lists. You can assign each account to one of these price lists. For
example, if you assign a doctor to price list #5, then that doctor will always be charged the price found in the #5
price list for any given product. The object is to decide how many prices (price lists) you want for each product
and then define those prices as shown above. It is important that you be consistent. That means that a doctor
who is assigned to price list #5 can NOT automatically get a price from price list #7 or any other list. A doctor
assigned to price list #5 will always be billed the #5 price for all products.
If you define more than one price list, then it is important that you define prices for all products for each of the
price lists. For example, if you define 4 price lists, then all products must have 4 prices define even if those
prices are the same. In the table above, there are 8 prices defined for each product. Notice that many of the
products have the same price in more than one price list. In the price sheet above, product #11, Acrylic partial,
has a price #1 price of $70.00, price #2 of $75.00 and all of the other prices for that product are $85.00. This is
very common.
Next, you must assign each doctor to just one of those price lists. After you have assigned each doctor to one of
your price lists, then Lab Manager will be able to automatically select the right price. When you create an invoice for a given doctor, Lab Manager will look up that doctor’s price list number and then when you add products to that invoice, Lab Manager will know which price to use. If the doctor on the invoice is assigned to price
list #5 then the price on that invoice will come from the 5th price amount defined in the product area for that
product.
Page: 28
LABORATORY
SYSTE MS GROUP
Printing the
LM 97 & 99
Manual
Did you know that the full length version of the
Lab Manager manual is on the Lab Manager CD?
It is there in Microsoft Word format for you to
print if you choose. The manual is about 100
pages and is complete with a table of contents.
The name of the manual file is LM97MAN.DOC
and can be found on the CD in the DOCS folder.
If you have Microsoft Word you can simply load
that document and print it. If you do not have
Microsoft Word, we have included a utility on the
CD that will print the manual. This utility is
called WORDVIEW and can be found in the
WORDVIEW folder on the CD.
Figure 1
To print the manual using WORDVIEW, follow
these simple steps;
1. Hold down the shift key while inserting the
CD. Holding down the shift key for at least 10
seconds prevents the installation program
from starting. If the installation program
starts, simply exit the program.
2. At the Windows desktop screen, click on
START then on RUN. See Figure 1.
Figure 2
3. In the OPEN window, type “D:\WORDVIEW
\WORDVIEW
D:\DOCS\LM97MAN.DOC”
without the quote marks. If your CD ROM
drive is not drive D: then substitute the
proper drive letter. See Figure 2.
4. After a moment, Wordview will open up and
you will see the first page of the manual on
the screen.
5. In Wordview, click on FILE at the top of the
screen, then click on PRINT and then click on
OK. See Figure 3.
The manual should begin printing when you click
on the OK button. Be sure you have plenty of
paper in the printer to accommodate the 100
page manual.
Figure 3
Page: 29
Quality Control Sheets For
Work Tickets and Invoices.
A custom designed quality
control sheet of the lab’s
own design can be automatically attached to each work ticket. Multiple
QC sheets can be defined and keyed to the
different departments to allow the computer
to automatically select the QC sheet that
fits the work shown on the Work Ticket.
2.) Text must be inserted for every department . It is possible to copy and
paste the same text from Dept to Dept.
LABORATORY
SYSTE MS GROUP
Procedure:
3.) Exit from DEPARTMENTS
Step 2
4.) Click on COMPANY & SYSTEM INFORMATION
1.) In the Company & System Information Form locate “Print QC Sheets“.
Step 1 for Work Tickets
2.) Click in the box to allow the option to print Quality Control sheets.
1.) Go to MAINTENANCE MENU - then
click on DEPARTMENTS
3.) Exit from COMPANY & SYSTEM INFORMATION screen
2) Enter questions that need to appear on
Work Ticket in the white box area on the
screen. Press CTRL and ENTER keys at the
same time to begin a new line.
Step 3
3) Text must be inserted for every department . It is possible to copy and paste the
same text from Dept to Dept.
5.) Click on the “PAGE 2” tab.
4.) Go to ACCOUNTS, PAYMENTS AND
PREFERENCES
6.) Click on ‘QC SHEETS’ to allow a QC
Sheet to print for this account.
Quality Control Document for Invoice: A custom designed quality control sheet of the
lab’s own design can be automatically attached to each Invoice. Multiple QC sheets
can be defined and keyed to the different
departments to allow the computer to automatically select the QC sheet that fits the
work shown on the Invoice.
Step 1 for Invoices
1.) Enter questions that need to appear on
Invoice. Press CTRL and ENTER keys at the
same time to begin a new line. Press ENTER
to advance to next field.
Type QC Sheet in here for Invoices
Type QC Sheet in here for Work Tickets
Page: 30
Page: 31
LABORATORY
SYSTE MS GROUP
The following describes a quick
and easy method to make a
back-up of your data each
month that will allow you to print
statements and other reports
from previous months.
This back-up procedure is not intended to replace the daily
back-up to a zip or tape drive that you are all currently doing.
Instead, this procedure is designed to make it easy to reprint a statement, or anything else, from a past month.
for. For example, type 2001-07.mdb if the data is for July,
2001.
Now, if we ever need to access the July 2001 data, the data
is available, though still several mouse clicks away. To make
the data even easier to reach, we can add it to Lab Manager’s
list of databases. To do that, go back into Lab Manager and
proceed to the Utility Menu. There, click on Change Company and then on Edit Database Connections as shown in
Figure 2.
Lab Manager for Windows currently allows the user to print
most anything for any time period, however, there are a few
things that simply can not be re-printed after the month has
been closed. One of those things is a statement. Let’s say a
doctor calls your office and tells you he needs a copy of the
statement from last April. If you do NOT have a back-up
of the April data, you will not be able to print for him a
copy of the statement. If you do have a back-up of the
data on a zip or tape drive, it is possible to restore the data,
being careful not to erase your current data, and print the
statement, however, the following describes a better process.
Figure 2
Saving Archived Data
At the end of the month, print your reports as usual, then,
when everything is correct, back-up your data to a Zip, CD, or
Tape drive, print your statements, and close the month.
After closing the month, exit Lab Manager and open up Windows Explorer. In Windows Explorer, locate the LMWin32
folder in the left window and click on it once to show the contents of that folder in the window to the right. In the right
window, locate the file prvmonth.mdb as shown in Figure 1.
In an empty line, in the description column, type a
description for this data base, something like 2001-07 and
then click on Find Database. Locate the file you renamed a
few minutes ago in Windows Explorer and double click on it.
It’s location and name will now be added to the Edit Database
Locations window. Exit this screen to see the Change Company window.
The next time you need to print a statement from the July
2001 data base or any other month you have archived this
way, all you need to do is go to the Utility Menu and click on
Change Company and finally choose the database you want
from the drop down list in the window as shown in Figure 3.
Figure 3
Figure 1
Some computers will show it simply as prvmonth.
Right click on the file and then left click on Rename. Next,
change the name to reflect the year and month the data is
Page: 32
When you are done in the past month database, be sure to
return to your current data by selecting Current Data from
the drop down list in the Change Company window.
LABORATORY
SYSTE MS GROUP
Setting up and using Lab Manager
Scheduling.
Lab Manager schedules by production step. These
are the procedures that the technicians perform to
make the various products that the lab sells to the
doctors. These “steps” might include procedures
like Preparatory, Pour Model, Frame Wax-up,
Frame Finish, Porcelain Buildup, etc. These steps
are defined in the “Production Steps” area in the
Maintenance Menu. Figure 1 shows an example of
the screen used to define these steps.
Start by defining the most important production
steps using the screen shown in Figure 1. Click on
the Add New button to enter each new step. Fill in
information next to the blue fields. The Description is the name of the procedure such as
“Preparatory.” Code is optional and is an abbreviated description. Days to finish tells Lab Manager
how many days it takes to finish that step. Steps
with a zero in the Days to finish will be scheduled
to be finished on the same day they are started.
The Mon thru Fri fields are used to tell Lab Manager how many of these steps the Laboratory can
usually finish on each of those days.
Figure 1
After defining all of your production steps, proceed
to the Products area of the Maintenance Menu.
Click on the Steps tab to assign the appropriate
steps to each product as shown in Figure 2.
Use the Scheduling Calendar button in the Maintenance Menu to define the days the laboratory is
closed (Events screen shown in Figure 3) so that
Lab Manager won’t schedule work on those days.
Select a Starting date (ending date can be deleted
to mean this “event” is the same year after year.
Select an Event Type of Closed. Finally, use the
Recurring window on the right to define what
months, weeks, and/or days you will be closed. For
example, to indicate that you are closed Saturdays
and Sundays, select a Starting date earlier than
today’s date, delete the Ending date, select Closed
from the Event Type, click on All Months, then on
All Weeks, and then click on Sun and on Sat. Use
the ADD button to add additional events for Special holidays.
Figure 2
Figure 3
Page: 33
After setting up your production steps, assigning the
appropriate steps to each product, and setting up the
scheduling calendar, you are ready to put Lab Manager’s scheduling to work. To do this, proceed to the
Case Enter screen as shown in Figure 4. If you choose
to schedule forward, Lab Manager will schedule for
the Start date as shown in Figure 4. If you choose to
schedule in reverse, it will schedule from the Finish
date as shown in Figure 4.
After defining the Account, patient name, starting
and finished dates as needed, click on the Products
tab as shown in Figure 5 to define what products will
be produced with this case. Select the products as
usual but notice that the number 1 will appear in the
SCH column. This tells Lab Manager that this products is to be scheduled. A zero in the SCH column indicates that the product is not to be scheduled.
When a number is used, the number 1 means schedule
first, 2 means schedule second and so on and is only
used when two or more products are scheduled on the
same case.
To schedule the case, return to the Main tab and click
on the Schedule button as shown in Figure 4. This
causes the screen shown in Figure 6 to be displayed.
Click on Forward or Reverse. Lab Manager will then
schedule the case. To see the results of the scheduling or to modify the scheduling click on the Manual
button shown in Figure 6. The Manual button displays
the screen shown in Figure 7. The upper left windows
shows the steps scheduled and their due Date. Click
on one of the due Dates and the calendar will synchronize with the due date. To change the due Date,
simply click on the desired day on the calendar. The bottom window
shows how many units of
each step are already
scheduled to help you
make manual scheduling
decisions. Click on the
Exit button to return to
the case entry screen.
These steps will not appear with their due
dates on the work
ticket.
Page: 34
Figure 4
Figure 5
Figure 6
Figure 7
LABORATORY
SYSTE MS GROUP
The following describes how to
upgrade Lab Manager from a
“demo” to a full working version
or to add a new module.
Figure 1
Demo Users:
This version of Lab Manager is configured to be a working demo with certain features deactivated such as the ability to define your company name
and address and end of month processing. If you are evaluating Lab
Manager as a demo there is nothing for you to do but enjoy playing
with the program. If you decide to purchase the program, you can simply
call our office at 1-800-677-1120 and purchase it with a credit card and
the operator will ask you to follow the procedures shown in step 5 to activate all of the features you have purchased. If you don’t have a credit
card, call our office for other options.
Current Lab Manager Users:
Figure 2
Refer to Figure 1 and look to see if the word Demo appears. If the word
Demo does NOT appear then there is nothing else to do. If the word
Demo does appear or if the module information is not correct, then follow
the Upgrade Program steps shown below.
Upgrading the program:
Upgrading your program will activate new features that your older Lab
Manager didn’t have. To take advantage of these new features, it is critical that you upgrade your data to work properly with the new program.
Step 1:
BACK UP YOUR DATA. This is a precautionary measure that
should be used any time changes are being made to the program or data.
Figure 3
Step 2:
Start Lab Manager, proceed to the Main Menu, and then call 1800-677-1120 and tell the operator you would like to activate your program. In addition to activating current features, you can also add, if you
choose, additional features by calling the same number, purchasing the
new features, and the operator will help you activate the new features.
If you have installed this update in the evening or during the weekend when Laboratory Systems Group is closed, then wait until the
next working day to call for the key. Lab Manager will operate
properly without the key except that it will not perform end-ofmonth processing. All other functions will work properly.
Figure 4
UpdateProgram.pub
Page: 35
LABORATORY
SYSTE MS GROUP
These instructions describe
how to upgrade your data after installing an updated Lab
Manager program.
From time to time, the Lab Manager program is updated
with new features and/or fixes to bugs. After installing the
new Lab Manager program, it is necessary to also upgrade
your data so that it matches the new program. The process
is simple but the conversion of the data could take anywhere
from a few minutes to a few hours.
BACK UP YOUR DATA. This is a precautionary measure
that should be used any time changes are being made to the
program or data. This should also be done on a daily basis.
If you only back up your data once a month and experience a
failure requiring you to restore backed up data, you will have
to manually input any data not included in the backup. (That
could mean up to 30 days of input!)
Figure 1
Updating your Data
From the Windows Desktop, click on START, PROGRAMS,
LAB MANAGER, and finally, Lab Manager to start the Lab
Manager program. After starting Lab Manager, proceed to
the Utility Menu and click on Upgrade Data as shown in Figure 1. That will display something like the screen shown in
Figure 2.
Stand-alone Computers: If your computer is not connected to another computer, AND your data is in the usual
place (C:\LMWin32\LMData.mdb) then simply click on the
Start button as shown in Figure 2.
Network Computers: If your computer is connected to
another computer, then you will have to click on Update/
Upgrade Manually and then click on the Start button. Use
the Select a Working Database window to locate your data
on the server.
Figure 2
When the data upgrade process begins, Lab Manager will
create a temporary backup as shown in Figure 3. Click OK
to continue.
Lab Manager will then upgrade your data and will display it’s
status on the screen. This is the process that can take
from a few seconds to a few hours.
Figure 3
UpgradeData.pub
Page: 36
How to add a
Quality Control
questionnaire to
LABORATORY
SYSTE MS GROUP
an Invoice
Did you know that Lab Manager
97/99 can print your own customized
quality control questionnaire on the
side of your invoice?
To use this
popular feature you need to use the
LSR/QC
or
the
LSR/QC-label
invoice form which can be selected
from the Interface tab in the
Company
screen.
&
System
Figure 1
shown in (Figure 2). Those doctors
that do not have a check mark here
will not get a QC questionnaire
added to their invoice.
Information
Simply click on the drop
down list box next to the Invoice
Form Type field and choose one of
the above listed forms, then follow
these steps.
Place a check in the field “Print QC
Sheets” to enable the printing of
quality control sheets as shown in
Figure 2
(Figure 1).
Define
the
quality
control
For each doctor to whom you wish to
questionnaire for each department in
send a quality control sheet, place a
the window provided.
check in the field “QC Sheet” as
document as you want it to appear
Page: 37
Type of the
using CTRL ENTER at the end of each
line instead of just pressing the ENTER
key alone. Refer to (Figure 3).
Figure 4
Figure 3
The final result is shown in (Figure 4)
when printed on our professional looking
LSR/QC form. The LSR/QC-Label form
looks much the same but includes a
handy self adhesive shipping label at the
bottom of the form.
Both forms are
conveniently perfed from top to bottom
so that the QC portion of the form can
be separated from the invoice by the
doctor and returned back to you.
The forms that use this format are:
LSR/QC
LSR/QC + LABEL
LSR/QC+ TAB
Page: 38
Figure 4
Weights and Measures Conversion Table
LABORATORY
SYSTE MS GROUP
GrainTroy
1
2
3
4
5
6
7
8
9
10
11
12
13
14
15
16
17
18
19
20
21
22
23
24
Penny Weight
0.04
0.08
0.13
0.17
0.21
0.25
0.29
0.33
0.38
0.42
0.46
0.50
0.54
0.58
0.63
0.67
0.71
0.75
0.79
0.83
0.88
0.92
0.96
1.00
Page: 39
The following describes how to make Lab Manager run faster in
Windows XP. This does not apply to any other version of Windows.
1. Click on the Start button and then click on Control Panel as
shown in Figure 1.
2. Click on Performance and Maintenance as shown in Figure 2.
NOTE: If you can’t see this selection, your computer might be set to
Classic View. To change to Category
View, click here.
3. Click on Adjust Visual Effects as
shown in Figure 3.
4. Click on the Advanced Tab as shown
in Figure 4.
5. Click on Background services as
shown in Figure 4
6. Click on Apply and close all of the
windows you opened.
7. Restart your computer and it will operate Lab Manager many times
faster.
Figure 1
Figure 2
Figure 3
Page: 40
Figure 4
LABORATORY
SYSTE MS GROUP
Reseting Year
To Date totals
to Zero
This process is performed during the first
month of the new year to reset some of Lab
Manager’s yearly totals. Performing this function will have no affect on your billing information and will have no affect on some yearly reports.
To perform this yearly task, start at the Main
Menu and select Utility Menu. From this menu,
select Year End. At the next menu, select
“Reset Year to Date totals.” The process only
takes a moment.
Page: 41