1
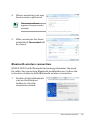
ASUS NOVA P20/22
User Manual
September 2007
Table of Contents
Safety information.................................................................................iv
About This User’s Manual...................................................................vi
Notes For This Manual..........................................................................vi
Welcome
Package contents................................................................................ vii
Overview................................................................................................ viii
Features.................................................................................................. viii
Getting Started
Knowing the parts..................................................................................9
Front view.....................................................................................9
Rear Side..................................................................................... 10
Using the Media Center remote control..................................... 12
Positioning your NOVA P20/P22.................................................... 18
Using your NOVA P20/P22
Connecting peripheals...................................................................... 19
Display connection................................................................. 19
Universal Serial Bus (USB) Devices connection............ 20
Network connection.............................................................. 21
Wireless network connection............................................. 22
Bluetooth wireless connection.......................................... 23
Using the optical drive....................................................................... 26
Inserting an optical disc........................................................ 26
Ejecting an optical disc......................................................... 26
Enjoying instant music...................................................................... 27
Configuring audio output................................................................ 27
Speaker configurations......................................................... 27
Speaker types........................................................................... 27
Connecting to analog speakers......................................... 28
Connecting to digital speakers.......................................... 29
Configuring audio output settings................................... 30
Using Windows Media Center......................................................... 34
Starting Windows Media Center........................................ 34
ii
Welcome
Table of Contents
TV + Movies*............................................................................. 34
Music ........................................................................................ 35
Pictures + Videos..................................................................... 36
Recovering your system
Using the Recovery DVD................................................................... 37
Using the Hidden Partition.............................................................. 39
ASUS NOVA P20/P22
iii
Safety information
Your ASUS NOVA P20/P22 is designed and tested to meet the
latest standards of safety for information technology equipment.
However, to ensure your safety, it is important that you read the
following safety instructions.
Setting up your system
• Read and follow all instructions in the documentation before
you operate your system.
• Do not use this product near water or a heated source such as
a radiator.
• Set up the system on a stable surface.
• Use the support stand if you want to stack up your NOVA.
Stacking up the system without the support stand would
hamper the ventilation and damage the system.
• Openings on the chassis are for ventilation. Do not block or
cover these openings. Make sure you leave plenty of space
around the system for ventilation. Never insert objects of any
kind into the ventilation openings.
• If you use an extension cord, make sure that the total ampere
rating of the devices plugged into the extension cord does
not exceed its ampere rating.
Care during use
• Do not walk on the power cord or allow anything to rest on it.
• Do not spill water or any other liquids on your system.
• When the system is turned off, a small amount of electrical
current still flows.
Always unplug all power, modem, and network cables from
the power outlets before cleaning the system.
• If you encounter the following technical problems with the
product, unplug the power cord and contact a qualified
service technician or your retailer.
• The power cord or plug is damaged.
iv
Welcome
•
•
•
•
Liquid has been spilled into the system.
The system does not function properly even if you follow
the operating instructions.
The system was dropped or the cabinet is damaged.
The system performance changes.
CD-ROM Drive Safety WARNING
CLASS 1 LASER PRODUCT
NO DISASSEMBLY
The warranty does not apply to the products that
have been disassembled by users
This symbol of the crossed out wheeled bin indicates that
the product (electrical, electronic equipment, and mercurycontaining button cell battery) should not be placed in
municipal waste. Check local regulations for disposal of
electronic products.
*The system does not come with a built-in TV tuner. To use the TV
function, purchase a TV docking or an external TV box first.
ASUS NOVA P20/P22
About This User’s Manual
You are reading the ASUS NOVA P20/P22 User’s Manual. This
User’s Manual provides information on the various components
in the NOVA P20/P22 and how to use them. The following are
major sections of this User’s Manuals:
1. Welcome
Introduces you to the NOVA P20/P22 and this User’s Manual.
2. Getting Started
Gives you information on the PC’s components and information on
getting started with the NOVA P20/P22.
3. Using your NOVA P20/P22
Gives you information on using the NOVA P20/P22.
4. Recovering your system
Gives you additional information on system recovery.
Notes For This Manual
A few notes and warnings are used throughout this guide
that you should be aware of in order to complete certain tasks
safely and completely. These notes have different degrees of
importance as described below:
WARNING! Important information that must be followed for
safe operation.
IMPORTANT! Vital information that must be followed to
prevent damage to data, components, or persons.
TIP: Tips for completing tasks.
NOTE: Information for special situations.
vi
Welcome
Welcome
Congratulations on your purchase of the ASUS NOVA P20/P22.
The following illustration displays the package contents of your
new ASUS NOVA P20/P22. If any of the below items is damaged
or missing, contact your retailer.
Package contents
OK
1
5
8
0
3
6
9
#
ENTER
Remote control
mini jack-S/PDIF
adapter
Stand
Quick
DEF
MNO
WXYZ
CLEAR
DVI-D-Sub adapter
2
JKL
TUV
4
7
P20/P22
ABC
GHI
PQRS
AC adapter
Power cord
Guide
Quick guide
Support DVD
Recovery DVD
Warranty card
ASUS NOVA P20/P22
vii
Overview
The ASUS NOVA P20/P22 features rich entertainment and
powerful computing capabilities. You can either run the
Windows® Media Center with other programs or enjoy it in fullscreen mode. With the Media Center remote, you can play videos
as well as music, and view pictures.
Features
•
•
viii
AV Entertainment
• High Definition video/audio support
• Playing DVDs and home videos
• Listening to music files
• Viewing and editing pictures
Connectivity
• USB
• Bluetooth
• DVI
• LAN
• Wireless LAN
• Audio I/O
• SPDIF: In & Out
Welcome
Getting Started
Knowing the parts
Front view
Refer to the diagram below to identify the components on this
side of the system.
1
2
3
4
Slot-in optical drive
1
The system comes with a slot-in optical disc drive
which allows you to load or eject optical discs easily.
The slot-in optical drive can only hold the standard optical
discs (12cm). Inserting smaller-sized or larger-sized disc
would damage the optical drive.
2
3
4
Optical Drive Electronic Eject (touch-sensitive)
The optical drive eject has an electronic eject button
for unloading the disc. You can also eject the optical
disc through any software player.
Power switch (touch-sensitive)
The power switch allows powering ON and OFF the
system and recovering from STD. Use the switch once
to turn ON and once to turn OFF the system.
Infrared port
The infrared (IrDA) communication port allows
convenient wireless data communication with infraredequipped devices or computer. This allows easy wire
less synchronization with PDAs or mobile phones and
even wireless printing to printers.
ASUS NOVA P20/P22
Rear Side
Refer to the diagram below to identify the components on this
side of the system.
11
10
CENTER/BASS
FRONT
S/PDIF
OUT
DCIN
5
5
9
S/PDIF
IN
SURROUND
DVI
6
7
8
Power (DC) Input
The supplied power adapter converts AC power to DC
power for use with this jack. Power supplied through
this jack supplies power to the PC. To prevent damage
to the PC, always use the supplied power adapter. CAUTION: MAY BECOME WARM TO HOT WHEN IN USE.
BE SURE NOT TO COVER THE ADAPTER AND KEEP IT
AWAY FROM YOUR BODY.
The system is using +19V AC/DC power adapter. If your
power adpater is damaged or fails to function, contact
your retailer.
6
2.0 USB Port (2.0/1.1)
10
The USB (Universal Serial Bus) port is compatible with
USB 2.0 or USB 1.1 devices such as keyboards, pointing
devices, cameras, and hard disk drives, connected in a
series up to 12Mbits/sec (USB 1.1) and 480Mbits/sec (USB
2.0). USB allows many devices to run simultaneously
on a single computer, with some peripherals acting as
additional plug-in sites or hubs. Also, USB supports hotswapping function.
Getting Started
7
Display (Monitor) Output
The Digital Visual Interface (DVI) monitor port supports
a high quality VGA-compatible device such as a monitor
or projector to allow viewing on a larger external display.
For D-sub connector-equipped display, use the DVI to
D-Sub adapter in the package when connecting the
display
8
LAN Port
The eight-pin RJ-45 LAN port supports a standard Ethernet cable for connection to a local network. The built-in
connector allows convenient use without additional
adapters.
9
Line in port (S/PDIF in port)
Plug an 3.5mm mini-jack stereo audio cable into this
jack for digital audio transfer.
10
Headphone Output Jack
The 1/8” stereo headphone jack (3.55mm) is used to
connect the system’s audio out signal to amplified
speakers or headphones. Using this jack automatically
disables the built-in speakers.
11
Microphone Jack
The microphone jack is designed to connect the microphone used for video conferencing, voice narrations, or
simple audio recordings.
ASUS NOVA P20/P22
11
Using the Media Center
remote control
Use the remote to launch the Media Center program to play
video recordings or other media files such as music and movies.
Refer to the following pages to familiarize yourself with the
functions of the remote control buttons. The remote control may
vary depending on territories.
A.
1
2
3
30
29
28
27
26
25
24
23
4
5
6
7
22
8
OK
21
9
20
10
19
18
11
12
ABC
2
3
GHI
JKL
MNO
4
5
6
PQRS
TUV
WXYZ
7
8
9
0
17
DEF
1
CLEAR
13
#
ENTER
14
15
16
12
Getting Started
1
Power: Press to turn off the power of the screen and the
speakers. (Away mode)
2
Photo: Press to enter the Photo mode.
3
Video: Press to enter the Video mode.
4
Pause: Press to pause a media during media playback.
5
Fast-foward: Press to fast-forward a media file.
6
Next track: Press to go to the next track.
7
Information: Press to display the program information
screen.
8
OK button: Press to confirm an action.
9
Mute: Press to disable audio.
10 Channel up/down: Press to change channels when
watching TV.*
11 Live TV button: Press to watch live TV programs.*
12 DVD button: Press to switch to DVD source.
13 Numeric keys: Press to enter a channel number directly.
14 Enter: Press confirm a selection.
15 Teletext buttons: Only available on European models.
16 Shift button: Toggles between numerical and
alphabetical input.
17 Clear: Press to clear input information.
18 TV Recording: Press to start recording the current TV
program.*
19 EPG (Electronic Program Guide): Press to display the
electronic program guide screen.*
20 Volume up/down: Press to increase/decrease audio.
ASUS NOVA P20/P22
13
21 Windows Media Center: Press to open the Media Center
program.
22 Four-way navigation keys: Press to scroll through onscreen display menus.
23 Return: Press to return to the previous page.
24 Previous track: Press to go back to the previous track.
25 Rewind: Press to rewind a media file.
26 Play: Press to playback a media file.
27 Record: Press to start recording.
28 Stop: Press to stop playing back a media file.
29 TV: Press to enter the TV mode.*
30 Music: Press to enter the Music mode.
*The system does not come with built-in TV tuner. To use the TV
function, purchase a TV docking or an external TV box first.
14
Getting Started
B.
26
25
24
23
22
1
2
3
4
5
6
7
8
9
21
20
10
19
18
11
12
17
16
15
13
14
ASUS NOVA P20/P22
15
1
Power: Press to turn off the power of the screen and the
speakers.
2
Pause: Press to pause a playback.
3
Stop: Press to stop playing a media file.
4
Play: Press to play a media file.
5
Fast-foward: Press to fast-forward a media file.
6
Next track: Press to go to the next track.
7
Windows® Media Center: Press to launch the Media
Center program.
8
Information: Press to display program information under
Media Center or other menu options.
9
OK: Press to confirm an action.
10 Channel up/down: Press to change TV channels.*
11 Live TV button: Press to watch live TV programs.*
12 DVD button: Press to switch to DVD source.
13 Enter: Press to confirm a selection.
14 Teletext buttons: Available on European models only.
15 Shift: Toggles between numerical and alphabetical input.
16 Clear: Press to clear input information.
17 Numeric keys: Press to enter a channel number.
18 Recorded TV: Press to display a list of your recorded TV programs.*
19 EPG (Electronic Program Guide): Press to display the
electronic program guide screen.*
20 Volume up/down: Press to increase/decrease the volume.
16
Getting Started
21 Mute: Press to disable audio output.
22 Four-way navigation keys: Press to scroll through on-screen
display menus.
23 Return: Press to return to the previous page.
24 Previous track: Press to go back to the previous track.
25 Rewind: Press to rewind a media file.
26 Record: Press to start recording TV.*
*The system does not come with built-in TV tuner. To use the TV
function, purchase a TV docking or an external TV box first.
ASUS NOVA P20/P22
17
Positioning your NOVA P20/P22
CORRECT
CORRECT
INCORRECT
Use the support stand if you want to stack up your NOVA
P20/P22. Stacking up the system without the support stand
would hamper the ventilation and damage the system.
18
Getting Started
Using your NOVA P20/P22
Connecting peripheals
You need complete some peripherals connections before starting
using your NOVA P20/P22.
Display connection
Follow the instructions below to connect the external display.
1. Connect one end of the DVI cable to the display.
2. Connect the other end of the cable to the DVI port on the
rear side of system.
S/PDIF
OUT
CENTER/BASS
DCIN
FRONT
S/PDIF
IN
SURROUND
DVI
2
1
If your display comes without a DVI port, use the DVI to D-Sub
adapter in the package when installing the display.
ASUS NOVA P20/P22
19
Universal Serial Bus (USB) Devices connection
The USB port is compatible with USB2.0 or USB 1.1 devices like
keyboards, mouses, printers, etc. You can attach any USB keyboard
and mouse to NOVA P20/P22. The illustration below shows the
USB keyboard and mouse connecting to the system.
S/PDIF
OUT
CENTER/BASS
DCIN
FRONT
S/PDIF
IN
SURROUND
DVI
* The package contents does not include USB keyboard and
mouse. Purchase USB peripherals based on your needs.
20
Using your NOVA P20/P22
Network connection
If you want to obtain network access, connect the network cable,
with RJ-45 connectors on each end, to the network port on the
system and the other end to a hub or switch. The illustration
below is the example of your NOVA P20/P22 connected to
a network hub or switch for use with the built-in Ethernet
controller.
I
S/PDIF
OUT
CENTER/BASS
DCIN
FRONT
S/PDIF
IN
SURROUND
DVI
Network hub or switch
Network cable with RJ-45 connectors
ASUS NOVA P20/P22
21
Wireless network connection
To connect to a wireless network, follow the instructions below.
1. Move the cursor to the
network icon on the taskbar
and you will see Not
Connected.
2. Right-click on the network
icon and select Connect to a
network.
3. Select the wireless network
you want to connect to
from the list.
Select Show Wireless if you have many networks in your area.
22
Using your NOVA P20/P22
4. When connecting, you may
have to enter a password.
This screen will not
appear if no password is
needed.
5. After connection has been
established, Connected will
be shown.
Bluetooth wireless connection
NOVA P20/P22 with Bluetooth technology eliminates the need
for cables for connecting Bluetooth-enabled devices. Follow the
instructions below to build Bluetooth wireless connection.
1. Double-click the Bluetooth
icon on the Windows
taskbar to start the
connection wizard.
ASUS NOVA P20/P22
23
2. Select the Bluetooth device
you want to connect to from
the list and click Next to
continue.
If you do not see the device you want
to connect on the Bluetooth device list,
click Refresh to search for the Bluetooth
devices again.
3. You may need to enter
the password if the device
requires authentication.
4. After the setup completes,
click Next to continue.
24
Using your NOVA P20/P22
5. The device you connect to
will be shown.
6. Click the New Connection button and follow the previous
instructions to add more Bluetooth devices.
Your NOVA P20/P22 can connect multiple devices at a time
via Bluetooth.
ASUS NOVA P20/P22
25
Using the optical drive
Inserting an optical disc
1. Place the disc to the slot-in optical drive with the label side
facing up.
2. Slide the disc into the drive.
Ejecting an optical disc
1. While the system power is on, press the eject button.
2. Remove the disc from the opening.
26
Using your NOVA P20/P22
Enjoying instant music
Through the pair of built-in Hi-Fi speakers locatetd at the front
side of ASUS NOVA, you can always enjoy high quality music
without extra speakers. ASUS NOVA also supports analog
and digital speakers with Dolby® Digital Live or DTS connect
technology, refer to next sections for detailed configurations.
Configuring audio output
ASUS NOVA P20/P22 supports different types of audio
configurations. You may set up the system using stereo speakers
or a multi-channel audio speaker system. Connect your speaker
system to NOVA P20/P22, and then configure your audio output
through the software.
Speaker configurations
You may set up the system with the following speaker
configurations:
Name
2 (stereo)
4
5.1
Port
Light Blue
Lime
Pink
Speaker system
Left speaker, right speaker.
Two front speakers, two rear speakers.
Two front speakers, two rear speakers, a center
speaker, and a subwoofer.
Headset
2-speaker
Line In
Line Out
Mic In
6-speaker
S/PDIF
Surround
Front
Center/Bass
S/PDIF in
S/PDIF out
Mic
Speaker types
A stereo speaker set is a left-right, two channel speaker system.
A multi-channel audio speaker has a left-right front and leftright rear channel, and it may include a subwoofer and a center
speaker. A subwoofer provides enhanced bass sounds.
“.1” indicates a subwoofer. For instance, 5.1 channels refers to an
six-speaker mode and uses two front speakers (left-right), two
rear speakers (left-right), a center speaker, and a subwoofer.
ASUS NOVA P20/P22
27
Connecting to analog speakers
ASUS NOVA P20/P22 is equipped with a line-out jack (lime) that
allows you to connect to stereo speakers.
There are three sound connectors enabling you to configure an
up to 5.1 channel audio setup.
Refer to the table below for the audio connectors on the rear
panel and their functions.
For stereo speakers
P20/P22
S/PDIF
OUT
FRONT
Description
Front connects to stereo speakers.
For a multi-channel audio speaker system
P20/P22
S/PDIF
OUT
FRONT
S/PDIF
IN
SURROUND
CENTER/BASS
28
Description
FRONT connects to the FRONT port on the subwoofer.
SURROUND connects to the REAR port on the
subwoofer.
CENT/BASS connects to the SUB/CENTER port on
the subwoofer.
Using your NOVA P20/P22
Connecting to digital speakers
You can also connect NOVA P20/P22 to your home stereo or
home theater multi-channel audio receiver/amplifier to use your
existing speaker system.
• Digital output: Plug an audio cable with a mini jack-s/PDIF
adapter from the S/PDIF Out port on the system rear panel to
your amplifier.
Connect the mini jack-S/PDIF adapter before
connecting digital speakers.
Subwoofer
Center
speakers
Front
speakers
Rear speakers
Receiver/Amplifier
S/PDIF
OUT
FRONT
S/PDIF
OUT
CENTER/BASS
DCIN
FRONT
S/PDIF
IN
SURROUND
DVI
ASUS NOVA P20/P22
29
Configuring audio output settings
After connecting a speaker system to your NOVA P20/P22, follow
the steps below to configure audio output:
Using analog speakers
1. From the Windows® Vista™
taskbar, right-click on the
volume control icon
and then select Playback
Devices.
2. Under the Playback window,
select Speakers and click
Set Default.
3. Click Configure and the
Speaker Setup window
pops up.
4. Select the speaker system
you have and click Next. If
you are using stereo speakers, select Stereo; 4 speakers, select Quadrophonic;
5.1 channel speakers, select
5.1 Surround.
You may click Test to test
each of your speakers.
30
Using your NOVA P20/P22
5. Check the boxes if you use
full-range speakers, and then
click Next.
This configuration screen
varies based on the
speakers you are using.
For 5.1 channel speakers
users, check the boxes
to indicate the speakers
that are present in your
surround configuration.
6. Click Finish to exit the
speaker setup.
Using digital speakers
1. From the Windows® Vista™
taskbar, right-click on the
volume control icon
and then select Playback
Devices.
ASUS NOVA P20/P22
31
2. Under the Playback window,
select Realtek Digital Output and click Set Default.
3. Click Properties and the
Realtek Digital Output
Properties window pops up.
Click the tabs on the top to
configure your preferences.
General
From the General tab, You can
customize the property name
and icon, view the controller/
jack information, and configure
the device usage.
Support Formats
From this tab, You can select
the encoded format and the
sample rates.
32
Using your NOVA P20/P22
Levels
You can enable or mute the
Realtek digital output level.
Enhancements
You can apply a special
sound effect for the listening
configuration from this tab.
Advanced
From this tab, You can click and
select the sample rate and bit
depth from the drop-down
menu for the default format.
ASUS NOVA P20/P22
33
Using Windows Media Center
Starting Windows Media Center
You can take full control of the Windows Media Center using your
wireless keyboard and either of your remote controls.
To start Windows Media Center, do one of the following:
• Press the Media Center button
on your Media Center
remote.
• From the Windows® desktop, click Start > All Programs >
Windows Media Center.
TV + Movies*
Enjoy your TV/movie viewing experience with the TV + Movies
feature. Use TV + Movies to watch live TV programs, record TV
programs, watch recorded programs, view program information,
and play DVDs.
Watching TV*
1. Press the Live TV button
on the remote. The last viewed
TV channel is displayed.
2. Use the Channel up/down buttons to change channels while
watching TV.
Recording TV programs*
1. Use the Channel up/down or the numeric keys to select the
program you wish to record.
2. Press the Record button
on the remote to start recording.
Playing TV recordings*
1. Press the Recorded TV button
TV programs.
to display a list of recorded
*The system does not come with built-in TV tuner. To use the TV
function, purchase a TV docking or an external TV box first.
34
Using your NOVA P20/P22
2. Select a recording and press the Play button
press OK to view details.
to play or
Media Center automatically records the program you are
watching for up to 30 minutes and saves it to a buffer.
Therefore, if you pause a live TV program, you can pick up
where you left off.
Watching DVDs
Insert a DVD into the Super Multi Drive and the DVD will be
played automatically. You can also press the DVD button
on
the remote to play it.
Music
Music provides you with a complete music experience. You can
listen to CDs or other music files, create your own playlists, view
album information, and listen to music by albums, genres, artists,
etc.
Adding music CDs to music library
1. From the Media Center main menu, select Music.
2. Insert a CD into the Super Multi Drive. The CD will be played
automatically, and a list of options appear on the left side of
the “now playing” screen.
3. Select Copy CD, and then select Yes to confirm your choice.
The CD is copied and saved as music files to the hard disk
drive under music library.
Playing Music
1. From the Media Center main menu, select Music > music
library to display your music files.
2. Select music to play by albums, genres, artists, etc.
ASUS NOVA P20/P22
35
Pictures + Videos
Enjoy and manage your digital photos/videos or downloaded
pictures/videoclips using Pictures + Videos. You can browse the
pictures individually or playing them as a slide show with music
background.
Viewing pictures
1. From the Media Center main menu, select Pictures + Videos
> picture library to display your picture folders.
2. Select a folder and press OK to open it. Select an image and
press OK to view.
To play the pictures in a selected folder as a slide show,
highlight the folder and press the Play button
to start
playing it. You can also select Play slide show on the sidebar.
Watching videos
1. From the Media Center main menu, select Pictures + Videos
> video library to display your videos.
2. highlight a video and press the Play button
playing it.
36
Using your NOVA P20/P22
to start
Recovering your system
Using the Recovery DVD
���
The Recovery DVD includes an image of the operating system,
installed on your system at the factory. The Recovery DVD, working
with the Support DVD, provides a comprehensive recovery
solution that quickly restores your system to its original working
state, provided that your hard disk drive is in good working order.
Before using the Recovery DVD, copy your data files (such as
Outlook PST files) to floppy disks or to a network drive and make
note of any customized configuration settings (such as network
settings).
1. Insert the Recovery DVD into the optical drive (System needs
to be powered ON).
2. Restart the system and press <DEL> on bootup to enter the
BIOS setup. Go to Boot > Boot Device Priority and select
the optical drive (may be labeled as “CDROM:XXXX”) as the
1st Boot Device.
3. Press <F10> to save the configuration and reboot from the
Recovery DVD.
4. Select a partition option and click Next. Partition options:
Recover system to a partition only.
This option will delete only the partition you select from
below, allowing you to keep other partitions, and create a
new system partition as drive “C”.
Recover system to entire HD.
This option will delete all partitions from your hard disk drive
and create a new system partition as drive “C”.
5. Follow the on-screen instructions to complete the recovery
process.
You will lose all your data during the system recovery. Ensure
to back up your important data before recovering your
system.
ASUS NOVA P20/P22
37
6. After the system recovery is completed, eject the the
Recovery DVD from the optical drive.
7. Restart the system and press <DEL> on bootup to enter the
BIOS setup. Go to Boot > Boot Device Priority and reset the
hard disk drive (may be labeled as “HDD:XXXX”) as the 1st
Boot Device.
8. Press <F10> to save the configuration and reboot the
system.
9. Insert the Support DVD into the optical drive.
10. Click ASUS InstAll - Drivers Installation Wizard from the
Drivers tab and install all the drivers.
It may take some time to reinstall all the drivers. If the
screensaver starts, press any key to bring back the installation
screen.
38
Recovering your system
Using the Hidden Partition
The Recovery Partition includes an image of the operating
system, drivers, and utilities installed on your system at the
factory. The Recovery Partition provides a comprehensive
recovery solution that quickly restores your system’s software to
its original working state, provided that your hard disk drive is in
good working order. Before using the Recovery Partition, copy
your data files (such as Outlook PST files) to floppy disks or to a
network drive and make note of any customized configuration
settings (such as network settings).
DO NOT delete the partition named “RECOVERY.” The
Recovery Partition is created at the factory and cannot
be restored by the user if deleted. Take your system to an
authorized ASUS service center if you have problems with the
recovery process.
1.
2.
3.
4.
Press <F9> during bootup (requires a Recovery Partition)
Press <Enter> to select Windows Setup [EMS Enabled]
Read the “ASUS Preload Wizard” screen and click Next.
Select a partition option and click Next. Partition options:
Recover Windows to a partition only.
This option will delete only the partition you select from
below, allowing you to keep other partitions, and create a
new system partition as drive “C”.
Recover Windows to entire HD.
This option will delete all partitions from your hard disk drive
and create a new system partition as drive “C”.
5. Follow the on-screen instructions to complete the recovery
process.
6. Reboot and insert the Support DVD into the optical drive.
7. Click ASUS InstAll - Drivers Installation Wizard from the
Drivers tab and install all the drivers.
ASUS NOVA P20/P22
39
40
Recovering your system