1
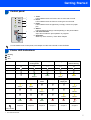
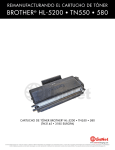
Quick Setup Guide Laser Printer HL-5240 HL-5240L HL-5250DN Before you can use the printer, you must set up the hardware and install the driver. Please read this ‘Quick Setup Guide’ for proper set up and installation instructions. STEP1 Setting Up the Machine STEP2 Installing the Printer Driver Setup is Complete! How to use the printer, see the User’s Guide in the CD-ROM. Keep this ‘Quick Setup Guide’ and the supplied CD-ROM in a convenient place for quick and easy reference at all times. Version 2 1 Symbols used in this guide Warning Warnings tell you what to do to prevent possible personal injury. Improper Setup Improper Setup icons alert you to devices and operations that are not compatible with the printer. Electrical Hazard Electrical Hazard icons alert you to a possible electrical shock. Hot Surface Caution Hot Surface icons warn you not to touch machine parts that are hot. Cautions specify procedures you must follow or avoid to prevent possible damage to the printer or other objects. Note User's Guide Network User's Guide Notes tell you how you should respond to a situation that may arise or give tips about how the current operation works with other features. Indicates reference to the User's Guide or Network User's Guide which is on the CD-ROM we have supplied. Table of Contents Safety Precautions ....................................................................................................................................... 2 Regulations ............................................................................................................................................. 3 Getting Started What is in the box?....................................................................................................................................... 6 Control panel................................................................................................................................................ 7 Printer LED Indications ................................................................................................................................ 7 Supplied CD-ROM ....................................................................................................................................... 8 STEP1– Setting Up the Machine Put the CD-ROM into the CD-ROM drive..................................................................................................... 9 Install the drum unit and toner cartridge assembly .................................................................................... 10 Load paper in the paper tray ...................................................................................................................... 11 Print a test page ......................................................................................................................................... 12 STEP2– Installing the Printer Driver Windows® For USB interface cable users (Windows® 98/Me/2000/XP only)............................................................. For parallel interface cable users .............................................................................................................. For network interface cable users (For HL-5250DN) ................................................................................ For Brother Peer-to-Peer network printer users (LPR/NetBIOS) ......................................................... For shared network printer users ......................................................................................................... 14 16 17 17 19 Macintosh® For USB interface cable users .................................................................................................................. For Mac OS ® X 10.2.4 or greater users............................................................................................... For Mac OS ® 9.1 to 9.2 users .............................................................................................................. For network interface cable users (For HL-5250DN) ................................................................................ For Mac OS ® X 10.2.4 or greater users............................................................................................... For Mac OS ® 9.1 to 9.2 users .............................................................................................................. 20 20 22 23 23 25 For Network Users (For HL-5250DN) BRAdmin Professional configuration utility (For Windows ® users) ............................................................ 26 BRAdmin Light configuration utility (For Mac OS® X users) ...................................................................... 27 Web browser .............................................................................................................................................. 28 Network default settings ............................................................................................................................. 28 Print the Printer Settings Page................................................................................................................... 28 Consumables and Options Options ....................................................................................................................................................... 29 Consumables ............................................................................................................................................. 29 Repacking Information Shipment of the printer............................................................................................................................... 30 Troubleshooting User’s Guide Chapter 7 1 Safety Precautions To Use the Printer Safely Warning There are high voltage electrodes inside the printer. Before you clean the inside of the printer, make sure that you have turned off the power switch and unplugged the printer from the AC power outlet. DO NOT handle the plug with wet hands. Doing this might cause an electrical shock. After you have just used the printer, some internal parts of the printer will be extremely hot. DO NOT touch the shaded parts shown in the illustration when you open the front or back cover of the printer. Inside the printer (Front View) Open the back cover (Back View) DO NOT remove or damage the caution labels located on or around the fuser. DO NOT use a vacuum cleaner to clean up scattered toner. Doing this might cause the toner dust to ignite inside the vacuum cleaner, potentially starting a fire. Please carefully clean the toner dust with a dry, lint-free cloth and dispose of it according to local regulations. DO NOT use flammable substances near the printer. Doing this might cause a fire or electrical shock. 2 Safety Precautions Regulations Federal Communications Commission (FCC) Declaration of Conformity (For USA) Responsible Party: Brother International Corporation 100 Somerset Corporate Boulevard P.O. Box 6911 Bridgewater, NJ 08807-0911 USA Telephone: (908) 704-1700 declares, that the products Product name: Laser Printer HL-5240 and HL-5250DN Model number: HL-52 Product option: Lower Tray Unit LT-5300 Cet appareil numérique de la classe B est conforme à la norme NMB-003 du Canada. Radio interference (220-240 volt model only) This printer follows EN55022 (CISPR Publication 22)/Class B. Before you use this product, make sure that you use one of the following interface cables. 1 A shielded parallel interface cable with twisted-pair conductors and that it is marked “IEEE 1284 compliant”. 2 A USB cable. The cable must not be more than 2 metres long. EC Declaration of Conformity comply with Part 15 of the FCC Rules. Operation is subject to the following two conditions: (1) This device may not cause harmful interference, and (2) this device must accept any interference received, including interference that may cause undesired operation. This equipment has been tested and found to comply with the limits for a Class B digital device, pursuant to Part 15 of the FCC Rules. These limits are designed to provide reasonable protection against harmful interference in a residential installation. This equipment generates, uses, and can radiate radio frequency energy and, if not installed and used in accordance with the instructions, may cause harmful interference to radio communications. However, there is no guarantee that interference will not occur in a particular installation. If this equipment does cause harmful interference to radio or television reception, which can be determined by turning the equipment off and on, the user is encouraged to try to correct the interference by one or more of the following measures: Reorient or relocate the receiving antenna. Increase the separation between the equipment and receiver. Connect the equipment into an outlet on a circuit different from that to which the receiver is connected. Consult the dealer or an experienced radio/TV technician for help. Important A shielded interface cable should be used in order to ensure compliance with the limits for a Class B digital device. Changes or modifications not expressly approved by Brother Industries, Ltd. could void the user's authority to operate the equipment. Industry Canada Compliance Statement (For Canada This Class B digital apparatus complies with Canadian ICES-003. 3 Safety Precautions Laser Safety (110 to 120 volt Model Only) This printer is certified as a Class 1 laser product under the U.S. Department of Health and Human Services (DHHS) Radiation Performance Standard according to the Radiation Control for Health and Safety Act of 1968. This means that the printer does not produce hazardous laser radiation. Since radiation emitted inside the printer is completely confined within protective housings and external covers, the laser beam cannot escape from the machine during any phase of user operation. FDA Regulations (110 to 120 volt Model Only) The U.S. Food and Drug Administration (FDA) has implemented regulations for laser products manufactured on and after August 2, 1976. Compliance is mandatory for products marketed in the United States. One of the following labels on the back of the printer indicates compliance with the FDA regulations and must be attached to laser products marketed in the United States. MANUFACTURED: Brother Industries, Ltd., 15-1 Naeshiro-cho Mizuho-ku Nagoya, 467-8561 Japan This product complies with FDA performance standards for laser products except for deviations pursuant to Laser Notice No.50, dated July 26, 2001. MANUFACTURED: Brother Corporation (Asia) Ltd. Brother Buji Nan Ling Factory Gold Garden Ind., Nan Ling Village, Buji, Rong Gang, Shenzhen, CHINA This product complies with FDA performance standards for laser products except for deviations pursuant to Laser Notice No.50, dated July 26, 2001. Caution Use of controls, adjustments or performance of procedures other than those specified in this manual may result in hazardous radiation exposure. IEC 60825-1 specification (220 to 240 volt model only) This printer is a Class 1 laser product as defined in IEC 60825-1 specifications. The label shown below is attached in countries where it is needed. CLASS 1 LASER PRODUCT APPAREIL À LASER DE CLASSE 1 LASER KLASSE 1 PRODUKT This printer has a Class 3B laser diode which produces invisible laser radiation in the laser unit. You should not open the laser unit under any circumstances. Caution Use of controls or adjustments or performance of procedures other than those specified herein may result in hazardous radiation exposure. For Finland and Sweden LUOKAN 1 LASERLAITE KLASS 1 LASER APPARAT Varoitus! Laitteen käyttäminen muulla kuin tässä käyttöohjeessa mainitulla tavalla saattaa altistaa käyttäjän turvallisuusluokan 1 ylittävälle näkymättömälle lasersäteilylle. Varning Om apparaten används på annat sätt än i denna Bruksanvisning specificerats, kan användaren utsättas för osynlig laserstrålning, som överskrider gränsen för laserklass 1. Internal laser radiation Maximum radiation power: 5 mW Wave length: 770 - 810 nm Laser class: Class 3B IMPORTANT - For Your Safety To ensure safe operation, the supplied three-pin plug must be inserted only into a standard three-pin power outlet that is properly grounded through the normal household wiring. Extension cords used with this printer must be threepin plug type and correctly wired to provide proper grounding. Incorrectly wired extension cords may cause personal injury and equipment damage. The fact that the equipment operates satisfactorily does not imply that the power is grounded and that the installation is completely safe. For your safety, if in any doubt about the effective grounding of the power, call a qualified electrician. This product should be connected to an AC power source within the range indicated on the rating label. DO NOT connect it to a DC power source. If you are not sure, contact a qualified electrician. 4 Safety Precautions Disconnect device You must install this printer near a power outlet that is easily accessible. In case of an emergency, you must disconnect the power cord from the power outlet to shut off the power completely. Caution for LAN connection (For model HL-5250DN only) Connect this product to a LAN connection that is not subjected to over voltages. IT power system (For Norway only) This product is also designed for an IT power system with phase-to-phase voltage 230V. Wiring information (for UK) Important If you need to replace the plug fuse, fit a fuse that is approved by ASTA to BS1362 with the same rating as the original fuse. Always replace the fuse cover. Never use a plug that does not have a cover. Warning - This printer must be earthed. The wires in the mains lead are coloured in line with the following code: Green and Yellow: Earth Blue: Neutral Brown: Live If in any doubt, call a qualified electrician. 5 Getting Started 1 1 What is in the box? Carton components may vary from one country to another. Save all packing materials and the printer carton in case for any reason you must ship your printer. 1 7 2 3 4 6 5 8 1 Front Cover Release Button 5 Paper tray 2 Control panel 6 Power switch 3 Face-down output tray support flap (Support flap) 7 Face-down output tray 4 Front cover 8 Multi -purpose tray (MP tray) CD-ROM (including User's Guide) Quick Setup Guide Drum Unit and Toner Cartridge Assembly AC Power Cord The interface cable is not a standard accessory. Buy the proper interface cable for the interface you want to use (USB, Parallel or Network). USB cable Do not use a USB interface cable that is longer than 6 feet (2.0 meters). Do not connect the USB cable to a non-powered hub or a Macintosh® keyboard. Make sure that you connect it to the USB connector of your PC. USB is not supported under Windows® 95 or Windows NT® 4.0. Parallel interface Do not use a parallel interface cable that is longer than 6 feet (2.0 meters). Use a shielded interface cable that is IEEE 1284-compliant. Network cable (for HL-5250DN) Use a straight-through Category5 (or greater) twisted-pair cable for 10BASE-T or 100BASE-TX Fast Ethernet Network. 6 Getting Started Control panel 2 1 Toner LED indicates when the Toner is low or at the end of its life. 2 Drum LED indicates when the Drum is nearing the end of its life. 3 Paper LED indicates when the paper tray is empty or there is a paper jam. 4 Status LED will flash and change color depending on the printer status. 5 Job Cancel button stops and cancels the print operation in progress. 6 Go button Wake-up / Error recovery / Form feed / Reprint 1 2 3 4 5 6 For the details of the control panel, see Chapter 4 of the User’s Guide on the CD-ROM. Printer LED Indications 3 : Blinking : ON : OFF Printer LED Sleep / OFF Warming up Cooling down Ready Receiving data Print Data remaining Green 2 Green Yellow 2 Yellow Toner Drum Paper Status Printer LED Toner low Toner life end Yellow 1 Yellow Drum near end of life Cover open No paper Paper jam Service call Toner Yellow 2 Drum Yellow 1 Yellow 2 Paper Yellow 2 Yellow 2 Status Green Red Green Red Red Red 2 Chapter 6 Chapter 6 Chapter 6 Chapter 7 Chapter 7 Chapter 4 User's Guide 1 The LED will blink in a pattern of ON for 2 seconds and then OFF for 3 seconds. 2 The LED will blink fast. 7 Getting Started 4 Supplied CD-ROM You can find a variety of information on the CD-ROM. Windows® Macintosh® 2 1 3 1 Mac OS® X 10.2.4 or greater Users 2 Mac OS® 9.1 to 9.2 Users The menu screen is not supported by Mac OS ® 9.1 to 9.2. 3 View the User’s Guide and Network User’s Guide in PDF format. (See Documentation below.) Initial Setup Instructional movie for printer setup. Install Printer Driver Install the printer driver. Install Other Driver or Utilities (For Windows® users) Install optional drivers, utilities and Network management tools (For HL-5250DN users). Documentation View the Printer User’s Guide and Network User's Guide (For HL-5250DN) in PDF format (Viewer included). You can also view the User’s Guide in HTML format by accessing the Brother Solutions Center. The User’s Guide in PDF format will be installed automatically when you install the driver. (For Windows® users only) Click the Start button, Programs 1, your printer (e.g. Brother HL-5250DN), and then User’s Guide. If you do not want to install the User’s Guide, choose Custom setup from Install Printer Driver, and uncheck User’s Guide in PDF format when you install the driver. 1 All Programs for Windows® XP users On-Line Registration Register your product on-line. Brother Solutions Center The Brother Solutions Center (http://solutions.brother.com) is a one-stop resource for all your printer needs. Download the latest drivers and utilities for your printers, read FAQs and troubleshooting tips, or learn about printer solutions. Note For visually impaired users, we have prepared an HTML file on the supplied CD-ROM: readme.html. This file can be read by Screen Reader ‘text-to-speech’ software. 8 Setting Up the Machine 1 1 Put the CD-ROM into the CD-ROM drive For Windows® users For Macintosh® users Improper Setup Improper Setup DO NOT connect the interface cable. Connecting the interface cable is done when installing the driver. 1 2 Put the supplied CD-ROM into your CD-ROM drive. The opening screen will appear automatically. Choose your printer model and the language. DO NOT connect the interface cable. Connecting the interface cable is done when installing the driver. 1 Click Initial Setup on the menu screen. 2 3 For Mac OS® 9.1 to 9.2 Users, go to next page. For Mac OS® 10.2.4 or greater Users, put the supplied CD-ROM into your CD-ROM drive, and then double-click the HL5200 icon on your desktop. Double-click the Start Here OS X icon. Follow the on-screen instructions. Click Initial Setup on the menu screen. You can view the initial setup instructions and follow along with the steps on pages 10 to 12. 3 You can view the initial setup instructions and follow along with the steps on pages 10 to 12. 9 STEP1 2 Setting Up the Machine Install the drum unit and toner cartridge assembly 4 Put the drum unit and toner cartridge assembly into the printer. Improper Setup DO NOT connect the interface cable yet. 1 5 Press the front cover release button and open the front cover (1). 1 2 3 10 Unpack the drum unit and toner cartridge assembly. Rock it from side to side several times to distribute the toner evenly inside the assembly. Close the front cover of the printer. Setting Up the Machine 3 Load paper in the paper tray 1 Pull the paper tray completely out of the printer. 3 4 2 Fan the stack of paper well to avoid paper jams and misfeeds. Put paper in the paper tray. Make sure that the paper is flat in the tray and below the maximum paper mark (1). 1 While pressing the blue paper-guide release lever (1), slide the paper guides to fit the paper size. Make sure that the guides are firmly in the slots. 5 Put the paper tray firmly back in the printer. 1 Note Not applicable for European countries For Legal size paper, press the lever (1) located at the back of the tray and pull out the back of the paper tray. Move the tray lock button (2) to the lock position. (Legal size paper is not available in some regions.) 1 2 11 STEP1 4 Setting Up the Machine Print a test page 4 Press Go. The printer prints a test page. Check that the test page has printed correctly. Improper Setup DO NOT connect the interface cable yet. 1 Make sure that the printer power switch is off. Connect the AC power cord to the printer. Note This function will not be available after the first print job you send from your PC. Now go to Go to the next page to install the driver. 2 3 12 Plug the AC power cord into an AC power outlet. Turn on the printer power switch. After the printer has finished warming up, the Status LED stops blinking and stays green. STEP2 Installing the Printer Driver Follow the instructions on this page for your operating system and interface cable. For the latest driver and to find the best solution for your problem or question, access the Brother Solutions Center directly from the CD-ROM / Driver or visit http://solutions.brother.com. Windows® For Windows® XP Professional x64 Edition users, visit http://solutions.brother.com for driver downloads and installation steps. For USB interface cable users (Windows® 98/Me/2000/XP only) ............................... 14 For parallel interface cable users.................................................................................. 16 For network interface cable users (For HL-5250DN) ................................................... 17 For Brother Peer-to-Peer network printer users (LPR/NetBIOS)..................................................... 17 For shared network printer users ...................................................................................................... 19 Macintosh® For USB interface cable users....................................................................................... 20 For Mac OS® X 10.2.4 or greater users .............................................................................................. 20 For Mac OS® 9.1 to 9.2 users.............................................................................................................. 22 For network interface cable users (For HL-5250DN) ................................................... 23 For Mac OS® X 10.2.4 or greater users .............................................................................................. 23 For Mac OS® 9.1 to 9.2 users.............................................................................................................. 25 The screens for Windows® in this Quick Setup Guide are based on Windows® XP. The screens for Mac OS® X in this Quick Setup Guide are based on Mac OS® X 10.4. 13 STEP2 Installing the Printer Driver Windows® 1 1 For USB interface cable users (Windows® 98/Me/2000/XP only) 4 Note If the Found New Hardware Wizard appears on your PC, click Cancel. Windows® USB N A C L E C Installing the driver and connecting the printer to your PC 1 2 5 Make sure the USB interface cable is NOT connected to the printer, and then begin installing the driver. If you have already connected the cable, remove it. 14 When this screen appears, make sure the printer power switch is on. Connect the USB interface cable to your PC, and then connect it to the printer. Click Next. Click Install Printer Driver on the menu screen. 6 3 When the License Agreement window appears, click Yes if you agree to the License Agreement. Click USB cable users. Click Finish. Installing the Printer Driver Note If you want to register your product on-line, check On-Line Registration. Windows® Setting your printer as the default printer (For Windows® 2000/XP only) 1 Click the Start button and then Printers and Faxes. For Windows® 98/Me users, the setup is now complete. Now go to Windows® USB For Windows® 2000/XP users, go to ‘Setting Your Printer as the Default Printer’. 2 Choose the Brother Printer icon. 3 Click File, and then Set as Default printer. The setup is now complete. 15 STEP2 2 Installing the Printer Driver Windows® For parallel interface cable users 4 Note Click Finish. If the Found New Hardware Wizard appears on your PC, click Cancel. N A C L E C Connecting the printer to your PC and installing the driver 1 Click Install Printer Driver on the Menu screen. Note If you want to register your product on-line, check On-Line Registration. 5 Windows® Parallel 6 2 Turn off the printer power switch. Connect the parallel interface cable to your PC, and then connect it to your printer. Click Parallel cable users. 7 Turn on the printer power switch. The setup is now complete. 3 16 When the License Agreement window appears, click Yes if you agree to the License Agreement. Installing the Printer Driver 3 Windows® For network interface cable users (For HL-5250DN) For Brother Peer-to-Peer network printer users (LPR/NetBIOS) • If you are going to connect the printer to your network, we recommend that you contact your system administrator prior to installation or see the Network User’s Guide. • Before installation, if you are using Personal Firewall software (e.g. the Internet Connection Firewall available in Windows XP), disable it. Once you are sure that you can print, restart your Personal Firewall software. • Peer-to-peer print with NetBIOS is not available for Windows® XP x64 Edition. Connecting the printer to your network and installing the driver 1 Click Install Printer Driver on the menu screen. 2 Click Network cable users. 3 Turn off the printer power switch. 4 5 6 7 Connect the network interface cable to the printer, and then connect it to a free port on your hub. Turn on the printer power switch. When the License Agreement window appears, click Yes if you agree to the License Agreement. Windows® Network Note Choose Brother Peer-to-Peer Network Printer, and then click Next. 17 STEP2 8 Installing the Printer Driver For LPR Users: Choose Search the network for devices and choose from a list of discovered devices (Recommended). Or enter your printer's IP address or its node name. Click Next. Windows® 10 Click Finish. For NetBIOS Users: Choose Search the network for devices and choose from a list of discovered devices (Recommended). Click Next. Note If you want to register your product on-line, check On-Line Registration. For Windows NT® 4.0 and Windows® 2000/XP users, the setup is now complete. Note Contact your administrator if you do not know the printer's IP address or node name. For LPR Users: Choose your printer and choose LPR (Recommended), and then click Next. Windows® Network 9 For NetBIOS Users: Choose your printer and NetBIOS, and then click Next. 18 For Windows® 95/98/Me users, the setup will be complete after your PC has restarted. Installing the Printer Driver Windows® For shared network printer users Note 4 If you are going to connect to a shared printer on your network, we recommend that you ask your system administrator about the queue or share name printer prior to installation. Choose Network Shared Printer, and then click Next. Installing the driver and choosing the proper printer queue or share name 1 Click Install Printer Driver on the menu screen. 5 2 Choose your printer's queue, and then click OK. Click Network cable users. Note 6 3 Windows® Network Contact your administrator if you do not know about the location and name of the printer in the network. Click Finish. When the License Agreement window appears, click Yes if you agree to the License Agreement. Note If you want to register your product on-line, check On-Line Registration. The setup is now complete. 19 STEP2 4 Installing the Printer Driver Macintosh® For USB interface cable users For Mac OS® X 10.2.4 or greater users Connecting the printer to your Macintosh® and installing the driver 1 2 3 5 Click Go, then Applications. 6 Double-click the Utilities folder. 7 Double-click the Printer Setup Utility icon. Click Install Printer Driver on the menu screen. Click USB cable users and follow the on-screen instructions. Then, restart your Macintosh ®. Note Connect the USB interface cable to your Macintosh ®, and then connect it to the printer. For Mac OS® X 10.2 users, open the Print Center icon. Macintosh® USB 8 Improper Setup DO NOT connect the printer to a USB port on a keyboard or a non-powered USB hub. 4 20 Make sure the printer power switch is on. Click Add. For Mac OS® 10.2.4 to 10.3 users: Go to the next step. For Mac OS® 10.4 or greater users: Go to Step 10. Installing the Printer Driver 9 Choose USB. Macintosh® 11 Click Printer Setup Utility, then Quit Printer Setup Utility. 10 Choose the proper printer, and then click Add. For Mac OS ® 10.2 users: The setup is now complete. For Mac OS ® 10.3 users: Macintosh® USB For Mac OS ® 10.4 or greater users: 21 STEP2 Installing the Printer Driver Macintosh® For Mac OS® 9.1 to 9.2 users Connecting the printer to your Macintosh® and installing the driver 1 2 Put the supplied CD-ROM into your CD-ROM drive. Double-click the Mac OS 9 folder. 5 Make sure the printer power switch is on. 6 From the Apple® menu, click Chooser. Double-click your language folder. 7 3 Click the Brother Laser icon. On the right side of the Chooser, choose the printer to which you want to print. Close the Chooser. Double-click the Printer Driver Installer icon to install the printer driver. Follow the on-screen instructions and restart your Macintosh ®. Macintosh® USB The setup is now complete. 4 Connect the USB interface cable to your Macintosh ®, and then connect it to the printer. Improper Setup DO NOT connect the printer to a USB port on a keyboard or a non-powered USB hub. 22 Installing the Printer Driver 5 Macintosh® For network interface cable users (For HL-5250DN) For Mac OS® X 10.2.4 or greater users Connecting the printer to your Macintosh® and installing the driver 2 3 4 5 Click Go, then Applications. 7 Double-click the Utilities folder. 8 Double-click the Printer Setup Utility icon. Click Install Printer Driver on the menu screen. Click Network cable users and follow the on-screen instructions. Then, restart your Macintosh ®. Turn off the printer power switch. Connect the network interface cable to the printer, and then connect it to a free port on your hub. Turn on the printer power switch. Note For Mac OS® X 10.2 users, open the Print Center icon. 9 Click Add. For Mac OS® 10.2.4 to 10.3 users: Go to the next step. Macintosh® Network 1 6 For Mac OS® 10.4 or greater users: Go to Step 12. 23 STEP2 Installing the Printer Driver 10 Make the following selection. Macintosh® 13 Click Printer Setup Utility, then Quit Printer Setup Utility. 11 Choose Brother HL-5250DN series, and then click Add. Go to Step 13. The setup is now complete. 12 Choose Brother HL-5250DN series, and then click Add. Note If there is more than one of the same model printer (HL-5250DN) connected on your network, the Ethernet address (MAC address) will be displayed after the model name. Macintosh® Network Network User's Guide Chapter 6 . 24 Installing the Printer Driver Macintosh® For Mac OS® 9.1 to 9.2 users Connecting the printer to your Macintosh® and installing the driver 2 Turn off the printer power switch. Connect the network interface cable to the printer, and then connect it to a free port on your hub. 8 3 4 5 6 From the Apple® menu, click Chooser. Turn on the printer power switch. Click the Brother Laser (IP) icon, and then choose BRN_xxxxxx (where xxxxxx are the last six digits of the Ethernet address). Click Setup.... Put the supplied CD-ROM into your CD-ROM drive. Double-click the Mac OS 9 folder. Double-click your language folder. 9 Network User's Guide Chapter 6. Click OK. Close the Chooser. The setup is now complete. Double-click the Printer Driver Installer icon to install the printer driver. Follow the on-screen instructions. Macintosh® Network 1 7 25 For Network Users (For HL-5250DN) 1 1 BRAdmin Professional configuration utility (For Windows® users) The BRAdmin Professional utility for Windows® is designed to manage your Brother network connected devices in a Local Area Network (LAN) environment. For more information on BRAdmin Professional, visit us at http://solutions.brother.com. Installing the BRAdmin Professional configuration utility 1 1 Click Install Other Drivers or Utilities on the menu screen. 2 2 Start BRAdmin Professional, and choose TCP/IP. Click Devices, then Search Active Devices. BRAdmin searchs for new devices automatically. Click BRAdmin Professional and follow the on-screen instructions. Note The default password for the print server is ‘access’. You can use BRAdmin Professional to change this password. 3 Double-click the new device. Setting your IP address, Subnet Mask and Gateway using BRAdmin Professional Note If you have a DHCP/BOOTP/RARP server in your network, you don’t have to do the following operation. Because the print server will automatically obtain its IP address. 4 5 26 Enter the IP Address, Subnet Mask and Gateway, and then click OK. The address information will be saved to the printer. For Network Users (For HL-5250DN) 2 BRAdmin Light configuration utility (For Mac OS® X users) The Brother BRAdmin Light software is a Java™ application that is designed for the Apple Mac OS® X environment. It supports some of the features of the Windows BRAdmin Professional software. For example, using the BRAdmin Light software, you can change some network settings on Brother’s network ready printers and multifunction devices. The BRAdmin Light software will be installed automatically when you install the printer driver. If you have already installed the printer driver, you don’t have to install it again. For more information on BRAdmin Light, visit us at http://solutions.brother.com. Setting your IP address, Subnet Mask and Gateway using BRAdmin Light 3 Double-click the BRAdminLight.jar file. Run the BRAdmin Light software. BRAdmin Light searches new devices automatically. Note • If you have a DHCP/BOOTP/RARP server in your network, you don’t have to do the following operation. The print server will automatically obtain its own IP address. Make sure that version 1.4.1_07 or later of Java™ client software is installed on your computer. • The default password for the print server is ‘access’. You can use BRAdmin Light to change this password. 1 4 Double-click the Macintosh HD icon on your desktop. 5 2 Double-click the new device. Enter the IP Address, Subnet Mask and Gateway, and then click OK. Choose Library, Printers, Brother and then Utilities. 6 The address information will be saved to the printer. 27 For Network Users (For HL-5250DN) 3 Web browser The Brother print server is equipped with a web server that allows you to monitor its status or change some of its configuration settings, using HTTP (Hyper Text Transfer Protocol). Note The User Name is ‘admin’ and the default password is ‘access’. You can use a web browser to change this password. See Chapter 2 of the Network User's Guide. 4 Network default settings To restore all network settings of the internal print server to default, follow the steps below. 1 2 3 4 28 Turn off the printer. Make sure that the front cover is closed and the power cord is plugged in. Hold down Go as you turn on the power switch. All the LEDs will light up and then Status LED will turn off. Release Go. Make sure that all the LEDs turn off. Press Go six times. Make sure that all the LEDs light up to indicate the print server has been reset to its default settings. 5 Print the Printer Settings Page The Printer Settings Page lists all the current printer settings, including network settings. To print the printer settings page, press Go three times within 2 seconds. Consumables and Options 1 1 Options The printer has the following optional accessories. You can expand the capabilities of the printer by adding these items. See Chapter 5 of the User's Guide. Lower Tray Unit DIMM Memory LT-5300 Second or third lower paper tray unit can hold up to 250 sheets of paper. When both trays are installed, the printer expands total input capacity up to 800 sheets. 2 External Print Server NC-2100p (For HL-5240/5240L only) You can expand the memory by installing the (144-pin DIMM) memory module. If you wish to connect the printer to your network, buy the optional Network device. The NC-2100p can be connected to the parallel interface port of your printer. For more information, visit us at http://solutions.brother.com. Consumables When the time comes to replace consumables, an error will be indicated by the LED’s on the control panel. For more information about the consumables for your printer, visit us at http://solutions.brother.com or contact your local Brother re-seller. See Chapter 6 of the User's Guide. Toner Cartridge Drum Unit 29 Repacking Information 1 1 Shipment of the printer If for any reason you must ship your printer, carefully package the printer to avoid any damage during transit. We recommend that you save and use the original packaging. The printer should also be adequately insured with the carrier. Caution When shipping the printer, the DRUM UNIT and TONER CARTRIDGE assembly must be removed from the printer and put in a plastic bag. Failure to remove the unit and put it in a plastic bag before shipping may cause severe damage to the printer and may VOID THE WARRANTY. 1 2 30 Turn off the printer power switch, and then unplug the AC power cord. Remove the drum unit and toner cartridge assembly. Put it in a plastic bag and seal the bag completely. 3 Repack the printer. Trademarks The Brother logo is a registered trademark of Brother Industries, Ltd. Apple, the Apple Logo, Macintosh and TrueType are registered trademarks of Apple Computer, Inc in the United States and other countries. Epson is a registered trademark and FX-80 and FX-850 are trademarks of Seiko Epson Corporation. Hewlett Packard is a registered trademark and HP LaserJet 6P, 6L, 5P, 5L, 4, 4L 4P, III, IIIP, II, and IIP are trademarks of Hewlett-Packard Company. IBM, IBM PC, and Proprinter are registered trademarks of International Business Machines Corporation. Microsoft, MS-DOS, Windows and Windows NT are registered trademarks of Microsoft Corporation in the U.S. and other countries. PostScript and PostScript 3 are trademarks of Adobe Systems Incorporated. Java and all Java-based trademarks and logos are trademarks or registered trademarks of Sun Microsystems, Inc. in the United States and other countries. All other terms and brand and product names mentioned in this Quick Setup Guide are registered trademarks of their respective companies. Compilation and Publication This manual has been compiled and published, under the supervision of Brother Industries Ltd., covering the latest product descriptions and specifications. The contents of this manual and the specifications of this product are subject to change without notice. Brother reserves the right to make changes without notice in the specifications and materials contained herein and shall not be responsible for any damages (including consequential) caused by reliance on the materials presented, including but not limited to typographical and other errors relating to the publication. This product is designed for use in a professional environment. EN © 2005 Brother Industries, Ltd. © 1998-2005 TROY Group, Inc. © 1983-2005 PACIFIC SOFTWORKS INC. This product includes the "KASAGO TCP/IP" software developed by Elmic Systems, Inc. ALL RIGHTS RESERVED.