1
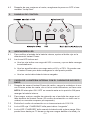
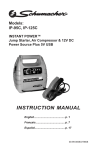
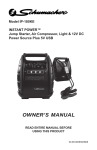
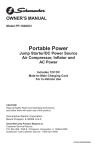
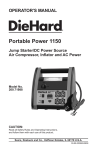
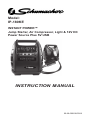
Model:
IP-180KE
INSTANT POWER™
Jump Starter, Air Compressor, Light & 12V DC
Power Source Plus 5V USB
INSTRUCTION MANUAL
00-99-000838/0308
IMPORTANT: CHARGE IMMEDIATELY AFTER PURCHASE
important: read and save this safety and instruction manual.
1.
important safety instructions
1.1
Consider having someone close enough by to come to your aid when you
work near a lead-acid battery.
1.2
Have plenty of fresh water and soap nearby in case battery acid contacts
skin, clothing, or eyes. If acid enters the eye area, rinse with cold water for
at least 10 minutes and get medical help immediately.
1.3
Do not smoke, or use matches or cigarette lighter, or allow any spark or
flame near the battery or engine.
1.4
Never operate the jump starter if it has a damaged lead wire or clamps.
1.5
Wear complete eye and clothing protection when working with any battery.
1.6
Do not permit the internal battery of the Instant Power™ to freeze. A fully
charged battery will not freeze - refer to the storage section of the manual.
1.7
Never charge a frozen battery.
2.
2.1
3.
handling warning
WARNING: Handling the cord on this product or cords associated with this
product, may expose you to lead, a chemical known to the State of California to cause cancer and birth defects or other reproductive harm. Wash
hands after handling.
operating instructions, using the quick connector
clamps
3.1
Use in a well-ventilated area.
3.2
Keep clear of fan blades, belts, pulleys and other parts that may cause
injury.
3.3
To prevent sparking, NEVER allow clamps to touch together or contact the
same piece of metal.
3.4
Turn the vehicle’s ignition OFF before making cable connections.
3.5
Make sure the ON/OFF switch on the IP-180KE is in the OFF position.
3.6
Plug the clamp’s connector into the connector attached to the IP-180KE.
3.7
Clamp the red clamp (+) to the positive terminal of the battery - For a
negative grounded system. (See section 3.12 for a positive grounded
system.)
3.8
Clamp the black clamp (-) to an unpainted and unmoving part of the chas•1•
sis or engine block.
3.9
If you have connected the clamps of your IP-180KE backwards, an audio
alarm will sound. DO NOT turn your IP-180KE on. This could cause serious damage. Reverse the connections, and the audio alarm will stop.
3.10 If no audio alarm is sounded, turn ON the Jump Start switch and then
crank the engine. If the engine does not start within 5-8 seconds, stop
cranking and wait at least 1 minute before attempting to start vehicle
again. (This permits the battery to cool down.)
3.11 After the engine starts, make sure to turn OFF the Jump Start switch.
Then disconnect the black clamp (-) and then the red clamp (+) in that
order. Store the clamps on the ears located on the sides of the case.
3.12 NOTE: In the rare case of jump-starting a vehicle that has a positivegrounded vehicle electrical system, connect the NEGATIVE black clamp
(-) to the negative terminal (-) of the vehicle battery. Then connect the
POSITIVE red clamp (+) to an unpainted and unmoving part of the vehicle
chassis or engine block. If you are unsure of the nature of the vehicle’s
electrical grounding system, check the owner’s manual of the vehicle. To
disconnect clamps, reverse order.
4.
OPERATING INSTRUCTIONS, USING THE QUICK CONNECTOR
RING TERMINALS
WARNING: Failure to follow instructions may cause damage or an
explosion. Read entire instruction manual before use.
4.1
Mount Ring Terminals to Battery
• Ring terminals can be permanently mounted to battery. If permanently
mounted, make sure the ring terminal cables are not obstructing or touching any live components in the vehicle. ALWAYS ensure ring terminals
are properly mounted prior to charging.
• Turn the vehicle’s ignition OFF before making ring terminal connections.
• Attach the red ring terminal (+) to the positive terminal of the battery.
• Attach the black ring terminal (-) to the negative terminal of the battery.
4.2
Jump Starting
• Use in a well-ventilated area.
• Keep clear of fan blades, belts, pulleys and other parts that may cause
injury.
• Make sure the vehicle’s ignition is OFF.
• Make sure the ON/OFF switch on the IP-180KE is in the OFF position.
• Plug the ring terminal connector into the connector attached to the IP-180KE.
•2•
• If the ring terminals were installed incorrectly, an audio alarm will sound.
DO NOT turn your IP-180KE on. This could cause serious damage. Reverse ring terminal connections and the audio alarm will stop.
• If no audio alarm is sounded, turn ON the Jump Start switch and then
crank the engine. If the engine does not start within 5-8 seconds, stop
cranking and wait at least 1 minute before attempting to start vehicle
again. (This permits the battery to cool down.)
• After the engine starts, make sure to turn OFF the Jump Start switch.
• Disconnect Quick Connector.
5.
control panel
6.
led indicators (Red, yellow and green lights)
6.1
To check the internal battery’s charge status, press the Battery Status Button on the front of the Instant Power™.
6.2
The led lights will indicate the charge level as follows:
• A red LED indicates a 50% or less charge and you should immediately
recharge the Instant Power™.
• A yellow LED indicates a 50 to 75% charge. The Instant Power™ may be
used but should be recharged as soon as possible.
• A green LED indicates the internal battery is fully charged.
7.
7.1
charging of internal battery with built-in charger
After removing the Instant Power™ from the carton, charge it for a minimum of 8 hours before using, even if the green charged LED glows.
NOTE: The ON/OFF switch should be in the OFF position to recharge the
internal battery.
•3•
7.2
To charge, plug an extension cord into charger plug on the right side of
the Instant Power™. (Extension cord not included; must be purchased
separately.)
7.3
Plug the extension cord into 110V AC electrical wall outlet.
7.4
The red CHARGING LED will glow indicating charging.
7.5
The green LED will glow when the battery has reached full charge. This
could take up to 72 hours due to the age and condition of the battery. The
charger will automatically drop into a float mode and maintain the battery
at full charge without damaging the battery.
7.6
Charge the Instant Power™ as soon as possible after use.
8.
8.1
12 volt dc power outlet chart
The Instant Power™ is a power source for all 12 volt DC accessories
equipped with a 12 volt accessory plug. Make sure the device to be powered is OFF before inserting 12 volt accessory plug into 12 volt DC accessory outlet. Use for power outages, fishing, and camping trips. Estimated
usage time is listed in below chart:
Appliance Type
Estimated
Wattage
Estimated Time
Cell Phones
4 Watts
30 Hours
Fluorescent
Lights
4 Watts
30 Hours
Radios, Fans
9 Watts
21 Hours
Depth Finders
9 Watts
21 Hours
Camcorders,
VCRs
15 Watts
12 Hours
Electrical Tools
24 Watts
7 Hours
Electrical Coolers
48 Watts
3 Hours
Car Vacuum,
Air Compressors
80 Watts
1.5 Hours
NOTE: Estimated run-times. Actual time may vary. Times are based on the
internal battery being fully charged.
The DC accessory outlet has a 15-amp automatic overload protection
circuit breaker. If an overload occurs, unplug (remove) accessory, and the
breaker will automatically reset.
9.
using usb port
Note: The Jump Start + USB On/Off switch energizes both the jump
•4•
starting clamps and the USB port. Do not allow the clamps to touch each
other or the same piece of metal when the switch is “On” (turned to the
right).
9.1
Confirm that both jump starting clamps are stored on the storage holders,
or that the Quick Connectors are disconnected. 9.2
Turn the Jump Start + USB switch to “On” position.
9.3
The USB plug is now live; plug in the accessory.
10. using the air compressor
PRECAUTION – Read instructions of the product being inflated before
using the compressor. Avoid over inflation, do not exceed the manufacturers recommended pressures. Do not leave the compressor unattended
during use.
The 12 volt compressor is rated for 150 PSI pressure. The hose is stored
on the back of your Instant Power™.
The On / Off switch for the compressor is located on the back of the
Instant Power™.
10.1 Attach the air compressor hose to the product or accessory to be inflated
by flipping down the lever.
10.2 Push the air compressor switch to the ON position and inflate product.
10.3 When the product is inflated to the proper air pressure, push the compressor switch to the OFF position and remove the hose.
10.4 Do not run compressor for more than 10 minutes maximum at a time. Allow the compressor to cool down for 10 minutes before using again.
NOTE: If the compressor overheats, the built-in thermal protection will turn
the unit off. Wait a few minutes and it will automatically restart.
Estimated Time for Inflating
Vehicle 13” to 16”
3 to 16 Minutes
Bike Tire
30 to 40 Seconds
Balls
5 to 30 Seconds
Use an air compressor gauge to ensure the proper pressure has been
reached. Do not over inflate.
11.
using light
11.1 Flip the Light Switch, located on the front of the IP-180KE, to the ON position.
NOTE: The LED lights are not replaceable.
•5•
12. storage
important:
• charge immediately after purchase
• keep fully charged.
Charge the Instant Power™ internal battery before first use and after
every use thereafter.
All batteries are affected by temperature. The ideal storage temperature is
at 70 degrees Fahrenheit. The internal battery will gradually self-discharge
(lose power) over time, especially in warm environments. Leaving the
battery in a discharged state may result in permanent battery damage. To
ensure satisfactory performance and avoid permanent damage, charge
the internal battery every month.
The Instant Power™ can be stored in any position. When the Instant
Power™ is ON, the clamps are live and will produce arcing or sparking if
they come in contact with each other. To prevent accidental arcing, always
keep the clamps on the storage holders and the JUMP START ON/OFF
switch in the OFF position when not using it to jump start a vehicle.
•6•
13. limited warranty
Schumacher Electric Corporation warrants your unit to be free from defects
in material and workmanship, excepting abuse or misuse, for a period of
one year from the date of sale to the original user or consumer purchaser.
If your unit fails or malfunctions within the first 30 days of the warranty, we
will replace it with a new unit. If your unit malfunctions or fails within the 12
month warranty period because of a defect in material or workmanship, we
will repair without charge.
The internal battery, excluding units with swollen batteries or melted battery terminals, carries a 90-day warranty from the date of purchase. Proof
of purchase required. All battery replacements will be at the sole discretion
of the manufacturer or his designated agents.
This warranty is in lieu of all other express warranties. The duration of any
implied warranty, including but not limited to any implied warranty of merchantability or fitness for a particular purpose, made in respect to your unit
is limited to the period of the express warranty set forth above.
For warranty service, return your product, with proof of purchase, to the
factory or a designated agent: Schumacher Electric Corporation Warranty
Service Department, 1025 E. Thompson Street, PO Box 280, Hoopeston,
IL 60942. Phone 1-800-621-5485, Customer Service hours: 7 AM to 4:30
PM CST.
You will be responsible for all insurance and freight or other transportation
charges to the factory or point of repair. We will return your unit freight
prepaid if repair is covered under warranty. Your unit should be properly
packed to avoid damage in transit, since we will not be responsible for any
such damage.
In no event shall Schumacher Electric Corporation be liable for consequential or incidental damages. Some states do not allow limitations on
the length of the implied warranty or the exclusion or limitation of incidental or consequential damages, so the above limitations or exclusions may
not apply to you. This warranty gives you specific legal rights and you may
also have other rights which vary from state to state.
•7•
•8•
Modelo:
IP-180KE
INSTANT POWER™
Arranque Inmediato, Compresor de Aire y
Fuente de Potencia de 12 Voltios CC Mas 5
Voltios USB
MANUAL DE INSTRUCCIONES
00-99-000838/0308
MPORTANTE: LEA Y GUARDE ESTE MANUAL DE SEGURIDAD E
INSTRUCCIONES MANTÉNGALO.
1.
instrucciones importantes de seguridad
1.1
Alguien debe estar dentro del alcance de su voz o lo suficientemente
cerca para venir en su ayuda cuando usted trabaja cerca de una batería.
1.2
Tenga cerca bastante agua fresca y jabón en caso que el ácido de la
batería haga contacto con la piel, la ropa o los ojos. Si ácido entra en los
ojos, enjuáguelos con agua fría durante por lo menos 10 minutos y consiga ayuda médica inmediatamente.
1.3
No fume, ni use fósforos o encendedores, ni permita que haya chispa o
llama cerca de la batería o del motor.
1.4
Nunca use arranque inmediato si el cable o las pinzas han sufrido daños.
Haga que un técnico calificado reemplace el cable.
1.5
Use protección total para los ojos y protección para la ropa cuando trabaje
con baterías.
1.6
No deje que la batería interna se congele. Nunca cargue una batería
congelada.
2.
advertencia sobre manejo
2.1
ADVERTENCIA: El manejo del cordón en este producto o los cordones
asociados con este producto, puede exponerle al plomo, un producto
químico conocido en el estado de California de causar cáncer y defectos
de nacimiento u otro daño reproductivo. Lávese las manos después de
manejar un cordón.
3.
INSTRUCCIONES DE OPERACIÓN AL USAR LAS ABRAZADERAS
DE CONEXIÓN RÁPIDA.
Advertencia: El no seguir las instrucciones puede
causardano o explosion. Lee el manual de instrucciones entero antes de usar.
3.1
Enchufe el cable de la abrazadera en el Conector Rápido acoplado al
IP-180KE
3.2
Apague la ignición antes de conectar los cables.
3.3
Asegúrese de que el interruptor del Arrancador Inmediato se encuentre
en la posición OFF (apagado) hasta que las pinzas estén conectadas a la
batería del vehículo.
3.4
Use en un área bien ventilada.
3.5
Manténgase alejado de las aspas del ventilador, poleas y otras piezas que
puedan causar lesiones.
•1•
3.6
Con el interruptor en posición ON, no deje nunca que las pinzas se junten
o que hagan contacto con la misma pieza de metal, para evitar chispeo.
(Vea la sección 3.12 si tiene sistema a tierra positivo.)
3.7
Conecta la pinza roja (+) al terminal positivo de la batería. (Para un
sistema a tierra negative.)*
3.8
Conecte la pinza negra (-) a una parte sin pintar e inmóvil del chasis o del
bloque del motor.
3.9
Si se hace conexión invertida de las pinzas del Instant Power, suena
alarma audible. NO encienda la unidad. Esto podría causar grave daño.
Invierta las conexiones, y el alarma deja de sonar.
3.10 Si no existe un sonido de alarma, encienda el Aparato y entonces arranque el motor. Si el motor no enciende, entre 5 y 8 segundos, detengase, expere 1 minuto antes de intentar arrancar el vehiculo nuevamente.
(Esto permite a la batería enfriarse.)
3.11 Después de que el motor enciende, asegúrese de que el interruptor de
potencia del Arrancador Inmediato esté en la posición OFF (apagado).
Desconecte primero la pinza negra (-) y luego la pinza roja (+) en ese orden. Guarde las pinzas sobre las orejas ubicadas en los lados de la caja.
3.12 Recargue el Instant Power lo más pronto posible después de usar.
NOTA: En el raro caso de hacer arranque inmediato de un vehículo que
tenga un sistema eléctrico a tierra positivo, conecte la pinza negra NEGATIVA (-) al terminal negativo de la batería del vehículo. Entonces conecte
la pinza roja POSITIVA (+) a una parte no pintada y no movible del chasis
o el bloque del motor del vehículo. Si usted no está seguro de la naturaleza del sistema a tierra eléctrico del vehiculo, verifique el manual de dueño
del vehículo. Para desconectar las pinzas, invierta el orden.
4.
INSTRUCCIONES DE OPERACIÓN AL USAR LOS TERMINALES DE
ARO DE CONEXIÓN RÁPIDA.
4.1
Conecte los terminales de aro a la batería.
4.2
Se .puede montar los terminales a la batería de modo permanente. Al
montar en forma permanente, asegúrese de que los cables de los terminales de aro no obstruyan ni toquen ninguno de los componentes vivos
en el vehículo. SIEMPRE asegúrese de que los terminales de aro estén
debidamente montados antes de comenzar la carga.
•2•
4.3
Después de que comience el motor, asegúrese de poner en OFF el conmutador “Jump Start”.
5.
Panneau de control
6.
indicadores led
6.1
Para verificar el estado de la batería interna, oprima el botón rojo en la
delantera del Instant Power.
6.2
Las luces LED indican así:
a. Una luz roja indica una carga del 50% o menos y que se debe recargar
inmediatamente.
b. Una luz amarilla indica una carga entre el 50 y el 75%. Se puede usar
el Instant Power pero debe recargarse lo más pronto posible.
c. Una luz verde indica batería interna cargada.
7.
7.1
carga de la bateria interna con el cargador incorporado
Después de sacar el Instant Power del cartón, cargue la unidad por lo menos 8 horas, antes de usarla, aún si la luz verde indicadora, se hace notar.
NOTA: El interruptor ON / OFF no necesita estar en la posición ON para
recargar la batería interna.
7.2
Para cargar, meta un cordón de extensión en el enchufe de cargar en el
ládo derecho del Instant Power. (El cordón de extensión no viene con la
unidad; se necesita comparer por separado).
7.3
Enchufe el cordón de extensión en un tomacorriente de 110V CA.
7.4
La luz LED roja “CHARGING” brilla para indicar “cargando”.
7.5
La luz LED “CHARGED” brilla cuando la batería esté a plena carga. Esto
puede llevar hasta por 72 horas en algunas cargas debido a la edad y la
•3•
condición de la batería. El cargador se baja automáticamente en un “float
mode” (modo flotante) y mantiene la batería a plena carga sin causar
daño a la bateria. El Instant Power puede quedarse conectado al tomacorriente de 110V, indefinidamente para manterenerse totalmente cargado.
7.6
Recargue la Instant Power después de usar y cada 3 meses hasta plena
carga para prolongar la vida de la batería.
8.
fuente de potencia multiproposito
8.1
El Instant Power es una fuente de poder para todo accesorio equipado
con enchufe de 12 voltios. Asegurese que la unidad se encuentre apagada (OFF) antes de enchufarle algun accesorio de 12 voltios en el tomacorreinte localizado en la parte izquierda-trasera del mismo. Use el aparato
para interrupciones electricas, viajes de pesca, caza y excursiones. A
continuacion, se da una idea del tiemp aroximado de uso:
9.
Appliance Type
Estimated
Wattage
Estimated Time
for IP-95C
Teléfonos
Celulares
4 Vatios
15 Horas
Luces
Fluorescentes
4 Vatios
15 Horas
Radios
9 Vatios
11 Horas
Ecosondadores
9 Vatios
11 Horas
Ventiladores
9 Vatios
11 Horas
Camcorders,
VCRs
15 Vatios
6 Horas
Herramientas
Eléctricas
24 Vatios
4 Horas
Enfriadores
Eléctricos
48 Vatios
1.5 Horas
para usar la conexion usb
Nota: El Interruptor de Arranque Inmediato + USB “On/Off” activa tanto las
pinzas de arranque inmediato como la conexión USB. No deje que las
pinzas se toquen entre sí ni a la misma pieza de metal cuando el interruptor esté “ON” (virado hacia la derecha).
9.1
Confirme que ambas pinzas de arranque inmediato estén guardadas
sobre sus orejas ubicadas en los costados de la caja.
•4•
9.2
Ponga el Conmutador de Arranque Inmediato + USB en la posición “ON”.
9.3
El enchufe USB ahora se encuentra vivo; ya se puede enchufar el accesorio.
10. uso del compresor de aire
PRECAUCIÓN – Lea las instrucciones del producto que se está inflando
antes de usar el compresor. Evite la inflación excesiva, no sobrepase las
presiones recomendadas por el fabricante. NO desatienda al compresor
mientras se usa.
El compresor de 12 voltios tiene presión nominal de 150 PSI. La
manguera se guarda en el compartimiento posterior del Instant Power. El
conmutador ON / OFF del compresor está en el dorso del Instant Power
debajo del enchufe de cargar.
10.1 Conecte la manguera del compresor de aire al producto o accesorio que
se desea inflar al bajar la palanca.
10.2 Empuje el conmutador del compresor de aire hasta la posición ON e infle
el producto.
10.3 Una vez inflado el producto hasta la debida presión de aire, empuje
el conmutador del compresor hasta la posición OFF y desconecte la
manguera.
10.4 No opere el compresor por más de 10 minutos seguidos. Si esto sucede,
permita que el Instant Power™ se enfríe por 10 minutos antes de volverlo
a usar.
NOTA: Si el compresor se sobrecalienta, la protección térmica incorporada hace apagar la unidad. Espere unos minutos y se repone automáticamente.
Use manómetro para asegurar haber llegado a la debida presión. No infle
excesivamente.
Estimated Time for Inflating
Llanta de vehículo 13” a 16”
3 hasta 16 minutos
Llanta de bicicleta
30 a 40 segundos
Pelotas
5 a 30 segundos
Use manómetro para asegurar haber llegado a la debida presión. No infle
excesivamente.
•5•
11.
almacenamiento
CARGUE EL COMPRESOR ENSEGUIDA AL COMPRARLO.
IMPORTANTE: MANTÉNGALO A PLENA CARGA
Cargue la batería interna del Instant Power™ antes del primero uso y
después de cada uso posterior.
La temperatura afecta a todas las baterías. La temperatura ideal de
almacenaje es a los 70 grados Fahrenheit. La batería interna se va descargando (pierde potencia) con el pasar del tiempo, especialmente en los
ambientes cálidos. Si se deja la batería en estado de descarga, puede
sufrir daños permanentes. Para asegurar el rendimiento satisfactorio y
evitar daños permanentes, cargue la batería interna mensualmente.
El Instant Power™ puede guardarse en cualquier posición. Cuando el
Instant Power™ está en ON, la abrazaderas están vivas y producen arco
o chisporroteo si hacen contacto entre sí. Para evitar arco accidental,
siempre mantenga las abrazaderas en los soportes de almacenaje y el
conmutador JUMP START ON/OFF en la posición OFF cuando el Instant
Power™ no se está usando para arranque inmediato de un vehículo.
•6•
12. garantia limitada
Schumacher Electric garantiza que su unidad está libre de defectos en materiales o mano
de obra, exceptuando abuso o mal uso, por el período de un año desde la fecha de venta
al usuario original o comprador consumidor. Si su unidad falla o no funciona bien durante
los primeros 30 días de la garantía, la reemplazaremos con una unidad nueva. Si su unidad
no funciona bien o falla durante el período de la garantía de 12 meses, debido a defecto en
materiales o mano de obra, la repararemos gratis.
La batería interna, excluyendo las unidades con baterías hinchadas o terminales de batería
derretidas, lleva una garantía de 90 días desde la fecha de compra. Se requiere prueba de
compra. Todo reemplazo de batería será a la sola discreción del fabricante o sus agentes
designados.
Esta garantía reemplaza toda otra garantía expresa. La duración de cualquier garantía
implícita, incluyendo pero no limitada a cualquier garantía de comerciabilidad o idoneidad
para un propósito específico, hecha con respecto a su unidad, se limita al período de
garantía declarada arriba..
Para servicio bajo garantía, devuelva el producto junto con prueba de compra a la fábrica
o a un agente designado: Schumacher Electric Corporation Warranty Service Department,
1025 E. Thompson Street, PO Box 280, Hoopeston, IL 60942. Tel.1-800-621-5485. Horas
de Servicio al Cliente: 7 a.m. a 4:30 p.m. hora central estándar.
Usted queda responsable por todo costo de seguro y de carga u otro transporte hasta la
fábrica o punto de reparación. Devolveremos su unidad con transporte prepagado si la
reparación está cubierta por la garantía. Su unidad debe estar debidamente empacada
para evitar daños durante el transporte, puesto que no quedaremos responsables por
ningún daño tal.
Bajo ninguna circunstancia Schumacher Electric Corporation quedará responsable por daños
consecuentes o incidentales. Algunos estados no permiten limitaciones en el período de la
garantía limitada o la exclusión o limitación de daños incidentales o consecuentes, de modo
que las limitaciones o exclusiones anteriores quizás no se apliquen a usted. Esta garantía
le concede derechos legales específicos y usted puede también tener otros derechos que
varían de estado en estado.
•7•
•8•