1
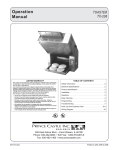
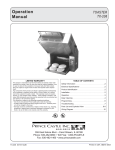
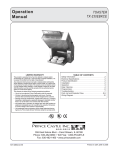
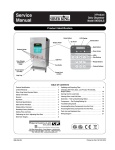
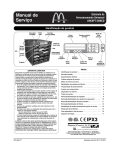
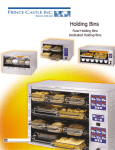
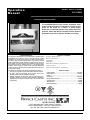
Operation
Manual
Romar Pasta Cooker
630-ROM4
Product Identification
The 630-ROM4 Romar Pasta Cooker automates fresh
cooking and dispensing of individual servings of dry
pasta. At the touch of a button, a pasta hopper
dispenses an individual portion of dry pasta, then uses
pressure, water and steam to rapidly cook the pasta to
perfection every time in about 3 minutes per serving.
LIMITED WARRANTY
This product is warranted to be free from defects in material and/or
workmanship for a period of one (1) year from date of original
installation, not to exceed 30 months from date of shipment from
our factory. Any component which proves to be faulty in material
and/or workmanship will be replaced or repaired (at the option of
Prince Castle, Inc.) without cost to the customer for parts or labor.
This warranty covers on location service (i.e., trip charges and/or
mileage). Travel mileage is limited to 100 miles (200 kilometers)
round trip (one trip warranty) from an authorized service agency or
its sub-service agency.
This warranty is subject to the following exceptions/conditions:
• Use of any non-genuine Prince Castle parts voids this warranty.
• All labor shall be performed during regular work hours.
Overtime premium will be charged to the buyer.
• Damage caused by carelessness, neglect, and/or abuse (e.g.,
dropping, tampering or altering parts, equipment damaged in
shipment, by fire, flood or an act of God) is not covered under
this warranty.
TABLE OF CONTENTS
Product Identification ...........................................
Safety Information ...............................................
Important! ...........................................................
Installation .........................................................
General Preparation & Operation ...........................
Cooking Pasta .....................................................
Periodic Maintenance & Cleaning ...........................
1
2
2
2
3
7
7
SPECIFICATIONS
•
•
•
•
•
•
•
Power Voltage.........................................................................240 VAC
Power Amps........................................................................... 27 Amps
Phase................................................................................................... 3
Frequency ............................................................................... 50/60 Hz
Boiler Controller Power ............................................................24VAC
Control Power ...........................................................................24 VAC
Max Pressure ............................................................................100 PSI
• Working Pressure...................................................................... 80 PSI
355 East Kehoe Blvd. • Carol Stream, IL 60118
Phone: 630-462-8800 • Toll Free: 1-800-PCASTLE
Fax: 630-462-1460 • www.PrinceCastle.com
630-500
Printed in USA 0404 © 2004
Romar Pasta Cooker
630-ROM4
Safety Information
Important!
WARNING!
Indicates information important to the proper operation of
the unit. Failure to observe may result in damage to the
equipment and/or severe bodily injury or death.
Prince Castle reserves the right to change specifications
and product design without notice. Such revisions do
not entitle the buyer to corresponding changes,
improvements, additions or replacements for previously
purchased equipment.
CAUTION!
Indicates information important to the operation of the
unit. Failure to observe may result in damage to the
equipment.
Installation
Pre-Installation
General Setup
Pre-installation is the responsibility of the user and should be
completed prior to the shipment of the unit to the location.
This unit is completely pre-wired and thoroughly tested prior to
shipment. All wiring and hookups shall be done without
opening the unit.
• Floor drain sink located no further than 10 ft. from the
intended location of the unit.
• Electrical hookup box located no further than 5 ft. from the
intended location of the unit. The box should provide three
phase, 240 V protected with a three-phase 30-A breaker. All
terminals should be rated for gauge number 10-4 wire (L1-L2L3-Ground).
• Dedicated water outlet with manual shut off valve no further
than 7 ft. from the intended location of the unit. The water
pressure should be at least 50 psi. The manual shut-off valve
output has to accommodate ¾ in. NPT Hose connector.
• Place unit on the counter. The counter must be designed to fit
the size and support the weight of the unit.
• The unit must be level to insure proper function. To level the
unit, use only the adjustable leveling feet (no shims or foreign
objects).
• EPH require a minimum height of 4 in. between the counter
and the unit.
• Supporting counter with the minimum suggested dimensions
of 24 in. high, 28 in. deep, and 44 in. wide. The counter must be
capable of withstanding 340 lbs (weight of unit).
Plumbing Connections
It is highly recommended that a licensed plumber install all
plumbing connections.
All pre-installation and installation work must be in compliance
with national and local plumbing codes and health department
requirements.
• For standard water installation, connect per local plumbing
codes.
• The drainage from the unit to the floor sink is achieved by
gravity only. Make sure that the 1” white PVC tubing is directed
downwards preventing any back-flow to the unit. Most local
Health Departments require you to terminate the drainage tube
4 in. above the highest point of the floor-sink.
Printed in USA 0404 © 2004
• When connecting the steam generator blow-down outlet,
ensure that the valve (provided by Prince Castle) is reachable
(arms length) from the front of the unit. The connecting “black
pipe” must be installed behind the unit and below the counter,
away from easy reach. The blow-down piping must be
secured all the way to the floor sink.
• Do NOT reduce the blow-down outlet from its original size.
Depending on local regulations, you may be required to
install a second check valve or pressure reducing backflow preventive device.
2
630-500
Romar Pasta Cooker
630-ROM4
Electrical Connections
WARNING!
SHOCK/DAMAGE HAZARD! No internal access is needed
when wiring this unit. Substitution and/or modification of
components and/or wiring system may void all warranties.
Such practice may lead to dangerous operating conditions.
It is highly recommended that a licensed electrician install all
electrical connections.
All pre-installation and installation work must be in compliance
with national and local electrical codes.
• Power wiring must be installed in accordance with local and
National Electric Code (N.E.C.) or Canadian electric code
requirements.
• Before conducting field power connection, check to be sure
that the field power conditions match with power
requirements and rating specified on the unit nameplate on
the back panel.
• As indicated in the Pre-Installation requirements, the user
must provide a circuit breaker between the main power
source and the unit. (Refer to nameplate for rating.)
• The unit is wired and tested by the factory to operate only
with a single phase power configuration with one ground for
main load and circuit control.
• To avoid severe electrical shock, provide grounding in
accordance with N.E.C. requirements.
• When all the above steps are completed, place both hoppers
on the rails and connect them.
General Preparation & Operation
Preparation of Pasta
1
Before loading the pasta into the unit, the long-cut
pasta must be “feathered” by hand.
2
Ensure that your hands are clean before handling
pasta.
A. Gently lift the pasta (as shown on left), letting it
fall between your hands back into the bowl.
B. Repeat feathering several times, as necessary.
The broken, unusable pieces that remain in the bottom
of the bowl may be discarded.
Place long-cut pasta into a large bowl.
The feathered long-cut pasta is now ready to be
cooked.
Procedure Complete
630-500
3
Printed in USA 0404 © 2004
Romar Pasta Cooker
630-ROM4
Pasta Dispensers
1
2
The Pasta Dispenser assembly is composed of
three removable parts: one hopper, one hopper
cover and one loading box. No tools are needed to
assemble these parts.
A. Fill loading box with approx. 1 lb. of long-cut
pasta.
B. Fill hoper with up to 14 lbs. of the same long-cut
pasta.
Use only pasta recommended by Prince Castle.
Using other types of pasta or food may cause
severe damage and void all warranties and
maintenance contracts.
The Pasta Dispenser is a precision machine and
should be handled with care.
Lift the cover from the Pasta Dispenser assembly and
slide the cover down inside the loading box as shown.
Loading
Box
Loading
Box
Cover
Loading
Box
3
Hopper
A. Remove the loading box cover, allowing pasta to
fall into the hopper.
B. Place loading box cover firmly on top of loading
box.
The long-cut Pasta Dispenser is now ready for use.
4
Fill each of the two short-cut past dispensers with up
to 14 lbs. of pasta.
The short-cut Pasta Dispensers are now ready for use.
It is recommended that you keep the hopper
supplied with at least two pounds of pasta at all
times.
Loading
Box
Cover
Procedure Complete
Printed in USA 0404 © 2004
4
630-500
Romar Pasta Cooker
630-ROM4
Pasta Guides/Funnels
Push the dispensers to the back position, then place
the four funnels into the holes located on top of the
unit.
1
2
Retract the dispensers to their normal positions.
Funnels
For proper operation of the unit, ensure that all
the Pasta Dispensers are securely in place in
the slots on top of the unit.
Procedure Complete
Trays & Strainers
The trays come already positioned. However, these may be
removed for cleaning. When returning the tray to its position,
ensure that it is snug and secure.
A. Insert the four drainage strainers into the trays.
B. Place the serving strainers inside the drainage strainers.
For sanitary purposes, remove and wash the trays and all
strainers thoroughly before first time use.
Wash trays and all strainers frequently to prevent starch
accumulation.
Tray
Drainage
Strainer
Serving
Strainer
Switching the Unit On
1
2
Ensure that all the previous steps were executed
properly before proceeding!
A. Visually and manually check that the Blow-Down
valve is closed.
B. Check that water supply line is fully opened.
630-500
Verify that the on/off switch on the back of the unit is
in ON position.
When unit is switched on, a beep sounds for two
seconds. This switch should remain on at all times
except when the unit is undergoing maintenance or
repair.
All the cooking chambers are sanitized for 60
secs. at 280°F each time the machine is switched
on.
5
Printed in USA 0404 © 2004
Romar Pasta Cooker
630-ROM4
3
On the back of the unit, turn the power button to the
ON position.
4
Power button
CAUTION!
DAMAGE HAZARD! While the steam generator is
heating and the sanitizing process is in progress,
the blue I/O button blinks. Do NOT push any
buttons until the process is complete.
When the blue I/O button light is steady and the
four green Serving buttons flash several times
and remain off, the entire process is complete.
CAUTION!
BURN HAZARD! Hot steam and hot water passes
through the unit. Keep hands and objects clear of
unit until numbered green lights no longer flash.
The power button lights up and the unit proceeds
through its start-up process.
The boiler begins to fill. The boiler is completely filled
when the water level has filled the Sight Glass halfway.
Hold the blue I/O button for approx. 3 secs.
Blue I/O
button
Sight
Glass
Yellow
Clean
button
WARNING!
EXPLOSION/DAMAGE/INJURY HAZZARD! The
Sight Glass indicator should NEVER rise above the
¾ full position! If so, immediately shut down the
unit and call for repair.
The button light blinks until the water pressure gauge
on the front of the unit indicates the water has reached
the proper level (80 psi).
WARNING!
EXPLOSION/DAMAGE/INJURY HAZZARD! Do NOT
turn either of the two red-handled Sigh Glass turnvalves. These are used by authorized service
personnel ONLY.
5
Pressure
Gauge
When the steam pressure reaches 80 psi, the gates are
actuated and the chambers are sanitized.
The four numbered green Serving button lights begin to
flash.
When the green Serving button lights remain steady,
the unit is ready for use.
Numbered Green
Serving buttons
Procedure Complete
Printed in USA 0404 © 2004
6
630-500
Romar Pasta Cooker
630-ROM4
Cooking Pasta
To begin the cooking cycle, press any of the dimmed
green Serving button(s).
The loaded dry pasta drops into the unit and begins to
cook.
When finished, the cooked pasta drops into the serving
strainer to be rinsed. The green Serving button light
flashes.
1
While the cook cycle is in progress, the green light
on the Serving button is lit. This indicates that the
cooking chamber is in use and cannot be used to
start another cook cycle until the green light has
turned off.
2
When the rinsing is complete, the unit beeps and the
green light stops flashing and dims.
The pasta is now ready to be served.
3
To turn the unit off at the end of the day, press and hold
the blue I/O button for about 3 secs.
The blue I/O button light dims.
The unit shuts down.
Procedure Complete
Periodic Maintenance & Cleaning
Daily Maintenance
A. Throughout the day, check the water level
frequently.
B. Check for any leaks from the Sight Glass. If leaks
are found, tighten the Sight Glass fixture nuts or
replace the Sight Glass and gaskets if necessary.
1
2
At the end of each day, perform the Daily Blow-Down
procedure (see Daily Blow-Down Procedure in the
Maintenance & Troubleshooting manual).
Also, clean the unit thoroughly (see Daily or Weekly
Cleanup below).
Procedure Complete
Daily Blow-Down Procedure
IMPORTANT!
It is extremely important to fully understand and perform
these maintenance procedures. This procedure should be
performed with caution, preferably at the end of the
workday. For the first few days, only TWO blow-downs per
day are recommended to clean the inside of the boiler.
CAUTION!
EXPLOSION/BURN/INJURY HAZZARD! The boiler is under
high pressure and high temperature. Never leave the boiler
unattended while performing the blow-down procedure.
Always wear protective gloves and goggles to prevent
injuries.
A daily blow-down is essential maintenance for a steam
generator. It lengthens the life of the boiler and prevents boiler
malfunction due to scale build-up.
IMPORTANT!
Before beginning the blow-down procedure, ensure that the
blow-down line is properly connected to a blow-down tank
or drain line for safe discharge purposes. If blowing down
into a receptacle, allow pressure to decrease to 5-10 psi
before opening Blow-Down Valve.
The following blow-down procedure removes most sediment.
However, a manual clean-out must also be performed
periodically, depending on local water conditions, but no less
than once every six months (see 3-6 Month Maintenance in the
Maintenance & Troubleshooting manual).
IMPORTANT!
Discharge only to a blow-down tank or to a safe discharge.
If blowing down into a receptacle, allow pressure to
decrease to 10 psi before opening blow-down valve.
IMPORTANT!
Do NOT use distilled water to operate the boiler.
Do NOT use any boiler cleaning components.
630-500
7
Printed in USA 0404 © 2004
Romar Pasta Cooker
630-ROM4
1
A. Press and hold the blue I/O button for about 3 secs.
The I/O button light dims.
2
IMPORTANT!
The blow-down valve must be opened SLOWLY, not
in one fast stroke.
If the Blow-Down Valve is connected to blowdown tank of drainage system, you can perform
the blow-down at operating pressure (80 psi). If
blowing down into a container or receptacle, wait
until the pressure drops to 10 psi.
A. When the discharge is complete and the boiler is
drained, ensure that the blow-down valve is closed
completely.
B. Press and hold the blue I/O button for about 3
secs. to turn the unit on.
C. Fill the boiler with water.
B. On the back of the unit, open the Blow-Down Valve
lever (see figure) SLOWLY by turning the handle
until the valve is fully opened for approx. 3 secs.,
then turn the handle back to the starting position to
close.
C. Keep repeating this process until the water level
indicator reaches the bottom of the Sight Glass.
Blow-down
Valve Lever
Procedure Complete
Daily or Weekly Clean-Up
1
IMPORTANT!
This process is semi-automatic and must be
followed exactly. Frequency of this procedure
depends upon frequency of usage. Failure to
comply with this procedure may void the unit
warranty.
IMPORTANT!
Use a standard long-handle 3.5 scrub brush head and mild
detergent only. No other cleaning tools or detergents other
than those supplied by Prince Castle may be used. Do NOT
use any boiler cleaning components.
This clean-up procedure is the last procedure to be
performed at the end of the day.
Remove the four funnels from the top of the unit.
2
Press and hold the blue I/O button for approx. 6 secs.
to turn the unit off.
The I/O button light dims.
Printed in USA 0404 © 2004
3
8
Press the yellow Clean button.
The Clean button light flashes for approx. one minute
as the unit prepares the chambers for manual
cleaning.
A beep sounds and the Clean button light becomes
steady, indicating that the chambers are ready to be
cleaned.
630-500
Romar Pasta Cooker
630-ROM4
4
Use a standard long-handle 3.5 in. scrub brush head
and mild detergent to clean each of the four chambers
and break away any residue.
5
Press the yellow Clean button to start the automated
cleaning cycle.
The top gates automatically close.
The chambers are flushed and rinsed, and the bottoms
gates are closed.
When the cleaning cycle is finished (approx. 30 secs.),
the unit automatically shuts down.
7
Slide the three dispensers forward to their normal
position. Ensure that they are secure in their
appropriate slots as shown.
Clean chambers by introducing the scrubber through
the top of the chamber.
Chamber
w/o funnel
(top view)
6
A. When finished, ensure that all foreign objects are
removed from the chambers.
B. Replace the funnels.
Funnels
Procedure Complete
630-500
9
Printed in USA 0404 © 2004