1
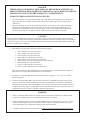
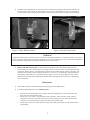
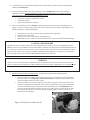
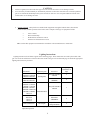
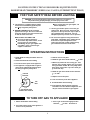
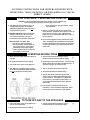
D E S I G N E D T O L E A D USERS’ INFORMATION MANUAL · AWI, TWI, CWI, BWF, CWD, BWC, 16 SERIES GAS WATER BOILERS · BSI SERIES - GAS STEAM BOILER · 32 SERIES - GAS WATER OR STEAM BOILER TO THE BOILER OWNER: READ THIS MANUAL IMMEDIATELY AFTER THIS BOILER IS PLACED IN SERVICE AND RETAIN IT FOR FUTURE REFERENCE. WARNING: If the information in this manual is not followed exactly, a fire or explosion may result causing property damage, personal injury or loss of life. -Do not store gasoline or other flammable vapors and liquids in the vicinity of this or any other appliance. -What to do if you smell gas: · Do not try to light any appliance · Do not touch any electrical switch; do not use any phone in your building. · Immediately call your gas supplier from a neighbor’s phone. Follow the gas supplier’s instructions. · If you cannot reach your gas supplier, call the fire department. -Installation and service must be performed by a qualified installer, service agency, or the gas supplier. AVERTISSEMENT. Assurez-vous de bien suivre les instructions données dans cette notice pour réduire au minimum le risque d’incendie ou d’explosion ou pour éviter tout dommage matériel, toute blessure ou la mort. - Ne pas entreposer ni utiliser d’essence ni d’autres vapeurs ou liquides inflammables dans le voisinage de cet appareil ou de tout autre appareil. - QUE FAIRE SI VOUS SENTEZ UNE ODEUR DE GAZ: · Ne pas tenter d’allumer d’appareils. · Ne touchez à aucun interrupteur. Ne pas vous servir des téléphones dans le bâtiment où vous vous trouvez. · Appelez immédiatement votre fournisseur de gaz depuis un voisin. Suivez les instructions du fournisseur. · Si vous ne pouvez rejoindre le fournisseur de gaz, appelez le service des incendies. -L’installation et I’entretien doivent être assuréx par un installateur ou un service d’entretien qualifié ou par le fournisseur de gaz. PN 980425 REV K DANGER THERE ARE NO USER SERVICABLE PARTS ON THIS BOILER. ATTEMPTS TO SERVICE THIS BOILER BY SOMEONE OTHER THAN A QUALIFIED GAS SERVICE TECHNICIAN COULD VOID THE WARRANTY, CAUSE PROPERTY DAMAGE, PERSONAL INJURY OR LOSS OF LIFE. • • Do not use this boiler if any part has been under water. Immediately call a qualified service technician to inspect the boiler and to replace any part of the control system and any gas control which has been under water. Should overheating occur or the gas supply fail to shut off, do not turn off or disconnect the electrical supply to the pump. Instead shut off the gas supply at a location external to the appliance/En cas de surchauffe ou si l’admission de gaz ne peut étre coupée, ne pas couper ni débrancher l’alimentation électrique de la pompe. Fermer plutot le robinet d’admission de gaz à l’extérieur de l’appareil. CAUTION Like all central heating appliances, this boiler is equipped with safety devices, which could cause it to shutdown, requiring service to restore normal operation. Where such a shutdown could result in damage from low temperatures (such as frozen pipes), do not leave the heating system unattended during cold weather unless alarms or other safeguards are in place to prevent damage. 1) This manual covers the proper care and use of the following boilers: • • • • • • • • • AWI “Aruba III” series gas water boiler TWI “Tortuga” series gas water boiler CWI “Cayman” series gas water boiler BWF “Bali” series fan assisted water boiler CWD “Cabo2” series gas direct vent water boiler BWC “Bimini” series gas condensing direct vent water boiler BSI “Bermuda” series gas steam boiler Series 16 commercial gas hot water boiler Series 32 commercial gas hot water or steam boiler Most of the information in this manual applies to all of the above boilers. Information that is unique to a particular series is clearly marked with the series to which it applies. 2) Instructions to safely light and shut down this boiler are shown on pages 5 - 10, as well as on a label affixed to the boiler. 3) All boilers except the CWD, BWC, and some Series 32 boilers are equipped with a flame rollout switch (Figure 1). This switch will shut the burners down in the event that flames exit the burner compartment through the front opening. The CWD and BWC use an electronic means built into the ignition system to extinguish the burner/s in the event that flames exit the combustion chamber. If the boiler fails to fire, call a qualified heating service agency to diagnose and correct the problem. WARNING • In the event that the flame rollout switch opens, the cause of the flame rollout must be diagnosed and corrected by a qualified gas service technician before the boiler is restarted. • In the event that the ignition system on a CWD or BWC does not permit the boiler to fire, there is either a problem with the igntion system, an occurrence of flame rollout, or a problem with the vent system. Call a qualified gas service technician to diagnose and correct the problem. • A “tripped” rollout switch must be replaced by an identical switch having the same temperature setting. 1 4) The AWI, TWI, CWI, BSI, Series 16 and some Series 32 Boilers are equipped with a blocked vent shut-off switch (Figure 2). This switch will shut the boiler down in the event that there is an excessive blockage in the vent system. This switch has a reset button, which must be pressed before the boiler can be restarted. Figure 1: Flame Rollout Switch Figure 2: Blocked Vent Switch WARNING A shutdown of the burners due to the blocked vent switch is an indication that there is a problem with the vent system, such as a blockage. The blocked vent switch should only be reset after a qualified gas service technician has diagnosed and corrected the venting problem that caused the blocked vent switch to open. 5) BWF, CWD, BWC Series boilers – These boilers are equipped with a safety feature which will shut down the burners in the event that there is a blockage in the vent system. In the event that the boiler fails to function, and the boiler is vented through an outside wall accessible from the ground, inspect the vent terminal on the outside wall for a blockage such as a bee’s nest or ice. If a blockage is found, the burners should ignite approximately 30 seconds after the blockage is removed. If no blockage is found, or if the terminal is inaccessible from the ground, the problem must be diagnosed and corrected by a qualified gas service technician. Maintenance 1) Safe reliable operation of this boiler depends upon proper periodic maintenance. 2) The following should be done on a continuous basis: • • • Keep the area around the boiler free of objects, which are flammable or which could obstruct the flow of air into and around the boiler. Do not store or use sources of hydrocarbons such as bleaches, fabric softeners, paints, cleaners, refrigerants, and cat boxes near the boiler. Traces of these chemicals can be drawn into the boiler, causing severe corrosion damage to the boiler and/or objectionable odors. Do not expose the boiler to large amounts of dust such as that generated by dry wall construction or woodworking. 2 3) A qualified gas service technician should perform the maintenance procedure shown in the installation manual on an annual basis. 4) The owner should visually inspect the venting system on a monthly basis. If any of the following conditions are found, the boiler should be shut down and a qualified gas service technician called to correct the problem before the boiler is placed back in service: • • • 5) Loose joints, corrosion or other deterioration Condensate leakage Sags in horizontal runs of vent pipe The owner should also perform a monthly visual inspection of the boiler and the surrounding system piping. To do this, remove the boiler jacket door. If any of the following are found, a qualified gas service technician should be consulted immediately: • • • • Deterioration of the visible controls, wiring, and sheet metal components Heating system water Leaks Carbon (“soot”) in or near the burner compartment area (BWC Boilers Only) - Make sure that the condensate drain system is unobstructed and leaktight. CAUTION - BWC BOILERS The BWC has a heat exchanger made from a special aluminum alloy which can be severely damaged by frequent additions of water or by the addition of boiler water additives which are not designed for use with aluminum boilers. If it is nessasary to add water to the boiler, have a service technican check the system for leaks. Do not add any chemicals to the boiler not listed in Section X of the BWC installation manual. Warranty is void if the service and maintenance procedure shown in Part XII of the BWC installation manual is not followed. WARNING Carbon (“soot”) in or near the burner compartment area is an indication of a potential carbon monoxide hazard. If carbon is found, the boiler should be shut down immediately and inspected by a qualified gas service technician. The cause of the sooting should be found and corrected before the boiler is restarted. 6) BSI Series and Steam Series 32 Boilers Only – Steam boilers require the following maintenance: • • Some steam boilers are equipped with a float type low water cut-off (Figure 3). This control must be “blown down” on a weekly basis, or more often if needed. To do this, follow the instructions on the label adjacent to the low water cut-off. It will occasionally be necessary to add water to the boiler. In most cases this will be true even if the boiler is equipped with an automatic water feeder (most automatic water feeders maintain the water level at the minimum point required to assure boiler operation). On a monthly basis, turn the boiler off and wait at least 10 minutes for any water in the system to return to the boiler. Add water to the boiler until the water level in the glass is approximately 6” (about 3/4 of the way) from the bottom of the glass. Figure 3: Float Type Low Water Cut-off 3 CAUTION • • Failure to regularly blow down the float type low water cut-off can result in severe damage to boiler. If it is necessary to either manually or automatically add water to the boiler more than once a month, a qualified gas service technician should inspect the system for leaks or defective vents. Frequent additions of fresh water could result in severe damage to boiler. 7) Auxilary Controls – Many boilers are installed with equipment not supplied with the boiler, but which is critical for safe, reliable operation of the boiler. Some examples of this type of equipment include: • • • • Zone Controls Boiler Feed Pumps Draft Inducers and Power Venters Motorized Combustion Air Louvers Make sure that this equipment is maintained in accordance with its manufacturer’s instructions. Lighting Instructions Lighting instructions for all boilers appear on the following pages. These instructions are listed by the model of the gas valve used. The table below references the boiler model to the gas valve used and the page on which the appropriate lighting instructions may be found. Boiler Model AWI037S - AWI295S CWI069S - CWI276S BSI069S - BSI276S CWI310S - CWI379S BSI310S - BSI379S AWI037E - AWI295E TWI061E - TWI162E CWI069E - CWI345E BSI069E - BSI345E BWF069E - BWF229E CWD060 - CWD245 Series 32 CWI-379E BSI-379E Series 16 Series 32 Ignition System Gas Valve * Standing Pilot Lighting Instructions on Page: Honeywell VR8200 or VR8300 5 Robertshaw 7000ERHC 6 Honeywell VR8204 or VR8304 7 Robertshaw 7000DERHC 8 Intermittent Pilot Honeywell VK8115 or 9 Dungs GB-WND * Gas valve numbers are to reference lighting instructions only. Do not use this chart as a replacement parts list. BWC070-BWC425 Direct Spark 4 LIGHTING INSTRUCTIONS FOR BOILERS EQUIPPED WITH HONEYWELL VR8200 AND VR8300 SERIES GAS VALVES (STANDING PILOT) FOR YOUR SAFETY READ BEFORE OPERATING WARNING: If you do not follow these instructions exactly, a fire or explosion may result causing property damage, personal injury or loss of life. A. This appliance has a pilot which must be lighted by hand. When lighting the pilot, follow these instructions exactly. If you cannot reach your gas supplier, call the fire department. C. Use only your hand to push in or turn the gas control knob. Never use tools. If the knob will not push in or turn by hand, don’t try to repair it, call a qualified service technician. Force or attempted repair may result in a fire or explosion. B. BEFORE LIGHTING smell all around the appliance area for gas. Be sure to smell next to the floor because some gas is heavier than air and will settle on the floor. WHAT TO DO IF YOU SMELL GAS Do not try to light any appliance. Do not touch any electric switch; do not use any phone in your building. Immediately call your gas supplier from a neighbor’s phone. Follow the gas supplier’s instructions. D. Do not use this appliance if any part has been under water. Immediately call a qualified service technician to inspect the appliance and to replace any part of the control system and any gas control which has been under water. LIGHTING INSTRUCTIONS 1. STOP! Read the safety information above on this label. 8. Turn Knob on gas control counterclockwise to “PILOT”. 2. Set the thermostat to lowest setting. 9. Push down and hold the red reset button while you light pilot burner with a match. After about one minute, release reset button. Pilot should remain lit. If it goes out, turn gas control knob clockwise to OFF. To relight, repeat steps 5-9. If button does not pop up when released, stop and immediately call your service technician or gas supplier. If the pilot will not stay lit after several tries, turn the gas control knob to “OFF” and call your service technician or gas supplier. 3. Turn off all electric power to the appliance. 4. Remove front access panel. 5. Rotate the gas control knob clockwise to OFF. RESET BUTTON GAS INLET GAS OUTLET 10. After pilot remains lit when red reset button is released, turn gas control knob counterclockwise to ON. GAS CONTROL KNOB (SHOWN IN “ON” POSITION) GAS VALVE - TOP VIEW 6. Wait five (5) minutes to clear out any gas. Then smell for gas, including near the floor. If you then smell gas, STOP! Follow “B” in the safety information above on this label. If you don’t smell gas, go to the next step. 7. Find pilot - follow metal pilot tube from gas control to PILOT pilot burner. BURNER 11. Replace front access panel. 12. Turn on all electric power to the appliance. 13. Set thermostat to desired setting. THERMOCOUPLE TO TURN OFF GAS TO APPLIANCE 1. Set the thermostat to lowest setting. 3. Push in gas control knob slightly and turn clockwise to “OFF”. Do not Force. 2. Turn off all electric power to the appliance if service is to be performed. 146-80-254 Rev. 0 (Standing Pilot) 5 LIGHTING INSTRUCTIONS FOR BOILERS EQUIPPED WITH ROBERTSHAW 7000ERHC SERIES GAS VALVES (STANDING PILOT) FOR YOUR SAFETY READ BEFORE LIGHTING WARNING: If you do not follow these instructions exactly, a fire or explosion may result causing property damage, personal injury or loss of life. A. This appliance has a pilot which must be lighted by hand. When lighting the pilot, follow these instructions exactly. If you cannot reach your gas supplier, call the fire department. C. Use only your hand to push in or turn the gas control knob. Never use tools. If the knob will not push in or turn by hand, don’t try to repair it, call a qualified service technician. Force or attempted repair may result in a fire or explosion. B. BEFORE LIGHTING smell all around the appliance area for gas. Be sure to smell next to the floor because some gas is heavier than air and will settle on the floor. WHAT TO DO IF YOU SMELL GAS Do not try to light any appliance. Do not touch any electric switch; do not use any phone in your building. Immediately call your gas supplier from a neighbor’s phone. Follow the gas supplier’s instructions. D. Do not use this appliance if any part has been under water. Immediately call a qualified service technician to inspect the appliance and to replace any part of the control system and any gas control which has been under water. LIGHTING INSTRUCTIONS 1. STOP! Read the safety information above on this label. 8. Turn Knob on gas control counterclockwise to “PILOT”. 2. Set the thermostat to lowest setting. 9. Push down and hold the Knob while you light pilot burner with a match. After about one minute, release reset button. Pilot should remain lit. If it goes out, turn gas control knob clockwise to OFF. To relight, repeat steps 5-9. If button does not pop up when released, stop and immediately call your service technician or gas supplier. If the pilot will not stay lit after several tries, turn the gas control knob to “OFF” and call your service technician or gas supplier. 3. Turn off all electric power to the appliance. 4. Remove front access panel. 5. Rotate the gas control knob clockwise to OFF. POSITION INDICATOR PILOT GAS INLET 10. After pilot remains lit when red reset button is released, turn gas control knob counterclockwise to ON. ON OFF GAS CONTROL KNOB SHOWN IN "OFF" POSITION 6. Wait five (5) minutes to clear out any gas. Then smell for gas, including near the floor. If you then smell gas, STOP! Follow “B” in the safety information above on this label. If you don’t smell gas, go to the next step. 7. Find pilot - follow metal pilot tube from gas control to PILOT pilot burner. BURNER 11. Replace front access panel. 12. Turn on all electric power to the appliance. 13. Set thermostat to desired setting. THERMOCOUPLE TO TURN OFF GAS TO APPLIANCE 1. Set the thermostat to lowest setting. 3. Push in gas control knob slightly and turn clockwise to “OFF”. Do not Force. 2. Turn off all electric power to the appliance if service is to be performed. 6 LIGHTING INSTRUCTIONS FOR BOILERS EQUIPPED WITH HONEYWELL VR8204 AND VR8304 SERIES GAS VALVES (INTERMITTENT PILOT) FOR YOUR SAFETY READ BEFORE LIGHTING WARNING: If you do not follow these instructions exactly, a fire or explosion may result causing property damage, personal injury or loss of life. A. This appliance is equipped with an ignition device which automatically lights the pilot. Do not try to light the pilot by hand. If you cannot reach your gas supplier, call the fire department. C. Use only your hand to push in or turn the gas control knob. Never use tools. If the knob will not push in or turn by hand, don’t try to repair it, call a qualified service technician. Force or attempted repair may result in a fire or explosion. B. BEFORE LIGHTING smell all around the appliance area for gas. Be sure to smell next to the floor because some gas is heavier than air and will settle on the floor. WHAT TO DO IF YOU SMELL GAS Do not try to light any appliance. Do not touch any electric switch; do not use any phone in your building. Immediately call your gas supplier from a neighbor’s phone. Follow the gas supplier’s instructions. D. Do not use this appliance if any part has been under water. Immediately call a qualified service technician to inspect the appliance and to replace any part of the control system and any gas control which has been under water. OPERATING INSTRUCTIONS 1. STOP! Read the safety information above on this label. 5. Remove front access panel. 6. Rotate the gas control knob clockwise 2. Set the thermostat to lowest setting. to OFF. 7. Wait five (5) minutes to clear out any gas. Then smell for gas, including near the floor. If you then smell gas, STOP! Follow “B” in the safety information above on this label. If you don’t smell gas go to the next step. 3. Turn off all electric power to the appliance. 4. This appliance is equipped with an ignition device which automatically lights the pilot. Do not try to light the pilot by hand. 8. Rotate the gas control knob counter clockwise to “ON”. GAS CONTROL KNOB (SHOWN IN “ON” POSITION) 9. Replace front access panel. 10. Turn on all electric power to the appliance. GAS INLET GAS OUTLET 11. Set thermostat to desired setting. 12. If the appliance will not operate, follow the instructions “To Turn Off Gas To Appliance” and call your service technician or gas supplier. GAS VALVE - TOP VIEW TO TURN OFF GAS TO APPLIANCE 3. Push in gas control knob slightly and turn clockwise to “OFF”. Do not Force. 1. Set the thermostat to lowest setting. 2. Turn off all electric power to the appliance if service is to be performed. 146-80-255 Rev. 0 (Electronic Ignition) 7 LIGHTING INSTRUCTIONS FOR BOILERS EQUIPPED WITH ROBERTSHAW 7000DERHC SERIES GAS VALVES (INTERMITTENT PILOT) FOR YOUR SAFETY READ BEFORE LIGHTING WARNING: If you do not follow these instructions exactly, a fire or explosion may result causing property damage, personal injury or loss of life. A. This appliance is equipped with an ignition device which automatically lights the pilot. Do not try to light the pilot by hand. If you cannot reach your gas supplier, call the fire department. C. Use only your hand to push in or turn the gas control knob. Never use tools. If the knob will not push in or turn by hand, don’t try to repair it, call a qualified service technician. Force or attempted repair may result in a fire or explosion. B. BEFORE LIGHTING smell all around the appliance area for gas. Be sure to smell next to the floor because some gas is heavier than air and will settle on the floor. WHAT TO DO IF YOU SMELL GAS Do not try to light any appliance. Do not touch any electric switch; do not use any phone in your building. Immediately call your gas supplier from a neighbor’s phone. Follow the gas supplier’s instructions. D. Do not use this appliance if any part has been under water. Immediately call a qualified service technician to inspect the appliance and to replace any part of the control system and any gas control which has been under water. OPERATING INSTRUCTIONS 1. STOP! Read the safety information above on this label. 5. Remove front access panel. 6. Rotate the gas control knob clockwise 2. Set the thermostat to lowest setting. to OFF. 7. Wait five (5) minutes to clear out any gas. Then smell for gas, including near the floor. If you then smell gas, STOP! Follow “B” in the safety information above on this label. If you don’t smell gas go to the next step. 3. Turn off all electric power to the appliance. 4. This appliance is equipped with an ignition device which automatically lights the pilot. Do not try to light the pilot by hand. 8. Rotate the gas control knob counter clockwise to “ON”. POSITION INDICATOR 9. Replace front access panel. 10. Turn on all electric power to the appliance. GAS INLET 11. Set thermostat to desired setting. 12. If the appliance will not operate, follow the instructions “To Turn Off Gas To Appliance” and call your service technician or gas supplier. ON OFF GAS CONTROL KNOB SHOWN IN "OFF" POSITION TO TURN OFF GAS TO APPLIANCE 1. Set the thermostat to lowest setting. 3. Push in gas control knob slightly and turn clockwise to “OFF”. Do not Force. 2. Turn off all electric power to the appliance if service is to be performed. 8 LIGHTING INSTRUCTIONS FOR BOILERS EQUIPPED WITH HONEYWELL VK8115 OR DUNGS GB-WND SERIES GAS VALVES (DIRECT SPARK) FOR YOUR SAFETY READ BEFORE LIGHTING WARNING: If you do not follow these instructions exactly, a fire or explosion may result causing property damage, personal injury or loss of life. A. This appliance does not have a pilot. It is equipped with an ignition device which automatically lights the burner. Do not try to light the burner by hand. B. BEFORE OPERATING smell all around the appliance area for gas. Be sure to smell next to the floor because some gas is heavier than air and will settle on the floor. WHAT TO DO IF YOU SMELL GAS • Do not try to light any appliance. • Do not touch any electric switch; do not use any phone in your building. • Immediately call your gas supplier from a neighbor's phone. Follow the gas supplier's instructions. • If you cannot reach your gas supplier, call the fire department. C. Use only your hand to turn the gas control knob. Never use tools. If the knob will not push in or turn by hand, don't try to repair it, call a qualified service technician. Force or attempted repair may result in a fire or explosion. D. Do not use this appliance if any part has been under water. Immediately call a qualified service technician to inspect the appliance and to replace any part of the control system and any gas control which has been under water. OPERATING INSTRUCTIONS ඞ 1. STOP! Read the safety information above on this label. 5. Turn the external boiler manual gas valve Thandle counterclockwise to open gas supply. 2. Set the thermostat to the lowest setting. 6. Smell for gas in the boiler enclosure. If you smell gas, STOP! Follow "B" in the safety information above. If you don't smell gas, go to the next step. 3. Turn off all electric power to the appliance. 4. This appliance is equipped with an ignition device which automatically lights the burner. Do not try to light the burner by hand. 7. Turn on all electric power to the appliance. 8. Set the thermostat to the desired setting. 9. The first digit of the control display panel will show a series of numbers that indicate the boiler control sequence. The number 3 or 4 means the burner is firing. The number 0 means there is no call for heat from the thermostat or the domestic water heater. 10. If the appliance will not operate, follow the instructions "To Turn Off Gas To Appliance" below and call your service technician or gas supplier. TO TURN OFF GAS TO THE APPLIANCE 1. Turn off all electric power to the appliance if service is to be performed. 3. Turn the external boiler manual gas valve Thandle clockwise to close the gas supply. 2. Set the thermostat to the lowest setting. 10 9 ඟ THIS PAGE INTENTIONALLY LEFT BLANK 10 Manufacturer of Hydronic Heating Products P.O. Box 14818 3633 I. Street Philadelphia, PA 19134 7HO)D[ZZZFURZQERLOHUFRP