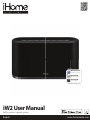
1
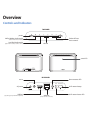
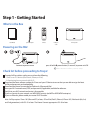
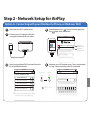
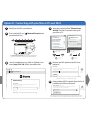
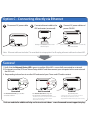
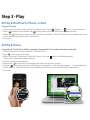
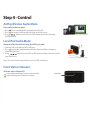
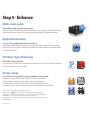
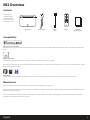
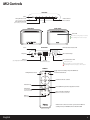
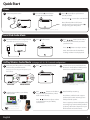
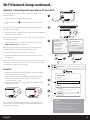
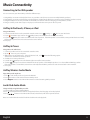
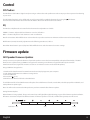
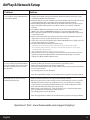
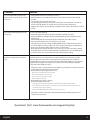
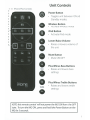
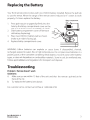
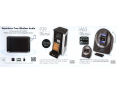
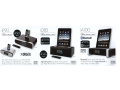
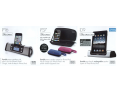
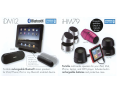
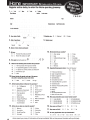
iW2 Start Guide SCAN How-To Videos Visit our website for additional help and how-to videos www.ihomeaudio.com/support/airplay/ Overview Controls and Indicators TOP PANEL power power iPod and iTunes music controls AirPlay Wireless Audio mode (audio via iOS device or iTunes) Local iPod Audio mode volume (play audio via USB sync cable or aux-in) status LED status aux-in network setup 12V 3A REAR PANEL aux-in firmware status LED status aux-in AC power network setup Wi-Fi network setup 12V 3A USB Port (Sync, Charge, Play and firmware updates) ethernet (direct network connection) Wi-Fi network status LED Step 1 - Getting Started What’s in the Box bass treble reset 9a Start Guide power adaptor remote USB sync cable iW2 Speaker Powering on the iW2 1 2 outlet 12V connect to power source press & hold power button (3 seconds) to power unit ON allow 20 seconds to allow system to startup Check list before proceeding to Step 2 To enjoy AirPlay wireless audio, you must have the following: - iTunes or an iOS device (iPod touch, iPhone, or iPad). - A functioning home network with Wi-Fi. Download the latest software updates for iTunes and your iOS device to ensure that you are able to enjoy the latest AirPlay enhancements and compatibility. Download the iHome Connect app for iPod touch, iPhone and iPad. Have your Wi-Fi network name (SSID) and password (if applicable) available for reference. Verify that your Wi-Fi network and router is discoverable. If you use security for your network, use WPA/WPA2 security (not WEP or WPA/WPA2 enterprise) If you use Ethernet, please enable your router DHCP function. Note: AirPlay requires iTunes 10.1 (Mac and PC) or later; OR an iPad, iPad 2, iPhone 4, iPhone 3GS, iPod touch (4th, 3rd, and 2nd generations) with iOS 4.2 or later. The iHome Connect app requires iOS 4.0 or later. Step 2 - Network Setup for AirPlay Option A - Connecting with your iPod touch, iPhone, or iPad over Wi-Fi 1 2 3 Verify that the iW2 is powered on. Download our free iHome Connect app from the App Store and launch. Connect your iOS device to the iW2 using the included USB sync cable. 10:09 PM 10:09 PM Connect Wi-Fi Not Connected Name iHome iW2 Select your Wi-Fi network Customize speaker name Select above to change the iW2 network settings and to set the name your speaker will use to appear pp on the Network Network. H How t use Ai to A AirPlay irPlay Pl y About iHome Connect 4 Select your preferred Wi-Fi network from the list of available networks. 5 Rename your iW2 speaker, press ‘Save’, and proceed to Step 3 if connected to your Wi-Fi network. 10:09 PM Settings 10:09 PM Wi-Fi Networks Cancel Not Connected Connected Status Status Name Save Choose a Network for iW2... Your Wi-Fi Network Livingroom Speaker Other Wi-Fi Network This name will be displayed when selecting your Other Wi-Fi Network speaker from a list of available AirPlay devices. Other Wi-Fi Wi Fi Network Other Wi-Fi Network 30-120s Q W E R T Y U I O P A S D F G H J K L Connecting to a network may take up to 2 minutes. Make sure you have your password ready. Z X C V B N M Option B - Connecting with your Mac or PC over Wi-Fi 1 Verify that the iW2 is powered on. 2 Press and hold (3 sec.) on the back of unit. 3 Network Setup button select the network called "iHome Setup ######" from Wi-Fi network settings on your Mac or PC. AirPort: On Turn AirPort Off iHome Setup ###### Your Wi-Fi network Another network Another network power status Currently connected to: YOUR Wi-Fi NETWORK Internet access iHome Setup ###### Join Other Nework... Create Network... Open Network Preferences... network setup upper right corner of Mac screen The Network Status LED will soon begin flashing green and the top control panel will also flash. 4 Launch a web browser (ex. Safari or Explorer) and enter http://192.168.1.12 in the address bar. 30s 5 Information sent over this network miight be visible to others. Connect Open Network and Sharing Center 9:42 01/15/2011 lower right corner of PC Screen 30s Rename the iW2 speaker and click ‘Save’. (optional) Device Name This name will be displayed when selecting your speaker from a list of available AirPlay devices. http://192.168.1.12 iHome Bedroom 15s Save If at any point the page becomes unresponsive, reload the page. If problem persists, see “Troubleshooting”. Network Setup Device Name This name will be displayed when selecting your speaker from a list of available ava ilable AirPl AirPlay ay y dev ices. ices devices. iHome iW2 6 Select preferred Wi-Fi network from the list of available and click ‘Join Network’. Current Network: iHome Setup Connect the iW2 speaker to the same network as your AirPlay source (iTunes, iPad, iPhone, or iPod touch). Available Networks Save Save - If the page is not initially available, reload the page. 30-120s Join Network If the Status LED continues to flash green for more than 2 minutes, reset the iW2 speaker and repeat the Wi-Fi Network Setup process. Option C - Connecting directly via Ethernet 1 Disconnect AC power cable. 2 Connect ethernet cable to the iW2 and router (or network). 3 Connect AC power cable and power ON iW2. 12V 12V directly connect to router or wall ethernet port press & hold power button (3 seconds) to power ON iW2 Note: Ethernet cable not included. To revert vert back to setup option A or B unplug ethernet cable and re-boot iW2. Success! 1. Verify that the Network Status LED is green to confirm if the iW2 is successfully connected to a network. 2. Disconnect your Mac/PC from “iHome Setup ######” and then connect your computer to the same network the iW2 is on. 3. Keep reading to learn how to use the iW2 and control your iTunes and iOS audio content. status network setup status network setup 12V Connected If the Network Status LED is green, the iW2 is connected to a network Not Connected If the Network Status LED is flashing red, the h iW2 iis not connected to a network because, either: - The iW2 has not been connected to a Wi-Fi network - There is a problem with your Wi-Fi network - Or, the iW2 is out of range Problem? Reset the iW2 Speaker: - Unplug power, wait 30 seconds then reconnect - Press & hold power button (3 seconds) - Repeat iW2 Wi-Fi Network Setup process if necessary Visit our website for additional help and instructional videos: www.ihomeaudio.com/support/airplay/ Step 3 - Play AirPlay & iPod touch, iPhone, or iPad Using an iOS device: 1. Connect yyour iOS device to the same Wi-Fi network as iW2. Go to Settings --> Wi-Fi on your iOS device. 2. Tap on iPod/Music app, look for the AirPlay button next to the iPod music transport controls. 3. Tap on the AirPlay icon and choose iW2 from the list of speakers. If the iW2 speaker is not available, restart your iOS device and verify that the iW2 is powered on. 4. Press play. AirPlay & iTunes Using a Mac or PC with iTunes (AirPlay streaming is designed for iTunes media and audio content only): 1. Connect your Mac or PC to the same Wi-Fi network as iW2. 2. Open iTunes on your computer. 3. Within iTunes open “Preferences”, Select the “Devices” tab, and activate the following option: “Allow iTunes control from remote speakers” 4. Click OK, close iTunes preferences. 5. Look for the AirPlay icon in the bottom right corner of the iTunes window. 6. Click the AirPlay icon and choose iW2 from the list of speakers. Click "Multiple Multiple Speakers..." to select additional AirPlay speakers. If the iW2 speaker is not available, restart iTunes and verify that the iW2 is powered on. 7. Press play. iHome iW2 speaker Step 4 - Control AirPlay Wireless Audio Mode Enjoy AirPlay audio anywhere: 1. Press to exit standby mode and power the iW2 ON. 2. Press for wireless audio mode and listen to AirPlay music. 3. Use buttons on the iW2 or iW2 remote to control streaming AirPlay content. Local iPod Audio Mode Charge and Play iPod & iPhone using iPod USB sync cable: 1. Connect USB sync cable to iW2’s USB port. 2. Press Local audio mode button and enjoy iPod and iPhone charging and audio playback. 3. Using buttons on the iW2 or iW2 remote in iPod mode will control your iPod music. (iPhone & sync charge stand not included) Note: Use Local Audio mode to play music via USB and Aux-in. Front Status Indicators iW2 front status indicator LED: Green when touching a button on the remote. Green, blinking when volume is muted. status LED Step 5 - Enhance Multi-room audio Add AirPlay-enabled speakers to any room iHome’s AirPlay solutions provide an affordable way to enjoy a truly wireless home audio experience anywhere you want; kitchen, bedroom, livingroom or patio. Apple Remote App Control iTunes playback anywhere in the house Download Apple’s Remote app free from the App Store to your iOS device and control your iTunes library and AirPlay speakers wirelessly when connected to the same Wi-Fi network. iOS Music App Streaming PANDORA® and iHeartRadio® Turn your iW2 system into an internet radio when you use AirPlay audio streaming with your favorite iOS music apps. iHome+Apps iW2 works with a suite of iHome apps available on the app store. - iHome Set - control iW2 features like EQ, Volume and more. - iHome Sleep - wake to custom alarms and music playlists. - iHome Radio - listen to radio stations from around the world. - iHome Connect - easy network setup for iHome speakers with AirPlay. © 2011 SDI Technologies Inc. All rights reserved. iHome and the logo are registered trademarks of SDI Technologies. AirPlay, iPad, iPhone, iPod touch, iPod, are registered trademarks of Apple Inc. PANDORA® is a registered trademark of Pandora Media Inc. iHeartRadio® is a registered trademark of Clear Channel Communications, Inc. Printed in China. iW2 09222011-A + Troubleshooting Problem Solution I am unable to connect the iW2 to my home Wi-Fi network. 1. Try using the free iHome Connect app. 2. Verify that your Wi-Fi network is functioning that the firmware of your router is up-to-date. 3. Verify that your router is discoverable. 4. Use Open or WPA/WPA2 Personal security settings (not WEP or Enterprise). 5. Make sure that the SSID name of your home router consists of normal characters or digits, with no space or special characters. 6. Move the iW2 closer to your network access point; the Wi-Fi signal is weak or the iW2 is out of range of your Wi-Fi network. 7. iW2 Hardware Reset: - Unplug & Reconnect AC cable. - Press & hold power button (3 seconds) to power iW2 ON. - Repeat Network Setup if necessary. I’ve successfully connected the iW2 to my home network, but I cannot select the iW2 speaker from iTunes or my iOS Device. 1. The iW2 speaker must be on the same network as your AirPlay source. 2. Verify you have the latest version of iTunes and/or iOS. 3. Try restarting iTunes or your iOS device. Note: The original iPhone, iPhone 3G, and iPod touch (1st generation) do not support AirPlay. I’ve selected the iW2 speaker as my AirPlay audio source, but I do not hear any music. 1. Verify that the volume is not muted or set to 0. 2. Verify that there is not another iTunes library or iOS device connected to the iW2 speaker. 3. Try restarting iTunes or your iOS device. The iW2 doesn’t respond or doesn’t turn ON. 1. Verify that the adaptor is connected and the power outlet is always ‘live’ (not controlled by a wall switch). 2. iW2 Hardware Reset: - Unplug & Reconnect AC cable, wait 30 seconds. - Press & hold power button (3 seconds) to power iW2 ON. Visit our website for additional help and instructional videos: www.ihomeaudio.com/support/airplay/ works with iHome Connect Wi-Fi Network Setup app iHome Sleep FREE alarm clock app iHome Radio Internet radio app available on the App Store works with iW2 User Manual AirPlay wireless speaker system English www.ihomeaudio.com Welcome to the iHome iW2 Thank you for choosing iHome. The Air Series represents the new frontier of product offerings from iHome that embrace Wi-Fi connectivity and AirPlay, Apple’s new wireless streaming technology. The iHome iW2 with AirPlay offers the latest experience in home audio entertainment allowing users to stream digital audio over Wi-Fi from iTunes, iPad, iPhone and iPod touch. Featuring SRS TruBass DSP technology, the iW2 offers high fidelity audio with a versatile, space-saving design. You can use the iW2 to: t Stream music directly from iTunes on your Mac or PC using your home Wi-Fi network t Stream your favorite music from your iPad, iPhone, or iPod touch from your iPod library or popular music apps like PANDORA® and iHeartRadio®, available on the App Store t Play and charge your iPad, iPhone, iPod with included USB sync cable t Add Multiple iHome AirPlay speakers to enjoy multi-room audio anywhere in the home (note: streaming to multiple speakers simultaneously requires iTunes as the source) t Download and enjoy iHome apps available on the App Store: - iHome Sleep, a free music alarm clock app - iHome Radio, an internet radio music app - iHome Connect, a network setup app for iHome AirPlay enabled products Keep reading to discover everything you need to know to get the most from your iHome iW2. English 2 iW2 Overview Contents 1. iW2 speaker 2. Power adaptor 3. USB sync cable 4. Remote control 5. Document pack bass treble reset 9a iW2 Speaker power adaptor USB sync cable remote Start Guide (Document Pack) Compatibility USB connector works with: iPod touch (1st, 2nd, 3rd, and 4th generation), iPod nano (2nd, 3rd, 4th, 5th, and 6th generation), iPhone 4, iPhone 3GS, iPhone 3G, iPad, and iPad2. AirPlay works with: iTunes, iPod touch (2nd, 3rd, and 4th generation), iPhone 4, iPhone 3GS, iPad 2, and iPad. For AirPlay, the iW2 must be connected to Wi-Fi with networked access to a Mac or PC running iTunes 10.1 or later; or an iPad, iPhone, or iPod touch running iOS 4.2 or later. iHome Apps: iHome Sleep and iHome Radio, and iHome Connect apps only work with iPad, iPhone, iPod touch and requires iOS 4.0 or later Maintenance Place the unit on a level surface away from sources of direct sunlight or excessive hear. Protect your furniture when placing your unit on a natural wood and lacquered finish. A cloth or other protective material should be placed between it and the furniture. Clean your unit with a soft cloth moistened only with mild soap and water. Stronger cleaning agents, such as benzene, thinner or similar materials can damage the surface of the unit. English 3 iW2 Controls TOP PANEL power power iPod and iTunes music controls AirPlay Wireless mode (audio via iOS device or iTunes) Local iPod Audio mode volume (audio via USB sync cable or aux-in) REAR PANEL FRONT PANEL status LED Green when touching a button on remote Green, blinking when volume is muted status aux-in network setup 12V 3A REAR PANEL aux-in firmware button & status LED status aux-in AC power network setup Wi-Fi network setup 12V 3A USB Port Wi-Fi network status LED ethernet (Sync, Charge, Play and firware update) (direct network connection) Master power is OFF Green, solid when connected to a Wi-Fi network Red, blinking when NOT connected to a Wi-Fi network REMOTE Toggle between standby and power ON mode AirPlay Wireless mode Local iPod Audio mode Volume and music controls Volume mute iPod shuffle & repeat music playback controls SFX button turn SRS TruBass DSP audio enhancement on/off bass treble Bass and treble adjustment default is 0 for both bass and treble reset EQ reset return eq setting to default 9a English NOTE: Power control on remote cycles between ON and standby modes; it will NOT turn the unit OFF or ON. 4 Quick Start Power 1 2 Connect to power source Press & hold power button (3 seconds) to power unit ON. 3 2 Press repeatedly to cycle between standby and ON. Press & hold (3 seconds) to turn iW2 OFF outlet Note: When the iW2 is OFF (not in standby mode) you must press & hold to begin using your iW2 speaker. 12V wait 20 seconds to allow system to startup Local iPod Audio Mode 1 2 Connect iPad/iPhone/iPod using iPod USB sync cable (iPod and aux-in play in parallel) Press for iPod mode 3 Press buttons on the iW2 or iW2 remote, in iPod mode, to control your iPod music. Press buttons to adjust volume. Note: Use iPod mode for both iPod docking and Aux-in audio playback. AirPlay Wireless Audio Mode 1 (visit pages 8-9 for Wi-Fi network configuration) Verify that your iW2 speaker is successfully connected to your Wi-Fi network. 2 Press for AirPlay wireless mode 3 (visit page 8 for connecting your iW2 speaker to your Wi-Fi network) status network setup Connected status network setup AirPlay only works with iPod touch, iPhone, iPad, or iTunes (Mac or PC) Not Connected AirPlay Wireless Audio Mode 4 Select the iHome iW2 as your AirPlay audio speaker iHome iW2 speaker Look for the AirPlay logo to select your speaker English Launch iTunes or use your iPad, iPhone, iPad touch. Verify iW2 and AirPlay source device is on same Wi-Fi network. 5 Press buttons on the iW2 or use your iTunes, iPad, iPhone, or iPod touch controls directly. Press buttons to adjust volume or control volume on your AirPlay source device. ! Note: for AirPlay streaming: iPad, iPhone, and iPod touch support point-to-point audio streaming to one AirPlay enabled speaker. iTunes supports point-to-multipoint audio streaming to up to three AirPlay enabled speakers (performance depends on your Wi-Fi network and environment). 5 Getting Started Master Power The iW2 has a master power mode control interface to power the unit ON or OFF, help conserve energy, and reboot the iW2 speaker. In order for the iW2 speaker to power ON, the unit must be connected to an AC outlet. Master Power ON - Press & hold Master Power OFF - Press & hold unit. Power Button (3 seconds) to boot-up and activate your iW2 speaker. Power Button (3 seconds) a second time to power the iW2 speaker OFF, conserve energy, and reset the Note: If the iW2 is in the Master Power OFF state the iW2 will not support iPad/iPod/iPhone charging, remote control commands, AirPlay, network setup, nor firmware updates. Powering your iW2 speaker ON To power the iW2 speaker ON: 1. Plug AC adaptor cable into the iW2 speaker, and plug adaptor into a live AC wall outlet. 2. Press & hold the Power button (3 seconds) to power the unit ON. Note: Allow 20 seconds for the speaker to startup before interacting with the iW2 speaker. 3. Press the Power button to switch between power ON and Standby mode. The iW2 speaker will power ON to AirPlay mode. 1 2 outlet 12V allow 20 seconds to allow system to startup Resetting your iW2 speaker Just like your computer, it is sometimes necessary to reset the iW2 speaker to make sure the unit is working properly. To reset and reboot the iW2 speaker: 1. Unplug AC adaptor and wait for 10 seconds then reconnect AC adaptor to the iW2 speaker. 2. Press & hold the Power button (3 seconds) to power the unit ON. Note: Allow 20 seconds for the speaker to startup before interacting with the iW2 speaker. The iW2 will store your network settings and automatically reconnect to your network if it is detected after being reset or unplugged from AC power. English 6 Using your iW2 Top panel controls The iW2 speaker has a backlit control interface for power, mode, volume, and music controls. Controls will be lit according to the status of the iW2 speaker and the selected mode. Note: Music transport controls will flash once to signal a proper press. TOP PANEL power power AirPlay Wireless mode iPod and iTunes music controls (audio via iOS device or iTunes) Local iPod Audio mode (play audio via USB sync cable or aux-in) volume Standby mode Standby Mode (master power is ON): power Press the Power button to place the iW2 speaker in standby mode and stop audio playback. Power ON modes iPod Mode (iPad/iPhone/iPod detected via USB connector): power iPod Mode (iPad/iPhone/iPod not detected via USB connector): power AirPlay Wireless Mode (connected to a network): power AirPlay Wireless Mode (not connected to a network): power Note: The AirPlay Wireless button will continuously flash on/off to indicate that the iW2 is not linked to a network when ON and in AirPlay Wireless mode. Volume Press English buttons to adjust volume. 7 Network Setup for AirPlay Check list Please verify the following steps before attempting to connect your iW2 speaker to a Wi-Fi network: To enjoy AirPlay wireless audio, you must have the following: - iTunes 10.1 or later on a Mac or PC. - iPad, iPhone, or iPod touch with iOS 4.2 or later. - A functioning home network with Wi-Fi. Download the latest software updates for iTunes and your iOS device to ensure that you are able to enjoy the latest AirPlay enhancements and compatibility. Download the iHome Connect app for iPod touch, iPhone and iPad. Have your Wi-Fi network name (SSID) and password (if applicable) available for reference. Verify that your Wi-Fi network and router is discoverable. If you use security for your network, use WPA/WPA2 security (not WEP or WPA/WPA2 enterprise) If you use Ethernet, please enable your router DHCP function. Connecting directly via Ethernet to you home network The iW2 has a dedicated Ethernet port that allows you to connect directly to your access point or home network without using Wi-Fi (Ethernet cable not included). 1 12V To setup your iW2 speaker via Ethernet: 1. Disconnect AC power cable. disconnecting 2. Connect ethernet cable to the iW2 and to access point router (or network). 2 3. Connect AC power cable and power ON iW2. Renaming your speaker: To rename your iW2 speaker when using a direct Ethernet connection you must use either our iHome Connect app or put the iW2 speaker into “iHome Setup” mode . Please refer to pages 9 & 10 to discover how to change the name of your iW2 speaker. directly connect to router or wall ethernet port Note: Unplug ethernet cable and re-boot iW2 first if you want to switch to Wi-Fi connection . reconnecting 3 Success! 1. Verify that the Network Status LED is green to confirm if the iW2 is successfully connected to a network. 2. Keep reading to learn how to use the iW2 and to control your iTunes and iOS audio content. status network setup status 12V press & hold power button (3 seconds) to power ON iW2 network setup Problem? Connected Not Connected Note: To begin using AirPlay wireless streaming, your AirPlay source devices must be connected to the same Wi-Fi network to which your iW2 speaker is connected. English Reset the iW2 Speaker: - Unplug & reconnect the AC power cable from back of the iW2 speaker - Press & hold power button (3 seconds) - Repeat iW2 Network Setup process if necessary - See Troubleshooting on page 13-16 for other tips. 8 Wi-Fi Network Setup Option A - Connecting with your iPod touch, iPhone, or iPad (Recommended) If you have an iPod touch, iPhone, or iPad with iOS 4.0 or later, we recommend that you use our free iHome Connect app for the quickest Wi-Fi network setup experience. 1 To connect your iW2 speaker to a Wi-Fi network using an iOS device, follow these steps: 12V 1. Connect AC power and power ON iW2 speaker. 1. Connect your iOS device to the iW2 using the included iPod USB sync cable. 2. Download our free iHome Connect app from the Store and launch the app. press & hold power button (3 seconds) to power ON iW2 App 2 3. Select your preferred Wi-Fi network from the list of available networks and enter password if prompted. Note: Connecting to a network may take up to 60 seconds. If network connection is unsuccessful reset the unit or disconnect your iOS device and reconnect and repeat the above steps. 4. Rename your iW2 speaker and press ‘Save’ (optional). Success! 3 10:09 PM 10:09 PM 6HWWLQJV :L)L1HWZRUNV &KRRVHD1HWZRUNIRUL: 1. Verify that the Network Status LED is green to confirm that the iW2 is successfully connected to a network. 2. Keep reading to learn how to use the iW2 and control your iTunes and iOS audio content. <RXU:L)L1HWZRUN Wi-Fi Not Connected Name iHome iW2 2E33 0RGHOL+RPHL:)LUPZDUH +RZWRXVH$LU3OD\ +RZ +RZWR WRXVH R XVH $LU3 $LU3OD\ OD\ \ 2WKHU:L)L1HWZRUN 2WKHU:L)L1HWZRUN 2WKHU:L)L1HWZRUN 2WKHU:L)L1HWZRUN Choose your Wi-Fi network from the available networks status network setup status and wait as the iW2 attempts to connect. network setup $ERXWL+RPH&RQQHFW 4 Connected 30s 10:09 PM 10:09 PM Cancel Name Save Not Connected Note: To begin using AirPlay wireless streaming, your AirPlay source devices must be connected to the same Wi-Fi network to which your iW2 speaker is connected. Livingroom Speaker Wi-Fi Your Wi-Fi Network Name iHome iW2 2E33 This name will be displayed when selecting your speaker from a list of available AirPlay devices. 0RGHOL+RPHL:)LUPZDUH Q W E R T Y U I O P +RZWRXVH$LU3OD\ A S D F G H J K L $ERXWL+RPH&RQQHFW Z X C V B N M Problem? Reset the iW2 Speaker: - Unplug & reconnect the AC power cable from back of the iW2 speaker - Press & hold power button (3 seconds) - Repeat iW2 Network Setup process if necessary - See Troubleshooting on page 13-16 for other tips. English 9 Wi-Fi Network Setup continued... Option B - Connecting with your Mac or PC over Wi-Fi To connect your iW2 speaker to a Wi-Fi network using a Mac or PC, follow these steps: 1 12V 1. Connect AC power and power ON iW2 speaker. 2. Press and hold (5 sec.) unit. press & hold power button (3 seconds) to power ON iW2 Network Setup button on the back of Note: The Network Status LED will begin flashing green and the top control panel will also flash. 2 power status network setup 3. On your Mac or PC, select the network called "iHome Setup ######" from Wi-Fi network settings. Note: This process can take up to 2 minutes. Be patient and refresh your network list if necessary. 3 Currently connected to: AirPort: On Turn AirPort Off 4. Launch a web browser (ex. Safari, Chrome, or Firefox) and enter http://192.168.1.12 in the address bar. YOUR Wi-Fi NETWORK Internet access iHome Setup ###### Your Wi-Fi network Another network Another network Note: If the page is not initially available or becomes unresponsive, reload the page. See “troubleshooting” if problem persists. iHome Setup ###### Information sent over this network might be visible to others. Connect Join Other Network... Create Network... Open Network Preferences... Open Network and Sharing Center 9:42 01/15/2011 5. Rename the iW2 speaker and click ‘Save’. (optional) upper right corner of Mac screen 6. Select preferred Wi-Fi network from the list of available and click ‘Join Network’. Note: Connecting to a network may take up to 120 seconds. If network connection is unsuccessful reset the unit or disconnect your iOS device and reconnect and repeat the above steps. 30s 30s 4 lower right corner of PC Screen KWWS Success! 1. Verify that the Network Status LED is green to confirm if the iW2 is successfully connected to a network. 2. Disconnect from “iHome Setup ######” from your Wi-Fi network setting and connect your Mac/PC to the same network you connected the iW2 speaker. 3. Keep reading to learn how to use the iW2 and control your iTunes and iOS audio content. 1HWZRUN6HWXS Device Name 5 This name will be displayed when selecting your speaker from a list of available AirPlay devices. Customize the name of your speaker iHome iW2 15s Save &XUUHQW1HWZRUN status network setup status network setup 6 Connect the iW2 speaker to the same network as your AirPlay source (iTunes, iPad, iPhone, or iPod touch(. Select your Wi-Fi network from list st Available Networks -RLQ1HWZRUN 30-120s 200s Connected Note: To begin using AirPlay wireless streaming, your AirPlay source devices must be connected to the same Wi-Fi network to which your iW2 speaker is connected. English 9LHZ1HWZRUN'HWDLOV 9LHZ1 9LHZ 9L 1 W 1HWZR UN UN'H N 'H ' WDLOV W LO Not Connected Problem? Reset the iW2 Speaker: - Unplug & reconnect the AC power cable from back of the iW2 speaker - Press & hold power button (3 seconds) - Repeat iW2 Network Setup process if necessary - See Troubleshooting on page 13-16 for other tips. 10 Music Connectivity Connecting to the iW2 speaker You can connect to your iHome iW2 speaker four different ways: 1. Using AirPlay® to stream wirelessly from iTunes on your Mac or PC (iTunes can stream to multiple AirPlay speakers). 2. Using AirPlay® to stream wirelessly from your iPad, iPhone, and iPod touch (iOS devices stream to only one AirPlay speaker at a time). 3. Using the USB port on the rear panel with an iPod USB sync cable for audio and charging your iPad, iPhone, or iPod. 4. Using an auxiliary audio device (mp3 or CD player) connected to the aux-in port on the rear panel. AirPlay & iPod touch, iPhone, or iPad Using an iOS device: 1. Connect your iOS device to the same Wi-Fi network as iW2. Go to Settings --> Wi-Fi on your iOS device. 2. Tap on iPod/Music app, look for the AirPlay button next to the iPod music transport controls. 3. Tap on the AirPlay icon and choose iW2 from the list of speakers. If the iW2 speaker is not available, restart your iOS device and verify that the iW2 is powered on and connected to the same network. 4. Press play. AirPlay & iTunes Using a Mac or PC with iTunes: 1. Connect your y Mac or PC to the same Wi-Fi network as iW2. 2. Open iTunes on your computer. 3. Within iTunes open “Preferences”, Select the “Devices” tab, and activate the following option: “Allow iTunes control from remote speakers” 4. Click OK, close iTunes preferences. 5. Look for the AirPlay icon in the bottom right corner of the iTunes window. 6. Click the AirPlay icon and choose iW2 from the list of speakers. Click "Multiple Speakers..." to select additional AirPlay speakers. If the iW2 speaker is not available, restart iTunes and verify that the iW2 is powered on and connected to the same network. 7. Press play. AirPlay Wireless Audio Mode Enjoy AirPlay audio anywhere: 1. Press to exit standby mode and power the iW2 ON. 2. Press for wireless audio mode to listen to AirPlay music. 3. Use buttons on the iW2 or iW2 remote to control streaming AirPlay content. Local iPod Audio Mode Charge and Play using iPod USB sync cable: 1. Connect USB sync cable to iW2’s USB port. 2. Press Local Playback mode button and enjoy iPod, iPhone, iPad charging and audio playback. 3. Using buttons on the iW2 or iW2 remote, in iPod mode, will control your iPod music. Note: Use Local iPod Audio mode for both iPod and Aux-in audio playback. English 11 Control SRS TruBass The iW2 features SRS TruBass® digital sound processing to enhance the audio performance and ensure proper bass response when listening to your music. The SRS TruBass function is on by default and can only be turned off or on with the IR remote by pressing the The Front Status LED will flash Green when the SRS TruBass effect is turned OFF or ON via the remote. SFX button. EQ The iW2 has an EQ feature that is controlled via the remote that adjusts Bass and Treble. TREBLE +/- buttons: Adjust treble levels between -5 and +5. Default is 0 BASS +/- buttons: Adjust bass levels between -5 and +5. Default is 0 Note: The Front Status LED will flash Green 3 times when the eq reaches maximum or minimum and then return to last status settings. RESET button (remote): Resets EQ adjustments to the following state: Bass: 0, Treble: 0. Note: When Reset button is pressed, Top Panel LEDs will flash 2 times and then return to last status settings. Firmware update iW2 Speaker Firmware Updates It may be necessary to update the firmware of your iW2 speaker to ensure the latest compatibility and optimal functionality. The iW2’s firmware can be updated using a USB Mass Storage device containing a new firmware image downloaded by the user from www.ihomeaudio.com (register for an iHome account on our website to receive emails about FW updates). Using a USB Mass Storage device: 1. Download the latest firmware from www.ihomeaudio.com/airplay/support to your computer. 2. Load downloaded firmware to a USB mass storage device. 3. Connect USB device 4. Press & Hold (5 sec). 5. iW2 will scan for firmware file local to the USB device. If a valid firmware file is found, iW2 firmware will update. If no valid firmware is found, reset the iW2, reload the proper file on USB stick, and attempt firmware update again. Note: You will need to reconnect the iW2 speaker to your home network after a firmware update. During Firmware Update: When firmware is being updated, all top panel controls icons will light (left to right) indicating progress of the firmware update installation. All buttons are inactive except for the firmware button. If firmware update is successful, a confirmation (positive) tone will sound. installation = 0% English 50% 100% 12 Troubleshooting Quick tips for problems with network setup: 1. Verify that your router is discoverable (must broadcast itself and not require user to type in the exact name). Verify that the firmware of your router is up-to-date. 2. Must use WPA/WPA2 security (not WEP, or WPA/WPA2 enterprise). 3. Try moving the iW2 closer to your access point (within 10-6 ft) during network setup. Sometimes multiple Wi-Fi networks are create interference. 4. Try using our free and easy-to-use iHome Connect app available on the App Store. 5. Use the Safari browser (Apple’s software tends to work best with its own technology). 6. Refresh the iHome Setup webpage (http://192.168.1.12) and selecting available networks a few times until it shows up. 7. Make sure that the SSID name of your home router consists of normal characters or digits, with no space or special characters like %/#/* inserted. 8. Reset your router and start network setup over again. 9. iW2 Reset: Sometimes you simply need to reset the iW2 and start network setup over again. - Disconnect the AC cable, wait for two minutes - Reconnect the AC cable, then press and hold power for 3 seconds - Repeat iW2 Network Setup process if necessary I want to find the iW2’s MAC address: Some network configurations may require you to know the iW2's MAC address. Follow these steps to determine your iW2's MAC address: 1. Turn on iW2, press and hold network setup button for 4 seconds, and wait for about 60 seconds. From your computer, connect to the network named "iHome Setup ######" 2. On a Mac, open the "Terminal" application. On a PC, click Start -> Run, type "cmd" and click OK . 3. When the prompt appears, type "arp -a" and press Enter. 4. You may get a long list of items in response. Please find the line that reads similar to "ihome-iW2-e52431.local (192.168.1.12) at c8:d5:fe:e5:24:31 on en1 [ethernet]" where the six hexadecimal pairs (c8:d5:fe:e5:24:31 in this example) represent the MAC address for your iW2. 5. You can use this MAC address in your network's setup to allow the iW2 on your network. Network setup when using a hidden SSID: Setting up iW2 requires you to unhide your SSID. Don't worry, this is only temporary. You can use your router's settings to change your security settings to un-hide your network's SSID. After doing so, the iW2 will be able to detect, select, and join your network. Once the network setup is completed, you can re-hide your network's SSID. The iW2 will remain connected to your network after hiding your SSID. Questions? Visit www.ihomeaudio.com/support/airplay English 13 AirPlay & Network Setup Problems Solution I am unable to connect the iW2 to my home Wi-Fi network. 1. Verify that your Wi-Fi network is functioning and Wi-Fi certified. This device is only compatible with Wi-Fi certified routers. 2. Move the iW2 closer to your network access point; the Wi-Fi signal is weak or there are overlapping Wi-Fi signals or the iW2 is out of range of your Wi-Fi network. 3. Enable SSID broadcast (un-hide network) on the Wi-Fi router. Once you have successfully connected the iW2 speaker to your Wi-Fi network, you can then re-hide the network. 4. Use a WPA or WPA2 Personal key for security. We do not recommend the use of any WEP key for security and WPA/WPA2 enterprise is not compatible with AirPlay. 5. Keep away from potential sources of interference which may affect Wi-Fi signal, such as microwave ovens. 6. Make sure that the SSID name of your home router consists of normal characters or digits, with no space or special characters like %/#/* inserted. 7. If you choose to rename the AirPlay device ‘iHome iW2 XXXX’ in the settings menu, do not use special characters or symbols. 8. Reset the iW2 Hardware and repeat network setup: - Unplug & reconnect the AC power cable from the back of the iW2 speaker. - Press & hold power button (3 seconds) to turn the iW2 speaker on and wait 20 seconds for the unit to startup. - Repeat iW2 Wi-Fi Network Setup process if necessary 9. If the problem remains, it is strongly recommended to use our free iHome Connect app for your iPod Touch/iPhone/iPad to do the first time Wi-Fi setup as some PC settings may affect the Wi-Fi network setup. I’ve successfully connected the iW2 to my home network, but I cannot select the iW2 speaker from iTunes or from my iOS device. 1. The iW2 speaker must be on the same network as your AirPlay source. 2. Verify you have the latest version of iTunes and/or iOS. 3. Disable the firewall software and security software, which may block ports that AirPlay uses to stream content. 4. Try restarting iTunes or your iOS device. Note: The original iPhone, iPhone 3G, and iPod touch (1st gen) do not support AirPlay. No AirPlay icon in iTunes or on my iPad/iPhone/iPod touch 1. Make sure that the device has already joined the AirPlay network. 2. Before you open iTunes, make sure that you have enabled Bonjour service in your PC. Take Windows XP for example: to enable the service, you can click Start->Settings>Control Panel, and doubleclick Administrative Tools-> Services->Bonjour Service, then click Start followed by OK on the pop-up menu. 3. Within iTunes open “Preferences”, Select the “Devices” tab, and activate the option that says “Allow iTunes control from remote speakers.” 4. Try restarting iTunes or your iOS device. Note: The original iPhone, iPhone 3G, and iPod touch (1st gen) do not support AirPlay. Questions? Visit www.ihomeaudio.com/support/airplay/ English 14 Problems Solution I’ve selected the iW2 speaker as my AirPlay audio source, but I do not hear any music. 1. Verify that the volume is not muted or set to 0. 2. Verify that there is not another iTunes library or iOS device connected to the iW2 speaker. 3. Try restarting iTunes or your iOS device. 4. Try restarting your iW2 by pressing and holding the power button for 3 seconds to turn the unit off. Wait for 10 seconds, then repeat to turn the unit back on. 5. Upgrade the software on your AirPlay compatible device (iTunes, iPad, iPhone, or iPod touch). Occasional breaking of AirPlay music streaming. Do one or all of the following: 1. Enable the Auto Channel Scan option (if available on the Wi-Fi router). 2. Enable the Wireless Intelligent Stream Handling (WISH) option (if available on the Wi-Fi router). 3. Enable the Quality of Service (QoS) option (if available on the Wi-Fi router). 4. Move your iW2 speaker closer to your Wi-Fi access point. 5. Change network security settings to WPA (WPA2) Personal. WEP is known to cause issue with AirPlay streaming and we do not recommend this legacy security format. 6. Restart your iPod Touch/iPhone/iPad or iTunes or iW2 speaker. 7. Browsing Internet content like news, music, video, etc. via your home Wi-Fi network from other Wi-Fi devices may affect the AirPlay performance. In case of AirPlay break or disconnection, it is recommended to stop or limit Internet surfing. Problems using the iHome Connect app. Sometimes there is an authentication error with an iOS device (common to any iOS accessory) that causes the device running the iHome Connect app to be unable to detect the iW2. The user may correctly connect the iW2 with the USB sync cable, but the app will keep showing the message “Please connect your iHome AirPlay compatible device with an iPod USB sync cable”. 1. Verify sync cable is connected to the rear USB port on the iW2 and securely connected to your iOS device (iPad, iPhone, iPod touch) 2. Restart iHome Connect app (takes 10 sec.) - Exit app and double tap home button - Press & hold iHome Connect app - Close app and exit app manager - Restart iHome Connect 3. Restart iOS device (takes 1 minute) 4. Restart iW2 (takes 30 seconds) - Unplug & reconnect the AC power cable from back of the iW2 speaker. - Press & hold power button (3 seconds) to turn the iW2 speaker on and wait 20 seconds for the unit to startup. - Repeat iW2 Wi-Fi Network Setup process if necessary Note: iHome Connect only works when docked with iHome AirPlay products and requires iOS 4.0 to work. Questions? Visit www.ihomeaudio.com/support/airplay/ English 15 General Problems Solution The iW2 doesn’t respond or doesn’t turn ON. 1. Verify that the adaptor is connected and the power outlet is always ‘live’ (not controlled by a wall switch). 2. Reset the iW2 Hardware: - Unplug & reconnect the AC power cable from back of the iW2 speaker. - Press & hold power button (3 seconds) to turn the iW2 speaker on and wait 20 seconds for the unit to startup. No sound. 1. Verify that the volume is not muted or set to 0. 2. Verify the mode (AirPlay Wireless or iPod mode). 3. Verify iPod or iPhone is properly connected with the USB sync cable and connected to the iW2’s USB port. 4. Verify that there is not another iTunes library or iOS device connected to the iW2 speaker. 5. Check the network connection. Set up the network again if needed. 6. Try restarting iTunes or your iOS device. iPad/iPhone/iPod doesn’t charge or play audio in iPod mode. 1. iPad/iPhone/iPod is not docked properly – Disconnect your iPad/iPhone/iPod from the USB sync cable and check for obstruction on the connectors in the USB sync cable, on your iPad/iPhone/iPod, or USB port on the iW2. 2. Reset your iPhone/iPod - Please see the user manual or the Apple web site for details. Typically, holding the sleep button and the home button on a newer iPad, iPhone or iPod will reset it. 3. Upgrade the software on your iPad, iPhone or iPod to the latest version by connecting it to a computer with iTunes installed and checking through iTunes that your unit has the most recent software. Update if needed. 4. Verify that the iW2 is compatible with your iPod or iPhone: iPod touch (1st, 2nd, 3rd, and 4th generation), iPod nano (2nd, 3rd, 4th, 5th, and 6th generation), iPhone 4, iPhone 3GS, and iPhone 3G. Sound crackles, is distorted, has a loud hum or buzzing. 1. Turn the iPod device or other source component’s volume down. 2. Make sure that the iPod’s device EQ setting is set to “OFF.” 3. Make sure that the USB sync cable is plugged all the way into your iPad, iPhone, or iPod and connected all the way to the iW2’s USB port. 4. Make sure that the audio cable is plugged all the way into the iW2’s Aux Input jack. Replace the aux-in cable or iPod sync cable. 5. Unplug the power supply and connect it to a different AC outlet. 6. Move unit away from potential sources of interference, such as microwave ovens, fluorescent lights, etc. Questions? Visit www.ihomeaudio.com/support/airplay/ English 16 FAQ’s What is AirPlay? AirPlay is a wireless audio and video platform designed by Apple to stream digital media over a home network (Wi-Fi or Ethernet). AirPlay is built-in to iTunes and the iPad, iPhone, and iPod touch running the latest software. For AirPlay enabled speakers, this means: 1. Consumers can stream their iTunes music to our iW2 AirPlay enabled speaker, their Apple TV, or other AirPlay enabled speakers. 2. iPad/iPhone/iPod touch owners can stream their iPod music AND audio content from other music apps like Pandora and iHeartRadio to our iW2 AirPlay enabled speaker, their Apple TV, or other AirPlay enabled speakers. 3. iTunes is unique because a user can stream whatever is playing in iTunes to multiple speakers around the house. 4. iOS devices (iPad/iPhone/iPod touch) can only stream to one AirPlay enabled device at a time. What other equipment do I require to use iW2 with AirPlay? Using the iHome iW2 with AirPlay requires a Mac or PC running iTunes (10.1 or later), or an Apple iOS device running iOS (4.2 or later) connected to the same network. Typically, a network will consist of a Wi-Fi router or hub. What devices are compatible with AirPlay? AirPlay works with iPod touch (2nd, 3rd, and 4th generation), iPhone 4, iPhone 3GS, iPad 2, iPad with iOS 4.2 and iTunes 10.1 (Mac or PC) or later. What Apple devices are compatible with iW2’s USB connector? iW2 supports USB docking for iPhone and iPod for audio and charging with included USB sync cable. The USB connector works with iPod touch (1st, 2nd, 3rd, and 4th generation), iPod nano (2nd, 3rd, 4th, 5th, and 6th generation), iPhone 4, iPhone 3GS, iPhone 3G, iPad 2, and iPad. Can I stream audio wirelessly to the iW2 without a network connection? No, the iW2 and AirPlay audio source must be connected to the same Wi-Fi network via a router or hub. Can I stream video wirelessly to iW2? No, only audio streaming is supported. Does the iW2 have an AUX-input for my TV or other audio device? Yes, the iW2 can be used as a speaker system with many products that have headphone, stereo RCA or optical audio outputs (cable not included). How many iHome iW2 units can I stream to at once? This will depend on your network equipment capabilities and set-up. For Mac/PC with iTunes with a high performance network, up to three iHome iW2’s may be used. An iPad, iPhone, or iPod touch can only stream to a single iW2 speaker. What Wi-Fi technologies does iW2 support? The iW2 is Wi-Fi certified to work with networks that use the 802.11b/g wireless standards. What network security types does the iW2 support? The iW2 supports the following security types: Open, WPA Personal (-PSK), WPA2 Personal (-PSK). iHome does not recommend using iW2 on security networks configured with WEP security due to inconsistencies in compatibility with that aging security standard. The iW2 does not support WPA/WPA2 Enterprise security types. For instructions on changing security types of your home network, refer to your Wi-Fi access-point's documentation. For best results, ensure your Wi-Fi access point is WiFi-certified and is configured to support 802.11g communications. English 17 Consumer Product Safety Guide Safety Instructions FCC Radiation Exposure Statement 1. FCC ID: EMOiW2. IC: 986B-iW2 This equipment complies with FCC RF radiation exposure limits set forth for an uncontrolled environment. This transmitter must not be co-located or operating in conjunction with any other antenna or transmitter. Water and Moisture – The unit should not be used near water. For example: near a bathtub, washbowl, kitchen sink, laundry tub, swimming pool or in a wet basement. 2. Ventilation – The unit should be situated so that its location or position does not interfere with its proper ventilation. For example, it should not be situated on a bed, sofa, rug or similar surface that may block ventilation openings. Also, it should not be placed in a built-in installation, such as a bookcase or cabinet, which may impede the flow of air through the ventilation openings. 3. Heat – The unit should be situated away from heat sources such as radiators, heat registers, stoves or other appliances (including amplifiers) that produce heat. 4. Power Sources – The unit should be connected to a power supply only of the type described in the operating instructions or as marked on the appliance. 5. Power Cable Protection – Power supply cables should be routed so that they are not likely to be walked on or pinched by items placed upon or against them. It is always best to have a clear area from where the cable exits the unit to where it is plugged into an AC socket. 6. Cleaning – The unit should be cleaned only as recommended. See the Maintenance section of this manual for cleaning instructions. 7. Objects and Liquid Entry – Care should be taken so that objects do not fall and liquids are not spilled into any openings or vents located on the product. 8 Attachments – Do not use attachments not recommended by the product manufacturer. 9 Lightning and Power Surge Protection – Unplug the unit from the wall socket and disconnect the antenna or cable system during a lightning storm or when it is left unattended and unused for long periods of time. This will prevent damage to the product due to lightning and power-line surges. 10. Overloading – Do not overload wall sockets, extension cords, or integral convenience receptacles as this can result in a risk of fire or electric shock. 11. Damage Requiring Service – The unit should be serviced by qualified service personnel when: A. B. C. D. E. the power supply cable or plug has been damaged. objects have fallen into or liquid has been spilled into the enclosure. the unit has been exposed to rain. the unit has been dropped or the enclosure damaged. the unit exhibits a marked change in performance or does not operate normally. 12. Antenna – Do not connect an external antenna to the unit (other than that provided). 13. Periods of None Use – If the unit is to be left unused for an extended period of time, such as a month or longer, the power cable should be unplugged from the unit to prevent damage or corrosion. 14. Servicing – The user should not attempt to service the unit beyond those methods described in the user’s operating instructions. Service methods not covered in the operating instructions should be referred to qualified service personnel. This Device complies with RSS-210 of the IC Rules; Operation is subject to the following two conditions: 1. This device may not cause interference and 2. This device must accept any interference received, including interference that may cause undesired operation This device complies with FCC radiation exposure limits set forth for an uncontrolled environment and it also complies with Part 15 of the FCC RF Rules. Operation is subject to the following two conditions: (1) this device may not cause harmful interference, and (2) this device must accept any interference received, including interference that may cause undesired operation. (FCC15.19) Le présent appareil est conforme aux CNR d'Industrie Canada applicables aux appareils radio exempts de licence. L'exploitation est autorisée aux deux conditions suivantes : (1) l'appareil ne doit pas produire de brouillage, et (2) l'utilisateur de l'appareil doit accepter tout brouillage radioélectrique subi, même si le brouillage est susceptible d'en compromettre le fonctionnement. The device meets the exemption from the routine evaluation limits in section 2.5 of RSS 102 and compliance with RSS-102 RF exposure, users can obtain Canadian information on RF exposure and compliance. Le dispositif rencontre l'exemption des limites courantes d'évaluation dans la section 2.5 de RSS 102 et la conformité à l'exposition de RSS-102 rf, utilisateurs peut obtenir l'information canadienne sur l'exposition et la conformité de rf. This equipment complies with the limits for a Class B digital device as specified in Part 15 of FCC Rules. These limits provide reasonable protection against radio and TV interference in a residential area. However, your equipment might cause TV or radio interference even when it is operating properly. To eliminate interference you can try one or more of the following corrective measures: t3FPSJFOUPSSFMPDBUFUIFSFDFJWJOHBOUFOOB t*ODSFBTFUIFEJTUBODFCFUXFFOUIFFRVJQNFOUBOEUIFSBEJPPS57 t6TFPVUMFUTPOEJõFSFOUFMFDUSJDBMDJSDVJUTGPSUIFFRVJQNFOUBOEUIFSBEJPPS57 t$POTVMUZPVSEFBMFSPSBOFYQFSJFODFESBEJPUFMFWJTJPOUFDIOJDJBOJGUIFQSPCMFN still exists. Modifying or tampering with your system’s internal components can cause a malfunction and might invalidate the system’s warranty and void your FCC authorization to operate it. The separation distance between the equipment and the user shall not be less than 20 cm This Class B digital apparatus complies with Canadian ICES-003. Cet appareil numérique de la classe B est conforme à la norme NMB-003 du Canada. .is a registered trademark of SRS Labs, Inc. TruBass technology is incorporated under license from SRS Labs, Inc. SRS WOW®, which features TruBass®, significantly improves the playback quality of audio, delivering a dynamic 3D entertainment experience with deep, rich bass and high frequency clarity for crisp detail English 18 Warranty Limited 1 Year Warranty Information iHome, a division of SDI Technologies Inc. (hereafter referred to as SDI Technologies), warrants this product to be free from defects in workmanship and materials, under normal use and conditions, for a period of 1 Year from the date of original purchase. Should this product fail to function in a satisfactory manner, it is best to first return it to the store where it was originally purchased. Should this fail to resolve the matter and service still be required by reason of any defect or malfunction during the warranty period, SDI Technologies will repair or, at its discretion, replace this product without charge (except for a $30.00 charge for handling, packing, return UPS/postage, and insurance). This decision is subject to verification of the defect or malfunction upon delivery of this product to the Factory Service Center listed below. The product must include proof of purchase, including date of purchase. The fee for service without proof of purchase is $75.00. Before returning this product for service: Before returning this product for service, please check our support section at www.ihomeaudio.com/support or call our customer service team to resolve any problems you may be experiencing. Disclaimer of Warranty: NOTE: This warranty is valid only if the product is used for the purpose for which it was designed. It does not cover (i) products which have been damaged by negligence or willful actions, misuse or accident, or which have been modified or repaired by unauthorized persons; (ii) cracked or broken cabinets, or units damaged by excessive heat; (iii) damage to digital media players, computers, routers, CD’s or tape cassettes (if applicable); (iv) the cost of shipping this product to the Factory Service Center and its return to the owner. This warranty is valid only in the United States of America and does not extend to owners of the product other than to the original purchaser. In no event will SDI Technologies or any of its affiliates, contractors, resellers, their officers, directors, shareholders, members or agents be liable to you or any third party for any consequential or incidental damages, any lost profits, actual, exemplary or punitive damages. (Some states do not allow limitations on implied warranties or exclusion of consequential damages, so these restrictions may not apply to you.) This warranty gives you specific legal rights, and you may also have other rights which vary from state to state. If service is still required: 1. Pack unit in a well padded, heavy corrugated box. 2. Enclose a photocopy of your sales receipt, credit card statement, or other proof of the date of purchase, if within the warranty period. Your acknowledgment and agreement to fully and completely abide by the above mentioned disclaimer of warranty is contractually binding to you upon your transfer of currency (money order, cashier's check, or credit card) for purchase of your SDI Technologies product. 3. Enclose a check or money order payable to the order of SDI Technologies, for the sum of $30.00 ($75.00 without proof of purchase). 4. Send the unit prepaid and insured, to the Factory Service Center listed below. Consumer Repair Department SDI Technologies Inc. 1330 Goodyear Dr. El Paso, TX 79936-6420 Questions? Visit www.ihomeaudio.com/support/airplay Toll Free Customer Service: 1-800-288-2792 ©SDI Technologies 2011 All rights Reserved. English is a registered trademarks of SRS Labs, Inc. TruBass technology is incorporated under license from SRS Labs, Inc. SRS WOW®, which features TruBass®, significantly improves the playback quality of audio, delivering a dynamic 3D entertainment experience with deep, rich bass and high frequency clarity for crisp detail. 19 • I AIR SERIES www.ihomeaudio.com Rz14 remote control instruction booklet Unit Controls - - - iPhone/iPod Controls Power Button • Toggles unit between ON and Standby modes. Wireless Button • Activate wireless mode e iPod Button • Activate iPod mode Lower/Raise Volume • Raises or lowers volume of the unit Mute Button • Mute ON/OFF Plus/Minus Bass Buttons bass • Raises and lowers bass settings Plus/Minus Treble Buttons treble • Raises and lowers treble settings NOTE: this remote control will not power the iW2 ON from the OFF state. To turn the iW2 ON , press and hold the Power Button on the iW2 for 3 seconds. 1 SFX Button • Togg les special audio effects on the unit (Expanded bass, etc.) ON or OFF. Reset Button • Qu ickly resets bass and treble to default settings iPhone/iPod Controls Play/Pause Button • Switches iPhone or iPod between Play and Pause modes Track Buttons • Skip to next or previous track • HOLD to scan reverse or forward within a track Shuffle Button • Play tracks random ly from the selected playlist Repeat Button • Repeat the currently playing track NOTE: this remote control may have features and functions that don't apply to or work with your particular iHome model. 2 Replacing the Battery Your Rz14 remote control comes with one CR2032 battery installed. Remove the pu ll tab to use the remote. When the range of the remote seems reduced or if it ceases to work properly, it's time to replace the battery. 1. 2. 3. 4. Press point of a pin or paperclip firmly into the hole by the battery compartment cover on the rear of the remote control to release the cover. Slide battery compartment cover off (remove old battery if replacing). Place new CR2032 in battery well as shown (make sure+ side is facing up). Replace battery compartment cover. WARNING: Lithium batteries can explode or cause burns if disassembled, shorted, recharged, exposed to water, fire, or high temperatures. Do not place loose batteries in a pocket, purse, or other container containing metal objects, mix with used or other battery types, or store with hazardous or combustible materials. Store in cool, dry, ventilated area. Follow applicable laws and regulations for transport and disposal. Troubleshooting Problem: Remote doesn't work Solutions: A Make sure you are within 15 feet of the unit and that the remote is pointed at the front of the unit. · B. Try replacing the battery (see above). For customer service, contact us toll free at 1-800-288-2792 Rz141B-09122011-A Printed in china 3 To ensure your AirPlay device and your iHome work together, follow these 3 tips to avoid common problems: Wi-Fi Network General Issues 1. Verify that your router's firmware is up-to-date. 2. Older model Wi-Fi routers are not fully optimized to stream AirPlay content. Consider updating your Wi-Fi router if your having streaming issues to ensure the best AirPlay streaming experience. 3. Verify that your secured network is using WPA or WPA2 personal encryption. WEP and Enterprise encryption is not supported by AirPlay technology. AirPlay & iOS for iPod touch, iPhone, or iPad General Issues 1. Verify that the firmware of your iPod touch, iPhone or iPad is up-to-date. 2. Restart your iOS device after you connect the iHome AirPlay speaker to your network. AirPlay & iTunes General Issues 1. Verify that iTunes is up-to-date and running the latest version. 2. Restart iTunes after you connect the iHome AirPlay speaker to your network. 3. Verify that you activate"AIIow iTunes control of remote speakers" from iTunes: Preferences> Devices Still have Problems? Visit our website: or email us at: www.ihomeaudio.com/support/airplay [email protected] Experience True Wireless Audio Introducing the iWl AirPia~ wireless audio system with rechargeable battery ~~~JI I I -a For more deto1ls. vis1! www.ihomeo~d~o com/ d1scover/o1rp1oy/ iP39 iA63 ...... lot fa iPod t:J iPhone iA63B Dual kitchen timer alarm/dock radio speaker system for iPhane/iPad w ith USB charging ~~----------~and magnetic remote control 1 App-enhanced alarm clock FM radio stereo speaker system with motorized rotating dock for iPhone/iPod iD85 iP90 M... b ~ iPod r.l iPhone iAlOO ........ 5} iPod !J iPhone O iPad aO N GIOVI l_~:.'s l ~ -- -• T• c• >•e•lfl The stereo clock radio for your iPhone/iPod. Ploy, charge, &woke/sleep to your iPhone/ iPod! Dual alarm, EQ function & radio presets. App-enhanced dual alarm clock radio for your iPod/iPhone/iPod with AM/FM presets. , =r= , Bluetooth® alarm clock with FM radio for iPod/iPhone/iPod. App-enhanced for wake, sleep, & internet radio. iPl6 _,. ~ iPod IJ iPhone iP37 M•clefOt ~ iPod iD9 t:l iPhone Also available with built-in alarm dock as iP38 works with ;.1 iHome+Sieep fRE.E okum dod. opp P1 iHome+Radio l&J '"~~rr141t 1adf0 opp •D9S Portable stereo speakers with ala rm clock for iPhone®/iPod®. Charge, w ake & sleep to iPhone/iPod. Portable stereo speaker system for iPhone/iPod. Ploy & charge your iPhone/iPod in this ...-:-=-:-....,...,...,.,.,..., splosh resistant zippered case. Portable opp-friendly rechargeable speaker System for iPod/iPhone/iPod. iDMl2 0 Bluetooth® Protect1ve speoker cover con be removed and used as on iPod/iPhone stand Portable rechargeable Bluetooth® stereo speakers for iPad/iPhone/iPod or any Bluetooth enabled device. iHM79 Portable multimedia speakers for your iPad, iPod, iPhone, laptop, and MP3 player. Includes bui lt-in rechargeable batteries and protective case. Register by mail or online www.ihomeaudio.com/register • Confirmation of Ownership • Product Safety Notifications • Product Tips and Updates Thank you for choosing iHome. We hope to enhance your product ownership experience. SDI Technologies Inc. Attn: Customer Service 135 Essex Avenue Avenel NJ,07001 First-Class Postage Required Post Office will not deliver without proper postage TBCO 1 • I PO BOX 174032 DENVER CO 80217-4032 11 •• 1.11 ••••• 1.1 ••• 111 ••• 1.1 •• 111 ••••• 11 ••• 1.1 •• 11 ••• 1.11 •• 1.1 Register online today to enter the iHome quarterly giveaway 1. 1. 0 Mr. First Name 2. 0 Mrs. 3. 0 Ms. 4. 0 Miss Initial Last name TB CO 1 Street Apt. State/Province Zip/Postal code E-mail address: 2. I Your date of birth: 3. Marital status: Month 4. 5. Date of purchase: Month Day Name of store where purchased: 7. Did you: 01. 0 Purchase this product yourself? 02. 0 Receive this product as a gift? 9. Price paid (excluding sales tax): Model number: 13. What brands did you consider? 01. 02. 03. 04. 05. 06. 07. $ Which of the following best describes this purchase? 01. 02. 03. 04. 05. 0 The first product of this type you've owned 0 A replacemenVupgrade of a similar product 0 An addition to a similar product you already own 0 Received as a gift 0 Other 01. 02. 03. 04. 05. 06. 07. 08. 09. 10. 11. 12. 13. who will be using this product most often: Male 02. 0 Female 03. Age: 11. What features/factors influence this purchase? 01. 0 02. 0 03. 0 04. 0 05. 0 06. 0 Ad- TV/Magazine/ Newspaper Application enhancemenV Bongiovi technology Brand reputation/ Experience Battery backup Charges iPod/iPhone Friends/Relatives recommendation 07. 08. 09. 10. 11. 12. 0 0 0 0 0 0 13. 0 14. 0 15. 0 Overall design Price Remote control Store display Sound Wake/Sleep to iPod/ iPhone Wake to radio/alarm Website Other 12. Where do you plan on using this product? 01. 02. 03. 04. 0 0 0 0 Bedroom Home office Family Room/Den Home gym 05. 06. 07. 08. 0 0 0 0 Kitchen Work office Dormitory Other 0 0 0 0 0 0 0 Altec Lansing Bose HoMedics/Sharper Image iluv JBL Logitech Memo rex 08. 0 09. 0 10. 0 11. 0 12. 0 Philips Sony XtremeMac No other brands considered Other 14. Occupation/Employment status: (check all that apply) 10. Please indicate the gender and age of the person 01. 0 02. 0 Single Year 6. 8. 01. 0 Married Year 15. Professional/Technical Upper managemenVExecutive Middle management Sales/Marketing Clerical/Service worker Tradesman/Machine op./Laborer Teacher/Educator Healthcare-Physician/Nurse/Other Homemaker Military Retired Self employed/Business owner Work from home office You 0 0 0 0 0 0 0 0 0 0 0 0 0 Spouse 0 0 0 0 0 0 0 0 0 0 0 0 0 Which group describes your annual family income? 01. 0 02. 0 04. 0 Under $25,000 $25,000-$49,999 $50,000-$7 4,999 05. 0 $75,000-$99,999 06. 0 $100,000-$149,999 07. 0 $150,000 and over 16. Do you own an iPhone? 01. 0 Yes 02. 0 No 17. Do you own an iPad? 01. 0 Yes 02. 0 No 18. How many applications have you downloaded? 01. 0 0-10 02. 0 11-20 03.0 21-30 04. 0 31+ iHome respects your privacy All information will be kept confidential. We do not share personal information with any third party Important Safety Instructions 1. Water and Moisture- The unit should not be used near water. For example: near a bathtub, washbowl, kitchen sink, laundry tub, 2. Ventilation- The unit should be situated so that its location or position does not interfere with its proper ventilation. For example, it should swimming pool or in a wet basement. 3. 4. 5. 6. 7. 8. 9. 10. 11. not be situated on a bed, sofa, rug or similar surface that may block ventilation openings. Also, it should not be placed in a built-in installation, such as a bookcase or cabinet, which may impede the flow of air through the ventilation openings. Heat- The unit should be situated away from heat sources such as radiators, heat registers, stoves or other appliances (including amplifiers) that produce heat. Power Sources -The unit should be connected to a power supply only of the type described in the operating instructions or as marked on the appliance. Power Cable Protection - Power supply cables should be routed so that they are not likely to be walked on or pinched by items placed upon or against them. It is always best to have a clear area from where the cable exits the unit to where it is plugged into an AC socket. Cleaning- The unit should be cleaned only as recommended. See the Maintenance section of this manual for cleaning instructions. Objects and Liquid Entry- Care should be taken so that objects do not fall and liquids are not spilled into any openings or vents located on the product. Attachments- Do not use attachments not recommended by the product manufacturer. lightning and Power Surge Protection- Unplug the unit from the wall socket and disconnect the antenna or cable system during a lightning storm or when it is left unattended and unused for long periods of time. This will prevent damage to the product due to lightning and power-line surges. Overloading -Do not overload wall sockets, extension cords, or integral convenience receptacles as this can result in a risk of fire or electric shock. Damage Requiring Service -The unit should be serviced by qualified service personnel when: A. the power supply cable or plug has been damaged. B. objects have fallen into or liquid has been spilled into the enclosure. C. the unit has been exposed to rain. D. the unit has been dropped or the enclosure damaged. E. the unit exhibits a marked change in performance or does not operate normally. 12. 13. Antenna- Do not connect an external antenna to the unit (other than that provided). Periods of None Use- If the unit is to be left unused for an extended period of time, such as a month or longer, the power cable should be 14. Servicing -The user should not attempt to service the unit beyond those methods described in the user's operating instructions. Service unplugged from the unit to prevent damage or corrosion. methods not covered in the operating instructions should be referred to qualified service personnel. Questions? Visit www.ihomeaudio.com Printed in China iW2 09052011-0 iW2- Consumer Product Safety Guide FCC Radiation Exposure Statement FCC ID: EMOIW2 IC: 986B-IW2 This equipment complies with FCC RF radiation exposure limits set forth for an uncontrolled environment. This transmitter must not be co-located or operating in conjunction with any other antenna or transmitter. This Device complies with RSS-21 0 of the IC Rules; Operation is subject to the following two conditions: 1. This device may not cause interference and 2. This device must accept any interference received, including interference that may cause undesired operation This device complies with FCC radiation exposure limits set forth for an uncontrolled environment and it also complies with Part 15 of the FCC RF Rules. Operation is subject to the following two conditions: (1) this device may not cause harmful interference, and (2) this device must accept any interference received, including interference that may cause undesired operation. (FCC1 5.19) Le present appareil est conforme aux CNR d'lndustrie Canada applicables aux appareils radio exempts de licence. !:exploitation est autorisee aux deux conditions suivantes: (1) l'appareil ne doit pas produire de brouillage, et (2) l'utilisateur de l'appareil doit accepter tout brouillage radioelectrique subi, meme si le brouillage est susceptible d'en compromettre le fonctionnement. The device meets the exemption from the routine evaluation limits in section 2.5 of RSS 102 and compliance with RSS-1 02 RF exposure, users can obtain Canadian information on RF exposure and compliance. Le dispositif rencontre !'exemption des limites courantes d'evaluation dans Ia section 2.5 de RSS 102 et Ia conformite !'exposition de RSS-102 rf, utilisateurs peut obtenir !'information canadienne sur !'exposition et Ia conformite de rf. a This equipment complies with the limits for a Class B digital device as specified in Part 15 of FCC Rules. These limits provide reasonable protection against radio and TV interference in a residential area. However, your equipment might cause TV or radio interference even when it is operating properly. To eliminate interference you can try one or more of the following corrective measures: Reorient or relocate the receiving antenna. Increase the distance between the equipment and the radio or TV. Use outlets on different electrical circuits for the equipment and the radio or TV. Consult your dealer or an experienced radio/television technician if the problem still exists. Modifying or tampering with your system's internal components can cause a malfunction and might invalidate the system's warranty and void your FCC authorization to operate it. The separation distance between the equipment and the user shall not be less than 20 em. This Class B digital apparatus complies with Canadian ICES-003. Cet appareil numerique de Ia classe Best conforme aIa norme NMB-003 du Canada. Printed in China iW2 09052011-0 Garantie limitee de 1 an iHome Products, une division de SDI Technologie Inc. (Cia pres refere com me SDI Technologies), garantit ce produit contre tout defaut de main d'~uvre et de materiet en condition normale d'utillisation, pour une periode de 1 an a compter de Ia date d'achat. Si ce produit ne vous satisfait pas pleinement, il est preferable de le retourner au magasin ou vous l'avez achete. Si cela ne suffit pas a resoudre le probleme et qu'un service est requis pour resoudre un mauvais fonctionnement, durant cette periode de garantie, SDI Technologie se reserve le droit de reparer, ou a sa discretion, de rem placer le produit gratuitement (sauf 30 $de frais de main d'~uvre, d'emballage, de retour par UPS/courrier, et d'assurance). Cette decision est sujette a verification de Ia panne ou du probleme apres reception de ce produit au centre de service de l'usine mentionne ci-dessous. Le produit doit etre accompagne de Ia preuve d'achat, incluant Ia date d'achat. Sans cette preuve d'achat les frais pour ce service seront de 75 $. Avant de retourner ce produit'pour le fa ire reparer, consultez Ia section Assistance au www.ihomeaudio.com/support ou appelez notre service clientele pour vous aider a resoudre tout probleme que vous rencontrez. Si un entretien est requis: 1. Emballez le produit dans une bolte en papier ondule robuste et bien matelassee. 2. lnserez-y une photocopie de votre ticket de caisse, releve de carte bancaire, ou autre preuve d'achat. 3. Joignez un cheque ou un mandata l'ordre de SDI Technologies, au montant de 30 $ (75 $sans preuve d'achat). 4. Envoyez l'appareil, prepaye et assure, au centre de service de l'usine mentionne ci-dessous. Consumer Repair Department SDI Technologies Inc. 1330 Goodyear Drive El Paso, TX 79936-6420 Reserve de garantie NOTE: Cette garantie est valable seulement si le produit est defectueux suite a I' usage pour lequel il est prevu. Cela ne couvre pas (i) les produits qui ont ete ablmes par negligence, mauvais usage ou accident, ou qui ont ete modifies ou repares par du personnel non qualifie; (ii) si le boltier est ablme ou casse, ou si l'appareil est endommage par une chaleur ou une humidite excessive; (iii) les dommages aux lecteurs medias, lecteurs CD ou cassettes (s'ils surviennent); (iv) le coOt d'envoi du produit au centre de service de l'usine et son retour a l'expediteur. Cette garantie est valable uniquement aux Etats-Unis d'Amerique et ne s'etend pas aux proprietaires suivant celui qui a fait !'acquisition du produit. En aucun cas SDI Technologie ou ses filiales, entreprises, revendeurs, leurs employes, directeurs, actionnaires, membres ou agents ne peuvent etre tenus responsables des dommages, accidents, pertes, que vous-meme ou une tierce personne pourriez subir suite a un mauvais usage du produit. (Certain etats ne reconnaissent pas les limitations de garantie ou !'exclusion des dommages resultants, done ces restrictions ne s'appliquent peut-etre pas a vous). Cette garantie vous donne des droits legaux specifiques, et vous avez egalement d'autres droits qui varient d'un etat a !'autre. Votre acceptation et accord de Ia totalite de Ia reserve de garantie mention nee ci-dessus est contractuelle lors de votre transfert de monnaie (monnaie, cheque ou carte de credit) lors de l'achat de votre produit SDI Technologie. Des questions? Visitez le www.ihomeaudio.com ou pour toutes autres questions: 1-800-288-2792 ©2011 SOl Technologies, Inc. Tous droits reserves. iW2 09082011-0 (Fr) lmprime en Chine Limited 1 Year Warranty Information iHome, a division of SDI Technologies Inc. (hereafter referred to as SDI Technologies), warrants this product to be free from defects in workmanship and materials, under normal use and conditions, for a period of 1 Year from the date of original purchase. Should this product fail to function in a satisfactory manner, it is best to first return it to the store where it was originally purchased. Should this fail to resolve the matter and service still be required by reason of any defect or malfunction during the warranty period, SDI Technologies will repair or, at its discretion, replace this product without charge (except for a $30.00 charge for handling, packing, return UPS/postage, and insurance). This decision is subject to verification of the defect or malfunction upon delivery of this product to the Factory Service Center listed below. The product must include proof of purchase, including date of purchase. The fee for service without proof of purchase is $75.00. Before returning this product for service, please check our support section at www.ihomeaudio.com/support or call our customer service team to resolve any problems you may be experiencing: If service is still required: 1. 2. 3. 4. Pack unit in a well padded, heavy corrugated box. Enclose a photocopy of your sales receipt, credit card statement, or other proof of the date of purchase, if within the warranty period. Enclose a check or money order payable to the order of SDI Technologies, for the sum of $30.00 ($75.00 without proof of purchase). Send the unit prepaid and insured, to the Factory Service Center listed below. Consumer Repair Department SOl Technologies Inc. 1330 Goodyea r Dr. El Paso, TX 79936-6420 Disclaimer of Warranty NOTE: This warranty is valid only if the product is used for the purpose for which it was designed. It does not cover (i) products which have been damaged by negligence or willful actions, misuse or accident, or which have been modified or repaired by unauthorized persons; (ii) cracked or broken cabinets, or units damaged by excessive heat; (iii) damage to digital media players, computers, routers, CO's or tape cassettes {if applicable); (iv) the cost of shipping this product to the Factory Service Center and its return to the owner. This warranty is valid only in the United States of America and does not extend to owners of the product other than to the original purchaser. In no event will SDI Technologies or any of its affiliates, contractors, resellers, their officers, directors, shareholders, members or agents be liable to you or any third party for any consequential or incidental damages, any lost profits, actual, exemplary or punitive damages. (Some states do not allow limitations on implied warranties or exclusion of consequential damages, so these restrictions may not apply to you.) This warranty gives you specific legal rights, and you may also have other rights which vary from state to state. Your acknowledgment and agreement to fully and completely abide by the above mentioned disclaimer of warranty is contractually binding to you upon your transfer of currency (money order, cashier's check, or credit card) for purchase of your SDI Technologies product. Questions? Visit www.ihomeaudio.com Toll Free Customer Service: 1-800-288-2792 ©SOl Technologies 201 1 All rights Reserved. Printed in China iW2 09082011-0