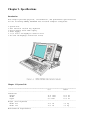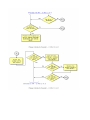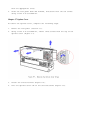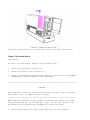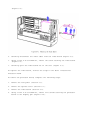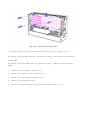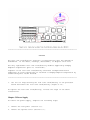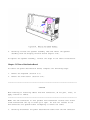
1
Notice
The information in this guide is subject to change without notice.
Compaq Computer Corporation shall not be liable for technical or editorial
errors or omissions contained herein; nor for incidental or consequential
damages resulting from the furnishing, performance, or use of this material.
This guide contains information protected by copyright. No part of this guide
may be photocopied or reproduced in any form without prior written consent
from Compaq Computer Corporation.
Copyright 1991 Compaq Computer Corporation.
All rights reserved. Printed in the USA
COMPAQ, DESKPRO, SYSTEMPRO, LTE, FASTART
Registered United States Patent and Trademark Office.
SLT is a trademark of Compaq Computer Corporation.
The software described in this guide is furnished under a license agreement
or nondisclosure agreement. The software may be used or copied only in
accordance with the terms of the agreement.
Product names mentioned herein may be trademarks and/or registered trademarks
of their respective companies.
MAINTENANCE AND SERVICE GUIDE
COMPAQ PORTABLE 486c Personal Computer
First Edition (October 1991)
Text Number 128987-001
Chapter 1. Specifications
Introduction
This chapter provides physical, environmental, and performance specifications
for the following COMPAQ PORTABLE 486c Personal Computer subsystems:
o
o
o
o
o
o
System Unit
Full Function 101/102 Key Keyboard
Active Matrix Color VGA Display
Power Supply
3 1/2 inch 1.44 Megabyte Diskette Drive
210 and 120 Megabyte Fixed Disk Drives
Chapter 1.1 System Unit
=============================================================================
U.S.
Other
----------------------------------------------------------------------------Dimensions
Height
11.0 inch
27.9 cm
Width
15.6 inch
39.6 cm
Depth
5.5 inch
13.9 cm
----------------------------------------------------------------------------Weight (with keyboard)
Model 210
17.6 lb
7.9 kg
Model 120
17.6 lb
7.9 kg
----------------------------------------------------------------------------Environmental Requirements
Temperature
Operating
50oF to 104oF
10oC to 40oC
Nonoperating
-22oF to 140oF
-30oC to 60oC
Relative Humidity (noncondensing)
Operating
20% to 80%
20% to 80%
Nonoperating
5% to 90%
5% to 90%
Maximum Unpressurized
Altitude
Operating
10,000 ft
3,050 m
Nonoperating
30,000 ft
9,150 m
----------------------------------------------------------------------------Cooling
12 VDC fan
12 VDC fan
----------------------------------------------------------------------------Shock
40g, 11 ms, half sine
(nonoperating)
----------------------------------------------------------------------------Vibration
Operating
0.25g, 5 to 500 Hz,
1/2 octave/min sweep
Nonoperating
1.0g, 5 to 500 Hz,
1/2 octave/min sweep
=============================================================================
Chapter 1.2 Keyboard
=============================================================================
English
Other
----------------------------------------------------------------------------Dimensions
Height
1.2 inch
3.0 cm
Depth
7.4 inch
18.7 cm
Width
15.7 inch
39.8 cm
----------------------------------------------------------------------------Weight
2.65 lb
1.2 kg
----------------------------------------------------------------------------Number of Keys
101
102
----------------------------------------------------------------------------Cable
Compressed
24.0 inch
60.9 cm
Extended
46.5 inch
118.1 cm
----------------------------------------------------------------------------Interface
6 pin mini DIN
6 pin mini DIN
connector
connector
----------------------------------------------------------------------------Power
Volts
4.5 to 5.5 VDC
4.5 to 5.5 VDC
Current
300 mA
300 mA
=============================================================================
Chapter 1.3 Active Matrix Color Display
=============================================================================
U.S.
Other
----------------------------------------------------------------------------Dimensions (viewing area)
Height
6.2 inch
15.8 cm
Width
8.3 inch
21.1 cm
----------------------------------------------------------------------------Diagonal Size
10.4 inch
26.4 cm
----------------------------------------------------------------------------Mounting
Internal
Internal
----------------------------------------------------------------------------Tilt Angle
-5oF to 32oF
-5oC to 32oC
----------------------------------------------------------------------------Display
Active Matrix
Active Matrix
Color VGA, TFT
Color VGA, TFT
----------------------------------------------------------------------------Color Capability
256, 16 shades
256, 16 shades
per primary color
per primary color
----------------------------------------------------------------------------Brightness
Adjustable
Adjustable
----------------------------------------------------------------------------Maximum Pixel Resolution
(Text and Graphics)
640 x 480
640 x 480
640 x 400
640 x 400
640 x 350
640 x 350
----------------------------------------------------------------------------Operating Frequency
25 MHz
25 MHz
----------------------------------------------------------------------------VDC Input
Nominal Voltage
5 VDC
12 VDC
Current Maximum
150 mA
420 mA
Power Maximum
0.75W
5.04W
==============================================================================
Chapter 1.4 Power Supply
=============================================================================
U.S.
Other
----------------------------------------------------------------------------Input Requirements
Nominal Voltage
120 VAC
240 VAC
Maximum Range Voltage
100 to 120 VAC
220 to 240 VAC
Line Frequency
60 Hz
50 Hz
Current
4A
2A
Fuse
5A
5A
----------------------------------------------------------------------------Operating Power
125W *
125W *
----------------------------------------------------------------------------Line Voltage Switching
Automatic
Automatic
----------------------------------------------------------------------------Cooling
2 speed fan,
2 speed fan,
thermostatically
thermostatically
controlled
controlled
----------------------------------------------------------------------------Operating Temperature
41oF to 104oF
5oC to 40oC
----------------------------------------------------------------------------VDC Output
Nominal Voltage
5V
12V
-12V
Current Minimum
1.5A
0.1A
0A
Current Maximum
12A
4.2A
1A
Maximum Peak Current
18A
6A
1A
Regulation Tolerance
3%
5%
5%
-----------------------------------------------------------------------------
NOTE: These values are maximum values based on nominal operating conditions
for temperature, line voltage, frequency, and altitude.
----------------------------------------------------------------------------* 60W maximum available through EISA expansion slots.
=============================================================================
Chapter 1.5 Diskette Drive
=============================================================================
1.44 MB
----------------------------------------------------------------------------Diskette Size
3 1/2 inch
Capacity Per Diskette
(high/low)
1.44 MB/720 KB
LED Indicators
Read/Write (high density)
Read/Write (low density)
Green
Orange
Drives Supported
One
Drive Height
0.75 inch (1.9 cm)
Drive Rotation (rpm)
300
Transfer Rate (bps)
(high/low)
500K/250K
Bytes Per Sector
512
Sectors Per Track
(high/low)
18/9
Tracks Per Side
(high/low)
80/80
Access Times
Track to Track
Average
Settling Time
Latency Average
3 ms
80 ms
15 ms
100 ms
Cylinders (high/low)
80/80
Read/Write Heads
2
=============================================================================
Chapter 1.6 Fixed Disk Drives
=============================================================================
210 MB
120 MB
----------------------------------------------------------------------------Standard Configurations
Model 210
Model 120
Formatted Capacity
212.6 MB
121.5 MB
Drives Supported
One
One
Form Factor
3 1/2 inch
3 1/2 inch
Drive Height
1 inch
1 inch
Drive Weight
1.3 lb
1.3 lb
Drive Type (logical)
51
50
Drive Speed
4500 rpm
3399 rpm
Transfer Rate (per second)
Head
Buffer (max)
20 MB
5 MB
12 MB
4.5 MB
Sector Interleave
1:1
1:1
Seek Times
Track to Track
Average
Maximum
3 ms
12 ms
30 ms
8 ms
19 ms
35 ms
Cylinders
Physical
Logical
2119
683
1522
760
Read/Write Heads
Physical
Logical
4
16
4
8
Sectors Per Track
Physical
Logical
49
38 + 1 spare
40
39 + 1 spare
Bytes Per Sector
512
512
=============================================================================
Chapter 2. Power On Self Test (POST)
Introduction
This chapter lists the subassemblies checked by the Power On Self Test (POST)
and briefly describes the types of error codes that can occur. The chapter
also includes problem isolation procedures and a flowchart for quick
reference.
Chapter 2.1 POST
POST is a series of diagnostic tests that runs automatically on the COMPAQ
PORTABLE 486c Personal Computer when it is turned on.
POST checks the following subassemblies to ensure that the computer system is
functioning properly:
o
o
o
o
o
o
o
Processor Board
Memory Module
Keyboard
Controller Circuitry
Video Circuitry
Fixed Disk Drive
Diskette Drive
If POST finds an error in the computer, an error condition is indicated by an
audible and/or visual message. See Chapter 3, "Error Messages and Codes,"
for an explanation of the error codes and a recommended course of action.
Chapter 2.2 Preliminary Steps
If you encounter an error condition, complete the following steps before
starting the problem isolation procedures:
1.
Turn off power to the computer.
2.
Disconnect any external devices. Do not disconnect the printer if you
want to test the printer or use it to log error messages.
3.
Install all appropriate loopback plugs and terminating plugs for complete
testing.
4.
Clear the power on password, if it is preset by the user. You will know
that the power on password is set when a key icon (0--m) appears on the
screen when POST completes. If this occurs, you must enter the password
to continue.
If you do not have access to the password, you must disable the power on
password feature by setting the power on password switch (see section
2.3, "Clearing Power on Password").
5.
Access the fixed disk drive.
You will know that the fixed disk drive password is set when the
DriveLock icon (see illustration of DriveLock icon below) appears on the
screen. If this occurs, you must enter the fixed disk drive password to
continue.
IMPORTANT: It is not necessary to access the fixed disk drive in order to run
the Diagnostics diskette; however, complete system testing cannot be done
without access to the complete system.
The user must clear the fixed disk drive password or give you access
before servicing can be performed.
6.
Position the brightness and volume controls approximately in the center
of their range.
7.
Insert the Diagnostics diskette into drive A.
8.
Turn on the computer.
9.
Follow the procedures of the Problem Isolation Flowchart, section 2.4.
Refer to Chapter 3, "Error Messages and Codes," for detailed information
on problem isolation.
Chapter 2.3 Clearing Power On Password
To clear the power on password feature, reset the power on password switch
(SW5) located on the I/O board. To do so, complete the following steps:
1.
Disconnect the AC power.
2.
Disassemble the computer to reach the I/O board (refer to Chapter 5).
3.
Locate the power on password switch (SW5) on the I/O board; set the
switch to ON (Figure 2-1).
4.
Reconnect AC power.
5.
Turn on the computer and allow it to complete POST.
6.
Turn the computer off.
7.
Set switch SW5 to OFF.
8.
Disconnect AC power.
9.
Reassemble the computer (refer to Chapter 5).
10.
Reconnect the AC power.
11.
Turn on the computer and allow it to complete POST. If the key icon
(o--m) does not appear when POST completes, the power on password has
been cleared.
Chapter 2.4 Problem Isolation Flowchart
The problem isolation flowchart provides a quick reference for identifying
and correcting problems that may occur during POST. The flowchart gives
troubleshooting procedures for identifying malfunctions. It also directs you
to the Diagnostics chapter in the SUPPORT SOFTWARE MAINTENANCE AND SERVICE
GUIDE and to Chapter 3, "Error Messages and Codes," for more detailed
troubleshooting information.
Chapter 3. Error Messages and Codes
This chapter contains Power On Self Test (POST) messages, Diagnostic error
codes, and memory error codes for the COMPAQ PORTABLE 486c Personal Computer.
The messages and codes appear in tables that list the message or error code,
a description of the error or its probable cause, and the action recommended
to resolve the error condition.
Chapter 3.1 Power On Self Test Messages
An error message results if a problem is encountered during POST, which runs
automatically when the system is turned on.
Table 3-1 lists the messages for POST, the audible (beep) messages, probable
causes, and recommended actions.
Table 3-1. Power On Self Test Messages
=============================================================================
Message
Beeps
Probable Cause
Recommended Action
----------------------------------------------------------------------------101 - ROM Error
1 Long,
System ROM
The following steps
1 Short
checksum
apply to error
code 101:
101 - I/O ROM Error
1 Long,
Option ROM
1. Inspect the ROM
1 Short
checksum
placement.
2. Verify the correct
ROM.
3. Replace the ROM.
----------------------------------------------------------------------------102 - Processor
None
Processor board:
Replace the processor
Board Failure
DMA timers, etc.
board.
----------------------------------------------------------------------------162 - System Options 2 Short
Configuration
Run COMPAQ EISA
Not Set
incorrect or no
Configuration utility.
diskette drive
----------------------------------------------------------------------------163 - Time and
2 Short
Invalid time or
Run COMPAQ EISA
Date Not Set
date in
Configuration utility.
configuration
memory
----------------------------------------------------------------------------164 - Memory Size
2 Short
Configuration
Run COMPAQ EISA
Error
memory size
Configuration utility.
incorrect
----------------------------------------------------------------------------170 - Expansion
1 Short
EISA board not
Run COMPAQ EISA
Device
ready after
Configuration utility
power on delay
----------------------------------------------------------------------------172 - EISA
1 Short
Nonvolatile
Run COMPAQ EISA
Configuration
configuration
Configuration utility
Nonvolatile
memory corrupt or
for error codes 172-xx
Memory
jumper installed
through 177-xx.
173 - EISA Slot ID
1 Short
Board replaced,
Mismatch
configuration not
updated
174 - EISA
Configuration/
Slot Mismatch
1 Short
EISA board
not found
175 - EISA
Configuration/
Slot Mismatch
1 Short
EISA board added,
configuration not
updated
176 - Slot with
Unreadable ID
1 Short
EISA board in
slot that should
contain ISA board
177 - Configuration
1 Short
Incomplete EISA
Not Complete
configuration
----------------------------------------------------------------------------Message
Beeps
Probable Cause
Recommended Action
----------------------------------------------------------------------------178 - Processor
1 Short
System board type
Run COMPAQ EISA
Configuration
invalid or step
Configuration utility.
does not match
configuration memory
----------------------------------------------------------------------------XX000Y ZZ *
None
RAM failure
1. Replace the
201 - Memory Error
memory module
(see Figure 3-1).
2. Replace the
processor board.
----------------------------------------------------------------------------XX000Y ZZ *
None
Memory failure
Replace the
203 - Memory
processor board.
Address Error
----------------------------------------------------------------------------205 - Memory Error
None
Cache Memory
Run Diagnostics.
XXYYYYY
controller or
ZZZZZZZZ
RAM failure
----------------------------------------------------------------------------301 - Keyboard
None
Keyboard
1. Check that keyboard
Error
failure
is connected.
2. Replace the
keyboard.
----------------------------------------------------------------------------303 - Keyboard
None
Processor board,
Replace the keyboard,
Controller Error
keyboard, or
mouse or I/O board.
mouse
----------------------------------------------------------------------------304 - Keyboard or
None
Keyboard or
1. Replace the
System Unit
processor board
keyboard.
Error
2. Replace the
processor board.
----------------------------------------------------------------------------501 - Display
1 Long,
Video display
Replace the video board
Adapter Failure
2 Short
controller
----------------------------------------------------------------------------Message
Beeps
Probable Cause
Recommended Action
----------------------------------------------------------------------------601 - Diskette
None
Diskette Controller
1. Replace the power
Controller Error
circuitry
distribution board
and retest.
Run Diagnostics.
Replace the
I/O board.
----------------------------------------------------------------------------605 - Diskette Drive 2 Short
Mismatch in
Run COMPAQ EISA
Type Error
drive type
Configuration utility.
----------------------------------------------------------------------------610 - External
None
External Storage
Turn on External
Storage Module
Module connected
Storage Module or
Failure. Hit
but turned off
disconnect from
F1 when ready.
computer.
----------------------------------------------------------------------------701 - Coprocessor
None
Coprocessor
Replace processor
Error
board.
----------------------------------------------------------------------------1151 - Comm Port 1
2 Short
Added or removed
Run COMPAQ EISA
Configuration
modem, or second
Configuration utility
Error
modem board
for error codes
1151 through 1154.
2.
3.
1152 - Comm Port 2
Configuration
Error
2 Short
Added or removed
modem, or second
modem board
1153 - Comm Port 3
Configuration
Error
2 Short
Added or removed
modem, or second
modem board
1154 - Comm Port 4
2 Short
Added or removed
Configuration
modem, or second
Error
modem board
----------------------------------------------------------------------------Message
Beeps
Probable Cause
Recommended Action
----------------------------------------------------------------------------1771 - Primary Disk
2 Short
Internal and
Run Diagnostics.
Port Address
external fixed disk
Assignment
drive controllers
Conflict
are assigned to the
primary address
----------------------------------------------------------------------------1772 - Secondary
2 Short
Internal and
Run Diagnostics.
Disk Port Address
external fixed disk
Assignment
drive controllers
Conflict
are assigned to the
secondary address
----------------------------------------------------------------------------1780 - Disk 0
None
Fixed disk drive/
1. Run Diagnostics.
Failure
format error
2. Check and/or
replace the power
distribution board.
3. Replace the fixed
disk drive.
----------------------------------------------------------------------------1781 - Disk 1
None
Fixed disk drive/
1. Run Diagnostics.
Failure
format error
2. Check and/or
replace the power
distribution board.
3. Replace the fixed
disk drive.
----------------------------------------------------------------------------1782 - Disk
None
Fixed disk drive
1. Run Diagnostics.
Controller
controller error
2. Check and/or
Failure
replace the power
distribution board.
3. Replace the fixed
disk drive.
----------------------------------------------------------------------------Message
Beeps
Probable Cause
Recommended Action
----------------------------------------------------------------------------1790 - Disk 0 Error
None
Fixed disk drive
1. Run Diagnostics.
error or wrong
2. Replace the
drive type
drive.
----------------------------------------------------------------------------1791 - Disk 1 Error
None
Fixed disk drive
1. Run Diagnostics.
error or wrong
2. Replace the
drive type
drive.
----------------------------------------------------------------------------XX000Y ZZ Parity
None
Parity RAM
Run Diagnostics.
Check 2
failure
----------------------------------------------------------------------------Audible
1 Short
Power on
None.
successful
----------------------------------------------------------------------------Audible
2 Short
Power on
None.
successful
----------------------------------------------------------------------------(RESUME =
None
As indicated
Press F1 key
"F1" KEY)
to continue.
=============================================================================
Chapter 3.2 Diagnostic Error Codes
Diagnostic error codes occur if the system recognizes a problem while running
the Diagnostics program (refer to the SUPPORT SOFTWARE MAINTENANCE AND
SERVICE GUIDE for additional information on running the Diagnostics
software). These error codes help identify possible defective subassemblies.
Tables 3-2 through 3-12 list possible error codes, a description of the error
condition, and the action required to resolve the error condition.
In each case, the Recommended Action column lists steps necessary to correct
the problem. After completing each step, run the Diagnostics program to
verify whether the error condition has been corrected. If the error code
reappears, perform the next step, then run the Diagnostics program again.
Follow this procedure until the Diagnostics program no longer detects an
error condition.
The error codes appear in an AYY XX or AAYY XX format.
A or AA = number that represents faulty assembly
YY = test or action that failed
XX = a specific problem
Example: Error code 610-21 shows that the diskette drive failed to get change
line status.
For assistance in the removal and replacement of a particular subassembly,
see Chapter 5, "Removal and Replacement Procedures."
Table 3-2. Processor Test Error Codes
=============================================================================
Error
Recommended
Code
Description
Action
----------------------------------------------------------------------------101 - 01
16 bit CPU failed
Replace the processor board
and retest for error codes
101 - 02
32 bit CPU failed
101 - xx.
101 - 50
BIOS dispatch of processor
101 - 51
Processor is unavailable
or non existent
101 - 52
Time out waiting for
completion of test
101 - 53
Failure to terminate processor
101 - 54
Time out waiting for serial
semaphore
101 - 56
Unexpected interrupt occurred
during test
101 - 91
16 bit multiplication, expected
101 - 92
32 bit multiplication expected
101 - 93
16 bit multiplication
unexpected
101 - 94
32 bit multiplication
unexpected
101 - 95
Coprocessor and processor
board conflict
101 - 96
Refer to Authorized Compaq
Dealer Service Bulletin No. 84.
----------------------------------------------------------------------------Error
Recommended
Code
Description
Action
----------------------------------------------------------------------------102 - 01
Coprocessor initial status
The following steps apply
word incorrect
to error codes 102 - xx:
1. Run COMPAQ EISA
102 - 02
Coprocessor initial control
Configuration utility.
word incorrect
2. Replace the processor
board and retest.
102 - 03
Coprocessor
tag word not all ones
102 - 04
Coprocessor tag
word not all zeros
102 - 05
Coprocessor exchange
command failed
102 - 06
Coprocessor masked
exception incorrectly handled
102 - 07
Coprocessor unmasked
exception incorrectly handled
102 - 08
Coprocessor wrong mask
bit set in status register
102 - 09
Coprocessor unable to
store real number
102 - 10
Coprocessor real number
calculation test failed
102 - 11
Coprocessor speed test
failed
102 - 12
Coprocessor pattern test failed
102 - 14
Switch indicates no numeric
coprocessor present
102 - 15
Coprocessor is inoperative
----------------------------------------------------------------------------Error
Recommended
Code
Description
Action
----------------------------------------------------------------------------103 - 01
DMA page registers test
Replace the processor
failed
board and retest for
error codes 103 - xx
103 - 02
DMA byte controller test
through 114 - xx.
failed
103 - 03
DMA word controller test
failed
104 - 01
Interrupt controller master
test failed
104 - 02
Interrupt controller slave
test failed
104 - 03
Interrupt controller software
RTC is inoperative
105 - 01
Port 61 bit 6 not at zero
105 - 02
Port 61 bit 5 not at zero
105 - 03
Port 61 bit 3 not at zero
105 - 04
Port 61 bit 1 not at zero
105 - 05
Port 61 bit 0 not at zero
105 - 06
Port 61 bit 5 not at one
105 - 07
Port 61 bit 3 not at one
105 - 08
Port 61 bit 1 not at one
----------------------------------------------------------------------------Error
Recommended
Code
Description
Action
----------------------------------------------------------------------------105 - 09
Port 61 bit 0 not at one
Replace the processor board
and retest for error codes
105 - 10
Port 61 I/O test failed
103 - xx through 114 - xx.
105 - 11
Port 61 bit 7 not at zero
105 - 12
Port 61 bit 2 not at zero
105 - 13
No interrupt generated
by failsafe timer
105 - 14
NMI not triggered by
failsafe timer
107 - 01
CMOS RAM test failed
107 - 02
NOVRAM failed
107 - 03
Unable to restore extended
non volatile memory contents
108 - 02
CMOS interrupt test failed
108 - 03
CMOS interrupt test, CMOS
not properly initialized
109 - 01
CMOS clock load data test
failed
109 - 02
CMOS clock rollover test
failed
109 - 03
CMOS clock test, CMOS not
properly initialized
----------------------------------------------------------------------------Error
Recommended
Code
Description
Action
----------------------------------------------------------------------------110 - 01
Programmable timer load
Replace the processor board
data test failed
and retest for error codes
103 - xx through 114 - xx.
110 - 02
Programmable timer dynamic
test failed
110 - 03
Programmable Timer No. 2
load data test failed
111 - 01
Refresh detect test failed
112 - 01
Speed test slow mode out
of range
112 - 02
Speed test mixed mode out
of range
112 - 03
Speed test fast mode out
of range
112 - 04
Speed test unable to enter
slow mode
112 - 05
Speed test unable to enter
mixed mode
112 - 06
Speed test unable to enter
fast mode
112 - 07
Speed test system error
112 - 08
Speed test unable to enter
auto mode
----------------------------------------------------------------------------Error
Recommended
Code
Description
Action
----------------------------------------------------------------------------112 - 09
Speed test unable to enter
Replace the processor board
high mode
and retest for error codes
103 - xx through 114 - xx.
112 - 10
Speed test high mode out
of range
112 - 11
Speed test auto mode out
of range
112 - 12
Speed test variable speed
mode inoperative
112 - 13
Failed Cache speed test
113 - 50
BIOS dispatch of processor
113 - 51
Processor is unavailable
or nonexistent
113 - 52
Time out waiting for
completion of test
113 - 54
Time out waiting for serial
semaphore
113 - 56
Unexpected interrupt
occurred during test
114 - 01
Speaker test failed
=============================================================================
Table 3-3. Memory Test Error Codes
=============================================================================
Error
Recommended
Code
Description
Action
----------------------------------------------------------------------------201 - 01
Memory machine ID test
The following steps apply
failed
to error codes 201 - xx
through 202 - xx:
1. Replace the system ROM
201 - 02
Memory machine type
and retest.
test failed
2. Replace the processor
board and retest.
201 - 03
Memory machine ID
and type test failed
202 - xx
ROM checksum test failed
202 - 01
Test failed
202 - 02
Failed RAM/ROM map
test
202 - 03
Failed RAM/ROM protect
test
202 - 04
System RAM/ROM
checksum test failed
----------------------------------------------------------------------------203 - xx
RAM write/read test
The following steps apply
failed
to error codes 203 - xx
through 211 - xx:
203 - 01
Memory write/read test
1. Replace the memory
module and retest.
203 - 02
Error during saving
2. Replace the processor
program memory in
board and retest.
write/read test
203 - 03
Error during restore of
memory in write/read test
204 - xx
RAM address test failed
204 - 01
Memory address test
failed
204 - 02
Error during saving
program memory in
address test
----------------------------------------------------------------------------Error
Recommended
Code
Description
Action
----------------------------------------------------------------------------204 - 03
Error during restore of
The following steps apply
program memory in
to error codes 203 - xx
address test
through 211 - xx:
1. Replace the memory
204 - 04
A20 address test failed
module and retest.
2. Replace the processor
204 - 05
Page hit address test
board and retest.
failed
205 - 01
Walking 1/0 test failed
205 - 02
Error during saving
program memory in
walking 1/0 test
205 - 03
Error during restore of
program memory in
walking 1/0 test
205 - 04
Insufficient memory
to perform test
206 - xx
Increment pattern test
failed
208 - 01
Memory refresh test
failed
208 - 02
Error during saving
program memory in
refresh test
208 - 03
Error during restore
program memory in
fresh test
----------------------------------------------------------------------------Error
Recommended
Code
Description
Action
----------------------------------------------------------------------------210 - xx
Random Pattern Test
The following steps apply
Failed
to error codes 203 - xx
through 211 - xx:
210 - 01
Data read from block did
1. Replace the memory
not match data written
module and retest.
2. Replace the processor
210 - 02
Scan of test block prior to
board and retest.
testing
210 - 05
Inverted pattern compare,
RAM correct
210 - 10
Mapping LIM block, LIM
page not present
211 - xx
Random Pattern Test
211 - 01
Memory random pattern
test failed
211 - 02
Error during saving program
memory and random pattern
in write/read test
211 - 03
Error during restore of
program memory and random
pattern in write/read test
211 - 04
Insufficient memory to
perform test
211 - 05
Inverted pattern compare,
but RAM correct
=============================================================================
Table 3-4. Keyboard Test Error Codes
=============================================================================
Error
Recommended
Code
Description
Action
----------------------------------------------------------------------------301 - 01
Keyboard short test,
The following steps apply
8042 self test failed
to error codes 301 - xx
through 304 - xx:
301 - 02
Keyboard short test,
1. Check the keyboard
interface test failed
connection. If
disconnected, turn off
301 - 03
Keyboard short test, echo
the computer and
test failed
connect the keyboard.
2. Replace the keyboard
301 - 04
Keyboard short test failed
and retest.
3. Replace the I/O board
302 - 01
Keyboard long test failed
and retest.
303 - 01
Keyboard LED test, 8042
self test failed
303 - 02
Keyboard LED test, reset
test failed
303 - 03
Keyboard LED test, reset
test failed
303 - 04
Keyboard LED test, LED
command test failed
303 - 05
Keyboard LED test, LED
command test failed
303 - 06
Keyboard LED test, LED
command test failed
303 - 07
Keyboard LED test, LED
command test failed
----------------------------------------------------------------------------Error
Recommended
Code
Description
Action
----------------------------------------------------------------------------303 - 08
Keyboard LED test,
The following steps apply
command byte restore
to error codes 301 - xx
test failed
through 304 - xx:
1. Check the keyboard
303 - 09
Keyboard LED test, LEDs
connection. If
failed to light
disconnected, turn
off the computer and
304 - 01
Keyboard typematic test
connect the keyboard.
failed
2. Replace the keyboard
and retest.
304 - 02
Unable to enter mode 3
3. Replace the I/O board
and retest.
304 - 03
Incorrect scan code from
keyboard
304 - 04
No make code observed
304 - 05
Unable to disable typematic
feature
304 - 06
Unable to return to
normal mode
=============================================================================
Table 3-5. Parallel Printer Test Error Codes
=============================================================================
Error
Recommended
Code
Description
Action
----------------------------------------------------------------------------401 - 01
Printer failed or not
The following steps apply
connected
to error codes 401 - xx
through 403 - xx:
402 - xx
Printer port
1. If a printer is
connected, be sure it
402 - 01
Printer data register
is turned ON and in
failed
ONLINE mode.
2. Replace the printer
402 - 02
Printer control register
cable and/or printer
failed
and retest.
3. Replace the I/O board
402 - 03
Printer data and control
and retest.
register failed
402 - 04
Printer loopback failed
402 - 05
Printer loopback and data
failed
402 - 06
Printer loopback and control
register failed
402 - 07
Printer loopback, data, and
control register failed
402 - 08
Printer interrupt test failed
402 - 09
Printer interrupt and data
register failed
402 - 10
Printer interrupt and control
register failed
----------------------------------------------------------------------------Error
Recommended
Code
Description
Action
----------------------------------------------------------------------------402 - 11
Printer interrupt, data, and
The following steps apply
control register failed
to error codes 401 - xx
through 403 - xx:
402 - 12
Printer interrupt and
1. If a printer is
loopback failed
connected, be sure it
is turned ON and in
402 - 13
Printer interrupt, loopback,
ONLINE mode.
and data register failed
2. Replace the printer
cable and/or printer
402 - 14
Printer interrupt, loopback,
and retest.
and control register failed
3. Replace the I/O board
and retest.
402 - 15
Printer interrupt, loopback,
data, and control register
failed
402 - 16
Printer unexpected interrupt
received
402 - 25
Printer multiple interrupt
402 - 26
Printer multiple interrupt
403 - 01
Printer pattern test failed
=============================================================================
Table 3-6. Active Matrix Color Display Test Error Codes
=============================================================================
Error
Recommended
Code
Description
Action
----------------------------------------------------------------------------501 - 01
Video Controller Test
Replace the video board
Failed
and retest for error
codes 501 - xx through
502 - 01
Video Memory Test
516 - xx.
Failed
503 - 01
Video Attribute Test
Failed
504 - 01
Video Character Set Test
Failed
505 - 01
Video 80 x 25 Mode
9 x 1 Character Cell
Test Failed
506 - 01
Video 80 x 25 Mode
8 x 8 Character Cell Test
Failed
507 - 01
Video 40 x 25 Mode
Test Failed
508 - 01
Video 320 x 200 Mode
Color Set 0 Test Failed
509 - 01
Video 320 x 200 Mode Color
Set 1 Test Failed
510 - 01
Video 640 x 200 Mode
Test Failed
511 - 01
Video Screen Memory
Page Test Failed
512 - 01
Video Gray Scale Test
Failed
514 - 01
Video White Screen Test
Failed
516 - 01
Video Noise Pattern Test
Failed
=============================================================================
Table 3-7. Diskette Drive Test Error Codes
=============================================================================
Error
Recommended
Code
Description
Action
----------------------------------------------------------------------------600 - xx
Diskette ID drive types
The following steps apply
test failed
to error codes 600 - xx
through 610 - xx:
601 - xx
Diskette format failed
1. Replace the diskette
and retest.
602 - xx
Diskette read test failed
2. Replace the diskette
drive and retest.
603 - xx
Diskette write, read,
3. Replace the I/O board
compare test failed
and retest.
4. Replace the power
604 - xx
Diskette random seek
distribution board
test failed
and retest.
605 - xx
Diskette ID media failed
606 - xx
Diskette speed test failed
607 - xx
Diskette wrap test failed
608 - xx
Diskette write protect
test failed
609 - xx
Diskette reset controller
test failed
610 - xx
Diskette change line test
failed
610 - 01
Exceeded maximum
soft error limit
610 - 02
Exceeded maximum
hard error limit
610 - 03
Previously exceeded
maximum soft error limit
----------------------------------------------------------------------------Error
Recommended
Code
Description
Action
----------------------------------------------------------------------------610 - 04
Previously exceeded
The following steps apply
maximum hard error limit
to error codes 600 - xx
through 610 - xx:
610 - 05
Failed to reset controller
1. Replace the diskette
and retest.
610 - 06
Fatal error while reading
2. Replace the diskette
drive and retest.
610 - 07
Fatal error while writing
3. Replace the I/O board
and retest.
610 - 08
Failed compare of
4. Replace the power
write/read buffers
distribution board and
retest.
610 - 09
Failed to format a track
610 - 10
Failed sector wrap test
610 - 20
Failed to get drive type
610 - 21
Failed to get change
line status
610 - 22
Failed to clear change
line status
610 - 23
Failed to set drive type
in ID media
610 - 24
Failed to read diskette
media
610 - 25
Failed to verify diskette
media
610 - 26
Failed to read media in
speed test
610 - 27
Failed speed limits
610 - 28
Failed write protect test
----------------------------------------------------------------------------Error
Recommended
Code
Description
Action
----------------------------------------------------------------------------697 - 00
Diskette type error
The following steps apply
to error codes 697 - xx and
698 - xx:
698 - 00
Diskette drive speed
1. Replace the diskette
not within limits
and retest.
2. Replace the diskette
drive and retest.
3.
Check and/or replace
drive cable and
retest.
4. Replace the I/O board
and retest.
----------------------------------------------------------------------------699 - 00
Diskette drive/media ID
1. Replace the media.
error, rerun COMPAQ
2. Run COMPAQ EISA
EISA Configuration utility
Configuration utility.
=============================================================================
Table 3-8. Serial Test Error Codes
=============================================================================
Error
Recommended
Code
Description
Action
----------------------------------------------------------------------------1101 - 01
Serial Port Test: UART
Replace the I/O board and
DLAB bit failure
retest for error codes
1101 - xx through
1101 - 02
Serial Port Test; line
1109 - xx.
input or UART fault
1101 - 03
Serial Port Test; address
line fault
1101 - 04
Serial Port Test; data
line fault
1101 - 05
Serial Port Test; UART
control signal failure
1101 - 06
Serial Port Test; UART
THRE bit failure
1101 - 07
Serial Port Test; UART
DATA READY bit failure
1101 - 08
Serial Port Test; UART
TX/RX buffer failure
1101 - 09
Serial Port Test; INTERRUPT
circuit failure
1101 - 10
Serial Port Test; COM1 set
to invalid interrupt
1101 - 11
Serial Port Test; COM2 set
to invalid interrupt
----------------------------------------------------------------------------Error
Recommended
Code
Description
Action
----------------------------------------------------------------------------1101 - 12
Serial Port Test; DRIVER/
Replace the I/O board and
RECEIVER control signal
retest for error codes
failure
1101 - xx through
1109 - xx.
1101 - 13
Serial Port Test; UART
control signal interrupt
failure
1101 - 14
Serial Port Test;
DRIVER/RECEIVER
data failure
1101 - 15
Serial port test modem
detection
1101 - 16
Serial port test, modem
ROM checksum
1101 - 17
Serial port test, tone
detection
1101 - 18
Serial port test, COM3
set to invalid interrupt
1101 - 19
Serial port test, COM4
set to invalid interrupt
1109 - 01
Clock register initialization
failure
1109 - 02
Clock register rollover
failure
----------------------------------------------------------------------------Error
Recommended
Code
Description
Action
----------------------------------------------------------------------------1109 - 03
Clock reset failure
Replace the I/O board and
retest for error codes
1109 - 04
Input line or clock failure
1101 - xx through
1109 - xx.
1109 - 05
Address line fault
1109 - 06
Data line fault
=============================================================================
Table 3-9. Modem Test Error Codes
=============================================================================
Error
Recommended
Code
Description
Action
----------------------------------------------------------------------------1201 - xx
Modem Internal
The following steps apply
Loopback Test
to error codes 1201 - xx
through 1210 - xx:
1201 - 01
UART DLAB bit failure
1. Refer to modem
documentation for
1201 - 02
Line input or UART
Configuration utility
failure
procedures.
2. Check the modem line.
1201 - 03
Address line fault
3. Replace the modem
and retest.
1201 - 04
Data line fault
1201 - 05
UART control signal failure
1201 - 06
UART THRE bit failure
1201 - 07
UART DATA READY bit
failure
1201 - 08
UART TX/RX buffer failure
1201 - 09
INTERRUPT circuit
failure
1201 - 10
COM1 set to invalid
interrupt
1201 - 11
COM2 set to invalid
interrupt
1201 - 12
DRIVER/RECEIVER
control signal failure
----------------------------------------------------------------------------Error
Recommended
Code
Description
Action
----------------------------------------------------------------------------1201 - 13
UART control signal
The following steps apply
interrupt failure
to error codes 1201 - xx
through 1210 - xx:
1201 - 14
DRIVER/RECEIVER
1. Refer to modem
data failure
documentation for
Configuration utility
1201 - 15
Modem detection failure
procedures.
2. Check the modem line.
1201 - 16
Modem ROM; checksum
3. Replace the modem and
failure
retest.
1201 - 17
Tone detection failure
1202 - xx
Internal Modem Test
1202 - 01
Modem timed out waiting
for SYNC (local loopback
mode)
1202 - 02
Modem timed out waiting
for response (local
loopback mode)
1202 - 03
Modem exceeded data
block retry limit (local
loopback mode)
1202 - 11
Modem timed out waiting
for SYNC (analog loopback
originate mode)
1202 - 12
Modem timed out waiting
for modem response (analog
loopback originate mode)
----------------------------------------------------------------------------Error
Recommended
Code
Description
Action
----------------------------------------------------------------------------1202 - 13
Modem exceeded data block
The following steps apply
retry limit (analog
to error codes 1201 - xx
loopback originate mode)
through 1210 - xx:
1. Refer to modem
1202 - 21
Modem timed out waiting
for SYNC (analog loopback
answer mode)
1202 - 22
Modem timed out waiting
for modem response (analog
loopback answer mode)
1202 - 23
Modem exceeded data
block retry limit (analog
loopback answer mode)
1203 - xx
Modem External
Termination Test
1203 - 01
Modem external
TIP/RING failure
1203 - 02
Modem external DATA
TIP/RING failure
1203 - 03
Modem line termination
failure
1204 - xx
Modem Auto Originate
Test
1205 - xx
2.
3.
documentation for
Configuration utility
procedures.
Check the modem line.
Replace the modem
and retest.
Modem Auto Answer
Test
----------------------------------------------------------------------------Error
Recommended
Code
Description
Action
----------------------------------------------------------------------------1206 - xx
Dial Multifrequency Tone
The following steps apply
Test
to error codes 1201 - xx
through 1210 - xx:
1210 - xx
Modem Direct Connect
1. Refer to modem
Test
documentation for
Configuration utility
1210 - 01
Modem timed out waiting
procedures.
for SYNC
2. Check the modem line.
3. Replace the modem
1210 - 02
Modem timed out waiting
and retest.
for response
1210 - 03
Modem exceeded data
block retry limit
1210 - 04
RCV exceeded carrier
lost limit
1210 - 05
XMIT exceeded carrier
lost limit
1210 - 06
Time out waiting for dial
tone
1210 - 07
Dial number string too
long
1210 - 08
Modem timed out waiting
for remote response
1210 - 09
Modem exceeded
maximum redial limit
1210 - 10
Line quality prevented
remote connection
1210 - 11
Modem timed out waiting
for remote connection
1210 - 17
Tone detection failure
=============================================================================
Table 3-10. Fixed Disk Drive Test Error Codes
=============================================================================
Error
Recommended
Code
Description
Action
----------------------------------------------------------------------------1700 - xx
Fixed disk ID drive
The following steps apply
types test failed
to error codes 1700 - xx
through 1719 - xx:
1701 - xx
Fixed disk drive format
1. Replace the fixed disk
test failed
drive and retest.
2. Replace the power
1702 - xx
Fixed disk drive read
distribution
test failed
board and retest.
3. Replace the I/O board
1703 - xx
Fixed disk drive write
and retest.
read compare test failed
1704 - xx
Fixed disk drive random
seek test failed
1705 - xx
Fixed disk drive
controller test failed
1706 - xx
Fixed disk drive ready
test failed
1707 - xx
Fixed disk drive recalibrate
test failed
1708 - xx
Fixed disk drive format bad
track test failed
1709 - xx
Fixed disk drive reset
controller test failed
1710 - xx
Fixed disk drive park head
test failed
----------------------------------------------------------------------------Error
Recommended
Code
Description
Action
----------------------------------------------------------------------------1714 - xx
Fixed disk drive file
The following steps apply
write test failed
to error codes 1700 - xx
through 1719 - xx:
1715 - xx
Fixed disk drive head
1. Replace the fixed disk
select test failed
2.
1716 - xx
Fixed disk drive conditional
format test failed
1717 - xx
Fixed disk drive Error Correction
Code test failed
1719 - xx
Fixed disk drive power
mode test
1719 - 01
Exceeded maximum soft
error limit
1719 - 02
Exceeded maximum hard
error limit
1719 - 03
Previously exceeded
maximum soft error limit
1719 - 04
Previously exceeded
maximum hard error limit
1719 - 05
Failed to reset controller
1719 - 06
Fatal error while reading
3.
drive and retest.
Replace the power
distribution board and
retest.
Replace the I/O board
and retest.
1719 - 07
Fatal error while writing
----------------------------------------------------------------------------Error
Recommended
Code
Description
Action
----------------------------------------------------------------------------1719 - 08
Failed compare of
The following steps apply
write/read/compare
to error codes 1700 - xx
through 1719 - xx:
1719 - 09
Failed to format a track
1. Replace the fixed disk
drive and retest.
1719 - 10
Failed sector wrap test
2. Replace the power
distribution board
1719 - 19
Controller failed to
and retest.
deallocate bad sector
3. Replace the I/O board
and retest.
1719 - 40
Failed cylinder 0
1719 - 41
Drive not ready
1719 - 42
Recalibrate failed
1719 - 43
Failed to format bad
track
1719 - 44
Failed fixed disk drive
controller diagnostics
1719 - 45
Failed to get drive
parameters from ROM
1719 - 46
Invalid drive parameters
found in ROM
1719 - 47
Failed to park heads
1719 - 48
Failed to move disk
table to RAM
----------------------------------------------------------------------------Error
Recommended
Code
Description
Action
----------------------------------------------------------------------------1719 - 49
Failed to read media in
The following steps apply
file write test
to error codes 1700 - xx
through 1719 - xx:
1719 - 50
Failed file I/O write test
1. Replace the fixed disk
drive and retest.
1719 - 51
Failed file I/O read test
2. Replace the power
distribution board
1719 - 52
Failed file I/O compare test
and retest.
3. Replace the I/O board
1719 - 53
Failed drive/head
and retest.
register test
1719 - 54
Failed digital input
register test
1719 - 55
Failed cylinder 1
1719 - 56
Fixed disk drive controller
RAM diagnostics failed
1719 - 57
Fixed disk drive
controller to drive
test failed
1719 - 58
Failed to write sector
buffer
1719 - 59
Failed to read sector
buffer
1719 - 60
Failed to compare sector
buffer
1719 - 61
Failed uncorrectable
Error Correction Code error
----------------------------------------------------------------------------Error
Recommended
Code
Description
Action
----------------------------------------------------------------------------1719 - 62
Failed correctable Error
The following steps apply
Correction Code error
to error codes 1700 - xx
through 1719 - xx:
1719 - 63
Failed soft error rate
1. Replace the fixed disk
and retest.
1719 - 65
Exceeded maximum
2. Replace the power
bad sector per track
distribution board
and retest.
1719 - 66
Failed initial drive
3. Replace the I/O board
parameter
and retest.
1719 - 67
Failed to write long
1719 - 68
Failed to read long
1719 - 69
Failed to read drive size
from controller
1719 - 70
Failed translate mode
1719 - 71
Failed nontranslated mode
1719 - 72
Bad track limit exceeded
1719 - 73
Previously exceeded bad
track limit
1719 - 74
Failed sleep mode
1719 - 75
Failed idle mode
1719 - 76
Failed standby mode
1719 - 77
Failed to change mode
1719 - 78
Exceeded spinup time limit
=============================================================================
Table 3-11. Tape Drive Test Error Codes
=============================================================================
Error
Recommended
Code
Description
Action
----------------------------------------------------------------------------1900 - xx
Tape ID failed
The following steps
apply to error codes
1901 - xx
Tape servo write failed
1901 - xx through
1906 - xx:
1902 - xx
Tape format failed
1. Replace the tape
cartridge and retest.
1903 - xx
Tape drive sensor test
2. Replace the tape drive
failed
and retest.
3. Replace the I/O board
1904 - xx
Tape BOT/EOT test failed
and retest.
1905 - xx
Tape read test failed
1906 - xx
Tape write/read/compare
test failed
1906 - 01
Drive not installed
1906 - 02
Cartridge not installed
1906 - 03
Tape motion error
1906 - 04
Drive busy error
1906 - 05
Track seek error
1906 - 06
Tape write protected error
1906 - 07
Tape already servo written
1906 - 08
Unable to servo write
----------------------------------------------------------------------------Error
Recommended
Code
Description
Action
----------------------------------------------------------------------------1906 - 09
Unable to format
The following steps apply
to error codes 1901 - xx
1906 - 10
Format mode error
through 1906 - xx:
1. Replace the tape
1906 - 11
Drive recalibration error
cartridge and retest.
2. Replace the tape
1906 - 12
Tape not servo written
drive and retest.
3. Replace the I/O board
1906 - 13
Tape not formatted
and retest.
1906 - 14
Drive timeout error
1906 - 15
Sensor error flag
1906 - 16
Block locate (block ID)
error
1906 - 17
Soft error limit exceeded
1906 - 18
Hard error limit exceeded
1906 - 19
Write (probably ID) error
1906 - 20
NEC fatal error
1906 - 21
Received servo pulses
second time but not first
1906 - 22
Never got to EOT after
servo check
----------------------------------------------------------------------------Error
Recommended
Code
Description
Action
----------------------------------------------------------------------------1906 - 23
Change line not set
The following steps apply
to error codes 1901 - xx
1906 - 24
Write protect error
through 1906 - xx:
1. Replace the tape
1906 - 25
Unable to erase cartridge
cartridge and retest.
2. Replace the tape
1906 - 26
Cannot identify drive
drive and retest.
3. Replace the I/O board
1906 - 27
Drive not compatible with
and retest.
controller
1906 - 28
Format gap error
1906 - 30
Exception bit not set
1906 - 31
Unexpected drive status
1906 - 32
Device fault
1906 - 33
Illegal command
1906 - 34
No data detected
1906 - 35
Power on reset occurred
1906 - 91
Power lost during test
=============================================================================
Table 3-12. Video Test Error Codes
=============================================================================
Error
Recommended
Code
Description
Action
----------------------------------------------------------------------------2402 - 01
Video memory test failed
Replace the video board
and retest for error
2403 - 01
Video attribute test failed
codes 2402 - xx through
2432 - xx.
2404 - 01
Video character set test
failed
2405 - 01
Video 80 x 25 mode
9 x 14 character cell test
failed
2406 - 01
Video 80 x 25 mode 8 x 8
character cell test failed
2407 - 01
Video 40 x 25 mode test
failed
2408 - 01
Video 320 x 200 mode
color set 0 test failed
2409 - 01
Video 320 x 200 mode
color set 1 test failed
2410 - 01
Video 640 x 200 mode
test failed
2411 - 01
Video screen memory
page test failed
2412 - 01
Video gray scale test failed
2414 - 01
Video white screen test
failed
----------------------------------------------------------------------------Error
Recommended
Code
Description
Action
----------------------------------------------------------------------------2416 - 01
Video noise pattern test
Replace the video board
failed
and retest for error codes
2402 - xx through
2418 - 01
Video memory test failed
2432 - xx.
2418 - 02
Video shadow RAM test
failed
2419 - 01
Video ROM checksum
test failed
2420 - 01
Video attribute test failed
2421 - 01
Video 640 x 200 graphics
mode test failed
2422 - 01
Video 640 x 350 16
color set test failed
2423 - 01
Video 640 x 350 64
color set test failed
2424 - 01
Video monochrome text
mode test failed
2425 - 01
Video monochrome
graphics mode test failed
2431 - xx
Video 640 x 480 graphics
mode test failed
2432 - xx
Video 320 x 200 graphics
mode test failed
=============================================================================
Table 3-13. Pointing Device Interface Test Error Codes
=============================================================================
Error
Recommended
Code
Description
Action
----------------------------------------------------------------------------8601 - xx
Pointing Device Interface
1. Install new copy of
test failed
mouse driver software.
2. Replace with a
working pointing
device and retest.
3. Replace the I/O
board and retest.
=============================================================================
Chapter 3.3 Memory Error Codes
Memory error codes appear when the system detects a memory fault during the
Power On Self Test (201 or 203 error codes) or as a result of a diagnostic
test. The TEST programs attempt to isolate the memory fault to a specific
location, then generate a memory error code.
The memory error code points to a specific memory address. The physical
location of the memory address depends on the number and type of memory
modules installed and the type of memory device used.
Memory error codes are displayed in an eight digit format (XX000Y ZZ). The
XX and Y alphanumeric codes are key identification points for defective
memory isolation.
XX000Y
| | |
| | |
| | |
ZZ
Error Message
|
|-------- 201 (ROM)
|
--------------------- Failed data bit.
Values are:
00, 01, 02, 04,
|
|
|
|
|
|
|
|
|
|
|
|
|
|
|
|
|
|
|
|
|
|
|
|
|
|
|
|
|
|
|
|
|
|
|
|
|
|
|
|
|
|
|
|
|
08, 10, 20, 40, 80, ??
00
01
02
04
08
10
20
40
80
??
=
=
=
=
=
=
=
=
=
=
parity bit
data bit 0
data bit 1
data bit 2
data bit 3
data bit 4
data bit 5
data bit 6
data bit 7
unable to determine failed data bit.
------------------------ Failed byte.
Values are 0, 1.
-------------------------- Always 000.
----------------------------- Failed address.
0X
1X
2X
3X
=
=
=
=
error
error
error
error
in
in
in
in
1st
2nd
3rd
4th
Values are 00 through 20.
megabyte
megabyte
megabyte
megabyte
Chapter 4. Illustrated Parts Catalog
This chapter provides an illustrated parts breakdown and identifies the spare
parts for the standard features of the COMPAQ PORTABLE 486c Personal
Computer.
Chapter 4.1 Illustrated Parts Breakdown
System Unit
Table 4-1. System Unit
=============================================================================
Description
Spare Part Number
----------------------------------------------------------------------------1. System Chassis
128937-001
2.
Front Bezel
128946-001
3.
Rear Panel
Handle
Connector Cover
Enhanced Option Cover
128938-001
4.
Base Panel
128948-001
5.
Tilt Base
135999-001
6.
Power Supply
128898-001
7.
Fan Assembly
128901-001
8.
Keylock
135901-001
9.
AC Power Cord (U.S./Canada)
121258-001
(UK)
128943-001 *
----------------------------------------------------------------------------* Not shown
=============================================================================
Active Matrix Color Display
Table 4-2.
Active Matrix Color Display
=============================================================================
Description
Spare Part Number
----------------------------------------------------------------------------1. Front Bezel
128946-001
2.
Display Assembly
Display Shield
128902-001
3.
Backlight Assembly
Display Shield
136964-001
4.
Video Cable
128903-001
5. Display Inverter Board
128900-001
=============================================================================
Mass Storage Devices
Table 4-3. Mass Storage Devices
=============================================================================
Description
Spare Part Number
----------------------------------------------------------------------------1. 210 Megabyte Fixed Disk Drive
128956-001
2.
120 Megabyte Fixed Disk Drive
3.
128955-001
3 1/2 inch 1.44 Megabyte
Diskette Drive
123313-001
=============================================================================
Cables
Table 4-4. Cables
=============================================================================
Description
Spare Part Number
----------------------------------------------------------------------------1. Power Distribution Board
128935-001
2. Video Cable
128903-001
=============================================================================
Processor Board
Table 4-5. COMPAQ PORTABLE 486c Personal Computer Processor Board Connectors
=============================================================================
1. Memory Module Connectors, Slots 2, 3, and 4
2. Intel 486 33 MHz Microprocessor Connector
3. System ROM Connector
4. Real Time Clock/Battery Connector
5. Memory Module Connector, Slot 1
=============================================================================
I/O Board
Table 4-6. COMPAQ PORTABLE 486c Personal Computer I/O Board Connectors
=============================================================================
1. Enhanced Option Connector
2. Internal Keyboard Connector
3. Fan Assembly Connector
4. Diskette Drive Connector
5. Fixed Disk Drive Connector
6. Processor Slot
7. Video Slot
8. Audio Input Jack
9. EISA Slots
10. I/O Board Switches
11. Serial Connector
12. Parallel Connector
13. External Storage Module Connector
14. CD-ROM Connector
15. Pointing Device (Mouse) Connector
16. External Keyboard Connector
=============================================================================
Standard Boards
Table 4-7. Processor and Standard Board Assemblies and Subassemblies
=============================================================================
Item Description
Spare Part Number
----------------------------------------------------------------------------1. Processor Board
128897-001
2. 4 Megabyte Memory Module
118741-001
3. System ROM
128939-001
4. Real Time Clock/Battery
126570-001
5. I/O Board
128949-001
6. Video Board
128899-001
7. Display Inverter Board
128900-001
8. Speaker Assembly
128966-001
=============================================================================
Keyboard
Table 4-8. Keyboards
=============================================================================
Description
Spare Part Number
----------------------------------------------------------------------------1. U.S. English
128958-001
2. Keyboard template
128934-001
3. UK English
128958-003 *
4. German
128958-004 *
5. French
128958-005 *
6. Italian
128958-006 *
7. Spanish
128958-007 *
8. Danish
128958-008 *
9. Norwegian
128958-009 *
10. Swedish/Finnish
128958-010 *
11. Swiss
128958-011 *
12. Portuguese
128958-013 *
13. Latin American
128958-016 *
14. Belgian
128958-018 *
----------------------------------------------------------------------------* Not shown
=============================================================================
Chapter 4.2 Spare Part Numbers
The following table provides a list of all of the spare part descriptions and
part numbers for standard features of the COMPAQ PORTABLE 486c Personal
Computer. Refer to the OPTIONS AND PERIPHERALS MAINTENANCE AND SERVICE GUIDE
for spare part numbers to optional features.
Table 4-9. Spare Parts List
=============================================================================
Description
Part Number
----------------------------------------------------------------------------System Unit:
System Chassis
128937-001
Front Bezel
128946-001
Rear Panel
128938-001
Handle
Connector Cover
Enhanced Option Cover
Base Panel
128948-001
Tilt Base
135999-001
Power Supply
128898-001
Fan Assembly
128901-001
Keylock
135901-001
AC Power Cord (U.S./Canada)
121258-001
AC Power Cord (UK)
128943-001
Active Matrix Color Display:
Front Bezel
Display Assembly
Display Shield
Backlight Assembly
Display Shield
Video Cable
Display Inverter Board
Mass Storage Devices:
210 Megabyte Fixed Disk Drive
120 Megabyte Fixed Disk Drive
3 1/2 inch 1.44 Megabyte
Diskette Drive
128946-001
128902-001
136964-001
128903-001
128900-001
128956-001
128955-001
123313-001
Cables:
Power Distribution Board
Video Cable
128935-001
128903-001
Processor and Standard Board Assemblies
and Subassemblies:
Processor Board
4 Megabyte Memory Module
System ROM
Real Time Clock/Battery
I/O Board
Video Board
Display Inverter Board
Speaker Assembly
128897-001
118741-001
128939-001
126570-001
128949-001
128899-001
128900-001
128966-001
Keyboards:
U.S. English
Keyboard template
UK English
German
French
Italian
Spanish
Danish
Norwegian
Swedish/Finnish
Swiss
Portuguese
Latin American
128958-001
128934-001
128958-003
128958-004
128958-005
128958-006
128958-007
128958-008
128958-009
128958-010
128958-011
128958-013
128958-016
Belgian
128958-018
Documentation:
Service Aids Kit
105264-001
Maintenance and Service Guides:
COMPAQ PORTABLE 486c Personal Computer
128987-001
Options and Peripherals Volume 1
120577-001
Options and Peripherals Volume 2
120577-001
Options and Peripherals Volume 3
120577-001
Support Software
120576-001
Operations Guide
128940-001
COMPAQ PORTABLE 486c
PERSONAL COMPUTER TECHNICAL
REFERENCE GUIDE
128822-001
COMPAQ SERVICE QUICK REFERENCE
GUIDE
106854-001
Diagnostics
3 1/2 inch 720 Kbyte Diskette
*
User Programs
3 1/2 inch 1.44 Megabyte Diskette
*
----------------------------------------------------------------------------* The software spare part numbers are subject to change. Please consult the
current price list for the software spare part number before ordering.
=============================================================================
Table 4-10. Miscellaneous Hardware
=============================================================================
Description
Part Number
----------------------------------------------------------------------------Logo Labels
128944-001
Plastic Parts Kit
Access Cover
Brightness/Volume Controls
Board Guide Assembly
Keyboard Feet
Options Door
Options Bezel
Screw Covers
Switch Cover
135900-001
Hardware Kit
Anti skid feet
Backlight cable
Diskette drive cage ground strap
Display inverter board insulator
Fixed disk drive ground strap
Enhanced option cap
Enhanced option shield
Options cover
128945-001
Screw Kit
4-40 x 3/16, PNHD, Torx
133982-001
Screw Kit
6-19 x 1/4, PNHD, Torx, PT, CS
136965-001
Screw Kit
6-19 x 1/2, PNHD, Torx, Plastite
136973-001
Screw Kit
6-32, MA, TH, T-15, CS
136967-001
Screw Kit
6-32 x 1/4, Torx, TT, HI, T/WSr
119548-001
Screw Kit
6-32 x 1/4, S-Torx, PNHD
136966-001
Screw Kit
6-32 x 1/4, TAPTITE, HT
128212-001
Screw Kit
136974-001
6-32 x 1/2, S-Torx, TT
=============================================================================
Chapter 5. Removal and Replacement Procedures
Introduction
This chapter provides module level removal and replacement procedures for the
COMPAQ PORTABLE 486c Personal Computer.
After completing all removal and replacement procedures, run the Diagnostics
program to verify that all components operate properly. Refer to the SUPPORT
SOFTWARE MAINTENANCE AND SERVICE GUIDE for information on installing new or
updated utilities when adding or removing options.
Chapter 5.1 Electrostatic Discharge
Before beginning to remove and replace a component in the COMPAQ PORTABLE
486c Personal Computer, be sure you are discharged of static electricity.
A sudden discharge of static electricity from a finger or other conductor can
destroy static sensitive devices or micro circuitry. Often the spark is
neither felt nor heard, but damage occurs. An electronic device exposed to
electrostatic discharge (ESD) may not be affected at all and will work
perfectly throughout a normal cycle. Or it may function normally for awhile,
then degrade in the internal layers, reducing its life expectancy.
Networks built into many integrated circuits provide some protection, but in
many cases, the discharge contains enough power to alter device parameters
and/or melt silicon junctions.
Generating Static
Table 5-1 shows how different methods generate static electricity and at
different electrostatic voltage levels.
Table 5-1. Typical Electrostatic Voltages
=============================================================================
Event
Relative Humidity
10%
40%
55%
----------------------------------------------------------------------------Walking across carpet
35,000V
15,000V
7,500V
Walking across vinyl floor
12,000V
5,000V
3,000V
Motions of bench worker
6,000V
800V
400V
Removing DIPs from plastic tubes
2,000V
700V
400V
Removing DIPs from vinyl trays
11,500V
4,000V
2,000V
Removing DIPs from Styrofoam
14,500V
5,000V
3,500V
Removing bubble pack from PCBs
26,000V
20,000V
7,000V
Packing PCBs in foam lined box
21,000V
11,000V
5,000V
=============================================================================
NOTE:
700 volts can degrade a product.
Preventing Electrostatic Damage to Equipment
Many electronic components are sensitive to ESD. Circuitry design and
structure determine the degree of sensitivity. Proper packaging and
grounding are necessary precautions to prevent damage.
precautions to protect equipment from static damage:
Use the following
o To avoid hand contact, transport products in static safe containers such as
tubes, bags, or boxes.
o Protect all electrostatic parts and assemblies by conductive or approved
containers or packaging.
o Keep electrostatic sensitive parts in their containers until they arrive at
static free stations.
o Place items on a grounded surface before removing them from their
container.
o Always be properly grounded when touching a sensitive component or
assembly.
o Place reusable electrostatic sensitive parts from assemblies in protective
packaging or conductive foam.
Use transporters and conveyors made of antistatic belts and metal roller
bushings. Mechanized equipment used for moving materials must be wired to
ground and proper materials selected to minimize static charging. When
grounding is not possible, use an ionizer to dissipate electric charges.
Preventing Damage to Drives
To prevent static damage to diskette drives and fixed disk drives, handle
drives gently and perform the following static guarding techniques:
o
o
o
o
Store drives in their original shipping containers.
Avoid dropping the drive from any height onto any surface.
Handle drives on surfaces which have at least one inch of shock proof foam.
Always place drives PCB assembly side down on the foam.
Grounding Methods
Methods for grounding must include either a wrist strap or a foot strap at a
grounded workstation. When seated, wear a wrist strap connected to a
grounded system. When standing, use footstraps and a grounded floor mat.
Table 5-2 lists different antistatic materials and their shielding protection
levels.
Table 5-2. Static Shielding Protection Levels
==================================================
Method
Voltages
-------------------------------------------------Antistatic plastic
1,500
Carbon loaded plastic
7,500
Metallized laminate
15,000
==================================================
Grounding Workstations
To provide a grounded workstation, do the following:
o Cover workstations with approved static dissipating material. Provide a
wrist strap connected to work surface and properly grounded tools and
equipment.
o Use static dissipating mats, heel straps, or air ionizers to give added
protection.
o Handle electrostatic sensitive components, parts, and assemblies by the
case or PCB laminate. Handle them only at static free workstations.
o Avoid contact with pins, leads, or circuitry.
o Turn off power and input signals before inserting and removing connectors
or test equipment to the computer.
o Use fixtures made of static safe materials when fixtures must directly
contact dissipating surfaces.
o Keep work area free of non conductive materials such as ordinary plastic
assembly aids and Styrofoam.
o Use field service tools, such as cutters, screwdrivers, vacuums, that are
conductive.
o Use a portable field service kit with a static dissipating vinyl pouch that
folds out to a work mat. Also use a wrist strap and a ground cord for the
work surface. Ground the cord to the chassis of the equipment undergoing
test or repair.
Grounding Equipment
Use the following equipment to prevent static electricity damage to
equipment:
Wrist Straps are flexible straps with a minimum of 1 megohm ñ 10%
resistance in the ground cords. To provide proper ground, a strap must be
worn snug against the skin. On grounded mats without banana plug connectors,
connect a wrist strap with alligator clips.
Heelstraps/Toestraps/Bootstraps can be used at standing workstations and are
compatible with most types of shoes or boots. On conductive floors or
dissipative floor mats, use them on both feet with a minimum of 1 megohm
resistance between operator and ground. To be effective the conductive
strips must be worn in contact with the skin.
Other materials and equipment that are recommended for use in preventing
static electricity include:
o Antistatic tape
o Antistatic smocks, aprons or sleeve protectors
o Conductive bins and other assembly or soldering aids
o Conductive foam
o Conductive table top workstations with ground cord of 1 megohm resistance
o Static dissipating table or floor mats with hard tie to ground
o Field service kits
o Static awareness labels
o Wrist straps and footwear straps providing 1 megohm ñ 10% resistance
o Material handling packages
- Conductive plastic bags
- Conductive plastic tubes
- Conductive tote boxes
- Metal tote boxes
- Opaque shielding bags
- Transparent metallized shielding bag
- Transparent shielding tubes
Chapter 5.2 Tool and Software Requirements
To service the COMPAQ PORTABLE 486c Personal Computer, you need the
following:
o
o
o
o
o
o
o
o
Case utility tool
Flathead screwdriver
Modem terminating plug
Nonconductive probe
ROM removal tool
Torx screwdrivers, sizes T-10 and T-15
9 pin serial interface loopback plug
25 pin parallel interface loopback plug
Chapter 5.3 Disassembly/Assembly Sequence Chart
Use the following chart as a reference along with the procedures in this
chapter for removing and replacing the subassemblies of the COMPAQ PORTABLE
486c Personal Computer.
5.4
5.5
5.6
5.7
5.8
PREPARATION PROCEDURES
|
|-- KEYBOARD
|
|-- REAR PANEL
|
|
|
|-- OPTIONS COVER
|
|
|
|-- STANDARD BOARDS
|
|
|-- Video Board
|
|
|-- Processor Board
|
|
|-- System ROM
5.9
5.10
5.11
5.12
5.13
5.14
5.15
5.16
|
|
|
|
|
|
|
|
|-|
|-|
|
|
|-|
|
|
|
|
|
|-|
|--
|
|
|-|
|-|
|--
|-- Real Time Clock/Battery
POWER SUPPLY
FAN ASSEMBLY
I/O BOARD
BASE PANEL
MASS STORAGE DEVICES
|-- Diskette Drive
|-- Fixed Disk Drive
ACTIVE MATRIX COLOR DISPLAY
|-- Front Bezel
|-- Display Assembly
|-- Backlight Assembly
|-- Display Inverter Board
|-- Speaker Assembly
POWER DISTRIBUTION BOARD
KEYLOCK
Chapter 5.4 Preparation Procedures
Before beginning the removal and replacement procedures, complete the
following steps:
1.
Turn off the computer.
2.
Disconnect the AC power cord from the AC outlet and from the computer
(Figure 5-1).
3.
Disconnect all external devices (printer, monitor, and other devices)
from the computer.
>>>>>>>>>>>>>>>>>>>>>>>>>>>>>>>>>>>>>>><<<<<<<<<<<<<<<<<<<<<<<<<<<<<<<<<<<<<<<
CAUTION
Static electricity can damage the CMOS components. Be sure that you are
properly grounded before performing any of the following procedures.
>>>>>>>>>>>>>>>>>>>>>>>>>>>>>>>>>>>>>>><<<<<<<<<<<<<<<<<<<<<<<<<<<<<<<<<<<<<<<
CAUTION
Screws in this system are not interchangeable. As you remove screws, place
them with the component you removed. Damage may occur if you insert these
screws in the wrong place.
>>>>>>>>>>>>>>>>>>>>>>>>>>>>>>>>>>>>>>><<<<<<<<<<<<<<<<<<<<<<<<<<<<<<<<<<<<<<<
Chapter 5.5 Keyboard
To remove the keyboard, complete the following steps:
1.
Remove the keyboard from storage position by pressing down on the two
keyboard latches and pulling the keyboard out from the front bezel
(Figure 5-2).
2.
Using a nonconductive probe, remove the access cover (Figure 5-3).
3.
Disconnect the keyboard cable by gently pulling the keyboard connector
tab (Figure 5-4).
4.
Carefully remove the keyboard cable from the cable slot (Figure 5-4).
To replace the keyboard, reverse the steps in the above illustrations.
Chapter 5.6 Rear Panel
To remove the rear panel, complete the following steps:
1.
Push the tilt adjustment buttons on the sides of the computer in and tilt
the display assembly forward (Figure 5-5).
2.
Lift the handle and remove two screws, using a Torx T-15 screwdriver
(Figure 5-5).
3.
Pull the rear panel out and up, until the bottom latches are released
from the slots (Figure 5-6).
To replace the rear panel, complete the following steps:
1.
Position the rear panel on the computer by aligning the bottom latches
with the appropriate slots.
2.
Slide the rear panel down and forward, and secure with the two screws
using a Torx T-15 screwdriver.
Chapter 5.7 Options Cover
To remove the options cover, complete the following steps:
1.
Remove the rear panel (Section 5.6).
2.
Using a Torx T-15 screwdriver, remove three screws from the top of the
options cover (Figure 5-7).
3.
Loosen two slotted screws (Figure 5-8).
4.
Lift the options cover off of the slotted screws (Figure 5-8).
To replace the options cover, reverse the steps in the above illustration.
Chapter 5.8 Standard Boards
Video Board
To remove the video board, complete the following steps:
1.
Remove the rear panel (Section 5.6).
2.
Remove the options cover (Section 5.7).
3.
Remove any expansion boards from the expansion slots (Refer to the COMPAQ
PORTABLE 486c Personal Computer Reference Guide).
>>>>>>>>>>>>>>>>>>>>>>>>>>>>>>>>>>>>>>><<<<<<<<<<<<<<<<<<<<<<<<<<<<<<<<<<<<<<<
CAUTION
When removing or inserting cables with Zero Insertion Force (ZIF) connectors,
do not pull, twist, or apply tension to cables.
>>>>>>>>>>>>>>>>>>>>>>>>>>>>>>>>>>>>>>><<<<<<<<<<<<<<<<<<<<<<<<<<<<<<<<<<<<<<<
NOTE: The ZIF connectors in this product have mechanical latches that either
slide foreword and lift up or slide up to open. Be sure the latches on the
ZIF connectors are opened before attempting to remove the cable.
4.
Carefully disconnect the video board cable from the ZIF connector
(Figure 5-9).
5.
Carefully disconnect the video cable from the video board (Figure 5-9).
6.
Using a Torx T-10 screwdriver, remove the screw securing the video board
(Figure 5-9).
7.
Carefully pull the video board out of the slot (Figure 5-9).
To replace the video board, reverse the steps in the above illustration.
Processor Board
To remove the processor board, complete the following steps:
1.
Remove the rear panel (Section 5.6).
2.
Remove the options cover (Section 5.7).
3.
Remove the video board (Section 5.8).
4.
Using a Torx T-15 screwdriver, remove five screws securing the processor
board to the display pan (Figure 5-10).
5.
Carefully pull the processor board out of the slot (Figure 5-10).
To replace the processor board, reverse the steps in the above illustration.
System ROM
To remove the system ROM from the processor board, complete the following
steps:
1.
Remove the rear panel (Section 5.6).
2.
Remove the options cover (Section 5.7).
3.
Remove the video board (Section 5.8).
4.
Remove the processor board.
5.
Locate the system ROM on the processor board (Figure 5-11).
6.
Using the ROM removal tool, grasp the ROM and gently pull up until it is
released from the socket (Figure 5-11).
To replace the system ROM, reverse the steps in the above illustration.
NOTE: When replacing the system ROM, align Pin 1 with the dot on the system
ROM socket.
Real Time Clock/Battery
To remove the real time clock/battery, complete the following steps:
1.
Remove the rear panel (Section 5.6).
2.
Remove the options cover (Section 5.7).
3.
Remove the video board (Section 5.8).
4.
Remove the processor board (Section 5.8).
5.
Locate the real time clock/battery on the processor board (Figure 5-12).
>>>>>>>>>>>>>>>>>>>>>>>>>>>>>>>>>>>>>>><<<<<<<<<<<<<<<<<<<<<<<<<<<<<<<<<<<<<<<
WARNING
The real time clock/battery contains a lithium battery that may explode if
mishandled. Do not abuse, recharge, disassemble, or dispose of in fire.
Use only replacement real time clock/battery modules supplied by Compaq
Computer Corporation (part no. 126570-001).
Disposal of the real time clock/battery should be accomplished within
compliance of local regulations or returned to Compaq Computer Corporation by
established parts return methods.
>>>>>>>>>>>>>>>>>>>>>>>>>>>>>>>>>>>>>>><<<<<<<<<<<<<<<<<<<<<<<<<<<<<<<<<<<<<<<
6.
Cut the tie wrap securing the real time clock/battery to the processor
board and remove the real time clock/battery (Figure 5-12).
To replace the real time clock/battery, reverse the steps in the above
illustration.
Chapter 5.9 Power Supply
To remove the power supply, complete the following steps:
1.
Remove the rear panel (Section 5.6).
2.
Remove the options cover (Section 5.7).
3.
Using a Torx T-15 screwdriver, remove three screws securing the power
supply to the I/O board (Figure 5-13).
4.
Pull out the power supply with the switch bezel attached (Figure 5-13).
5.
Remove the switch bezel from the power supply (Figure 5-13).
To replace the power supply, reverse the steps in the above illustration.
Chapter 5.10 Fan Assembly
To remove the fan assembly, complete the following steps:
1.
Remove the rear panel (Section 5.6).
2.
Remove the options cover (Section 5.7).
3.
Carefully disconnect the fan assembly cable (Figure 5-14).
4.
Using a Torx T-10 screwdriver, remove the screw securing the fan assembly
(Figure 5-14).
5.
Slide the fan assembly out (Figure 5-14).
To replace the fan assembly, reverse the steps in the above illustration.
Chapter 5.11 I/O Board
To remove the I/O board, complete the following steps:
1.
Remove the rear panel (Section 5.6).
2.
Remove the options cover (Section 5.7).
3.
Remove the video board (Section 5.8).
4.
Remove the processor board (Section 5.8).
5.
Remove the power supply (Section 5.9).
6.
Remove the fan assembly (Section 5.10).
7.
Carefully disconnect the diskette drive cable, fixed disk drive cable,
and power cable (Figure 5-15).
8.
Disconnect the fan assembly cable (Figure 5-15).
9.
Using a Torx T-10 screwdriver, remove the screw securing the internal
keyboard connector to the display pan (Figure 5-15).
10.
Using a Torx T-15 screwdriver, remove seven screws securing the I/O
board (Figure 5-15).
To replace the I/O board, reverse the steps in the above illustration.
Chapter 5.12 Base Panel
To remove the base panel, complete the following steps:
IMPORTANT: The base panel cannot be removed with the cable lock provision
pulled out. Be sure the cable lock provision is completely pushed in before
performing the following steps.
1.
Push in the cable lock provision (Figure 5-16).
2.
Position the computer on the rear panel (Figure 5-16).
3.
Using a Torx T-15 screwdriver, remove the screw from the base panel
(Figure 5-16).
4.
Remove the base panel by sliding it out toward the diskette drive side of
the computer (Figure 5-16).
To replace the base panel, reverse the steps in the above illustration.
Chapter 5.13 Mass Storage Devices
Diskette Drive
To remove the diskette drive, complete the following steps:
1.
Remove the base panel (Section 5.12).
2.
Carefully disconnect the cable from the diskette drive (Figure 5-17).
3.
Using a Torx T-15 screwdriver, remove the screws securing the diskette
drive cage; then swing the drive cage out (Figure 5-17).
4.
Using a Torx T-15 screwdriver, remove four screws securing the diskette
drive to the drive cage (Figure 5-17).
To replace the diskette drive, reverse the steps in the above illustration.
Fixed Disk Drive
To remove the fixed disk drive, complete the following steps:
1.
Remove the base panel (Section 5.12).
2.
Carefully disconnect the two cables from the fixed disk drive
(Figure 5-18).
3.
Using a Torx T-15 screwdriver, remove the screws securing the fixed disk
drive cage; then swing the drive cage out (Figure 5-18).
4.
Lift the fixed disk drive out of the cage and remove the shock mounts
(Figure 5-19).
To replace the fixed disk drive, reverse the steps in the above
illustrations.
Chapter 5.14 Active Matrix Color Display
Front Bezel
To remove the front bezel, complete the following steps:
1.
Remove the keyboard (Section 5.5).
2.
Pull the brightness and volume controls off (Figure 5-20).
3.
Remove four plastic screw covers from the front bezel (Figure 5-20).
>>>>>>>>>>>>>>>>>>>>>>>>>>>>>>>>>>>>>>><<<<<<<<<<<<<<<<<<<<<<<<<<<<<<<<<<<<<<<
WARNING
The display inverter board contains high voltage. Avoid contact with all
surfaces of the display inverter board when removing the front bezel.
>>>>>>>>>>>>>>>>>>>>>>>>>>>>>>>>>>>>>>><<<<<<<<<<<<<<<<<<<<<<<<<<<<<<<<<<<<<<<
4.
Using a Torx T-15 screwdriver, remove four Plastite screws securing the
front bezel (Figure 5-20).
5.
Pull the front bezel out from the display assembly (Figure 5-20).
To replace the front bezel, reverse the steps in the above illustration.
Display Assembly
To remove the display assembly, complete the following steps:
1.
Remove the keyboard (Section 5.5).
2.
Remove the front bezel (Section 5.14).
>>>>>>>>>>>>>>>>>>>>>>>>>>>>>>>>>>>>>>><<<<<<<<<<<<<<<<<<<<<<<<<<<<<<<<<<<<<<<
WARNING
The display inverter board contains High Voltage. Avoid contact with all
surfaces of the display inverter board when removing the display assembly.
>>>>>>>>>>>>>>>>>>>>>>>>>>>>>>>>>>>>>>><<<<<<<<<<<<<<<<<<<<<<<<<<<<<<<<<<<<<<<
CAUTION
Before touching the display assembly, be sure you are discharged of static
electricity by touching a grounded metal object.
>>>>>>>>>>>>>>>>>>>>>>>>>>>>>>>>>>>>>>><<<<<<<<<<<<<<<<<<<<<<<<<<<<<<<<<<<<<<<
3.
Using a Torx T-15 screwdriver, remove four screws securing the display
assembly (Figure 5-21).
>>>>>>>>>>>>>>>>>>>>>>>>>>>>>>>>>>>>>>><<<<<<<<<<<<<<<<<<<<<<<<<<<<<<<<<<<<<<<
CAUTION
When removing or inserting cables with ZIF connectors, do not pull, twist, or
apply tension to cables.
>>>>>>>>>>>>>>>>>>>>>>>>>>>>>>>>>>>>>>><<<<<<<<<<<<<<<<<<<<<<<<<<<<<<<<<<<<<<<
NOTE: The ZIF connectors in this product have mechanical latches that either
slide forward and lift up or slide up to open. Be sure the latches on the
ZIF connectors are opened before attempting to remove the cable.
4.
Carefully disconnect the video board cable from the ZIF connector
(Figure 5-21).
5.
Carefully disconnect two display inverter board cables (Figure 5-21).
6.
Remove the display assembly and the display shield (Figure 5-21).
To replace the display assembly, reverse the steps in the above
illustrations.
>>>>>>>>>>>>>>>>>>>>>>>>>>>>>>>>>>>>>>><<<<<<<<<<<<<<<<<<<<<<<<<<<<<<<<<<<<<<<
CAUTION
Do not clean the display screen with soap or isopropyl alcohol. Gently wipe
the display screen with a clean, low lint cloth, moistened with water.
>>>>>>>>>>>>>>>>>>>>>>>>>>>>>>>>>>>>>>><<<<<<<<<<<<<<<<<<<<<<<<<<<<<<<<<<<<<<<
Backlight Assembly
To remove the backlight assembly, complete the following steps:
1.
Remove the keyboard (Section 5.5).
2.
Remove the front bezel (Section 5.14).
3.
Remove the display assembly (Section 5.14).
>>>>>>>>>>>>>>>>>>>>>>>>>>>>>>>>>>>>>>><<<<<<<<<<<<<<<<<<<<<<<<<<<<<<<<<<<<<<<
CAUTION
Before touching the display assembly, be sure you are discharged of static
electricity by touching a grounded metal object.
>>>>>>>>>>>>>>>>>>>>>>>>>>>>>>>>>>>>>>><<<<<<<<<<<<<<<<<<<<<<<<<<<<<<<<<<<<<<<
4.
Place the display assembly screen down on a soft, clean surface.
5.
Using a Phillips screwdriver, remove the four screws securing the display
assembly to the backlight assembly (Figure 5-22).
6.
Carefully release the display assembly cables from the four corner
brackets (Figure 5-22).
7.
Release the five tabs securing the backlight assembly to the display
assembly (Figure 5-22).
To replace the backlight assembly, reverse the steps in the above
illustration.
>>>>>>>>>>>>>>>>>>>>>>>>>>>>>>>>>>>>>>><<<<<<<<<<<<<<<<<<<<<<<<<<<<<<<<<<<<<<<
CAUTION
When installing the display assembly cables into the four corner brackets,
ensure that the cable wires are not pulled, twisted, or pinched.
>>>>>>>>>>>>>>>>>>>>>>>>>>>>>>>>>>>>>>><<<<<<<<<<<<<<<<<<<<<<<<<<<<<<<<<<<<<<<
NOTE: When replacing the backlight assembly, align the five tabs with the
display assembly.
Display Inverter Board
To remove the display inverter board, complete the following steps:
1.
Remove the keyboard (Section 5.5).
2.
Remove the front bezel (Section 5.14).
3.
Remove the display assembly (Section 5.14).
>>>>>>>>>>>>>>>>>>>>>>>>>>>>>>>>>>>>>>><<<<<<<<<<<<<<<<<<<<<<<<<<<<<<<<<<<<<<<
WARNING
The display inverter board contains high voltage.
surfaces of the board.
Avoid contact with all
>>>>>>>>>>>>>>>>>>>>>>>>>>>>>>>>>>>>>>><<<<<<<<<<<<<<<<<<<<<<<<<<<<<<<<<<<<<<<
CAUTION
When removing or inserting cables with ZIF connectors, do not pull, twist, or
apply tension to cables.
>>>>>>>>>>>>>>>>>>>>>>>>>>>>>>>>>>>>>>><<<<<<<<<<<<<<<<<<<<<<<<<<<<<<<<<<<<<<<
NOTE: The ZIF connectors in this product have mechanical latches that either
slide forward and lift up or slide up to open. Be sure the latches on the
ZIF connectors are opened before attempting to remove the cable.
4.
Carefully disconnect the power distribution board cable from the ZIF
connector on the display inverter board (Figure 5-23).
5.
Carefully disconnect two cables from the display assembly (Figure 5-23).
6.
Pull the display inverter board insulator aside to gain access to the
screws (Figure 5-23).
7.
Using a Torx T-15 screwdriver, remove five screws securing the display
inverter board (Figure 5-23).
To replace the display inverter board, reverse the steps in the above
illustration.
Speaker Assembly
To remove the speaker assembly from the display inverter board, complete the
following steps:
1.
Remove the keyboard (Section 5.5).
2.
Remove the front bezel (Section 5.14).
3.
Carefully disconnect the speaker assembly cable from the display inverter
board (Figure 5-24).
4.
Carefully release the speaker assembly tabs and remove the speaker
assembly from the display inverter board (Figure 5-24).
To replace the speaker assembly, reverse the steps in the above illustration.
Chapter 5.15 Power Distribution Board
To remove the power distribution board, complete the following steps:
1.
Remove the keyboard (Section 5.5).
2.
Remove the front bezel (Section 5.14).
>>>>>>>>>>>>>>>>>>>>>>>>>>>>>>>>>>>>>>><<<<<<<<<<<<<<<<<<<<<<<<<<<<<<<<<<<<<<<
CAUTION
When removing or inserting cables with ZIF connectors, do not pull, twist, or
apply tension to cables.
>>>>>>>>>>>>>>>>>>>>>>>>>>>>>>>>>>>>>>><<<<<<<<<<<<<<<<<<<<<<<<<<<<<<<<<<<<<<<
NOTE: The ZIF connectors in this product have mechanical latches that either
slide forward and lift up or slide up to open. Be sure the latches on the
ZIF connectors are opened before attempting to remove the cable.
3.
Carefully disconnect the power distribution cable from the ZIF connector
on the display inverter board (Figure 5-25).
4.
Turn the computer around and remove the rear panel (Section 5.6).
5.
Remove the options cover (Section 5.7).
6.
Remove the video board (Section 5.8).
7.
Remove the processor board (Section 5.8).
8.
Remove the power supply (Section 5.9).
9.
Remove the fan assembly (Section 5.10).
10.
Remove the I/O board (Section 5.11).
11.
Remove the base panel (Section 5.12).
12.
Carefully disconnect the diskette drive cable, fixed disk drive cable,
and power cable (Figure 5-26).
13.
Using a Torx T-15 screwdriver, remove four screws securing the power
distribution board (Figure 5-27).
14.
Carefully pull the I/O cables, diskette drive cable, fixed disk drive
cable, and power cable through their respective slots and remove the
power distribution board (Figure 5-27).
To replace the power distribution board, reverse the steps in the above illustrations.
Chapter 5.16 Keylock
To remove the keylock, complete the following steps:
1.
Remove the rear panel (Section 5.6).
2.
Remove the options cover (Section 5.7).
3.
Using a flathead screwdriver, remove the metal clip securing the keylock
(Figure 5-28).
4.
Pull the keylock out of the computer (Figure 5-28).
To replace the keylock, reverse the steps in the above illustration.
Chapter 5.17 Memory Expansion
Some of the memory expansion alternatives for the COMPAQ PORTABLE 486c
Personal Computer are shown in Table 5-3. Memory modules can be added in
combinations of 2, 4, and 8 megabytes for a total of 32 megabytes.
NOTE: Memory modules can be installed in any combination and in any available
slot. However, slot 1 must contain a memory module.
Table 5-3. Memory Expansion
COMPAQ PORTABLE 486c Personal Computer
=============================================================================
Memory Module(s) Added
Total
Slot 1
to Slots 2, 3, or 4
Memory
----------------------------------------------------------------------------4 MB
2 MB
2 MB
6 MB
4 MB
2 MB
2 MB
2 MB
8 MB
4 MB
4 MB
2 MB
8 MB
4 MB
2 MB
2 MB
2 MB
10 MB
4 MB
2 MB
4 MB
2 MB
10 MB
4 MB
2 MB
2 MB
4 MB
12 MB
4 MB
4 MB
4 MB
2 MB
12 MB
4 MB
8 MB
2 MB
12 MB
4 MB
2 MB
4 MB
4 MB
14 MB
4 MB
2 MB
8 MB
2 MB
14 MB
4 MB
2 MB
2 MB
8 MB
16 MB
4 MB
4 MB
4 MB
4 MB
16 MB
4 MB
4 MB
8 MB
2 MB
16 MB
4 MB
2 MB
4 MB
8 MB
18 MB
4 MB
4 MB
4 MB
8 MB
20 MB
4 MB
8 MB
8 MB
2 MB
20 MB
4 MB
2 MB
8 MB
8 MB
22 MB
4 MB
4 MB
8 MB
8 MB
24 MB
4 MB
8 MB
8 MB
8 MB
28 MB
|
|
|
|
|
|
|
|
|
|
8 MB
8 MB
8 MB
8 MB
32 MB
=============================================================================
Chapter 6. Jumper and Switch Information
This chapter provides the switch settings for the COMPAQ PORTABLE 486c
Personal Computer I/O board. The I/O board contains six switches. The
default settings shown in the following table are set for the computer as
configured by Compaq Computer Corporation. These settings need to be changed
only when the system configuration changes.
Table 6-1 lists the switch settings and describes the function of each
switch. Figure 6-1 shows the location of the switches on the I/O board.
Table 6-1. I/O Board Switch Settings (Assy No. 002142)
=============================================================================
Switch
Position
Status
Function
----------------------------------------------------------------------------SW1
ON
Disabled
Controls the integrated
OFF
Enabled
video graphics controller.
OFF is the default position.
ON is used to avoid conflict
when using a third party
video board.
----------------------------------------------------------------------------SW2
ON
Enabled
Controls EISA configuration.
OFF
Disabled
OFF is the default position
and allows the user to change
the configuration in CMOS.
ON allows the EISA
configuration to be viewed
but not changed.
----------------------------------------------------------------------------SW3
ON
Enabled
Controls Read/Write
OFF
Disabled
to the Diskette Drive.
OFF is the default position
and allows Read/Write
capability.
ON sets the diskette drive
for Read only.
----------------------------------------------------------------------------Switch
Position
Status
Function
----------------------------------------------------------------------------SW4
ON
Enabled
Controls whether the diskette
OFF
Disabled
can be used to restart.
OFF is the default position
and uses the EISA
configuration selection.
ON allows the user to restart
from the diskette drive and
overrides the EISA
configuration selection.
-----------------------------------------------------------------------------
SW5
ON
OFF
Enabled
Disabled
Controls the power on
password.
OFF is the default position
and enables the power on
password feature.
ON will clear the power
on password.
----------------------------------------------------------------------------SW6
ON
Enabled
Allows the configuration
OFF
Disabled
memory to be cleared.
OFF is the default position
and allows configuration
memory to remain unchanged.
ON clears the
configuration memory.
=============================================================================