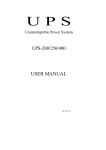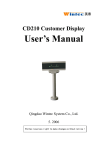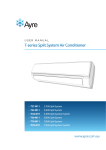
1
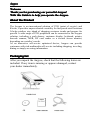
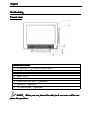
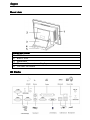
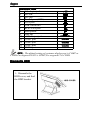
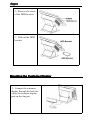
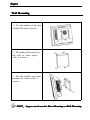
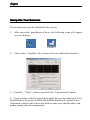
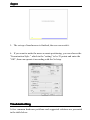
600
Anypos
Anypos600
User Manual
AOPOS SYSTEMS S.A.
Anypos
Welcome
Thank you for purchasing our powerful Anypos!
With this Guide is to help you operate the Anypos.
About the Product
The Anypos is an innovational solution of POS (point of service) and
Kiosks, it provides unprecedented versatility for fast-paced retail locations.
It helps retailers stay ahead of changing customer trends and prepare for
growth. A wide range of POS peripherals can be connected to the Anypos
solution, including a cash drawer, customer display, keyboard, printer,
barcode scanner, MSR, RF card reader or a second screen monitor,
depending on a retailer’s needs.
As an innovative self-service optimized device, Anypos can provide
customers with rich multimedia self-service including shopping, traveling,
dining or simply accessing information.
Packag
ing list
ackaging
After you unpack the Anypos, check that the following items are
included. If any item is missing or appears damaged, contact
your dealer immediately.
Anypos
Outlooking
Front view
DESCRIPTION
1 15-inch TFT LCD and Touch screen
2 Magnet Stripe Reader(Optional)
3 Power LED
4 HDD LED
5 Power Switch
6 Front Line-out jack(Optional)
7 Speaker(Optional)
8 RF card reader(Optional)
When you use front Line
-O
ut jack, no voice will be out
NOTE
NOTE:When
ine-O
-Out
from the speakers
speakers..
Anypos
Rear view
DESCRIPTION
1 HDD Cover
2 Back Cover
3 Main Base
4 The screw for customer display
5 The hole for cables
IO Ports
Anypos
DESCRIPTION
1
AC adapter jack
2
PS2 KB
3
PS2 MS
4
Parallel port (LPT1)
5
VGA port
6
USB 1&2&3&4
7
RJ-45 LAN port
8
Microphone
9
Line-out
10 +12V Output jack
11 COM1 port
12 COM2 port
13 COM3 port
14 COM4 port
OUT 12V
COM1
COM2
COM3
COM4
NOTE
NOTE:The default setting of customer display port is COM2 or
COM4.For anypos616/632 is COM2,For anypos615 is COM4.
Dismantle HDD
1、Dismantle the
HDD cover, and find
the HDD bracket.
Anypos
2、Remove the screw
of the HDD bracket.
3、Pull out the HDD
bracket.
Mounting the Customer Display
1、Connect the customer
display through the hole for
cables to customer display
port on the Anypos.
Anypos
2、Fix the display with 4
supplied screws.
Mounting the 2nd Display
1、Connect the 2nd LCD
display to the VGA port and
+12V output jack separately
through the holes for cables.
2、Fix the display with 4
supplied screws.
Anypos
Wall Mounting
1、Fix the holder on the rear
of the POS with 6 screws.
2、Mounting the bracket on
the wall or other place
with 4 screws.
3、Put the holder into brac
ket,and fix them with 2
screws.
Anypos can be use
NOTE
NOTE:Anypos
usedd in Base Mounting or Wall Mounting
Mounting..
Anypos
Setup the Touchscreen
The touchscreen must be calibrated before in use.
1、 After successful installation of diver, the following icons will appear
on your desktop.
2、 Click on the “Touchkit”, the system will enter calibration interface.
3、Click the “Tools”button, then click the “Linearization” button.
4、A new window will be popped-up to guide the user do calibration. User
should follows the guide to touch and hold the blinking X symbol in the
calibration window until it does not blink to make sure that the utility can
gather enough data for computation.
Anypos
5、The set-up of touchscreen is finished ,the user can work it.
6、If you want to make the more accurate positioning, you can choose the
“Linearization Style ” which in the “setting” to be 25 points and enter the
“OK”, then can operate it according with the 3rd step.
Troubleshotting
A few common hardware problems and suggested solutions are presented
in the table below:
Anypos
PROBLEM
The display screen is
dark.
“Invalid system disk,
Replace the disk, and
then press any key”
The following message appears at boot
up: “Invalid system
disk, Replace the
disk, and then press
any key”
An unidentified
message is displayed.
Can’t turn on the POS.
The scanner doesn’t
work
Display isn’t clear
The date or time isn’t
right
The printer doesn’t
work
The speaker is dump
The touchscreen
cann’t give the right
position
The touchscreen
doesn’t work
The MSR doesn’t
work
SOLUTION
Make sure that the Power LED is on
andAnypos is not in suspend mode and
adjust the display brightness.
Ensure that an operating system is
correctly installed. Check the boot
sequence in the BIOS setup utility.
Reboot the terminal and run the BIOS
Setup Utility. Confirm the Setup Utility
parameters. If the same message is
displayed after booting up again,
Check the AC adapter connection.
Make sure that the adapter LED is on.
Otherwise,replace the adapter.
Check if the power LED is on.
Check the scanner cable connection.
Check the scanner with another terminal to
see if it works. If the same problem occurs,
replace the scanner.
Setup the resolutions to 1024*768.
Change the date or time is BIOS or OS,
and save. Otherwise change the battery .
Ensure the cable right connecting.
Ensure the power on the printer.
Ensure the printer is on line.
Check if the volume is on mute
Setup the touch screen to calibrate.
Clean the touch screen.
Reinstall the driver of touch.
Setup the touch screen to calibrate.
Try other card again.
Check the cable of the MSR.
Anypos
WARRANTY
For your legal rights, promise you offer the warranty and service
according to following standard:
1. Duration of limited warranty
1 year warranty.
2. Online Service
You can obtain help from Aopos when you are unable to solve the
problem. Please contact our service and Maintenance Department for
any requires. Hotline:+34-902253588. Our service engineers will
provide the most efficient help, or visit our website: www.aopos.com
to obtain help online.
3. Limitations of warranty
Total Touch limited warranty covers only those that arise as a result of
normal use of the product, and does not cover any other problems,
including those that arise as a result of:
�
�
�
�
�
�
�
The entire or spare parts are out of the warranty period;
Improper installation, modifications, maintenance;
Unauthorized installation/uninstallation , modification or misuse;
Software, media, parts, or supplies not provided or supported by
AOPOS;
Unpredictable factor and personal cause, includes computer virus,
improper input voltage, shipping, transport, etc;
Operation outside the product’s instruction;
The event of force majeure, such as earthquake and fire.