1
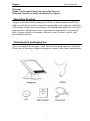
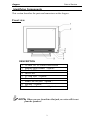
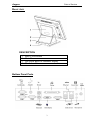
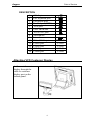
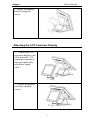
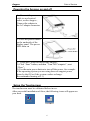
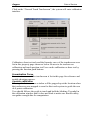
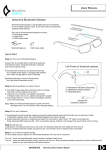
Anypos200
User Manual
AOPOS SYSTEMS, S.A.
Anypos
Point of Service
Welcome
Thank you for purchasing our powerful Anypos!
With this Guide is to help you operate the Anypos.
About the Product
Anypos is an innovational design from Point of Sale terminals and Kiosk
with over decade of market experience and product development capability,
A full range of functions are designed, developed and produced to meet the
requirements of department store, supermarket, hypermarket, convenient
store, boutique shops, restaurants, theaters, railway, metro, school, and
government projects.
Checking the packaging list
After you unpack the Anypos, check that the following items are included.
If any item is missing or appears damaged, contact your dealer immediately.
1
Anypos
Point of Service
Identifying Components
This section describes the parts and connectors on the Anypos.
Front view
DESCRIPTION
1
2
3
4
5
6
7
8
9
15-inch TFT LCD and Touch screen
Magnet Stripe Reader(Option)
Power LED
HDD LED
IC Card LED(Option)
Power botton
Front Line-out jack(Option)
Speaker(Option)
RF card reader antenna(Option)
NOTE:When you use front Line-Out jack, no voise will be out
from the speakers.
2
Anypos
Point of Service
Rear view
DESCRIPTION
1
2
3
4
Back Cover Board
Main Base
The screw holes of customer display
The hole of line
Bottom Panel Ports
3
Anypos
Point of Service
DESCRIPTION
1
2
3
4
5
6
7
8
9
10
11
12
13
14
AC adapter connector
PS2 keyboard port
PS2 mouse port
Parallel port (LPT1)
VGA port
USB 1&2&3&4
10/100 NIC port
Microphone
Line-out
DC +12V Output
COM1 port
COM2 port
COM3 port
COM4 port
Attaching VFD Customer Display
1、Connect the customer
display through the
cable to customer
display port on the
bottom panel.
4
OUT 12V
COM1
COM2
COM3
COM4
Anypos
Point of Service
2、Secure the display
with four supplied
screws.
Attaching the LCD Customer Display
1、Connect the LCD
customer display to the
VGA port and +12V
output port separately
through signal cable
and power supply
cable.
2、Secure the display
with four supplied
screws.
5
Anypos
Point of Service
Powering the Anypos on and off
1、Connect the power
cable to an electrical
outlet ,on the Anypos ,
Connect the adapter to
the AC adapter connector
2、Press the power button
on the underside of the
display panel. The power
LED turns on
3、There are 2 ways to turn off the Anypos:
1) Click “Start” button, and then “Turn Off Computer”, next
“Close”;
2) Use the main power button to turn off the power, for example
if the operating system you are using does not support power
down by the OS or if the system crashes or hangs.
Recommended turning off: 1)
Setup the Touchscreen
The touchscreen must be calibrated before in use.
After successful installation of diver, the following icons will appear on
your desk.
6
Anypos
Point of Service
Click on the “General Touch Touchscreen”, the system will enter calibration
interface.
Calibration, draw test tools and the linearity curve of the touchscreen were
list in this property page shown as below for user to do touchscreen
calibration and touch position test.User can do calibration or draw test by
pressing the function push buttons.
Linearization Curve
Linearization curve of the touchscreen is list in this page for reference and
trouble shooting purpose.
4 points calibration
Pressing this button, a new window will be popped-up at the location when
the touchscreen was mapped to area for this touch system to guide the user
do 4 points calibration.
User should follows the guide to touch and hold the blinking X symbol in
the calibration window until it does not blink to make sure that the utility
can gather enough data for computation.
7
Anypos
Point of Service
Clear and Calibration
Press this button to erase the 25 points calibration/linearization parameters
and force user to do 4 points calibration again. After 25 points calibration
data was clear, the 4 points calibration data will be invalid. It needs to do 4
points calibration.
Linearization
Linearization ( 25 or 9 points calibration ) function is used to compensate
the touchscreen linearity. After linearization completed, the linearity of the
touchscreen will be shown in the Linearity curve window.
Pressing this button, a new window will be popped-up at the location when
the touchscreen was mapped to area for this touch system to guide the user
do 25 points calibration. User should follows the guide to touch and hold
the blinking X symbol in the calibration window until it does not blink to
make sure that the utility can gather enough data for computation.
8
Anypos
Point of Service
Draw Test
This function is used for accuracy and performance check. Press this button
and a new pop up window will be popped up in the location where the
touchscreen was mapped to the touch system.
COM1~COM4 Ring function selector
JP1 :COM1/COM2 Ring function selector
JP2 :COM3/COM4 Ring function selector
JP1and JP2 enable you to choose between 5V and 12V on COM1~COM4
respectively. Since pin 9 on COM1~COM4 is reserved for switching
between 5V and 12V
Troubleshotting
Often after time spent troubleshooting, the problem is traced to something
as simple as a loose connection. Check the following before proceeding to
the problem-specific solutions.
PROBLEM
The display screen is
dark.
The following message
appears at boot up:
“Invalid system disk,
Replace the disk, and
then press any key”
An unidentified
message is displayed.
You cannot turn on the
SOLUTION
Make sure that the Power LED is on and
Anypos is not in suspend mode, and adjust
the display brightness.
Ensure that an operating system is installed.
Check the boot sequence in the BIOS setup
utility.
Reboot the terminal and run the BIOS Setup
Utility. Confirm the Setup Utility parameters.
If the same message is displayed after booting
up again,
Check the AC adapter connection. Make sure
9
Anypos
Point of Service
terminal.
that the adapter LED is on. Otherwise,replace
the adapter
Check the scanner cable connection. Check
The scanner is not
the scanner with another terminal to see if it
working
works. If the same problem occurs, replace the
scanner.
Check that the power cord is plugged into a
The screen is blank and working electrical outlet. Check that the
you don't hear any beeps. power is on. (Press the power switch again for
confirmation.)
Reinstall the operating system, and power on
Only the cursor appears.
the Anypos.
Ensure the audio cable is not defective. The
Audio problems
mute is off.
Terminal is not working
Wait 30 seconds and try again.
at all
If still not working – Reboot the terminal.
Otherwise, have the Anypos serviced..
Terminal is frozen
Wait 30 seconds and try again.
If still not working – Reboot the terminal.
Otherwise, have the Anypos serviced.
Having the Anypos Serviced
If you are unable to solve the problem, you should have the Anypos
serviced. Pack the Anypos in the original carton. Include a description of
the problem and a checklist of the steps you took when trying to fix the
problem. The information may be useful to the service personnel. Return
the Anypos to the place you purchased it.
10