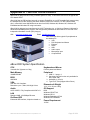
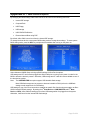
1
eBox-2300
Windows Embedded CE 6.0
Jump Start Guide
By Samuel Phung, eMVP
ICOP Technology Inc.
This is a step-by-step guide showing the process to build Windows Embedded CE 6.0 image for
the eBox-2300 using Platform-Builder and the ICOP_Vortex86_60CS BSP.
Introduction
Learning by example and learn by doing are effective methods to learn new technology. This
step-by-step guide, using hands-on-lab approach, is created to show the process of creating,
customizing, building and downloading a Windows Embedded CE 6.0 image on to eBox-2300
using the ICOP_Vortex86_60CS Board-Support-Package for CE 6.0. This guide also shows
how to create a Hello-world Visual Studio 2005 C# managed code application, establish a
connection between eBox-2300 and Visual Studio 2005 workstation using Corecon and
download the application to eBox-2300 for testing.
The samples in this guide have been tested on Windows XP Professional and Windows Vista
development stations.
•
On the Windows XP Professional SP2 development station, Visual Studio 2005, Visual
Studio 2005 SP1, Windows Embedded CE 6.0 and ICOP_Vortex86_60CS BSP for CE
6.0 are installed.
•
On the Windows Vista development station, Visual Studio 2005, Visual Studio 2005
SP1, Visual Studio 2005 SP1 Update for Vista, Windows Embedded CE 6.0 and
ICOP_Vortex86_60CS BSP for CE 6.0 are installed.
An eBox-2300 is used as the target-hardware device. Detailed information about eBox-2300 is
available in appendix D. Both the development station and eBox-2300 are connected to the same
local LAN segment with DHCP service.
This guide provides a quick and easy overview showing how to create, configure and build
Windows Embedded CE 6.0 OS image for eBox-2300 and develop managed code application
that runs on CE 6.0. Additional subjects relevant to Vortex86 hardware and application
development using Visual Studio 2005 are provided.
Additional references and other technical information for Windows Embedded CE are listed in
Appendix C.
Note: To go through all of the exercises in this guide, you need to have Visual Studio 2005,
Windows Embedded CE 6.0 Platform Builder and ICOP_Vortex86_60CS Board-SupportPackage installed on your development station. Refer to appendix A & B for device
preparation and setup information.
eBox-2300 Windows Embedded CE 6.0 JumpStart rev 3.5
Page 2 of 53
eBox-2300 JumpStart Kit
eBox-2300 JumpStart kit includes the following
•
An eBox-2300 embedded system with 128MB RAM and a 256MB EmbedDisk (IDE
bootable flash storage) & power supply.
The eBox-2300 is pre-configured to boot to DOS and provide various options to load the
Windows CE image. A pre-built Windows Embedded CE 6.0 image is included.
•
Windows Embedded CE 6.0 Platform Builder evaluation version CD/DVD
This is a fully functional 180-day evaluation version of Windows Embedded CE 6.0
Platform Builder. A 180-day evaluation version of Visual Studio 2005 Professional is
also included.
•
An eBox-2300 Windows Embedded CE 6.0 JumpStart CD
ICOP_Vortex86_60CS Board-Support-Package, SDK and a pre-built Windows
Embedded CE 6.0 image are on this CD along with other resources.
•
One RJ-45 Ethernet Crossover cable
With a crossover Ethernet cable and proper static IP address settings, Windows CE
device can be connected directly to the development workstation to create a stand alone
development environment.
•
One DB-9 female to DB-9 female null modem serial cable
The null modem serial cable is used to connect between COM1 of the Windows CE
device to an available serial port on the development workstation. Debug messages from
the Windows CE device can be captured by using Hyper Terminal, with serial port
setting setup for 38400 Baud and 8 data bits-No parity-1 stop bit.
eBox-2300 Windows Embedded CE 6.0 JumpStart rev 3.5
Page 3 of 53
Table of Contents
Introduction..................................................................................................................................... 2
eBox-2300 JumpStart Kit ........................................................................................................... 3
eBox-2300 JumpStart kit includes the following .................................................................... 3
Part 1 – What’s New ................................................................................................................... 6
Windows Embedded CE 6.0 .................................................................................................... 6
Windows Embedded CE 6.0 Development Tools .................................................................... 6
Part 2 – Windows Embedded CE 6.0 Installation....................................................................... 7
Platform Builder Installation .................................................................................................. 7
Board-Support-Package Installation ...................................................................................... 8
VS2005 CoreCon Component Installation.............................................................................. 8
Part 3 – Configure an OS Design................................................................................................ 9
Visual Studio 2005 IDE .......................................................................................................... 9
Windows Embedded CE 6.0 OS Design Wizard ................................................................... 10
OS Design Wizard – Board Support Packages (BSPs)......................................................... 11
OS Design Wizard – Design Templates ................................................................................ 11
OS Design Wizard – Applications & Media ......................................................................... 12
OS Design Wizard – Networking & Communications .......................................................... 13
OS Design Wizard – Complete ............................................................................................. 13
Catalog Item Notification ..................................................................................................... 14
Part 4 – Customize and build the OS Design............................................................................ 15
Add Components to the OS Design ....................................................................................... 16
Other Windows Embedded CE 6.0 Components................................................................... 17
Configuration Manager – Debug & Release Build .............................................................. 19
Configure OS Design Project Properties – Build Options ................................................... 20
Configure OS Design Project Property – Environment Variables ....................................... 21
Building Windows Embedded CE 6.0 OS Image .................................................................. 22
Build Complete - Windows Embedded CE 6.0 OS Image Generated................................... 23
Part 5 – Download OS Image to eBox-2300 ............................................................................ 24
Configure Target Device Connectivity Options.................................................................... 24
Add New Target Device ........................................................................................................ 25
Establish Connection with eBox-2300 .................................................................................. 25
eBox-2300 Windows Embedded CE 6.0 JumpStart rev 3.5
Page 4 of 53
Downloading Image to eBox-2300 ....................................................................................... 27
Deploy the CE 6.0 OS Image to the eBox-2300.................................................................... 28
Part 6 – Windows Embedded CE 6.0 SDK............................................................................... 29
Create and Configure Windows Embedded CE 6.0 SDK ..................................................... 29
Build Windows Embedded CE 6.0 SDK................................................................................ 31
Part 7 – C# Application with Visual Studio 2005..................................................................... 32
Step 1: Create a New Visual Studio 2005 C# Project ......................................................... 32
Step 2: Preparing eBox-2300 to Connect to VS2005........................................................... 33
Step 3: Connecting eBox-2300 to VS2005 Station using Corecon ...................................... 37
Step 4: Download C# Application to eBox-2300 ................................................................. 38
Debug Information.................................................................................................................... 39
Summary ................................................................................................................................... 42
Congratulations! - You’ve completed all the steps................................................................... 43
Appendix A – Development Environment Setup - with DHCP service................................... 44
Appendix B – Development Environment Setup – Without DHCP......................................... 45
Appendix C – Windows CE Technical Information Reference................................................ 46
Appendix D – eBox-2300 Technical Information .................................................................... 47
M
oryy M
Meem
mor
Maappppiinngg ................................................................................................................. 51
II//O
OM
Maappppiinngg .......................................................................................................................... 51
IIRRQ
QM
Maappppiinngg ........................................................................................................................ 52
Appendix E – eBox-2300 Boot Options ................................................................................... 53
eBox-2300 Windows Embedded CE 6.0 JumpStart rev 3.5
Page 5 of 53
Part 1 – What’s New
Windows Embedded CE 6.0
The Windows Embedded CE 6.0 operating system combines the richest real-time embedded
operating system with the most powerful tools for rapidly creating the next generation of smart,
connected, and small-footprint devices. The latest version, Windows Embedded CE 6.0, expands
upon the solid foundation developed in previous Windows CE versions by providing:
•
•
•
•
•
•
•
•
Increase the ability to handle 32,000+ processes
Increase the memory footprint for each process to 2GB
Production Quality device drivers
More secure and scalable networking
Greater real-time processing
Faster performance
Richer multimedia and Web browsing capabilities
Greater interoperability with PCs, servers, Web services, and devices
Windows Embedded CE 6.0 delivers reliable, secure performance in a small footprint along with
the latest networking and communications technologies. Windows Embedded CE 6.0 provides
developers with broad device support and enhanced features, including voice over IP (VoIP)
phone and gateway configurations, platform development tool enhancements, greater application
compatibility with other Windows CE-based devices, Internet Explorer 6.0, Windows Media
Codecs, Microsoft .NET Compact Framework, and a number of other newly supported protocols
and services.
Visit http://msdn.microsoft.com/embedded/windowsce/default.aspx for more information about
Windows CE.
Windows Embedded CE 6.0 Development Tools
Platform Builder is the development tool used to configure an OS Design and build a Windows
CE image from the OS Design. The previous versions of Windows CE Platform Builder were
stand alone development tools. This latest version, Windows Embedded CE 6.0 Platform
Builder, is a Plug-in for Visual Studio 2005.
Note: Visual Studio 2005 SP1 is needed to develop application for Windows Embedded CE
6.0. When evaluating or using new technology and development tool, it’s good
practice to install all update, QFE and patches.
For Windows Vista, in addition to Visual Studio 2005 SP1, Visual Studio 2005 SP1
Update for Vista is also needed.
eBox-2300 Windows Embedded CE 6.0 JumpStart rev 3.5
Page 6 of 53
Part 2 – Windows Embedded CE 6.0 Installation
This latest version Windows Embedded CE 6.0 (“CE 6.0”) Platform Builder is a plug-in to
Visual Studio 2005 (“VS2005”), take advantage of VS2005 IDE & tools.
Board-Support-Package (“BSP”) consists of all necessary CE 6.0 device drivers and hardware
abstraction library for the hardware is needed by PB to create OS Design and build CE 6.0 image
for the hardware. ICOP_Vortex86_60CS BSP is provided as part of this jumpstart kit to create
OS Design and build CE 6.0 image for eBox-2300.
Corecon is the component needed to establish link between eBox-2300 and VS2005
development station for the purpose of developing CE 6.0 application and download the
application onto eBox-2300 for testing and debug.
For Windows XP development station, it’s recommended to install VS2005, CE 6.0 and BSP in
the following sequences.
1. Visual Studio 2005
2. Visual Studio 2005 SP1
3. Windows Embedded CE 6.0
4. BSPs
For Windows Vista development station, it’s recommended to install VS2005, CE 6.0 and BSP
in the following sequences.
1. Visual Studio 2005
2. Visual Studio 2005 SP1
3. Visual Studio 2005 SP1 Update for Vista
4. Windows Embedded CE 6.0
5. BSPs
Platform Builder Installation
Platform Builder (“PB”) is the tool used to configure and build CE 6.0 OS images. To install
PB, Visual Studio 2005 (“VS2005”) must already be installed onto the develop station. While
PB installation does not require VS2005 SP1 to installed, it’s required to install SDK generated
by PB for the OS Design to support CE 6.0 application development using VS2005.
By default, PB installation program only selects and includes ARMV4I CPU support with the
installation. eBox-2300 is an x86 device. X86 CPU support must be installed with PB to use the
ICOP_Vortex86_6CS BSP and build CE 6.0 image for eBox-2300.
eBox-2300 Windows Embedded CE 6.0 JumpStart rev 3.5
Page 7 of 53
Fig. 1
-
CE 6.0 installation, supported CPU selection
Board-Support-Package Installation
To install and use ICOP_Vortex86_60CS BSP with CE 6.0, after CE 6.0 is installed (with x86
CPU support), run the ICOP_Vortex86_60CS_BSP.msi from the JumpStart CD. It’s located in
the CD’s BSP folder.
Note: x86 CPU support for CE 6.0 PB is needed in order to use ICOP_Vortex86_60CS BSP
to create OS Design and build CE 6.0 image for eBox-2300.
VS2005 CoreCon Component Installation
Corecon component files for x86 devices are included as part of VS2005 installation and located
in the following default installation folder.
..\Program Files\Common Files\Microsoft Shared\CoreCon\1.0\Target\WCE400\x86\
There are different sets of Corecon component files to support different type of CPU, and located
in the relative folder with name of the CPU.
..\Program Files\Common Files\Microsoft Shared\CoreCon\1.0\Target\WCE400\<CPU>\
CoreCon files can be copied to a CE 6.0 image after the image is built, and use them to establish
link between the CE 6.0 device and VS2005 development station. The need to copy CoreCon
files to a CE 6.0 device every time after reset to establish link with VS2005 development station
is inefficient and waste of precious development time.
A CoreCon catalog component for CE 6.0, in MSI self installable file format, is provided with
the JumpStart kit CD. To install, locate and execute VS2005_CoreCon_x86_WINCE600.msi
on the CD. It’s located in the CD’s CoreCon folder. After installation, The CoreCon component
shows up on CE 6.0 Platform Builder Component catalog as “ConMan_x86 Files Component”.
By including this component as part of an OS Design, CoreCon files will be compiled into the
resulting CE 6.0 image.
eBox-2300 Windows Embedded CE 6.0 JumpStart rev 3.5
Page 8 of 53
Part 3 – Configure an OS Design
This section will guide you thru the process of creating and configuring an OS design using the
New Platform Wizard within Platform Builder, to create an initial OS design workspace which
you will then modify by adding Windows CE components, applications and making changes to
the registry.
Visual Studio 2005 IDE
Windows Embedded CE 6.0 (“CE 6.0”) Platform Builder is a Visual Studio 2005 (“VS2005”)
plug-in. To use Platform Builder (“PB”), you need to start VS2005 and access PB from VS2005
Integrated Development Environment (“IDE”).
When starting VS2005, you should see a VS2005 screen similar to the following:
Fig. 2
-
Visual Studio 2005 IDE
Visual Studio 2005 provides a common Integrated Development Environment (IDE) for Visual
Basic, Visual C++, Visual C#, Visual J# and Platform Builder. Depending on the development
preference selected during the installation of VS2005, your VS2005 screen may look different
from the above.
VS2005 IDE provides support to create different type of projects, such as Windows Application,
Console Application, Class Library, smart device application, Windows Services, Web Control,
etc…
When starting a new project with VS2005, there are options for different type of projects. PB for
CE 6.0 is one of the available project types. From VS2005 IDE, select “File | New | Project …”
the following project screen will appear.
eBox-2300 Windows Embedded CE 6.0 JumpStart rev 3.5
Page 9 of 53
Fig. 3
•
•
•
•
•
-
VS2005 New Project
On the left side of the New Project screen, click to high-light Platform Builder for CE
6.0.
On the right side of the New Project screen, click to high-light OS Design.
Enter eBox2300 as the name of the project.
Make sure the Create directory for solution check box is checked.
Click on the OK button to continue.
Windows Embedded CE 6.0 OS Design Wizard
When a new CE 6.0 OS Design project is selected, the Windows Embedded CE 6.0 OS Design
Wizard starts automatically to guide you thru the process and help configure an OS Design.
Fig. 4
•
-
Windows Embedded CE 6.0 OS Design Wizard
Click on the Next button to continue
eBox-2300 Windows Embedded CE 6.0 JumpStart rev 3.5
Page 10 of 53
OS Design Wizard – Board Support Packages (BSPs)
In the BSP selection step, the OS Design Wizard provides the option to select one or more BSP
for the new project, from a list of available BSP. All of the installed BSPs, including BSPs from
third party companies are listed.
Fig. 5
•
•
-
OS Design Wizard – Select BSP
Select ICOP_Vortex86_60CS: x86 BSP
Click on the Next button to continue
OS Design Wizard – Design Templates
In the design templates selection step, the OS Design Wizard provides the options to select an
OS Design Template.
Fig. 6
-
OS Design Wizard – Design Templates
eBox-2300 Windows Embedded CE 6.0 JumpStart rev 3.5
Page 11 of 53
•
•
Fig. 7
•
•
Click to high-light and select Industrial Device
Click on the Next button to continue
-
OS Design Wizard – Design Template Variants
Click to high-light and select Internet Appliance
Click on the Next button to continue
OS Design Wizard – Applications & Media
In the applications & media selection step, the OS Design Wizard provides the options to select
.NET Compact Framework to support managed code applications, Internet Explorer, Windows
Media components, etc...
Fig. 8
-
OS Design Wizard – Applications & Media
The following components are selected for this exercise.
•
•
.NET Compact Framework 2.0
Internet Explorer 6.0
eBox-2300 Windows Embedded CE 6.0 JumpStart rev 3.5
Page 12 of 53
•
•
•
•
•
Windows Media Audio/MP3
Windows Media Player Application
Windows Media Player OCX
Windows Media Video/MPEG-4 Video
Click on the Next button to continue
OS Design Wizard – Networking & Communications
In the networking & communications step, the OS Design Wizard provides the options to select
communication, networking and security components.
Fig. 9
-
OS Design Wizard – Networking & Communications
We will use the default settings for networking and communications. Click on the Next button
to continue.
OS Design Wizard – Complete
At this point, the OS Design Wizard completed its task and collected the necessary OS Design
parameters to configure an OS Design based on the selected template and support components.
eBox-2300 Windows Embedded CE 6.0 JumpStart rev 3.5
Page 13 of 53
Fig. 9
•
-
OS Design Wizard – Completed
Click on the Finish button to continue.
Catalog Item Notification
At the completion of OS Design Wizard, a security warning is raised to provide a warning for
any components included in the OS Design that can pose a security risk.
Fig. 10 -
Catalog Item Notification – Security Warning
Click on the Acknowledge button to complete the OS Design Wizard steps.
Platform Builder will generate the necessary OS Design project folders and pull in all the
components required by the Internet Appliance OS Design template along with the components
selected during the OS Design Wizard steps.
eBox-2300 Windows Embedded CE 6.0 JumpStart rev 3.5
Page 14 of 53
Part 4 – Customize and build the OS Design
At this point, with the help of the OS Design Wizard, the eBox2300 project is created using the
Internet Appliance design template along with ICOP_Vortex86_60CS BSP. The following
project folders have been created for the eBox2300 project, under the main CE 6.0 Platform
Builder’s OS Designs directory (..\WINCE600\OSDesigns\).
•
C:\WINCE600\OSDesigns\eBox2300\
Folder for the eBox2300 Solution
VS2005 supports different project types. A solution provides a centralized work
environment to keep different project types supporting the same solution in one location.
For example, the eBox2300 solution may include an “eBox2300 OS Design”, “Visual
Basic managed code application”, “Visual C# managed code application” and “Visual
C++ native code application”.
•
C:\WINCE600\OSDesigns\eBox2300\eBox2300\
This is the folder for the eBox2300 CE 6.0 Platform Builder project, an OS Design.
Your VS2005 IDE should look similar to the following screen:
Fig. 11 -
VS2005 IDE after OS Design Wizard
eBox-2300 Windows Embedded CE 6.0 JumpStart rev 3.5
Page 15 of 53
Add Components to the OS Design
The Catalog Item View window lists all of the available Windows CE components, including
applications, library, drivers, utilities & 3rd party components that can be added to the OS
Design. An existing set of components are included in the OS Design by the Wizard based on
the BSP and design template selected during the OS Design Wizard phase.
To enhance the function and features of the OS image, additional components (drivers, utilities,
applications, etc.) selected from the component catalog can be added to the OS Design.
•
On the Catalog Items tab, expand the Third Party, BSP, ICOP_Vortex86_60CS: x86
and all sub folder under Device Drivers, check to make sure the following drivers are
selected as part of the OS Design.
-
Device Drivers | Vortex86_Audio
Device Drivers | Vortex86_Display
Fig. 12
-
Component Catalog
•
Expand Third Party catalog items and select ConMan_x86 Files Component. This
component adds the CoreCon files to the final image, needed to establish connection
between the CE 6.0 device and VS2005 development station.
•
Expand Core OS | CEBASE catalog items, find and include the following components to
the OS Design.
-
Applications-End User | CAB File Installer/Uninstaller
This component provides application installation & removal. It’s needed for
application development using Visual Studio .NET 2003 and Visual Studio 2005.
-
Core OS Services | USB Host Support | USB Storage Class Driver
This component provides support for hot pluggable USB storage device
supporting most USB flash drive and external USB mass storage device.
eBox-2300 Windows Embedded CE 6.0 JumpStart rev 3.5
Page 16 of 53
•
•
.NET Compact Framework 2.0 components are needed to support managed code
application. During the OS Design wizard steps, .NET Compact Framework 2.0
components were selected to include in the OS Design. If not selected during the OS
Design wizard phase, make sure the following two components are included.
-
.NET Compact Framework 2.0
-
OS Dependencies for .NET Compact Framework 2.0
Expand Core OS | CEBASE | File Systems and Data Store catalog items, find and
include the following file system components to the OS Design.
-
RAM and ROM File System
The RAM and ROM file system driver capable of reading data from the ROM and
RAM file system in the object store.
-
Hive-based Registry
This component provides the function for the system to persist registry setting
changes when the device is powered off
Note: The following environment variables need to be set for this component to
function.
•
PRJ_ENABLE_FSREGHIVE
•
PRJ_BOOTDEVICE_ATAPI
•
PRJ_ENABLE_FSMOUNTASROOT
Other Windows Embedded CE 6.0 Components
In addition to the components selected during the OS Design wizard and the components
automatically included in the OS Design by the template, additional components from the
catalog can be included into the OS Design to provide the associated function.
For example, the File Server component can be added to provide files and folders sharing over a
network connection. The FTP Server component can be added to provide remote file upload
and download services. The RAS Server/PPTP Server (Incoming) component can be added to
provide inbound dialup network connection via the serial port.
Following is a list of eBox-2300 I/O peripherals and the associated CE 6.0 device drivers and
support components.
eBeBox-2300 Peripherals
Windows Embedded CE 6.0 Drivers & Support Components
Video (SiS-550)
Vortex86_Display (Driver included with BSP)
Audio (SiS-7019)
Vortex86_Audio (Driver included with BSP)
Ethernet (RealTek-8100)
RTL8139 (Driver available from PB’s component catalog)
eBox-2300 Windows Embedded CE 6.0 JumpStart rev 3.5
Page 17 of 53
Serial Ports
Com16550 (Driver available from PB’s component catalog)
Serial Ports
Serial Port Support (Support components from PB’s component
catalog)
USB Ports (USB 1.1 Host)
OHCI (Driver available from PB’s component catalog)
CompactFlash*¹
ATAPI (Driver available from PB’s component catalog)
IDE
ATAPI (Driver available from PB’s component catalog)
*¹
The CompactFlash (“CF”) slot on eBox-2300 is link to the IDE interface, and does NOT support hotswap. When a CF card is plugged into the slot prior to power on, the system will detect and
recognize the CF card as slave IDE storage. When booting to CE 6.0, the CF card will shows up as
“Hard Disk 2”
To learn more about each of the components on the catalog, refer to the help document.
eBox-2300 Windows Embedded CE 6.0 JumpStart rev 3.5
Page 18 of 53
Configuration Manager – Debug & Release Build
Using the configuration manager, the OS Design can be configured to generate a debug or
release image. A debug image will provide debug messages when the compiled OS image loads
and executes applications and modules. The size of the debug image is generally about 50%
larger in size comparing to the release image built from the same OS design. For the purpose of
this guide, let’s select the release build.
Fig. 13 -
•
Configuration Manager
From VS2005 IDE, select Build | Configuration Manager… to bring up the
Configuration Manager screen. From the Active solution configuration selection
options, select ICOP_Vortex86_60CS x86 Release and click the Close button to set the
OS Design to generate a Release image.
Note: A Debug image provides more detailed system status and activities information
during startup of the OS and when application modules are executing. To generate a
debug image, repeat this step and select ICOP_Vortex86_60CS x86 Debug option
instead, and continue to finish building a debug image.
eBox-2300 Windows Embedded CE 6.0 JumpStart rev 3.5
Page 19 of 53
Configure OS Design Project Properties – Build Options
With different Build Options, the OS Design can be further customized to include additional
functions to the final image, provide additional debug resources, etc…
From VS2005 IDE, select Project | eBox2300 Properties… to bring up the OS Design Property
screen.
Fig. 14 -
OS Design Property – Build Options
•
Click to expand Configuration Properties tree on the left side of the screen.
•
Click to high-light Build Options, a list of Build Options with check boxes will be
shown on the right side of the screen.
•
Select Enable eboot space in memory (IMGEBOOT=1)
This option adds support for Ethernet debugging by bundling the Ethernet boot loader in
the image.
•
Select Enable ship build (WINCESHIP=1)
This option will enable a retail build and suppress debug messages.
•
Disable KITL – Make sure the Enable KITL (no IMGNOKITL=1) check box is NOT
selected.
Note: When deploying a release image onto eBox-2300’s local storage with KITL
enabled, the system may not boot or takes a long time to complete the boot
process. This is caused by the system looking for an unavailable KITL
connection, and it eventually times out and completes the boot.
eBox-2300 Windows Embedded CE 6.0 JumpStart rev 3.5
Page 20 of 53
Configure OS Design Project Property – Environment Variables
Environment variables are used to further customize the OS Design by include/exclude certain
components from the image, set device memory range & etc….
Continuing with the OS Design Property screen from the previous step…
Fig. 15 -
eBox2300 Property Pages – Environment variables
•
•
Click to high-light Environment on the left side of screen.
Click on the New… button, enter IMGRAM128 for Variable name, and enter 1 for
Variable value and click on the Ok button.
By setting the IMGRAM128 variable, the resulting image is generated for a system with
128MB RAM.
•
Click on the New… button, enter PRJ_ENABLE_FSREGHIVE for Variable name, and
enter 1 for Variable value and click on the Ok button.
This is one of the needed variables to enable Hive-based registry to persist registry
changes when the device is powered off.
•
Follow the previous steps to create PRJ_BOOTDEVICE_ATAPI and
PRJ_ENABLE_FSMOUNTASROOT environment variables and set the values to 1.
•
Click the Apply button followed by the OK button to complete the configuration
eBox-2300 Windows Embedded CE 6.0 JumpStart rev 3.5
Page 21 of 53
Building Windows Embedded CE 6.0 OS Image
From the VS2005 IDE, select Build | Build Solution to build OS image from the OS Design
project.
Fig. 16 -
VS2005 IDE – OS Design being compile and build
Depending on the speed of the development system, the build process may take approximately
15~20 minutes.
During the build process, the output tab on VS2005 IDE displays compilation activities.
eBox-2300 Windows Embedded CE 6.0 JumpStart rev 3.5
Page 22 of 53
Build Complete - Windows Embedded CE 6.0 OS Image Generated
When the build process is completed, the VS2005 IDE should look like the following:
Fig. 17 -
VS2005 IDE – Build completed
When the build process is completed, the resulting files are generated in the following build
release directories.
For the Debug image:
C:\WINCE600\OSDesigns\eBox2300\eBox2300\RelDir\ICOP_Vortex86_60CS_x86_Debug
For the Release image:
C:\WINCE600\OSDesigns\eBox2300\eBox2300\RelDir\ICOP_Vortex86_60CS_x86_Release
Searching the above directories, with a successful build, there should be a NK.BIN file. This is
the Windows Embedded CE 6.0 OS image.
The next section will cover connecting the eBox-2300 to the development station to download
and execute the image built in this section for the eBox-2300.
eBox-2300 Windows Embedded CE 6.0 JumpStart rev 3.5
Page 23 of 53
Part 5 – Download OS Image to eBox-2300
Configure Target Device Connectivity Options
The image generated from the previous session is ready to be downloaded to the device. A
connection between the eBox-2300 and the development station needs to be established to
accomplish this task.
Note: Please refer to Appendix A and B for eBox-2300 and development station connectivity
information. If there are problem establish connection, disable firewall utility. The
firewall utility may be blocking the connection.
From VS2005 IDE, select Target | Connectivity Options… to bring up the Target Device
Connectivity Options screen
Fig. 18 -
Target Device Connectivity Options
A connection can be establish by modifying the default CE Device settings. To provide more
information about the connectivity option, let’s create a device connectivity profile for this
project.
Note: Multiple device connectivity profiles can be created to help developer working on
multiple projects, or project involving multiple target hardware to be more efficient.
eBox-2300 Windows Embedded CE 6.0 JumpStart rev 3.5
Page 24 of 53
Add New Target Device
From the Target Device Connectivity Options screen, clicks on Add Device to bring up the
new target device screen. Enter eBox2300 as the new target device name and click on the Add
button to continue.
Fig. 19 -
Target Device Connectivity Options
Establish Connection with eBox-2300
From the Target Device Connectivity Options screen, clicks on one of the Settings buttons to
bring up the Ethernet Download Settings screen.
Fig. 20 -
Ethernet Download Settings
Turn on power and boot up eBox-2300 with the provided Windows CE SDK boot image. It will
boot to DOS and provide the following menu selections.
eBox-2300 Windows Embedded CE 6.0 JumpStart rev 3.5
Page 25 of 53
1.
2.
3.
4.
5.
6.
7.
8.
9.
Boot CE/PC (local nk.bin with /L:1024x768x32)
Boot CE/PC (ether via eboot.bin with /L:1024x768x32)
Boot CE/PC (ether via eboot.bin with /L:800x600x32)
Boot CE/PC (ether via eboot.bin with /L:640x480x32)
Boot CE/PC (ether via eboot.bin without display settings)
Boot CE/PC (Static IP: 192.168.2.232, with /L:1024x768x32)
Boot CE/PC (Static IP: 192.168.2.232, with /L:640x480x32)
Boot CE/PC (Static IP: 192.168.2.232, without display settings)
Clean Boot (no commands)
Option 1:
The eBox-2300 will load NK.bin (Windows CE image) from local storage
with 1024x768 display resolution.
Option 2 ~ 5:
The eBox-2300 will load eboot.bin which in turn will send request to an
available DHCP server to assign an IP address. Then, it sends bootme
request to the Platform-Builder development station.
Option 6 ~ 8:
The eBox-2300 will load eboot.bin with a static IP address
(192.168.2.232), and sends a bootme request to the Platform-Builder
development station.
Option 9:
Boots up to a clean DOS environment.
If the development station and eBox-2300 are connected to a LAN with DHCP service, select
option 2, 3, 4 or 5. If eBox-2300 is connected directly to the development station using a crossover Ethernet cable, select option 6, 7 or 8.
After eBox-2300 boots-up and sends a boot-me request, the Ethernet Download Settings dialog
screen should look similar to the following, with a device ID listed in the Active target devices
list box.
Fig. 21 -
•
•
Ethernet Download Settings
Click and highlight the device ID listed in the Active Devices window
Click Ok to continue
eBox-2300 Windows Embedded CE 6.0 JumpStart rev 3.5
Page 26 of 53
Note: In the environment where there are multiple eBox-2300s connected to the same
network segment, with multiple eBox-2300 sending bootme request, there may be
multiple device IDs listed in the Active Devices windows. To identify the eBox2300 you are working with, make sure it’s the only one booting and sending a bootme
request.
On the Target Device Connectivity Options screen, click on Apply and then Close.
Downloading Image to eBox-2300
You are now ready to download the Windows CE image built during the earlier steps to the
eBox-2300. From VS2005 IDE select Target | Attach Device. The following “Download
Runtime Image to …” screen will come up.
Fig. 22 -
•
•
Download Runtime Image / waiting for bootme request
Turn on power and boot up eBox-2300
Select an option from the menu according to your setup and display preference
After eBox-2300 completes the boot-up process and send boot-me request, you will see activities
on the Download Runtime Image screen showing the image being download to the device.
Fig. 23 -
Download Runtime Image / downloading
eBox-2300 Windows Embedded CE 6.0 JumpStart rev 3.5
Page 27 of 53
After the image download process is completed, eBox-2300 will load the Windows CE image it
just received. Again, be patient… It may take a few moments for the image to come up.
When the Windows CE screen is displayed on eBox-2300, it’s an indication the booting process
is completed.
Fig. 24 -
Windows Embedded CE 6.0 desktop running on eBox-2300
Deploy the CE 6.0 OS Image to the eBox-2300
In the previous step, when the CE 6.0 image is downloaded and launched on the eBox-2300, it’s
being loaded to the system RAM directly and is not saved to the local storage. To deploy a CE
6.0 OS image onto eBox-2300’s local storage, you need to manual copy the OS image, NK.BIN,
to eBox-2300’s local IDE bootable flash storage.
There are multiple methods to copy the CE 6.0 image to the eBox-2300’s local storage.
1. Use a USB bootable flash storage.
eBox-2300 can be set to boot from USB bootable storage device. Refer to Appendix E
for setup information.
Using a USB bootable flash storage, copy the CE 6.0 OS image file, NK.bin, from
\WinCE600\OSDesigns\eBox2300\eBox2300\RelDir\ICOP_Vortex86_60CS_x86_Relea
se directory to the USB bootable flash storage. Boot eBox-2300 with the USB bootable
flash storage and copy the NK.bin file to eBox-2300 IDE flash storage’s root directory
(over written the existing NK.bin file).
2. While running a CE 6.0 image downloaded from the Platform Builder development
station, copy CE 6.0 OS image file (NK.bin) from a shared network file folder to the
“Hard Disk” folder.
3. Remove the EmbedDisk (IDE bootable flash storage) from eBox-2300 and copy the
image file (NK.bin) using hardware setup capable of copying file to IDE storage device.
(This method requires disassembling the device and is not recommended.)
eBox-2300 Windows Embedded CE 6.0 JumpStart rev 3.5
Page 28 of 53
Part 6 – Windows Embedded CE 6.0 SDK
In the previous steps, we created configured and built an OS Design that ran on the eBox-2300.
Another Windows CE advantage is the ease of application development using Visual Studio
2005. In order to write applications using Visual Studio 2005 and establish a connection to
download applications to the eBox-2300 for testing and debug, a CE 6.0 SDK for the OS Design
we created in the previous steps is needed.
In this section, we will go thru the step of creating, configuring and building a SDK from the OS
Design.
Create and Configure Windows Embedded CE 6.0 SDK
From VS2005 IDE, select Project | Add New SDK… to bring up the SDK Property Pages
screen.
Fig. 25 -
•
•
•
SDK Property Page
Enter eBox2300_WinCE600_SDK as the name for the SDK
Fill in the company name and company website information
On the left side of SDK Property Page, click on Install and enter MSI folder path and
MSI file name on the right side. Use the default path, and enter
eBox2300_WinCE600_SDK.msi as the file name.
Fig. 26 -
SDK Property Page
eBox-2300 Windows Embedded CE 6.0 JumpStart rev 3.5
Page 29 of 53
•
On the left side of SDK Property Page, click on Development Languages and select
both Native and Managed development support.
Fig. 27 -
•
SDK Property Page
Click on the Apply and then OK button to complete the Add New SDK process.
Note: To make changes to the SDK before building, from VS2005 IDE, select the Solution tab,
expand the SDKs folder, right click on eBox2300_WinCE600_SDK and select
Properties to bring up the SDK Property Pages.
Fig. 28 -
VS2005 IDE / Edit SDK
eBox-2300 Windows Embedded CE 6.0 JumpStart rev 3.5
Page 30 of 53
Build Windows Embedded CE 6.0 SDK
From VS2005 IDE, select Build | Build All SDKs… to build and generate SDK installation file.
A SDK with the file name “eBox2300_WinCE600_SDK.msi” is generated in the following
directory.
..\WINCE600\OS Designs\eBox2300\eBox2300\SDKs\SDK1\MSI\
Install this SDK to the VS2005 station used to development CE 6.0 application for eBox-2300.
Note: It’s a good practice to close VS2005 when installing this SDK.
eBox-2300 Windows Embedded CE 6.0 JumpStart rev 3.5
Page 31 of 53
Part 7 – C# Application with Visual Studio 2005
Visual Studio 2005 can be used to develop native and managed code applications for CE 6.0.
This section will go thru the process to show how to connect the eBox-2300 to a development
station with Visual Studio 2005 while developing a managed code application using Visual Basic
or Visual C#. For the exercise in this section, we will use Visual C#. The steps should be
similar for developing with Visual Basic within Visual Studio 2005.
Note: Project files for this exercise are provided in the ..\VC#_Sample directory on the CD.
Step 1: Create a New Visual Studio 2005 C# Project
From Visual Studio 2005 IDE, Select File | New | Project, the following new project screen will
appear.
Fig. 29 -
VS2005 IDE / New Project
On the left hand side, expand “Visual C#” and “Smart Device” folders to select “Windows CE
5.0. On the right side of the screen, select “Device Application”, enter “eBox2300_Demo” as
the project name and click “Ok”.
After the project is created, let’s add some simple code to the application.
•
•
•
•
Resize the Form to a smaller size (320x240) to make it easy to see the application when it
runs on CE 6.0.
Change the Form caption to “eBox2300 Visual C# Demo”
Add a text-box to the form, change the name to textHelloWorld, and clear the content in
the text-box
Add a button to the form, change the name to buttonHelloWorld, and change the text on
the button’s caption to “Hello World”
Add the following code to the “buttonHelloWorld_Click” event.
textHelloWorld.Text = "Hello World.";
eBox-2300 Windows Embedded CE 6.0 JumpStart rev 3.5
Page 32 of 53
Visual Studio 2005 IDE screen may look like the following screen shot.
Fig. 30 -
VS2005 IDE / New Project
Compile and build the Visual C# application.
Step 2: Preparing eBox-2300 to Connect to VS2005
To perform this portion of the exercise, CE 6.0 image configured and built during the previous
sections of this guide must be downloaded and running on eBox-2300, and
eBox2300_WinCE600_SDK must be installed.
Corecon components are used to connect eBox-2300 to Visual Studio 2005 development
workstation.
The following 5 files need to be copied to \Windows\ folder on eBox-2300.
•
•
•
•
•
Clientshutdown.exe
ConmanClient2.exe
CMaccept.exe
eDbgTL.dll
TcpConnectionA.dll
These files are stored at the following directory on the Visual Studio 2005 development
workstation.
“..\Program Files\Common Files\Microsoft Shared\CoreCon\1.0\Target\wce400\..”
Corecon components supporting different CPU architectures are provided. There are folders,
with names corresponding to the CPU, containing Corecon components for each CPU family.
eBox-2300 is designed using an x86 CPU architecture. CoreCon components in the “..\x86” sub
folder are used.
eBox-2300 Windows Embedded CE 6.0 JumpStart rev 3.5
Page 33 of 53
In the earlier part of this guide, during the Platform-Setting/Environment-Variable step,
BSP_VS2005_CORECON environment variable is added to the OS Design. This step triggers
Platform Builder to include the above Corecon files, included with ICOP_Vortex86_60CS BSP,
to the OS image.
To establish a connection between the eBox-2300 and the Visual Studio 2005 development
station, the following steps need to be carried out.
The eBox-2300 IP Address is needed when setting up the device properties within VS2005 to
establish connection between eBox-2300 and VS2005 development station.
•
From eBox-2300 desktop, with CE 6.0 running, click on Start | Run from CE 6.0
desktop with the cmd command to open a console command window.
Fig. 31 -
•
CE 6.0 desktop – executing cmd command
From within the console command window, type s IpConfig to view the eBox’s assigned
IP-address.
Fig. 32 -
CE 6.0 console command window
eBox-2300 Windows Embedded CE 6.0 JumpStart rev 3.5
Page 34 of 53
Now that we have eBox-2300’s IP address, let’s move to VS2005 IDE to configure device
settings. In order for this to work, both the VS2005 development station and eBox-2300
must be connected to the same LAN segment and acquire their IP address from the same
DHCP server.
From VS2005 IDE, set the target device to “eBox2300_WinCE600_SDK x86 Device”
Fig. 33 -
VS2005 IDE / select target device
From VS2005 IDE, select Tools | Options…
Fig. 34 -
VS2005 Tools Options
•
On the left, click to expand the “Device Tools” folder and select the “Devices” subfolder.
•
On the right, select eBox2300_WinCE600_SDK from the list of available platform
in the Show devices for platform combo text box.
•
Click on the Properties button to bring up eBox2300_WinCE600 x86 Device
Properties setting screen
eBox-2300 Windows Embedded CE 6.0 JumpStart rev 3.5
Page 35 of 53
Fig. 35
-
eBox2300_WinCE600 x86 Device properties
•
Click on the Configure button to bring up Configure TCP/IP Transport
•
Select Use specific IP address and enter eBox-2300’s IP address
Fig. 36
•
-
Configure TCP/IP Transport / Set device IP Address
Click OK and to commit device IP address setting.
eBox-2300 Windows Embedded CE 6.0 JumpStart rev 3.5
Page 36 of 53
Step 3: Connecting eBox-2300 to VS2005 Station using Corecon
To initiate connection between VS2005 development station and eBox-2300 using Corecon, take
the following steps to launch ConmanClient2.exe and cMaccept.exe Corecon components from
eBox-2300.
•
From eBox-2300 desktop, with CE 6.0 image created in the earlier steps running, double
click on My Device and open the Windows folder.
•
From the Windows folder, double click on ConmanClient2.exe follow by double click
on cMaccept.exe to launch Corecon connection service.
•
From Visual Studio 2005 IDE, select Tools | Connect to device… and select
eBox2300_WinCE600_SDK from the list of available devices, and click on the Connect
button.
Fig. 37 -
Connect to Device (eBox-2300)
When connection is successful, the Connecting dialog box will display Connection
succeeded to indicate a successful connection.
Fig. 38 -
eBox-2300 connected
eBox-2300 Windows Embedded CE 6.0 JumpStart rev 3.5
Page 37 of 53
Step 4: Download C# Application to eBox-2300
We are now ready to download the C# application to eBox-2300.
From Visual Studio 2005 IDE, select Debug | Start Debugging to bring up the Deploy
eBox2300_Demo screen.
Fig. 39 -
Deploy eBox2300_Demo
•
Select eBox2300_WinCE600_SDK and click Deploy
•
The C# managed code application will download and execute on eBox-2300 as shown in
the following screen shot.
Fig. 40 -
CE 6.0 desktop with C# managed code application running
eBox-2300 Windows Embedded CE 6.0 JumpStart rev 3.5
Page 38 of 53
Debug Information
While it’s not within the scope of this guide to cover in depth development and debug issues, we
feel it’s informative to point out some of the built-in debug resources Platform Builder provides.
Using the same Platform Builder project, “eBox2300”, created in the earlier part of this guide.
Switch to “Debug” build mode to build a “Debug Image” with the following “Build Options”.
From VS2005 IDE, select Build | Configuration Manager… to bring up the Configuration
Manager screen. From the Active solution configuration selection options, select
ICOP_Vortex86_60CS x86 Debug and click the Close button to set the OS Design to generate
a debug image.
Fig. 41 -
Configuration Manager
From VS2005 IDE, select Project | eBox2300 Properties… to bring up the OS Design Property
screen. Click to expand the Configuration Properties folder and select Build Options.
Fig. 42 -
Configuration Manager
eBox-2300 Windows Embedded CE 6.0 JumpStart rev 3.5
Page 39 of 53
Enable the associated check box to select the following build options.
•
Enable eboot space in memory (IMGEBOOT=1)
•
Enable event tracking during boot (IMGCELOGENABLE=1)
•
Enable kernel debugger (no IMGNODEBUGGER=1)
•
Enable KITL (no IMGNOKITL=1)
•
Flush tracked events to release directory (IMGAUTOFLUSH=1)
Un-check “Run-time Image Can be Larger than 32MB” to disable this build option. This
build option sets the IMGRAM64 environment variable which in turn sets the system memory to
64MB. The eBox-2300 has 128MB system memory. The BSP is configured to utilize 128MB
system memory by default.
Click “OK” to close Platform Settings screen.
From the VS2005 IDE, select Build | Build Solution to build the debug image from the OS
Design project.
After the debug image build process is completed, follow the procedure in “Download Image to
eBox-2300” (page 24) to download the debug image to eBox-2300.
After the debug image is downloaded to eBox-2300, the Platform Builder IDE should look
similar to the following screen.
Fig. 43 -
VS2005 IDE
eBox-2300 Windows Embedded CE 6.0 JumpStart rev 3.5
Page 40 of 53
Within Platform Builder’s Debug Output window, the display shows much more detailed
information about the image’s boot up and device driver loading process. The additional
information is useful, and may be critical, to help debug and solve problems and prevent
potential problems. Debug output messages can be copied to a text file to be analyze in detail.
Refer to Platform Builder online document for more information about various debug and
trouble shooting resources available.
NOTE:
The debug image takes more time to complete the boot process. Be patient and let
the image complete the boot process.
eBox-2300 Windows Embedded CE 6.0 JumpStart rev 3.5
Page 41 of 53
Summary
You have now completed all the steps in this guide. Here’s what we have covered:
•
•
•
•
•
•
•
•
Created an OS Design project
Customized the OS Design by adding additional components
Built a Windows CE image from the OS Design
Downloaded a Windows CE image to eBox-2300
Create a C# managed code application using Visual Studio 2005
Establish connection between eBox-2300 running CE 6.0 and VS2005 development
station using Corecon
Deploy C# managed code application from VS2005 and launch on eBox-2300 running
CE 6.0
Configure the OS Design to build a debug image.
eBox-2300 Windows Embedded CE 6.0 JumpStart rev 3.5
Page 42 of 53
Congratulations! - You’ve completed all the steps.
There are many additional resources to help you gain additional Windows CE knowledge.
Microsoft Web sites.
http://msdn.microsoft.com/embedded/getstart/default.aspx
http://msdn.microsoft.com/embedded/usewinemb/ce/default.aspx
http://msdn.microsoft.com/embedded/getstart/basics/default.aspx#ceadv1
http://msdn.microsoft.com/embedded/community/community/newsgrp/
To learn more about Vortex86 hardware, visit the following Web sites.
http://www.vortex86.com
http://www.icoptech.com
Or contact ICOP
email: [email protected]
Phone: (626) 444-6666
Update to this jumpstart guide and other Windows CE information resources are available at the
following web site:
http://www.embeddedpc.net
Additional Windows CE information references are available in the Appendixes.
eBox-2300 Windows Embedded CE 6.0 JumpStart rev 3.5
Page 43 of 53
Appendix A – Development Environment Setup - with DHCP service
It’s recommended that you use Windows XP Professional with your development station. Both
the development station and eBox-2300 should be connected to the same Local-Area-Network
with DHCP service.
A NULL modem serial cable linking one of the development station’s COM ports with the
eBox-2300’s COM1 port provides additional debug information.
This is a typical setup. Both the development station and eBox-2300 are connected to a
Local LAN with DHCP service. The null serial debug cable is connected between development
station’s COM1 and eBox-2300’s COM1.
If the eBox does not boot with this configuration, you may need to enable DHCP service for each
new device on your network. Some secure networks require that the MAC address be added to
the list of devices authorized for DHCP in the DHCP server.
eBox-2300 Windows Embedded CE 6.0 JumpStart rev 3.5
Page 44 of 53
Appendix B – Development Environment Setup – Without DHCP
It’s recommended that you use Windows XP Professional with your development station. In this
setup, eBox-2300 is connected directly to the development station’s Ethernet port using a
Crossover RJ45 Ethernet cable.
A NULL serial cable linking between one of the development station’s COM port with eBox2300’s COM1 provides additional debug information.
When eBox-2300 is connected directly to the development station as above, the IP address for
the development station must be configured correctly for it to work.
When working with this setup method, 192.168.2.232 is the preset static IP address for eBox2300.
The development workstation’s IP address needs to be set correctly for this to work.
Following is the IP address setting guideline for the development station.
IP address:
192 . 168 . 2 . xxx (must be different from eBox-2300’s IP address)
Subnet mask:
255 . 255 . 255 . 0
If the IP address is not setup correctly, eBox-2300 will not able to communicate with the
development station.
eBox-2300 Windows Embedded CE 6.0 JumpStart rev 3.5
Page 45 of 53
Appendix C – Windows CE Technical Information Reference
Windows CE Reference
Mike Hall's Blog
http://blogs.msdn.com/mikehall
Anything has to do with Windows Embedded technologies, Mike Hall probably knows about it. There
are tons of useful information related to Windows CE on Mike’s blog.
Windows Embedded Tutorials
http://msdn.microsoft.com/embedded/getstart/basics/default.aspx
This site provides how-to tutorials on basic and advanced topics about using Windows CE in
development of embedded devices.
Windows Embedded News Group
http://msdn.microsoft.com/embedded/community/community/newsgrp/default.aspx
Windows Embedded Worldwide - China
http://www.microsoft.com/china/windows/embedded/default.mspx
Windows Embedded Worldwide - Japan
http://www.microsoft.com/japan/windows/embedded/default.mspx
Windows CE shared source projects
USB Webcam driver for Windows CE shared source project
http://www.gotdotnet.com/workspaces/workspace.aspx?id=0eb87e35-13e4-4fa3-9fde-71e9136f47de
USB Webcam device driver for Windows CE - Logitech QuickCam Pro-5000 is the Webcam used for
this project.
Phidgets USB I/O driver shared source projects
http://www.codeplex.com/Project/License.aspx?ProjectName=PhidgetsWinCEDriver
USB I/O device with GPIO, A/D, servo control, sensors, RFID reader & etc…
Other Useful Links
http://www.windowsembedded.com.tw
This site provides Windows Embedded information resources in English and Traditional Chinese.
http://www.windowsembedded.com.cn
This site provides Windows Embedded information resources in Simplified Chinese.
http://www.windowsembedded.jp
This site provides Windows Embedded information resources in Japanese.
http://www.learningce.com
This site has useful reference for Windows CE.
http://www.embeddedpc.net
This site has useful reference for Windows CE.
Hardware Reference Information
Vortex86 System-On-Chip
http://www.vortex86.com
eBox-2300 is designed and built using Vortex86(SiS-55x) System-On-Chip. Datasheet and technical
information for Vortex86 System-On-Chip is available on this web site.
eBox-2300 Windows Embedded CE 6.0 JumpStart rev 3.5
Page 46 of 53
Appendix D – eBox-2300 Technical Information
eBox-2300 is design and built using Vortex86 System-on-Chip. It has similar architecture as typical x86
CPU based CEPC.
eBox-2300 has an IDE interface internally to support EmbedDisk or any IDE bootable flash storage using
the standard 44-Pin IDE interface (the same interface used on the common 2.5” IDE notebook hard
drive). eBox-2300 uses AMI BIOS and can boot from DOS, Windows 98, Windows XP, Windows XP
Embedded and Windows CE using boot loader.
eBox-2300 is designed and manufactured by ICOP Technology Inc., a Gold Level Partner in Microsoft’s
Windows Embedded partner program, and recognized by Microsoft as 2005 Partner-of-The-Year in the
Independent Hardware Vendor (IHV) category.
URL:
http://www.icoptech.com
Email: [email protected]
eBox-2300 has all the typical I/O peripherals as
the desktop PC.
• VGA
• PS/2 Keyboard and Mouse
• Ethernet
• Serial
• USB
• Audio output
• Microphone input
• CompactFlash
eBox-2300 System Specification
CPU
Keyboard and Mouse
Vortex86 SoC (System on Chip)
PS/2 Keyboard and Mouse
Main Memory
Peripheral
128MB SDRAM
BIOS
AMI BIOS
VGA
1. USB V1.1 ports x 3
2. Serial port x2(This function only available for
eBox-2300-JSK)
3. Audio(Mic-in, Line-in)
4. Type I/II CF Slot (Support Micro Driver)
AGP Rev.2.0 Compliant
Resolution up to 1,280x1,024 High Colors
Dimension & Weight
Audio
OS Support
AC97 CODEC, Fully Compliant with AC97v2.1
LAN
Realtek 8100B, 10/100Mbps Ethernet
On-Board IDE
Enhanced IDE interface, 44-pin box header x 1
115 x 115 x 35 mm / 505g
DOS
Windows CE.NET 4.2
Windows CE 5.0
Windows Embedded CE 6.0
Windows XP Embedded
Power Requirement
+5VDC
eBox-2300 Windows Embedded CE 6.0 JumpStart rev 3.5
Page 47 of 53
Front Connectors Outline for eBox-2300
CF Slot
USB
Mic-in
Line-out
Power BTN
PWR, ACT LED
Rear Connectors Outline for eBox-2300
DC Power Jack
PS/2 KB/MS
Power Switch
VGA
RJ-45 LAN
Serial Ports (Optional)
USB
Wireless ANT (Optional)
Connectors Summary for eBox-2300 main system board
Connector Description
Type of Connections
Number of Pins
J1
VGA Connector
D-Sub Connector
8-pin
J2
Power Button
Power Button
J3
USB (Back)
USB Connector
8-pin
J4
PS/2 keyboard or Mouse
Mini DIN Connector
6-pin
J5
RST (Reset)
Hear 2x1 2.0mm
2-pin
J6, J7
USB (Front)
USB Connector
8-pin
J8
LAN
RJ-45
8-pin
J9
Line Out
Audio Jack
J10
Mic In
Audio Jack
J11
IDE connector
Box Header 22x2 2.0mm
44-pin
J12
CF Device Jumper
Close : Master
2-pin
J14
DC 5V Input
Mini-Din Connector
3-pin
J16,1J7:
COM Port
Box Header 5x2 2.0mm
10-pin
J18:
Mini PCI
Mini PCI socket
124-pin
eBox-2300 Windows Embedded CE 6.0 JumpStart rev 3.5
Page 48 of 53
Pin Assignment
J1: VGA – 15-pin D-Sub Connector
Pin #
1
2
3
4
5
Signal Name
MR
MG
MB
NC
GND
Pin # Signal Name
6
GND
7
GND
8
GND
9
NC
10
GND
Pin #
11
12
13
14
15
Signal Name
NC
VCC
HYSYNC
VSYNC
VCC
J3: USB (90o)– 4-pin USB Type 1 Connector (Vertical Type)
Pin #
1
2
3
4
5
6
Signal Name
VCC
USB0USB0+
GND
GGND
GGND
eBox-2300 Windows Embedded CE 6.0 JumpStart rev 3.5
Page 49 of 53
System BIOS
Reconfiguring eBox-2300
1. Take note that AMI BIOS is used in the eBox-2300 VESA PC. To reconfigure the VESA
PC, depress or hit the <Del> key to enter your BIOS setup main menu.
2. Select from the menu, the desired setup for change.
3. Press <Esc> to go back to main menu.
4.
Move your cursor to “Save Settings and Exit”, press “Y” to save the changes that you
just made. eBox-2300 will restart accordingly to your new setup.
eBox-2300 Windows Embedded CE 6.0 JumpStart rev 3.5
Page 50 of 53
M
Meem
moorryy M
Maappppiinngg
Address
Description
0000:0000-9000:FFFF
System RAM
A000:0000-A000:FFFF
EGA/VGA Video Memory
B000:0000-B000:7FFF
MDA RAM, Hercules graphics display RAM
B000:8000-B000:FFFF
CGA display RAM
C000:0000-C000:BFFF
EGA/VGA BIOS ROM
CC00:0000-CC00:3FFF
Boot ROM enable.
D000:0000-E000:7FFF
Expansion ROM space.
E000:8000-E000:FFFF
USB Legacy SCSI ROM space.
F000:0000-F000:FFFF
Motherboard BIOS
II//O
OM
Maappppiinngg
I/O Address
Device
000h - 00Fh
8237 DMA Controller #1
020h - 021h
8259 Master Interrupt Controller
040h - 043h
8253 Programmable Timer
060h - 06Fh
8042 Keyboard Controller
070h - 07Fh
RTC, NMI Mask Register
080h - 09Fh
DMA Page Registers
0A0h - 0B1h
8259 Slave Interrupt Controller
0C0h - 0DFh
8237 DMA Controller #2
0F0h - 0F1h
Math Coprocessor
0F8h - 0FFh
Math Coprocessor
1F0h - 1F8h
Hard Disk Controller #1
278h - 27Fh
Parallel Printer **
2E8h - 2EFh
Serial Port 4**
2F8h - 2FFh
Serial Port 2
378h - 37Fh
Parallel Printer**
3B0h - 3BBh
MDA Adapter
3BCh - 3BFh
Parallel Printer**
3C0h - 3CFh
VGA/EGA Adapter
3D0h - 3DFh
CGA Adapter
3E8h - 3EFh
Serial Port 3**
3F0h - 3F7h
Floppy Controller #1**
3F8h - 3FFh
Serial Port 1
** eBox-2300 does not expose these devices
eBox-2300 Windows Embedded CE 6.0 JumpStart rev 3.5
Page 51 of 53
IIR
RQ
QM
Maappppiinngg
IRQ#
IRQ0
Device
System Timer
IRQ1
Keyboard Controller
IRQ2
Cascade for IRQ8 - 15
IRQ3
Serial Port 2
IRQ4
Serial Port 1
IRQ5
Unassigned
IRQ6
Unassigned
IRQ7
Unassigned
IRQ8
Real Time Clock
IRQ9
Unassigned
IRQ10
USB
IRQ11
Ethernet 10/100M LAN
IRQ12
Mouse
IRQ13
Math Coprocessor
IRQ14
Hard Disk Controller
IRQ15
Unassigned
eBox-2300 Windows Embedded CE 6.0 JumpStart rev 3.5
Page 52 of 53
Appendix E – eBox-2300 Boot Options
By changing the BIOS settings, eBox-2300 can be set to boot from the following resources.
•
Internal IDE storage
•
CompactFlash
•
USB Floppy
•
USB storage
•
USB CD/DVD-ROM drive
•
Remote Network Boot using PXE
By default, eBox-2300 is set to boot from the internal IDE storage.
To change the boot device, enter system BIOS setting mode to change boot settings. To enter system
BIOS setting mode, press the DEL key multiple times immediate after turning on the power on.
Select Advanced CMOS Setup to bring up BIOS settings for Boot Device options.
USB storage and CF card must be plugged into eBox-2300 prior to turning on the power in order for the
BIOS to detect the devices’ present. Otherwise, USB storage and CF card will not be available as one of
the boot device options.
Note:
The USB RMD-FDD boot option support USB bootable flash storage.
Most USB flash storage can be program to become bootable to DOS (refer to the USB flash
storage vendor support site for information).
USB storage is one of the most convenience methods to transfer files from development station to eBox2300’s internal IDE flash storage. By setting the 1st Boot Device to USB RMD-FDD and 2nd Boot
Device to IDE-0, eBox-2300 will attempt to boot from USB storage when it’s plugged into the system.
Otherwise, it will boot from the internal IDE flash storage.
eBox-2300 Windows Embedded CE 6.0 JumpStart rev 3.5
Page 53 of 53